Tater tots are a mid twentieth century (1953) invention born out of the frugality of brothers F. Nephi and Golden Grigg. Co founders of Ore-Ida, they were looking for a way to use the potato pieces left over when making their french fries. The pieces were used as feed for the livestock on the family farm or just tossed in the trash. The brothers Grigg knew that there had to be a way to consume the discards.They chopped the potato pieces, added seasonings and salt, put them through an extruder where they got their tot shape then into the deep fryer.
Fast forward to the twentieth first century and Americans consume 70 million tots a year. They are loved by young and old alike, everyone from high end chefs like Daniel Boulud to mommy bloggers. Mommy bloggers have taken tots beyond the potato. To their delight they discovered that their little ones would eat veggies they wouldn’t touch before when they were presented in tot form. Broccoli, cauliflower, sweet potatoes, carrots, beets and zucchini have all been used to make tots.
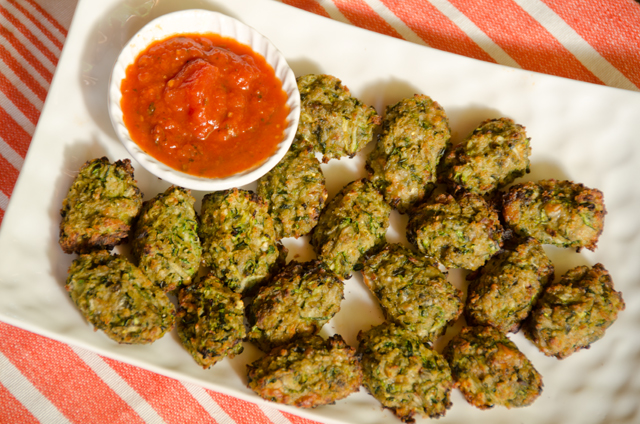
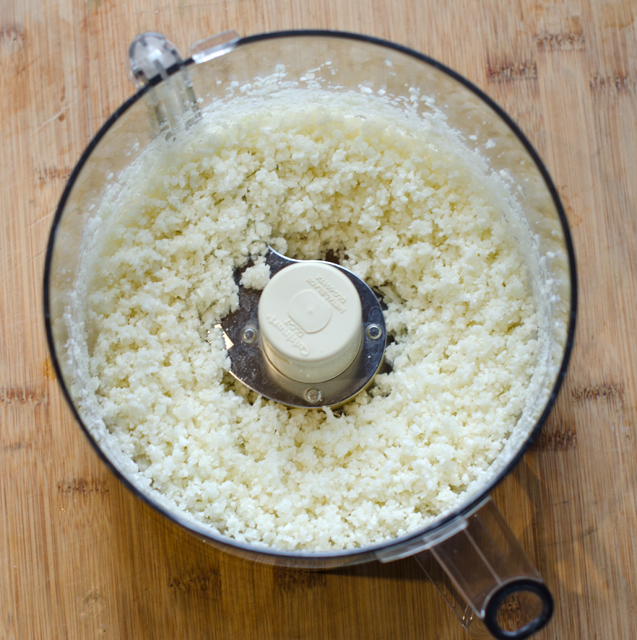
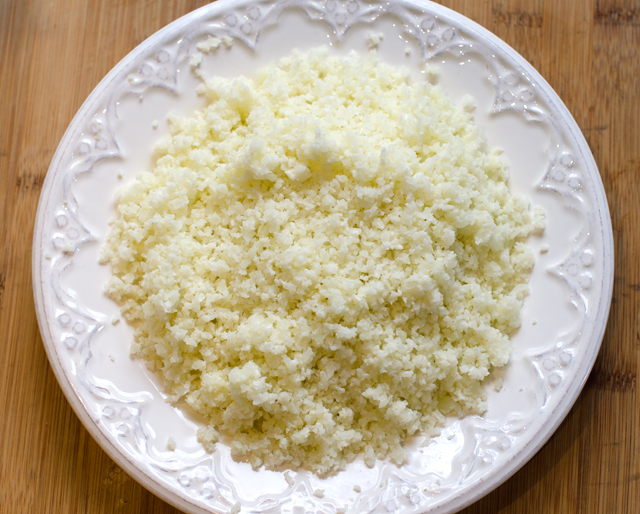
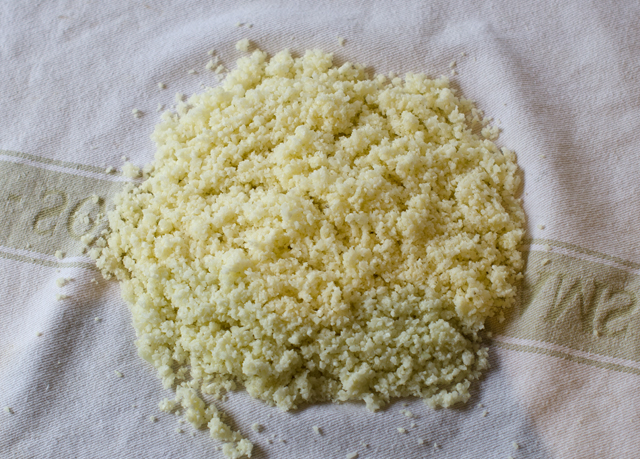
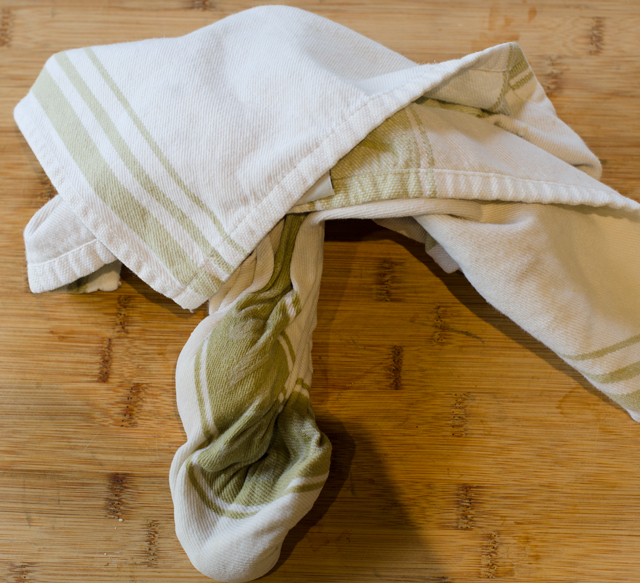
So it was time for me to take on the tot. I chose two things we have in abundance, zucchini and basil. Basil is in season so why not make some pesto? Whatever vegetable you choose for your tots it is important to squeeze as much water out of the shredded vegetable as possible. A clean linen dishcloth is what I recommend. If time is short and you don’t have time to make the tot shape, divide the mixture evenly into well greased mini muffin pans. Make a double batch and freeze half for later. To eat, place frozen tots on a baking sheet and bake at 400°F 10-15 minutes, until heated through.Crispy on the outside and soft on the inside, zucchini pesto tots make a great snack or side dish.
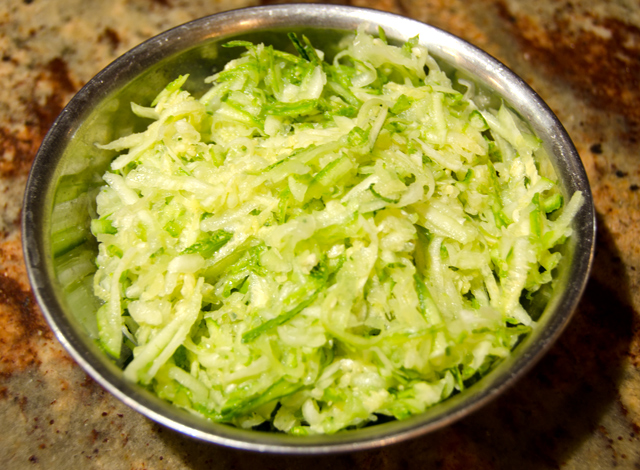
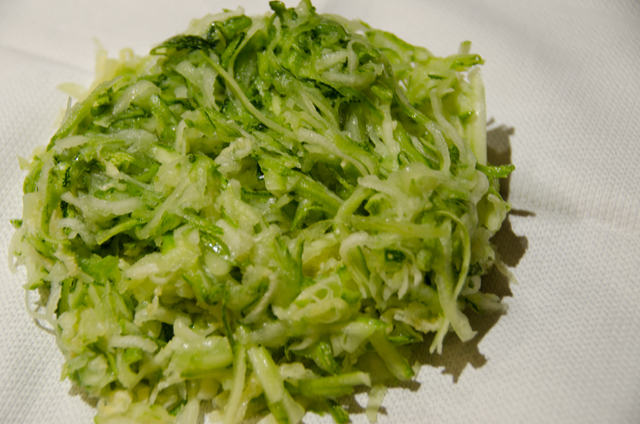
Shredded zucchiniShredded zucchini after squeezing
Zucchini Pesto Tots
Ingredients
1¼ lb zucchini
2-3 T basil pesto
1 large egg, lightly beaten
½ c panko bread crumbs
½ c grated Parmesan cheese
Kosher salt and freshly ground black pepper
Directions
Preheat oven to 400° F. Line a large baking sheet with parchment paper.
Grate the zucchini with the large holes of a box grater.
Transfer the grated zucchini to a large dish towel and strain out as much liquid as possible.
Transfer the grated zucchini to a large bowl then add the pesto, egg, Parmesan and kosher salt and freshly ground pepper to taste. Mix together until well blended.
Spoon a generous tablespoon into your hand and roll it into a cylinder. Place on the prepared baking sheet. Repeat with remaining zucchini mixture.
Bake 18-20 minutes, rotating the baking sheet half way through, until golden brown. Serve with your favorite dipping sauce.
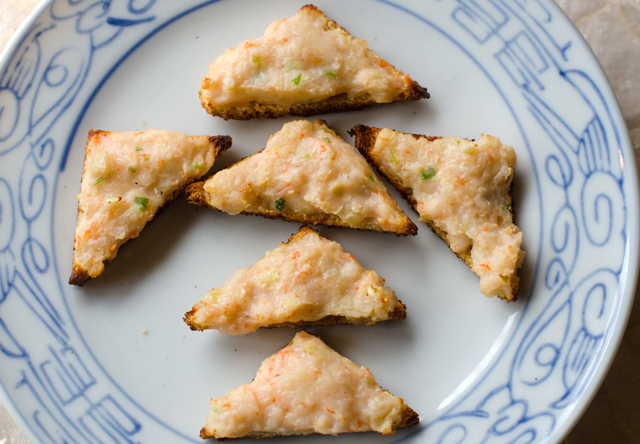
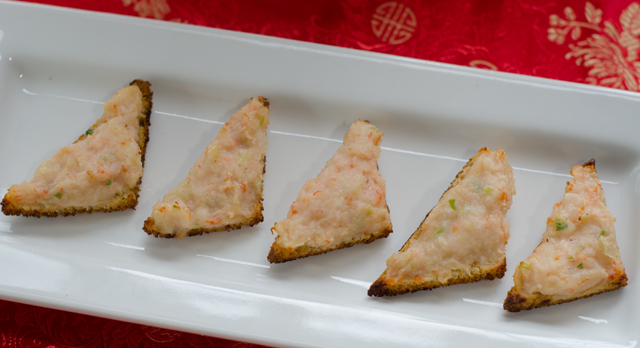
Shrimp toasts, bite-sized triangles of bread topped with shrimp paste are a popular dim sum item and a new addition to our Chinese New Year celebration. It is said the dish originated in Guangzhou (Canton) in China nearly a hundred years ago. There are others who claim it is a hybrid of a traditional Chinese shrimp recipe and bread, not native to China but introduced by foreign travelers to Hong Kong. I chose to use a recipe from Susannah Foo, a popular and highly acclaimed Philadelphia chef who eponymous restaurant closed in 2009. Shrimp toasts are often fried, this version is baked and can be made ahead and frozen, a big plus when you are serving an extensive menu. This year we celebrate the year of the rooster, which comes after a monkey year and before a dog year. Roosters are said to honest, bright, communicative and ambitious.
Baked Shrimp Toasts
Makes 3 dozen or more
Ingredients
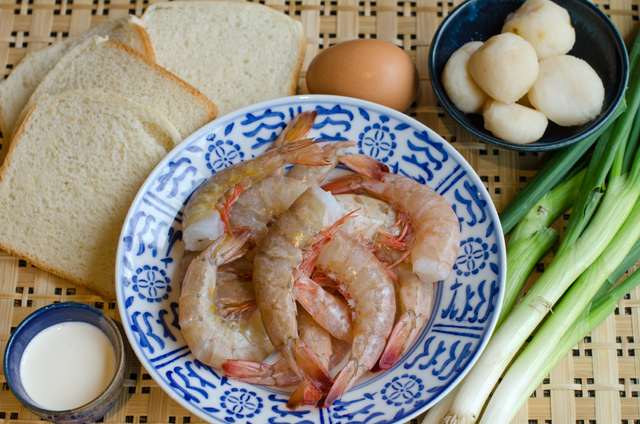
10 to 12 slices thinly sliced white bread, crusts removed
1 large egg white
1 lb medium or large shrimp, peeled and deveined
2 T heavy cream
1 T vodka
1 t kosher salt
½ c chopped water chestnuts
2 scallions, minced
Directions
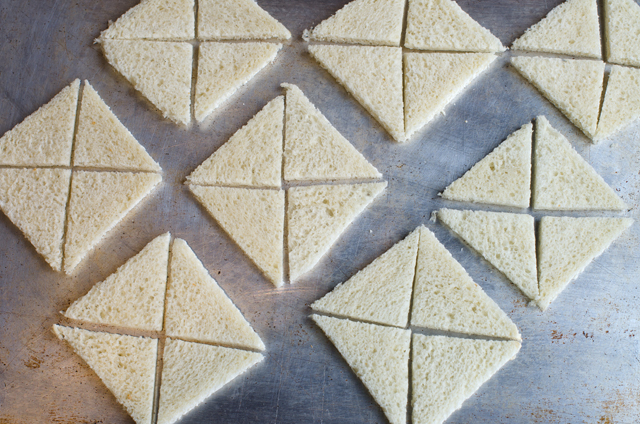
Preheat oven to 250° Cut each piece of bread into 4 triangular pieces. Place on a baking sheet and bake for about twenty minutes, until the bread is dry but not browned; leave oven on.
While the toast is drying, beat the egg white lightly. Dry the shrimp well with a paper towel and place in a food processor; puree.
Add the egg white, cream, vodka and salt. Process until just pureed. Transfer to a bowl.
Add the water chestnuts and scallions to the shrimp mixture and mix just until all the ingredients are combined.
If you are baking the shrimp toasts immediately, increase the oven temperature to 375°F and coat a baking sheet lightly with non stick spray.
Spread 2 heaping teaspoons of the shrimp mixture on each piece of bread. Repeat with the remaining triangles.
At this point, the shrimp toast can be frozen for later use. Place the triangles on baking sheets and freeze. Once frozen, remove from the baking sheets, place in freezer bags and return to the freezer.
Bake frozen shrimp toasts directly from the freezer, about 10 minutes, the shrimp will be cooked through, all the ingredients hot and the toast is golden brown on the bottom. Triangles that were not frozen will take a little less time.
We have adopted the Italian/Italian American tradition of seven fishes and it has been our Christmas eve feast we share with friends for the past six years. I explained the tradition of the seven fishes in a post from 2012.
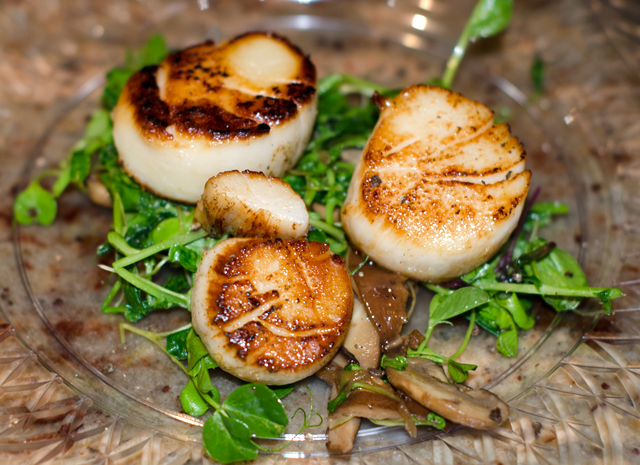
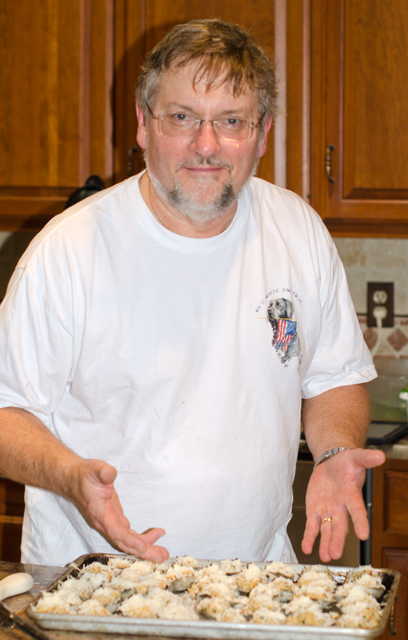
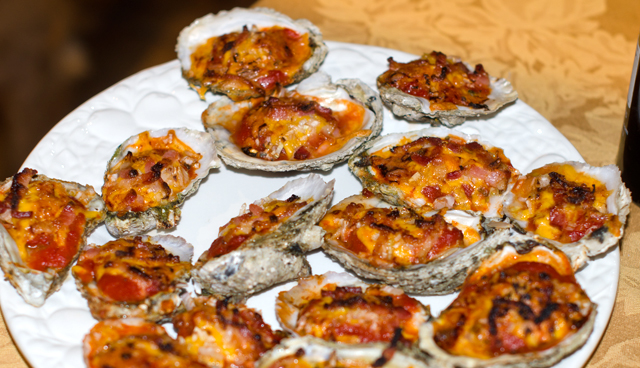
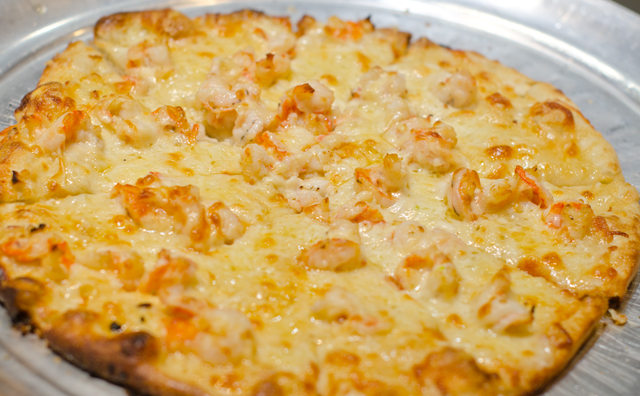
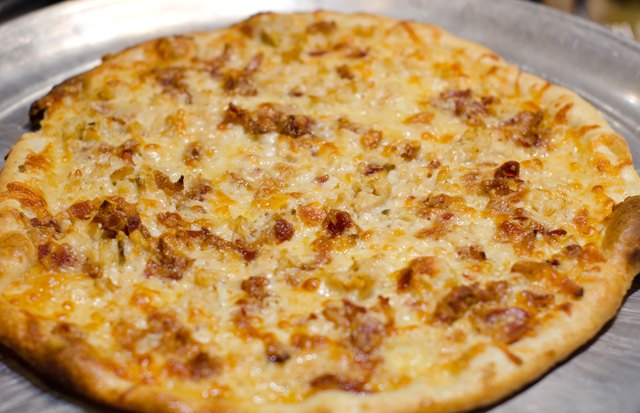
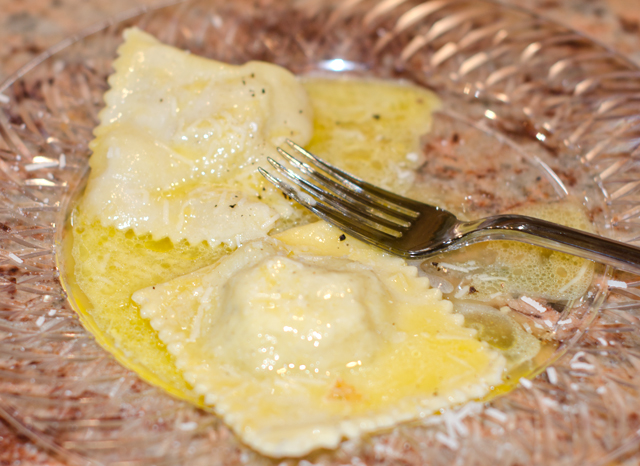
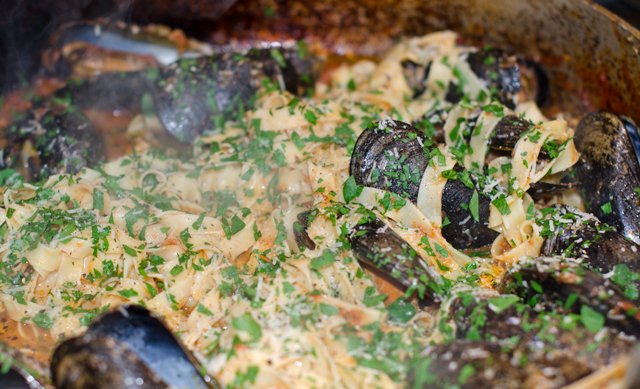
This year our seafood included oysters straight from the Chesapeake Bay courtesy of Nik. The extra large succulent oysters are enjoyed both raw with lemon and a splash of cranberry pear vinegar and baked a la Oysters Kenwood. We had a traditional (for us) shrimp scampi pizza as well as a newly inspired creation of a clam and bacon pizza. Both were delicious. We had a refreshing calamari salad, seafood stew, the best stuffed clams ever, just hope Joe remembers the recipe. Homemade pasta was served in two forms, mussels diavola with fettuccine and delicious crab ravioli served with a delicate lemon butter sauce. Golden brown seared scallops were served on a bed of microgreens with mixed sautéed mushrooms. The last course was swordfish skewers and pearl onions with a balsamic sweet and sour sauce. Some years Joe has cooked these in the fireplace grill but due to exceptionally warm weather this year they were cooked outdoors on the grill.
We start the party a little earlier each year, so that we aren’t finishing the last course at midnight. That actually happened the first few years. To finish things off, we left just enough room to finish off the meal with delicious Italian cookies and pastries from Chambersburg, an Italian neighborhood in Trenton, courtesy of Rich.
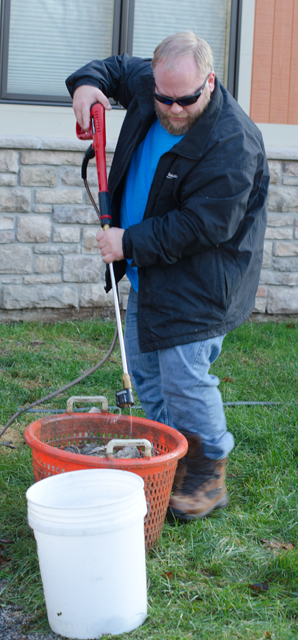
Nik power washes the oysters before they come inside for shucking..Joe and his wonderful stuffed clams.Stuffed clams had bacon in them too.Oysters Kenwood, oysters baked with tomato sauce, bacon and cheddar cheese. Delicious!!Shrimp scampi pizza.Clam and bacon pizza, this year’s new creation.Delicate crab ravioli with lemon butter sauce.Homemade fettuccine with mussels diavola.Seared scallops on a bed of microgreens and sautéed mushrooms.
One of the highlights of last summer was our trip to the Food and Wine Classic in Aspen Colorado. It is touted as America’s premier culinary event, and certainly lived up to those expectations. We enjoyed three days of cooking demonstrations, wine tastings and best of all, the grand tasting pavilion. It was there that we, and 5000 other fanatical foodies sipped, savored and sampled our way around the massive white tents. One area we were certain to stop at during each grand tasting was to sample the offerings of Food and Wine magazines best new chefs. Everything we tried was imaginative and delicious as well. Not coincidentally, the July issue of Food and Wine magazine offered recipes from each of these up and coming chefs.
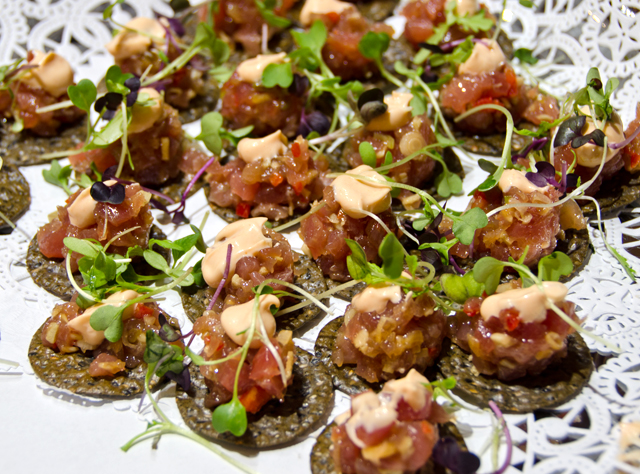
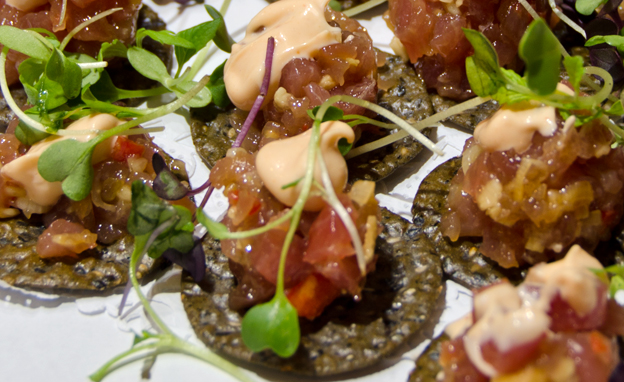
With memories of the wonderful small plates we enjoyed at the classic, it was time to try some of their dishes for ourselves. This summer I tried the rather ambitious, summer squash with lemon curd and citrus vinaigrette from chef Brad Kilgore. Joe was more interested in the Tuna Poke on Nori Crackers. This very simple version is from Ravi Kapur, chef at Liholiho Yacht Club, a San Francisco restaurant with Hawaiian, Indian and Chinese influences.
If you are not familiar with it, poke, pronounced POH-keh is a raw fish salad. Poke, means chop or chunk, which refers to the bite sized pieces the fish is cut into. It is commonplace in Hawaii, found everywhere from the deli departments of grocery stores to fine dining establishments.
The first time we tried it just for ourselves and the poke passed our taste test with flying colors. The nori crackers are a nice “cheffy” touch but speaking on behalf of the cleanup crew, messy and not necessary for the home cook. For this recipe, make the poke with sushi grade ahi tuna from the most reputable vendor you can find. The spicy mayo has only three ingredients, tamari, sriracha and mayo. So it’s very simple, finely chopped tuna, scallion, ginger, jalapeno, tamari and dark sesame oil combined in a bowl and seasoned with salt. Spoon the poke on black sesame crackers, I like the ones from Edward and Sons, easily found in large supermarkets. Dollop or pipe some of the spicy mayo on top. Garnish with some Asian microgreens and a few toasted sesame seeds. We have served it at two parties so far this year, both to rave reviews.
Tuna Poke
Serves 6-8
Ingredients for the Spicy Mayo
¼ c good quality mayonnaise
¼ t tamari
1 t sriracha (or to taste)
Ingredients for the Poke
12-oz sushi grade tuna cut into ¼-inch dice
4 t minced scallions
2 t minced peeled fresh ginger
2 t seeded and minced jalapeno
1 t tamari
½ t toasted sesame oil
Kosher salt
Black sesame crackers
Asian microgreens and toasted sesame seeds for garnish
Directions for the Spicy Mayo
In a small bowl whisk all the ingredients together until smooth.
Directions for the Poke
In a large bowl, fold all the ingredients except the garnishes together; season with salt.
Spoon the poke on the black sesame crackers and dollop with some of the spicy mayo. Garnish with sprouts and sesame seeds.
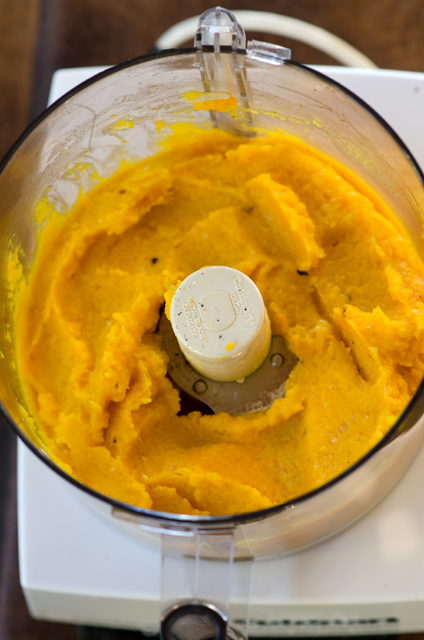
An often requested hors d’oeuvre from my catering days were butternut squash quesadillas with chipotle lime dipping sauce. They were a lighter alternative to classics like miniature beef wellingtons or scallops wrapped in bacon. A recipe I originally found in Gourmet magazine and now on the Epicurious website, it seemed to be universally liked by everyone. Crunchy on the outside, sweet roasted butternut squash and melted cheese inside, they disappeared as quickly as wait staff could get them out to hungry guests. The flavors of the roasted squash, onion and garlic are a perfect combination with creamy jack cheese, and sweet red pepper.
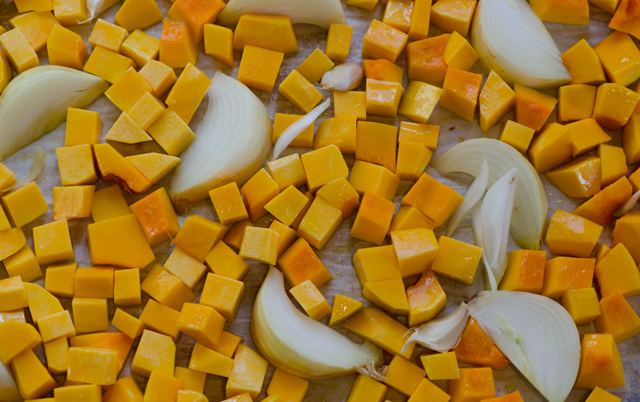
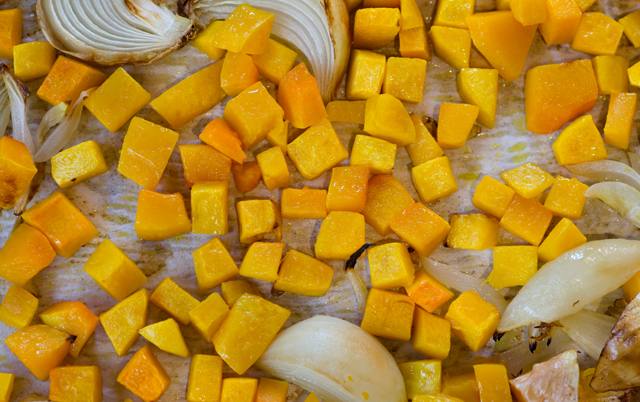
Begin the recipe by roasting squash cubes, an unpeeled onion cut in segments and several cloves of garlic. Since we had a large butternut squash crop this year, I am getting faster at peeling and chopping my own squash. But if you don’t want to take the time, you can purchase butternut squash that has already been peeled and cubed. It is considerably more expensive for the convenience. For the best results, roast cubes rather than baking squash halves . Although the roasted squash will be puréed before it is spread on the quesadilla, roasting cubed squash and the onion, allows the natural sugars in the vegetables to caramelize and enhances the flavor.
On a rimmed baking sheet, drizzle the squash cubes, onion and garlic with a neutral oil (vegetable, safflower) and toss lightly. Spread them out as evenly as possible so the squash will roast, not steam. Halfway through the cooking time use a plastic spatula to toss the cubes around a bit to maximize the surface area that gets browned. The garlic will be done first, use tongs to remove it to a work surface. Continue to roast the squash and onion until tender, as much as 15 more minutes, I like to check about every five minutes or so at this point. The squash will be soft and browned in places. Remove the peel from the onion and the garlic.
While the squash is cooking you will have time to chop the red pepper. Cut it into small dice, it will make for neater pieces when you cut the quesadillas. Place chopped pepper and jack cheese into separate bowls at your work station.
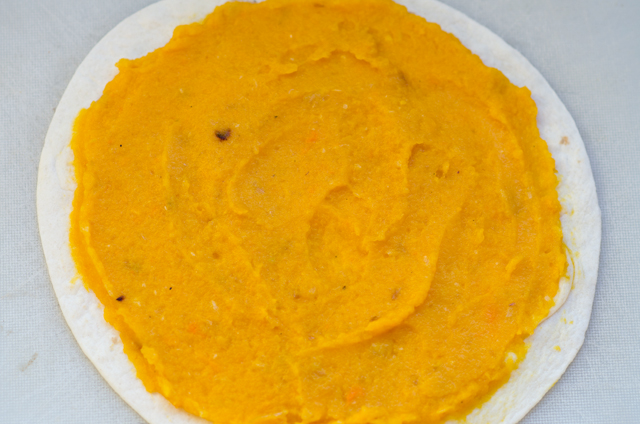
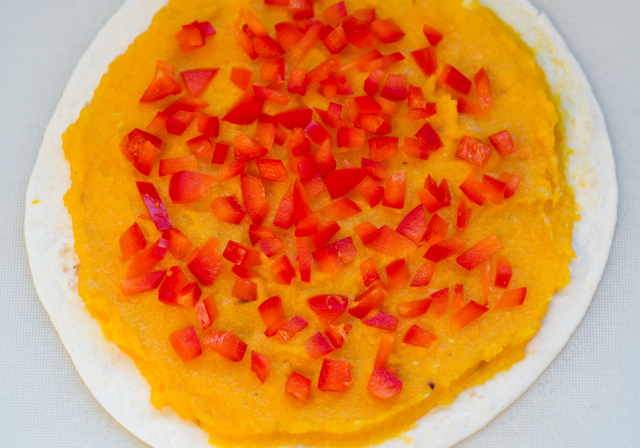
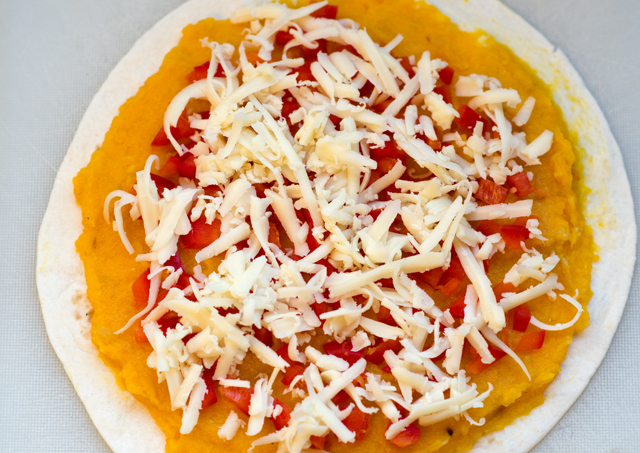
In a food processor or blender, purée the squash, onion and garlic until not quite smooth, leave it just a little chunky and transfer to a bowl. On a work surface spread out four tortillas. Next to the tortillas, place your bowls of squash puree, pepper and onion. Since you will be using one-fourth of each item on the tortillas, it’s relatively easy to “guesstimate” how much to use. Spread the puree first, evenly, almost but not quite to the edges, then sprinkle on the red pepper and then the cheese. Top with a second tortilla and press lightly to adhere. Spread a light coating of softened, not melted butter on either side of each tortilla. This step is little messy, you can put a sheet of waxed paper on two large baking sheet to cut down on the butter getting all over your work surface.
Heat a 7 inch non stick skillet over medium high heat until hot and cook the quesadillas. While the first side is cooking, press down lightly on the quesadilla so that everything sticks together, it will make the flipping easier. Cook the quesadillas about 3 minutes per side, you can lift up a little to see if you have achieved the light toasty brown color. I use a plastic spatula to flip them over, with a little help from my hand. Repeat with the remaining quesadillas and regulate the heat as necessary. Transfer to a warm oven while you are cooking the remaining quesadillas. Cut the quesadillas into 6 to 8 wedges, I have found a pizza wheel makes the neatest cuts.
Serve quesadillas with chipotle lime dipping sauce. Years ago when I first made this recipe it was difficult to obtain chipotles, now they are available at any supermarket. Chipotle peppers are smoked and dried jalapenos that are marinated in a tangy sweet red sauce. A little chipotle goes a long way. It is better to add a little at first to see how it tastes. The sour cream will mellow the chili out and the lime adds a nice contrast.
The dip can be made ahead, and even though the recipe doesn’t say so, the quesadillas can be made ahead. Reheat the quesadillas in a warm oven for about 10 minutes or until they feel hot. The important thing to remember whether fresh or reheated is to let the quesadilla rest for a few minutes before cutting. Too hot and the filling oozes out and is a mess to eat.
I have always used the recommended flour tortillas, I’m sure other varieties would work too. If you like your food spicy, pepper jack cheese could be substituted or any other good melting cheese. They would make a good vegetarian entree or a light lunch along with a green salad.
Butternut Squash Quesadillas
Makes 24 to 32 pieces
Ingredients
5 c butternut squash, peeled and cut into ¾ inch pieces
1 medium onion, unpeeled and cut into eights
1 large garlic clove, unpeeled
1 T vegetable oil
8- 5 to 6-inch flour tortillas
1 c chopped red pepper
1 c coarsely grated jack cheese
½ stick unsalted softened butter
Directions
Preheat oven to 400°F.
Arrange squash cubes, onion and garlic in a single layer on a shallow baking sheet. Drizzle with oil and toss lightly to coat.
Roast vegetables in the oven for about 15 minutes, until the garlic is softened. Transfer garlic to cutting board.
Roast squash and onion for an additional 15 minutes or until tender. Discard peels from the onion and garlic.
Purée the squash, onion and garlic in a food processor. Season to taste with salt and pepper.
On a work surface, spread out four tortillas. Spread one-fourth of the squash purée on each of the four tortilla. Sprinkle each tortilla with one fourth each of the red pepper and the cheese. Top each quesadilla with a plain tortilla, pressing gently together. Spread each side of the quesadillas with a thin layer of softened butter.
Heat a medium non stick skillet over medium high heat until hot and cook quesadillas, 1 at a time until golden, about 3 minutes on each side, transferring to a cutting board.
Cut each quesadilla into 6 to 8 wedges and serve with chipotle lime dip.
Chipotle Lime Dip
Makes one cup
Ingredients
1 canned chili in adobo, minced
2 t fresh lime juice
1 c sour cream
Directions
In a small bowl stir the chili and lime juice into the sour cream until well combined. Can be made ahead, cover and chill.
Spread out squash, onion and garlic on a parchment lined baking sheet.After roasting the vegetables.Process until not quite smooth, you want the butternut squash to have some texture.Spread the puree evenly over four tortillas to about a half inch from the edges.Next is the finely diced red pepper.Top it with an even layer of Jack cheese.And another tortilla. Press down so everything sticks together.Cook individual tortillas in a non stick pan on both sides until they are golden brown.
Inspiration for the recipes at Sue’s Seasonal Palate comes from many sources. Sometimes it’s a magazine article I’ve read, an intriguing recipe from the internet or a dish I’ve recently tried in a restaurant. The latter was the case for this recipe.
Last weekend we got together with some long time friends at a popular brewpub called The Vault. It’s located in a former bank built in 1889 in the historic borough of Yardley Pennsylvania. The owners of the Vault bring their own brand of sophistication to the brewpub concept and have turned it into an experience that is unique. No deafening pop or rock music or a bank of televisions tuned to the latest sports programs, they have chosen to feature live and recorded jazz that enhances the relaxed atmosphere and is more conducive to conversation. The beer is brewed on premises and the offerings from the kitchen are made in-house or sourced locally. Both the kitchen and the brewery are open to view. Though I am more of a wine drinker I really enjoyed the Sweet Potato Ale. The menu includes a nice selection of starters along with sandwiches, interesting salads and pizzas from their wood fired oven. The menu is definitely a cut above the average pub fare and one of their appetizers made me want to recreate it at home.
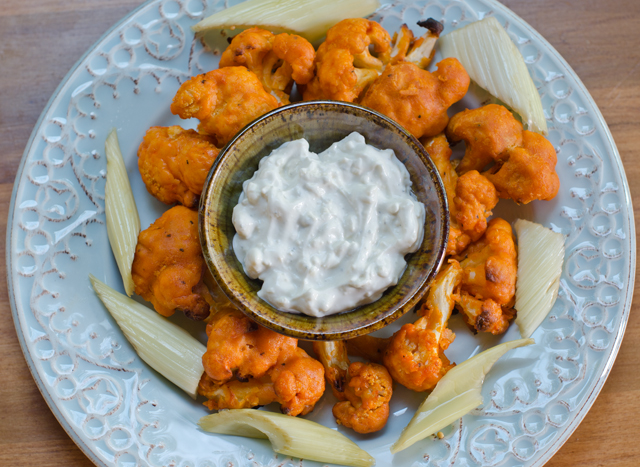
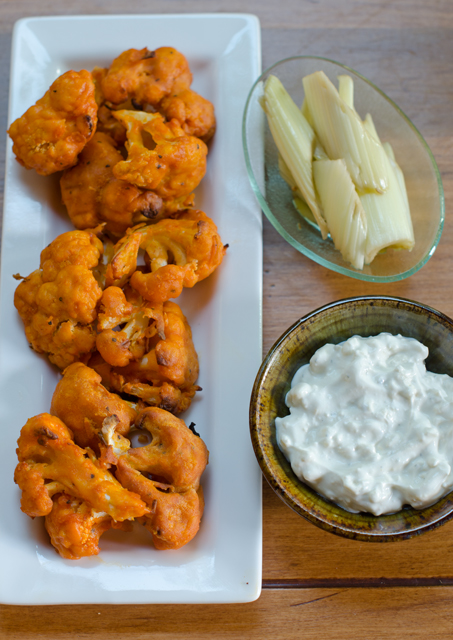
Our server suggested we start off with an appetizer of buffalo cauliflower to share for the table while we were pondering our other food choices. For a brief history of the buffalo wing we only need to go back to 1964 where they originated in, no surprise here, Buffalo, New York. The story has several versions but the most popular and my favorite, is that one evening, Teressa Bellissimo, co-owner of the Anchor Bar was challenged to whip up a late night snack for her son and his friends. “Mother Teressa” found some large chicken wings that had been deemed too meaty for the stockpot. Bellissimo chopped the wings into two sections, deep-fried them and tossed them with some hot sauce. She served them with celery that was part of the Anchor Bar’s antipasto and some of the house blue cheese dressing. The wings were reported to be an immediate local success and the first official Chicken Wing Day was celebrated on July 29, 1977. Over fifty years later they are a national favorite consumed everywhere from bars, to sporting venues to “competitive eating events” like the Philadelphia Wing Bowl and Buffalo’s annual National Buffalo Wing Festival.
It wasn’t enough for cauliflower to be a substitute for mashed potatoes, couscous and even pizza crust, the versatile vegetable takes the place of chicken wings in this recipe. The Vault’s buffalo cauliflower is described on the menu as buttermilk cauliflower, house buffalo sauce, chive sour cream and the real surprise, sweet pickled celery. The calorie count for six pieces of deep-fried chicken wings at one website I looked at was 616. Though I have nothing against traditional buffalo wings I also thought this recipe was worth the somewhat healthier do-over.
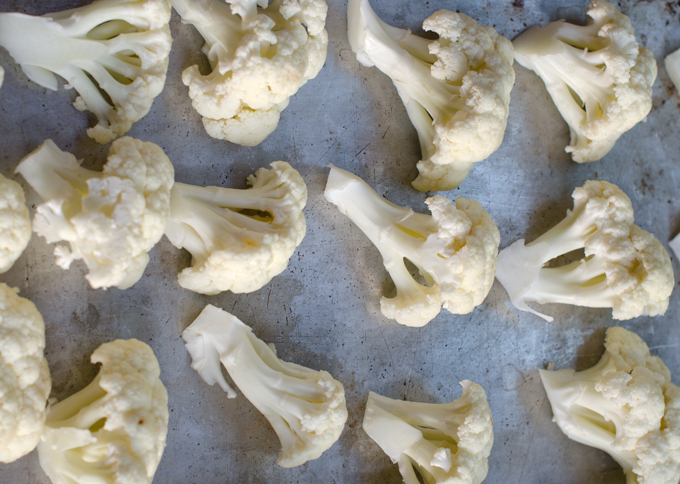
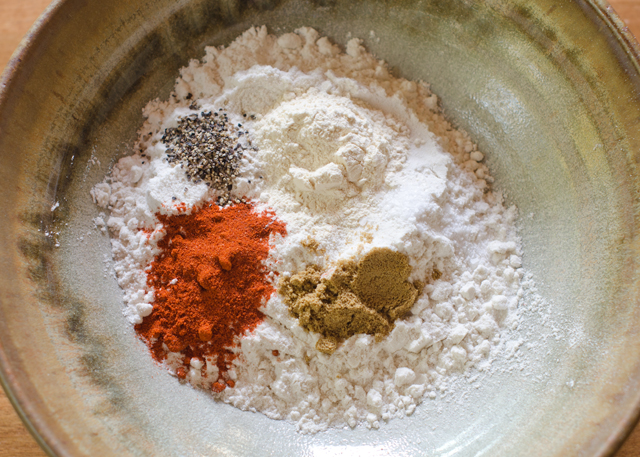
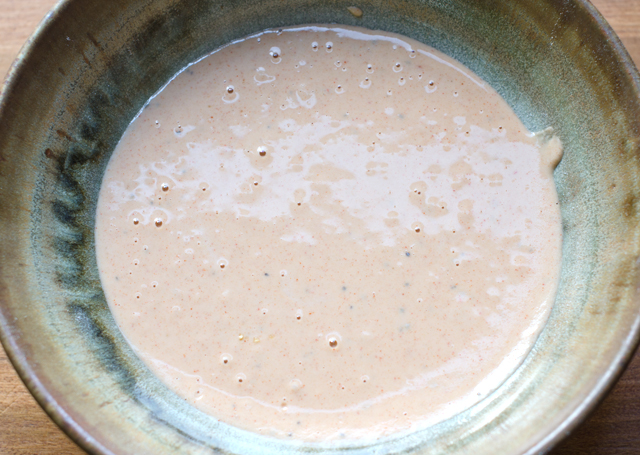
Start with a large head of cauliflower and break into chicken wing size florets. I was aiming for 1½ in by 2½ inches in length, you should have 5 to 6 cups of “wings” and probably more. Some recipes I found called for the cauliflower to be roasted with olive oil, salt and pepper. I wanted the florets to have a bit more substance so I coated the cauliflower with a simple batter of flour, milk and spices. Substitutions can be made here, almond milk for vegans, rice flour for a gluten-free diet. If you use rice flour as I did, you may need to thin the batter out a bit more.
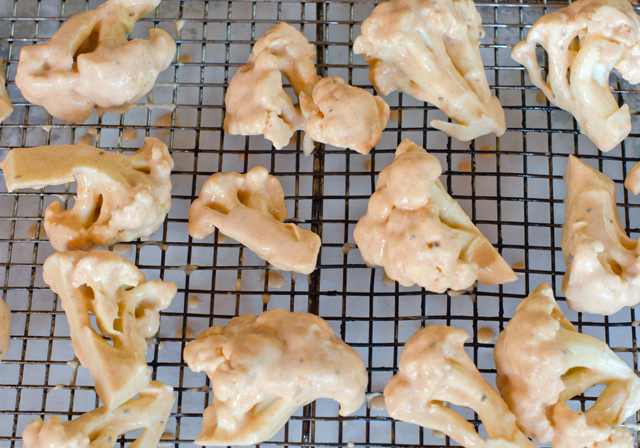
I tried at first to dip the pieces by using the handle at the bottom of my cauliflower “wing”. This turned out to be a very messy approach., It is easier to use tongs to dip the individual pieces in the batter. Dip each piece thoroughly, lift out and allow the excess batter to drip back into the bowl. To minimize clean up, line the baking sheet with foil or parchment. Since several of the blogs I read mentioned excess batter clumping up and sticking to the baking sheet, I chose to place the florets on a wire rack thoroughly sprayed with Pam over the baking sheet. Preheat oven to 425°F, (convection heat) and bake for about twenty minutes or until golden. I flipped the pieces halfway through the baking process.
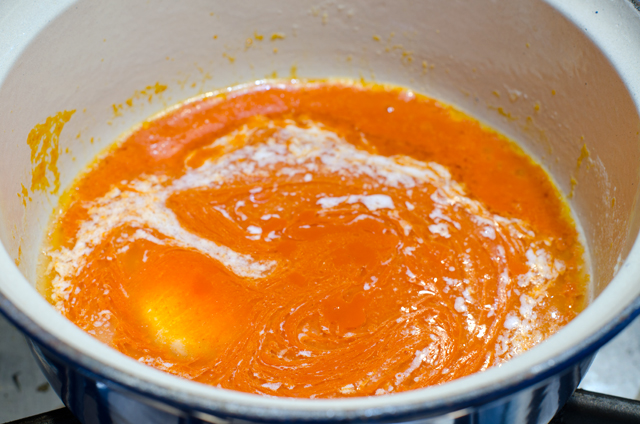
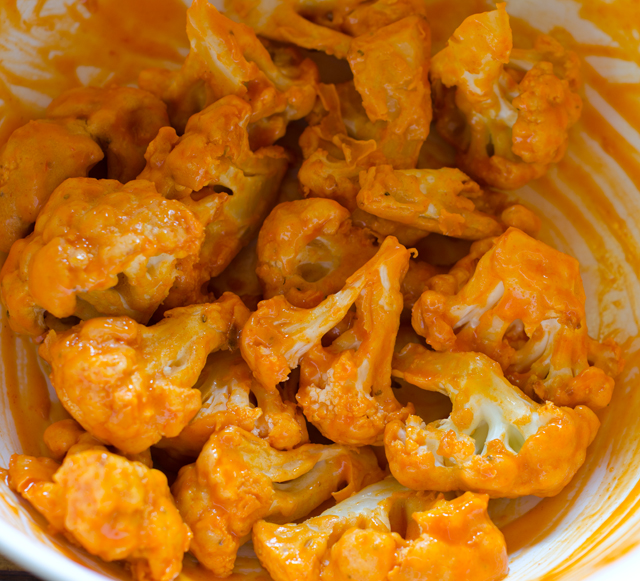
While the cauliflower is baking, melt the butter in a small saucepan over medium heat. Add the hot sauce and stir to combine. In a medium bowl, combine the cooked cauliflower and sauce, toss gently to combine. Place the cauliflower back on the baking sheet and bake for another 10 minutes, until the cauliflower begins to crisp. Serve immediately with plain or sweet pickled celery and blue cheese dressing or sauce.
Cauliflower pieces shouldn’t be too small.Ingredients for the batter.A simple batter of flour, spices and milk.Dip cauliflower pieces in the batter. Place on a wire rack above the parchment lined baking tray for easy clean up.While the cauliflower is baking, stir together melted butter and hot sauce.After the cauliflower has baked to a golden brown, mix with hot sauce and butter. Bake until crisp.The final product served with blue cheese sauce and pickled celery.
Buffalo Cauliflower Bites
Serves four or two very hungry people
Ingredients
1 c flour, can be all-purpose, whole wheat, brown rice etc.
1 c milk, almond milk or water
1 t garlic powder
1 t cumin
1 t smoked paprika
1 tsp. salt
½ t ground paprika
1 head cauliflower,cut into florets
½ c hot sauce (I used Franks Original)
3 T butter
Directions
Preheat oven to 425°F. Line a large baking sheet with parchment paper or foil. Spray a large wire rack with cooking spray to place over the baking sheet.
Combine flour, water, spices, salt and pepper in a large bowl and stir until smooth. Using tongs, dip cauliflower pieces in the batter. Coat well, lift out and allow the excess to drip back into the bowl.
Arrange cauliflower in a single layer on the wire rack that is on top of the baking sheet. Bake 20 minutes or until golden.
In a small saucepan, melt the butter, add the hot sauce and stir to combine. Pour evenly over cauliflower. Toss gently until cauliflower is evenly coated.
Bake 10 minutes or until cauliflower begins to crisp, rearranging florets occasionally if needed. Serve with celery and blue cheese dressing.
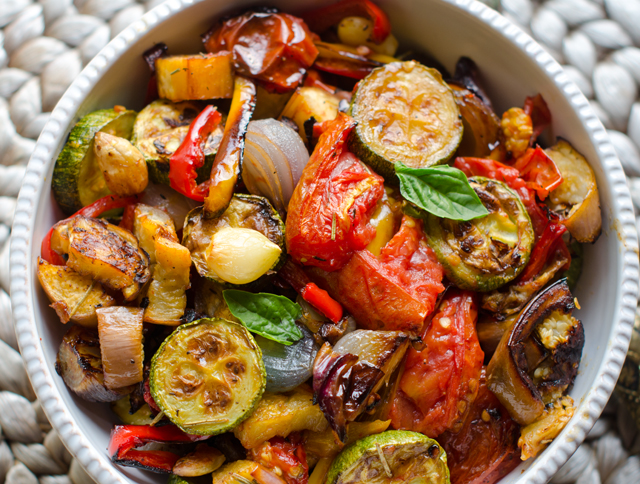
I love recipes that use the bounty of the garden in a single dish and ratatouille accomplishes that in a very delicious way. In case you didn’t know, ratatouille (rat-uh–too-ee), is a summer vegetable stew that had it’s origins in the Provencal city of Nice in southern France. Traditionally, each ingredient, eggplant, zucchini, peppers, onion, garlic and tomatoes, is cooked separately on the stove top and tossed together at the very end. So it’s really a sauté that is presented as a stew.
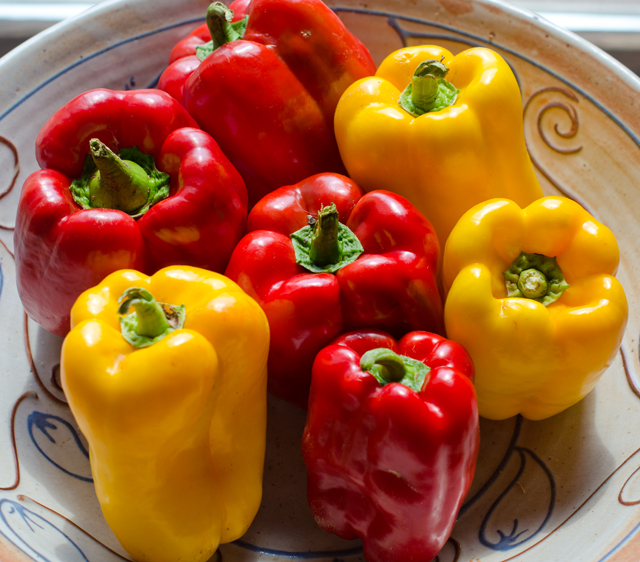
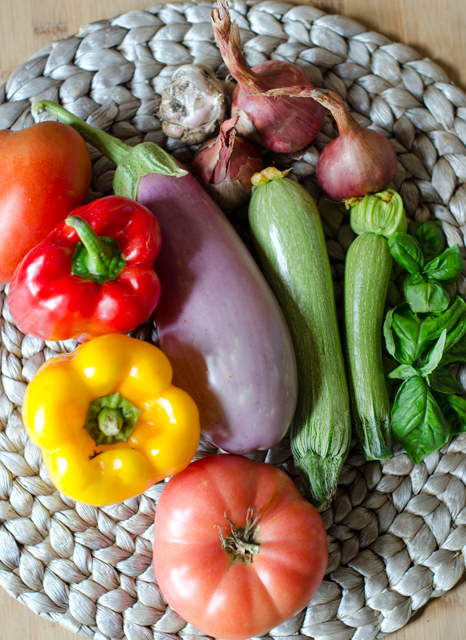
In this version the vegetables are tossed in olive oil and roasted in the oven, eliminating the time cooking over a hot stove. Our red and yellow bell pepper harvest is the earliest I can remember. They must like the hot temperatures and abundant rainfall this year. The orange Valencia peppers are not far behind. I prefer using Chinese or Japanese eggplants for their thin skin and milder flavor. I substituted shallots for onions since our harvest was so plentiful this year. The garlic was also from the garden, a first for us.
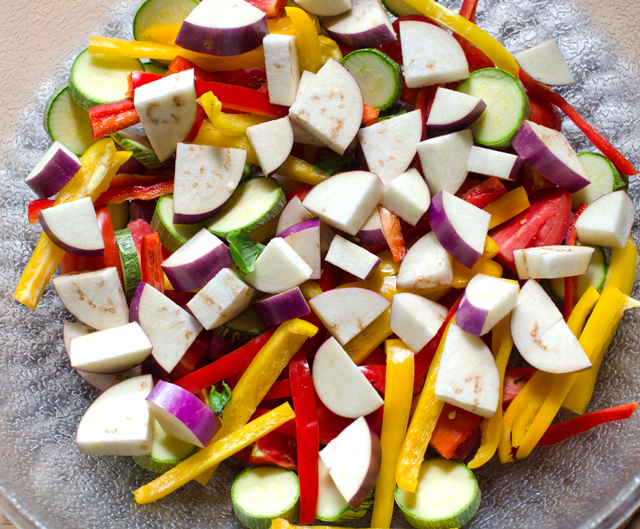
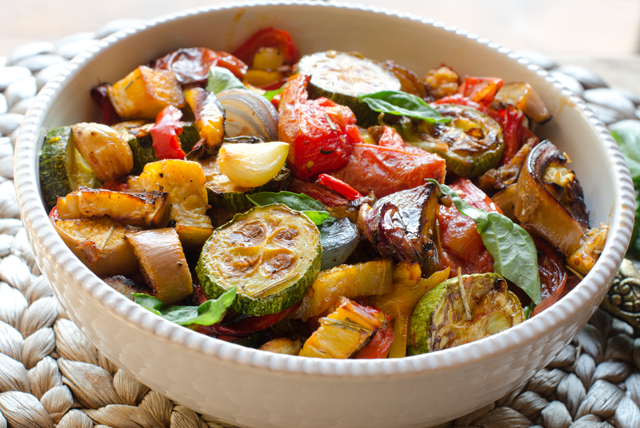
Cut the vegetables in similar size so they will get done at the same time. The smaller the cut, the less time it will take to cook. Lightly toss the vegetables with about a half cup of a good quality olive oil. Spread them out evenly over two large baking sheets. Rotate the baking sheets top to bottom and front to back half way through the cooking time. Roasting allows the vegetables to retain their shape and they take on a delicious toasted flavor. Move the cooked vegetables to a large serving bowl and tossed with a basil chiffonade. Chiffonade, translates “made of rags” from the French (of course!). It is a technique for cutting herbs and vegetables into long thin strips, in this case, basil.
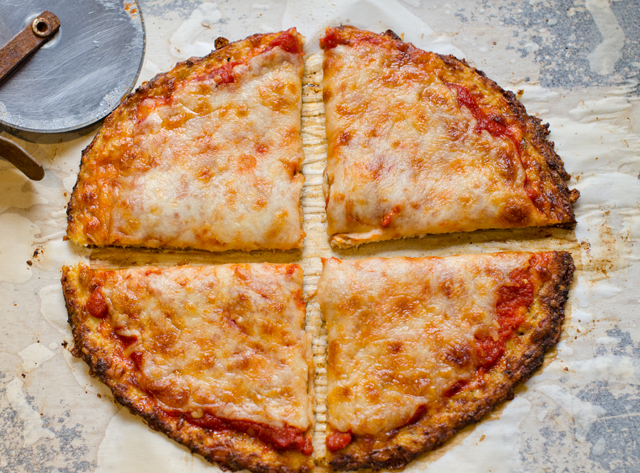
Ratatouille can be used in many ways, a side dish, a topping for bruschetta, chicken or fish. We used it as the topping for an impromptu flatbread pizza. It can be served hot or cold and is even better the next day, if it lasts that long.
This season is the earliest we have had ripe bell peppers. I guess they really like the hot and rainy weather.Ingredients for the ratatouille, I substituted shallots for onions since Joe just harvested his crop.
Oven Roasted Ratatouille
Serves four (or two very generously)
Ingredients
2 small onions (about 5 oz. each), cut into ¼-inch-thick half-moons
2 bell peppers, red, yellow or orange, cored, seeded and cut into ¼-inch lengthwise strips
Japanese eggplant, about 1 lb, cut crosswise ½ inch thick rounds, then sliced in quarters
1 lb small to medium zucchini, trimmed and cut into ½ inch thick rounds
10 whole cloves garlic, peeled
½ c extra virgin olive oil, and more as needed
1 t chopped fresh rosemary
Kosher salt and freshly ground pepper
1½ lbs medium tomatoes (about 4), cored, and cut into 1/2-inch chunks
¼ c basil cut into a chiffonade
Toss the ingredients in a large bowl with olive oil, salt and pepper.Transfer the vegetables to two large baking sheets.
Directions
Place racks in the top and bottom thirds of the oven. Heat to 400°F. If using convection heat, 375°F.
In a large bowl, toss the onions, peppers, eggplant, zucchini, tomatoes, garlic, olive oil, rosemary, and 1-1/2 tsp. kosher salt and a grind of pepper. Spread the vegetables evenly over two large 12 x 16 sheet pans. Don’t spread the vegetables too thin or they may burn (they shrink a lot as they cook).
Roast, stirring the vegetables a few times and swapping the positions of the pans once, until the vegetables are slightly collapsed or shriveled, starting to brown, and very tender, about 35 minutes for my oven. It could take 10 minutes longer if you are not using convection heat.
Scrape all the vegetables and any juices into a serving bowl. Toss with the basil, taste for seasoning, and serve.
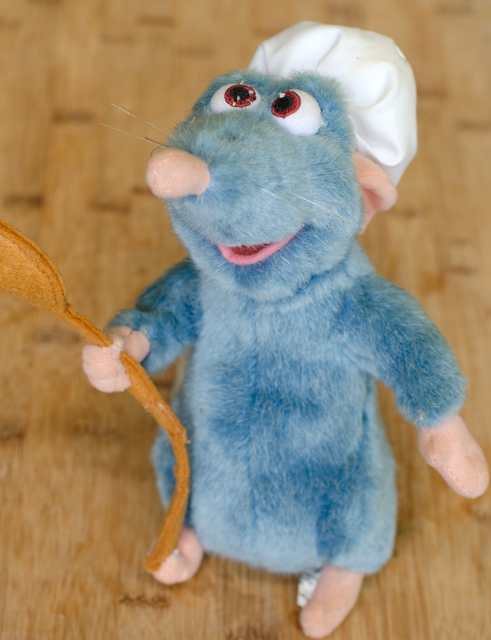
Ratatouille makes a great pizza topping.How could I resist posting a picture of Remy, the star of the movie Ratatouille who presides over my kitchen from his perch above.
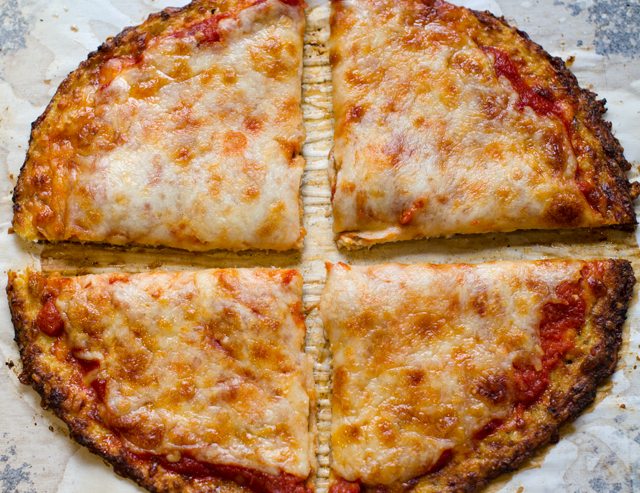
Consider the amazing versatility of cauliflower. Tossed with olive oil, salt and freshly ground black pepper and roasted until it is golden brown, it’s addictive as popcorn. It’s a delicious gluten-free substitute for mashed potatoes and couscous and the secret ingredient in a healthier version of Alfredo sauce.
In this recipe, the vegetable master of disguise is the basis for a pizza crust. I began my research by reading through about 20 recipes for cauliflower pizza I found online. They were written by cookbook authors, celebrity chefs and food bloggers. No two recipes were exactly the same and some were quite vague in their instructions. I used these recipes to construct my own version of a crust that works every time.
Line a pizza pan or a baking sheet with parchment paper. I used a nonstick spray on the corners to make sure it stayed in place. Preheat your oven to 425°F.
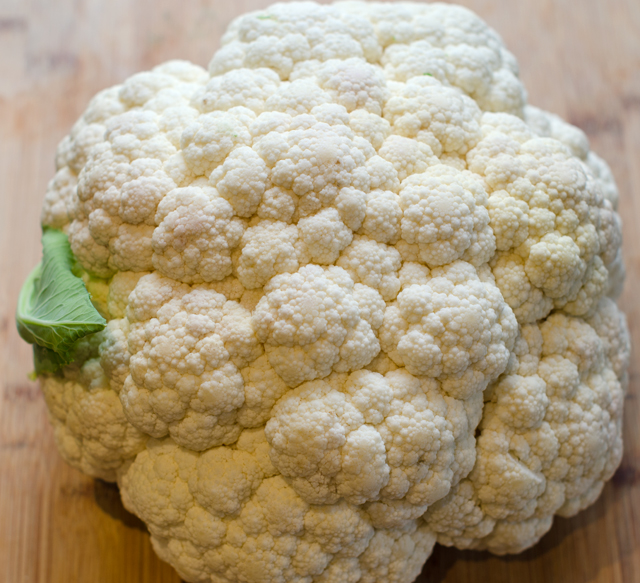
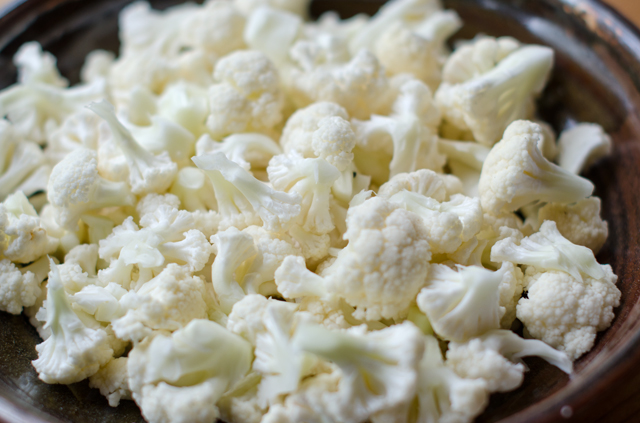
Start with a head of cauliflower, chop it into four cups of smaller florets, you want uniform pieces that won’t overwhelm your food processor.
If you are using a hand grater leave the pieces larger and the stem attached so you don’t scrape your fingers. Save the stems for cauliflower mashed potatoes. Pulse the florets with the metal blade in the food processor until the cauliflower is the consistency of small grains of rice or couscous. Some writers referred to this as cauliflower “snow”. 4 cups of cauliflower florets yielded two and three-quarter cups of finely chopped cauliflower.
Cauliflower needs to be cooked to get rid of excess moisture. Some of the recipes I read called for sautéing the cauliflower on the stove top, others chose steaming and a few didn’t cook it at all. I am not a big fan of the microwave, but I feel it’s the easiest way to cook the cauliflower for this recipe and there is no need for additional water to be added. Place the cauliflower in a microwave safe container and cover with plastic. I cooked mine on the “fresh vegetable” setting for about six minutes. Let the cauliflower cool thoroughly before proceeding with the next step, if you don’t you could easily burn your fingers.
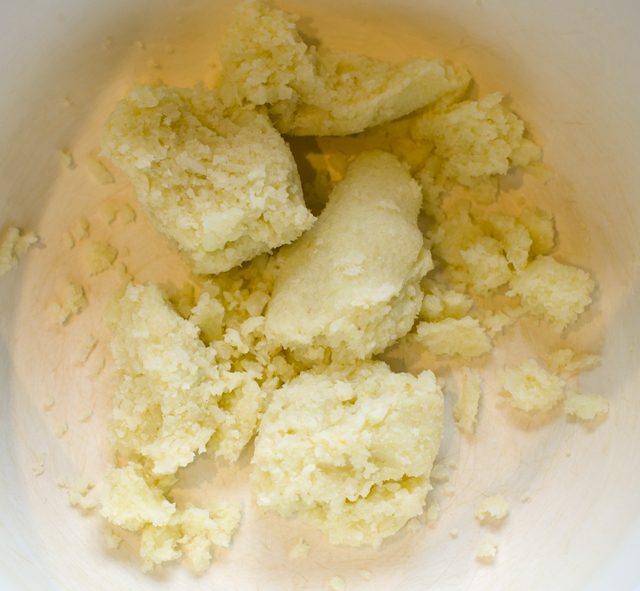
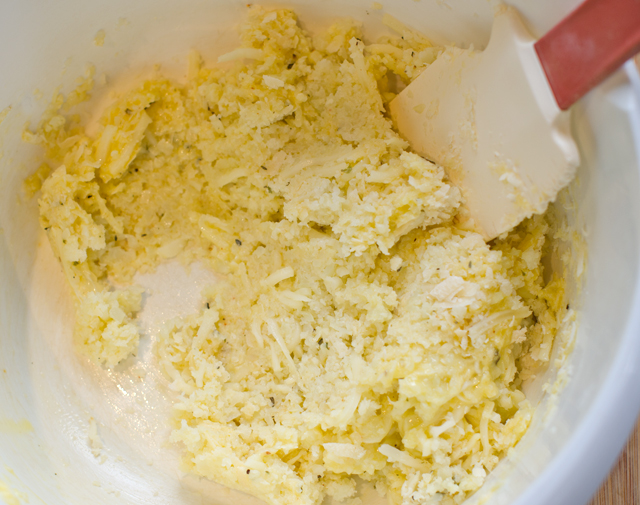
The next step is crucial to the success of this recipe. Dump the cauliflower into the center of a clean, cloth dish towel. Gather up the four corners and twist. Squeeze the bottom to extract as much liquid from the cauliflower as possible. When you think you’ve squeezed enough, squeeze one more time. Transfer the cauliflower pulp to a bowl, you should have about a scant cup. Add to this one lightly beaten large egg, a pinch of salt, three quarters of a cup of shredded mozzarella, half cup of shredded Parmesan cheese. Although not necessary you can add a half teaspoon each of dried oregano and basil. Mix first with a spatula to incorporate the ingredients, then mix with your hands for best results.
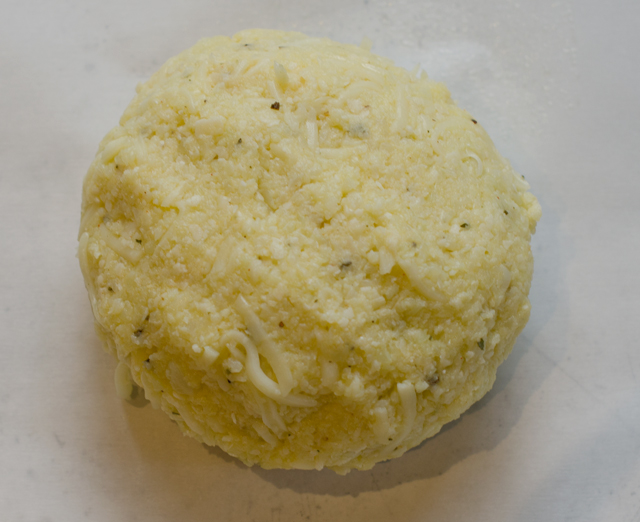
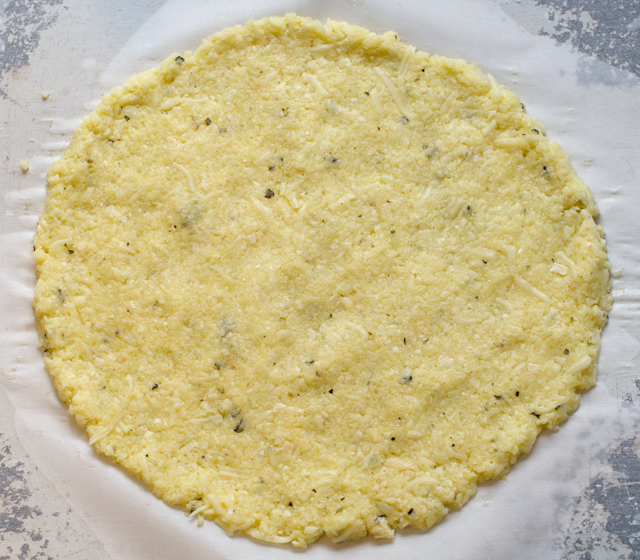
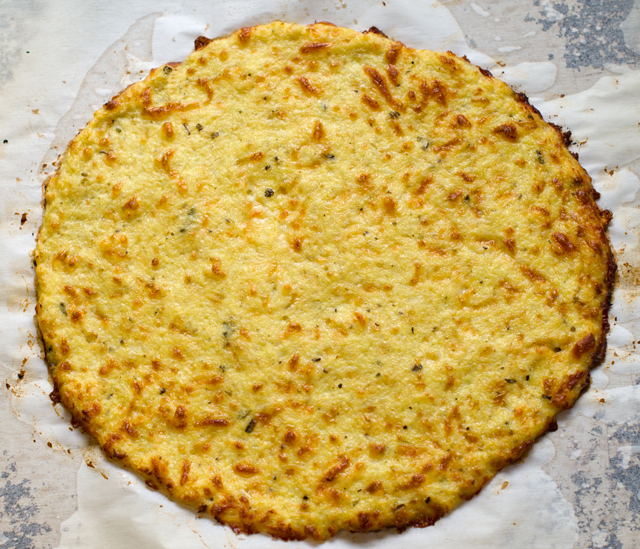
Form into a disk and place on the prepared baking sheet. Press out from the center evenly to make a 10 inch circle. Be sure that the crust is evenly pressed out, with no thin or thick spots. Some sources said to spray the surface of the parchment paper with nonstick spray but I didn’t and my results were fine. Place the baking sheet on the middle rack of your preheated oven. Bake until spotty brown, it took about 12 minutes in the convection oven, it may take you a little longer for a conventional oven.
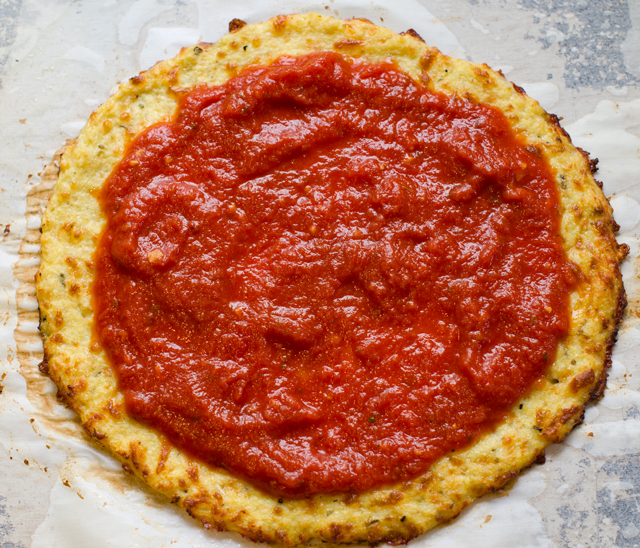
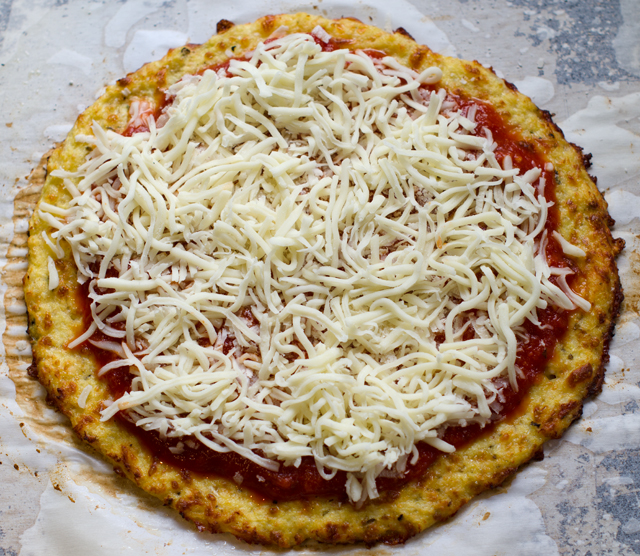
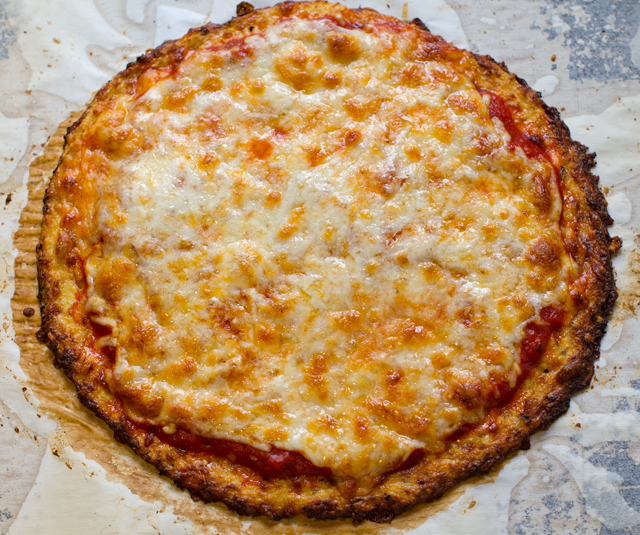
Remove baking sheet from the oven and add your favorite toppings. I made a basic tomato sauce and mozzarella cheese pizza. I baked it in the oven for another 10 minutes, until the cheese was melted and bubbly. I was able to cut the pizza with a wheel and the slices held together nicely. The possibilities for toppings are endless. In about a month or so I will be topping this crust with basil pesto and thinly sliced zucchini.
Start with a large head of cauliflower, you won’t need it all.Separate into smaller florets.Add to the food processor with metal blade attached.Process finely until you get rice or couscous like granules.Now it is ready for the microwave.Place the cooked cauliflower in the middle of a cotton dishtowel.Squeeze to extract all the excess liquid.You will be left with cauliflower “pulp”.Mix in beaten egg, cheeses, salt and dried herbs.Form it into a ball.Flatten into a 10 inch round.Bake at 425 F for ten to fifteen minutes, until starting to brown in spots.Top with sauce.And mozzarella cheese.Bake for 10 minutes, until the cheese is bubbly.Delicious!
Makes one 10″ round
Ingredients
4 cups of cauliflower florets
1 large egg, lightly beaten
¾ c shredded low fat mozzarella cheese
½ freshly grated Parmesan cheese
½ t dried oregano
½ t dried basil
Directions
Line a rimmed baking sheet or pizza pan with parchment paper and preheat oven to 425°F.
Chop cauliflower into 4 cups of smaller florets. Transfer to a food processor and pulse until the cauliflower is the consistency of rice or couscous, my finished product measured 2 ¾ cups. Alternately grate larger pieces on a box grater until you have 2 ¾ cups of finely grated cauliflower.
Place in a large bowl and microwave on high for 6 minutes. Remove from oven and let cool.
Dump the cauliflower into the center of a cotton dish towel, flour sack types are best. Draw up the corners and twist tightly. Squeeze the cauliflower in the dish towel to extract as much liquid as possible.
Transfer the cauliflower “pulp” to a bowl. Next, add the beaten egg, cheeses and herbs. Combine with a rubber spatula and for best results, finish the mixing with your hands.
Form into a disk and place on the prepared baking sheet or pan. Press out from the center to make an even 10″ round.
Place baking sheet on the lower middle rack of the preheated oven. Bake until spotty brown, mine took about 12 minutes, the crust may be ready anywhere from 10 to 15 minutes.
Remove crust from the oven and top with your favorite pizza combinations. Bake until cheese is melted and bubbly, another 10 minutes.
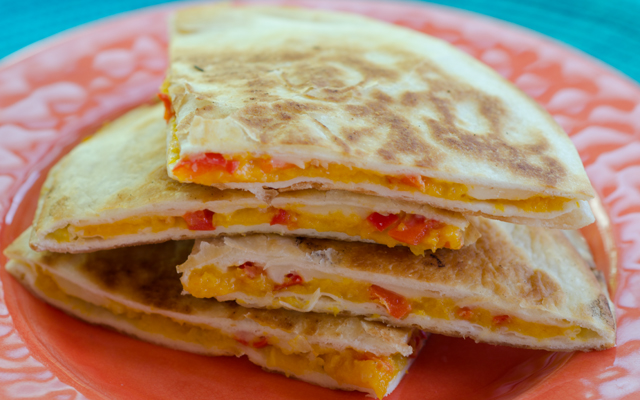
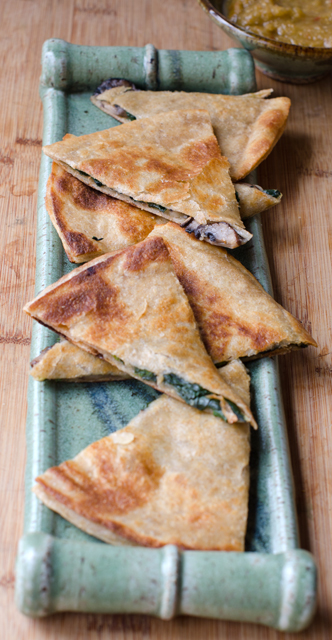
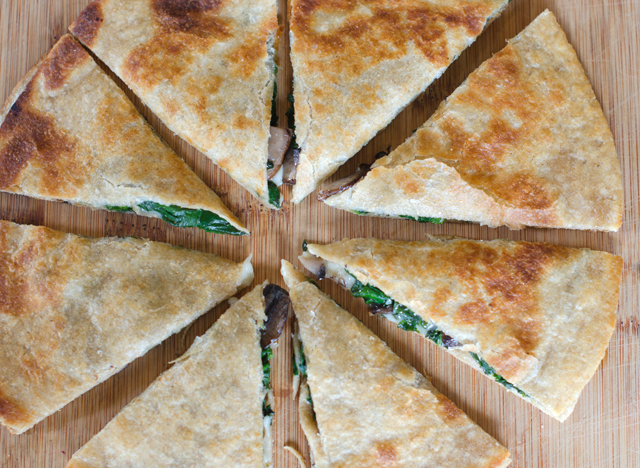
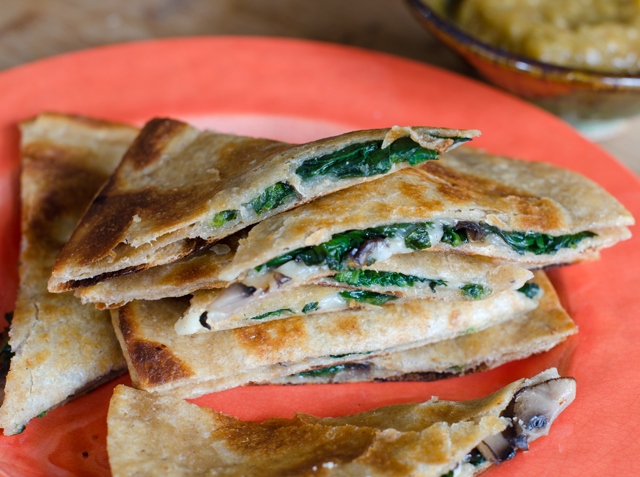
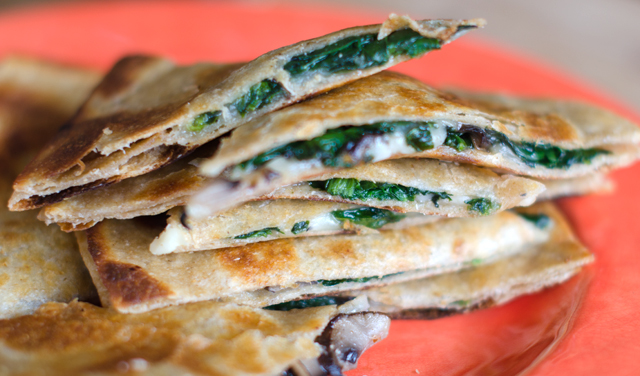
Still inspired by an abundance of, you guessed it, spinach, I was looking for yet another way to use our bounty. Inspiration this time came to me in the form of a quesadilla. Crispy on the outside and melted and creamy inside, spinach adds a healthy component to this popular dish. Quesadillas are easy and delicious any time of day, as a quick snack, lunch, even for breakfast. To accompany the quesadillas I made a simple tomatillo salsa.
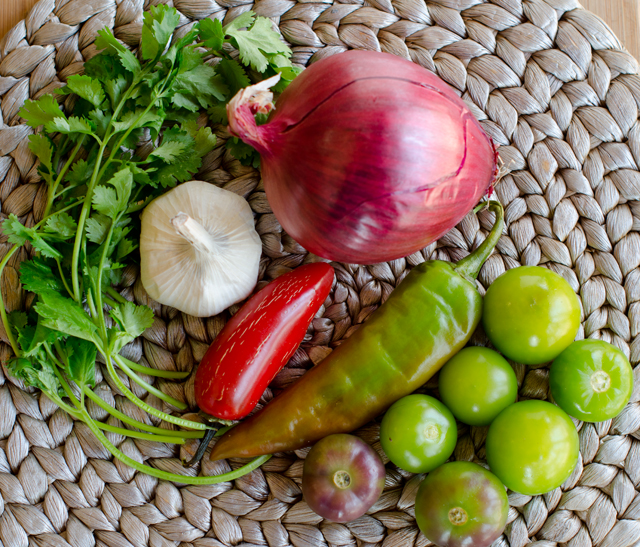
With the exception of the cilantro and garlic, the ingredients for the tomatillo salsa came straight from our freezer. Preparing tomatillos for the freezer is easy, I remove the papery husks and freeze them whole and raw in quart bags. A previously frozen tomatillo will not hold up to roasting but are fine in raw preparations like this. The Numex Joe E. Parker pepper used in this recipe is an Anaheim style pepper with a long slender shape and mild heat. We have an interesting variety of frozen hot peppers from gardens past, milder ones like Joe E Parker and poblanos to hotter ones, cayenne, jalapeno, serrano and Thai hot. The surprising thing is that freezing them does not diminish their heat in the least. When a recipe calls for several hot peppers, I start with one, it is much easier to add heat than to take it away.
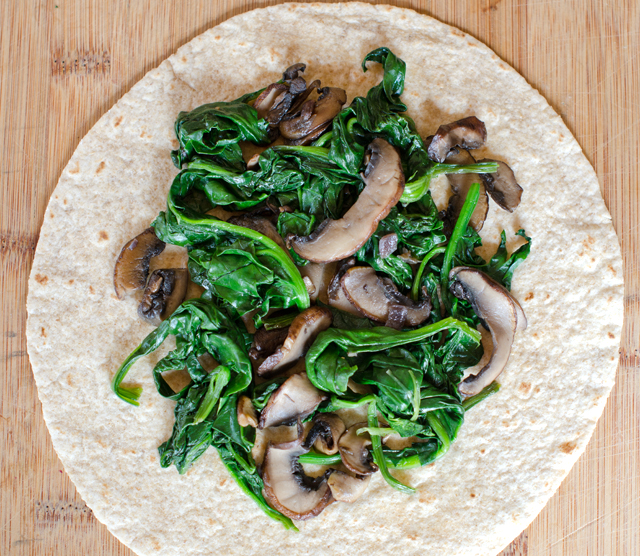
As always, picking the spinach takes more time than most of the steps in the recipe. The filling is easy to make and used twelve cups of fresh spinach, a real plus for me. If you don’t have an abundance of spinach in your garden, use bagged baby spinach. The slightly more assertive flavor of cremini mushrooms compliments the spinach nicely.
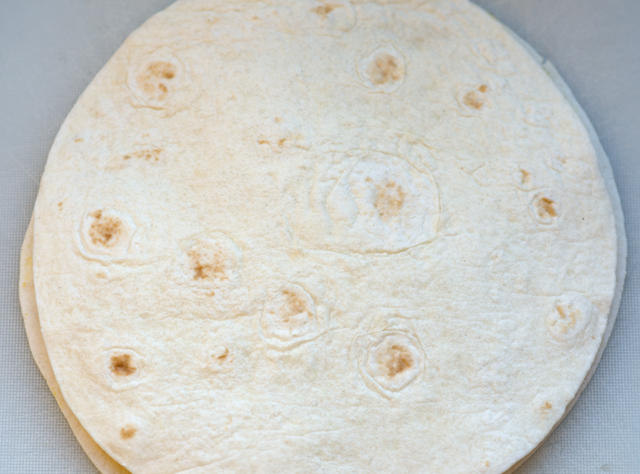
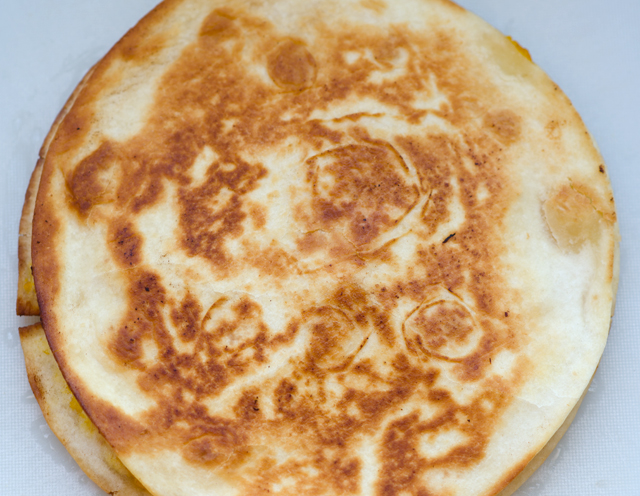
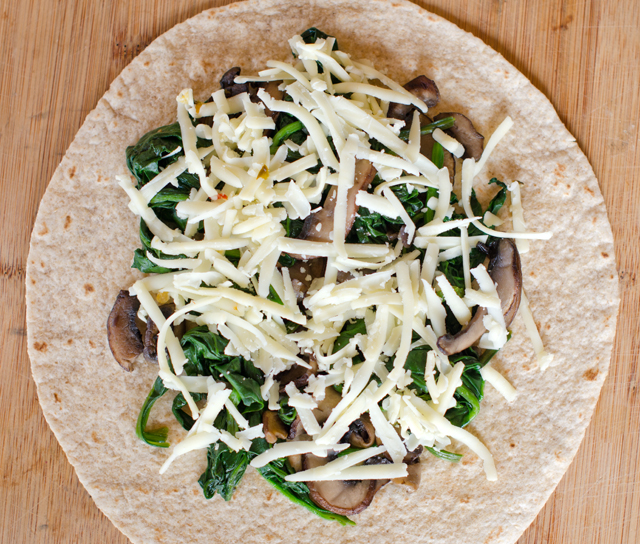
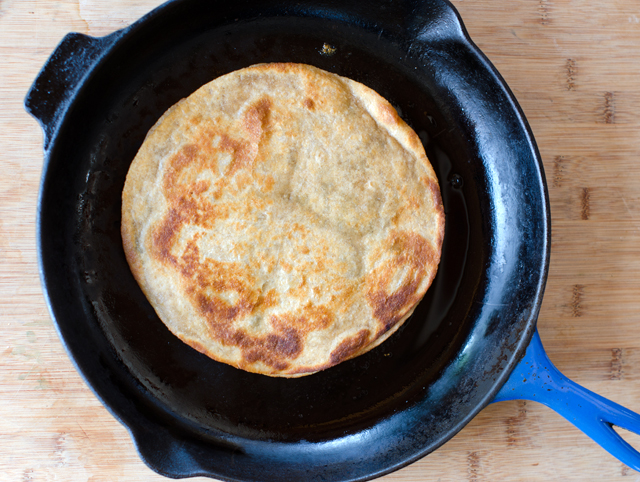
The options for cheese are endless. I used pepper jack and cheddar cheese, a good melting cheese is important here. Choose a large heavy bottom skillet to cook quesadillas. Just a light brushing of oil in the pan is all that’s necessary to brown the tortilla and keeps it from getting greasy. You can either fold one tortilla in half or stack one on top of another. I press lightly on the quesadilla in the pan to allow the cheese to melt a bit and hold the layers together before it is flipped. The pizza wheel is the perfect tool to cut it into portions. Finished quesadillas can be held in an oven on low heat for 20 minutes.
Spinach and Mushroom Quesadillas
Makes four 8″ quesadillas
Ingredients for the filling
1½ T olive oil or bacon drippings
8 oz mushrooms, button or cremini, stemmed and sliced
2-3 cloves garlic, finely chopped
¼ c finely chopped red onion
12 c spinach, large stems removed
Directions for the filling
In a large skillet heat the oil or bacon drippings over medium high heat.
Add the mushrooms, stirring constantly, until they begin to brown.
Add the onion and garlic and continue cooking, stirring frequently until it looks translucent.
Add the spinach by the handful, wilting it before adding more, until it is all used. Do not overcook. Season with salt to taste.
Ingredients for assembling the quesadillas
Eight 8″ soft tortilla or taco shells, I used whole grain
Olive Oil
1½-2 c grated cheese, I used a combination of pepper jack and cheddar
Directions for assembling and cooking the quesadillas
Preheat oven to 180°F.
Place four tortillas on two baking sheets, divide evenly the spinach and mushroom filling and the grated cheese between them.
Top with the four remaining tortillas and lightly press to seal.
Place a 12″ heavy bottomed skillet over medium high heat. Brush the skillet lightly with olive oil.
Place the quesadillas in the skillet one at a time, pressing down lightly but firmly and cook for about 3 minutes on each side. You can peek by lifting up with a spatula to see if it is getting golden brown. Transfer the cooked quesadillas to a baking sheet and keep warm in the oven, lightly covered with foil.
Slice each quesadilla into 6-8 wedges, a pizza cutter works well here, and serve hot with tomatillo salsa or your own favorite.
Tomatillo Salsa
Ingredients
3 cloves garlic, peeled
1 jalapeno pepper, stemmed and seeded and quartered
1 Numex pepper, stemmed and seeded and quartered
¼ c roughly chopped red onion
1 lb tomatillos, husked, rinsed and cut into quarters
¾ c loosely packed, lightly chopped cilantro
Directions
With a food processor or blender running, drop in the garlic cloves one at a time letting each piece get finely chopped before adding the next. Add the peppers, onion, tomatillos and cilantro and process until smooth.
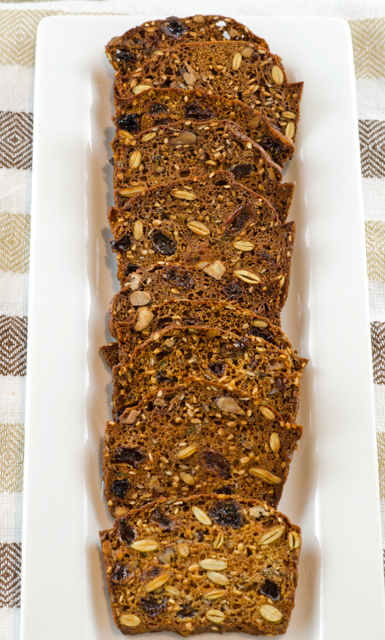
There’s a cracker I love that I have to buy whenever I stop in at Whole Foods, Raincoast Crisps. Created by Parisian trained chef Lesley Stowe, she started her own cooking school and catering company in Canada’s raincoast, Vancouver, over 25 years ago. The crisps originated from a bran bread that she served in her catering business with smoked salmon. Always looking for new and original ideas, on one occasion she sliced the bread and dried it out. It was met with approval from her kitchen staff so she decided to “pump it up” with additional ingredients. That was the beginning of the Raincoast Crisp.
The crisps are toasty and nutty, loaded with ingredients like pumpkin seeds, raisins, and pecans. They are delicious to nibble on their own or maybe just a spread of soft cheese or your favorite preserve. One never tastes like enough and it’s easy to justify munching a box full because they are so good. So what’s the problem? At 7.99 and up per 6 ounce box they are a pricey indulgence. So some intrepid bloggers came along and cracked the code and a rather similar recipe is available to any one who is able to whip up a quick bread.
The DIY recipe is very simple to make. Stir together the ingredients and bake in mini loaf pans. Alternately you could bake them in two square cake pans for longer skinny slices. Be sure to thoroughly cool the loaves after baking before proceeding to slice. You could give them a short stay in the freezer to firm them up or just wait till the next day to proceed with the recipe.
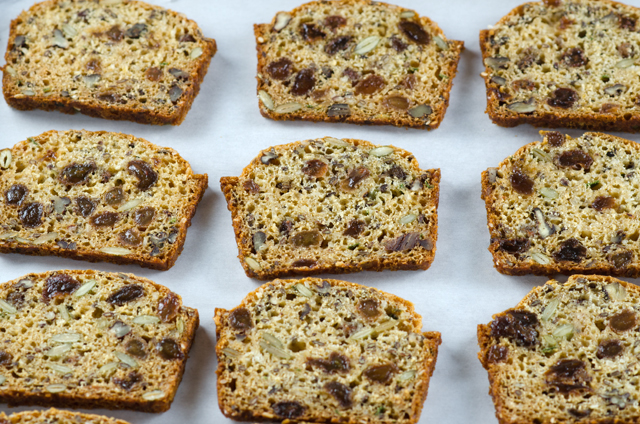
The next step is to slice the crackers as thinly as possible. Most of recipes I read said that it makes about 8 dozen crackers. That meant I needed to make 24 slices from each of the 4 loaves. I came fairly close, or maybe that had something to do with slices I had to “test” before baking! I used my thin blade serrated Cutco knife to make the thinnest and most even slices. I experimented with a food slicer which was ok, it’s important to maintain even pressure to keep the slices neat.
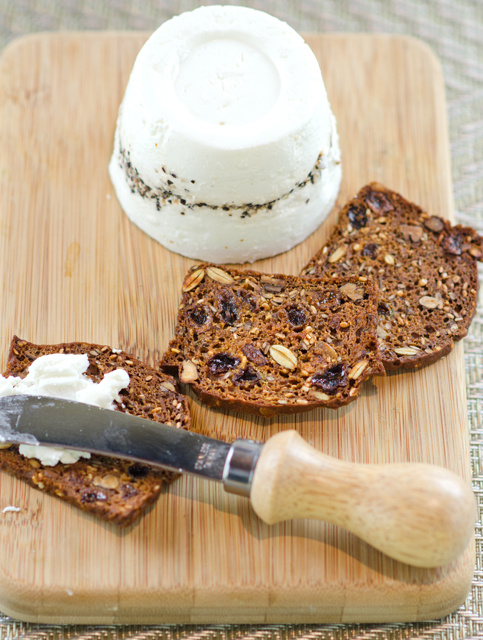
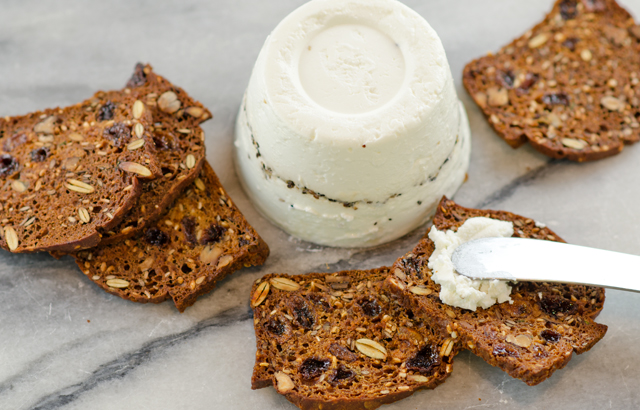
Bake the slices like super thin biscotti until they are crisp and golden. Now that I know the proportions of the recipe I am looking forward to customizing it. Different flours, dried fruits, spices and nuts, the possibilities are endless. I served mine with a delicious soft goat cheese from Giggling Goat Dairy, a new vendor at my local farmers market in Wrightstown. The goat dairy is located in Dublin Pa and they make and sell fresh French-style goat cheese known as chèvre, a traditional style Feta as well as spreads and dips. I’m certain I will be frequenting their stand quite often this summer.
Raincoast Crisps with Raisins and Rosemary
Makes about 8 dozen
Ingredients
2 c flour
2t baking soda
1t sea salt
2c buttermilk
1/4c brown sugar
1/4c honey or maple syrup
1c raisins
1/2c lightly chopped pecans
1/2c roasted unsalted pumpkin seeds
1/4c sesame seeds
1/4c flax seeds
1T chopped fresh rosemary
Directions
Preheat oven to 350°F.
Stir together flour, salt and baking powder in a large bowl. Add the buttermilk, brown sugar and honey and stir to combine. Add the raisins, nuts, pumpkin seeds, sesame seeds. flax seed and rosemary and stir until all the ingredients are thoroughly combined.
Pour the batter into 4 mini loaf pans that have been sprayed with nonstick spray. Bake loaves for 30 to 35 minutes, rotating halfway during baking time. The loaves should be golden and springy to the touch. Remove loaves from the pans and cool on a wire rack.
Allow the loaves to cool completely, then freeze for about an hour. This will allow you to slice the loaves as thinly as possible. I used a serrated edge knife for the neatest cut.
Place the slices on baking sheets that have been lined with parchment paper. Bake the slices at 300°F for about 15 minutes, then flip them over and bake for another 10 minutes until crisp. Cool completely and store in an airtight container.
Slices on a parchment lined sheet ready for their second bake.Delicious on their own or with a spread of goat cheese, this is the fresh garlic peppercorn from Giggling Goat Dairy.