January 30, 2016 Spinach, Blood Orange and Bean Salad with Sprouts

DSC_5806aThe February issue of Bon Appetit includes a nine page (ten if you count the colorful illustration on the first page) article devoted to beans. The title, “Cool Beans” brings a smile to my face because it was an often used expression of a dear friend of mine.
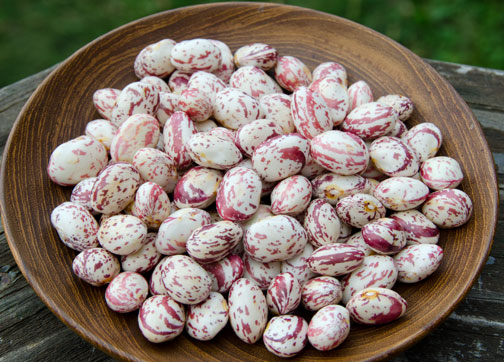
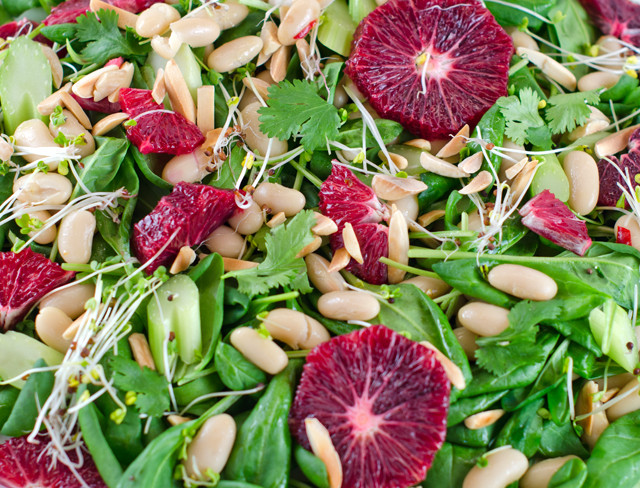
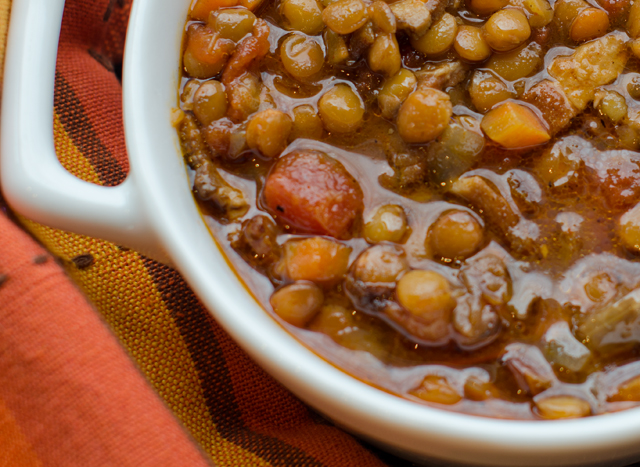
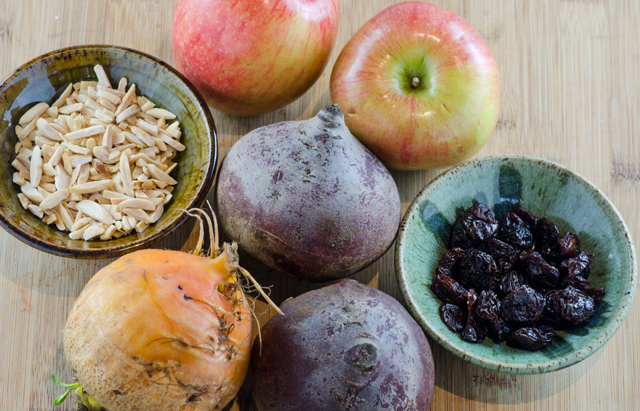
“Cool Beansincludes a four step method on how to cook dried beans from scratch, a pictorial of some of the prettiest beans I have ever seen, available by mail order only and they even address the, ahem, gas issue. There are recipes for cassoulets, pastas, stews and chilis. What caught my attention however was a bean salad; blood orange and mixed bean salad with sprouts. Since I wanted to make the salad for that evening, I needed to forgo the soaking and the next day slow cooking. So I did the next best, and most practical thing, I used a can of cannellini beans, Goya is my brand of choice. If you use canned beans, rinse and drain them well. A large can of cannellini beans will give you 1 1/2 cups of beans as opposed to the 2 cups in the original recipe.

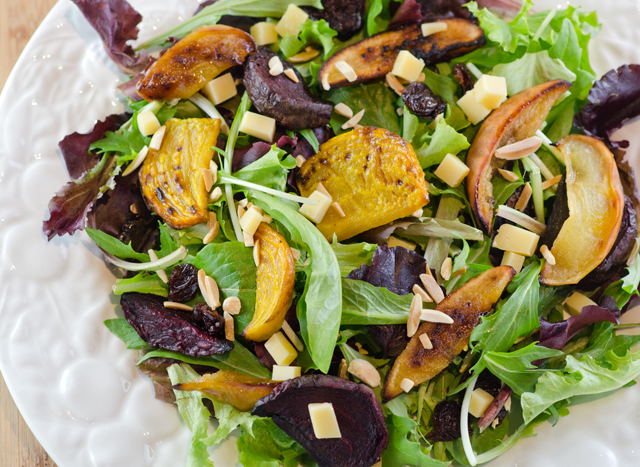
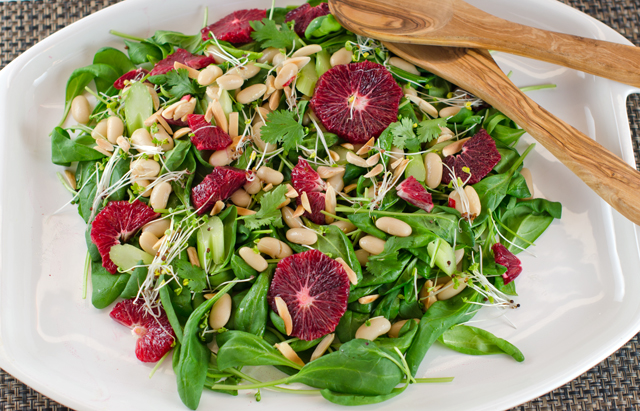
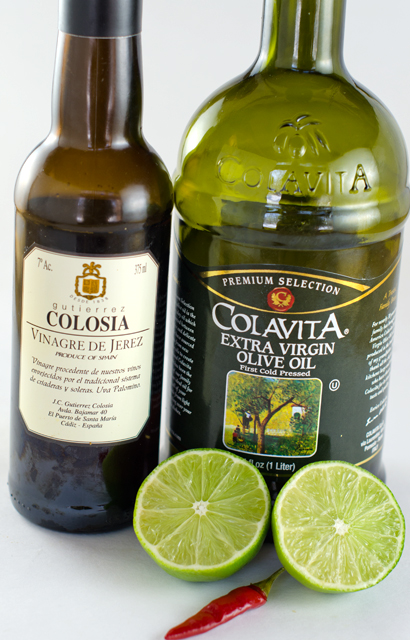
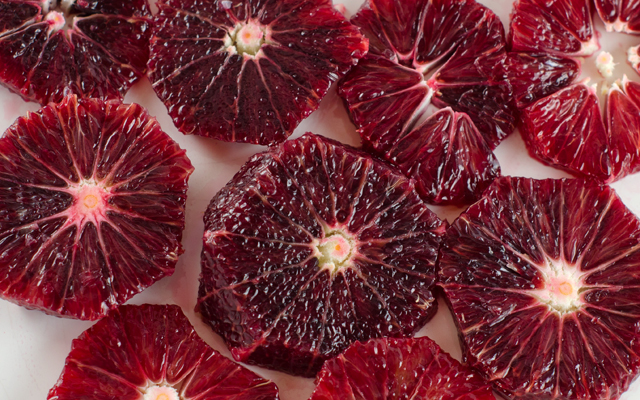
The salad comes together very quickly. Blood orange segments, readily available this time of year enhance the salad with beautiful garnet red color and deep sweet orange flavor with just a little bit of raspberry tartness. Celery slices, underused in salads (at least by me) and broccoli sprouts give a crisp contrast. Fennel would be an interesting substitution for celery. The dressing is a very simple vinaigrette, lime juice, sherry vinegar, extra virgin olive oil and a small Thai chili. Our rather large supply of frozen chilis pack as much heat as any fresh one. My additions to the original recipe were baby spinach leaves and toasted almonds for crunch. Top the salad with some cilantro or parsley leaves. This salad probably could serve four but we ate it in one sitting as a side dish.

The origin of the expression “cool beans”? A Cheech and Chong movie? The 80’s sitcom Full House? There doesn’t seem to be a true concensus. What I do know is that it’s time to place an order for some heirloom beans so I can make this delcious salad again.

Spinach, Blood Orange and Bean Salad with Sprouts

Serves four

For the vinaigrette

Ingredients

  • 2T fresh lime juice
  • 2t Sherry or red wine vinegar
  • ¼c extra virgin olive oil
  • 1 small Thai chili, thinly sliced
  • Kosher salt and freshly ground pepper

DSC_5793a

Directions

  1. Whisk ingredients together in a medium bowl. Season to taste with salt and freshly ground pepper. Set aside.

For the salad

Ingredients

  • 6c baby spinach leaves
  • 1 can cannellini beans, rinsed and well drained or fresh cooked beans
  • 3 blood or navel oranges
  • 1c celery stalks, sliced thinly on the diagonal
  • ½c radish or broccoli sprouts
  • ¼c toasted almond slivers
  • Kosher salt and freshly ground pepper

DSC_5797a

Directions

  1. Add beans to vinaigrette and toss to coat, let sit for 10 minutes for flavors to blend.
  2. Remove peel and pith with a small, very sharp knife from 3 blood or navel oranges. Cut crosswise into ¼” thick rounds.
  3. Add the spinach, orange sections, celery slices and sprouts to the bowl with beans and toss. Season with salt and pepper.
  4. Top with additional sprouts, cilantro leaves and toasted almonds.
DSC_6772a
The borlotti beans we grow in the garden are very pretty. Unfortunately they lose their mottled color when cooked.

DSC_5800a

January 26, 2016 Smoky Bacon and Lentil Soup

DSC_5761aThe anticipation of a cold and snowy weekend was a good reason to make a slow cooker soup. It only took about twenty minutes to put this smoky bacon and lentil soup together on a Friday afternoon.

Lentils are very nutritious. Rich in minerals, vitamins and fiber, they contain more protein than whole grains like brown rice. They have an earthy, nutty flavor and are low in fat and have zero cholesterol.

Unlike other dried beans, lentils can be prepared the day of serving since a presoak is not necessary.  Spread lentils on a light colored plate or board to check for and remove small stones or debris. Then place the lentils in a fine strainer and rinse them under cool running water. Purchase fresh lentils in a store where you know there is high product turnover to ensure freshness. Store them in an airtight container away from heat and moisture, they will stay fresh for about a year.
I chose a flavorful, aromatic cherrywood bacon for my soup. Choose a thick cut or slab bacon for easy dicing. Fry the chopped bacon in a heavy skillet, until brown and add to the slow cooker. In the rendered bacon fat, saute the onion and carrot until the onion is translucent, add them to the cooker.  Now for the easy part, add the lentils, broth, diced tomatoes, tomato paste, smoked paprika and ground pepper to the slow cooker.

Green or brown lentils work best in this recipe because they hold their shape.  I cooked the soup on low for seven hours and turned it off before we went to bed. The next day I turned the heat to low for an hour to warm it back up before it went to the keep warm setting. We had a  satisfying and delicious soup that fortified Joe between his plowing and snow blowing sessions in the blizzard of 2016.

DSC_5758a

Smoky Bacon and Lentil Soup

Serves 4-6

Ingredients

  • 8oz smoky slab or thick cut bacon
  • 6c chopped yellow onion
  • 1c chopped carrots
  • 1½ quarts of low sodium chicken broth or chicken stock
  • 1¼c brown lentils
  • 1c canned diced tomatoes (I used a variety with green chilies)
  • 1T tomato paste
  • 1T smoked paprika
  • 1t ground black pepper

Directions

  1. Cut the bacon into medium dice. Fry in a large heavy skillet over medium heat until brown and crisp, about 7-8 minutes. Using a slotted spoon, transfer the bacon to the slow cooker insert. Leave the bacon fat in the skillet.
  2. Add the carrots and onion to the skillet and cook until the onions are translucent, 4-5 minutes. Scrape the onion and carrots into the slow cooker.
  3. Stir in the broth, lentils, tomatoes, tomato paste, smoked paprika and pepper.
  4. Cover and cook on low for 7 hours or high for 3 hours.

DSC_5745a

DSC_5744a


January 21, 2016 Scallop Salad with Gremolata and Asian Vinaigrette

DSC_5726aThis is a twist on a recipe in the latest issue of Fine Cooking. In the Fine Cooking version, the scallops were tossed in a mixtue of citrus and Asian ingredients for a quick marinade. I wanted to make mine a salad so I patted the scallops dry, seared them and the marinade ingredients became the basis for an easy vinaigrette.
I love scallops for a quick meal and the jumbo sea scallops at Heller’s Seafood this week were pristine and just perfect. Wherever you shop, look for dry scallops. Wet scallops are soaked in a preservative phosphate solution. The solution preserves and whitens the scallops and causes them to absorb more water. So when you cook wet scallops they don’t brown as well or not at all because of the extra liquid. They can also have a soapy taste. Dry scallops are shucked and shipped packed on ice with no preservatives.  Therefore they have a shorter shelf life and are fresher when you buy them. Dry scallops come with a higher price tag, but they are fresher and you are not paying for water weight.

It’s fairly easy to tell the difference, wet scallops are bright white because of the phosphate solution and dry scallops are ivory or pinkish. Don’t hesitate to sniff them, the scallops should smell like the ocean.  When in doubt, ask, and if they don’t know, run! You shouldn’t be shopping there anyway.

Prepare scallops by first removing the tough abductor muscle, it peels off easily. Then I pat them dry on both sides with paper towels. I coat a non-stick skillet with a neutral oil (vegetable or canola). Be sure that your skillet will hold the scallops without crowding them, you want to sear, not steam them. I turn the heat up to high and wait for the first sizzle. I add the scallops to the pan in a clockwise fashion with any extras in the middle. That way I know what scallop has cooked the longest. Now is the hard part, cook the scallops without moving them until a little peek (lift up the spatula a bit) shows a deep golden crust. Be sure not to overcook, you want the middle to stay tender and sweet.  Two to three minutes per side will do.

Gremolata is made from parsley, garlic and lemon zest and is the traditional topping for braised veal shank or osso buco. This version takes on a definite Asian flair using cilantro, garlic, sesame seeds and lime zest. These flavors harmonize perfectly with the sweet scallops. The marinade for the scallops included mirin, lime juice, ginger and sesame oil. In case you didn’t know, mirin is a type of rice wine, like sake but mirin is sweet and has a higher alcohol content. When you are looking for sesame oil it should be the dark variety. Both mirin and dark sesame oil are readily available in the Asian section of the supermarket.  I used these flavors with a little additional honey to dress my salad greens with. I chose baby arugula, but a spring mix or baby spinach would work well too.

This dish comes together quickly, both the gremolata and the vinaigrette are easy to make. It is just important to take the time to cook the scallops correctly. This recipe can be doubled and is perfect for a first course or part of a small plates dinner.

DSC_5720a

DSC_5721a
Don’t crowd the pan, give the scallops room to brown, too close and they will steam.

Scallop Salad with Gremolata and Asian Vinaigrette

Serves 2

Ingredients for the scallops

  • ½ to ¾lb dry packed sea scallops (about 6)
  • A neutral cooking oil, canola for example
  • Salt and freshly ground pepper

Directions for cooking the scallops

  1. Remove the tough abductor muscle from the side of each scallop (some scallops are sold with the muscle already removed). If you feel any grit on the scallops, rinse them under cold water. Pat the scallops dry with paper towels; surface moisture impedes browning.
  2. Heat a 10- or 12-inch nonstick skillet over medium-high heat for 1 to 2 minutes. Add the oil and heat until quite hot. Pat the scallops dry once more and put them in the pan in a single, uncrowded layer. Season with salt and pepper and let sear undisturbed until one side is browned and crisp, 2 to 3 minutes. Using tongs, turn the scallops and sear until the second side is well browned and the scallops are almost firm to the touch, 2 to 4 minutes.
  3. Take the pan off the heat, transfer the scallops to a plate, and set them in a warm spot while you finish the other components of the recipe.

Ingredients for the sesame cilantro gremolata

  • ¼c finely chopped cilantro
  • 1T toasted sesame seeds
  • 2t finely chopped garlic
  • 1t lime zest

Directions for the sesame cilantro gremolata

  1. In a small bowl, combine the cilantro, sesame seeds, garlic and lime zest. Set aside.

Ingredients for the dressing

  • 3T mirin
  • 1t grated ginger
  • 2t fresh lime juice
  • 1t honey (or more to taste)
  • 3T sesame oil

Directions for the dressing

  1. In a small bowl whisk all the ingredients together. Set aside

Final Assembly of the salad

Ingredients

  • 4-5 cups of baby arugula, spring mix or baby spinach

Directions

  1. Place the greens in one medium or individual salad plates.
  2. Top with seared scallops
  3. Sprinkle gremolata on the scallops.
  4. Dress greens and scallops lightly with dressing.
  5. Serve immediately.

DSC_5731a

DSC_5735a


January 13, 2016 Smoky Indonesian Style Chicken Curry

DSC_5680aSmoky Indonesian style chicken curry gets it’s intense heat from pasilla chilies, smoked paprika and sambal oelek balanced with the fragrant warm spices of ginger, coriander and cumin. This is another recipe from Bruce Weinstein and Mark Scarbrough’s article, Slow Cooker Secrets in Fine Cooking magazine

The dark meat of chicken thighs is a natural for the long simmer in the slow cooker. In this recipe, no browning is required,  the skin is removed before cooking and the thighs are coated with a rich complex chile paste.

Pasillas are the chile of choice for this recipe. A variety we have grown for many years, pasilla roughly translates “little raisin” from the Spanish, referring to the way the dark green fruit turns a reddish brown and slightly wrinkled when mature.  I especially like it for it’s mild heat and versatility for use in Mexican and Asian cuisine.Pasilla chiles can be used in chili sauces and pastes as well as moles. They are wonderful fresh on the grill in summer along with a steak.  Pasillas are rich, earthy and mildly spicy with just a hint of sweetness.

We had a bumper crop of peppers this year and to preserve the harvest, I dry some of them. Start with whole, unblemished peppers that have been washed and dried. Place the peppers on a wire mesh rack over a large baking sheet with room between each pepper for air to circulate. I used the lowest convection setting (140°F) in my oven. Drying time varies and I check them every now and then to see how they are progressing. Smaller peppers will dry quicker, the larger ones could take a day or more.  It is important that the peppers are completely dry before storing. Partially dry peppers will turn moldy and ruin the whole container, I know from prior experience.

To use dried chilies, reconstitute by placing them in a bowl and covering them with boiling water. Check at about twenty minutes to see if they are soft. To make the chili paste, the reconstituted pasillas are combined with shallot, lemongrass, tomato paste, spices, brown sugar and sambal oelek. I am fortunate to have a large supply of lemongrass at my disposal. Our lemongrass plant grows large and bushy in the garden every summer. Joe harvests a large portion of the stalks that I freeze for recipes like this. The significantly cut back plant is brought indoors for the winter where it’s only predator is Cody, our Golden Retriever who enjoys nibbling on the leaves. Lemongrass has a mild citrus flavor with a floral aroma. Sambal oelek is a ground paste made only of chili peppers and salt.  It is less acidic than sriracha and is chunkier and thicker in texture.  It is readily available in the Asian section of most supermarkets.

The chili ingredients are combined in the blender and chicken broth is added to make a thick sauce. I needed more broth than the original recipe called for, use as much broth as you need to make the sauce smooth, not chunky. Layer the potato pieces at the bottom of the slow cooker. Season the chicken pieces generously with salt and pepper. I found it easier to spread the chili paste on the chicken after it was in the slow cooker. Put the lid on and cook until the chicken and potatoes are tender, 2 to 3 hours on high, 6 hours on low. Turn the slow cooker on high (if you were cooking on low) and sprinkle the green beans evenly over the chicken and cook until crisp tender, 30 minutes. Add peas and cook until heated through, 10 minutes. They suggest serving it with rice, but one starch (potatoes) is sufficient for me.

Dried pasilla bajio chilies from the garden.


Smoky Indonesian Style Chicken Curry

Serves four

Ingredients

  • 5 dried pasilla or New Mexico chiles, stemmed and seeded
  • 1 small shallot, quartered
  • 2 Tbs. thinly sliced lemongrass
  • 2 Tbs. tomato paste
  • 2 Tbs. sweet smoked paprika
  • 1 Tbs. minced peeled fresh ginger
  • 1 Tbs. packed dark brown sugar
  • 1 Tbs. sambal oelek
  • 1-1/2 tsp. ground cumin
  • 1-1/2 tsp. dried coriander
  • Kosher salt
  • 6 Tbs. lower-salt chicken broth
  • 8 bone-in chicken thighs (about 3-1/4 lb.), skin removed
  • Freshly ground black pepper
  • 1-1/4 lb. waxy potatoes, such as Yukon Gold, cut into 1-inch pieces (about 3-1/2 cups)
  • 1/2 lb. green beans, trimmed and cut into 1-inch pieces
  • 2/3 cup thawed frozen peas
Ingredients for the chili paste.
DSC_5675a
The ingredients are blended together.
Chicken thighs are coated with the chili paste before cooking.

Directions

  1. Put the chiles in a medium bowl and cover with boiling water; set aside to soften for 20 minutes. Drain, then transfer the chiles to a blender.
  2. Add the shallot, lemongrass, tomato paste, smoked paprika, ginger, brown sugar, sambal oelek, cumin, coriander, and 2 tsp. salt. Blend the mixture until smooth, drizzling the broth through the hole in the lid and stopping occasionally to scrape down the inside of the jar.
  3. Generously season the chicken with salt and pepper and spread evenly with the chile mixture. Layer the potatoes in the bottom of a 5- to 6-quart slow cooker and arrange the chicken in an even layer on top. Cover and cook until the potatoes are fork-tender and the chicken is tender but not falling off the bone, 2 to 3 hours on high and 6 hours on low. (The curry can stay on the keep-warm setting for up to 3 hours.)
  4. About 45 minutes before serving, turn the slow cooker to high (if it was on low or keep-warm), sprinkle the green beans evenly over the top, cover, and cook until crisp-tender, about 30 minutes. Add the peas and cook until heated through, about 10 minutes. Stir to combine, season to taste with salt and pepper, and serve.

DSC_5684a


January 9, 2016 Spicy Slow Cooked Short Ribs with Lime and Basil

DSC_5664aI received my first slow cooker, a Crock Pot, almost thirty four years ago as a wedding present. It’s a very basic model,  just a low and high setting, no timers or special functions. Even though I have never replaced the glass lid that broke many years ago, I have other lids that fit just fine and it works as well today as the day I got it. I confess that in recent years my crock pot didn’t get much use, maybe just a little foodie snobbery on my part, only on Thanksgiving to keep soup warm or for hot apple cider. Then last February Joe used it to cook a short rib recipe from an article in a magazine as part of the multi course meal he treats me with every year for Valentine’s Day.

Before Christmas I discovered my brother and sister in law were in need of a slow cooker and I decided it would be a great and very practical gift.  I did some research and found one that I thought would fit the bill.  Not only can you slow cook in this model, you can brown your meat, steam vegetables or fish and it has a “keep warm” function that keeps your finished dish warm up to eight hours. Little did I know that when I was doing my research my hubby was looking for one for me as well. That meant my sister in law and I received new slow cookers (Cuisinart brand) as Christmas presents. It was the first gift I opened Christmas morning since Joe was anxious to recreate the recipe for our Christmas dinner.

The recipe for spicy slow cooked short ribs with lime and basil came from an article with recipes, Slow Cooker Secrets, in Fine Cooking magazine. Cookbook authors Bruce Weinstein and Mark Scarbrough wrote the article in conjunction with their recently published, The Great American Slow Cooker Book. Their goal in writing this book was to achieve the best results from an appliance that is found over 80% of American homes. They have found that the low and slow temperatures and the high moisture environment of the slow cooker are the perfect combination for braising all kinds of dishes. The busy cook can prepare their meal early in the day, set it and forget it while at work or doing other things.

Short ribs are a perfect match for the slow cooker. The meat is dense and well marbled with connective tissue that softens during the long cooking process.  Be sure to get English cut short ribs which are cut parallel to the bone rather than cut across the bone. Ribs cut across the bone are referred to as flanken cut and are used for Korean style short ribs.  Even though our slow cooker has a browning function, Joe thought he would achieve higher temperatures and better browning in a skillet. Once browned, the ribs are set aside and the onion is added to the same pan and cooked until soft. Additional aromatics, ginger, thyme, chilis, garlic, nutmeg and allspice are the next additions to the pan. The original recipe uses Thai bird chilies cut in half, we used whole (frozen from the garden) for a little less heat.

The next step is small but adds a unique flavor to the sauce.  A half cup of lime marmalade is stirred into the onions and aromatics.  Lime marmalade is found in the British section of many larger supermarkets and I think it’s tangy sweetness is worth looking for. If you can’t find it, orange marmalade is a good substitute, just add a little fresh lime juice and peel.

Add this sauce to the slow cooker insert, stir in soy and chicken broth and nestle your short ribs in the sauce. The ribs are cooked on low for 9 hours or 5-6 on high. The final step is to move the finished ribs to a platter, then defat and finish the sauce. Stir chopped basil into the sauce and season with salt and pepper to taste. Garnish with additional basil leaves. We made this twice in the week between Christmas and New Year, once with bone-in short ribs, the other time with boneless, both were delicious. The short ribs were incredibly tender and the sauce was spicy with a delicious citrusy tang.   We served this with soft polenta finished with some Parmesan to sop up the juices. A definite keeper for us.

The recipe uses English style short ribs, perfect for the slow cooker.
Brown the short ribs in a skillet or your slow cooker insert.
After the meat is browned, the onion and aromatics are added to the pan.

DSC_5638a

DSC_5642a
Adding the browned short ribs to the slow cooker insert.
My new Cuisinart slow cooker.
Nestling the browned short ribs into the sauce.


Spicy Short Ribs with Lime and Basil

Serves four

Ingredients

  • 1T peanut oil
  • 3lb bone-in short ribs
  • 1 medium onion, chopped
  • 6 small Thai bird chilies, stemmed and halved lengthwise
  • 2 medium cloves garlic, quartered
  • 1 3-inch piece of ginger, thinly sliced
  • 1t dried thyme
  • ½t ground allspice
  • ¼t freshly grated nutmeg
  • ½c lime marmalade
  • ½c lower salt chicken broth
  • 2T soy sauce
  • 1T white wine vinegar
  • 2T finely chopped fresh basil leaves; plus small leaves for garnish
  • Kosher salt and freshly ground pepper

Directions

  1. Heat the oil in a 12-inch skillet (or removable insert).
  2. Add half the short ribs, turn once, brown well.
  3. Transfer ribs to a bowl, repeat with remaining ribs.
  4. Add onion and cook stirring often until soft (about 3 minutes).
  5. Add chiles, garlic, ginger, thyme, allspice and nutmeg
  6. Stir until fragrant (about 1 minute).
  7. Add marmalade and stir until melted.
  8. Pour contents into slow cooker insert, if you were cooking in a skillet.
  9. Stir in broth and soy sauce.
  10. Nestle the ribs into the sauce pouring the meat juices into the pot.
  11. Cover and cook until fork tender (5-6 hrs on high or 9 hrs on high).
  12. The cooked ribs can stay on the “keep warm” setting for up to 2 hrs.
  13. Use tongs to transfer the short ribs to serving bowls or a platter.
  14. Strain the sauce, set aside.
  15. Pour the sauce into a saucepan.
  16. Add the vinegar to the sauce, bring to a boil, until reduced by half (about 8 min).
  17. Stir in basil and cook for 1 minute to let the flavors meld.
  18. Season to taste with salt and pepper, pour sauce over the short ribs.
  19. Garnish with small basil leaves.
Short ribs served on a bed of polenta.


January 5, 2016 Roasted Vegetable Salad

DSC_5416aJust because we are in the middle of a chilly (notice I didn’t say cold) and somewhat rainy winter, doesn’t mean that a green salad can’t be part of your meal. I have been using a formula from an article in Fine Cooking to make delicious and interesting winter salads. Hearty roasted vegetable salads combine mixed winter greens with roasted winter vegetables and fruits, nuts, cheeses and dried fruits.

I confess that even though I’m not making the trek out to the greenhouse these days where I still might find some spinach or claytonia, my local supermarkets are providing a varied assortment of fresh salad greens. I always purchase a smaller package because I am more likely use them up before the recommended expiration date. Choose from one of the many blends in your produce section or go solo with baby arugula or spinach.

Winter root vegetables are the next component in the salad. I line my pan first with parchment paper for easy clean up.  Uniformity is the key here, cut everything into a 3/4 inch dice or wedge and toss with a little olive oil and some kosher salt. If you choose to roast red beets they will need to be on a pan of their own so they won’t bleed into the other fruits and vegetables. High heat cooking carmelizes and brings out the sweetness in the vegetables and fruit. Just remember not to crowd the pan or you will end up steaming them.

Dried fruit balances out the bitterness of the greens, for this recipe I chose dried cherries. Some aged Gouda brings another layer of flavor and toasted slivered almonds add a little crunch. Toss the salad with a simple fruity vinaigrette, I combined a tangy red apple vinegar with toasted almond oil from the Tubby Olive.

Roasted Vegetable Salad

Ingredients

  • 4 generous cups winter greens such as spinach, arugula, endive, baby greens-kale, chard etc.
  • Roasted root vegetables and fruit, I used a combination of red and gold beets, and a firm tart apple such as a Braeburn, roasting recipe follows
  • ¼c toasted slivered almonds
  • 1/3c diced aged Gouda
  • 3T dried cherries
  • Kosher salt and freshly ground pepper
I roasted red and golden beets along with apples. Toasted almonds and dried cherries complemented the flavors nicely.


For the vinaigrette

Ingredients

  • 2T red apple balsamic vinegar
  • 1t honey
  • ½t Dijon mustard
  • 3T toasted almond oil
  • ¼ t grated lemon peel
  • Kosher salt and freshly ground pepper

Directions

  1. Whisk all the ingredients together in a small bowl.
  2. Season to taste with salt and pepper.

For the Roasted Vegetables

Ingredients

  • 6c mixed root vegetables and fruit (I used red and golden beets and apples) trimmed and cut into ¾ inch wedges
  • Olive oil to coat the vegetables
  • Kosher salt

Directions

  1. Position racks in the upper and lower third of the oven. Preheat oven to 450°F.
  2. In a large bowl combine the golden beets with the apples. Toss them with a little oil and some kosher salt. Transfer them to a large parchment lined heavy duty baking sheet and spread out in a single layer. Repeat the process with the red beets and transfer to their own baking sheet.
  3. Roast, flipping over with a spatula halfway through and rotating the baking sheets. The vegetables should be browned and tender.  It took me about 18 minutes, watch carefully so you don’t burn them.
Roasted golden beets and apples, red beets were roasted separately.


Directions for assembling the salad

  1. Put the greens in a bowl large enough to toss them. Drizzle the greens with about 2T of the vinaigrette. Toss the greens well and add a little more dressing if necessary. Arrange greens on salad plates or a large platter.
  2. Season the roasted vegetables lightly with some of the remaining vinaigrette. Arrange them over the greens, then top with the nuts, cheese and fruit.
  3. Serve with freshly ground pepper and additional dressing if desired.

DSC_5417a