The feast of the seven fishes is a tradition of often disputed, sometimes confusing origins. The “hot button” issue here seems to be, is the tradition Italian or Italian-American?Italian-Americans who believe seven fishes began in Italy are quite passionate in their beliefs. They believe the feast originated in southern Italy and Sicily where seafood is abundant. Others propose that it originated with Italian American immigrants, celebrating the prosperity and bounty of the new world. It is referred to as “Festa del sette pesci” (feast of the seven fishes) or “La Vigilia” (the vigil) referring to the old Roman Catholic tradition of fasting or refraining from eating meat before a holy day, in this case, Christmas.
I became aware of the seven fishes tradition several years ago at my local seafood purveyor, Hellers. The long lines of people waiting for the store to open in the days before Christmas piqued my curiosity. I also noticed some different items in their refrigerated cases for the occasion: fresh octopus, eel and a dried salt cod called baccala. It interested me enough to do my own research and add my own spin on it for our Christmas eve dinner.
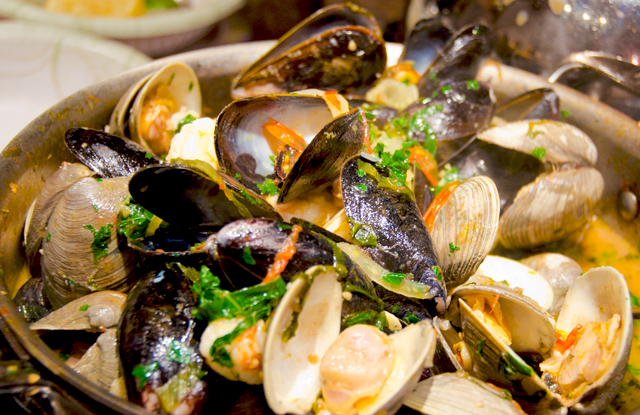
Why seven fishes? Some say it is for the seven sacraments of the Catholic church, or the seven hills of Rome, and others, the seven virtues: faith, hope, charity, temperance, prudence, fortitude and justice.The exact number of fish to be eaten is another question. Numbers range from three, for the three wise men or the Trinity, to thirteen in reference to Jesus and his disciples. Whatever the number, it is a tradition in it’s third year for us, small courses with an interesting variety of not just fish but all kinds of seafood to usher in Christmas. This year, I counted eight types of seafood: calamari, clams, oysters, shrimp, crab, mussels (with shrimp and clams making a second appearance in the soup), scallops and sole.
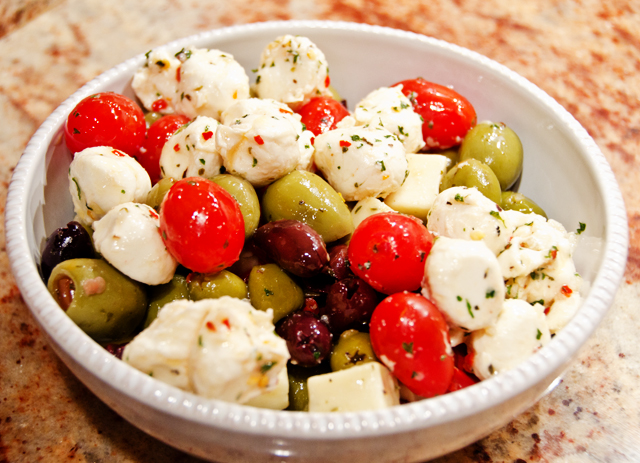
We started the evening with a little antipasti to stave off any hunger pains.
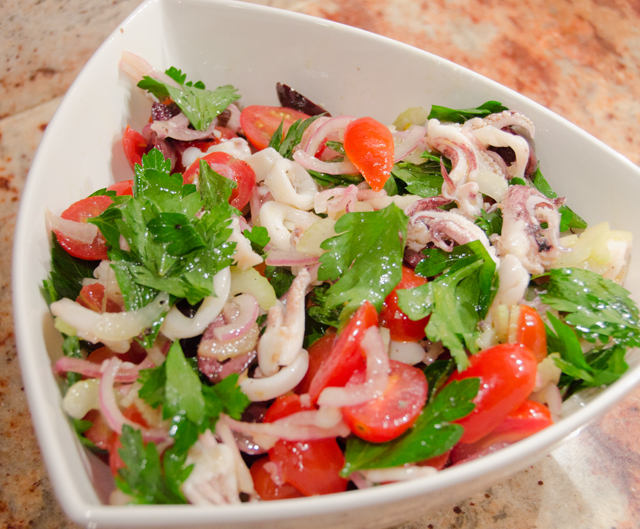
The first course was a cold calamari salad, very light and refreshing.
Nik brought fresh, briny Chesapeake Bay oysters that were harvested that day.
Obviously these were enjoyed, with a squirt of lemon, horseradish or cranberry-pear balsamic vinegar.
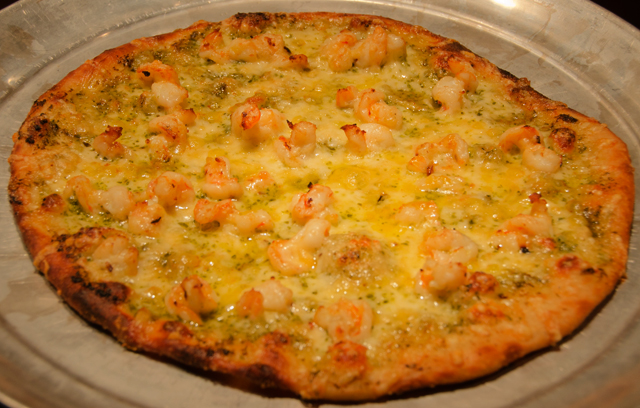
A thin crust pesto and shrimp pizza was the next course.We enjoyed stuffed clams next.
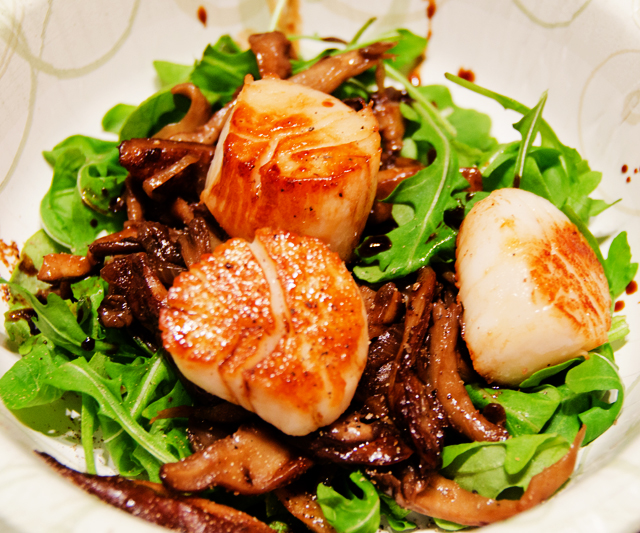
Seared scallops on a bed of baby greens with sauteed wild mushrooms.Joe’s homemade crab ravioli were ethereal and delicious with a simple herb beurre blanc.
A few of our guests found it necessary to take a nap during dinner!
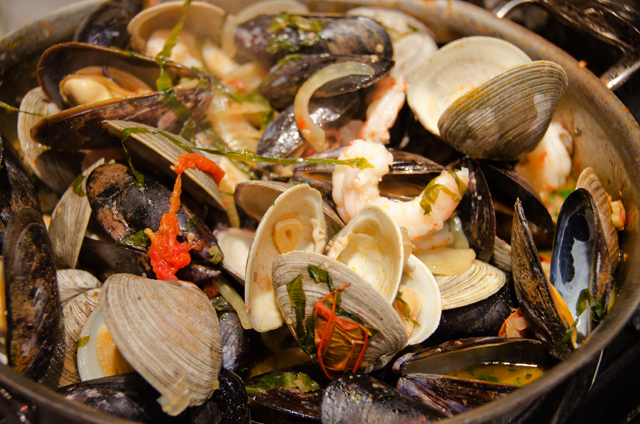
Michy’s seafood stew combines shrimp, clams and mussels.
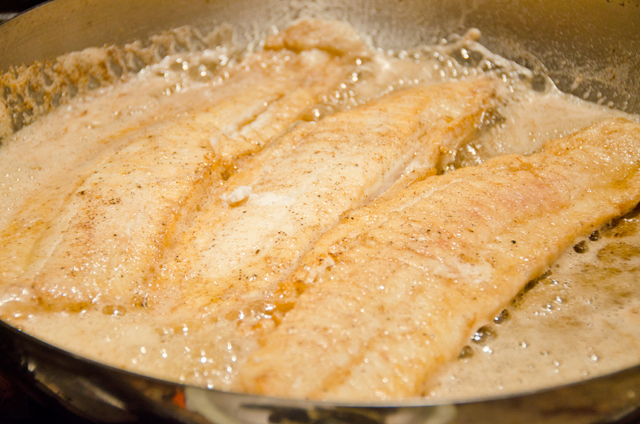
We finished off the evening with lemon sole with lemon and capers.
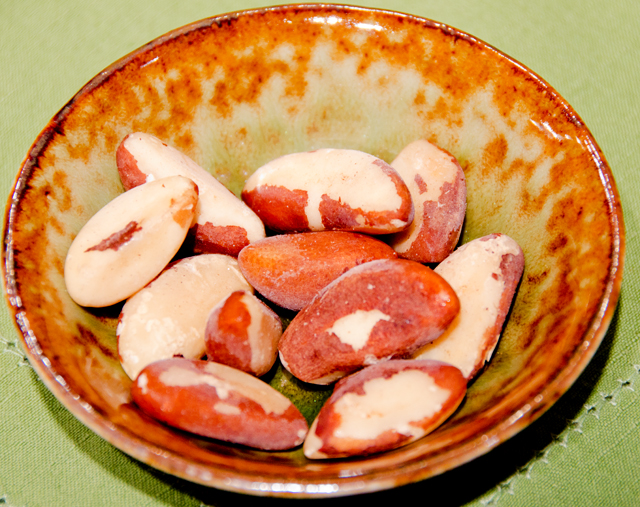
When I was a little girl, my parents received quite a few trays of cookies and other treats at Christmas time from Dad’s co-workers, friends and relatives. These treats were not to be savored until a few days before Christmas. For me, it wasn’t the candy canes, fancy cookies and homemade sweets that tempted me the most, it was the tin of salty mixed nuts that sat inside one gift basket. Once the lid was open I dove in for my favorites, past the walnuts, cashews, almonds, hazelnuts and red-skinned peanuts, directly to my target, the Brazil nuts. Salty, rich, meaty in flavor, they stuck out like little thumbs.
The “almonds of the Andes” are grown not only in Brazil but in Bolivia and Peru as well. Found in the Amazon rain forest, Brazil nut trees can reach 150 feet in height and 6 feet in diameter. The Brazil nut grows inside a dark brown fruit the size and shape of a small coconut. A pod in the center of the fruit holds 12-24 nuts, packed neatly like orange segments. Harvesters wait for the 4 to 6 pound pods to drop, a potentially hazardous situation.
I didn’t know it at the time but Brazil nuts have amazing health benefits. They are rich in selenium, a trace mineral and antioxidant that has been linked to cancer prevention, mood lifting and immunity support. They are also a good source of vitamin E and mono unsaturated fatty acids, which increases HDL or “good” cholesterol. Of course, along with that comes a high calorie content, so as with many things, moderation is key.
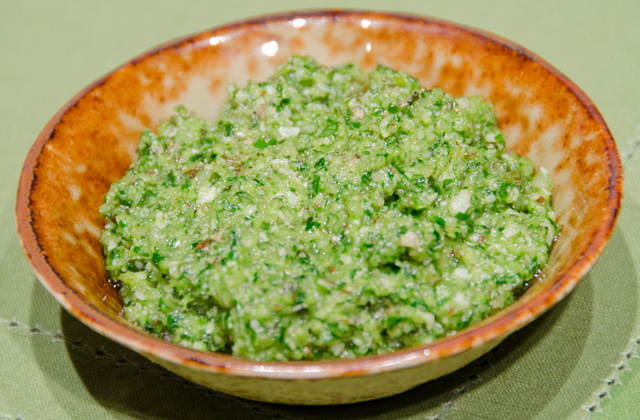
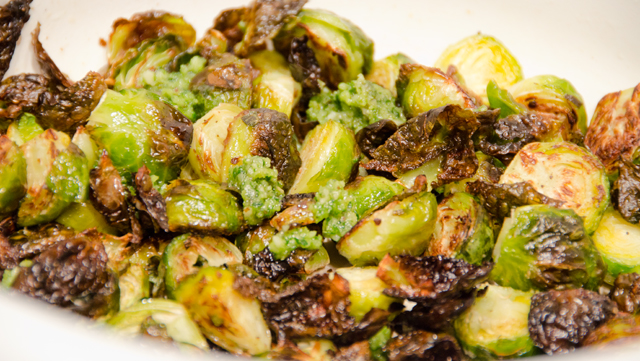
In this version of pesto, flat leaved parsley and just a touch of anisey tarragon take the place of basil. Brazil nuts have a sweet, creamy texture that add a richness to this pesto. I like tossing Brazil nut pesto with roasted vegetables like Brussels sprouts, but it would be equally as good tossed with pasta or topping a fish like salmon.
Roasted Brussels Sprouts with Brazil Nut Pesto
Ingredients
1/2c coarsely chopped flat-leaved parsley
1/4c Brazil nuts, coarsely chopped
2T water
1T chopped tarragon
1 large clove garlic, chopped
1/2t finely grated lemon zest
5T extra-virgin olive oil
3T freshly grated Parmesan cheese
Kosher salt and freshly ground pepper
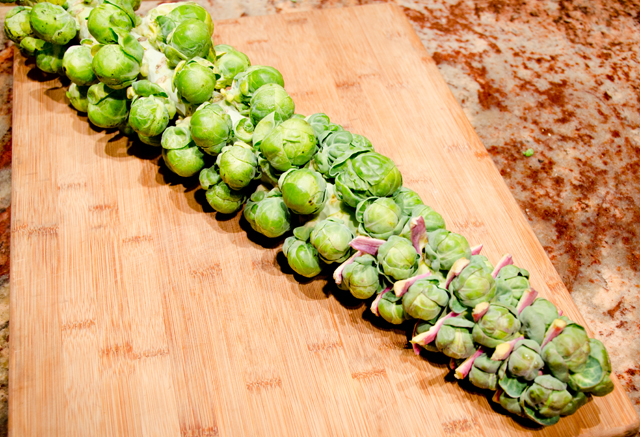
1 1/2 lb Brussels sprouts, trimmed, cut in half lengthwise
Directions:
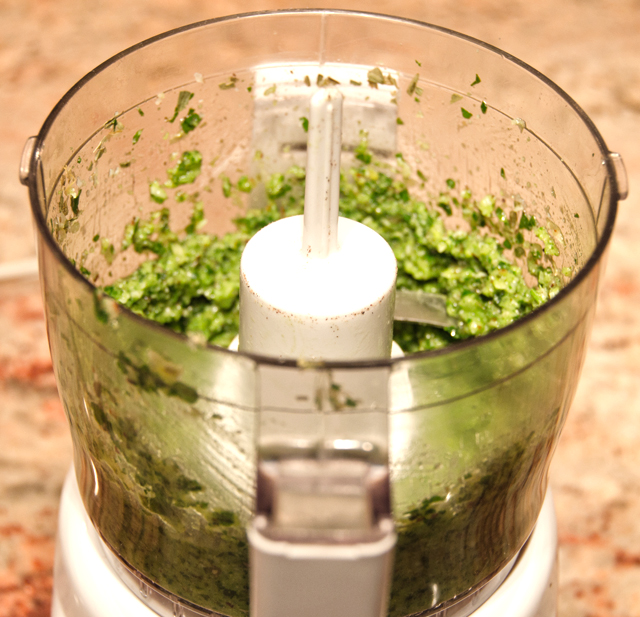
Preheat the oven to 500°. In a mini food processor, combine the parsley with the Brazil nuts, water, tarragon, garlic and lemon zest and pulse to a coarse paste. Add 3 tablespoons of the olive oil and the Parmesan and process to a slightly smooth paste. Season with salt and pepper.
On 2 large, rimmed baking sheets, toss the Brussels sprouts with the remaining 2 tablespoons of olive oil and spread in an even layer. Season with salt and pepper. Roast the Brussels sprouts in the center of the oven for 8 minutes. Use a spatula to loosen and move the sprouts around for even roasting. Switch the baking sheets and continue to roast for about 8 minutes longer, or until the sprouts are browned and crisp-tender. Transfer the Brussels sprouts to a platter, drizzle the pesto on top, toss lightly and serve.
Just a half cup of Brazil nuts is needed in this recipe.The mini processor is all you need to make a quick batch of pesto.
Brazil nut pesto is good with roasted vegetables, fish or pasta.
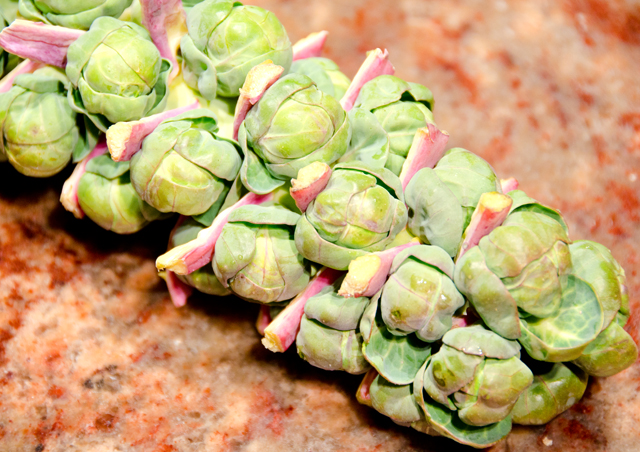
Brussels sprouts grow on stalks that range from 24-48 inches.
A broken foot put me out of commission and out of the kitchen for way too many weeks. During that time my sister in law Jody’s birthday occurred, and now that I am back on my feet I wanted to commemorate her special day, about two months after the fact! Jody is a lover of all things peanut butter. Her wedding shower even featured a table exclusively of various peanut butter treats. I decided on peanut butter and jam bars, so we could enjoy them for dessert after Sunday dinner and I could send some home with everyone for later.
In this classic combination of flavors, creamy peanut butter, crunchy peanuts and tangy sweet strawberry jam combine to make a delicious bar cookie. It’s a nice mix of sweet and salty, crunchy and soft. Interestingly, Ina’s original recipe is titled Peanut Butter and Jelly bars, even though Ina calls for raspberry jam in hers. The classic duo, of course would be the childhood favorite, peanut butter and grape jelly. Feel free to substitute the jelly/jam of your choice. After much deliberation, I used strawberry jam.
Don’t skip the parchment layer, it will make your life easier when you remove the cooled cookies from the pan. I increased the amount of peanuts in my nut topping and chose honey roasted salted peanuts, because I like a little salty with my sweet. The next time I make these bars I will sprinkle some of the nuts on the jam so they will stick better before I crumble on the streusel topping. When I cut my bars this time I had too many escaped “errant nuts” that I had to push back on or consume in the name of neatness!!
The yield stated for the bars according to the original recipe is 24. I would most likely cut them on a 6×4 grid. However, as a former caterer I would be inclined to cut them even smaller, especially if they were going to be part of a dessert buffet. I have always found that the smaller the portion, the more likely someone will take one. That way your guests can sample a larger variety of sweets with a little less guilt. The bars keep best in the refrigerator and they get better with time, if you can keep them that long.
I must conclude with my rant concerning the ever shrinking world of product sizes. When Ina first developed this recipe in the kinder and simpler world of 2005, a standard 18 ounce jar of peanut butter and an 18 ounce jar of jam or jelly would be used for the recipe, leaving no leftovers. In late 2008, Unilever Brands, makers of Skippy, reduced the size of their standard 18 ounce jar of peanut butter to 16.3 ounces. The jar still looks exactly the same in shape and size, but there is a “dimple” in the bottom that reduces the content by about 10%. I am loyal to Skippy but if you are a “choosy mother”, you will find an additional ounce in your 17.3 ounce jar of Jif. So, what to do, reduce the amount of peanut butter in the recipe by about 2 ounces? I think not. The next size jar is 28 ounces, so 10 ounces of Skippy creamy peanut butter is waiting for the next recipe, another batch anyone?
Peanut Butter and Jam Bars
Yield 24 bars
From Barefoot Contessa at Home
Ingredients
1/2 lb (2 sticks) unsalted butter, at room temperature
1 1/2 c sugar
1 t pure vanilla extract
2 extra-large eggs, at room temperature
2 c (18 ounces) creamy peanut butter (recommended: Skippy)
3 c all-purpose flour
1 t baking powder
1 1/2 t kosher salt
1 1/2 c (18 ounces) raspberry jam or other jam or jelly of your choice
1 c honey roasted salted peanuts, coarsely chopped
Directions
Preheat the oven to 350 degrees F.
Grease a 9 by 13 by 2-inch cake pan. Line it with parchment paper, then grease and flour the pan.
In the bowl of an electric mixer fitted with the paddle attachment, cream the butter and sugar on medium speed until light yellow, about 2 minutes. With the mixer on low speed, add the vanilla, eggs, and peanut butter and mix until all ingredients are combined.
In a small bowl, sift together the flour, baking powder, and salt. With the mixer on low speed, slowly add the flour mixture to the peanut butter mixture. Mix just until combined.
Spread 2/3 of the dough into the prepared cake pan and spread over the bottom with a knife or offset spatula. Spread the jam evenly over the dough. Drop small globs of the remaining dough evenly over the jam. Don’t worry if all the jam isn’t covered; it will spread in the oven. Sprinkle with chopped peanuts and bake for about 45 minutes, until golden brown. Cool completely and cut into squares.
Parchment makes it easier to pull the bars out after they cool.
Our Thanksgiving dinner always begins with a bowl of satisfying warm soup. Whether it’s made with kabocha, Hubbard or butternut, squash soup has become the traditional starter of our annual feast. Butternut squash soup with cider cream is an Epicurious recipe that originated in a November 1998 Bon Appetit article about soups and salads written by one of my favorite cookbook authors, Betty Rosbottom.
Butternut squash has a sweet nutty flavor, similar to a pumpkin and is a good source of fiber and vitamins B, C and E. In this recipe cubed squash, celery, carrots and leeks are sauteed until softened. Tart Granny Smith apples, fragrant sage and thyme are added along with chicken stock and cider. The addition of apples and apple cider lighten the consistency of the soup. Use a tart apple like a Granny Smith to offset the natural sweetness of the squash. Wonderful aromas will fill your kitchen as the soup simmers. I chose not to add the heavy cream called for in the original recipe, I felt the velvety texture of the butternut squash gave the soup sufficient creaminess. Don’t skip the cider cream in this recipe. It adds a creamy, cool tanginess that contrasts nicely with sweet nutty flavor of the soup. I am pleased to say that the leeks and the sage I used in this recipe were from the garden. Since our chives died back after the first snow and I can’t bear to spend a fortune for an herb that we have in such abundance in season, I chose to garnish with toasted pumpkin seeds. Both the soup and the cider cream can be prepared a day or two ahead. Reheat the soup in a crock pot on a low setting and you will have time to pay attention to other last minute menu details.
Butternut Squash Soup with Cider Cream
Epicurious from Bon Appetit, November 1998
Ingredients
5 T butter
2½ lb butternut squash, cubed and roasted (about 6 cups)
2 c chopped leeks (white and pale green parts only; about 2 large)
½ c chopped peeled carrot
½ c chopped celery
2 small granny smith apples, peeled, cored, and chopped
1½ t dried thyme
½ t dried sage leaves
5 c low salt chicken broth
1½ c apple cider, divided
⅔ c sour cream
1/2 c toasted pumpkin seeds
Directions
Melt butter in heavy large pot over medium-high heat. Add squash, leeks, carrot and celery. Saute until lightly softened, about 15 minutes. Mix in apples, thyme and sage. Add broth and 1 cup cider; bring to boil. Reduce heat to medium-low, cover, and simmer until apples are tender, stirring occasionally, about 30 minutes. Cool slightly.
Working in batches, puree soup in a food processor until smooth. Return soup to pot. Or puree with immersion blender. Season to taste with salt and pepper.
Boil remaining apple cider in heavy small saucepan until reduced to ¼ cup, about 5 minutes. Cool. Place sour cream in small bowl. Whisk in reduced cider.
Ladle soup into bowls and serve with dollop of cider cream and a sprinkling of pumpkin seeds.
Saute chopped squash, leeks, carrots and celery in butter until slightly softened.Your home will smell wonderful as the soup simmers.
I have always loved to make bread. Not that I was always good at it, in fact many of my first loaves were less than stellar. Armed with my Betty Crocker and Good Housekeeping cookbooks, I made multiple attempts at white, wheat and whole grain breads. My biggest problem was yeast, or my lack of success in proofing it. The loaves would turn out flat and leadened, thrown outside as crumbs for the birds. My father used to say, the birds wouldn’t even eat my bread, it was too heavy to fly away with! I am happy to say that my tenacity paid off and have made many delicious loaves since those days.
I have a sizable collection of books dedicated to breads in my cookbook library. One of my favorites is The Bread Bakers Apprentice authored by Peter Reinhart, former professional baker and current baking instructor at Johnson and Wales University. The first half of the book is set up like a well written text book. In this section he examines bread making through mastering the twelve stages of baking. Reinhart’s desire is to empower his readers not to be dogmatic but to follow the “spirit of the law”; bakers who understand their options and thus will be able to bring about their desired outcomes. The second half are the recipes or formulas as he refers to them, with accompanying beautiful photography.
It was a cup of leftover mashed potatoes that inspired me to make his Potato Rosemary bread for Thanksgiving dinner. The bread is a two day process. The first day, the biga is made, a preferment of bread flour, water and yeast that rises once and ferments overnight in the refrigerator. The second day the biga is mixed into the other ingredients to make a delcious fragrant loaf. Scented with fresh rosemary, the potatoes give the bread a soft, tender texture and the optional roasted garlic gives it an extra dimension of flavor. The roasted garlic is easy to do. My method is to cut enough of the tops off of the garlic to expose the cloves. Place the garlic on a sheet of aluminum foil large enough to wrap them in. Drizzle a little olive oil over the cloves, wrap them up and bake in a 375F oven for about 45 minutes. The fragrant toasty brown cloves will easily slip out of their skins. Potato rosemary bread is a fantastic recipe that will complement your dinner table on any occasion.
Biga, is the Italian version of a preferment. It improves the flavor and structure of the bread.
Roasted garlic adds another dimension of flavor.
The biga after a rise and an overnight ferment in the refrigerator.Seven ounces of the biga go into this recipe. Refrigerate or freeze the remainder for another use.
The bread is shaped into two round loaves or boules and placed on a parchment lined baking sheet dusted with cornmeal.Allow the finished loaves to cool for at least an hour before serving.
Days to make: 2
Day 1: 2 1/2 to 4 hours biga.
Day 2: 1 hour to de-chill biga; 12 minutes mixing; 4 hours fermentation, shaping and proofing; 20 to 45 minutes baking.
Ingredients for the biga
2 1/2c unbleached bread flour
1/2t instant yeast
about 1c of water at room temperature
Ingredients for the bread
1 1/4c Biga
3 c plus 2T unbleached bread flour
1 1/2 t salt
1/2 t black pepper, coarsely ground (optional)
1 1/4 teaspoons Instant yeast
1 c mashed potatoes
1 T olive oil
2 T coarsely chopped fresh rosemary
3/4 c plus 2T to 1c water, at room temperature (or warm if the potatoes are cold)
4T coarsely chopped roasted garlic
Semolina flour or cornmeal for dusting
Olive oil for brushing on top
Biga
Directions
Stir together the flour and yeast in a 4-quart bowl (or the bowl of an electric mixer). Add the water, stirring until everything comes together and makes a coarse ball (or mix on low speed for 1 minute with the paddle attachment). Adjust the flour or water, according to need, so that the dough is neither too sticky nor too stiff. (It´s better to err on the sticky side, as you can adjust easier during kneading.)
Sprinkle some flour on the counter and transfer the dough to the counter. Knead for 4 to 6 minutes (or mix on medium speed with the dough hook for 4 minutes), or until the dough is soft and pliable, tacky but not sticky. The internal temperature should be 77° to 81°F.
Lightly oil a bowl and transfer the dough to the bowl, rolling it around to coat it with oil. Cover the bowl with plastic wrap and ferment at room temperature for 2 to 4 hours, or until it nearly doubles in size.
Remove the dough from the bowl, knead it lightly to degas, and return it to the bowl, covering the bowl with plastic wrap. Place the bowl in the refrigerator overnight. You can keep this in the refrigerator for up to 3 days, or freeze it in an airtight plastic bag for up to 3 months.
Dough
Directions
Remove the biga from the refrigerator 1 hour before you plan to make the bread and weigh out the portion you need, the above recipe makes more than twice that amount. Refrigerate or freeze the remainder for another recipe.
Stir together the flour, salt, black pepper, and yeast into a 4-quart mixing bowl (or the bowl of an electric mixer). Add the biga pieces, mashed potatoes, oil, rosemary and 3/4 cup plus 2 tablespoons water. Stir with a large spoon (or mix on low speed with the paddle attachment) for 1 minute, or until the ingredients form a ball. Add more water, if neccesary, or more flour, if the dough is too sticky.
Sprinkle flour on the counter, transfer the dough to the counter, and begin to knead (or mix on medium speed with the dough hook). Knead for about 10 minutes (or 6 minutes by machine), adding more flour if needed, until the dough is soft and supple, tacky but not sticky. It should register 77° to 81°F. Flatten the dough and spread the roasted garlic over the top. Gather the dough into a ball and knead it by hand for 1 minute (you will probably have to dust it with flour first to absorb the moisture from the garlic). Lightly oil a large bowl and transfer the dough to the bowl, rolling it around to coat it with oil. Cover the bowl with plastic wrap.
Ferment at room temperature for about 2 hours, or until the dough doubles in size.
Remove the dough from the bowl and divide it into 2 equal pieces. Shape each of the pieces into a boule. Line a sheet pan with baking parchment and dust lightly with semolina flour or cornmeal. Place the dough on the parchment, separating the pieces so that they will not touch, even after they rise. Mist the dough with spray oil and cover loosely with plastic wrap.
Proof at room temperature for about 2 hours or until the dough doubles in size.
Preheat the oven to 400°F with the oven rack on the middle shelf. Remove the plastic from the dough and lightly brush the bread with olive oil. You don´t need to score this bread, but you can if you prefer.
Place the pan in the oven. Bake for 20 minutes, then rotate the pan 180 degrees for even baking. The loaves will take 35 to 45 minutes total to bake. The loaves will be a rich golden brown all around, and the internal temperature should register at least 195°F and make a hollow sound when thumped at the bottom. If the loaves are fully colored but seem too soft, turn off the oven and let them bake for an additional 5 to 10 minutes to firm up.
Remove the finished loaves from the oven and cool on a rack for at least 1 hour before serving.