February 25, 2013 Yu Sheng

 DSC_8524 copy

Yu sheng is definitely not a traditional Chinese New Year dish though similar salad recipes have always existed in China. It is a contemporary dish unique to the Chinese communities of both Singapore and Malaysia. Though debated by some, the most popular and generally accepted story of the salad’s origins came from the 1960’s at the upscale Cathay Hotel in Singapore. Four chefs, referred to as the “heavenly kings” were brought together years earlier by a Hong Kong master chef with the intention of introducing Cantonese cuisine to the world. At the passing of the master chef, the heavenly four went their separate ways, each commanding his own restaurant. The chefs still got together on a regular basis to exchange ideas and create new dishes, and yu sheng was the most memorable of these creations.
In English, yu sheng literally means “raw fish” but it is a homophone for another Chinese word that means abundance. Yu sheng is traditionally served on the seventh day of the new year celebration, when man was created,  also referred to as “everyone’s birthday”. It is said that eating yu sheng will bring diners good fortune and prosperity in the new year.  The salad should have at least seven ingredients. Each ingredients has it’s own symbolism.

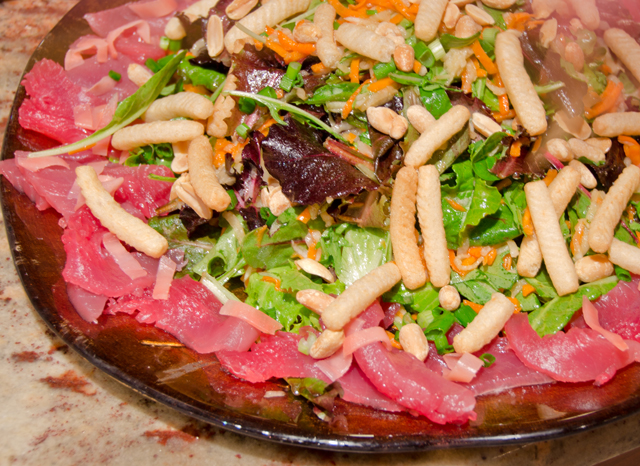
The ingredients we chose were

lettuce:  symbolizing harmony and wealth

carrots: eminence 

daikon radish:  success

pickled ginger: good luck

raw fish: abundance

peanuts: longevity

shrimp chips: resembling gold bars and the wealth they bring.

Fish choices for yu sheng on the many menus and recipes I consulted included salmon, mackerel and abalone but our fish of choice has always been pristine sushi grade tuna. Other ingredients that might be found in yu sheng include dyed sweet potato, papaya, jellyfish, pomelo and candied fruit. When the salad is tossed the diners call out “lo hei” which means to mix it up but it also sounds like a word that means to prosper more and more. The higher the toss, the better the luck in the coming year.

Yu Sheng

Serves 2-4

Ingredients

Salad

  • 5-6 cups of mesclun lettuce
  • 1/4 lb sushi grade tuna, sliced thinly
  • 2 carrots, shredded
  • 1 3″ section of daikon radish, shredded, squeezed to remove excess liquid
  • 1/4c red pickled ginger cut into thin strips
  • 1/2c roasted, unsalted peanuts, chopped coarsely
  • Shrimp chips

Directions

  1. Place lettuce in a serving bowl and top with shredded carrot and daikon
  2. Top with pickled ginger, tuna and peanuts. Place shrimp chips around the outer rim of the plate.

Dressing

  • Juice of two limes (about 1/4c)
  • 1/3c plum sauce, chopped if too chunky
  • 2T Toasted sesame oil
  • 3T Canola oil
  • 1/4t five-spice powder

Directions

  1. Whisk salad dressing ingredients together in a small bowl. Taste and correct seasoning as needed.
  2. Pour dressing over salad and toss high for a happy and abundant new year. Lo hei!

February 10, 2013 Spicy Sichuan Noodles

DSC_8417a

Searching out new and unusual ingredients has always played an important part in my “joy of cooking”.  In the olden days (the eighties) and  b.i. (before Internet), the hunt would involve trips to ethnic markets, phone calls to vendors and an ever-growing stack of mail order catalogs to aid in my search.  Gardening has always given us the ability to grow fresh herbs and vegetables that were not readily available in our markets. There was one elusive spice that I encountered in Chinese cookbooks that wasn’t just hard to find, but unavailable for many years in the United States, Sichuan peppercorns. 

Banned in 1968, Sichuan peppercorns were safe for human consumption. The real concern here was citrus canker, a disease the imported spice could carry and infect the foliage of citrus plants in the United States. The ban was lifted in 2005 when it was discovered that heating the peppercorns to 170 degrees, killed the bacteria that harmed plants.

Sichuan peppercorns are not true peppercorns or chilies but tiny crimson berries that come from the prickly ash trees that grow in the mountainous regions of Sichuan province. The first taste of a Sichuan peppercorn on the tongue starts with the impression of a mentholy flavor with some lemony overtones followed by a numbing tingle in the mouth.  According to Harold McGee, author of “On Food and Cooking”, Sichuan peppercorns can produce the same effect as carbonated drinks on the lips and tongue. Combined with chili peppers or ginger, they create a taste combination unique to Sichuan cooking, ” ma la ” or the spicy and tingly sensation left in the mouth after eating a dish with this combination.  Ma means both anesthetic and “pins and needles” in Chinese. La, of course, is the spicy part of the equation, provided by chills and ginger.

Spicy Sichuan Noodles showcases the ma la combination very nicely. Using the original recipe as a starting point, we recreated a dish as best memory would allow. It was one of many dishes that we shared with friends in an excellent Sichuan restaurant hidden away in a New Jersey strip mall. Dry roasting the Sichuan peppercorns releases their aromatic oils and brings out their flavor. Only roast the amount you will be using in a recipe since the oils dissipate quickly. In our version, we chose to stir fry, not deep fry the pork. We also chose thicker udon noodles instead of Chinese egg noodles and added some roasted peanuts on top for extra crunch. Noodles are always a part of the Chinese new year celebration, as they symbolize longevity. Noodles should never be cut, even when eating. Twist those noodles around your chopsticks for a long life.


Spicy Sichuan Noodles

Adapted from “The Taste of China” by Ken Hom

Serves 4-6 as part of a Chinese meal, 2-4 as a single dish

 Ingredients

  • 1 tablespoon Sichuan peppercorns
  • 1/2 pound ground pork
  • 3 tablespoons dark soy sauce
  • 3 teaspoons salt
  • 3T peanut oil
  • 3 tablespoons chopped garlic
  • 2 tablespoons finely chopped peeled fresh ginger
  • 5 tablespoons finely chopped scallions
  • 2 tablespoons sesame paste or smooth peanut butter
  • 2 tablespoons chili oil
  • 1 cup chicken stock
  • 12 ounces fresh or dry Chinese egg noodles
  • 1 T toasted, chopped peanuts

Directions

  1. Heat a wok or heavy skillet over medium heat. Add the peppercorns and stir-fry for about 5 minutes until they brown slightly and start to smoke. Remove them from the heat and allow them to cool, then grind them. Set aside.
  2. Heat the same wok over medium high heat and add 1T oil. When the oil is hot add the ground pork, stirring with a spatula to break up the pieces. Add the dark soy sauce and continue to cook pork until browned, about four minutes. Remove pork with a slotted spoon and drain on paper towels.
  3. Bring a 3-4 quart pot of water on the stove to a boil.
  4. Reheat the wok with the 2 tablespoons oil and stir-fry the garlic, ginger and  4 tablespoons of the scallions for 30 seconds, then add the peanut butter or sesame paste, the remaining soy sauce and salt, the chili oil and chicken stock. Simmer for four minutes. Return the pork to the pan and stir.
  5. Cook the noodles in the boiling water two minutes if they are fresh, five minutes if they are dried. Drain in a colander. Transfer them to a serving bowl or individual bowls. Ladle on the sauce and top with the  pork mixture. Sprinkle with the ground Sichuan peppercorns, toasted peanuts, scallions and serve.

DSC_8455a

DSC_8432a

February 5, 2013 Chinese Dumplings-Potstickers

DSC_8388a

Dumplings are important part of the Chinese New Year menu. They are considered lucky because they resemble ancient Ming dynasty coins, silver and gold ingots called yuan bao. Dumplings symbolize wealth and hopes for a profitable future. Some cooks will hide a gold coin in a dumpling. The person who finds the coin will find good fortune in the new year, as long as they don’t bite down or swallow the coin!

Dumplings can be steamed, boiled or pan fried and can be wrapped in various styles. The wrappers are easily found in most supermarkets, usually near the produce section. Wonton wrappers are square and gyoza wrappers are round. I find the thickness of either depends on the manufacturer. Last year, needing a new challenge, I learned how to make my own. The dough is very simple, just flour and water, either cold or very hot, I had better results with the very hot water.  Chinese cooks prefer Gold Medal all purpose bleached flour for dumpling making, its slightly lower gluten content produces the best results. Higher gluten flour produces a less than ideal tough chewy skin.

I like to make my filling first, preferably the day before I am filling the dumplings. Chilling makes it easier to handle and portion between the dumplings. For the dumpling wrapper recipe I chose to weigh my flour for the most accurate results. A cup of flour weighs 4.5 ounces, so 10 ounces is a generous two cups. I made my dough in the food processor, adding the just-boiled water slowly until it was absorbed by the flour. Because of the extremely dry conditions that day, I am certain the dough absorbed a bit more water than what would be typical  Place the dough in a quart bag to let the gluten in the dough relax for at least an hour. Dumpling wrappers are rolled out the same way as the pork bun dough was in this post. After struggling with a standard rolling pin, Joe made me a small one that made the task much easier.

I made two varieties, potstickers and beggars purses. Potstickers are just that, dumplings that are browned on the bottom in a little oil first. Water is added to the pan, a lid is put on the pan and steam finishes them in the second part of the process. Dumplings of any variety can be frozen for future snacking. Just remember to spread the uncooked dumplings out on a lightly greased cookie sheet, making sure the dumplings are not touching. Place the cookie sheet in the freezer for several hours. Now the dumplings can be stored in freezer bags until you are ready to use them. Partially thaw before cooking the dumplings.

Dumpling Dough

from Asian Dumplings, author  Andrea Nguyen

Ingredients

  • 10 oz (2 cups appx.)  all purpose flour
  • 3/4c very hot water

Directions

  1. Weigh or measure out your flour and add to food processor bowl fitted with the metal blade.
  2. With the machine running, slowly add the water through the feed tube allowing it to be absorbed by the flour until a ball is formed. Do not over process!
  3. Place the ball of dough onto a work surface and knead until uniform and smooth. The dough should be firm and silky to the touch and not sticky.
  4. Place the dough ball in a quart-sized bag and seal. Let dough rest for at least an hour
  5.  After the rest, pull out the dough and cut it into 4 roughly equal sections. Roll each section into a 1-inch thick log, then cut each log into 9 pieces. Shape each piece into a thick coin or disc. Lightly flour the top and bottom of each disc.
  6. I placed my discs between the front and back of a cut up quart sized freezer bag and stamped down with my marble mortar to make a circle.
  7. Use a dowel rolling pin to press on just the outer edges of the disc. Roll back and forth once, then rotate the disc. Roll, rotate. Roll, rotate. Add a little flour if necessary to keep it from sticking and tearing.
  8. You don’t want to make your wrappers too thin.They need to be thick enough to hold whatever filling you’re going to put in it. The final dumpling skin should be just over 3 inches in diameter. This recipe should make about 36 wrappers. Cover wrappers with plastic until using.
DSC_8324a
My repurposed baby scale gives exact measurements!


DSC_8327a
Dumpling dough just relaxing for a little bit.
DSC_0790a
A marble mortar and a quart-sized freezer bag helped make my dumpling circles.


 Pork and Shrimp Filling for Potstickers

From Fine Cooking #103

Ingredients

  • 2 c finely chopped napa cabbage
  • 8 oz. ground pork
  • 8 oz. peeled, deveined raw shrimp, coarsely chopped
  • 3 medium scallions, thinly sliced
  • 3 large cloves garlic, minced
  • 2 T Shaoxing (Chinese rice wine) or dry sherry
  • 1T grated fresh ginger
  • 1 T soy sauce
  • 2 t toasted Asian sesame oil
  • 1/2 teaspoon granulated sugar
  • Freshly ground black pepper
  • 36 very thin, 3-inch circular, store-bought pot sticker or gyoza wrappers
  • 2 tablespoons peanut or vegetable oil

Directions

For the filling

  1. In a medium bowl, toss the cabbage with 2 teaspoons salt and set aside for 30 minutes to release moisture. Wring out in a clean kitchen towel to extract as much liquid as possible.
  2. In a large bowl, combine the cabbage with the pork, shrimp, scallions, garlic, Shaoxing, ginger, soy sauce, sesame oil, sugar, and 1/4 teaspoon pepper. Stir until well mixed. Refrigerate for at least 20 minutes and preferably overnight.
DSC_8334a
Pork and shrimp filling on a dumpling round.

To form the dumplings

  1. Spoon 1 to 2 teaspoons of the filling onto a dough wrapper, fold it in half, and make your first pinch at the center of the curved edge and then pleat toward the center on both sides to create a rounded belly. This wider shape allows the dumplings to sit upright in the pan and form a flat surface for browning.
  2. Repeat with the remaining wrappers and filling. As you work, arrange the filled dumplings in a single layer without touching on large plates, so they don’t stick together.
  3.  Heat 2 Tbs. vegetable oil in a heavy-duty 10- or 12-inch skillet over medium-high heat until shimmering. Working quickly and in batches if necessary (adding more oil for the second batch if needed), arrange the dumplings belly side down in concentric circles starting from the outer edge. Cook until golden brown on the bottom, 1 to 2 minutes.
  4. Pour in about 1/2 cup water or enough to come about a third of the way up the sides of the dumplings, bring to a boil, cover, and cook until all of the water has been absorbed, 2 to 3 minutes. Remove the lid, reduce the heat to medium, and continue cooking just until the dumplings are dry and crisp on the bottom, 1 to 2 minutes. Loosen the dumplings from the pan with a spatula.
  5. Invert the pan over a plate to flip the dumplings, browned side up, onto the plate (or transfer with a spatula). Serve immediately with your choice of dipping sauce.
DSC_8397a
Potstickers, ready to serve with some dipping sauce.

 DSC_8406a


February 2, 2013 Chicken and Black Bean Soup

DSC_8312a

Last week I made chicken and black bean soup or should I more accurately describe it, cooking by the power of suggestion. Our ladies Bible study group is currently in a series on the book of Nehemiah. The teacher of the series, Kelly Minter is a self described foodie and each chapter of the study ends with a few of her favorite recipes. This past week there was a recipe for her favorite Southwest Chicken Soup. I didn’t want to follow her recipe exactly but a concept was set in my mind and the frigid temperatures we were experiencing definitely called for a satisfying warm soup.

The starting point for a good soup is a good homemade chicken stock and I like to have it on hand for impromptu meals like this one. Not only do you benefit from the richer flavor of homemade but you can control the amount of salt in your recipe.  Another plus is that when your homemade stock has been cooled and refrigerated, the fat separates at the top and can easily be scraped off. Normally when I make stock I simmer the chicken long enough for it to be cooked through. Then I remove the meat from the bones and cook the broth, vegetables and bones a bit longer before straining. But because of Hurricane Sandy and the need to consolidate all of our frozen foods into one freezer, some of my supply of frozen chicken had fallen victim to the dreaded freezer burn.  Not bad, just icy, a little dried out and less than optimal. So I used some boneless and bone in pieces to make this batch of stock. I didn’t waste the chicken, the dogs were quite happy to partake in this batch, supplementing their usual food.

For my soup I used homemade stock, chopped, roasted tomatoes that I froze last summer and a pickled jalapeno from a batch that I canned. I did use canned beans, since the meal was impromptu; I didn’t have time to soak and cook fresh ones. I chose boneless chicken thighs because the dark meat holds up better when reheating a soup, and let’s face it, most soup does get reheated. Good canned chicken broth is a reasonable substitute. I prefer a low sodium version and usually have a few containers of the Pacific brand of both chicken and beef on hand. I seasoned my chicken with Penzey’s adobo seasoning to enhance the flavor profile of the southwest. Substitute a combination of cumin, oregano and cayenne if you don’t have this blend.  A small can of chopped roasted tomatoes could stand in for my garden variety. You get the idea, use what you have. I added the chopped spinach at the end since I knew it didn’t need to cook very long and wanted to give the soup a green vegetable element. We had ours with a salad, maybe a little sour cream top the soup and some crusty bread would also be a welcome addition.

Chicken and Black Bean Soup

Serves 4-6

Ingredients

  • 1 small onion, finely chopped
  • 1T canola oil
  • 3 boneless skinless chicken thighs cut into 1″ pieces
  • 2t Penzey’s adobo seasoning or a combination of cumin, smoked paprika and oregano
  • 1 qt bag roasted tomatoes, chopped or 1 can
  • 1 finely chopped pickled jalapeno (optional)
  • 4-5 c defatted, homemade chicken stock or low fat canned chicken broth
  • 3-4c baby spinach
  • Kosher salt and freshly ground pepper to taste

Directions

  1. Heat chicken stock or broth over medium high heat in a 5 quart Dutch oven until heated through.
  2. In a saute pan, cook  the onion over medium heat until softened but not browned, 3-4 minutes. Set aside.
  3. Sprinkle adobo seasoning over chicken, add to the saute pan and cook, adding a little broth to the pan as needed until slightly browned, 10-12 minutes.
  4. Puree 1/2 c of the black beans in a mini food processor.
  5. Add cooked onion, pureed beans, chopped tomatoes, pickled jalapeno and the rest of the canned beans to the broth. Add cooked chicken and heat through. Add salt and freshly ground pepper to taste.
  6. Soup can be prepared up to 2 hours ahead. Reheat over medium heat. Before serving, add spinach to wilt. Serve in warmed bowls.
DSC_5791b
The first blush on a jalapeno last summer.