March 29, 2014 Roast Pork Tenderloin with Carrot Romesco

DSC_6375aLet’s see, it’s salmon on Monday, leftovers on Tuesday, chicken on Wednesday and pork tenderloin shows up on our dinner menu most Thursdays. Boring you say, well it could be, but I am always on the look out for new ways to season and sauce that low fat and easy to cook cut of  “the other white meat.” Pork tenderloin’s mild flavor lends itself nicely as a canvas for many different cuisines.

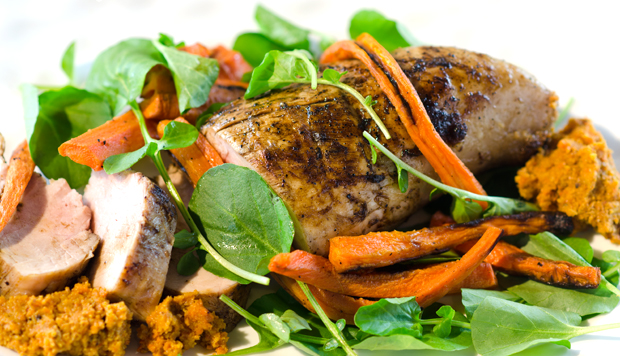
The most basic pork tenderloin recipe we enjoy is seasoned with salt and pepper and topped with a honey mustard rosemary glaze that is brushed on right before the end of cooking. We often enjoy it “Thai style” borrowing from a dish that I have enjoyed at a local Thai restaurant for many years, pork tenderloin in a spicy peanut sauce over a bed of watercress. Looking through some of the recent recipes from Bon Appetit, pork tenderloin with a carrot Romesco seemed to be quick and intriguing enough to give a try.

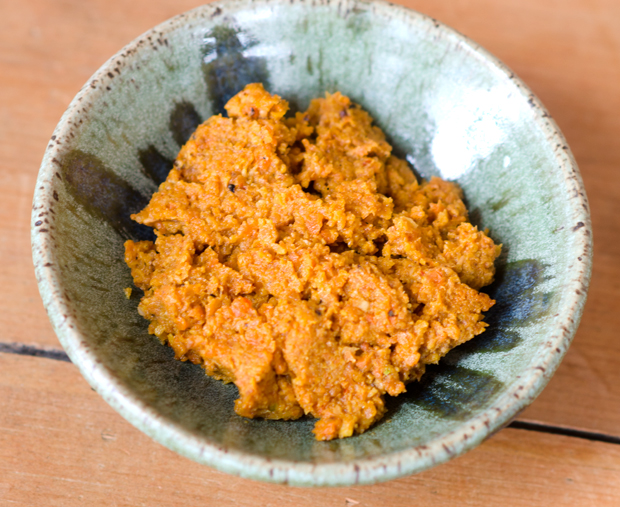
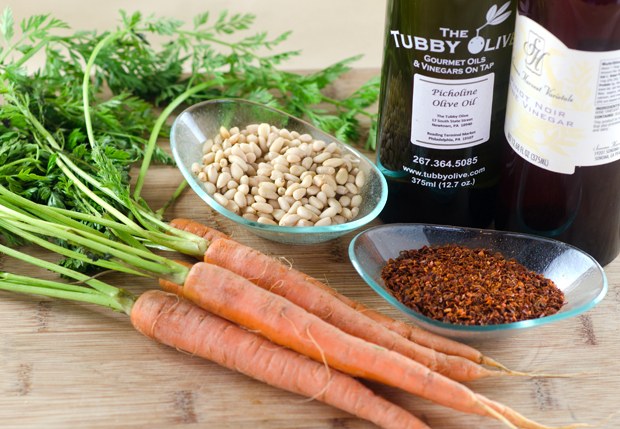
I am quite familiar with Romesco, a Spanish sauce of roasted peppers, tomatoes, garlic and almonds and even wrote about it here. Bon Appetit’s new version combined roasted carrots with garlic and pine nuts, definitely stretching the definition of Romesco. It does mimic the rough texture of the classic sauce, reminiscent of pesto. The roasted carrots bring a body and sweetness to the sauce that nicely compliments the pork.

Resist overcooking the pork tenderloin, nothing is worse than dried out pork.  It should still be somewhat pink in color and will be quite juicy. Remember that because of carry over cooking you should take the tenderloin out of the oven when it is 5 to 10 degrees below your desired temperature. The temperature of the meat will continue to rise after it’s taken out of the oven  I don’t know where Bon Appetit finds their pork tenderloins, I have never encountered one that is a pound and a half. Mine were about 3/4lb each, with two to a package.

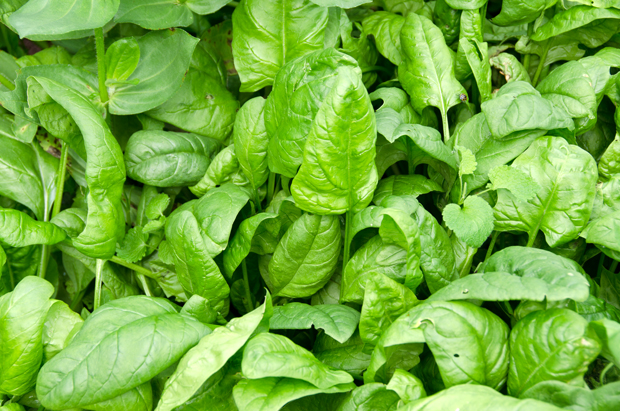
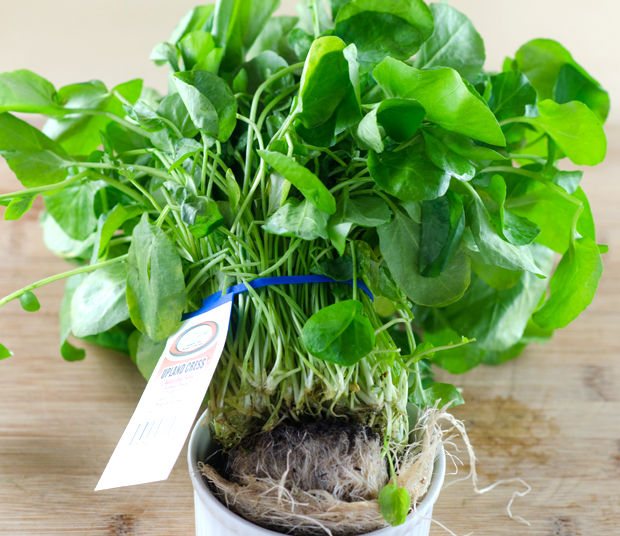
My local market had beautiful hydroponically grown upland cress, also known as creasy greens in the south. It is a cousin of watercress with dark green heart shaped leaves with a slightly more peppery pungent flavor. I used mine right away but for longer storage could have submerged the root ball in a small container of water and kept it at room temperature for a week. I think that toasted almonds would be a good substitute for the pine nuts. Aleppo pepper adds another dimension to the sauce with it’s rich fruity heat with just a hint of tartness. Would I make this again? A definite yes. The sauce was easy to assemble and soon the carrots and the spicy greens I will be using will be harvested from our garden.

DSC_6364aDSC_6368a


Roast Pork Tenderloin with Carrot Romesco

Serves four

From Bon Appetit Magazine April 2014

Ingredients

  • 1/4c pine nuts
  • 1 1/2 lbs. small carrots, peeled and halved if larger
  • 5T olive oil, divided
  • Kosher salt and freshly ground pepper
  • 2 medium pork tenderloins, about 3/4lb each
  • 1 small clove garlic, finely chopped
  • 1 tsp. Aleppo pepper
  • 2T red wine vinegar, divided
  • 2 or more cups spicy greens like cresses or baby mustard greens

DSC_6367a

Directions

  1. Preheat oven to 350°F. Toast pine nuts on a rimmed baking sheet, shaking occasionally until nuts are golden brown, 5-6 minutes. Remove from baking sheet and allow nuts to cool.
  2. Increase oven temperature to 450°F. Toss carrots with 1T oil on another baking sheet, season with salt and pepper. Roast, tossing occasionally, until softened and browned, about 15 minutes; let cool slightly.
  3. Pulse pine nuts, garlic and 3T oil in a food processor to a coarse paste. Add Aleppo pepper, one fourth of the carrots, 1T vinegar and 1T water. Process, adding more water as needed to a coarse paste; season romesco with salt, black pepper and more vinegar if desired.
  4. Brush 1T oil in a large ovenproof grill pan over medium high heat. Season pork with salt and pepper and cook until golden brown grill marks appear on all sides, about 8 to 10 minutes. Transfer the skillet to oven and roast pork until a thermometer inserted into the thickest portion registers 135°F.Remove pork from oven and let rest for 5 minutes before slicing.
  5. Toss greens with remaining carrots and 1T vinegar in a large bowl; season with salt and pepper. Serve pork with romesco and salad.

DSC_6387a

March 26, 2014 Looking for Spring

DSC_0100a


Spring is here, that’s what the calendar says but it certainly doesn’t feel like it. I am looking out at bare trees on a rather gray landscape watching snowflakes dance by the confused robins.

It’s not supposed to accumulate they say and we will see. The beginning of March to me means putting away my heaviest winter sweaters, for Joe, it’s time to plant the peas. I still need the sweaters and the weather has not cooperated for pea planting. With temperatures just yesterday feeling like it was in the teens, the ground has not been ready to work yet. We have seen an occasional crocus and the green of future daffodils but there is a small patch of snow still left over down by the Christmas tree line. We did enjoy spinach just last week from a greenhouse planting of last October.  It was large, crinkly and probably the sweetest spinach I have ever tasted. That is why we garden.

DSC_0005a
Metal cages became a necessity for the pea seeds, makes it harder for the voles to get to them.
DSC_0087a
Not just peas but early spring greens are planted.

DSC_0064aDSC_0117aDSC_2096a

DSC_3424a
Spinach planted in October tastes even better in March after frigid winter temperatures!


March 22, 2014 Winter Market Salad

DSC_6347 copy

A full day of snapping pictures, shooting video and taking in the exhibits at the Philadelphia Flower Show didn’t allow us time to stop for lunch so a “prevening” meal was in order. We headed across the street from the Pennsylvania Convention Center to refuel at the Reading Terminal Market. A descendant of the open air markets that have been in operation in the same general locale since the 1600’s, it is the nation’s oldest continuously operating farmers’ market. A vast array of food choices ranging from Pennsylvania Dutch to Thai to Mexican await hungry visitors. But there’s not just food, the market offers quilts, homemade crafts, fresh flowers and cookbooks.
We did a quick browse of the many vendors and found a place to rest our weary bones, Molly Malloy’s, a restaurant and bar. They offer 24 beers on tap and when possible, locally sourced produce, courtesy of Molly Malloy’s sons, Jimmie and Vinny, the Iovine brothers. They also operate Iovine Brothers Urban Produce Market  in the Reading Terminal Market. We settled in and perused the menu. Starters of butternut squash soup, crispy calamari and carmelized onion and goat cheese flatbread hit the spot. Joe chose the green apple salad and I chose the market salad.
Appropriate for winter with it’s heartier greens, the salad featured kale, radicchio, romaine and shaved brussels sprouts. A tangy mustard seed vinaigrette and some parmesan bacon crisps tied the salad together nicely. Not wanting to get into a salad “rut” I decided to recreate this at home.
I began by tearing the romaine and the radicchio into bite sized pieces. I used a sharp knife to cut the kale into thin strips. If you have a choice, the Lacinato kale works better because the straighter crinkled leaves are much easier to cut into strips. Shave the brussels sprouts as thinly as possible. You could use a mandoline, but that might be a bit risky if you forget to use the guard. Not that I know anyone who would do that. I trimmed the root ends of the sprouts and sliced them with the 2mm blade on the food processor. You could also cut them in half with a knife, turn them cut side down and thinly slice from root to top. Gently tease apart the layers of the sprouts into distinct shreds  The serrano honey vinegar I used in my tangy mustard seed dressing came from another terminal market vendor, The Tubby Olive. I love visiting their store in Newtown, since then they have opened locations in Doylestown and most recently at the Reading Terminal Market.
A crispy salty component comes from the addition of the parmesan crisps. Known as frico in Italy, it is a wafer of shredded cheese, baked until golden. I sprinkled a little crispy bacon over the frico in the last few minutes of cooking.
The most important rule for all tossed salads is the bowl you are tossing in needs to be large enough to hold the ingredients comfortably. Add the dressing a little at a time to coat, not drown your salad. Tongs or very clean hands do the best job of coating the greens. A half of a lonely avocado was a last minute addition to my salad. Though not part of the original recipe I think it worked in quite nicely.

DSC_6339a

Winter Market Salad

Serves four

Mustard Seed Vinaigrette

Ingredients

  • 3T Serrano honey vinegar or 3T apple cider vinegar plus 1t honey and a pinch of chili powder
  • 2t Dijon mustard
  • 8T extra virgin olive oil
  • 2t yellow mustard seeds
  • Kosher salt and freshly ground black pepper

Directions

  1. Mix vinegar and mustard in a small bowl; slowly whisk in oil. Add mustard seeds. Season dressing with salt and pepper.

Parmesan Bacon Crisps

Ingredients

  • 4 ounces Parmesan cheese
  • 2 slices of bacon, cooked until crisp and crumbled

Directions

  1. Preheat the oven to 350 degrees. Line 2 sheet pans with parchment paper.
  2. Grate 2 ounces of the Parmesan using the side of the box grater that finely grinds the cheese and then grate 2 ounces of the Parmesan using the side of the box grater that makes long shreds of cheese, and then mix them together.
  3. Drop rounded tablespoons of the grated Parmesan on the parchment paper to make neat mounds. Bake in the oven for 4 minutes then sprinkle bacon over the crisps, bake an additional 2-3 minutes or until golden.
  4. Cool slightly and loosen with a metal spatula.

DSC_6352a

Salad Assembly

Ingredients

  • 1 small head of romaine lettuce
  • 1 small head radicchio
  • 4 leaves of Lacinato kale
  • 12 Brussels sprouts
  • Mustard seed vinaigrette
  • Parmesan bacon crisps
DSC_6335a
Brussels sprouts shredded in the food processor.

Directions

  1. Wash romaine and radicchio leaves and tear into 1 inch pieces. Spin dry in a salad spinner
  2. Wash the kale leaves and cut the leaves away from the stems. Cut the leaves into 1/2″ ribbons
  3. Trim the bottoms of the Brussels sprouts, slice in half lengthwise and either slice in a food processor with a 2mm blade or slice thinly with a sharp knife from root to top.  Gently tease apart the layers into distinct shreds.
  4. Add romaine and radicchio to a large bowl. Top with kale strips and shredded Brussels sprouts.
  5. Toss salad with the mustard seed vinaigrette. Serve parmesan bacon crisps on the side. Season salad with additional fresh ground pepper.

DSC_6342a


March 12, 2014 Red Snapper with Red Curry Sauce

DSC_6318a


Times certainly have changed. Ten years ago, shopping for the ingredients for red curry carrot sauce would have required a trip to the local Asian market. Now, most large well stocked supermarkets have curry pastes, coconut milk and fish sauce needed to make this recipe. Here’s a little background information on the special ingredients.

The base of a red chili paste is dried red chilies. The chilies are combined with dry (cumin seeds, coriander seeds) and wet (lemon grass, ginger, garlic) ingredients to make a paste. Taste a little of the curry paste to get a feel for it’s heat before using. Curry pastes that you would purchase in an Asian market are considerably hotter than their counterparts aimed at American palates. There are many varieties of curry paste, in this case you are first looking for a Thai curry paste, the most popular are red and green, with green being the hotter of the two.

The coconut milk used in this recipe is not the kind that you might have on hand for a Pina Colada. That type has sugar and stabilizers added.  Also coconut milk is not the liquid inside the coconut, that is coconut water. Coconut milk is a liquid made by pureeing coconut meat and water.  Shake the can well before using to mix the cream that rises to the top with the milk. There are also many recipes on line for making your own coconut milk.

Fish sauce is known as nam pla in Thailand and nuoc mam in Vietnam. Amber in color, it is the liquid extracted from fish, usually anchovies, and  fermented with sea salt. This pungent condiment becomes subtle when combined with other ingredients.

The sweetness of the carrots and the creaminess of the coconut milk are balanced with the heat of the curry and the unami of fish sauce. We served red curry sauce with vermillion snapper, a variety that is slightly smaller than red, caught in the south Atlantic and Gulf of Mexico. It is listed as a “good alternative” by the Monterey Bay Aquarium Sea Watch.  The sauce would compliment any moderately firm delicate flavored fish. Remember to look for any pinbones and remove with tweezers before cooking your fish. As always, we use the Canadian fisheries method to determine the cooking time of the fillets.  Serve with jasmine rice to soak up the delicious sauce.

DSC_6281a
Ingredients to make the sauce.

Red Snapper with Red Curry Sauce

Adapted from a recipe in Food and Wine Magazine

Ingredients

  • 3/4lb carrots, peeled and trimmed, cut into 1/4″ pieces
  • 1 clove garlic smashed
  • 1 11/2c low sodium chicken broth or chicken stock
  • 1 can coconut milk (about 13.5 oz)
  • 2T fish sauce nam pla or nuoc mam
  • 2t brown sugar
  • 1 1/2t red curry paste (more or less to taste)
  • 1T canola oil
  • 1lb vermilion or red snapper fillets
  • Cilantro leaves and lime wedges for serving
  • Cooked jasmine or other long grain rice

Directions

  1. In a medium saucepan, bring the carrots, garlic and broth to a boil. Cook, covered, over moderately low heat until the carrots are tender, about 15 minute. Check for doneness with the tip of a knife.
  2. Puree the carrots, garlic, and broth in a blender and pour back into the pan. Add coconut milk, fish sauce, curry paste,, brown sugar and 1/2t salt and bring to a simmer, stirring occasionally.
  3. Preheat your oven to 450°F.
  4. Measure the fillets at their thickest point. Season fish with salt and pepper and place on a baking sheet.
  5. Bake fish for 10 minutes for every inch of thickness. The original instructions say to turn the fish over at the halfway point, you can, we don’t. If you check internal temperatures, it should be about 145°F.
  6. Mound the rice on plates and top with fish and sauce. Sprinkle with cilantro and serve with lime wedges.

DSC_6306a

March 8, 2014 Chicken and Andouille Sausage Gumbo

DSC_6186a

A whole new world opened up to me when I discovered my love of cooking and good food over thirty years ago. To learn as much as I could, I immersed myself in cooking magazines, cookbooks and food programs on television. In the pre Food Network days the only option was the local PBS affliliate. Sure there was Julia, but there was also Nathalie, Madeline and a program called The Great Chefs. The Great Chefs programs were the first to take the television cameras behind the scenes and into the kitchens of the finest restaurants in the world. Two of the those programs, Great Chefs of New Orleans and the Great Chefs Louisiana New Garde became my first encounter with the Cajun and Creole cooking of New Orleans. Probably the first celebrity chef to come out of  that town, even before Emeril, was Paul Prudhomme. I bought his first cookbook, Chef Paul Prudhomme’s Louisiana Kitchen and began cooking away.

We had parties revolving around the food of NOLA, Jambalaya Jams, we called them, featuring the spicy cuisine of that city. We also had the pleasure of visiting New Orleans several times and even dined at K-Paul’s, Prudhomme’s eponymous restaurant. While Joe was busy with medical seminars, I enjoyed some demonstration cooking classes to further my exploration in the cooking techniques of the region. I learned about a very different “holy trinity” than I was familiar with, how simple it is to make “prah-leens”,and that a roux (pronounced roo) was the basis of many of the region’s best dishes.

A New Orleans style roux is a fifty-fifty mixture of flour and oil. The oil, always something neutral like a vegetable oil, is heated to a high temperature, then the flour is added gradually. The flour will first bubble as it releases it’s moisture, then toasts as you continue to stir, and stir you must, constantly. The tool of choice here is a long-handled wooden spoon or heat proof spatula. The well-earned nickname “Cajun napalm” comes from the fact that splattering roux will stick to your skin and result in a nasty burn.  The roux will toast and begin to turn a caramel color and develop a wonderful nutty fragrance. A roux can range anywhere from light brown to almost black. Chef Prudhomme says that Cajun tradition is the darker the meat in the dish, the lighter the roux. A dark roux will provide less thickening since the starch is thoroughly cooked but will impart a richer flavor to the dish. If the roux has black specks in it, or smells burnt, discard it and start all over again. A burnt roux cannot be saved!

Gumbo is a classic New Orleans dish claimed by both Cajun and Creole cooks.  Along with a toasty roux, the flavor base of gumbo is enhanced by the “holy trinity” that I mentioned before, a Creole mirepoix of celery, onion and green pepper.  I chose to make this gumbo with chicken thighs since they stand up well to reheating and some andouille sausage to add a little spiciness and authenticity to the dish. Okra and file powder are traditional thickeners added at the end of the cooking process.  Okra is a green pod that is sliced into rounds and breaks down to thicken the gumbo. Okra, both the plant and it’s fruit contain mucilage. That is why some think okra brings a “slimey” quality to the dish. The other option, filé powder is made with the ground leaves of the sassafras tree. It smells like eucalyptus and adds a certain earthiness to gumbo. Filé powder needs to be added to individual bowls right before serving, cooking it makes it become stringy.

Intrestingly enough either one of these two thickeners could be the origin of the word gumbo. The African Bantu word for okra is “kingombo” and the Choctaw Indians were the first to make and sell filé powder which they called “kombo”.

Gumbo is a great make ahead dish. As with many stews, it tastes even better the next day. Gumbo can be stored in the refrigerator for several days or frozen. Serve over white rice, garnish with chopped scallions and pass around the Louisiana style hot sauce for a satisfying one dish meal.

DSC_6194a


Chicken and Andouille Sausage Gumbo

Serves 6-8

Ingredients

  • 2lbs boneless skinless chicken thighs, cut into 1″ pieces
  • 1t kosher salt
  • 1t garlic powder
  • 1/2-1t cayenne pepper
  • 6c chicken stock or low sodium chicken broth
  • Vegetable oil (1/2 cup plus a little more)
  • 1/2lb Andouille sausage or other spicy sausage, sliced in half lengthwise, then cut into 1/3 inch half moon slices
  • 1/4c Canadian bacon, cubed
  • 1 1/2c finely chopped onion
  • 1c finely chopped green pepper
  • 1c finely chopped celery
  • 3 cloves garlic, finely chopped
  • 2 bay leaves
  • 2t dried thyme
  • Finely chopped scallions
  • Louisiana style hot sauce
  • Hot cooked white rice
  • Filé powder

Directions

  1. Place the chicken in a bowl large enough to hold it comfortably. Mix salt, garlic powder and cayenne in a small bowl. Toss the chicken with the spices and let stand at room temperature for 30 minutes.
  2. Warm the chicken stock over medium heat.
  3. Heat 1 tablespoon vegetable oil in a 7-8 quart Dutch oven over medium high heat until hot, 1-2 minutes. Add the sausage and the Canadian bacon and cook, stirring occasionally with a wooden spoon, until well browned, 4-6 minutes. Transfer to a bowl with a slotted spoon.
  4. Add 2 tablespoons to the Dutch oven and sauté the chicken in several batches until golden brown, about 6-7 minutes. Transfer the chicken to the bowl with the sausage.
  5. Add enough vegetable oil to the Dutch oven to make 1/2 cup. Using a wooden spoon to scrape and loosen browned bits from the bottom of the pot.
  6. Using a long handled whisk, gradually stir in the 1/2 cup flour. Cook whisking constantly. I switched back and forth between a whisk and flat edged wooden spoon to make sure nothing stuck to the bottom of the pan. It will take anywhere from 4 to 8 minutes for the roux to reach a dark caramel color.
  7. Remove the pan from the heat and immediately add the onion, celery, pepper and garlic. Stir constantly to stop the roux from getting darker.
  8. Return pan to low heat and cook until vegetables are soft, about 5 minutes, stirring constantly and scraping the bottom of the pan well.
  9. Stir in the chicken broth, sausage, Canadian bacon, chicken, thyme and bay leaves.
  10. Bring to a boil and then reduce heat and simmer for 30 minutes.
  11. Gumbo can be served immediately or stored in the refrigerator for several days. Reheat gently before serving.
  12. Serve in large soup bowls over cooked rice. Add scallions, filé powder and hot sauce to taste.

DSC_6206a

March 4, 2014 “Masterpizzas”

DSC_4678a

Picasso, Renoir, Monet, artists with different styles but all started their paintings with the same thing, a blank canvas.  A pizza dough can serve the same role.  It becomes the canvas for the toppings you “paint” on your dough. An article in the March issue of Martha Stewart Living, “Modern Masterpizzas” featured pies that were inspired by artists from Picasso to Pollack. These unique brightly colored canvases were the inspiration for the pizza course that became part of the Valentine’s Day menu.  Martha’s pizzas were abstract looking rectangular creations topped with everything from brussels sprouts and delicata squash to a slightly more conventional prosciutto and mozzarella pie.

Joe has always been quite the pizza master. His first job as a teenager was at the most popular pizza shop in the area where he worked his way up from dishwasher to pizza maker. One of his more surprising talents is spinning and throwing pizza dough. So I was certain he would be up to a pizza challenge. He has liked the dough that I have made for several years but decided to use the dough in Martha’s recipe. My dough uses unbleached all purpose flour, Martha’s dough uses bread flour and three times the amount of yeast in the recipe I use. I prefer instant dry yeast in all my pizza and bread recipes. Instant dry yeast does not need to be dissolved in warm water like active dry yeast and can be added with the other dry ingredients. Joe found the dough made with the bread flour tore easily. It definitely rose much more than the pizza dough I make. As Joe put it, dough made with bread flour is not a “spinning dough”. So he worked the dough into the pan, baked it a short time until he could remove the pan and allow the bottom of the crust to brown.

He made two different types of pizza for this occasion. One was topped with an assortment of mushrooms, cremini aka “baby bellas”, shiitake and oyster that were sauteed in butter, olive oil and garlic. After the pizza was removed from the oven, he scattered baby arugula leaves on top. The best of both worlds, pizza and salad.

The other pizza was topped with four Italian cheeses and pancetta.  Like bacon, pancetta originates from pork belly. Bacon is cured by both brining and smoking. Pancetta is cured with salt and pepper but not smoked. Pancetta is readily available these days, even in the “big box” stores. I rewrap it from the original packaging and store it in the freezer for moments like this. Bacon or prosciutto could be substituted for a slightly different flavor profile.

When that pie came out of the oven, he drizzled a little honey over the warm pizza. The saltiness of the pancetta was the perfect contrast with the honey. Honestly, I think I could have eaten  the whole pizza  but used a little restraint, knowing I needed to save my appetite for the many courses yet to come.

DSC_4674a
Mushroom and four cheese pizza on the peel ready to slide back into the oven after a short prebake.
DSC_4677a
The warm mushroom and cheese pizza is topped with baby arugula. Can’t wait for spring and our own greens!


Martha’s Pizza Dough

Makes enough for three 12″ round pies

Ingredients

  • 4c unbleached bread flour, plus more for dusting
  • 1 1/2 t instant dry yeast, I use Fermipan 2 in 1
  • 1 3/4c water at room temperature
  • 2 1/4t coarse salt
  • 1T extra virgin olive oil, plus more for brushing and bowl

Directions

  1. In a large bowl, whisk together the flour and yeast. Slowly add water, mixing with a wooden spoon until incorporated. Stir in salt and oil. The dough will be lumpy and raggedy. Brush with oil. Cover bowl with a dry kitchen towel and let rest 1 hour.
  2. Turn out dough onto a floured surface and pat with flour. Continue to flour your hands as you work. Holding two opposite sides, pull dough until about a foot long, then fold back onto itself and pinch ends together. Repeat 4 more times, rotating dough each time to stretch alternate sides, until it feels smooth.
  3. Place dough in a well-oiled large bowl; brush with oil. Cover with plastic wrap and let rise in refrigerator until doubled in bulk, at least 24 hours and up to 48 hours.
  4. Turn out dough onto floured surface. Cut into 3 equal parts; form into balls. Brush with oil; cover. Let rest 1 hour.
  5. Place dough on fists and use knuckles to begin stretching dough from middle, rotating it slightly as you work. Set on surface and continue to stretch from all sides to form a rough 10-by-14-inch rectangle. Dough may tear at this point, just pinch it back together if that occurs.
  6. Transfer dough to a lightly oiled 12 round or 9-by-13 inch rimmed baking sheet. Pull edges to fill pan.

Wild Mushroom and Four Cheese Pizza  topped with Arugula

Ingredients

  • 2 cloves garlic, finely chopped
  • 1T olive oil
  • 2T unsalted butter
  • 8oz assorted mushrooms, about 3 cupes (Joe used porcini, oyster and shiitake)
  • 1 1/2c shredded four cheese Italian blend.
  • Baby arugula or other micro green
  • One pizza crust from the preceding recipe

Directions

  1. Place pizza stone on the bottom rack of the oven if using. Preheat oven to 500°F.
  2. Over medium high heat melt butter and olive oil in a sauté pan. Add mushrooms and cook until softened, 7-9 minutes.
  3. Brush pizza crust with a thin coating of olive oil. Evenly sprinkle cheese over the crust. Top with the sautéed mushrooms.
  4. Bake until cooked through, the crust should be golden on the edges and the cheese should be golden brown in spots, about 15 minutes. Joe bakes his pizza on the sheet for about 5 minutes, uses a pizza peel to remove the pan and bakes the pie directly on the pizza stone until it is done. This allows the bottom of the crust to brown nicely.
  5. Sprinkle arugula or micro greens over the warm pizza. Slice into 6 pieces and serve.

Honey Drizzled Pancetta and Cheese Pizza

Ingredients

  • 1 1/2c shredded four cheese blend or mozzarella
  • Thinly sliced pancetta to cover the pizza
  • Honey

Directions

  1. Place pizza stone on bottom rack of oven if using. Preheat oven to 500°F.
  2. Sprinkle cheese evenly over the crust. Bake for about five minutes or until it is easy to remove crust from the pan with a pizza peel. Return pizza to oven and continue to bake for another five minutes.
  3. Layer pancetta over the cheese and bake for another 5-7 minutes, until crust is golden around the edges.
  4. Remove pizza from oven with a pizza peel and slide pizza onto a cutting board. Lightly drizzle honey over the pancetta. Slice into 6 pieces and serve.