January 25, 2014 Chicken Salad with Grapes and Pecans

DSC_4428a
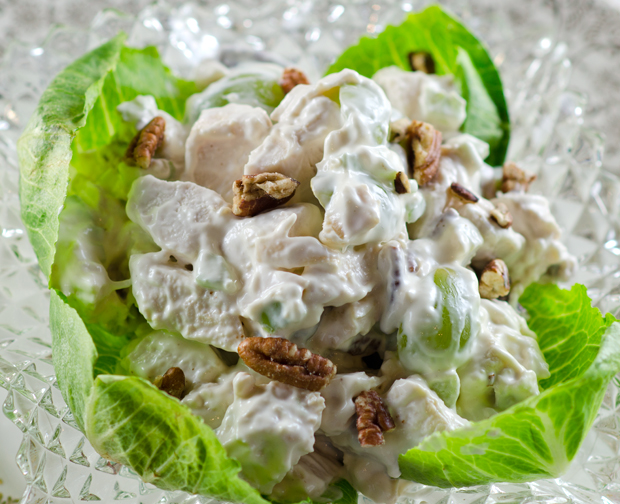
In almost 25 years as a caterer,  Chicken salad with grapes and pecans was a perennial favorite. Whether served in pate a choux puffs on a buffet, on a croissant as a luncheon favorite or in daintily cut tea sandwiches this salad has always been a taste combination that everyone enjoys.

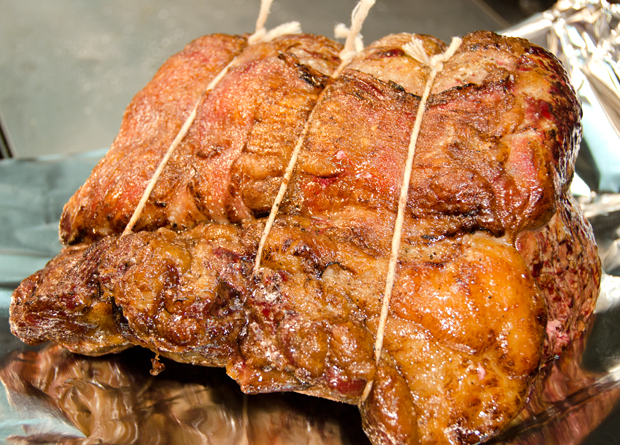
I have no claims for inventing this version of chicken salad, though I have never used a recipe and tweaked it over the years to make it my own. The most important part of the recipe is making sure that the cooked chicken is still moist and juicy. All the mayonnaise in the world won’t cover up dried out chicken breasts. Since I prefer using all white meat, split, bone-in chicken breasts from Bell and Evans are my usual choice but have on occasion used boneless skinless chicken breasts. Just remember the boneless breasts will take less time to cook.

An instant read thermometer is essential here, you are looking for an internal temperature of 160°F in the thickest part of the breast. I like to cook my chicken in convection mode on a wire rack above a parchment or foil lined baking sheet to allow air to circulate so the chicken cooks evenly. Allow the chicken to fully cool before shredding, remembering to shred with the grain.  Pressed for time? Use the meat from an already cooked supermarket rotisserie chicken.

About a cup of finely diced celery has always seemed to be the right proportion to the 5 to 6 cups of chicken. Cutting grapes in half makes for easier eating. It’s like finding a whole cherry tomato in your salad. Do you risk having it burst all over you and the people seated near by when you bite into it or do you stab it with your steely (or plastic) knife to avoid embarrassment? Red or green grapes? Whatever variety looks better the day you are making the salad. Taste a grape before you buy,( trust me, no one is watching), to be sure they are sweet enough.Homemade mayonnaise is always a nice touch but Hellmann’s has always been fine with me.  I use just enough mayonnaise to lightly coat all ingredients. If I have the luxury of time, I refrigerate the salad overnight and add any additional mayonnnaise and the pecans at the last minute to maximize crunch.

Chopped nuts are a less expensive way to buy them, usually in a medium chop which is perfect for the salad. If you choose to toast the nuts, preheat oven to 350°F and spread nuts evenly on a shallow baking sheet. Toast 5-7 minutes, checking halfway through cooking time to give the sheet a little shake and rotate. Walnuts, almonds and cashews are all good substitutes for the pecans. You could also add thinly sliced apple but that would be something I would add right before serving the salad.

I enjoy serving this chicken salad, as I did at a friend’s daughter’s wedding shower, on a bed of bibb lettuce. A basket of freshly baked rolls accompanied the salad for those who wanted to make a sandwich. I love the combination of flavors in this salad, tender juicy chicken, sweet-tart grapes, crunchy pecan and creamy mayonnaise. They make a chicken salad that is hard to beat.

DSC_4424a


Chicken Salad with Grapes and Pecans

Makes 6 cups

Ingredients

  • 3-4 Split chicken breasts, bone in and skin on
  • Olive oil
  • Salt and pepper
  • 1c celery in small dice
  • 1c pecan pieces
  • 1c seedless grapes (red or green) sliced in half
  • 1 to 1 1/4c  homemade or Hellmann’s mayonnaise

Directions

  1. Preheat oven to 350°F. Line a baking sheet with parchment paper or foil and place a wire rack on the sheet. Place chicken on the wire rack, spacing evenly to allow air to circulate.  Brush chicken breasts lightly with olive oil and season with salt and pepper.
  2. Roast chicken until an instant read thermometer inserted into the thickest part of the breast registers 160°F. If the breasts you are cooking are different in size, start checking the smallest at about the half hour mark.
  3. Remove chicken from oven and let sit until cool enough to handle. Remove the skin and pick the chicken off the bones. Tear or chop chicken into 3/4 inch pieces. You will have 4-5 cups of chicken.
  4. In a large bowl, combine chicken, chopped celery and grapes. Add mayonnaise, starting with about 2/3 cup and toss lightly. There should be enough mayonnaise to coat everything lightly.
  5. Add pecans and toss ingredients again, adding more mayonnaise as needed. Taste and adjust seasonings with salt and pepper.


January 19, 2014 Chocolate Dipped Coconut Macaroons

DSC_4413a

The assignment was for a “pick-up” dessert for the wedding shower I was co-hosting with three other friends. Looking for something easy to handle, My mind went first to bar cookies; brownies, blondies, maybe something using a little dulce de leche. Then in the cookbooks and magazines I was looking at I saw it, macaroons, nothing fancy for certain, but a cookie I had been meaning to try.

Macaroons had their ancient roots in amaretti, traditional almond meringue cookies  made from almonds, egg whites and sugar. Possibly originating in an Italian monastery, the name is derived from the Italian “ammacare” meaning to crush or beat, referring to the main ingredient of amaretti, ground almonds.

Tradition says that macaroons arrived in France by way of two Benedictine nuns seeking asylum during the French Revolution. The nuns, referred to as the “Macaroon Sisters” paid for their housing, baking and selling the confection.

Since the leavening in these cookies comes from egg whites, not flour, they were adopted by Italian Jewish bakers as a Passover sweet. The move in later years to shredded coconut was either the product of adventurous bakers or possibly because the almond cookies were often too delicate to transport and coconut made for a sturdier cookie.

The French translation of macaroon is macaron. The macaron is an entirely different cookie with essentially the same basic ingredients. The macarons we have come to be familiar with in the last few years are the multicolored darlings of the Parisian pastry shop. They are an elegant cookie, with a crisp smooth meringue exterior and a filling sandwiched between the layers. Macarons can be filled with jam, fruit curd, ganache or any variation of buttercream.

This recipe is a very easy to make coconut macaroon. The sweetness of the shredded coconut is balanced with the slightly tart dried cranberries and almonds. Like most macaroons, they are gluten free. Though the recipe called for the cookies to be shaped into pyramids, I scooped them out into balls and flattened the bottom. I drizzled bittersweet chocolate over the top, I think they look like little berets. You could also dip the bottoms in chocolate for a neater presentation. The one problem I had with the recipe is a continuation of the ever shrinking package size. The recipe calls for 3 cups or 8 ounces of sweetened shredded coconut. The standard package of that size now is 7 ounce or 2 2/3rds cups. You can decide if you need to buy another bag, I didn’t.  Variations are endless. A tropical version using chopped dried papaya and macadamia nuts drizzled with white chocolate sounds like a delicious possibility to me.

DSC_4403a
Cookies ready to bake on a parchment lined baking sheet.

Chocolate Dipped Coconut Macaroons

Makes about two dozen medium sized macaroons

Ingredients

  • 3 c (lightly packed) sweetened shredded coconut
  • 3/4 c sugar
  • 3/4 c egg whites (about 6 large)
  • 1/3c sweetened, dried cranberries, roughly chopped
  • 1/4c sliced almonds
  • 1 3/4 t vanilla extract
  • 1/4 t almond extract
  • 9 ounces bittersweet (not unsweetened) or semisweet chocolate, chopped
  • 6 T heavy whipping cream


Directions

  1. Mix first 5 ingredients in heavy large saucepan. Cook over medium heat until mixture appears somewhat pasty, stirring constantly, about 12 minutes. Remove from heat.
  2. Mix in 1 1/2 teaspoons vanilla extract and 1/4 teaspoon almond extract. Spread out coconut mixture on large baking sheet. Refrigerate until cold, about 45 minutes.
  3. Preheat oven to 300°F. Line another baking sheet with parchment. Press 1/4 cup coconut mixture into pyramid shape (about 1 1/2 inches high). Place on prepared sheet. Repeat with remaining coconut mixture. Bake cookies until golden, about 30 minutes. Transfer cookies to rack and cool.
  4. Set cookies on rack over rimmed baking sheet. Stir chocolate and cream in heavy medium saucepan over medium heat until melted and smooth. Remove from heat. Mix in remaining 1/4 teaspoon vanilla extract. Spoon glaze over cookies, covering almost completely and allowing chocolate to drip down sides. Refrigerate until glaze sets, at least 2 hours. (Can be made 1 day ahead. Transfer cookies to airtight container and keep refrigerated.)

DSC_4420a

January 9, 2014 Fridge and Pantry Turkey Chili

DSC_4387a

Warm and inviting, there’s nothing like a bowl of chili on a bitterly cold evening. What’s even better is when you can stay in your nice warm house and all the ingredients for that chili are at hand. Having a well stocked pantry doesn’t put you at the mercy of one more supermarket trip every time you follow a recipe or create a new dish on your own. Having basic ingredients on hand means you will be less likely to give up on cooking that night and order another mediocre take out dinner.

Your basic pantry will depend on your personal likes and dislikes. Love chili? Then you should have tomatoes, beans and some good chili powders on hand. Enjoy Asian food? Then your pantry should include soy sauce, oyster sauce, noodles, toasted sesame oil.

Keeping your pantry up to date is an ongoing task. Did you use the last bit of Dijon mustard? Immediately put it on your shopping list so you’re not surprised the next time you need it. When I was catering I had an endless source of materials to work with, now I try to be a bit more discriminating and choose the items we use most. I don’t keep much meat in the freezer, mostly ground turkey and pork tenderloins and try to use them within a month of purchase. Less chance for freezer burn or becoming that frosty mystery meat at the back of the shelf.

My three tiered lazy Susan (never liked that term) holds my spices that I attempt to keep in alphabetical order, not that they always stay that way. Having a varied supply of spices is a definite plus to impromptu cooking. Label everything you put in the freezer. You’re positive you’ll know what that brown sauce is in the container but two months later it will be an unidentified frozen object that is relegated to the garbage pail.

All I needed to do to prepare for this chili was to thaw out the low fat ground turkey and two bags of frozen roasted tomatoes. I am a Penzeys addict and am always looking for new spices and blends to add to my collection in addition to the basic items I purchase. I decided on adobo seasoning, a combination of onion, garlic, black pepper, Mexican oregano, cumin and cayenne pepper to season the ground turkey. When I added the tomatoes to the chili I added chili powder, chipotle chili powder and just a little unsweetened cocoa. Chipotle chili powder gives a deep smoky flavor and the cocoa powder adds a depth of flavor along with richness and a velvety texture. This chili turned out to be only moderately spicy, if you like it hotter, add more chili powder. Usually I would have added kidney beans to my chili but I only had black beans. Corn or another type of bean would be a good addition. Next time I’ll think ahead and presoak and cook the dried borlotto beans from our garden. A simple garnish of  cilantro, sour cream and cheddar to blend into the bowl and you are set for a warm satisfying bowl of chili.

DSC_4382a

Fridge and Pantry Turkey Chili

Serves 4-6

Ingredients

  • 1T olive oil
  • 1 medium onion, finely chopped
  • 1t finely chopped garlic
  • 1 1/4lb ground turkey (mine was low fat)
  • 1T Adobo seasoning
  • 1 28oz can chopped tomatoes (I use my frozen chopped tomatoes)
  • 1T Chili powder
  • 1T unsweetened cocoa powder
  • 1-2T Chipotle chile powder
  • 1T tomato paste
  • 1 can black beans

Directions

  1. In a medium Dutch oven, heat the oil over medium heat. Add the chopped onion and cook, stirring frequently, until the onion is softened, about 5 minutes, add garlic and sauté one minute more.
  2. Loosely break apart the ground turkey and add it to the pot. Gently stir until slightly more separated and sprinkle the adobo seasoning over the meat. Saute the meat until it starts to turn brown, 5-6 minutes.
  3. Stir in the diced tomatoes, tomato paste, medium chile powder, chipotle chili powder and unsweetened cocoa powder. Bring to a boil, reduce the heat to medium low or low and simmer, stirring frequently, until the sauce is slightly reduced and thickened, about 20 minutes. Stir in the black beans and taste, adding more seasonings . Garnish with sour cream, and shredded Cheddar cheese, if you like.
Make Ahead Tips

The chili can be refrigerated for up to two days, if it lasts that long.

DSC_4384a

January 4, 2014 Swordfish with Tomato, Cucumber and Radish Relish

DSC_4354a

A new year and a time for new beginnings. No more lobster bisque with heavy cream, filet wrapped in bacon with blue cheese. Time to put those tempting chocolate caramels topped with sea salt and every imaginable variation of chocolate truffles away for awhile. It’s time to eat healthy again and lose those few extra holiday pounds. As of January 2nd we have embarked on a healthy eating plan. What it doesn’t mean is deprivation.

We both love fish and swordfish steaks are one of my favorites. Swordfish can weigh as much as 1000 pounds but usually average between 50 and 100 pounds. The “sword” accounts for one third of their length. Due to mismanagement and overfishing the swordfish population was dwindling at the end of the twentieth century. After more than a decade of responsible management, the United States swordfish population is thriving. Now the Monterey Bay Aquarium Sea Watch rates North Atlantic swordfish (harpoon and hand line caught) a “best choice”. They are fished all along the North Atlantic coast, from Newfoundland to coastal Florida, wherever and whenever the water is warm.

There is a consumption advisory for swordfish, due to elevated levels of mercury. From what I have read in the most recent literature the health benefits of swordfish outweigh the detriments for most people. Large ocean fish, like swordfish have higher concentrations of selenium, a trace mineral necessary to all functions of the body. Selenium bonds to the mercury in swordfish and prevents the body from absorbing mercury.

Fish markets buy sections of swordfish called wheels, the thickness of which are measured in knuckles. Each knuckle corresponds to one of the fish’s vertabrae. A wheel is either sliced into steaks or quartered into loins. Swordfish flesh is firm, lean and sweet.

As the title of the book says this recipe is fast, easy and fresh. I call this a relish and not a salsa, I know that salsa means sauce but the secondary connotation is that a salsa will have some heat. This recipe is not hot, though that is an option open to the cook. You could add some avocado, red onion, a little celery, a small fresh chili, the options and combinations are many. When I need raw tomatoes out of season I prefer Campari tomatoes. They are small but have the best flavor of any tomato I have tried. Remember never refrigerate any tomato. They lose flavor and quickly become mealy.

Our swordfish piece was on the thin side so all the cooking it needed was a few minutes on each side in a hot grill pan, you want the center of the steak to remain moist. If you can make it through the snow, grilling would be another cooking option. Refer to my previous swordfish post for cooking a thicker piece of swordfish using the Canadian Fisheries method.

DSC_4363a


Swordfish with Tomato, Fennel, Cucumber, and Radish Relish

Adapted from The Bon Appetit Cookbook: Fast Easy Fresh

Serves 2

  • 2 6-to-7 ounce swordfish steaks
  • 3T olive oil
  • 2 t fresh lemon juice
  • 2 tomatoes or 5 Campari tomatoes, diced
  • 1/2c diced pickling cucumber or English hothouse cucumber
  • 1/2c finely diced fennel
  • 4 medium radishes, diced
  • 3 T chopped fresh cilantro

Directions

  1. Spray grill pan with Pam and preheat grill pan to medium-high heat.
  2. Combine the tomatoes, cucumbers, fennel, radishes and cilantro, 3 tablespoons olive oil, and 2 teaspoons fresh lemon juice in a small bowl. Stir to combine and season with salt and pepper.
  3. Timing is always a function of the thickness of your fish. One inch thickness of fish equals 10 minutes cooking time. Measure first!
  4. Sprinkle fish with salt and pepper and grill over a medium-high heat, our fish took  about 4 minutes per side, rotate fish half way through each cooking time to create a crosshatch pattern.
  5. Serve fish with relish.

DSC_4367a

January 1, 2014 Prime Rib

DSC_4341aA prime rib roast is a welcome centerpiece to the dinner table, a culinary highlight of the holiday season. Improper treatment of that piece of meat will waste your money, produce dry unappetizing meat  and leave you and your guests disappointed. So let’s go over the steps for  the perfect prime rib.

First things first, what makes a prime rib prime? The entire rib section of the animal, ribs six through twelve, is known by butchers as a primal cut. A prime rib roast can consist of anywhere from two to seven ribs. Many butchers will cut the prime rib, also known as a standing rib roast into two cuts. Ribs ten through twelve is the narrower end, also known as the loin end or the first cut. Ribs 6 through 9  is the chuck end or the second cut.

Prime rib does not mean that your roast is USDA prime. In fact, it probably isn’t, most prime meat is reserved for high end restaurants and upscale markets. The prime rib you will find at your supermarket will either be graded choice or select. The higher the grade of meat, the more marbling of fat. As always, fat equals flavor and that tenderizes the meat.

I purchase my bone-in roast with the bones cut off but tied back on the roast. Tying the roast makes for a more attractive presentation and keeps the outer flap of meat from overcooking. Bones off makes for easier carving, but the bones add flavor to the au jus that accompanies the roast. Enjoy the beef spare ribs as a chef’s treat the next day. Figure on about a pound of bone in meat per person if prime rib is your only entree.

Steak houses cook their prime rib low and slow in a 120°F degree oven to achieve consistently rosy meat from the center to the outer edges. Since no household oven I know of has a setting that low, we have been using the method for cooking prime rib from Cooks Illustrated magazine for many years with good results.

Now that you have that roast home, first step, up to four days before you cook the prime rib, liberally season the meat with salt. Let the meat sit uncovered in the refrigerator. Salting ahead allows the salt to penetrate the meat, break down some of the proteins and not just flavor the surface of the meat. The day you plan on cooking your roast, bring your roast out of the refrigerator several hours ahead so that the meat comes to room temperature. Preheat your oven to 200°F, place a rack in the lowest setting, of course you checked your oven ahead to be certain it can hold this large piece of meat.

To achieve the dark caramelized exterior that makes a fabulous prime rib Cooks Illustrated instructs you to sear all the edges of the meat in a pan on the stovetop before putting it in the oven. Effective but a little cumbersome and you dirty an extra pan. We used this method for years until we learned a tip from Thomas Keller in his cookbook, Ad Hoc. He browns the outside of his prime rib with a propane torch, not one of those little torches they sell in kitchen stores for crème brulee (yes I have one) a real propane torch. The torch gives you a way to control the flame and start a beautiful crust. Place the roast on a rack in pan you plan to cook it in.  Sear the meat until the fat begins to render and turn brown, The oven will continue to cook your meat and render the fat. The big torch works great also when you are serving crème brulee as well.

Season your meat with freshly ground pepper and place it in the preheated oven.  We start checking the internal temperature of the meat at the 2 1/2 hour point. Look for an internal temperature of 120°F for rare and 125°F for medium rare. It is very important to have a well calibrated thermometer, we rely on our thermapen instant read for accurate results. Meat cooked at higher temperatures will continue to cook and rise in temperature after they are removed from the oven. Since this recipe calls for cooking your roast at a low temperature, the rise in temperature of your roast when you remove it from the oven will be minimal.

Let your roast rest for about 20 minutes for the juices to redistribute. Transfer the meat and carve, serving with the juices. Have guests who don’t like pink meat? Quickly brown those slices in a sauté pan.

DSC_4318a
Prime rib after being aged in the refrigerator for five days.


Perfect Prime Rib

Recipe adapted from Cooks Illustrated, Nov/Dec 95 and Nov/Dec 11 and Ad Hoc

Serves 6-8

Ingredients

  • 1 (7-pound) first-cut beef standing rib roast (3 bones), meat removed from bones, bones reserved
  • Kosher salt and freshly ground pepper
  • 2 t vegetable oil

DSC_4327a

Instructions

  1.  Using sharp knife, cut slits in surface layer of fat, spaced 1 inch apart, in crosshatch pattern, being careful to cut down to, but not into, meat. Rub 2 tablespoons salt over entire roast and into slits. Place meat back on bones (to save space in refrigerator), transfer to large plate, and refrigerate, uncovered, at least 24 hours and up to 96 hours.

    2. Adjust oven rack to middle position and heat oven to 200 degrees. Heat oil in 12-inch skillet over high heat until just smoking. Sear sides and top of roast (reserving bone) until browned, 6 to 8 minutes total (do not sear side where roast was cut from bone). Alternately, place the roast fat side up on a rack in a roasting pan and sear the meat until the fat begins to render and turn gray. Place meat back on ribs, so bones fit where they were cut, and let cool for 10 minutes; tie meat to bones with 2 lengths of twine between ribs. Transfer roast, fat side up, to wire rack set in rimmed baking sheet and season with pepper. Roast until meat registers 110 degrees, 3 to 4 hours.

    3. Turn off oven; leave roast in oven, insert a temperature probe in the roast at this time and quickly close the oven door, minimalizing heat loss is crucial. Set your probe for about 120 degrees for rare or about 125 degrees for medium-rare, 30 to 75 minutes longer.

    4. Remove roast from oven (leave roast on baking sheet), tent loosely with aluminum foil, and let rest for at least 20 minutes.

    5.  Transfer roast to carving board; cut twine and remove roast from ribs. Slice meat into 3/4-inch-thick slices. Season with coarse salt to taste, and serve.

    DSC_4331a