July 7, 2018 Swiss Chard, Gruyere and Ham Frittata

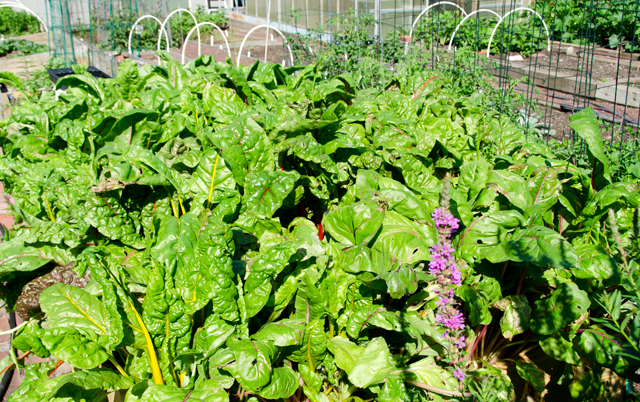
After a cold, very rainy spring, summer has arrived with a vengeance. We are experiencing temperatures in the upper 90’s with humidity that makes it feel like 100 degrees plus. With no real rain in the foreseeable future, drip irrigation and sprinklers are keeping the veggies and berries happy. We’ve had a few Sungold tomatoes, bright yellow blossoms are now producing the first zucchini of the season, tart juicy raspberries are beginning to ripen and we have the earliest eggplants ever.

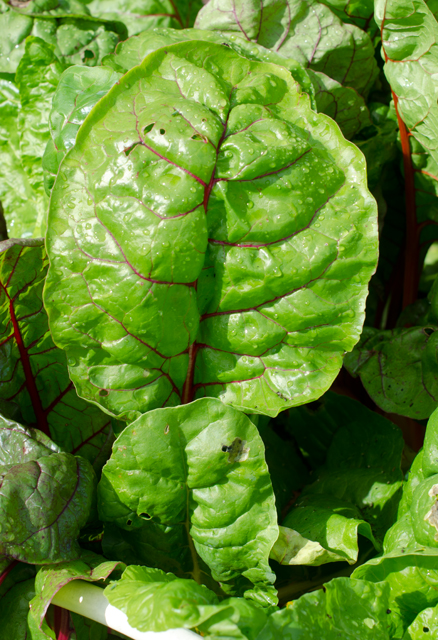
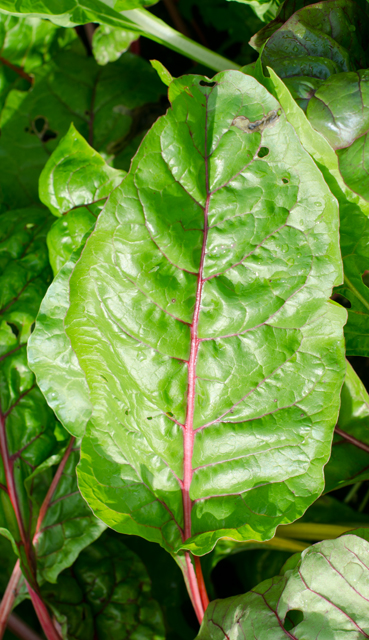
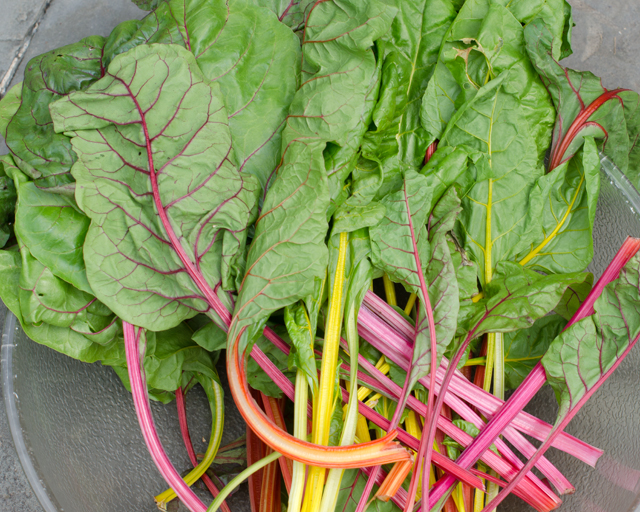
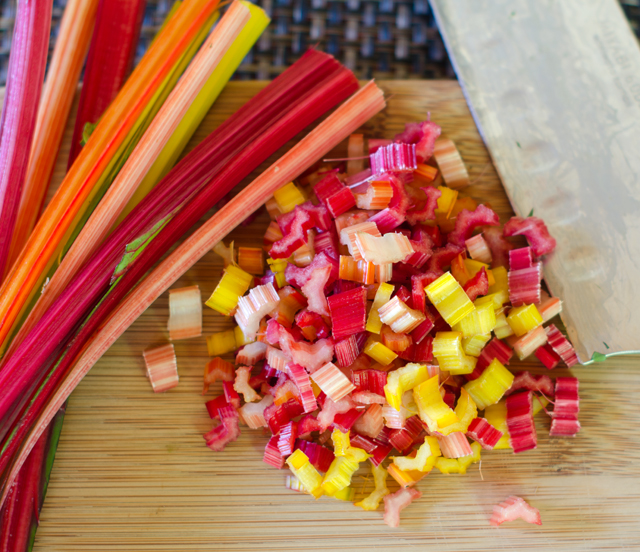
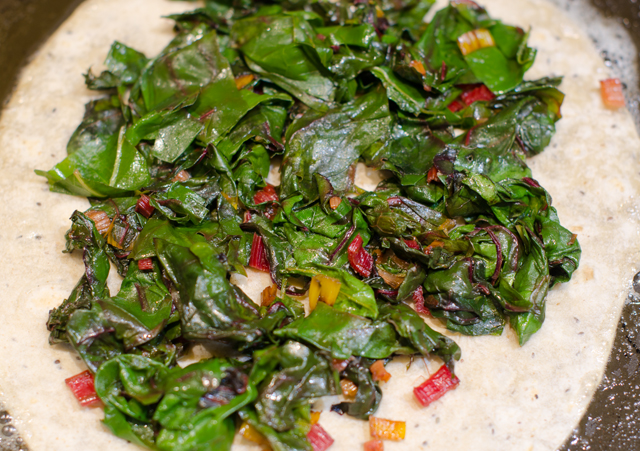
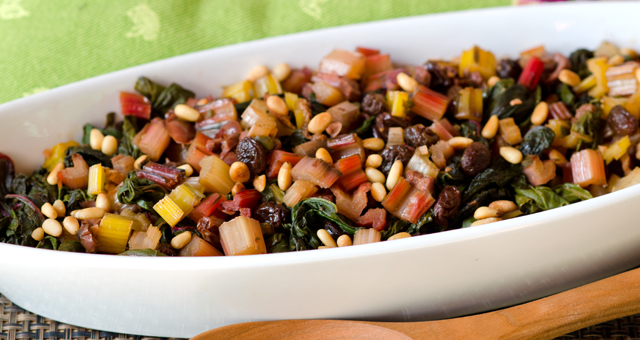
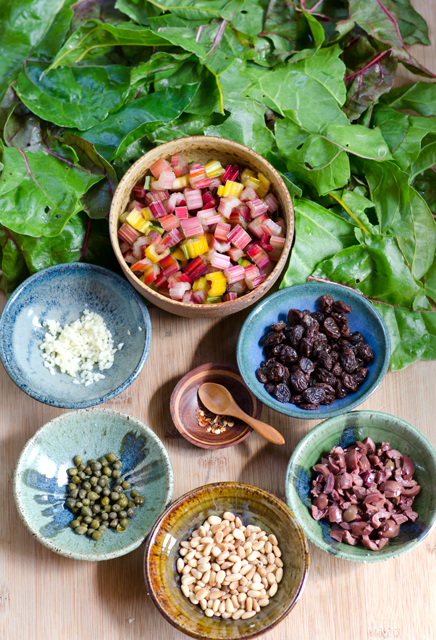
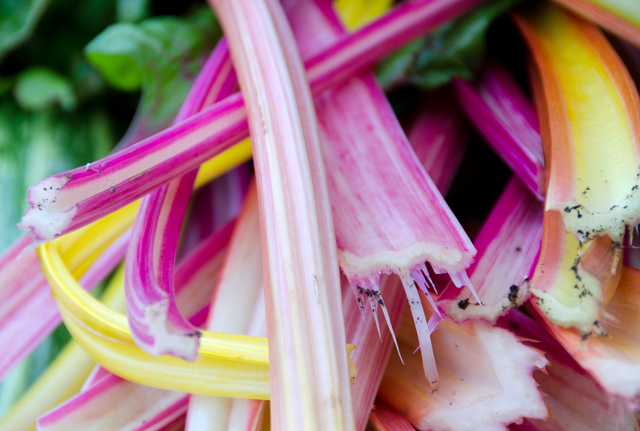
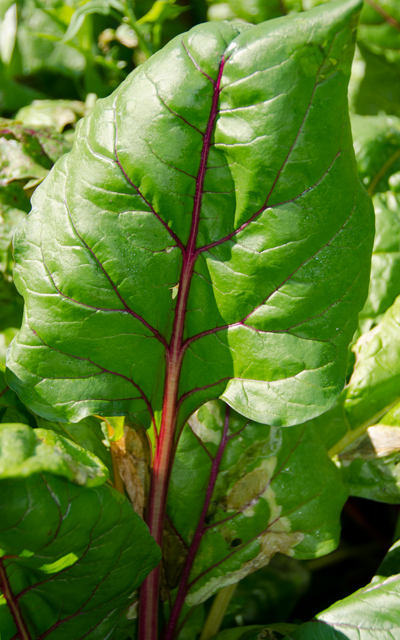
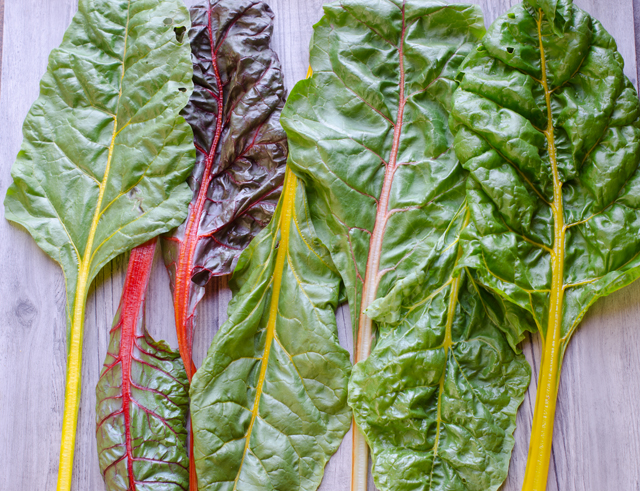
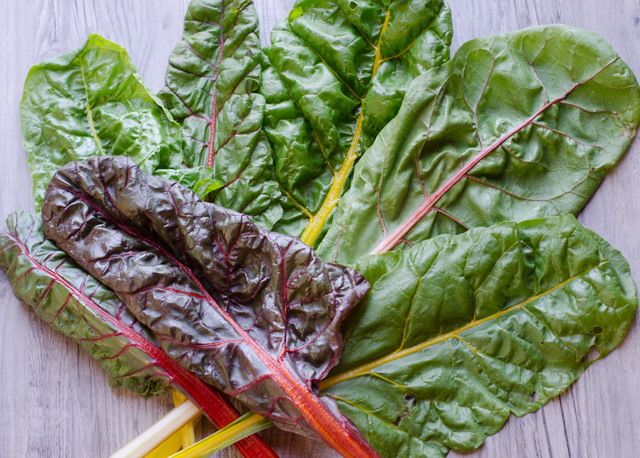
As you enter the garden, there is a large planting of Swiss chard. Not only delicious and nutritious, the stems and veins bring a pop of brilliant color to the garden. Earlier in the spring, Joe planted the faster growing spinach in between each row of chard. The spinach was harvested first before it had a chance to bolt. Now we are enjoying a daily harvest of chard. The leaves are always a dark green but the stems can be white, red, yellow and even an orangey color. Very small leaves can be used in salads, larger leaves need to be separated from the stems but both parts are edible. You can read about more of the basics of chard in this post.

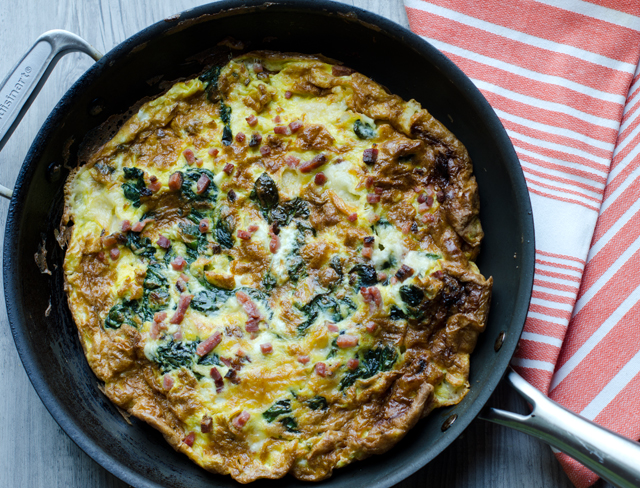
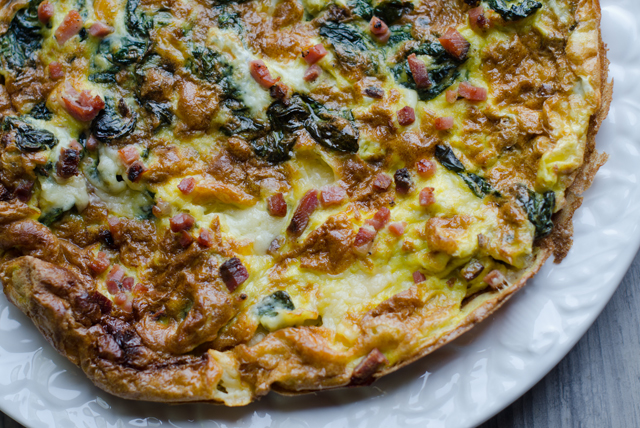
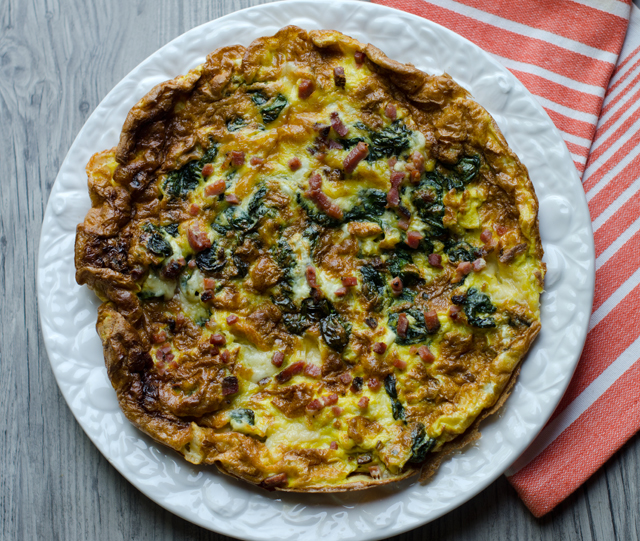
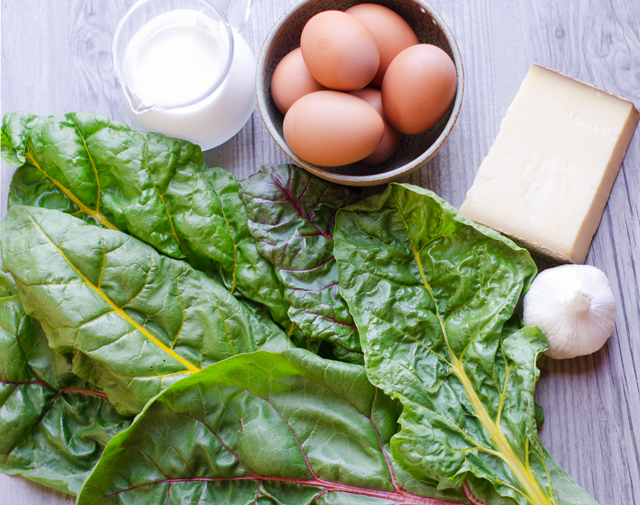
In season, I love making frittatas with ingredients straight from the garden. They are versatile as an on-the-go breakfast, lunch or a no-fuss light supper. In this recipe I take a basic frittata recipe I use as a guideline and use Swiss chard, both stems and leaves, a little Canadian bacon and, why not, a Swiss cheese. When I say Swiss most people are thinking of Emmenthaler, the mild holey cheese that is paired with ham in a sandwich. But there are other Swiss cheeses and Gruyère is one worth trying. Firm and dense, as in, no holes, Gruyere has a rich, creamy, slightly nutty taste.

Some important tips to remember when you are making this or any frittata. Cook any raw vegetable you will be adding to the frittata first. Even quick cooking vegetables like spinach and mushrooms exude water when you cook them. So cook them completely, no one wants a watery frittata! You also should adjust the amount of salt you use based on the saltiness of the ingredients you use like cheese and cured meats.

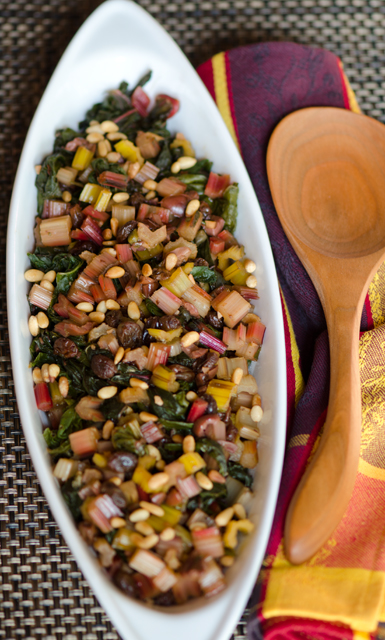
A  heavy bottomed oven safe non stick skillet or a well-seasoned cast iron pan is absolutely necessary to make the frittata. Before you proceed with the recipe be sure the skillet fits comfortably under the broiler without a great deal of maneuvering. The handle on my skillet was a bit high and made getting it in and out of the oven quite challenging. Have thick potholders at the ready so you don’t burn your fingers pulling the pan out of the oven. Once out, leave the potholder over the handle to remind yourself the pan is still hot. Use a spatula to loosen the frittata from the pan and transfer to a platter or cutting board. Of course, there are countless variations of the frittata and as the season moves on my add-ins will change.  Whatever you put in yours, it’s a great quick weeknight supper to serve alongside a simple green salad.

Our section of chard.

The colorful stems are good to eat as well.

Everything but the bacon.

Swiss Chard, Gruyère and Ham Frittata

Makes one 12″ frittata

Ingredients

  • 12 large eggs
  • 3 T half and half
  • Kosher salt and freshly ground pepper
  • 2 t olive oil
  • 8 c chard leaves roughly torn into 1″ pieces
  • ½ to 1 cup thinly sliced chard stems (optional)
  • 1 clove garlic, finely minced
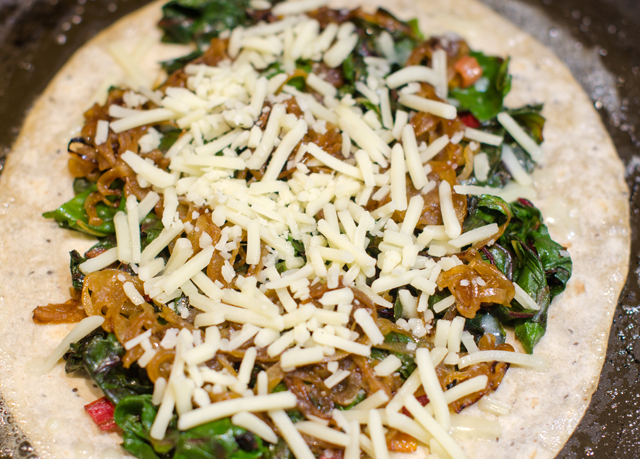
  • ¾ c shredded Gruyère cheese
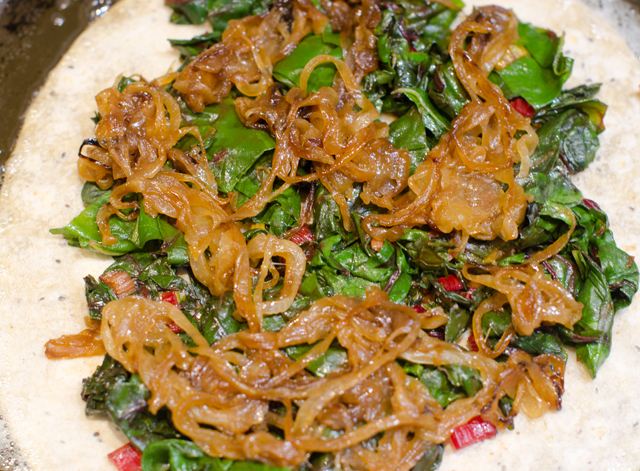
  • ¼ to ½ c finely diced Canadian bacon or ham

Directions

  1.  Adjust oven rack to upper middle position, about 5 inches away from the heating element. Heat broiler.
  2. Whisk eggs, half and half, ½ t salt and a grind of pepper in a medium bowl until well combined, about 30 seconds. Set eggs aside.
  3. Heat oil in a 12-inch non stick skillet over medium heat until shimmering; add stems first if using and saute until softened a bit, 3-4 minutes. Add chard and continue to cook until leaves are wilted and soft, another 4-5 minutes. Add chopped garlic and cook until fragrant.
  4. Stir shredded Gruyère into the egg mixture. Add egg mixture to the skillet and cook, using spatula to stir and scrape bottom of skillet, until large curds form and spatula begins to leave wake but eggs are still very wet, about 2 minutes. Shake skillet to  distribute eggs evenly, cook without stirring for 30 seconds. Sprinkle Canadian bacon over the frittata surface.
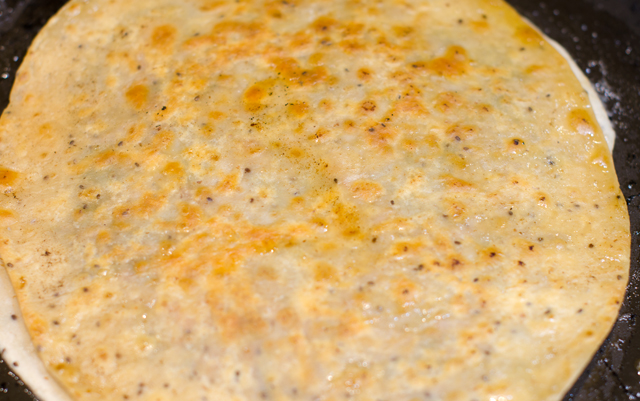
  5. Slide skillet under broiler and broil until the frittata has risen and the surface puffs and turn spotty brown, three to four minutes. Remove skillet from the oven and let stand 5 minutes to finish cooking.
  6. Using a spatula, loosen frittata from the skillet and slide onto a platter or a cutting board. Cut into wedges and serve.


July 12, 2017 Swiss Chard Quesadillas

Tuesday evening is Joe’s night to work late and although we don’t sit down for dinner when he comes home, I like to have a little snack ready. We sip a little wine, catch up on the days activities, maybe watch some television in the kitchen. This quesadilla was inspired by what I had in the fridge and the garden that summer evening. I have used spinach in a quesadilla in the past, why not some Swiss chard this time? A little sweet onion, sautéed until caramelized would be a good contrast to the earthy flavor of chard. All I needed now was a wrapper and some queso. I didn’t have tortillas on hand but I did have some sandwich wraps that could fill in. I always have several varieties of cheese in the fridge, the sharp flavor of cheddar worked well here.

We are still in the process of thinning the chard plants out. They are supposed to be 9-12 inches apart so it didn’t take long to pick what I needed. The chard is still relatively young so it wouldn’t need the long cooking that late summer chard does. I discuss basic chard preparation in this post. I also used some of the finely chopped stems for texture and their brilliant color.

I think a sweet onion works best with this flavor combination. I used a Vidalia, but whatever variety your market is featuring this week is fine. Sweet onions are low in pyruvic acid, the component that makes your eyes tear. I recently read that one of the best ways to store Vidalias is wrapped separately in a paper towel and stored in the refrigerator. I will be trying this method out.

If you are making a quesadilla you can’t forget the queso. If you prefer not to use cheddar, a Jack cheese would be a good choice too. I served the quesadillas plain, sour cream or a tomatillo salsa would be a good accompaniment. Next time I might add a few slivers of pickled jalapeno to the mix. Cooked black beans would be a good addition or some sautéed mushrooms. This recipe is just based on what I had on hand that evening. Golden crisp on the outside with healthy greens, a little sweetness from the onion with the creaminess of cheddar, this is a winning combination for a quick and delicious light meal or snack.


Swiss Chard Quesadillas

Makes two 8″ quesadillas

Ingredients

  • 16-18 medium to small chard leaves
  • 1 medium sweet onion
  • Extra virgin olive oil
  • Butter
  • Tortillas or wraps
  • ½-1 cup shredded cheese, I used cheddar, mozzarella or jack works too

Directions

  1. Wash chard leaves in several changes of water. Separate the chard leaves from the stems. Chop the leaves roughly. You should have 5 cups loosely packed leaves and ½-1 cup finely diced chard stems.
  2. Heat a tablespoon of olive oil in a 10 inch non stick skillet over medium high heat. Add stems and a sprinkle of salt and cook until softened, 3-4 minutes.
  3. Add the chard leaves and the water that still clings to the leaves and cook until wilted. Add a tablespoon more of water if necessary to wilt the leaves. Move stems and leaves to a plate and keep warm.
  4. Slice a medium onion very thinly, a mandolin or food processor is good for this. You should have 3 cups loosely packed thin slices.
  5. Wipe out the pan, add another tablespoon of oil and heat over medium high heat, cook onion until softened and brown. Reduce heat to medium if necessary. This should make about 1 cup of caramelized onion.
  6. Let the skillet cool off a bit and wipe out with a paper towel. Over medium high heat melt a teaspoon or so of butter and a little olive oil. When the butter is melted, add the first wrap or tortilla, spread out one half of the chard over this as evenly as possible.
  7. Evenly spread the cooked onions over the chard and then sprinkle the cheese over. Place the second wrap over the cheese and press down with your hand or a spatula to melt the cheese and make it adhere.
  8. Cook for 2-3 minutes on the first side, it’s okay to peek to make sure it isn’t browning too much. With the help of the spatula, flip and cook on the other side, about 2 minutes, adding a little more butter and oil if necessary.
  9. Move the quesadilla to a platter and keep warm, repeat cooking process with the second quesadilla. Cut quesadillas into wedges 4 to 8 pieces as desired.  Serve warm.
Chop the stems.
Sweet onion sautéed until golden brown.
Sautéed chard and stems are first to go on.
Then the sautéed onion.
Then a sprinkling of cheese.
A second tortilla or wrapper in my case, goes on top. Press down to help the cheese adhere. This was taken after this first quick flip.
Let it get golden brown.

July 27, 2014 Braised Swiss Chard with Raisins, Olives and Capers

DSC_8313aMove over broccoli, step aside tomatoes, the research has been completed and the new ranking of the powerhouse fruits and vegetables is in. Researchers at William Patterson University in conjunction with the CDC did a study of 41 fruits and vegetables ranking them by the 17 critical nutrients they contain. The foods were scored by their content of fiber, potassium, protein, calcium, folate and important vitamins. Following watercress and Chinese cabbage is our bronze medal winner, Swiss chard. Chard is a good source of vitamins K, A and C as well as potassium, iron and fiber.

We have been long time fans of chard, it is our choice for a cooked green in the summer after the heat causes our spinach plants to bolt. I think many people shy away from chard because it has two distinct parts, the leaves and the stems that need to be cooked separately. Many recipes avoid the stems but that is unfortunate since the stems can add texture and color to the dish. Two of the varieties we grow, Rhubarb, has bright red stems and Bright Lights has stems in almost neon shades of pink, yellow and orange. Although they will fade a bit, I prefer to simmer the stem sections in broth or water to maintain optimum color. Remember to cook chard in a non reactive pan, like spinach it will discolor if cooked in aluminum or unlined iron.

This preparation is one of our favorites that we have enjoyed for years. The earthy assertive flavor of chard combines nicely with Mediteranean flavors of garlic, capers, olives and raisins. I like to plump raisins in warm water for just a few minutes before adding to the recipe. I cut the stems of the chard into slightly smaller pieces than most recipes call for, the stems will cook quicker and will retain their color.

Farmers markets will be your best source for chard this time of year. Wash well in several changes of water. For a more detailed explanation about the preparation and cooking of chard, please look at this post.

As for the rankings, the word powerhouse equals nutrient density. Higher ranking foods provided more nutrients per calorie. Watercress scored a perfect 100, chard not far behind with 89.27. Broccoli and tomatoes? 34.89 and 20.37 respectively, reason enough to add chard to your diet.

ADSC_8174

Braised Swiss Chard with Raisins, Olives and Capers

Serves four

Ingredients

  • 2lbs chard, washed, leaves and stems separated
  • 11/2c chicken or vegetable stock (water is okay too)
  • 1T olive oil
  • 1T capers, rinsed
  • 2t chopped garlic
  • 1/4c raisins (dark or golden)
  • 1/4c chopped Kalamata olives
  • 1/8t red pepper flakes (or to taste)
  • Kosher salt and freshly ground pepper
  • 2T toasted pine nuts
DSC_8293a
A very attractive “mis en place”.

Directions

  1. Cut the chard stems away from the leaves. Cut chard leaves into rough slices and set aside. Cut stems into 1/2 inch pieces. Combine stems in a large non reactive saute pan with stock and bring to a simmer. Simmer over low heat for about 8-10 minutes until softened. Check an individual stem piece to see if it is at your desired doneness. With a slotted spoon, transfer to a bowl and keep warm.
  2. Add the olive oil, capers, garlic, raisins, olives, red pepper flakes to the saute pan. Bring to a simmer and add the reserved chard leaves, in batches if necessary. Cover the pan and cook for 2 minutes, or until wilted. Uncover the pan and continue to simmer over low heat until the leaves are tender, 8-10 minutes. Add the reserved stems and toss with the ingredients in the pan. Increase the heat to evaporate any remaining liquid. Season with salt and pepper. Transfer to a serving dish and sprinkle with toasted pine nuts.
DSC_4492a
The neon colored stems of Bright Lights chard.

DSC_8305a

September 25, 2012 Chard Chips and Pickled Chard Stems


When the new issue of Fine Cooking came last week I was ready to put it aside for a few weeks. The holiday desserts and side dishes looked very tempting, but the beginning of fall was just last Saturday and I am still enjoying cooking as much as I can with the harvest from our garden. As I quickly thumbed through the issue I happened to notice an article that interested me, “What We Are Cooking Now.” Specifically, what really caught my eye were Swiss chard chips. I had heard of kale chips, both the pricey little bags sold in health food stores and the homemade varieties that a friend introduced me to. So why not chard chips? We have three sections of chard of the Bright Lights and Rhubarb variety still producing, so I thought it would be fun to try my hand at this. Since I am a proponent of using both the chard leaves and the stems, I wanted to use the colorful stems in another healthy nibble so a refrigerator pickle seemed to be the best choice here.
My on-line research revealed many different approaches to making chard chips and after reading them all, came up with my own method. There are certain important things to remember if you are going to make chard chips. Wash the leaves thoroughly, chard leaves are usually very crinkly, and those crevices can be dirty. After washing the leaves, remove the stems, reserve if using. Spin the leaves dry in a salad spinner and use paper towels to remove any excess moisture. Any moisture left on the leaves will cause them to steam, not bake and crisp up. A  “bunch” is a non-specific term, to be exact as possible, I used 25 chard leaves that were about 12-14 inches long after stemming. When in doubt, keep the leaf pieces larger, 2 inch squares approximately. The leaves will break easily when they are dry and too many small pieces will give you chard crumbles or dust.  Place the dry leaf pieces in a large bowl and toss lightly with olive oil and your seasonings of choice. Start with a modest amount, about a tablespoon of oil, you can always add more, it’s not as easy to take it away. I used a little Espelette pepper olive oil, kosher salt, fresh ground pepper, a little garlic powder and a little plain olive oil to taste. I did not grease my baking sheet or use cooling racks to elevate the leaves. I did not crowd or overlap the leaves. I used four large baking sheets in two ovens, racks in the top and the bottom set to 275F on the convection bake setting. The caveat here is, know your own oven, my chips seemed to be ready quicker than most of the recipes I looked at, keep a watchful eye to ensure a crispy, not a burnt chip!
Chard Chips

  • 1 large bunch of chard, 25 leaves, 12-14 inches long
  • Olive oil
  • Seasoning of your choice, I used kosher salt, garlic powder and freshly ground pepper

Directions

  1. Preheat oven to 275F (convection bake). Put racks in the top and bottom of oven.
  2. Wash chard leaves thoroughly in several changes of water. Remove the stems from the leaves, reserve for chard stem pickles.
  3. Dry chard leaves, first in a salad spinner, then remove excess moisture with paper towels. Cut leaves into 2″x2″ pieces, or a size as close as possible, when in doubt, larger is better.
  4. Spread leaves on a large ungreased baking sheet, do not overlap or crowd. My leaves took up four sheets that I baked in two ovens.
  5. Bake chard for six to seven minutes, check to see how the leaves are drying, at this point I loosened the leaves with a spatula and my fingers and rotated the baking sheets, top to bottom and front to back.
  6. Bake for another six to seven minutes, chard should be crisp, not burnt.
Trimmed chard leaves ready to be tossed with olive oil and seasonings


Give the chard leaves enough room to ensure even baking.
Not the prettiest snack, but certainly tastes good!


Pickled Chard Stems

Colorful Bright Lights and Rhubarb chard stems are too pretty to waste.

Pickling shows off the brightly colored stems in another healthy nibble. Refresh the stems in some ice water to crisp them up and cut to even lengths to fit your canning jar. I chose pint jars but one cup sized jars would work as well. I used a basic refrigerator pickle recipe and added my own spice blend combination. Allow them to cure in the refrigerator for a few days, after three days they were ready. If your stems are wide, cut them in half lengthwise, there will be less chance for the stems to be stringy.

Quick Chard Pickle

Makes  2 pints

  • 2 pint canning jars and lids
  • Enough chard stems to pack tightly into the jars
  • 2c water
  • 1c rice wine vinegar
  • 1/4c granulated sugar
  • 1/2t cumin seed
  • 1/2t coriander seed
  • 1/2t fennel seed
  • 1 small piece of cinnamon stick about 2″
  • 1/2t pink peppercorns
  • 1/2t white peppercorns

Directions

  1. Sterlize two pint canning jars by washing them in hot soapy water, rinsing and drying them thoroughly. Crush spices in a mortar and pestle or small food processor. Distribute spices evenly between the two jars.
  2. In a medium saucepan bring two cups of water to a boil. Add vinegar, sugar and salt and bring the mixture back to a boil.
  3. Pack the chard stems in the jars as tightly as possible. Using a wide mouth canning funnel, pour the brine over the stems to cover completely. Place lids and bands on the jars and let cool. Refrigerate, chard pickles will be ready in a few hours but at their best in about two days.

    My spice blend ready to crush in the mortar and pestle.
Pickled chard stems ready for the refrigerator. Notice the classic Bicentennial Liberty Bell jar on the right.


July 12, 2012 Swiss Chard


Let’s begin with two misconceptions regarding chard. Swiss chard is not from Switzerland, but the botanist who named it in the nineteenth century was, and named it for his homeland.  Second, it is pronounced chard, not shard. I can understand why the mistake can occur. Chardonnay, a wine grape varietal, is referred to in a shorthand kind of way  by many people (moi included) as “shard”. The “ch” is pronounced “sh” in French, like chalet. Also a shard is a sharp piece of glass, not something one would consume.

Chard is from the Latin and the French for the word “thistle”. However, chard is not a member of the thistle family but belongs to the beet family.  Chard is cultivated for the leaves and stems of the plants, not the roots.  It is the cooked green of choice in the summer months in our house. We grow many varieties that are as pretty to look at as they are nutritious for you. Varieties like Rhubarb with its bright red stems and Bright Lights with its neon pink, orange and yellow stems give beautiful accents of color in the garden. Chard is a nutritional powerhouse with vitamins K, A and C, and is  a good source of potassium, iron and fiber.

European cooks are partial to chard stems discarding the leafy part and in America most cooks use the leaf and discard the stem. I take advantage of both the stems and the leaves .  The tiniest leaves are an interesting addition to salad mixes. When using larger leaves, the stems need to be separated from the leaves to cook both parts correctly. This is a recipe with the gardener in mind. If you don’t grow your own, your local farmer’s market is a good source for chard. Supermarket chard looks sad for the most part and wouldn’t make a chard lover out of anyone.

Swiss Chard with Garlic

Serves 4-6

Ingredients

  • 1 large bunch of chard
  • Kosher salt and fresh ground pepper
  • Low sodium chicken broth
  • Extra virgin olive oil
  • Several cloves of garlic, peeled and chopped

Directions

  1. Trim the bottoms of the stems and wash chard in several changes of water
  2. Cut the stems from the leaves. Chop stems into 1/2 to 1 inch pieces. Cut leaves into 1 to 2 inch ribbons. Stacking leaves on top of leaves and stems in an even row  makes the task go quicker.
  3. Bring a large pot of well-salted water to a boil. Add chard stems and blanch for 4-5 minutes. The timing will depend on how thick you cut the stems and how soft you want them to be. Remove stems from water with a slotted spoon or spider. Add a little more water to the pot if necessary and keep at a boil.
  4. Add chard leaves in batches and blanch until wilted, 2-3 minutes. Drain in a large colander. Squeeze out excess liquid when cool enough to handle.
  5. Heat a tablespoon or so of extra virgin olive oil in a large skillet over medium high heat for about a minute. Add stems and toss gently to coat. Add wilted chard leaves and stir often, until tender, adding a little chicken broth if the mixture seems too dry. Push chard to one side of pan, add a little more olive oil, add garlic to pan and saute garlic until golden, another minute or two.
  6. Serve warm. Cooked chard could be added to a frittata or omelet as well.


Crinkly rhubarb chard leaf with bright red stem.

Soak chard leaves in several changes of water. Dirt will sink to the bottom when you lift the leaves out. Drain chard in a colander.


Trim the bottom of the chard leaves. Cut the leaf away from the stalks, I prefer using scissors or a small serrated knife. Chop leaves in 1-2 inch ribbons. Stacking the leaves speeds the process along.

Chop stalks into 1/4 to 1/2 inch pieces.


Always cook more chard than you think you will need. This large bowl cooked down to this.


As you can see from the measuring cup, some of the color leaches out during the blanching process but they remain predominately red.


Saute the stems and leaves together and finish with a little chopped garlic.  A flavorful extra virgin olive oil will really enhance the flavors in this dish.