November 30, 2013 Cauliflower with Brown Butter, Pears, Sage and Hazelnuts

DSC_4022a

Move over kale there’s a new vegetable star in town, cauliflower. Well, at least according to Bon Appetit’s trend alert in the November issue. Top chefs are now embracing the once lowly vegetable, in everything from a “ragu” atop pizza to roasted and topped with tahini dressing.

We’ve been enjoying cauliflower in new ways in the last couple of years. I like to separate it into florets, put it in a big bowl and toss it with olive oil, kosher salt and Aleppo pepper. Then I roast it on a baking sheet in a hot oven, tossing it occasionally, so that all the pieces get sweet and toasty brown. If the cauliflower gets done before the main course, I keep it warm under a heat lamp and inevitably most of it gets eaten before we sit down to dinner. I refer to it as veggie popcorn. The other method of cooking is to cook the florets in boiling water until soft. Then I put the cauliflower in the food processor with a little half and half, salt, pepper and my seasoning of choice and puree it. This time cauliflower morphs into “mashed potatoes” for a low carb treat.

Last Saturday was the last local outdoor farmers market, some of the vendors will return once a month now for an indoor market. While loading up on vegetables for Thanksgiving, I noticed one farm was offering along side the usual white variety, purple and a yellow-orange cauliflower. The young woman behind the counter referred to the orange one as “cheddar”. The shopper next to me turned up her nose and made a “yuk” face. She said the color reminded her of packaged macaroni and cheese.

If she knew the story behind this variety I think she would have changed her mind. Cauliflower belongs to the genus Brassica which includes broccoli, cabbage and yes, kale. The “cheddar” or orange variety of cauliflower was first discovered in Canada in the 1970’s. Scientists at Cornell University crossed it with the standard white cauliflower to create a vitamin rich variety, popular with farmers markets and specialty grocers. What my fellow shopper didn’t know was that the hue is from extra beta carotene. It is naturally stored in edible portion of the plant, the head of the flower buds, also known as the curd. That means it has 25% more vitamin A than it’s white cousin and second only to carrots.

Purple cauliflower had it’s origins in either Italy or South Africa. Anthocyanin pigments, also found in red cabbage and red wine gives purple cauliflower it’s color and the added benefits of promoting eye and heart health. Milder in flavor than the white variety, most varieties will retain most of their purple color when cooked.

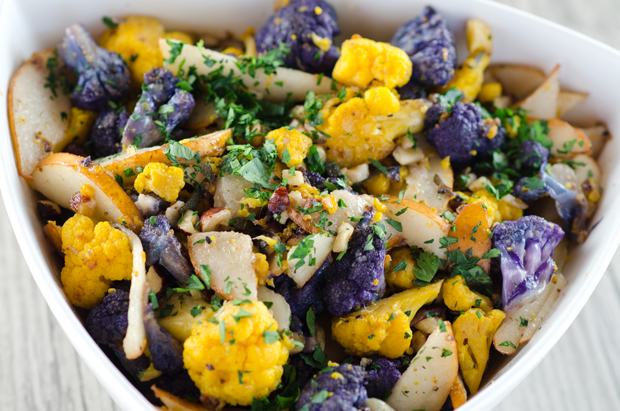
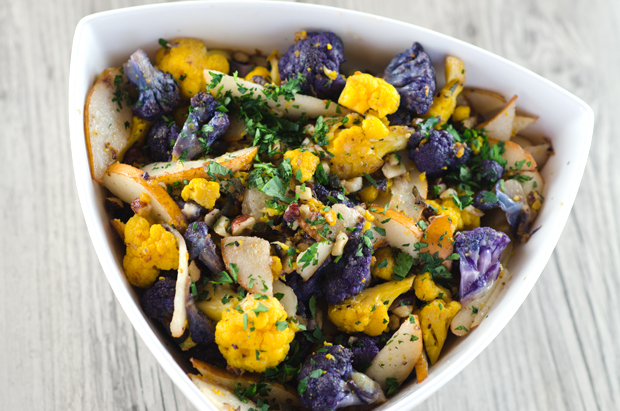
This recipe is courtesy of Andrew Carmellini, a Food and Wine best new chef 2000. He is best known for his modern Italian dishes and his recipe combines some of fall’s favorite ingredients. The nutty flavor of roasted cauliflower is enhanced with brown butter and hazelnuts and combined with sweet pears and fragrant sage. It is a great addition to any holiday table and easy enough for a weeknight. It gains points with busy holiday cooks in two ways; one, it is a stovetop dish, freeing up valuable oven space and two, it’s delicious both warm and at room temperature, perfect for a buffet and leaving time for last minute prep for other dishes. Purple and yellow cauliflower will certainly brighten up any holiday table, but it would be just as delicious with the standard white variety.

Cauliflower with Brown Butter, Pears, Sage and Hazelnuts

From Fine Cooking magazine

Serves 8-10

Ingredients

  • 6T unsalted butter
  • 1 medium head white cauliflower  or 2 small heads yellow and purple cauliflower cut into small florets about 3/4 inch wide
  • 1/2 cup toasted, skinned, chopped hazelnuts (see tip right)
  • 8 fresh sage leaves, thinly sliced crosswise
  • Kosher salt and freshly ground black pepper
  • 2 large ripe pears, cored and thinly sliced
  • 2 Tbs. chopped fresh flat-leaf parsley
Tip:

To toast hazelnuts, spread them in a single layer on a baking sheet. Bake in a 350°F oven for 14 to 18 minutes, stirring every 5 minutes, until lightly browned. While still warm, rub them against each other in a clean dishtowel to remove the papery skins.

Directions
  1. In a 12-inch skillet over medium-high heat, melt the butter until light brown and bubbly. Add the cauliflower, hazelnuts, and sage.
  2. Cook for 2 minutes, stirring occasionally. Season with 1 tsp. salt and 1/2 tsp. pepper and continue cooking, stirring occasionally, until the cauliflower is browned and crisp-tender, 7-8 minutes more.
  3. Remove the pan from the heat. Add the pear slices and parsley. Gently toss to combine and warm the pears. Season to taste with more salt. Serve hot or at room temperature.
Make Ahead Tips

You can prep all the ingredients several hours ahead except for the pears, which will brown if cut too far in advance.

DSC_4007a
Beautiful purple and “cheddar” cauliflower.
DSC_3412a
The sage is still doing well in our fall garden.
DSC_4019a
A side that would be a delicious and colorful addition to any holiday table.

November 23, 2013 Chicken Tomatillo Soup

DSC_3964a


As previously confessed, when we first grew tomatillos I wasn’t only unfamiliar with how to cook with them, but more importantly how the fruit develops and matures in the garden. The first year we grew them by about the beginning of July I was certain our crop was a bust.

The sprawling bushy plants grew to about three foot tall and were quite healthy. The vines produced little yellow flowers that eventually turned into small bright green papery looking Chinese lanterns.  When I examined the fruit, it felt like only a small pea was inside the husk. So I would either forget about them or months later gather up the few that would finally burst out of their now light brown husks.

Since then I have learned quite a bit about this member of the nightshade family. Tomatillos are more closely related to cape gooseberries than they are to eggplants and tomatoes.  I learned that as the fruit matures it fills out the husk. Tomatillos are about the size of a large cherry tomato, low in calories, a good source of iron and magnesium and vitamins C and K. Though they look like green tomatoes, they are much firmer in texture when ripe.  The thin papery coating will turn light brown as the fruit matures. They can be stored in the fridge for a couple of weeks or frozen whole.  Leave the husks on the fruit until ready to use.  To prepare tomatillos, remove the husk and stem and rinse off the remaining sticky residue that coats the fruit.

I am enjoying tomatillos more each season. We grow both green and purple tomatillos. The purple variety is supposed to be sweeter, I can’t say that for certain, but they certainly make an attractive addition to the garden. My tomatillo recipe repertoire to this point was limited to accompaniments. Roasting tomatillos for salsa verde was initially a good way to use them but now I wanted to branch out  This year I did something I never did before, I ate one raw. I was surprised and delighted with the bright, not too tart citrusy flavor. Prior to this I thought that biting down on a tomatillo would be the same as eating a green tomato, not necessarily a pleasant experience.

This time I used them in an easy to put together soup.  Bright lemony flavored tomatillos are combined with tomatoes, smoky cumin and green chilies. Homemade chicken stock is always a good base for a soup but low sodium chicken broth is fine also. I prefer using chicken thighs in soup recipes because they will hold up better if the soup is reheated.

DSC_0233a


Chicken and Tomatillo Soup

Ingredients

  • Olive oil
  • 1lb boneless, skinless chicken thighs cut into 1″ pieces
  • 1 medium onion, finely chopped
  • 2 t chile powder
  • 1T cumin
  • 1 t dried oregano (for this recipe I prefer Penzey’s Mexican oregano)
  • 1 clove garlic finely chopped
  • 2T diced canned roasted mild green chiles
  • 8 cups chicken stock or substitute low sodium chicken broth
  • 2c diced tomatoes, I use my roasted tomatoes, substitute your brand of choice
  •  3c finely chopped tomatillos
  • 1 can Great Northern beans
  • Kosher salt and freshly ground black pepper

Directions

  1. Heat 1T olive oil over medium-high heat in a 5- to 6-quart Dutch oven. Add the chicken pieces and brown on all sides, about 5-6 minutes. Remove to a plate and keep warm.
  2. Add onion and cook, stirring, until tender, 4 to 5 minutes. Add the chili powder cumin, oregano, and garlic and cook until fragrant, about 1 minute longer.
  3. Stir in the chicken and chiles and then add the broth, chopped tomatoes and tomatillos and a can of beans. Bring to a simmer. Reduce the heat to low and simmer, partially covered and stirring occasionally, until the flavors blend, about 30-40 minutes. Season to taste with salt and pepper.

DSC_0030aDSC_3961a


November 17, 2013 Eggplant “Pizzas”

DSC_3935a


Joe’s not so little greenhouse set out in the garden extended our growing season for some vegetables to the latest date ever. When he brought in the last of the peppers and eggplants on Sunday I knew I needed to find a special way to use them to commemorate the end of their growing season. The peppers, for the most part were transformed into one of his favorites, stuffed peppers and for the eggplant I turned to a recipe from Julia Child.

In her 1975 cookbook, From Julia Child’s Kitchen, among personal anecdotes  and recipes for Caesar Salad (yes, Mr. Caesar Cardini actually made this tableside for a young Julia and her family), consommés, stews and apple charlotte is this gem. Tranches d’aubergine a l’italienne might put off the average cook, but eggplant pizzas, now that’s something we can all relate to. The recipe made a second appearance as miniature eggplant pizzas in her 1989 work and one of my favorite go-to cookbooks, The Way to Cook.

The classic pear shaped variety of eggplant like Black Beauty works best here. I began by cutting the eggplants crosswise into 3/4 inch planks, the skin was relatively thin so I left it on.Then I salted the slices on both sides to extract excess liquid. This is a step I would skip in the summer when the eggplants are at their freshest and not very seedy. I let the eggplants sit for about a half hour and started my sauce.

The day before I defrosted two quart bags of my roasted tomatoes, a 28 ounce can of plum tomatoes or a store bought sauce can substitute here. Step one for me is to pour off the liquid that accumulates in the bag, a little lagniappe for the chef. It’s definitely not the prettiest, but it is the best tasting tomato juice you will ever try. I sautéed one finely chopped onion and two chopped cloves of garlic until softened but not brown, about five minutes. Then the tomatoes and the rest of the liquid are added to the pan, breaking up the larger chunks of tomatoes with the back of a wooden spoon. When the tomatoes have cooked down sufficiently, I put them through a food mill to strain out most of the seeds. This results in a smoother sauce.

The eggplant slices are patted dry and lightly brushed with olive oil. I baked the eggplant slices on a wire rack over a baking sheet so that both sides would cook evenly. As Julia says “not so long that the slices become mushy and lose their shape”. After twenty five minutes I removed the baking sheet from the oven and now set the oven to broil. I covered the slices with a generous coating of tomato sauce and sprinkled a combination of mozzarella and grated Parmesan. The “pizzas” are now returned to the oven until the cheese is melted and slightly browned. Julia suggests these as part of a vegetarian combination or arranged around a main event, be it an omelet, a steak or a roast lamb.

Eggplant pizzas would make a good snack or a light lunch with a salad. A recipe that’s vegetarian, low carb and gluten free, as always “Our Lady of the Ladle“, Julia was ahead of her time.


Julia Child’s Eggplant Pizzas

Ingredients

  • 2  large eggplants (about 1 lb. each)
  • 1T salt, for drawing water out of eggplant
  • 2T olive oil for brushing eggplant before roasting
  • 2 t Italian seasoning, for sprinkling on eggplant before roasting
  • 1/3 c freshly grated Parmesan
  • 1/3 c finely grated low-fat mozzarella

Sauce Ingredients

  • 1T olive oil
  • 1 small onion, finely chopped (about 1 cup)
  • 2 large garlic cloves, very finely chopped
  • 1 28 oz. can of plum tomatoes (or use 3 cups peeled and diced fresh tomatoes)
  • 1/2 t Italian seasoning
  • 1/4 t dried oregano

Directions

  1. Cut eggplant into 3/4 inch thick slices. Place eggplant pieces on a double layer of paper towels and sprinkle both sides generously with salt. Let the eggplant sit with the salt on it for about 30 minutes to draw out the liquid. (After the eggplant sits for 15 minutes, turn on the oven to 375°F.
  2. Make the tomato sauce while the eggplant sits. Heat 1 tablespoon of olive oil and sauté the onion and garlic just until it becomes softened and fragrant.   Add the diced tomatoes, Italian seasoning and oregano.
  3. Then let the sauce simmer on low until it’s thickened. Break up tomatoes with a fork while the sauce cooks. (You can add water as needed. Let sauce simmer until ready to put on eggplant slices.)
  4. After 30 minutes, pat the eggplant dry with paper towels. Brush both sides of the eggplant slices lightly with olive oil and sprinkle tops with Italian seasoning. Place eggplant slices on a wire rack over a baking sheet. Roast the eggplant about 25 minutes, but “not so long that the slices become mushy and lose their shape” as Julia says.
  5. While the eggplant roasts, combine Parmesan with mozzarella. After 25 minutes or when eggplant pieces are done, remove eggplant from the oven and turn oven setting to broil. Spread a few tablespoons of sauce on the top of each eggplant slice, sprinkle with thin basil slices and top with cheese blend. Put pizzas under the broiler until the cheese is melted and slightly browned.
DSC_3951a
We are still harvesting salad greens, spinach and arugula from the greenhouse.
DSC_3918a
Cooking down the roasted tomatoes.
DSC_3919a
Putting the cooked tomato sauce through a food mill makes a smoother sauce and eliminates most seeds.
DSC_3911a
Doesn’t look like the stuff in a bottle, but it is the best tasting tomato juice you will find.
DSC_3932a
Served with a simple salad of baby greens and radishes from the garden, eggplant pizzas make a delicious light lunch.


November 12, 2013 Kale, Shellfish and Sausage Soup

DSC_3868a It’s the beginning of November and the garden is still providing inspiration and produce for our menus. The spinach and chard have been harvested but the kale is now at it’s peak. The first kiss of frost sweetens the taste of this vitamin and mineral rich member of the cabbage family. We are currently growing two varieties in the garden. Lacinato kale, which also goes under the names of dinosaur kale, Tuscan kale, black kale or Cavolo Nero and the very distinctive Red Russian. Lacinato, the current “rock star” of the vegetable world has deep green oblong leaves with a pebbly texture. The Red Russian variety has sage green leaves with reddish purple veins. Red Russian has flat fringed leaves that resemble oversized oak leaves.

DSC_3895a
Cavalo Nero or Tuscan kale
DSC_3888a
Red Russian kale

This soup is very loosely based on the national soup of Portugal, caldo verde which translates “green soup”. In it’s simplest form caldo verde is broth or water, onion, thin strips of kale or collard greens and potatoes for thickening. Since this was considered peasant food, small slices of linguica, a Portuguese pork sausage would be added before serving. This soup takes on many variations for us. The base this time was homemade chicken stock but we have made it with a combination of low sodium chicken broth and bottled clam juice. How much kale is up to you, about eight cups of shredded leaves is a good starting point. The leaves need to be separated from the hard kale stems and then cut into thin strips. This will allow the kale to cook quicker. I added littleneck clams and mussels adding another depth of flavor. I wanted a lighter soup this time, so I did not add the traditional potatoes. Chopped tomatoes or cannelini beans would also be flavorful additions to this soup. Sausage like linguica or chorizo would bring another layer of flavor, my sausage was from our local pork producer, Purely Farms. I chose their very delicious cervallata  which features broccoli rabe, aged provolone, fennel and freshly ground black pepper along with the Purely Pork sausage. Joe added a few hot peppers, remove them after cooking or they will permeate the dish.

Is this a soup or a stew? Definitions of both terms abound, I turned to The Food Lovers Companion written by Sharon Tyler Herbst as my final authority. Ms Herbst defines a soup as any combination of vegetables, meat or fish cooked in a liquid. Soup can be thick or thin, smooth or chunky, cold or hot.  A stew is a dish of meat, vegetables and a thick broth resulting from the combination of the stewing liquid and the natural juices of the food being stewed. She also states that the food in a stew is cooked slowly for a long period of time. So a kale, shellfish and sausage soup it is.

DSC_3876a

Kale, Shellfish and Sausage Soup Serves 4-6 Ingredients

  • 1T olive oil
  • 1 lb.  linguica, chorizo, or other spicy sausage, split along the length and sliced 1/2-inch thick
  • 1 onion, diced
  • 3 cloves garlic, minced
  • 8 c (about 1 lb.) kale, preferably Tuscan, stems removed and chopped into thin ribbons
  • 4 cups chicken broth
  • 1 small hot pepper (optional)
  • 2 dozen littleneck clams
  • 2 dozen mussels
  • Kosher salt and freshly ground pepper to taste

Directions

  1. Set a dutch oven or large soup pot over medium-high heat and add the oil. When the oil is hot, add the sausage and sauté until the sausage is golden brown on all sides. Remove the sausage and drain on a paper towel.
  2. Reduce heat to medium and add the onion. Sauté until the onion is translucent then add the garlic and sauté until fragrant, about 30 seconds.
  3. Add the chicken broth, pepper if using and the kale to the pot. Stir to coat everything with chicken broth and then cover the pot with a lid. Stir the kale every three minutes until it is barely tender.
  4. Add the clams and mussels to the pot. Add the sausage and cook until the mussels and clams have opened and the kale is tender. Taste for seasonings and salt.
  5. Serve this soup in individual bowls with  a crusty slice of bread to sop up the broth at the bottom of the bowl.
DSC_3894a
The veins of the Red Russian kale are magenta in color.

DSC_3881a

November 5, 2013 Barnegat Light Scallops with Butternut Squash Puree and Tomato Jam

DSC_3843a

“Use us!” they seemed to call out, well not literally, I haven’t lost my mind yet. But every time I passed the small basket of the “last gasp” tomatoes that hung in there until late October I knew I should use them to commemorate the end of the season. Granted these survivors were not salad worthy, though red and ripe looking on the outside, inside they were a bit pale, even white in some sections. Several weeks ago I had torn out a recipe from the food section of the local newspaper that could fill the bill, Barnegat Light Scallops with Butternut Squash Puree and Tomato Jam. I knew I had the four cups of diced tomatoes needed so that’s where they would go.

Barnegat Light, the distinction of the scallops called for in this recipe, is located at the northern end of Long Beach Island, New Jersey. It’s home to “Old Barney” the second tallest lighthouse in the United States. Barnegat Light is one of the top fishing ports in the United States and home to a fleet of scallopers that bring in over 2 milllion pounds a year. This makes New Jersey the country’s second largest producer of scallops a year, just behind Masschusetts.

Whether your scallops have the Barnegat Light distinction or not, always cook with dry scallops. Dry scallops originate from boats that go out, shuck and ice their haul on board and return to shore the same day, hence the name “day boat”. Wet scallops come from boats that are out to sea for many days at a time.  To preserve their catch, fishermen have to soak their scallops in a solution of sodium tripolyphosphate (aka STP) before they are frozen. STP causes scallops to soak up water before the freezing process. This plumps up the scallop by as much as 30% and increases the before sale weight and also the price you pay. Wet pack scallops will appear plumper and whiter when placed next to their dry counterparts. When cooked, they will exude all the excess slightly soapy tasting water when cooked and will become shrunken and rubbery before they even get to the carmelization stage.

To achieve perfectly caramelized scallops, first pat the scallops dry with paper towels, excess moisture will impede the browning process. Detach the tough abductor muscle from the side of the scallop with your fingers. Season the scallops lightly with salt and pepper. Heat a heavy bottomed pan over high heat for a minute or two. Add a thin film of flavorless oil (canola is my preference) and place the scallops in the hot pan, making sure not to crowd them. If the scallops are too close they will steam, not sear. Leave the scallops to sear undisturbed for two minutes. With tongs, gently lift one up to see if the desired caramelization has been achieved. Flip the scallops and allow them to cook for another 2 to 3 minutes.

Tis the season for winter squash and they are appearing in abundance at my local farmers market. I just simply cut the squash in half, baked it at 375°F for a half hour. I pureed the squash with a little half and half, a little fresh nutmeg and a sprinkling of sage. Acorn or kabocha squash could easily fill in for the butternut. Cooking them slow and long, I coaxed as much flavor as possible out of my tomatoes. I was quite pleased with the results. Tomato jam would be a good accompaniment to a burger or a grilled cheese sandwich also. The mellow sweetness of the butternut squash complimented the nutty brown crust of the scallops. Inside the scallops were still tender and creamy and the tomato jam added a nice piquancy to the finished dish.

Barnegat Light Scallops with Butternut Squash Puree and Tomato Jam

Ingredients

  • 12 medium sized dry pack scallops
  • 1 medium butternut squash
  • 1/2 to 1 c heavy cream or half and half
  • 1/4t rubbed sage
  • 1/4t freshly ground nutmeg
  • 4c fresh tomatoes, finely diced
  • 1 small sweet onion, finely diced
  • 1c rice wine vinegar
  • 1/2c water
  • 1/2c sugar
  • Kosher salt and freshly ground pepper
  • Canola Oil

Directions

For the squash

  1. Preheat oven to 375°F. Cut squash in half lengthwise. Place cut side down on a baking sheet.
  2. Bake squash for about a half hour or until squash is easily pierced with a knife
  3. Allow the squash to cool slightly. Scoop squash flesh into the bowl of a food processor. Add sage, nutmeg and just enough cream or half and half to make a smooth puree. Transfer puree to a small saucepan and keep warm over low heat, or store until ready to use.

DSC_3793a

For the tomato jam

  1. Combine the tomatoes, onion, vinegar, water and sugar in a nonreactive saucepan, this is when I pull out the Le Creuset. Bring to a boil and reduce to a simmer.
  2. Allow to cook down until thickened, this may vary depending on the water content of the tomatoes. Remove from heat and cool. Season with salt and pepper.

DSC_3802a

For the scallops

DSC_3809ajpg
The small abductor muscle is tough, it is easy to pull off with your fingers.
  1. Remove the small abductor muscle from the side of the scallop. Pat dry with paper towels and season lightly with salt and pepper.
  2. Heat enough oil to film the bottom of a pan large enough to hold the scallops. If you don’t have one pan large enough, cook the scallops in two batches.
  3. When the oil just begins to smoke, carefully place the scallops in the pan, being careful not to crowd them. Sear on each side until golden brown. Time will vary based on your stovetop, but the hotter and quicker the better.

DSC_3820a


To Plate

  1. Place some puree on the bottom of a plate or bowl. Arrange three scallops on top of the puree and garnish with the tomato jam.

DSC_3831a