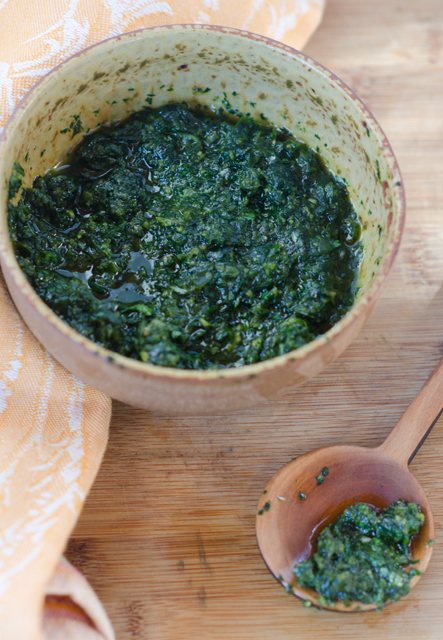
Whether you spell it zhoug, zhug, zhoog, or schug, they all describe the fiery Middle Eastern answer to pesto that has become the favorite accompaniment to Israeli street food. Zhoug didn’t have its origins in Israel. It was a staple of Yemeni cuisine and first brought to the newly created state of Israel (1948) during operation “On Wings of Eagles” that airlifted 49,000 Yemeni Jews to Israel.
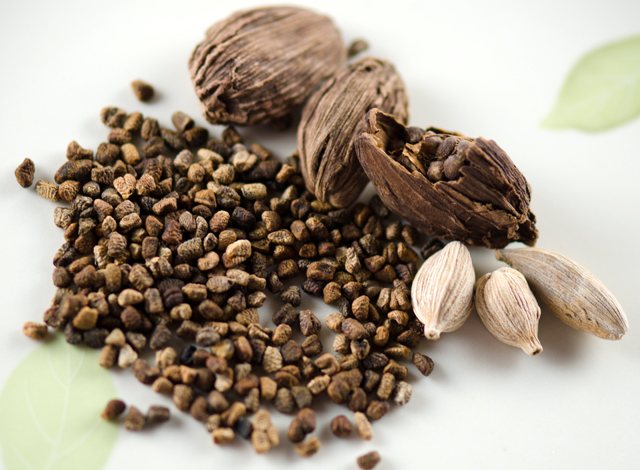
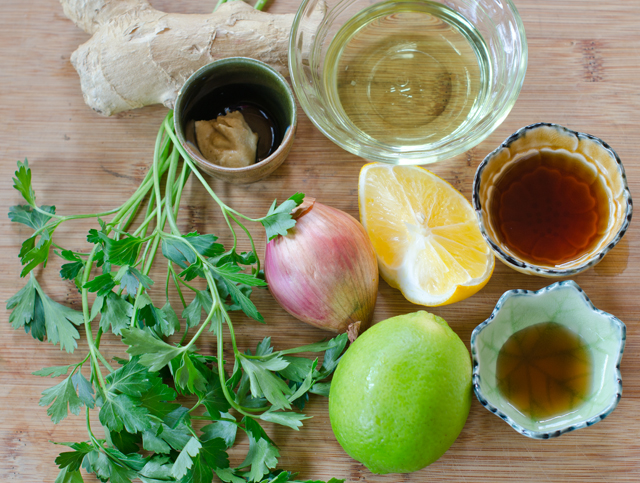
Traditionally zhoug is made in a mortar and pestle, but you can make it in a food processor in minutes. The word is zhoug is translated “ground” so use a light touch with the processor. The result should be a thick, slightly chunky paste. The basic ingredients are cilantro, garlic, hot peppers, green jalapeno or serrano, olive oil, salt and pepper. You can make it with half parsley half cilantro, or all parsley if you dislike cilantro. The addition of dried spices makes the sauce unique, cumin, coriander, cloves and an unexpected one, cardamom.
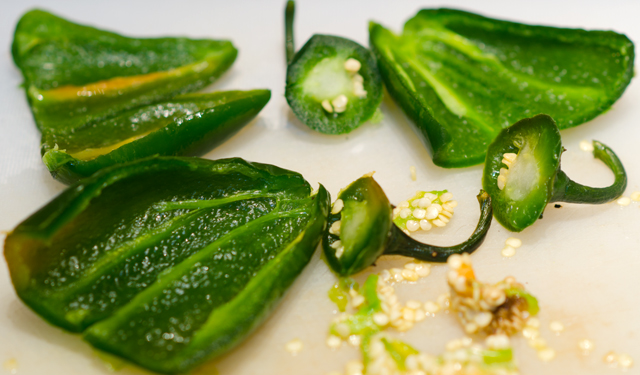
As with all hot pepper preparations, wear gloves and keep your hands away from your face. Use as many peppers as your taste buds allow, it is a hot sauce and the flavors blend and mellow out after the sauce is refrigerated. Place all of the dry ingredients into a food processor. Pulse the mixture, scraping the sides down periodically until it resembles a pesto-like consistency. Taste a bit of the mixture and adjust seasonings accordingly.
Zhoug is good with so many things, grilled lamb chops, roasted potatoes, stirred into yogurt for a delicious sauce, in your pita with falafel, any time you want to add a spicy kick.
Cardamom in its different forms.I used whole frozen jalapenos from last summer’s harvest and yes they are just as hot!!
Zhoug
Makes about a cup
Ingredients
2 ½ cups cilantro leaves
3-4 jalapeno peppers, stemmed, seeded
½ tsp cumin seeds
½ tsp cardamom seeds
½ tsp coriander seeds
¼ tsp salt
2 cloves garlic, peeled
½ c extra virgin olive oil
Fresh lemon juice to taste
Directions
Add cumin, cardamom and coriander seeds to a small dry skillet over medium heat. Toast the seeds, stirring frequently until they smell fragrant and toasty.
Grind spices either with a mortar and pestle or a mini processor/grinder.
Place the cilantro, jalapeno, garlic, toasted spices and salt into the food processor. Pulse the mixture, scraping the sides down as needed until a chunky texture is reached.
With the machine running, slowly pour in the olive oil and lemon. Taste and adjust with salt and lemon as desired. Store in fridge for a week.
Green zhoug is zhoug yarok, the red variety is zhoug adom.
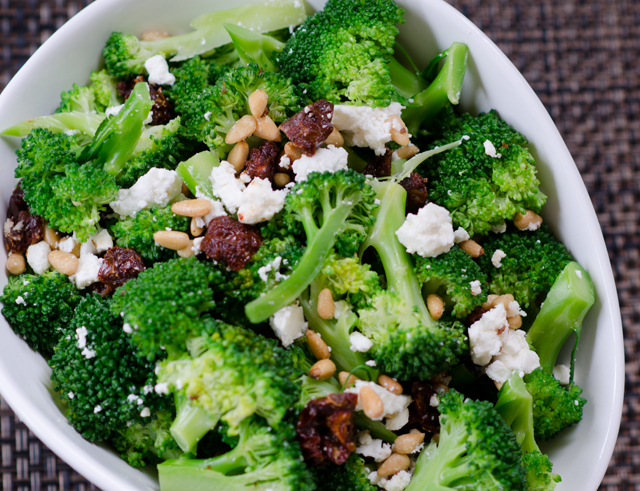
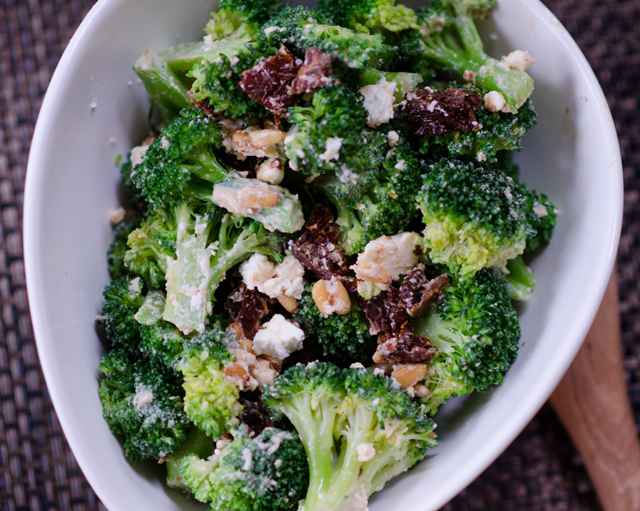
It’s the first full week of January so it’s time to put down those Christmas cookies and return to healthier eating habits. Quick and easy, this salad of crisp tender broccoli and sun-dried tomatoes is a good way to incorporate some great tasting vegetables into your dinner and diet. Broccoli is low in calories(30 calories in a cup) and high in fiber, potassium and iron. It is an excellentsource of vitamin C and a good source of vitamins A and B6.
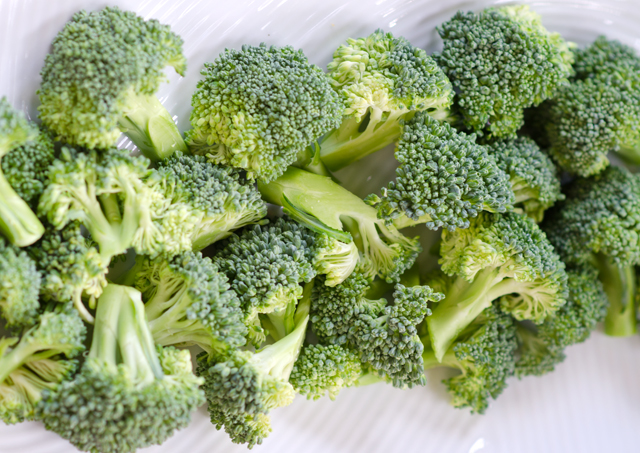
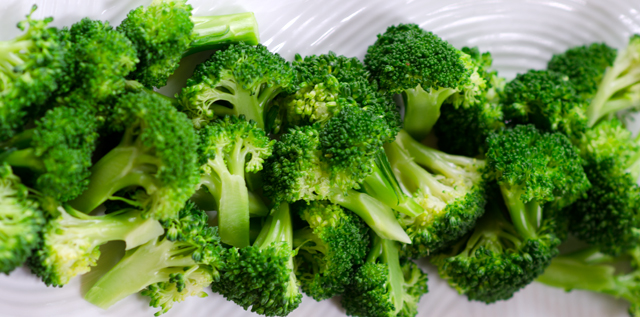
To blanch or not to blanch broccoli is a personal choice. I am not a fan of raw broccoliin a salad ( or anywhere for that matter) so I prefer the quickest blanching possible. I blanch broccoli for less than minute and immediately after draining, transfer to an ice bath to chill. The broccoli turns a bright green and will leave it crisp-tender without the harshness of raw broccoli. To prevent a soggy salad, dry the broccoli well, give the broccoli florets a spin in a salad spinner, then blot dry with a clean kitchen towel.
I chose an easy lemon tahini dressing for the salad. Tahini is a paste made from sesame seeds and oil. In the jar they separate, leaving a very thick paste on the bottom and the oil rises to the top. Use a small whisk or a spoon to recombine the paste and oil.Now you can combine all the ingredients for the dressing. The mixture will thicken, don’t worry about this. Add the water, a tablespoon at a time and whisking well after each addition until desired consistency. Drizzle dressing over the ingredients, and toss to coat. Salad will be best if allowed to rest for at least an hour. Store leftovers in fridge.
Before blanching.After a one minute blanch.
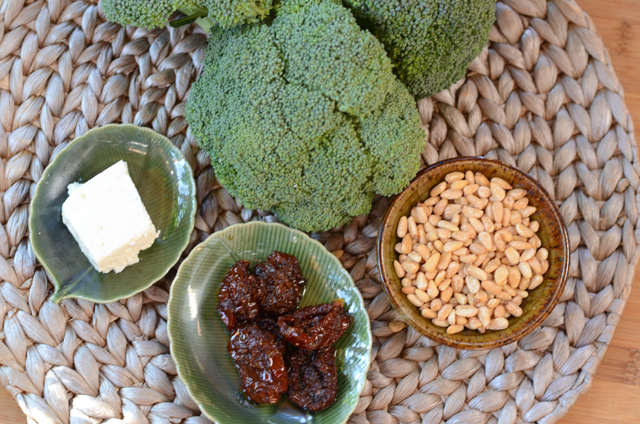
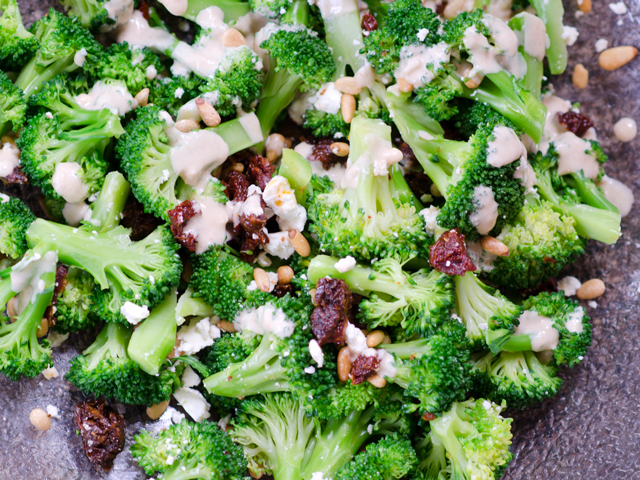
Broccoli Salad with Sun Dried Tomatoes and Feta
Serves four
Ingredients for Salad
6-8 cups of broccoli florets raw or blanched, cut into bite-sized pieces
½c chopped sun-dried tomatoes
½c crumbled feta cheese
¼c toasted pine nuts (can substitute walnuts)
Tahini dressing (recipe follows)
Tahini Dressing
Ingredients for dressing
¼ c tahini
2 T to ¼ c water (to thin out dressing)
2 T fresh lemon juice
1 T honey
¼ t smoked paprika (more if desired)
½ t cumin
Kosher salt and freshly ground pepper to taste
Directions for the tahini dressing and salad assembly
Add tahini to a medium bowl along with lemon juice, honey, smoked paprika and cumin. Whisk together until combined. Taste and add salt and pepper. Thin the dressing out to a pouring consistency.
In a medium bowl combine the broccoli, sun-dried tomatoes, feta and pine nuts. Drizzle dressing over the salad and toss well.
Let the salad rest for an hour to combine flavors. Store leftovers in the fridge.
Fall is just flying by. Especially for me. I have spent the last few months off my feet recuperating from a fractured pelvis. I missed the last steps coming down from the bedroom while holding on to my coffee mug. Sad to say the mug didn’t fare well either. Now that I am back on my feet, it’s time to get back in the kitchen.
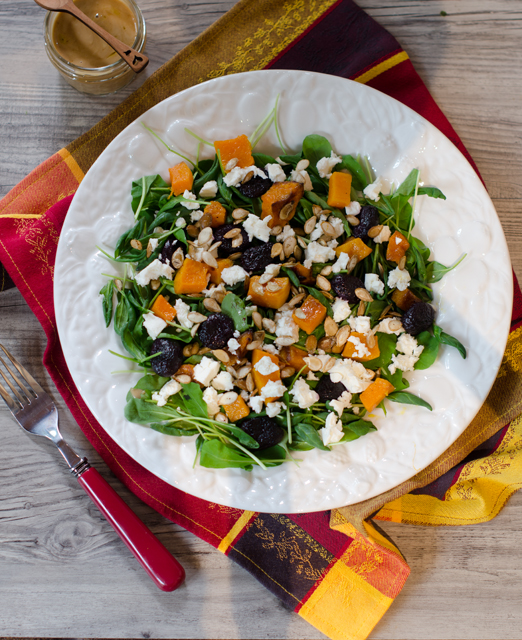
First on the agenda, a seasonal salad for Thanksgiving dinner. Most autumns we are enjoying green salads to the end of September, kale even later in the season. Too much rain this summer put an end to garden salads much too early.
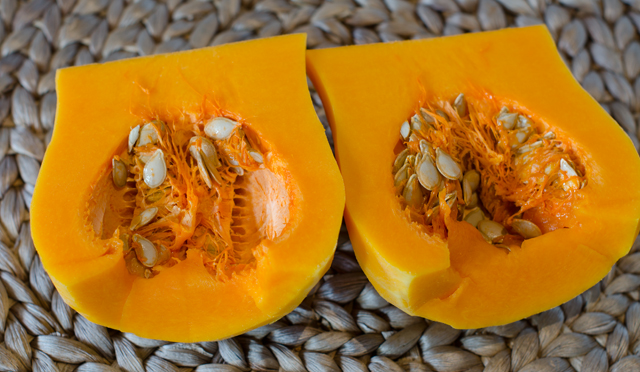
Joe doesn’t like raw kale in salads, so I chose a combination of spinach and arugula as the base to the salad. The next ingredient came from the garden, butternut squash. I peel the squash and cube it into 1 ½”inch pieces. Toss with olive oil, salt and pepper and place on a baking sheet. Roast for about 20 minutes, tossing the squash halfway through the cooking time and rotating the baking sheet. The amount of squash may seem like a lot, but roasting condenses their size and concentrates their flavor.
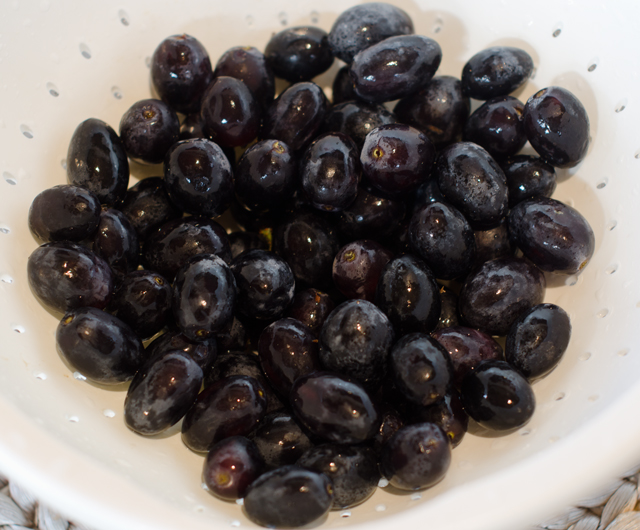
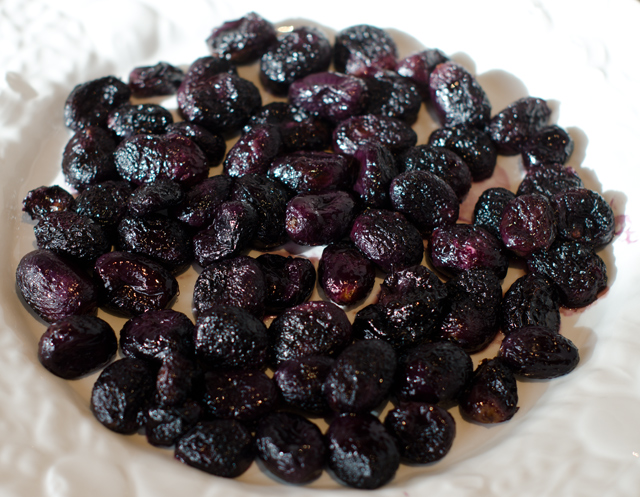
Speaking of concentrated flavor, if you have never tried roasted grapes, you will be in for a real treat. Like roasted vegetables, roasted grapes have a deeper richer flavor. Roasted grapes can be added to a cheese tray, salads or to chicken and pork dishes. Just rinse and pat dry, removing any damaged grapes. Toss grapes with a little olive oil, kosher salt and freshly ground pepper. Roast on a sheet pan at 425° F for about 30 minutes. Shake the pan halfway through to ensure even baking.
If you are going to roast butternut squash, why not save the seeds? Peel the squash, cut in half lengthwise and scoop out the seeds. I use a grapefruit spoon with its serrated edges to help the process along. I put all the seeds in a bowl of water, they aren’t as slippery and it’s easier to separate the seeds from the membrane. Drain the seeds in a colander, then lay out on paper towels cover with another towel. If you have the time, lay them out overnight to make them as dry as possible. Place seeds on a baking sheet and roast until they begin to pop and turn a light brown in color. Having a second larger baking sheet on the bottom shelf catches most of the ones that pop off the baking sheet. Alternately, use raw pumpkin seeds and follow the same procedure.
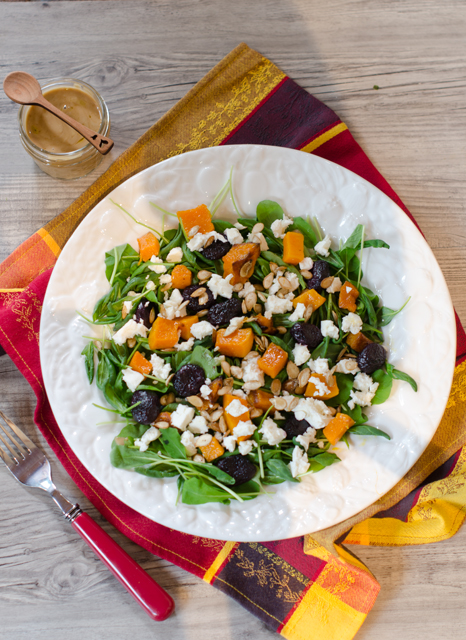
I dressed my salad with an easy to make maple balsamic dressing. A sprinkling of cheese is always nice, feta or blue works well here. For Thanksgiving I used cubed cheddar for something a little different. Different components of the salad, roasted grapes, the dressing, butternut squash cubes and roasted seeds can be made several days in advance. Add grilled chicken or shrimp for a nice lunch or light supper.
Roasted Grape and Butternut Squash Salad with Maple Balsamic Dressing
Serves four
Ingredients for the roasted grapes
3-4 cups of either red or black seedless grapes
Extra virgin olive oil
Kosher salt
Directions for the roasted grapes
Preheat oven to 425°. Destem the grapes, wash and pat dry.
Place the grapes in a bowl. sprinkle lightly with olive oil and kosher salt.
Transfer grapes to a baking sheet and roast for 30 minutes. Shake pan and move front to back halfway through the baking process. Store in an airtight container if not using right away.
Ingredients for roasted squash
1 medium butternut squash 3-4 lb
Olive oil
Kosher salt
Fresh ground pepper
Directions for roasted squash
Peel, halve and seed the squash, cut it into 1 inch cubes. In a large bowl toss the squash with olive oil and season with salt and pepper. Place evenly on the prepared baking sheet. Roast until golden brown, about 20 minutes, at the halfway point carefully move the cubes around on the sheet to ensure even browning. Set cubes aside to cool. You will have enough for several days worth of salads.
Ingredients for toasted squash seeds
Peeled and halved butternut squash from the previous step.
Directions for roasted squash seeds
Preheat oven to 350°F.
Use a spoon ( a grapefruit spoon works well) to remove the seeds and pulp. Use your fingers to separate the seeds from the pulp. Put the seeds in a small bowl of water. I find this makes it easier to separate any stubborn pulp from the seeds. Transfer the seeds to a colander and rinse.
Put squash seeds on a layer of paper towels and pat them as dry as possible.
Toss seeds with a little olive oil, salt and pepper. Place seeds on a dry baking sheet in a single layer.
Roast for about 15-20 minutes, stirring a few times, . Keep a close eye on them as they can burn easily.
Cool before using, 5 to 10 minutes, the seeds will become crisper as they cool.
Store in an airtight container.
Ingredients for Maple Balsamic Dressing
1 T pure maple syrup
½ c mayonnaise or Greek yogurt
¼ c balsamic vinegar (I used pomegranate balsamic)
½ t fresh lemon juice
Kosher salt
Freshly ground pepper
Directions for Maple Balsamic Dressing
Combine all ingredients in a small bowl . Whisk until smooth.
Ingredients for Salad Assembly
Baby spinach and arugula
Roasted grapes
Roasted butternut squash
Roasted squash seeds
Crumbled feta
Maple balsamic dressing
Directions for Salad Assembly
Place greens in a large salad bowl, toss lightly with dressing. Add grapes, butternut squash seeds and feta, toss again. Using tongs, transfer salad to individual salad plates. Pass freshly ground pepper and additional dressing.
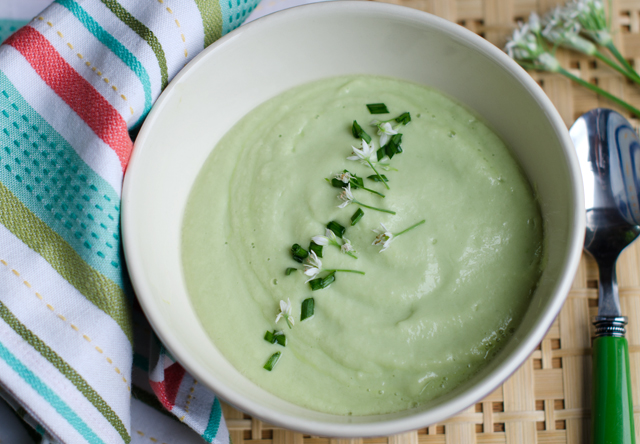
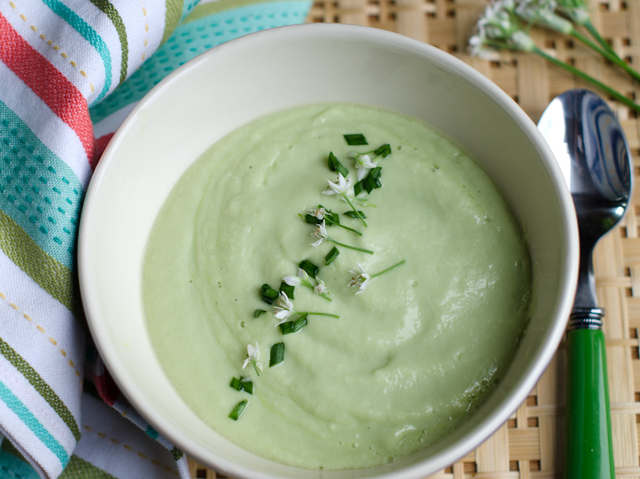
Nothing is more refreshing to start a meal on a hot and humid summer day than a chilled soup. It’s even better when those ingredients can go right into the blender, no need to spend time cooking over a hot stove. This recipe combines crisp juicy cucumbers and creamy avocado with tangy lime and garlic chives.
All the “green” in the recipe is courtesy of the garden, except the avocado and possibly in the future we will have those as well. Our wonderful and very thoughtful sister-in-law Jody, gave Joe an Avoseedo, an ingenious seed starting device that helps you sprout an avocado pit. With minimal attention, changing the water every 1-2 weeks, in a few months you will have an avocado plant. He’s planted two in pots so far. Certainly beats the old toothpick over a glass of water method. Be sure to use a ripe avocado for a smooth puree.
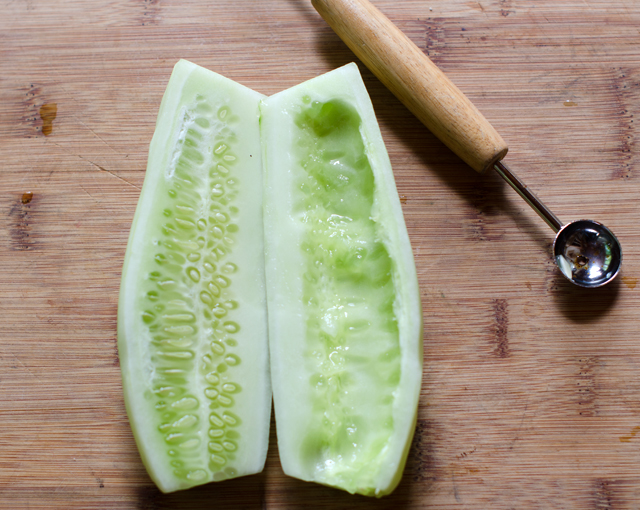
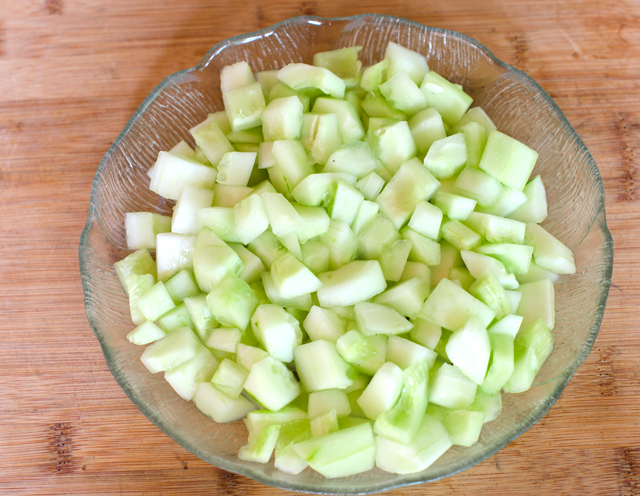
This is primetime for cucumbers in our garden, just wish they didn’t come in all at once. Since our cukes were more mature they were a bit seedy and the skins thicker, I peeled and seeded them for this recipe. First trim the ends, peel, then cut in half. I found a melon baller (small side) to be the best way to scoop out the seeds. Cut the sections into half-inch chunks. I used three cups of peeled and seeded chunks.
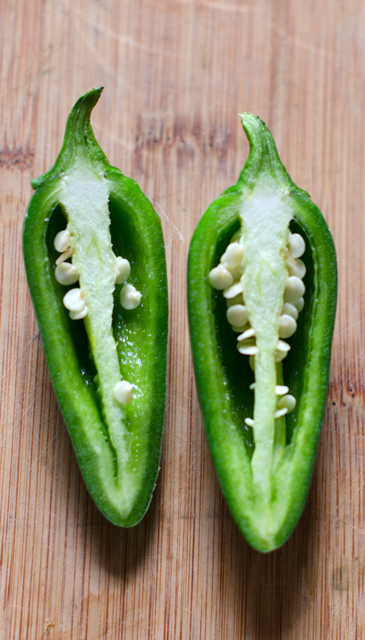
The jalapeno and other hot peppers are making an earlier than usual appearance in the garden. That’s good but there is a rabbit that is taking a bite out of quite a few of our peppers before we can harvest them. Time to put up the chicken wire. Half of a jalapeno added to the soup was the right amount for our taste. Peppers can vary in heat so taste a small piece of the pepper first and add accordingly. Our Persian lime tree is producing the most fragrant and juicy fruit, about two dozen on the tree at last count. Fresh lime juice adds the right acidity and brightness to the soup.
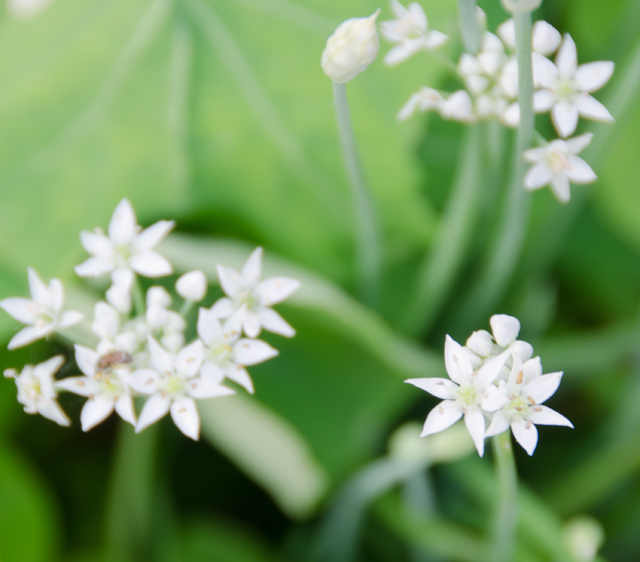
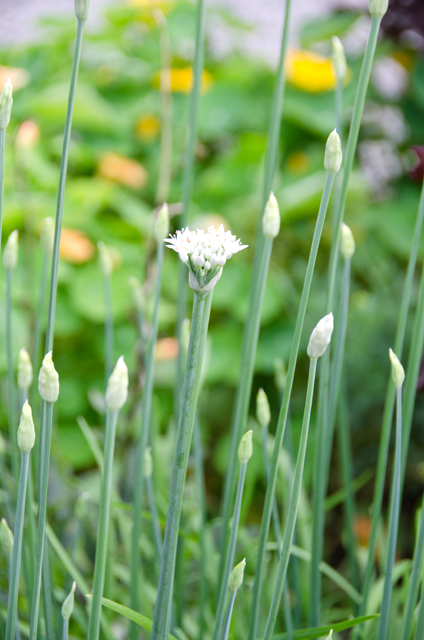
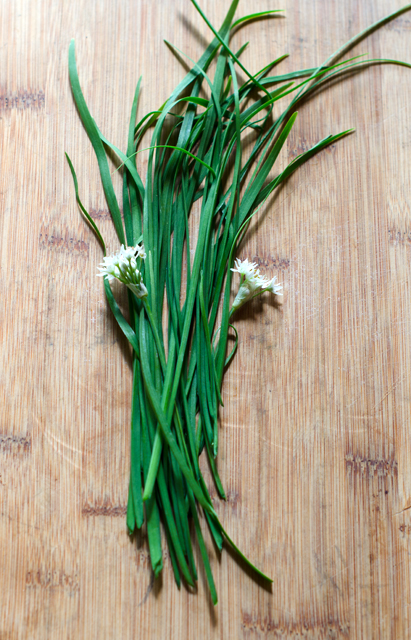
Garlic chives, also known as Chinese chives are the perfect herbal accent for this soup. If you are not familiar with them, common chives are tube-shaped and bright green while Chinese chives are a darker green and flat. Common chives have pinkish-purple globe like flowers that appear in the spring while Chinese chives have white star-shaped blossoms that are only starting to appear now. The flavor as the name indicates, is garlicky, but milder than a garlic clove.
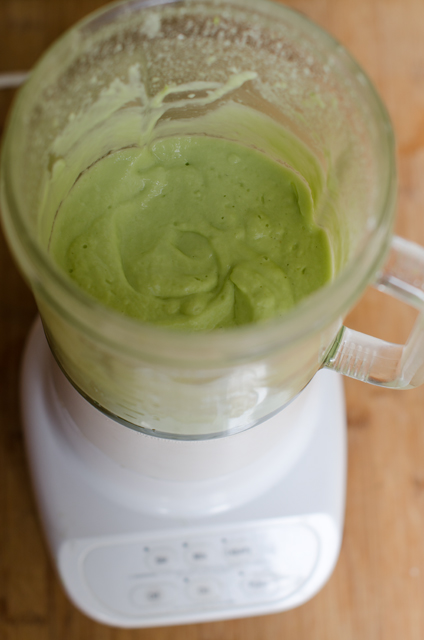
The soup couldn’t be simpler to make, put all the ingredients in the blender and puree until the soup is smooth. Add yogurt to your liking, anywhere from a half to a full cup. Season with salt and pepper to taste. Place in a bowl and refrigerate for 4-6 hours to allow the flavors to blend. Before serving you may need to thin the soup out with a little water or milk. Garnish with chopped garlic chives and flowers. Makes a delicious first course or light lunch.
Garlic chives in the garden.
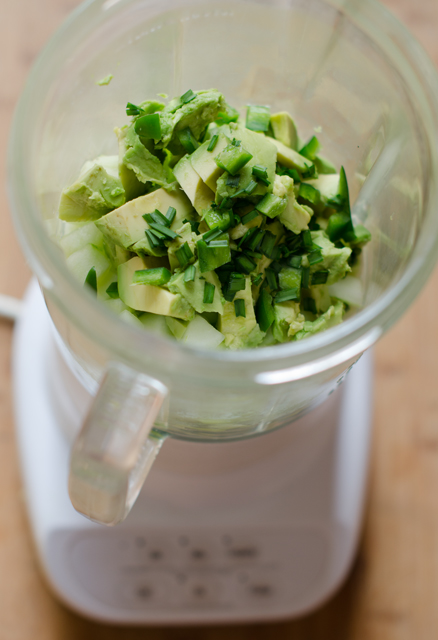
Garlic chives are flat with white flowers.The heat in the jalapeno comes from the white ribs.I used the smaller end of the melon baller to scoop out the cucumber seeds.Chop into 1/2 inch pieces.Into the blenderPuree until smooth
Spicy Cucumber Avocado Soup
Serves 3-4
Ingredients
3 cups cucumbers, peeled and seeded, cut into ½-inch chunks
1 medium ripe avocado
½-1 c Greek style low-fat plain yogurt
2 t fresh lime juice
½ chopped jalapeno (or to taste)
2 T chopped garlic chives
kosher salt and pepper to taste
Directions
Peel and pit the avocado. Cut into chunks.
Place all the ingredients in a blender and blend until smooth, about 1 minute. Taste for seasoning and add more salt if desired. Thin the soup out with a little cold water if necessary.
Refrigerate the soup for several hours to blend the flavors. Serve garnished with chopped garlic chives and flowers.
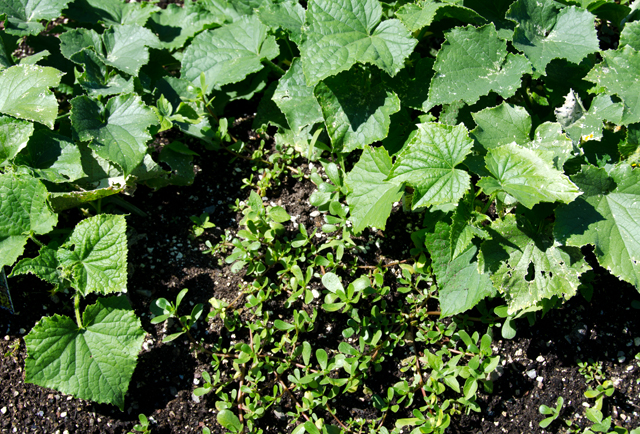
The next time you are weeding, take a second look, you may be unintentionally pulling out the most nutritious green in your garden. Purslane, also known as duckweed, fat weed, little hogweed and pursley, is the only weed that can claim “superfood” status. Purslane is a rare plant source of omega 3 fatty acids, found in fish and flax seeds. It is also a good source of vitamins A, C and B, magnesium, potassium, calcium and iron. Did I mention it’s low in calories and a good source of fiber? Not bad for a plant that is an uninvited guest everywhere from fertile garden soil to the cracks in your driveway.
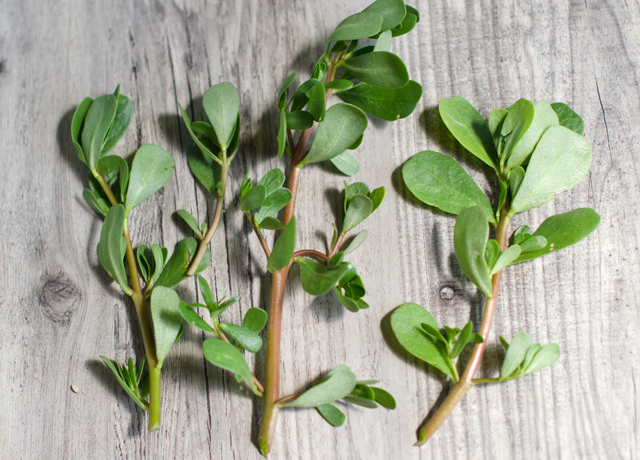
Purslane looks a bit like a miniature jade plant with small oval-shaped fleshy leaves that grow on thick succulent stems. Early season purslane leaves and stems are tender and edible, snip branchlets from heavier stems. The plant produces yellow flowers that will eventually produce tiny black seeds. Later in the summer separate larger leaves from mature stems. Most important, be sure you are harvesting purslane from areas that are not treated with herbicides. When in doubt, don’t pick!
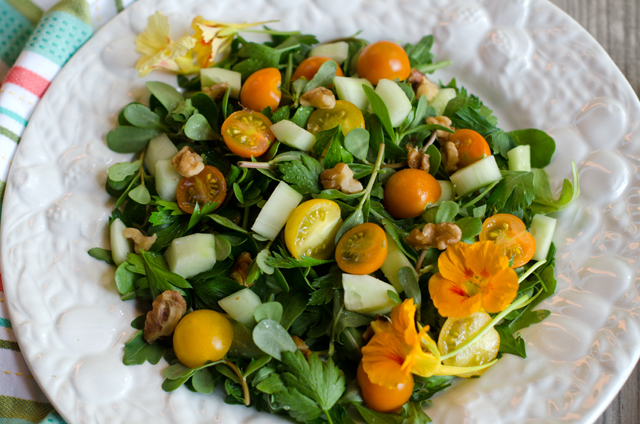
Purslane is native to India and Persia and is widely used in both cuisines. In Mexico purslane is known as verdolagas where it is combined with pork to make a classic stew. Purslane’s succulent-like leaves have a refreshingly crisp texture with a slightly tart finish. You can use it raw in salads or cooked as a side dish.
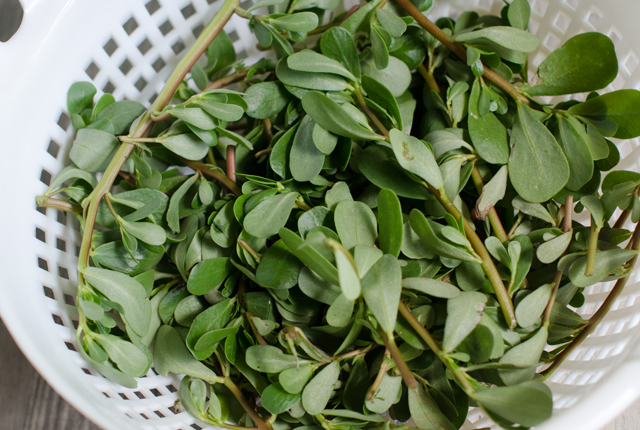
Purslane is abundant in our garden this year. I am using it as a “transitional green” between the greens we harvested for salads in the spring and the new crop that will be ready to pick soon. I harvest it daily but it can be kept in the refrigerator for several days. Since purslane grows so close to the ground it should be rinsed very well in several changes of water. I fill a sink with cold water and submerge the purslane and swish it around to loosen the dirt that may be attached to it. The purslane floats and the dirt (most of it) sinks to the bottom. At this point you can remove any bruised or damaged leaves. Then I lift it out and give it a second quick soak it in the salad spinner. now it is ready to spin.
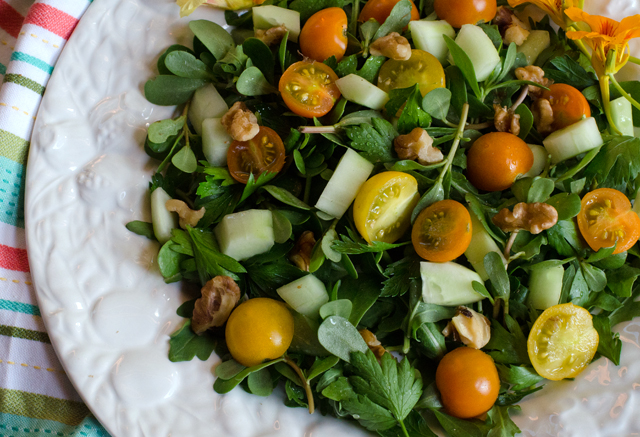
In this salad, purslane is combined with a little flat leaf parsley, baby arugula (ours will be ready soon) and cucumbers and sweet Sungold tomatoes from our garden. Walnuts add a little crunch, garnish with edible nasturtium blossoms for additional color.
Purslane has popped up next to the cucumbers.My daily purslane harvest.Up close and personal for better identification.
Purslane Salad
Serves two
Ingredients
2 c purslane leaves and tender stems
½ c Italian parsley leaves
2 c baby arugula
1 medium cucumber, peeled, quartered lengthwise, seeds removed, cut into 1″ pieces
1 dozen small tomatoes like Sungold, cut in half
1/3 c chopped walnuts
lemon juice or a light vinegar
Extra virgin olive oil
Kosher salt and freshly ground pepper to taste
Nasturtium blossoms for garnish.
Directions
Combine greens, cucumber, tomatoes and walnuts in a large bowl. Sprinkle with some kosher salt and toss.
Add a splash of lemon juice or vinegar and a tablespoon or so of olive oil and toss. Taste a leaf and correct seasoning as needed.
Divide on two plates and season with fresh ground pepper. Garnish with nasturtium blossoms and serve.
Is there any other vegetable as versatile as cauliflower? Puréed as a substitute for mashed potatoes, broken down into fine grains like rice, couscous and polenta, filling in as both pizza crust and tortilla, sometimes I think we forget how good it is without the disguises. I love to toss cauliflower florets with olive oil, salt and pepper and roast them until crispy brown on the outside and tender and creamy to the bite. A tray of roasted cauliflower sometimes doesn’t make it to the dinner table, we finish it off like popcorn. I shouldn’t leave out cauliflower “steaks”, thick slabs roasted in the same fashion as the florets and just as good. But the version that is visually impressive and surprisingly not that hard to do is whole roasted cauliflower. The internet has countless recipes for whole roasted cauliflower, most of the ones I read just baked the cauliflower. This one, from Israeli celebrity chef Eyal Shani in the latest issue of Milk Street Kitchen uses two techniques, poaching in well salted boiling water and then roasting at a high heat.
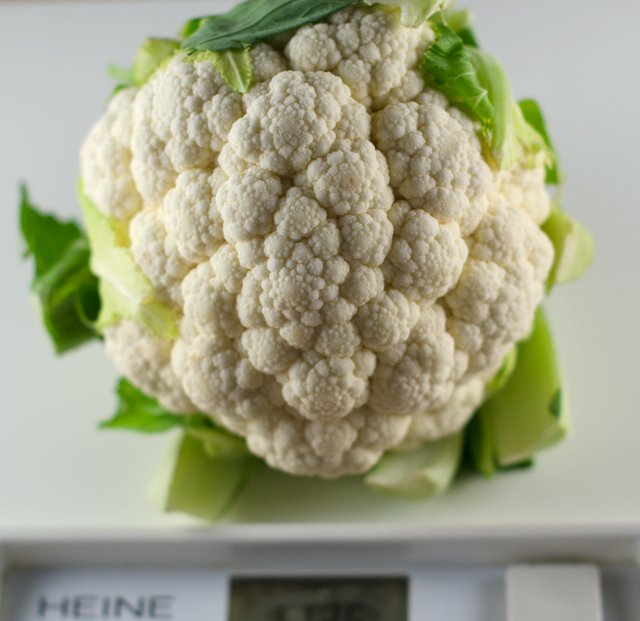
Prime season for cauliflower is in the fall and the ones available at farmers markets can be as large as 4-5 pounds. Out of season we depend on the wrapped varieties in our local supermarkets. Look for a cauliflower that weighs about two to two and half pounds. A larger head will be overcooked on the outside before it is tender on the inside. To begin the two step cooking process, get a large pot of water on to boil and preheat your oven to 475°F with the rack in the middle position.
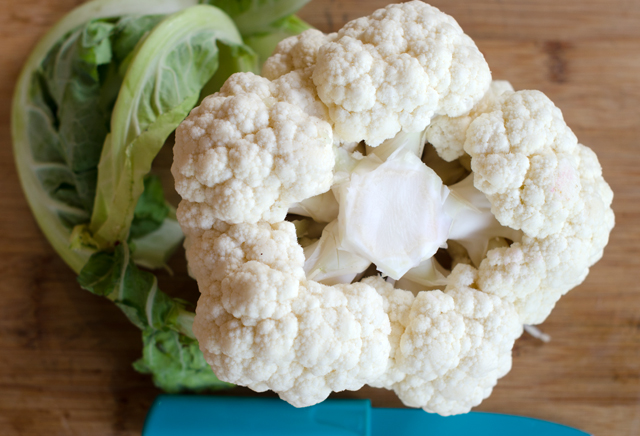
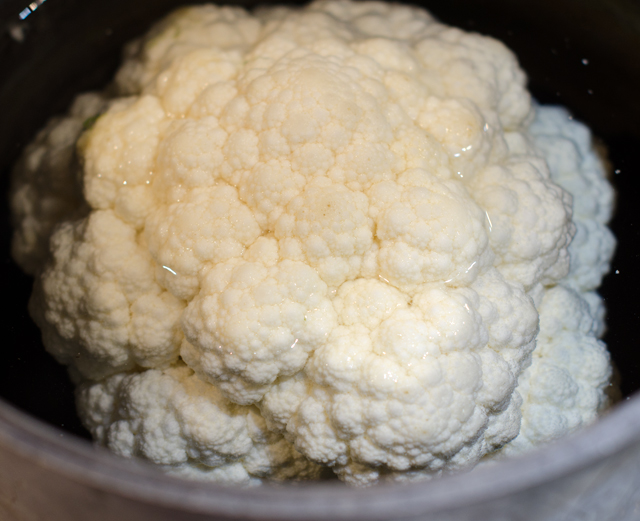
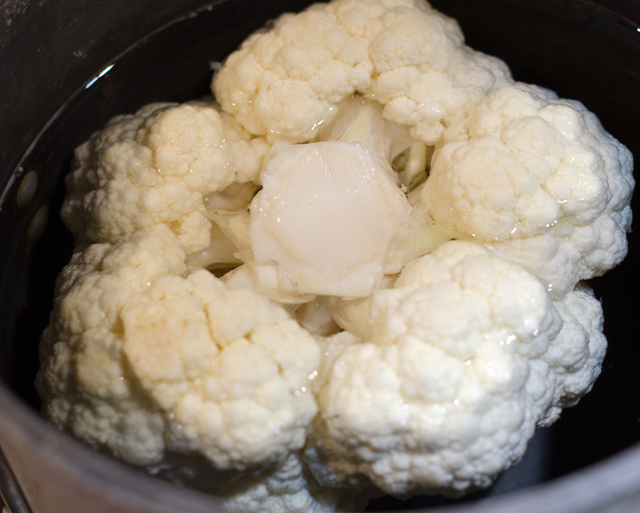
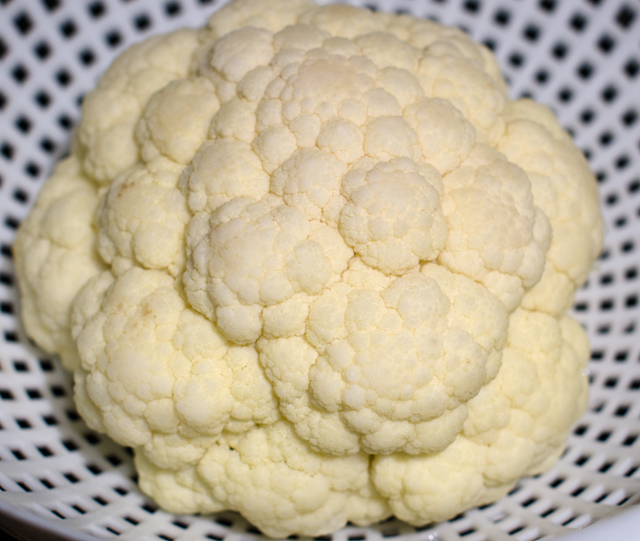
While you are waiting for things to heat up, carefully trim off the leaves and the hard core near the bottom of the cauliflower. Leave the main stem intact and make sure not to cut through any of the florets. When the water has come to a rolling boil, add a half cup of kosher salt to the water. Carefully lower the cauliflower into the boiling water and immediately set a timer for five minutes. Since the cauliflower floats to the top, you will need to flip it halfway through the cooking process so it will cook evenly. When the timer goes off, transfer the cauliflower, stem side down to a colander. I found that a large Chinese strainer made this process easy. Allow the cauliflower to drain for at least ten minutes, you want the cauliflower to roast, not steam.
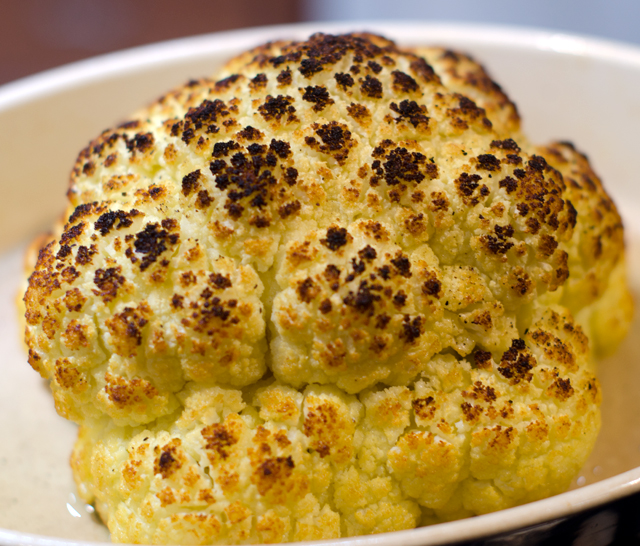
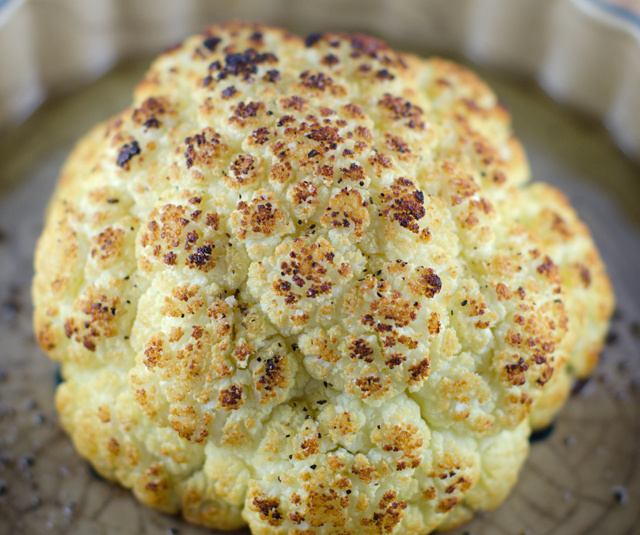
Transfer the cauliflower to a shallow sided baking dish, stem side down of course. Sprinkle with pepper or a pepper seasoning blend and rub with olive oil. Don’t neglect the bottom florets. Place the dish in the oven and bake, rotating the dish several times during the cooking process. This will allow for even browning. Tilting the pan with a potholder, use a small spoon to redistribute any olive oil that accumulates in the pan. The cauliflower is done when it is golden brown on the outside and the center is easily pierced with a skewer. Let cool for five minutes and serve right in the baking dish. Use a knife to cut into wedges. Delicious as is, or serve with your favorite dipping sauce.
Start with a cauliflower that weighs about 2 lbs.Trim away the leaves and the hard stem.Blanch cauliflower in a large pot of well salted water. Salting the water ensures the cauliflower is seasoned to the core.At the halfway point flip the cauliflower to the other side.Immediately transfer cauliflower to a colander to drain, stem side down.The finished product.
Whole Roasted Cauliflower
Serves two to four
Ingredients
2-pound cauliflower
Kosher salt and fresh ground pepper
3-4 T extra virgin olive oil
Directions
Preheat oven to 475°F with the rack in the middle position. In a 6 to 8 quart pot, bring 4 quarts of water to a rolling boil. While you are waiting for the water to boil, trim the green leaves and hard stem from the cauliflower. leaving the core and florets intact. Add a ½ cup of salt to the water and when it comes to a boil carefully lower the cauliflower into the water. Immediately set a timer for five minutes. Flip the cauliflower half way through the cooking process. Remove from heat.
Transfer the cauliflower to a colander stem side down and drain for at least 10 minutes.
Transfer the cauliflower to a shallow sided baking dish, stem side down.
Drizzle with olive oil and use your hands to rub it in. Season with fresh ground pepper.
Roast in the preheated oven, rotating the baking dish several times during the cooking process. Spoon oil that accumulates in the pan back over the cauliflower.
Cauliflower is done when golden brown on the outside and a skewer can easily pierce the center, 20-25 minutes.
Let rest for five minutes and serve in the baking dish.
Weekends at our house, fish is always on the menu and most likely it was purchased at Heller’s Seafood in Warrington Pa. Not the closest location to us, but worth the trip because I can always be assured of the quality and freshness of the seafood I purchase. How we cook the fish depends on the weather. In the warmer seasons we often cook whole fish on the grill stuffed with lemon and herbs or a fillet cooked on a fragrant cedar plank.
This time of year with temperatures still in the forties most days, the fish is baked according to Canadian fisheries method. Just measure your fillet, steak or whole fish at the thickest part and follow the rule of 10 minutes per inch or 5 minutes per side per inch. So often the real question is, how am I going to season and accent the flavors of the fish I am cooking. Meaty swordfish pairs nicely with a rich olive tapenade, sometimes I make my own but occasionally I will just pick up a container at the local supermarket for a quick meal. We top red snapper with a south of the border style Veracruzana sauce, especially good in summer with garden fresh tomatoes.
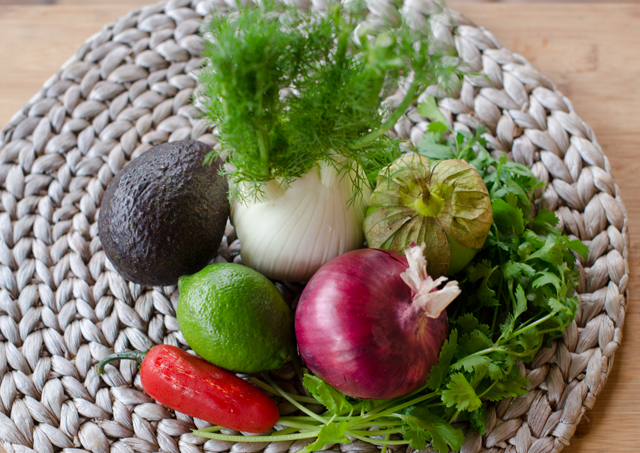
Recently while searching for a recipe for crispy skinned fish I came across a relish that is an excellent accompaniment to many fish preparations. Avocado, tomatillo and fennel relish originates from a television program on Food Network, “Worst Cooks in America,” not necessarily a place where I would look to find a recipe. Worst Cooks is a program on Food Network that takes contestants, as known as “recruits” with poor cooking skills and puts them through a culinary boot camp to earn cash prizes. This recipe was contributed by chef, restaurateur, cookbook author and Emmy award-winning reality television host, Bobby Flay. Bobby was one of the two mentors for seasons 3 to 5 and this episode is titled straight edge skills. In the clip I saw from the episode Bobby told the recruits he was looking for uniformity and good technique. I didn’t hold out much hope for the recruits I saw, one declared his fear of knives and mistook fennel for an onion and another was cutting the avocado without using the cutting board and only succeeded in cutting himself.
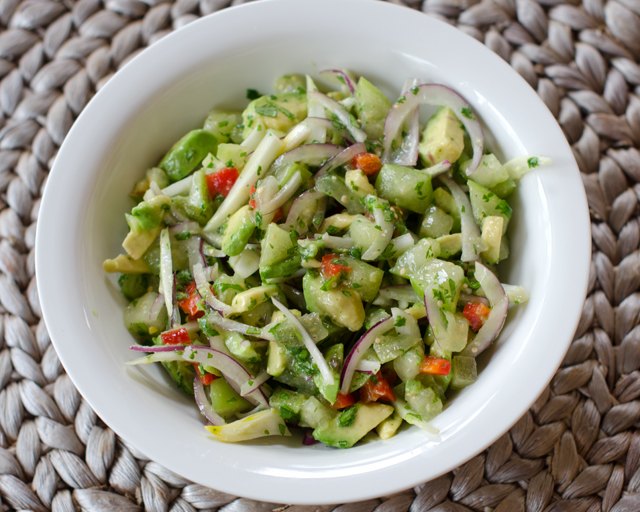
The relish relies on precise knife technique, small dice, fine dice, julienne and a little slicing.With a sharp knife it should go fairly quickly. What I really love about this dish is the contrast in textures and flavor. Tomatillos give a little citrus bite, avocado brings a creamy nuttiness and the fennel is crisp and licoricey sweet. Add pepper to your taste, the original recipe called for a serrano, I opted for a jalapeno, that’s not quite as hot. The original recipe called for red wine vinegar with a touch of honey I substituted grapefruit balsamic from The Tubby Olive.
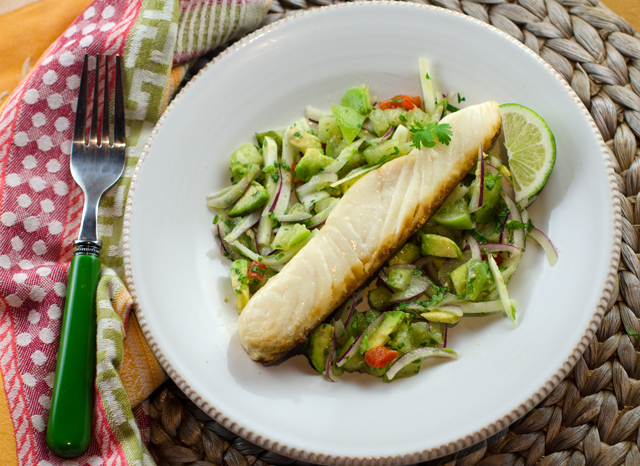
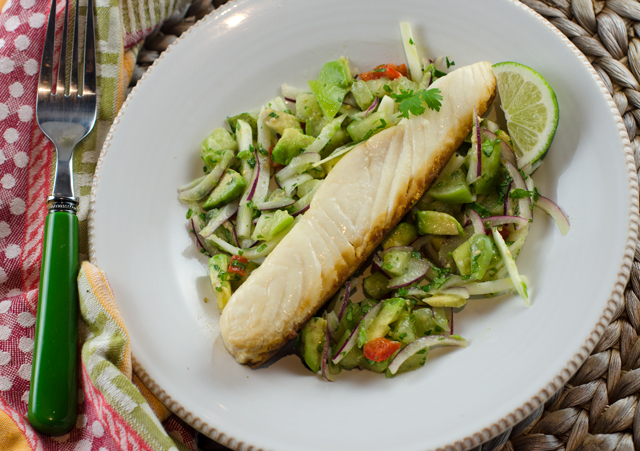
Halibut with Avocado, Tomatillo and Fennel Relish
Serves two
Ingredients
1 medium fresh tomatillo, husk removed, rinsed well and cut into small dice
½ medium avocado, peeled, pitted and cut into small dice
½ jalapeno, seeded and cut into small dice
¼ small head fennel, cut into julienne
¼ small red onion, thinly sliced against the grain
1 T neutral oil (canola, grape seed)
Juice of ½ fresh lime
Touch of red wine vinegar and honey or 1 T fruit vinegar
Kosher salt and freshly ground black pepper
2 T chopped fresh cilantro.
Two 6-oz. firm white fish fillets like halibut, grouper or cod
Directions for the relish
Combine the tomatillo, avocado, jalapeno, fennel and onion in a medium bowl.
Drizzle with the oil, lime juice, vinegar and honey. Season with salt and pepper and fold in the cilantro.
Cooking the Fish
Preheat oven to 450°F.
Coat a shallow baking dish with non stick spray. Season the fish fillets with salt.
Measure your fish fillets at the thickest point. Bake the fish for 10 minutes for every inch of thickness.
Serve halibut with the relish and a wedge of lime.
With three nor’easters bringing snow, rain and high winds over the last week or so and two more anticipated this week, it’s hard to believe that the first day of spring is tomorrow. We are months away from the heart of the summer produce season but that doesn’t mean you can’t enjoy a delicious fresh salad. Using this formula for a roasted vegetable salad from Fine Cooking magazine is just what you need to stimulate your cooking creativity and beat the winter blahs.
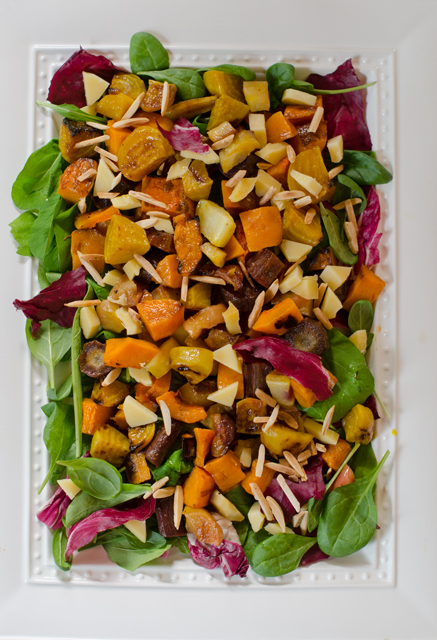
Hearty greens like spinach, arugula and radicchio form the base of this salad. Other choices could include baby greens like kale, collards and chard. I must emphasize baby (immature), because the mature greens are quite toothsome and should be used in recipes where they are cooked. This is a good time to experiment with bitter greens like escarole, endive and radicchio. They contrast nicely with sweetness of the roasted vegetables.
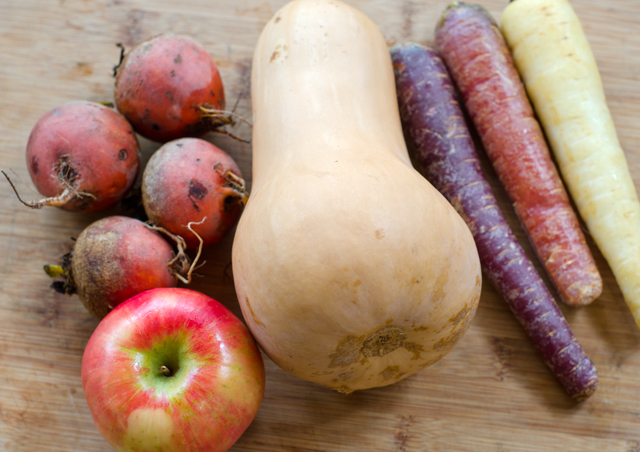
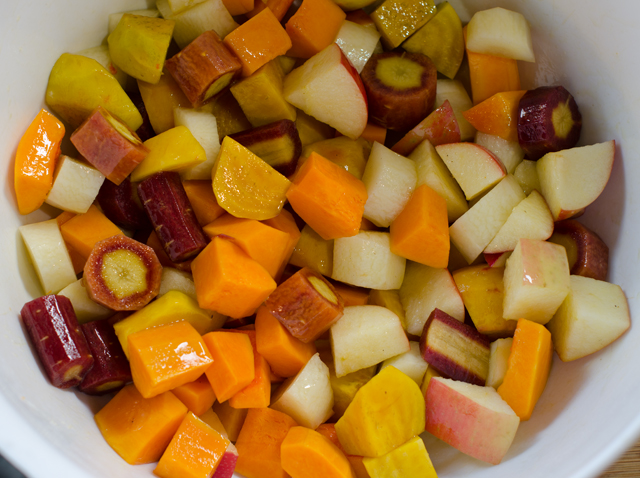
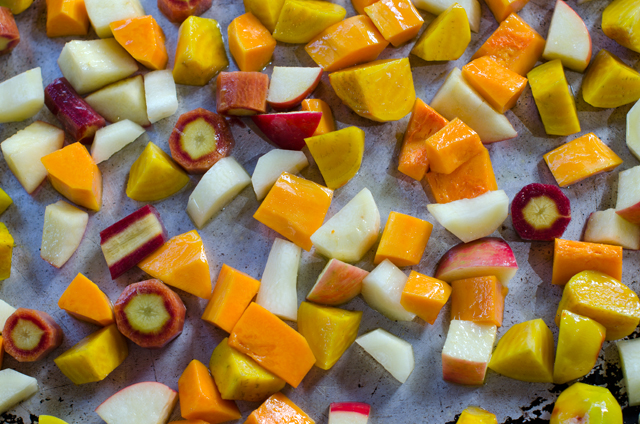
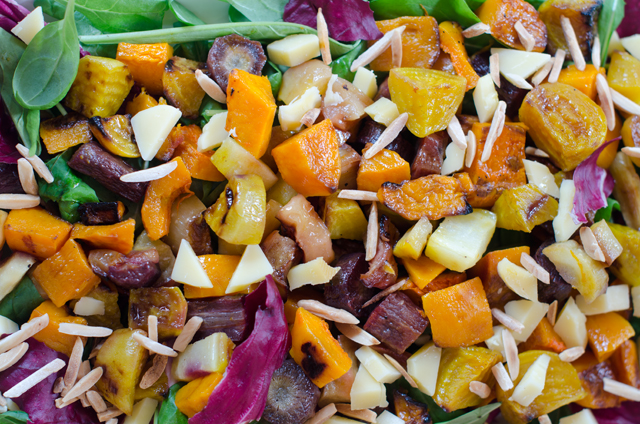
Roasted vegetables give the salad substance and a lot of deep rich flavor. Root vegetables, potatoes and winter squash are great for roasting, you can even add apple and pear wedges. Cut the vegetables into fairly even sized pieces so they cook evenly. Toss the vegetables with olive oil and some kosher salt. If you are using red beets, toss and roast on a separate pan. Otherwise the beets will discolor the other vegetables on the baking sheet. Roast about 20 minutes, tossing veggies halfway and rotating the baking sheet. The amount of vegetables may seem like a lot but roasting condenses them in size and concentrates their sweet flavor. I used golden beets, rainbow carrots, butternut squash and apple, all items I had in my pantry. So for me it was a “clean out your fridge” recipe.
The salad is accented with cheese and nuts that add contrasting flavors and textures. Aged Gouda brings a sharp, sweet flavor reminiscent of butterscotch and toasted slivered almonds add a wonderful aroma and crunch. An optional sprinkling of dried fruit, raisins, dried cranberries, figs give a nice touch as well.
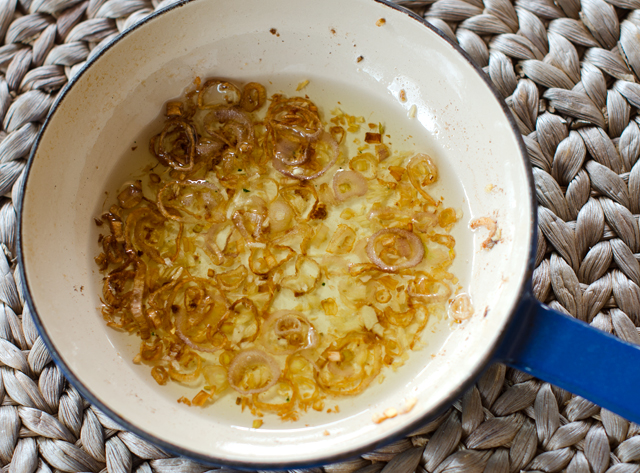
A slightly tart white balsamic lime vinaigrette is a pleasing contrast to the sweetness of the roasted vegetables. I chose this recipe because Joe picked a large yellow, very fragrant lime from our Persian lime tree. This vinaigrette calls for an oil you may not be familiar with. High in polyunsaturated fats and vitamin E, grape seed oil is extracted from the seeds of grapes. Its flavor is neutral allowing the infused flavors of shallots and ginger to shine through.
White balsamic vinegar is made from the same variety of white grapes as dark balsamic . While the dark balsamic is simmered for hours and aged in barrels for years, white balsamic is slow cooked to avoid caramelization and is not aged. White balsamic vinegar is a good choice when you don’t want to darken the appearance of your final dish.
Toss the greens in a large bowl with a drizzle of the warm vinaigrette. Distribute the greens on two plates. Next, gently toss the roasted vegetables with some of the remaining vinaigrette. Distribute the vegetables over the plates, along with the nuts, cheese and optional fruit.
This would be a nice vegetarian lunch or dinner. Add chicken or thinly sliced flank steak if you need to include meat. The formula gives you the chance to be creative and make your own unique and delicious salad.
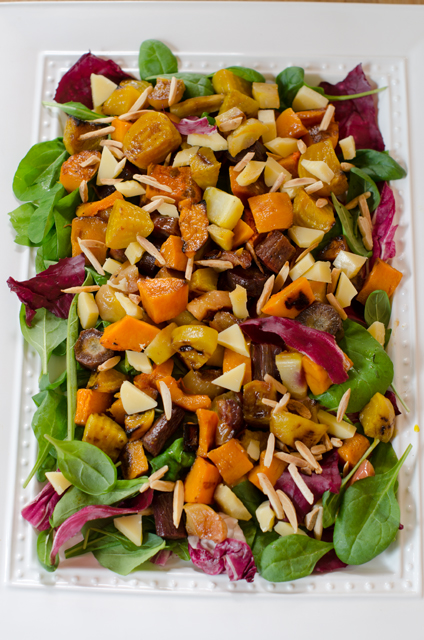
Butternut Squash, Golden Beet, Carrot and Apple Salad
Serves 2
Ingredients for the roasted vegetables
6-7 c mixed vegetables and fruit, I used butternut squash, rainbow carrots, golden beets and apple, trimmed and peeled.
2 T extra virgin olive oil
Kosher salt
Directions for the roasted vegetables
Position oven rack in the center and preheat oven to 450°F.
Trim vegetables into 1-inch dice or wedges.
In a large bowl, combine the vegetables and fruits with the oil and 1 t salt.
Toss well and transfer to a large rimmed heavy-duty baking sheet.
Spread the vegetables evenly on the baking sheet.
Roast. flipping the vegetables halfway through the baking time and rotating the baking sheet.
Cook until the vegetables are browned and tender, 20-25 minutes.
Let cool and transfer to a large bowl.
Toss the vegetables with olive oil and salt.Spread out evenly on a baking sheet.
Ingredients for the white balsamic lime vinaigrette
¼ c grape seed oil
1/3 c thinly sliced shallots
kosher salt
1 t chopped fresh ginger
2 T white balsamic vinegar
1 T maple syrup or honey
1 T fresh lime juice (more to taste)
1 t grated lime zest
1 t fine minced parsley
1 t Dijon mustard
Freshly ground black pepper
Despite the color, this is a lime, very fragrant and juicy from Joe’s citrus trees.Infusing grape seed oil with shallots and ginger.
Directions for the white balsamic lime vinaigrette
Heat the oil in an 8-inch skillet, over medium heat. Add the shallots and a pinch of salt and cook for 2-4 minutes, shallots should be softened and slightly browned.
Add chopped ginger and cook until fragrant until softened and fragrant, 15 seconds. Take infused oil off the heat and let cool for about 5 minutes.
While the oil is cooling, to a heat proof metal bowl add the vinegar, maple syrup, juice, zest, mustard, ¼ t salt and a few grinds of pepper.
Whisk the warm oil into the vinegar mixture until emulsified. Taste vinaigrette and season to taste with additional salt, pepper or citrus juice.
Ingredients for assembling the salad
5-6 cups of sturdy greens, torn into bite sized pieces if needed
Kosher salt
Roasted vegetables from step one
¼ c toasted slivered almonds
½ c cubed aged Gouda
Directions for assembling the salad
In a large bowl, lightly salt greens and toss with a drizzle of the warm vinaigrette. Taste a green and add a little more dressing if necessary. Arrange the greens on a platter or two plates.
Season the vegetables with a pinch of salt and dress them lightly with 1-2 T of the remaining vinaigrette.
Spread the vegetables evenly over the greens, then top with the almonds and Gouda. Serve immediately, passing the remaining dressing at the table.
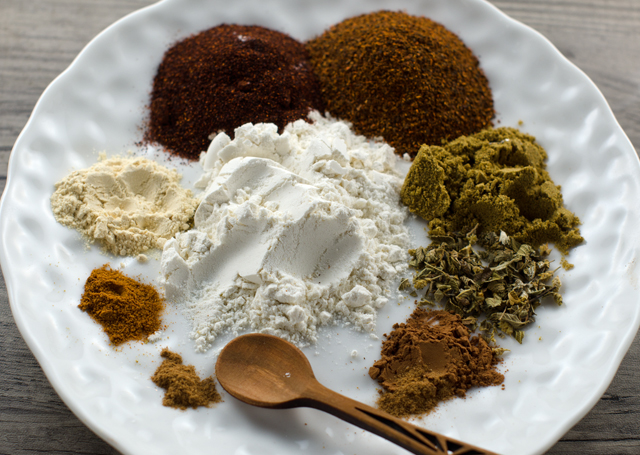
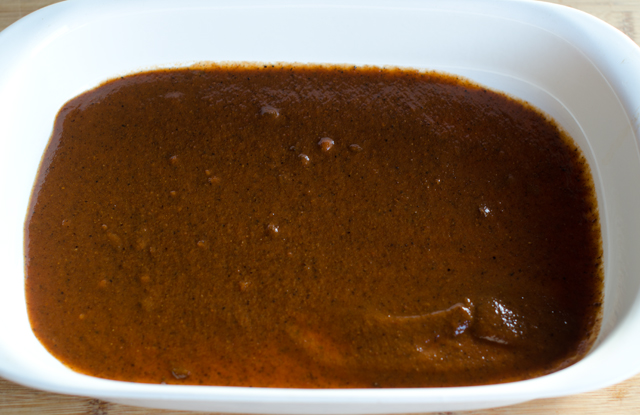
Now that I’ve mastered the cauliflower tortilla I thought it would be fun to try them in a chicken enchilada recipe. The “caulitillas” are just about the same size as a corn tortilla and not delicate as I was originally concerned, but very pliable and sturdy. Of course corn tortillas are what you would typically use and would be fine in this recipe. You can buy enchilada sauce in the supermarket but it’s quick and quite simple to make your own. You also can control the heat to your own taste. My advice would be to start out on the safe side with the amount of chili powder you add, you can always add more, it’s harder to tame the heat. I used a combination of regular and chipotle chili powder for its smoky quality. Measure out your ingredients before you start the recipe because you will be busy whisking to ensure a smooth sauce.
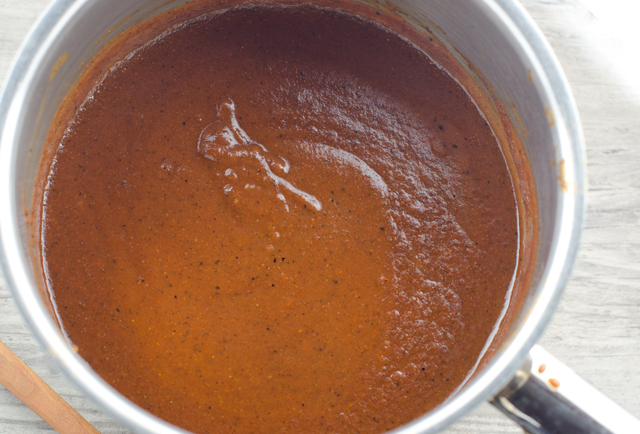
Heat the oil in a medium saucepan until it begins to sizzle. Add the flour and spices, whisking constantly until the spices become fragrant and deepen in color. Add tomato paste, tomato sauce and chicken stock and continue to whisk constantly to remove any lumps. Allow the sauce to come to a simmer, it will begin to thicken slightly. Taste sauce and adjust seasonings to your liking.
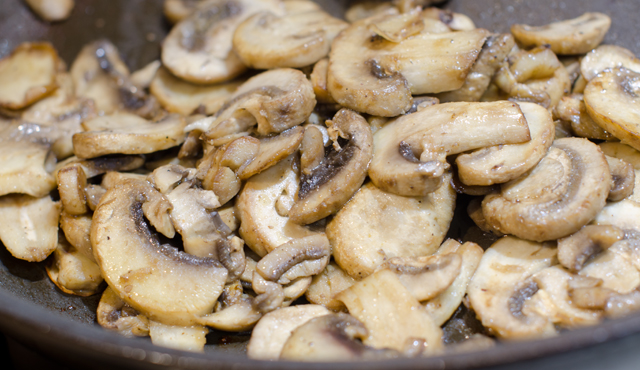
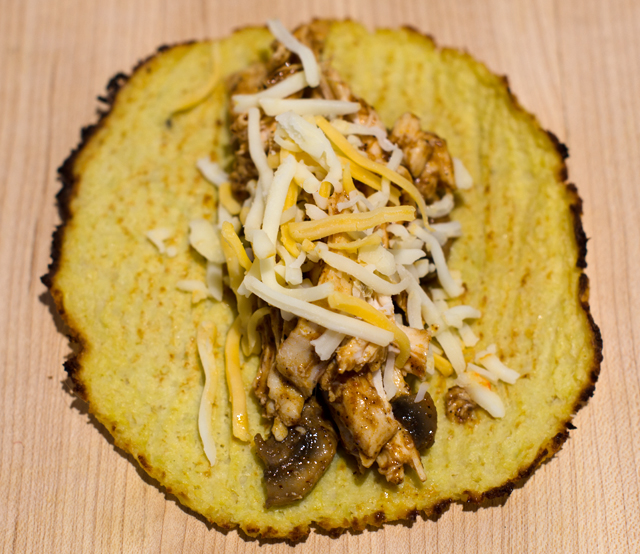
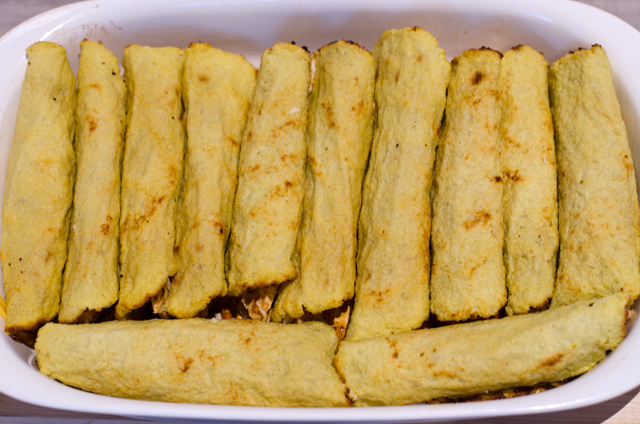
Now it’s time to assemble, you should have ready, a 9 x 13 inch baking dish, the tortillas, the warmed filling, the warmed sauce and shredded cheese. I chose to make a filling of shredded chicken and sautéed mushrooms but this sauce would be good with many filling combinations. Many recipes call for dipping the tortilla in the chili sauce. I thought that was too messy so I just put a thin layer of sauce in the bottom of my casserole dish.
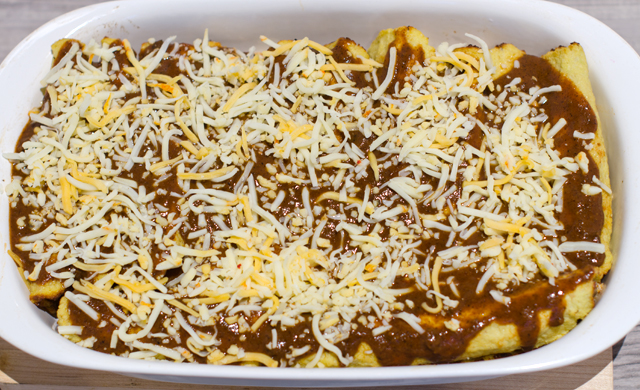
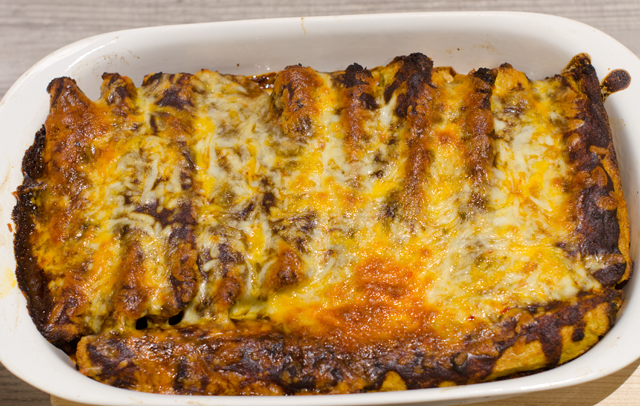
Lay out your tortilla and spread about two tablespoons of the filling down the center. Roll up the tortilla and place seam side down in the baking dish. Repeat with the remaining filling and tortillas. Top with additional sauce and shredded cheese and bake until the cheese is melted. Not the prettiest dish for certain, but definitely delicious. Leftovers heat up nicely.
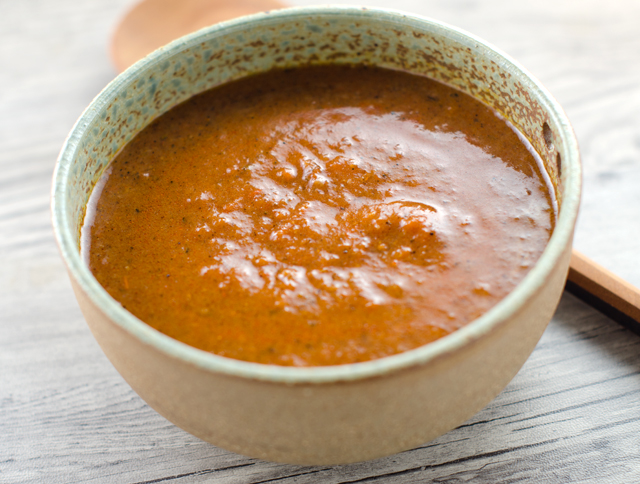
Spices and flour for the chili sauce.Takes only ten minutes to make a delicious complex sauce.
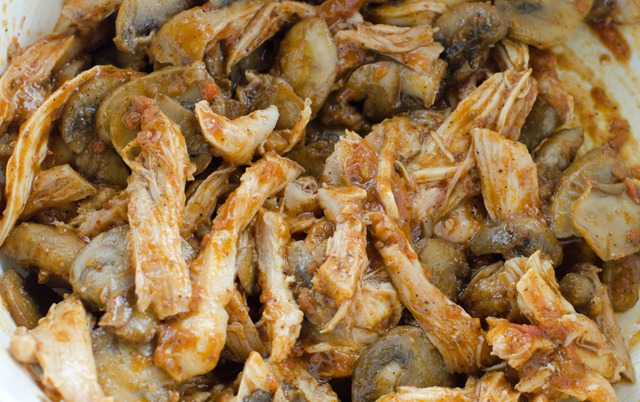
Chicken and mushroom enchilada filling.Filling the “caulitilla”.A thin layer of sauce on the bottom of the baking dish.Rolled and filled tortillas ready to be topped with sauce.Next the sauce and cheese.Ready to dig into!
Chicken Enchiladas
Makes 10-12
Red Enchilada Sauce
Makes about 2½ cups
Ingredients
2 T vegetable oil (I used avocado)
2 T all-purpose flour
3 T chili powder-I used 2 T regular and 1 chipotle (Penzey brand)
1 ½ t ground cumin
½ t dried oregano (Mexican is best)
½ t kosher salt
1/8 t cayenne pepper
¼ t cocoa powder
pinch of cinnamon
3 oz tomato paste
2 c chicken or vegetable broth
½ to ¾ c tomato sauce
Directions
Measure out the flour and the spices into a small bowl. Whisk to combine.
In a medium saucepan over medium high heat, warm the oil until it begins to sizzle.
Add the flour/spice mixture and whisk constantly. Cook until fragrant and darkened in color.
Whisk in the tomato paste and sauce until thoroughly combined with the flour/herb mixture. In a steady stream, whisk in chicken broth.
Reduce heat to medium and let sauce come to a simmer. Cook 8 to 10 minutes, sauce will thicken slightly. If not using immediately you may need to thin it out with a little stock or water.
Remove the sauce from the heat and let cool slightly. Add salt and freshly ground pepper to taste.
Coat the bottom of the baking dish with a thin layer of the sauce.
Set up an assembly line to make the tortillas: corn or cauliflower tortillas, chicken mushroom filling, cheese and sauce.
Lay out a tortilla and place about 2 generous tablespoons of the filling down the center of the tortilla. Sprinkle a little cheese on top. Roll it up with your fingertips and place in the baking dish, seam side down. Continue rolling and filling the rest of the tortillas.
Pour the remaining sauce over the enchiladas and sprinkle with the remaining cheese. Bake for 20 minutes and serve immediately.
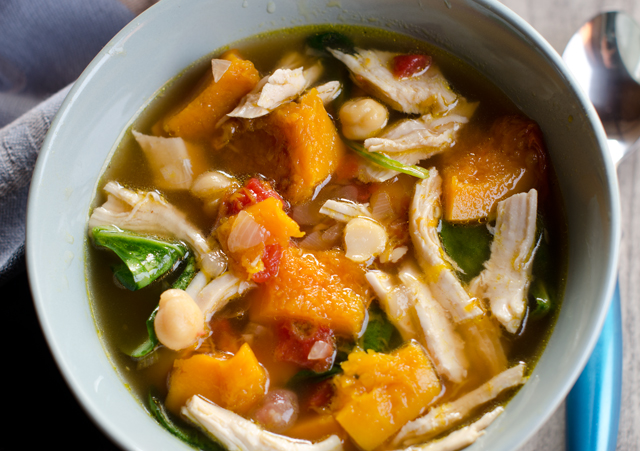
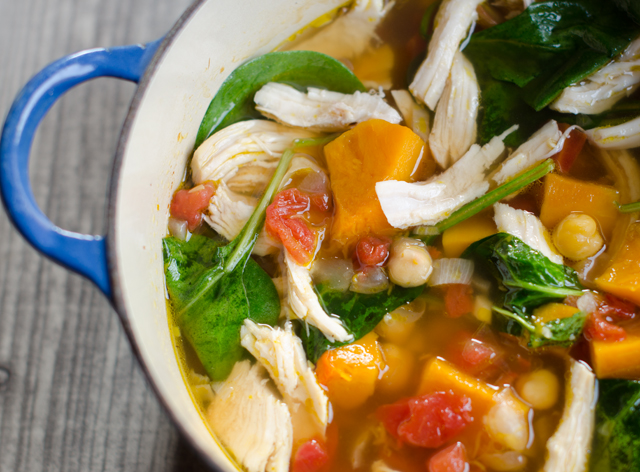
Chicken, butternut squash and garbanzo bean soup is the perfect comfort food loaded with lean protein, delicately sweet butternut squash, nutty garbanzos and spinach for a healthy meal. This hearty main dish soup of my own creation is a complete meal with almost all pantry items with exception of the spinach. Blue potatoes and butternut squash are still a part of the larder from last year’s garden and I am finally making a dent into the supply of butternut squash from the fall harvest.
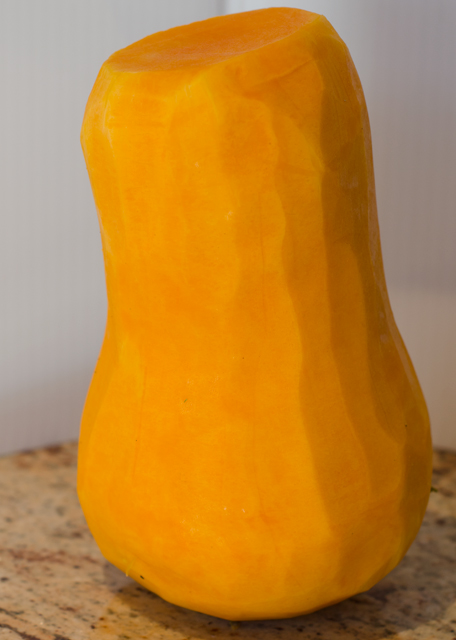
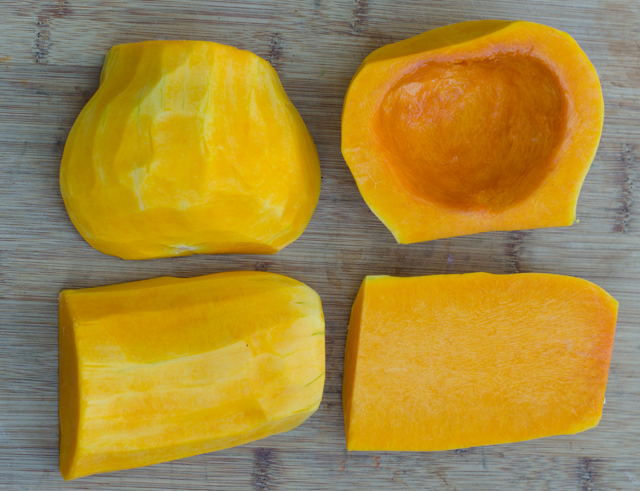
To save time you can buy cubed butternut squash in the produce section of most supermarkets. But if you choose to start with a whole squash, this is a method that works for me. I start by washing off the squash, any dirt left behind when you start cutting the squash will be transferred to your knife and subsequently, the squash flesh. Cut off a ½-inch piece at both ends so that they are flat, then I cut it where the neck and the bulb meet. I cut the bottom in half and scoop out the seeds and stringy fibers, a grapefruit spoon works well here. You can discard the seeds but I like roasting them for a snack or a salad topping. Use a vegetable peeler or chef’s knife to remove all of the skin and the green veins that are directly under the skin, your finished product should just be orange flesh. Now you can use a knife to cut the squash into pieces. I was aiming for 1½ inch pieces. The squash I used for this recipe weighed in 3.25 pounds and made about 8 cups of raw squash. In a large bowl, toss the squash with a little olive oil and salt and roast on a baking sheet until the cubes are caramelized but not at the point of disintegrating into the soup. The squash measured 4 ½ cups after roasting.
The soup would be good without it, but I added some chicken to up the protein quotient and really make it feel like a meal. Normally I would use chicken thighs, but I had boneless breasts in the fridge. I wanted to keep the chicken as moist as possible, (there is nothing worse than dried out chicken in your soup) so I turned to a method that I have used in the past, poaching. Poaching is a method that cooks chicken gently and slowly. Boneless breasts are arranged in a single layer and covered with the appropriate aromatics and liquid, water in this case, but a splash of wine is good too. The pot is brought to the boil, then reduced to a simmer. After about eight minutes, check the temperature of the chicken in the thickest part of the breast. Chicken is supposed to be cooked to 165°F but since I knew I would be adding it to my soup pot, I was aiming at 155-158°F so it wouldn’t overcook in that step. Remove from the poaching liquid and let cool, then shred into bite sized pieces. An easier approach? Use the meat from a rotisserie chicken.
Once you are finished these steps, the soup comes together very quickly. In a large Dutch oven, saute the onion, then add the garlic and herbs. The broth, tomatoes and garbanzos are next. Bring to a boil, reduce the heat. Add the squash, chicken and spinach and cook for about ten minutes, until the spinach is wilted.
Freshly cooked garbanzos are a favorite of mine and would be great in this recipe but would require some advanced planning. Puree a few cups of the soup before the last ingredients are added if you want to give the soup a more stew like consistency.
Peeled whole butternut squash.Preparing the butternut squash.
Chicken, Butternut Squash and Chick Pea Soup
Serves four
Ingredients
1 butternut squash, about 3 lb
Extra virgin olive oil-for baking the squash and making the soup
Kosher salt
¾ to 1 lb chicken breasts 2-3 relatively the same size or already cooked and shredded chicken, breast or thigh meat
1 medium onion, diced small
2-3 cloves of garlic, finely minced
1 t ground cumin
½ t ground coriander
3-4 c low sodium chicken broth
1-10 oz can diced tomatoes and green chilies (mild or hot)
1-15.5 oz can chick peas, drained and rinsed
4-5 cups spinach leaves
Directions
Preparing the butternut squash
Preheat oven to 375°F. Peel, seed and cut squash into 1½-in cubes. Alternately use 8 cups of pre-cut squash.
Put the squash cubes in a large bowl, drizzle with olive oil and kosher salt. Toss to coat and place on a baking sheet, distributing the cubes evenly as possible.
On the lower rack of the oven, bake squash for ten minutes. Gently flip the squash pieces so that the sides that aren’t caramelized are on the bottom, bake for another 5 minutes. Redistribute the squash pieces again and cook for another 5-7 minutes. Remove squash from baking sheet and transfer to a plate to cool.
Poaching the chicken
Place the chicken breasts in a heavy bottomed pot, large enough to hold them without overlapping but relatively snug.
Cover the breasts by an inch and a half with cool (not hot) water with a pinch of salt, or broth, garlic, a sprig of thyme or a bay leaf.
Over medium high heat, bring to a boil, then reduce the heat to a simmer. Partially cover and at the eight minute mark insert an instant read thermometer at the thickest point of the breast to check the temperature. I like pulling mine off the heat around 158°F since they will continue to cook a little after they are removed from the cooking liquid and when added to the hot soup will cook a little more.
Let the chicken cool then shred along the grain into bite sized pieces.
Assembling the soup
In a large 5-quart Dutch oven cook the onion over medium high heat until translucent. Add the garlic and spices are cook for another minute.
Add chicken broth, tomatoes and chick peas and bring to boil.
Reduce heat to a simmer and add squash, chicken and spinach, heat through for about ten minutes or until spinach is wilted.