April 28, 2015 Salmon Piperade

DSC_2394aMy local big box store always has one bargain that I can never pass up, sweet peppers. Six in a bag, two each of red, yellow and orange, they usually cost about 6.49. Supermarket sweet red peppers occasionally are on sale at a 1.99 per pound but can go as high as 4.99 a pound in the off season. Orange and yellow ones never seem to go on sale. Since we only have access to local and peppers from our garden only two months out of the year, I don’t mind buying them.

The peppers are grown in greenhouses in Canada and have consistent good flavor and texture. I like using them in salads, stuffing them with chili and cooking them on the grill. We had a few left over recently that weren’t grilled and was looking for a way to use them in the next several days. Then I remembered piperade.

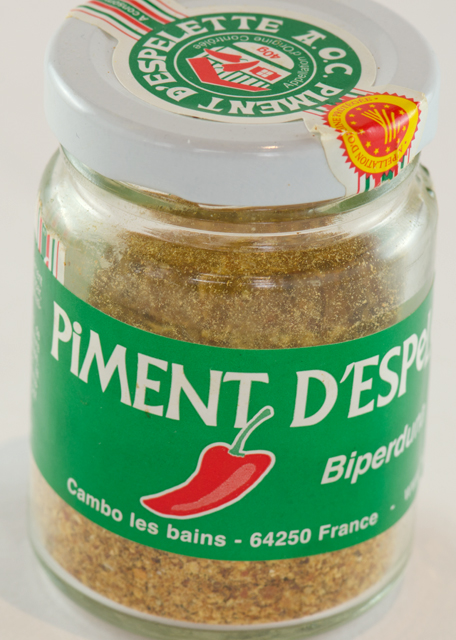
Classic piperade originates from the Basque country in the southwest region of France. It is a versatile preparation that compliments everything from eggs to chicken to fish dishes.  A simple saute of bell peppers, onion and tomato, piperade is enlivened by the addition of piment d’espelette. Piment d’espelette is a pepper native to France in the Basque country. The flavor is fresh and fruity with just a hint of smoky heat.

Piment d’Espelette has AOC (appellation d’origine contrôlée) status. This is a protective designation of origin and means the pepper only comes from a 22 square kilometer region around the town of Espelette. The peppers are harvest by hand, air dried and finished in a kiln. They are sold dried, whole or pulverized into a flaky powder. Since we are not in tomato season I used diced canned tomatoes for this recipe. The once 16 ounce can has shrunk to 14.5 ounces, when will this madness stop? I used Hunts because Cooks Illustrated put them on top of their most recent testing. Their flavor was reported to be fresh, bright and sweet-tart. Sounds good to me.

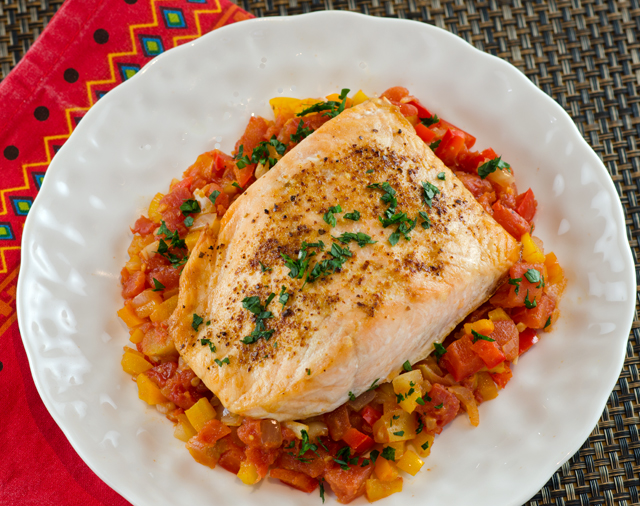
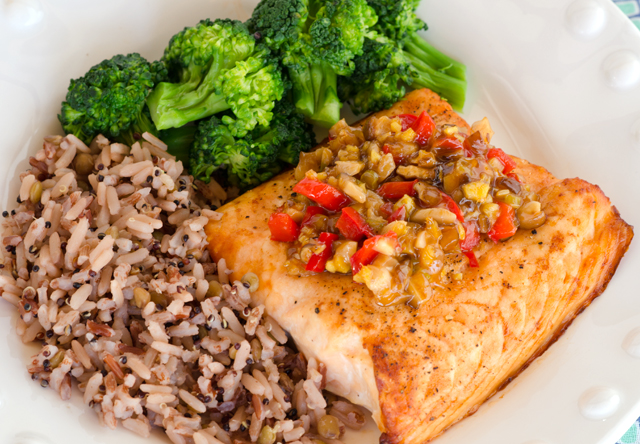
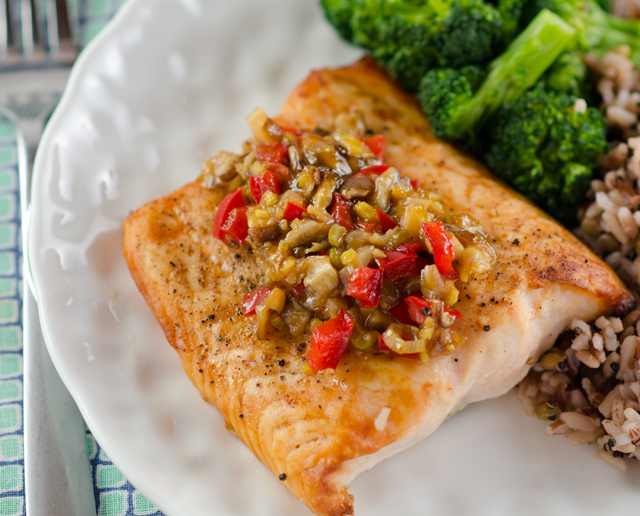
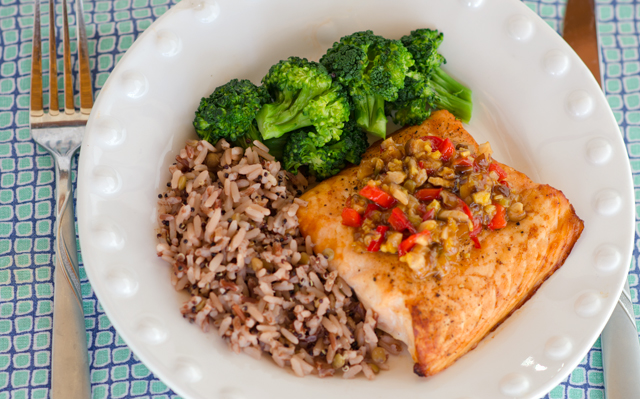
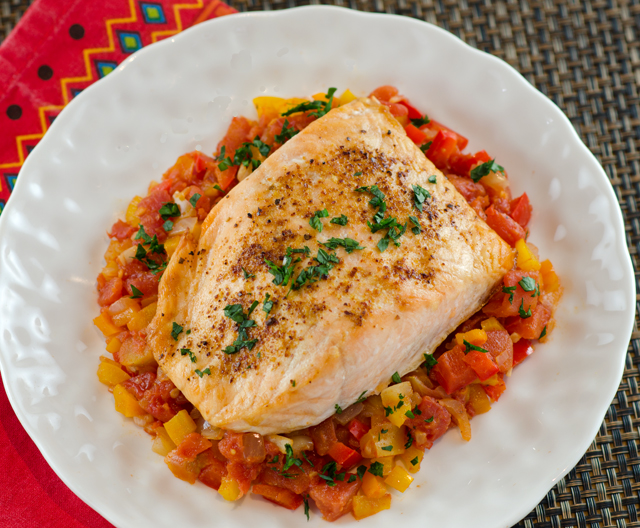
Espelette pepper is sold by specialty grocers and can easily be found on line if you are an intrepid spice hunter like me. If not, substitute smoky paprika or Aleppo pepper with a dash of cayenne pepper. The piperade comes together easily. Saute an onion until translucent, add garlic, peppers and piment d’Espelette. Cook another minute until fragrant then add the tomatoes and their juice. Bring the mixture to a boil, season well and cook slowly for about 45 minutes or until the juices have thickened. Keep piperade warm while you cook the fish. Serve salmon on a bed of piperade and garnish with parsley. Serve leftover piperade with poached or scrambled eggs the next day.

DSC_2386a
I used finely chopped peppers and onion in my preparation.
DSC_2471a
Piment d’Espelette is a protected designation meaning the peppers can only be grown in a specific location.

DSC_2389a

Salmon Piperade

Serves two

Ingredients

  • 1T olive oil, plus 2t for cooking salmon
  • 1 medium onion, diced small
  • 1T finely chopped garlic
  • 1 yellow pepper, diced (about ¾cup)
  • 1 red pepper, diced (about ¾cup)
  • 1 orange pepper, diced (about ¾cup)
  • 1t or to taste, piment d’Espelette, substitute smoky paprika and a dash of cayenne if necessary, additional to sprinkle on fish before baking
  • 1 14.5 ounce can of diced tomatoes
  • Kosher salt and freshly ground black pepper
  • 2 6-ounce boneless skinless salmon fillets
  • 1-2T chopped parsley

Directions

  1. Heat 1 tablespoon of olive oil in a medium sauté pan over medium high heat. When the oil begins to shimmer, add the onion. Cook, stirring frequently until the onion is translucent, about 4-5 minutes.
  2. Add the garlic, peppers and piment d’Espelette. Cook, stirring frequently until fragrant, about 1 minute. Add the tomatoes and their juices, season well with salt and pepper. Bring the mixture to a boil, lower to a simmer, cover and cook slowly for about 45 minutes, stirring every now and then.
  3. Brush salmon fillets with olive oil, season with salt, freshly ground pepper and piment d’Espelette. Cook fish according to your favorite method, this is how we bake our fish. Spoon warm piperade on serving dish, nestle cooked fish on the piperade. Sprinkle with chopped parsley.

DSC_2393a

April 21, 2015 Shrimp Scampi

DSC_2352a

It’s not every day that fresh Florida shrimp are available at my local fish market, that was reason enough for me to prepare a dish that showcases their pristine sweet flavor, shrimp scampi.

Most “fresh” shrimp  sold in supermarkets are shipped frozen and thawed for the seafood counter. That means the shrimp you will find with the frozen seafood is exactly the same and maybe even a little cheaper than what is being presented as fresh, it just hasn’t been sitting on a bed of ice all day. Thawed shrimp are a convenience to use only when you need them immediately.  The shelf life of thawed shrimp is only a day or so at best, while frozen shrimp retain their quality for several weeks in the freezer.

Most shrimp sold today are IQF or individually quick frozen, so it is easy to remove the amount of shrimp you need for a recipe. The best way to thaw shrimp is to put it in the fridge overnight or for a quicker thaw, put it in a colander of cold water and let some cold water trickle into the bowl while the excess goes down the drain. The shrimp should be ready to cook in about 15 minutes.

Shrimp are sold by the count, the number of shrimp to make a pound, so the lower the count, the bigger the shrimp.  The names that correspond with the sizes range from extra colossal, under 10 per pound to extra small, 61 to 70 shrimp per pound. The descriptions are not standardized however so one vendor’s extra large could be another’s jumbo. So it is always best to stick with looking at the count when buying shrimp.

According to Italian cookbook author Lidia Bastianich, shrimp scampi is one of the those creations in which immigrant cooks adapted Italian techniques to American ingredients. Scampi is the Italian word for a prawn or langoustine, more closely related to lobsters.   One traditional way of preparing them in Italy was to sauté them with garlic, onion, olive oil and white wine.  When Italians immigrated to America they adapted the preparation, substituting  the more readily available shrimp. The dish was called shrimp scampi and the name stuck, meaning shrimp prepared in the scampi style.

This recipe is from Melissa Pellegrino, cookbook author and contributing editor to Fine Cooking magazine,. What makes this interpretation of shrimp scampi unique is the addition of shrimp stock which further enhances the flavors in this dish.

Begin by peeling the shrimp, you can leave the tails on for presentation if you choose. The next step is to devein the shrimp, which isn’t a vein at all but the digestive tract. It is not absolutely necessary and you can eat shrimp with the vein still in, but one thing I know for certain, it will always get you Chopped. To devein, make a shallow slit down the middle of the back which exposes the intestine. Lift the vein out with the tip of a paring knife and wipe the blade with a clean paper towel. You can also do this under cold running water. There are also inexpensive tools that allow you to devein in one fell swoop.

The shrimp stock is made with the shrimp shells along with the usual ingredients used in stock making, onion, celery, carrot and a bay leaf. The ingredients are brought to a boil, simmered and strained. Only ¼ cup of the stock is needed so the rest can be frozen for future use.

Aromatic garlic, parsley and lemon peel are added to melted butter in the skillet. The shrimp are cooked in this mixture until they turn pink. Wine and shrimp stock are reduced to make a sauce with a final additon of pepper flakes, lemon peel and, of course, more butter. Served over pasta, rice or just accompanied with some crusty bread, shrimp scampi is a quick delicious entree easy enough for weeknights and elegant enough for special occasions.

DSC_2338a
Shrimp shells are used to make a flavorful stock.
Shrimp shells are combined with onion, celery, carrot and a bay leaf.
I used the juice and peel from our Ponderosa lemon.


Shrimp Scampi

Serves four

Ingredients

  • 1½ lb. 16-20 count shrimp (these may be called jumbo or extra jumbo) peeled and deveined (shells reserved) tails may be left on if you choose
  • 1 medium carrot, chopped
  • 1 medium rib celery, chopped
  • 1 small yellow onion, halved
  • 1 bay leaf
  • Kosher salt and freshly ground pepper
  • 4T unsalted butter
  • ¼c finely chopped Italian parsley
  • 2T minced garlic
  • 1T finely grated lemon zest
  • ¼c dry white wine
  • 1t fresh lemon juice
  • Crushed red pepper flakes
  • Lemon wedges for serving

Directions

  1. In a 4-quart saucepan , combine the reserved shrimp shells, carrot, celery, onion and bay leaf. Add four cups of water. Bring to a boil over medium-high heat, reduce to a simmer and cook for 30 minutes.
  2. Strain the stock through a fine-mesh sieve and reserve ¼cup for the scampi. The rest of the shrimp stock can be frozen for future use.
  3. Pat the shrimp dry and season with ½teaspoon salt and a grind of pepper.
  4. In a 12-inch heavy skillet, melt 3Tof the butter over medium heat. Add the parsley, garlic and lemon zest and cook, stirring occasionally until the garlic is lightly golden, 1-2 minutes. Raise the heat to high, add the shrimp and cook until they start to turn pink, about 1 minute. Add the wine and cook until reduced by half, 1 to 2 minutes. Add the lemon juice and crushed red pepper flakes and stir to coat.
  5. Transfer the shrimp to a serving plate using a slotted spoon. Whisk the remaining 1T butter into the sauce. If the sauce seems too thin, simmer for a minute or so to thicken. Season to taste with salt and pepper, pour over the shrimp and serve with lemon wedges on the side.

DSC_2350a

DSC_2354a


April 14, 2015 Beet Chutney

DSC_2334a

The good thing about cooking a ton of food for a holiday is that chances are, you will have lots of leftovers.  The challenging part is finding ways to repurpose those leftovers into something different and delicious. Smoked turkey was good on a salad, leftover roasted vegetables topped our homemade thin crust pizzas. In previous years I made moussaka with leftover lamb, this year we decided on lamb wraps. In addition to the usual tzatziki sauce that I would serve with lamb, Joe suggested  “something spicy.” I had some ideas but after googling it, found an interesting recipe for beet chutney.

As a beet lover, I enjoy their earthy quality and thought the sweet and sour quality of a chutney would be a nice contrast to the creamy coolness of tzatziki. The chutney comes together quickly and benefits from being made ahead, allowing the flavors to blend together. The recipes calls for a two inch diameter beet, which turned out to be just a little bit less than a cup. Tweak the sweet and sour elements to your own liking. I used golden raisins because that’s what I had on hand, dried cranberries might be nice as well. Dried cranberries would fit the color scheme and would fit right in with a Thanksgiving menu. The chutney would also be good  as a appetizer on top of a cracker spread with goat cheese or Brie.

DSC_2321a

Beet Chutney

Makes about a cup

Ingredients

  • 1/4c olive oil
  • 1 ½c red onion
  • 1 2-inch diameter red beet, peeled, cut into ¼ inch cubes
  • ½c water
  • ½c red wine vinegar
  • 3T raisins (I used golden raisins)
  • 3T sugar
  • 2t chopped peeled fresh ginger
  • 1t yellow mustard seeds
  • Pinch of cumin seeds

DSC_2323a

Directions

  1. Heat olive oil in a heavy medium saucepan  over medium heat. Add chopped red onion and beet cubes. Cook until onion is tender but not brown, stirring frequently, about 8 minutes
  2. Add ½c water. Increase heat to high and boil until mixture is thick, about 5 minutes. Add vinegar, raisins, sugar, ginger, mustard seeds, and a pinch of cumin seeds. Reduce heat to medium-low and simmer until beet cubes are tender and the chutney is thick, stirring often, about 10 minutes. Adjust seasonings as needed and season to taste with salt and pepper. Cool.
  3. Can be made 1 week ahead. Cover and chill.

DSC_2327aDSC_2336a


April 10, 2015 Cheddar Pepper Bread

DSC_2288a

Back in the seventies, my early forays into bread baking were less than successful. Armed with my Betty Crocker and Good Housekeeping cookbooks I made multiple attempts at white, wheat and whole grain breads. My biggest problem then was yeast and my lack of success in proofing it.  My loaves would turn out dense and leadened, thrown outside as crumbs for the birds. My dad used to say, the birds wouldn’t even eat my bread, it was too heavy for them to  fly away with!

But I was determined to find success and stuck with it. The early eighties introduced a new bread making tool, the food processor. The processor was capable of kneading the dough in a fraction of the time needed to do it by hand.  Many of the recipes I found back then were from a magazine called The Pleasures of Cooking. Published by Cuisinart founder Carl Sontheimer, it inspired and fed all aspects of my love of cooking.

Pleasures has been out of circulation for years but I still have all of my well used issues.  Many of the recipes became part of my catering repertoire, including several bread recipes. Although I use the stand mixer now for most of my bread recipes, I still pull out the food processor for classics like this. Cheddar pepper bread is still one of my favorites.  It is key to use an assertive “extra sharp” cheddar so that it’s flavor will shine through in the final product.  I served this along side the creamy leek and potato soup we had for Easter dinner. The recipe calls for the bread to baked in a loaf pan but it could be baked as a round loaf or even as rolls.

DSC_2278a

Cheddar Pepper Bread

Makes 1 1½ lb. loaf

Ingredients

  • 3oz extra sharp cheddar cheese
  • 1t instant dry yeast
  • 3 ½c all purpose flour
  • 2T unsalted butter
  • 1 ¼t cracked black pepper
  • 2t fine sea salt
  • ¼t hot pepper sauce
  • 1c warm water and a little more as needed

Directions

  1. Process the cheese with the medium disc of the food processor. Set aside.
  2. Place the yeast, flour, butter, black pepper, sea salt and hot pepper sauce in the bowl of a food processor fitted with the metal blade. Process the ingredients for about 20 seconds.With the food processor running, pour the water through the feed tube in a steady stream as fast as the flour absorbs it.
  3. After the dough cleans the sides of the bowl, add the shredded cheese, and process for  about 45 seconds more to knead the dough.
  4. Remove the dough from the processor, shape it into a ball and place it in a large ungreased bowl. Cover the bowl with plastic wrap and let the dough proof in a warm place for 1½ to 2 hours.
  5. Turn the dough onto a lightly floured surface and pat it down to deflate. Shape the dough into a loaf and place in a greased 8 by 4-inch loaf pan. Cover the pan with plastic wrap and let rise in a warm place until the center of the loaf rises up 1½ inches above the rim of the pan, 1 to 1½ hours.
  6. Preheat oven to 375°F. Bake in the center of the preheated oven for 30 to 35 minutes, rotating pan half way through the baking time. The loaf should be well browned and sound hollow when tapped.
  7. Remove the bread from the loaf pan and place on a wire rack to cool completely before storing.

DSC_2291a

April 2, 2015 Roasted Salmon with Ginger Shiitake Glaze


DSC_2133a

Salmon is on our dinner menu once a week and I am always looking for new and interesting ways to prepare it. Always a healthy dinner choice, salmon is a good source of protein, potassium, selenium, B vitamins and omega 3 fatty acids. This recipe from Fine Cooking magazine , salmon with ginger and shiitakes has become a new favorite for us.

The original recipe called for broiling the salmon but I have adapted it for the way we cook salmon most of the time in non grill months, roasting. The fish is seasoned simply with salt, pepper and  ground coriander, you can use whatever seasoning blend you choose that compliments the recipe. What makes this recipe special is the topping, a marriage of a glaze and chunky vegetable mix that is spooned right before the fish is done. A flavorful combination of red pepper, shiitake mushrooms, ginger and scallions is seasoned with honey, ginger, rice vinegar, soy and sriracha. The topping is easy to do and  can even be made several hours in advance,

I substituted tamari for the low sodium soy sauce that was called for in the original recipe. Maybe you have seen tamari on you supermarket shelf next to the soy sauce and wondered what makes it different. Tamari and soy are both the by-products of fermented soybeans.Tamari is a Japanese soy sauce and is thicker, less salty with an umami quality to it.  It is made by collecting the liquid that drains from miso, fermented soybean paste. Since it is brewed only from soybeans, water and salt, it is gluten free. Sriracha, once a product I could only find in Asian markets is commonplace in supermarkets today. Add Sriracha to your own liking, if you don’t have it, another hot sauce or a few pepper flakes can stand in.  In case you didn’t know, sriracha is a Thai hot sauce made from chili peppers, vinegar, garlic, sugar and salt. I recommend the Huy Fong brand that has a rooster on the label. I plan to make my own version from the large collection of hot peppers we have in the near future.

Roasted Salmon with Ginger Shiitake Glaze

Serves four

Ingredients

  • 1 1/2lbs salmon filet
  • 2T canola oil
  • 1/4t ground coriander
  • Kosher salt and freshly ground pepper
  • 1/3c finely diced red pepper
  • 4 scallions, finely sliced, white and green parts separated
  • 2T finely chopped ginger
  • 1c shiitake mushrooms, stemmed and cut into fine dice
  • 1/4c honey
  • 3T rice vinegar
  • 1T Tamari style soy sauce
  • 1t Sriracha (or to taste)
  • 1t cornstarch mixed with 1t of water

DSC_2249a


Directions

  1. Preheat oven to 450°F. Cut salmon into individual servings and salt and pepper lightly (kosher or sea salt) and sprinkle with ground coriander. Let the fish sit at room temperature while you prepare the sauce.
  2. In a 12″ skillet over medium heat,  cook the red pepper, scallion whites and ginger in 2 tablespoons of canola oil.
  3. Stir occasionally until the pepper and scallions start to soften and brown, about 3 minutes.
  4. Raise the heat to medium high and add the mushrooms and sprinkle with salt. Cook stirring until they soften and brown, about three minutes.
  5. Add the honey, vinegar, tamari, chili sauce and a 1/4c water. Bring to a simmer.
  6. Whisk the cornstarch and water together and stir this into the glaze. Return to a simmer and cook until the glaze thickens, about 1 minute. Remove from the heat.
  7. Coat a pan that will hold the filets comfortably with 1T canola oil or non stick spray. Measure thickest part of filet with a ruler (every 10th of an inch equals 1 minute of cooking time at 450° F.)
  8. At 1 minute prior to calculated time of completion, raise oven temperature to broil,  remove fish from oven and coat evenly with the glaze. Return the salmon to the oven to broil the topping, this could take 1-2 minutes. Watch this step carefully.
  9. Serve immediately or be sure to remove from baking pan immediately (so that the fish does not continue to cook.)
  10. For a more translucent preparation decrease cooking time by 1-2 minutes.
  11. Serve fish on warmed plates.

DSC_2140a

DSC_2136a