April 19, 2018 Halibut with Avocado, Tomatillo and Fennel Relish

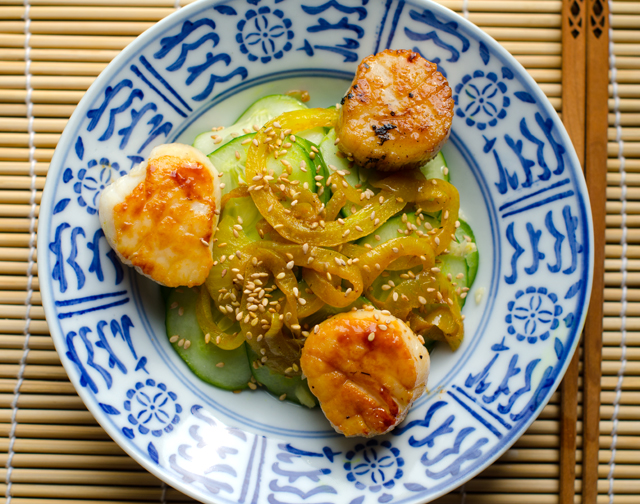
Weekends at our house, fish is always on the menu and most likely it was purchased at Heller’s Seafood in Warrington Pa. Not the closest location to us, but worth the trip because I can always be assured of the quality and freshness of the seafood I purchase. How we cook the fish depends on the weather. In the warmer seasons we often cook whole fish on the grill stuffed with lemon and herbs or a fillet cooked on a fragrant cedar plank.

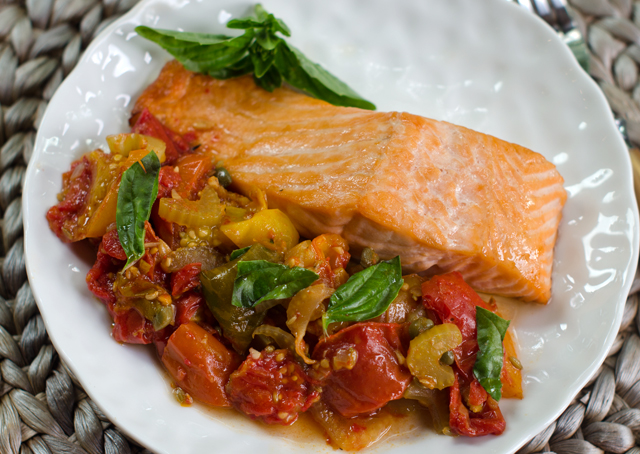
This time of year with temperatures still in the forties most days, the fish is baked according to Canadian fisheries method. Just measure your fillet, steak or whole fish at the thickest part and follow the rule of 10 minutes per inch or 5 minutes per side per inch. So often the real question is, how am I going to season and accent the flavors of the fish I am cooking.  Meaty swordfish pairs nicely with a rich olive tapenade, sometimes I make my own but occasionally I will just pick up a container at the local supermarket for a quick meal. We top red snapper with a south of the border style Veracruzana sauce, especially good in summer with garden fresh tomatoes.

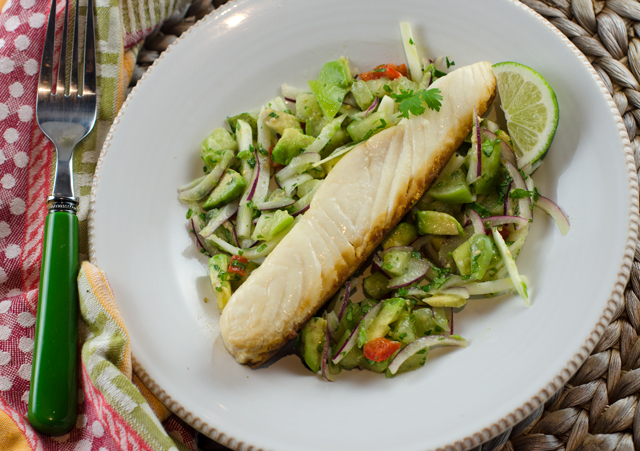
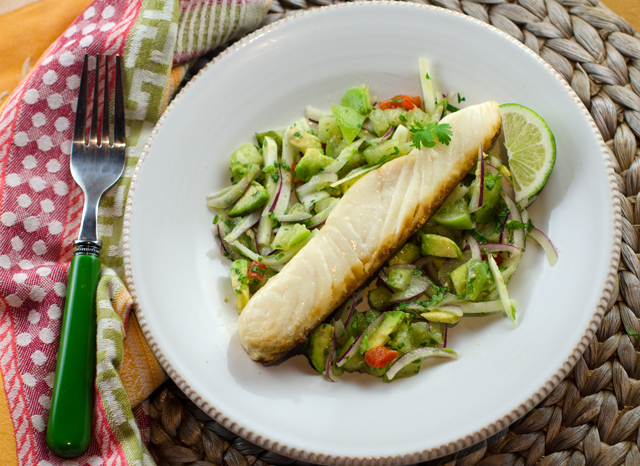
Recently while searching for a recipe for crispy skinned fish I came across a relish that is an excellent accompaniment to many fish preparations. Avocado, tomatillo and fennel relish originates from a television program on Food Network, “Worst Cooks in America,” not necessarily a place where I would look to find a recipe. Worst Cooks is a program on Food Network that takes contestants, as known as “recruits” with poor cooking skills and puts them through a culinary boot camp to earn cash prizes. This recipe was contributed by chef, restaurateur, cookbook author and Emmy award-winning reality television host, Bobby Flay. Bobby was one of the two mentors for seasons 3 to 5 and this episode is titled straight edge skills. In the clip I saw from the episode Bobby told the recruits he was looking for uniformity and good technique. I didn’t hold out much hope for the recruits I saw, one declared his fear of knives and mistook fennel for an onion and another was cutting the avocado without using the cutting board and only succeeded in cutting himself.

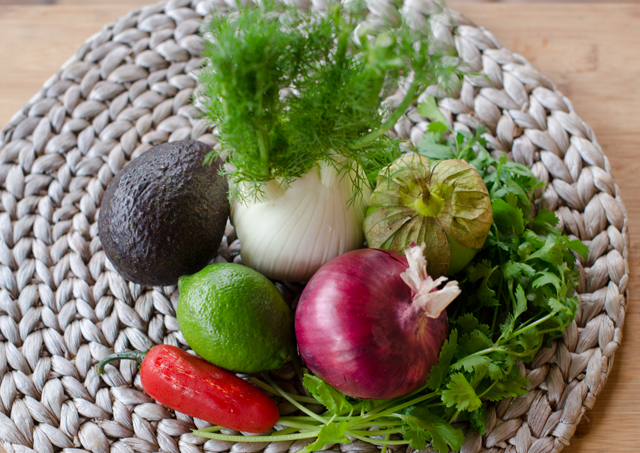
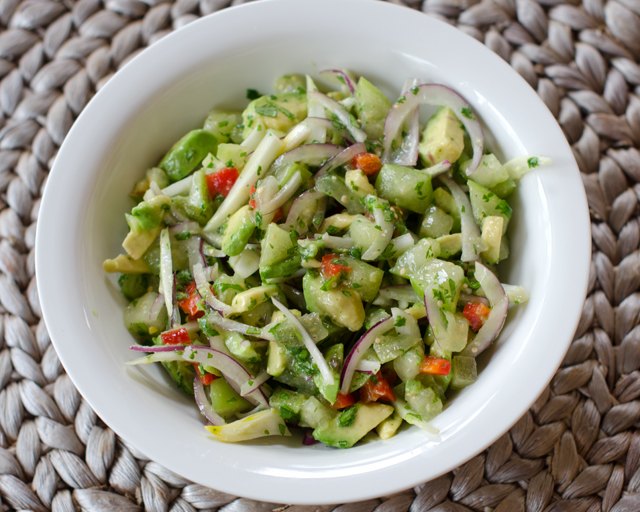
The relish relies on precise knife technique, small dice, fine dice, julienne and a little slicing.With a sharp knife it should go fairly quickly. What I really love about this dish is the contrast in textures and flavor. Tomatillos give a little citrus bite, avocado brings a creamy nuttiness and the fennel is crisp and licoricey sweet. Add pepper to your taste, the original recipe called for a serrano, I opted for a jalapeno, that’s not quite as hot. The original recipe called for red wine vinegar with a touch of honey I substituted grapefruit balsamic from The Tubby Olive.

Halibut with Avocado, Tomatillo and Fennel Relish

Serves two

Ingredients

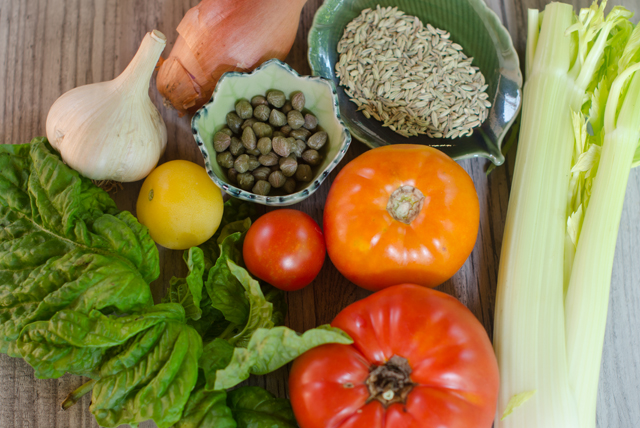
  • 1 medium fresh tomatillo, husk removed, rinsed well and cut into small dice
  • ½ medium avocado, peeled, pitted and cut into small dice
  • ½ jalapeno, seeded and cut into small dice
  • ¼ small head fennel, cut into julienne
  • ¼ small red onion, thinly sliced against the grain
  • 1 T neutral oil (canola, grape seed)
  • Juice of ½ fresh lime
  • Touch of red wine vinegar and honey or 1 T fruit vinegar
  • Kosher salt and freshly ground black pepper
  • 2 T chopped fresh cilantro.
  • Two 6-oz. firm white fish fillets like halibut, grouper or cod

Directions for the relish

  1. Combine the tomatillo, avocado, jalapeno, fennel and onion in a medium bowl.
  2. Drizzle with the oil, lime juice, vinegar and honey. Season with salt and pepper and fold in the cilantro.

Cooking the Fish

  1. Preheat oven to 450°F.
  2. Coat a shallow baking dish with non stick spray. Season the fish fillets with salt.
  3. Measure your fish fillets at the thickest point. Bake the fish for 10 minutes for every inch of thickness.
  4. Serve halibut with the relish and a wedge of lime.

September 17, 2017 Salmon with Heirloom Tomato Scampi Sauce

It’s still officially summer for another week or so but it’s easy to see that fall is in the air. We haven’t experienced a ninety degree day in several weeks and the days are sadly growing shorter. The tomatoes are making their last gasp, maybe not quite tomato salad worthy but still so much more flavorful than anything a supermarket might have to offer.

This recipe, courtesy of Top Chef season two semi-finalist, Sam Talbot uses a combination of heirloom tomatoes, garlic, shallots, capers and fresh basil. The original recipe used sea bass but I substituted salmon with excellent results.

Scampi is the Italian word for a hard shell prawn or langoustine. Prized in the Mediterranean, they are pink in color and more closely related to lobsters. The traditional method of scampi preparation in Italy is to saute them with garlic, onion, olive oil and white wine. Italian American chefs adapted the preparation using more readily available shrimp. The dish was called shrimp scampi, as in “shrimp prepared in the style of scampi” and the name stuck.

This is a scampi sauce in the broadest sense of the term, it does have garlic, onion, in this case shallots, olive oil and white wine. It also includes celery, which gives some textural difference, briny capers and fennel seed that adds just a hint of anise.

Heirloom tomatoes aren’t necessarily part of a scampi preparation either but they are a nice addition to this dish. Some of the varieties Joe grew this year included Garden Peach, Marvel Stripe, Cherokee Purple and both Red and Green Zebra, just to name a few. Heirloom tomatoes are open pollinated; pollen is carried by natural mechanisms like bees or wind. Heirlooms are varieties that are capable of producing seed that produce seedlings like the parent plant. In agriculture, the word “heirloom” doesn’t have a precise definition but usually refers to varieties that are at least 50 years old.

As always, we cook our fish according to the Canadian fisheries method. Popularized by legendary chef, James Beard, it is very simple and quite foolproof. Measure your fillet at the thickest part, one inch of thickness equals ten minutes of cooking time at 450°F. If you prefer your fish a bit translucent, deduct a minute or so off the cooking time.


An assortment of late season heirloom tomatoes.

Salmon with Heirloom Tomato Scampi Sauce

 Ingredients

  • 3 T extra virgin olive oil
  • 6 cloves of garlic, finely chopped
  • 2 shallots, finely diced
  • 1 T fennel seeds, toasted in a dry skillet
  • 4 celery ribs, sliced ¼ inch thick
  • 1 T drained, chopped capers
  • ¼ c dry white wine
  • 1 T red wine vinegar
  • Grated zest and juice of 1 medium lemon
  • 3 lbs mixed heirloom tomatoes, cut in wedges
  • 1 cup tightly packed hand-torn fresh basil leaves
  • 1½ lbs salmon filet, cut into 4 six ounces portions

Directions for the Sauce

  1. In a large skillet, heat the oil over medium high heat. Add the garlic, shallots, and fennel seeds and cook, stirring frequently, until the shallots are translucent about 2 minutes.
  2. Add the celery and capers and cook until the celery has softened, about 2 minutes.
  3. Add the wine to the pan and cook until it is reduced by half, about 1 minute. Add the vinegar, lemon zest and juice, tomatoes and basil and cook for 1 to 2 minutes to incorporate the flavors and heat the tomatoes through.

Directions for the fish

  1. A half hour before cooking bring the fish out to bring it to room temperature. Adjust oven rack to the middle position and preheat to 450°F.
  2. Measure fish at the thickest part of the fillet with a ruler, one inch of thickness equals about 10 minutes of cooking time. Evenly space fish fillets in a lightly oiled baking pan and transfer pan to the preheated oven. Bake for the designated time.
  3. Serve the salmon fillets topped with tomato scampi.

August 21, 2017 Stir Fried Shrimp with Eggplant and Cashews

It’s a great time of year to try out some new eggplant recipes. Whether from the farmers market, your local CSA or your own garden, freshly harvested eggplants are at their best. Our garden has produced an amazing array of colorful eggplants this summer. Bright fuchsia Asian Bride, slender dark violet Farmer’s Long, pure white Charming, beautifully variegated Listada de Gandia, all the varieties we have harvested this year have thin skin and minimal seeds.

During the eggplant season I have time to revisit the classics, eggplant Parmesan, caponata, moussaka and to look for new ways to serve this versatile vegetable that’s actually a fruit, but I digress. Stir fry recipes are quick and relatively easy, so why not shrimp and eggplant? Cook’s Illustrated magazine tests recipes countless times to understand how they work and in turn, offer the best version. So I knew I could try their recipe for stir fried shrimp with garlic, eggplant and cashews with confidence.

In perfecting this recipe they discovered several things that make this recipe stand out.

Soaking the shrimp for 30 minutes in salt, oil and aromatics yields a deeply flavored and tender finished product. The salt enters the flesh, allowing the shrimp to stay juicy. The oil picks up the flavor of the aromatics, in this case garlic, and distributes it over the shrimp. They also address the issue of the typical home stove that lacks the high heat of restaurant burners. This problem is solved by cooking the components of the dish in batches and trading in the wok for a skillet to ensure maximum surface area for even cooking.

As with all stir fry dishes, everything should be ready and portioned out when you start the recipe. Soak the shrimp in the seasoned brine. Whisk the sauce together next. My personal trick here is when you are making a sauce with both wet and dry ingredients I measure out the dry ingredients first since they will not stick to the measuring spoon, like soy sauce does.

The components of the dish are cooked in batches. First, the eggplant and scallion greens are cooked until lightly browned and transferred to a bowl. Next in are the aromatics, thinly sliced garlic and scallions. Cook until browned, don’t burn that garlic! To the aromatics, add in the shrimp. The shrimp are cooked to a light pink on both sides, then the sauce is added to the pan. Raise the heat to high to thicken the sauce and finish cooking the shrimp. The eggplant is returned to the skillet and tossed, ready to absorb the flavors of the sauce.

I made some changes to the original recipe. I used one tablespoon of sugar instead of two in the sauce, the oyster sauce adds its own sweetness. I also used more eggplant than called for since it cooks down considerably.  Serve with white or brown rice, this is a dish that is quick to execute and quite delicious.

A recent harvest of all the varieties of eggplant we are growing.

Stir Fried Shrimp with Eggplant and Cashews

adapted from Cooks Illustrated

Serves 4

  • 6 medium garlic cloves, 1 minced or pressed through garlic press, 5 thinly sliced 
  • 1 pound extra-large (21-25) shrimp, peeled, deveined, and tails removed 
  • 3 T vegetable oil 
  • ½ t table salt 
  • 2 T soy sauce (I use low-sodium Tamari)
  • 2 T oyster sauce 
  • 2 T dry sherry or Shaoxing wine
  • 1 T sugar 
  • 1  T toasted sesame oil
  • 1 T white vinegar (I use rice vinegar)
  • 1/8 t red pepper flakes 
  • 2 t cornstarch 
  • 6 large scallions, greens cut into 1-inch pieces and whites sliced thin 
  • ½ c cashews, unsalted 
  • 1 medium eggplant (about 3/4 pound), cut into 3/4-inch dice 

Directions

  1. Combine minced garlic with shrimp, 1 tablespoon vegetable oil, and salt in a medium bowl. Let shrimp marinate at room temperature 30 minutes.  Depending on your particular brown rice (regular, instant, etc.) start your rice as appropriate.
  2. Meanwhile, whisk soy sauce, oyster sauce, sherry, sugar, sesame oil, vinegar, red pepper flakes, and cornstarch in small bowl. Combine sliced garlic with scallion whites and cashews in another small bowl.  Heat 1 tablespoon oil in 12-inch nonstick skillet or a wok over high heat until just smoking. Add eggplant and cook, stirring frequently, until lightly browned, 3 to 6 minutes. Add scallion greens and continue to cook until scallion greens begin to brown and eggplant is fully tender, 1 to 2 minutes longer. Transfer vegetables to medium bowl.
  3. Heat remaining tablespoon oil to now-empty skillet/wok. Add cashew mixture and cook, stirring frequently, until just beginning to brown, about 30 seconds. Add shrimp, reduce heat to medium-low, and cook, stirring frequently, until shrimp are light pink on both sides, 1 to 1½ minutes. Whisk soy sauce mixture to recombine and add to skillet/wok.  Return to high heat and cook, stirring constantly, until sauce is thickened and shrimp are cooked through, 1 to 2 minutes. Return vegetables to skillet, toss to combine, and serve.

July 21, 2017 Spicy Chipotle Shrimp with Zucchini and Chorizo


Spicy chipotle shrimp with chorizo and zucchini is an entrée that is flavorful, easy to prepare and uses only one pan. If that isn’t enough, it’s a great way to use that July abundance of zucchini and yellow squash from your garden or farmers market.

I always have some frozen shrimp on hand for a quick dinner. Though my local seafood market on occasion has fresh (never frozen) Florida shrimp, in my area of the country (mid-Atlantic) frozen shrimp is not a bad thing. The shrimp you see sitting on ice at the supermarket seafood counter have been thawed out. Convenient yes, but you can’t be certain how long they have been sitting there. I prefer to buy individually quick frozen (IQF) shrimp in 1 or 2 pound plastic bags, then I can just defrost what I need in 15-20 minutes. I prefer larger shrimp because there is less of a chance to overcook them. Look for the count of shrimp per pound, in this case 21-25 count, rather than a size designation like extra-large or jumbo.

Easy peel, meaning the shell is split down the back and deveined is the easiest way to make this or any recipe calling for shrimp. Always devein shrimp before cooking, many an eliminated Chopped contestant rues the day they didn’t. It’s not hard to do, either use a small pairing knife or the tool specifically made for that purpose. It’s not actually a vein but the shrimp’s digestive tract and when it is dark in color,  it is filled with grit. Removal is not essential, nor will it make you ill, deveining just makes for a more attractive presentation.

Pat the shrimp completely dry with paper towels before cooking. Any extra moisture on the surface of the shrimp prevents them from searing and browning. Preheat your skillet for a few minutes before adding the oil. Wait a minute until the oil is shimmering before adding the shrimp. Place the shrimp in a single layer, leaving a little space between each. Don’t be tempted to flip the shrimp too soon, give them time to brown on the first side, a little pink will start to show, now flip. You want the shrimp to be slightly underdone since they will be added back to the pan later.

Transfer the shrimp to a plate, add the second 2 tablespoons of oil to the pan along with the diced chorizo. Spanish chorizo is a dried and cured (fully cooked) pork sausage seasoned with smoked paprika, garlic and other herbs. There is also Mexican chorizo that comes in casings and must be cooked before eating. It is used in tacos, tortillas and often served at breakfast with eggs. I would definitely say that the Spanish chorizo is the best choice here.

Add the cubed zucchini, onion and yellow squash, cook until the zucchini starts to brown, 3-4 minutes. Now it’s time to add the broth mixture. A chipotle chili and adobo sauce give it a real kick and the tomato paste and brown sugar mellow out the heat. Chipotles are small jalapeños that are dried by a smoking process that gives them a dark color and a distinct smoky flavor. They are canned in a red sauce, adobo, that has a smoky flavor as well. Start with the quantity given in the recipe and if you really like it hot, add a little more. Just remember it’s easier to add heat than take it away. Since you will not be using the entire can, store the remaining chilis in adobo in a well labeled plastic container or zip-loc bag in the freezer. I wasted too many opened cans of chilis before I got in this habit.

Bring the sauce to a boil, then reduce it to medium low and add the shrimp back in along with the lime juice and parsley. Cook for an additional 2-3 minutes, the zucchini should be tender and the shrimp opaque throughout. You can check for doneness by cutting a shrimp in half at its thickest point. It should be creamy white, firm and springy but still moist. You can add some strips of red pepper to the recipe and swap out cilantro for the parsley. Give a final seasoning with salt, pepper and more lime juice. Serve immediately garnished with the rest of the parsley on a bed of rice.


Spicy Chipotle Shrimp with Zucchini and Chorizo

Serves 2-3

Ingredients

  • ½ c low-salt chicken broth
  • ½ small chipotle, seeded and minced, plus 2 T adobo sauce (from a can of chipotles in adobo
  • 1 T tomato paste
  • 1 t brown sugar
  • 1 lb shrimp (21-25 per lb), peeled, deveined, rinsed and patted dry
  • 1 t kosher salt; more as needed
  • Freshly ground black pepper
  • ¼ c olive oil, divided
  • ¼ lb chorizo, cut into ¼ inch dice, a little less than a cup
  • 3 c combination of zucchini and yellow squash, cut into ½ inch dice
  • 1 cup thinly sliced yellow onion
  • ¼ c chopped parsley or cilantro
  • 2 T fresh lime juice; more as needed

Directions

  1. In a one cup measure, whisk together chicken broth, chipotle, adobo sauce, tomato sauce and brown sugar.
  2. Sprinkle the shrimp with a ¼ t salt and a few generous grinds of black pepper. Put a skillet (not non-stick) over medium high heat, when the skillet is hot, add 2 tablespoons oil. When it starts to shimmer, add the shrimp in a single layer. Cook the shrimp undisturbed until it browns nicely, a little less than 2 minutes. Flip and brown the shrimp on the other side, about 1 ½ minutes. Transfer the shrimp to a plate, it should be slightly under cooked.
  3. Add the remaining 2 tablespoons oil and the chorizo to the pan and cook, tossing occasionally, until it starts to brown, about 1 minute. Add the zucchini, yellow squash and onion, sprinkle with a little salt. Cook, tossing frequently, until the zucchini starts to brown and is tender, about 4 minutes.
  4. Add the broth mixture to the skillet and bring to a boil. Reduce the heat to medium low. Stir in the shrimp, half of the parsley and the lime juice.
  5. Cook, stirring often, until the zucchini and squash are tender and the shrimp are opaque, 2-3 minutes. Cut one in half to check if necessary. Season to taste with salt, pepper and more lime juice. Serve immediately, sprinkled with the remaining parsley.
One day’s pick of zucchini and yellow squash.


February 20, 2017 Shrimp Fried Cauliflower Rice

Cauliflower florets are a low carb substitute for white rice in this savory one pot, or should I say one wok, dish. It’s low glycemic, gluten-free and South Beach Diet friendly. Packed with juicy shrimp and colorful vegetables, this recipe is perfect for an easy go-to weeknight meal.

Cauliflower is sold by the head, not by weight. Depending on the time of year a standard head can vary greatly in size. Cauliflower is a cool weather crop in our area and harvested in the fall. When they appear at the farmers markets they can be huge, five pounds or more. In the winter months, imports from the West Coast are fairly small.  The head I used weighed in at 2.13 pounds and half of the head made 5 cups, just what I needed for this recipe.

Stores like Trader Joe’s are now selling prepackaged cauliflower rice, but it’s easy enough to make your own. Cut the cauliflower into florets by quartering the head through the stem end and cut away the piece of core from each quarter. Then cut the cored cauliflower into florets. You can use a box grater with medium-sized holes or the food processor fitted with the grater blade. With both techniques you are aiming for little pieces the size of rice granules. I like to press out any additional moisture from the rice by placing it in a clean cotton tea towel and squeezing to remove remaining water. No excess moisture equals a dish that won’t turn out soggy.

As with all stir fry preparations, all of your ingredients should be ready to go when it’s time to cook. Trying to stay with a South Beach friendly preparation I used red pepper strips and snow peas. The peas were frozen from last year’s garden and perfect for a meal like this. Other possibilities are peas, carrots, and water chestnuts. Heat your wok, the pan is hot enough when a bead of water instantly sizzles and evaporates on contact. Once this happens, add one tablespoon of a neutral oil; peanut or canola are fine here.  Swirl it around to thoroughly coat the pan. Add the shrimp all at once and spread them out over the pan so they are not overlapping. Cook shrimp on first side for one minute then flip and cook for thirty seconds. The shrimp should be almost cooked but not quite, they will finish cooking when you add them back to finish the recipe. Remove shrimp to a plate.

Add the eggs in next, stir and break them apart to get scrambled egg pieces. When the eggs are not quite cooked through, add them to the plate with the shrimp. Keep warm.
Wipe out your pan with a paper towel and return it to high heat. Add the second tablespoon of oil and swirl to coat the pan. The aromatics are in next, onion, garlic and ginger. Cook, stirring often until the onion is translucent, 3-4 minutes. Stir in your choice of vegetables and cook for another 3 minutes. Add the scallions and cook for 15 seconds. Add the cauliflower rice to the pan and sprinkle the tamari and sesame oil over the rice. Warm the cauliflower rice through and finally add in the shrimp and eggs. Let the shrimp and eggs heat back up and finish cooking. Toss to mix the rice evenly with all the ingredients. Taste for seasoning, adding more tamari and sesame oil if desired. Serve hot.

Shrimp Fried Cauliflower Rice

Ingredients

  • 1 medium head of cauliflower
  • ¾ to 1 lb medium uncooked shrimp, shelled and deveined
  • ½ t kosher salt
  • Black pepper
  • 2 tablespoons peanut oil, divided
  • 2 eggs, beaten in a small bowl
  • 1 small onion, finely chopped
  • 2 cloves garlic, minced
  • 4 scallions, minced
  • 1-2 c vegetables, I used a combination of snow peas and red pepper slivers. Peas, carrots, water chestnuts can be used.
  • 1 T tamari and more to taste
  • 1 teaspoon and more toasted sesame oil


Directions

    1. For the cauliflower rice, cut the cauliflower in half, cut out the core and discard. Cut the cauliflower into chunks.  Place the cauliflower into a food processor and pulse until it’s the consistency of grains of rice. Alternately you can a small handheld cheese grater or a chef’s knife. Set aside 4-5 cups for this recipe.
    2. Season shrimp with salt and pepper, set aside.
    3. Heat a wok or large sauté pan on high heat. When the pan is hot enough for a bead of water to instantly sizzle and evaporate, add 1 tablespoon of the oil and swirl to coat pan.  Add the shrimp, quickly spreading out around the pan so that they are not overlapping. Cook the shrimp untouched for a minute then flip over and let the other side cook for 30 seconds, or until about almost cooked through. Remove the shrimp from the pan onto a plate, leaving as much oil in the pan as possible.
    4. Turn the heat to medium high and let the pan heat up again. Pour in the eggs, stirring in a quick motion to break up and scramble the eggs. When the eggs are almost cooked through, scoop out of the wok onto the same plate as the cooked shrimp.
    5. Use a paper towel to wipe the pan clean and return to high heat with the remaining 1 tablespoon of cooking oil, swirling to coat. When the oil is very hot, add the garlic, ginger and onion to the skillet, and cook, stirring often, until onions have become translucent, about 3-4 minutes. Stir in red pepper strips and snow peas, and cook, stirring constantly, until vegetables are tender, about 3-4 minutes.
    6. Add green onions and stir fry until fragrant, about 15 seconds. Add in the cauliflower rice and stir well to mix in the green onions throughout.
    7. Drizzle the sauce all around the rice and toss. Add the cooked eggs, shrimp and sesame oil, tossing to mix the rice evenly with all of the ingredients. Finish cooking the shrimp and eggs and let everything heat back up again. Taste for seasoning and add additional tamari and sesame oil if desired. Serve hot.


January 31, 2017 Baked Shrimp Toasts

Shrimp toasts, bite-sized triangles of bread topped with shrimp paste are a popular dim sum item and a new addition to our Chinese New Year celebration. It is said the dish originated in Guangzhou (Canton) in China nearly a hundred years ago. There are others who claim it is a hybrid of a traditional Chinese shrimp recipe and bread, not native to China but introduced by foreign travelers to Hong Kong. I chose to use a recipe from Susannah Foo, a popular and highly acclaimed Philadelphia chef who eponymous restaurant closed in 2009. Shrimp toasts are often fried, this version is baked and can be made ahead and frozen, a big plus when you are serving an extensive menu. This year we celebrate the year of the rooster, which comes after a monkey year and before a dog year. Roosters are said to honest, bright, communicative and ambitious.

Baked Shrimp Toasts

Makes 3 dozen or more

Ingredients

  • 10 to 12 slices thinly sliced white bread, crusts removed
  • 1 large egg white
  • 1 lb medium or large shrimp, peeled and deveined
  • 2 T heavy cream
  • 1 T vodka
  • 1 t kosher salt
  • ½ c chopped water chestnuts
  • 2 scallions, minced

Directions

  1. Preheat oven to 250° Cut each piece of bread into 4 triangular pieces. Place on a baking sheet and bake for about twenty minutes, until the bread is dry but not browned; leave oven on.
  2. While the toast is drying, beat the egg white lightly. Dry the shrimp well with a paper towel and place in a food processor; puree.
  3. Add the egg white, cream, vodka and salt. Process until just pureed. Transfer to a bowl.
  4. Add the water chestnuts and scallions to the shrimp mixture and mix just until all the ingredients are combined.
  5. If you are baking the shrimp toasts immediately, increase the oven temperature to 375°F and coat a baking sheet lightly with non stick spray.
  6. Spread 2 heaping teaspoons of the shrimp mixture on each piece of bread. Repeat with the remaining triangles.
  7. At this point, the shrimp toast can be frozen for later use. Place the triangles on baking sheets and freeze. Once frozen, remove from the baking sheets, place in freezer bags and return to the freezer.
  8.  Bake frozen shrimp toasts directly from the freezer, about 10 minutes, the shrimp will be cooked through, all the ingredients hot and the toast is golden brown on the bottom. Triangles that were not frozen will take a little less time.

December 31, 2016 Seven Fishes Christmas Eve

We have adopted the Italian/Italian American tradition of seven fishes and it has been our Christmas eve feast we share with friends for the past six years. I explained the tradition of the seven fishes in a post from 2012.

This year our seafood included oysters straight from the Chesapeake Bay courtesy of Nik.  The extra large succulent oysters are enjoyed both raw with lemon and a splash of cranberry pear vinegar and baked a la Oysters Kenwood. We had a traditional (for us) shrimp scampi pizza as well as a newly inspired creation of a clam and bacon pizza. Both were delicious. We had a refreshing calamari salad, seafood stew, the best stuffed clams ever, just hope Joe remembers the recipe. Homemade pasta was served in two forms, mussels diavola with fettuccine and delicious crab ravioli served with a delicate lemon butter sauce. Golden brown seared scallops were served on a bed of microgreens with mixed sautéed mushrooms. The last course was swordfish skewers and pearl onions with a balsamic sweet and sour sauce. Some years Joe has cooked these in the fireplace grill but due to exceptionally warm weather this year they were cooked outdoors on the grill.

We start the party a little earlier each year, so that we aren’t finishing the last course at midnight. That actually happened the first few years. To finish things off, we left just enough room to finish off the meal with delicious Italian cookies and pastries from Chambersburg, an Italian neighborhood in Trenton, courtesy of Rich.

Nik power washes the oysters before they come inside for shucking..
Joe and his wonderful stuffed clams.
Stuffed clams had bacon in them too.
Oysters Kenwood, oysters baked with tomato sauce, bacon and cheddar cheese. Delicious!!
Shrimp scampi pizza.
Clam and bacon pizza, this year’s new creation.
Delicate crab ravioli with lemon butter sauce.
Homemade fettuccine with mussels diavola.
Seared scallops on a bed of microgreens and sautéed mushrooms.


December 2, 2016 Tuna Poke

dsc_8340aOne of the highlights of last summer was our trip to the Food and Wine Classic in Aspen Colorado. It is touted as America’s premier culinary event, and certainly lived up to those expectations. We enjoyed three days of cooking demonstrations, wine tastings and best of all, the grand tasting pavilion. It was there that we, and 5000 other fanatical foodies sipped, savored and sampled our way around the massive white tents. One area we were certain to stop at during each grand tasting was to sample the offerings of Food and Wine magazines best new chefs. Everything we tried was imaginative and delicious as well. Not coincidentally, the July issue of Food and Wine magazine offered recipes from each of these up and coming chefs.

With memories of the wonderful small plates we enjoyed at the classic, it was time to try some of their dishes for ourselves. This summer I tried the rather ambitious, summer squash with lemon curd and citrus vinaigrette from chef Brad Kilgore. Joe was more interested in the Tuna Poke on Nori Crackers. This very simple version is from Ravi Kapur, chef at Liholiho Yacht Club, a San Francisco restaurant with Hawaiian, Indian and Chinese influences.

If you are not familiar with it, poke, pronounced POH-keh is a raw fish salad. Poke, means chop or chunk, which refers to the bite sized pieces the fish is cut into. It is commonplace in Hawaii, found everywhere from the deli departments of grocery stores to fine dining establishments.

The first time we tried it just for ourselves and the poke passed our taste test with flying colors. The nori crackers are a nice “cheffy” touch but speaking on behalf of the cleanup crew, messy and not necessary for the home cook. For this recipe, make the poke with sushi grade ahi tuna from the most reputable vendor you can find. The spicy mayo has only three ingredients, tamari, sriracha and mayo. So it’s very simple, finely chopped tuna, scallion, ginger, jalapeno, tamari and dark sesame oil combined in a bowl and seasoned with salt. Spoon the poke on black sesame crackers, I like the ones from Edward and Sons, easily found in large supermarkets. Dollop or pipe some of the spicy mayo on top. Garnish with some Asian microgreens and a few toasted sesame seeds. We have served it at two parties so far this year, both to rave reviews.

dsc_8340aa

Tuna Poke

Serves 6-8

Ingredients for the Spicy Mayo

  • ¼ c good quality mayonnaise
  • ¼ t tamari
  • 1 t sriracha (or to taste)

Ingredients for the Poke

  • 12-oz sushi grade tuna cut into ¼-inch dice
  • 4 t minced scallions
  • 2 t minced peeled fresh ginger
  • 2 t seeded and minced jalapeno
  • 1 t tamari
  • ½ t toasted sesame oil
  • Kosher salt
  • Black sesame crackers
  • Asian microgreens and toasted sesame seeds for garnish

Directions for the Spicy Mayo

  1. In a small bowl whisk all the ingredients together until smooth.

Directions for the Poke

  1. In a large bowl, fold all the ingredients except the garnishes together; season with salt.
  2. Spoon the poke on the black sesame crackers and dollop with some of the spicy mayo. Garnish with sprouts and sesame seeds.

August 5, 2016 Swordfish Steaks with Orange, Fennel and Kalamata Olive Salad

DSC_7633aWhen I am looking for a quick and easy fish entree that comes together in about 15 minutes, swordfish is one of my first choices. I love it’s rich, meaty texture and like to balance it with something that is tart, a bit sweet and a little salty. This palate pleasing salad of oranges, fennel and olives takes it’s inspiration from Sicily.

The orange supremes take some careful knife work but are worth the effort. Using your sharpest pairing knife, trim off the top and bottom of the orange. Rest the orange on one of the cut ends and trim off the peel and pith in large strips, carefully following the contours of the fruit. Cut the segments free from the membrane. Be sure to do this over a bowl to catch all the juices. Squeeze the remaining membrane to capture every last drop of juice. I reduced the juice in a small saucepan to intensify the flavor in the vinaigrette.

I think fennel is a greatly under used vegetable. Related to carrots, parsley, dill and coriander, it has a crunchy texture and refreshing licoricey flavor popular in Mediterranean cooking. To cut, trim the feathery foliage and stalks off where they meet the top of the bulb. The stalks and foliage can be used as a bed for cooking the fish. Cut the bulb in quarters lengthwise and cut out the core. Slice the sections thinly using a mandoline or a very sharp knife. I used fennel thinnings from the garden. They didn’t have a hard solid core so I used the entire fennel bulb.

Kalamata olives are almond shaped and dark purple in color. They are cured in a red wine vinegar brine that gives them a rich, fruity flavor. They are often found on the Mediterranean bar in many supermarkets. To pit olives, place them on a flat surface and lightly crush with the side of a broad flat chef’s knife. Remove the pit and cut the olives in half lengthwise.

Cumin is one of my favorite spices and toasting cumin seeds really intensifies their flavor. Use a small dry skillet over medium to medium high heat. Keep the pan in constant motion, the seeds will darken and your kitchen will be filled with a warm toasty aroma. Immediately remove them from the pan and transfer to a bowl or a mortar and pestle. Crushing the toasted seeds brings out their flavor even more. If you don’t have a mortar and pestle, put the seeds in a plastic bag and crush them with the bottom of a heavy pan or a rolling pin.

Combine the reduced orange juice, toasted fennel and olive oil. Pour the dressing over the salad ingredients and lightly toss. Serve salad with the fish and garnish the plates with fennel fronds.

DSC_7602aOrange, Fennel and Kalamata Olive Salad

Ingredients

  • 1 small to medium fennel bulb
  • 2-3 medium oranges
  • 1//3 c kalamata olives, pitted and cut in half lengthwise
  • ½ t cumin seed
  • 2 T extra virgin olive oil
  • Kosher salt and pepper to taste

DSC_7606a

Directions

  1. Cut the fennel in quarters lengthwise, removing the core. Thinly slice the fennel, preferably with a mandoline. You will need 1 cup.
  2. Remove peel and pith from the oranges using a sharp paring knife. Working over a bowl to catch the juice, carefully cut between membranes, to remove segments. Squeeze remaining membrane to extract juice. In a small saucepan reduce the orange juice to two tablespoons. Set aside.
  3. Toast the cumin seed in a small non stick saute pan until fragrant and toasted. Grind toasted cumin seed in a mortar and pestle. In a small bowl combine reduced orange juice, cumin and olive oil, stir together.
  4. In a medium bowl combine the sliced fennel, orange segments, and olives. Pour the dressing over and lightly toss.  Season to taste with kosher salt and pepper.
DSC_7598a
Baby fennel from the garden.

DSC_7608a

Ingredients

  •  2- 6 oz swordfish steaks
  • Kosher salt and freshly ground pepper
  • Wondra flour
  • 1 T each olive oil and unsalted butter

Directions

  1. Preheat oven to 450°F.
  2. Measure steaks using the Canadian method to calculate total cooking time.
  3. Season swordfish steaks with salt and pepper. Dust with Wondra flour.
  4. Heat an oven-proof saute pan over medium high heat.
  5. Melt butter and oil in a saute pan large enough to hold the fish without crowding and small enough to fit in your oven.
  6. Brown swordfish for two minutes on each side.
  7. Move saute pan to oven. Finish in oven, subtracting four minutes from your total cooking time. For example 1″ fish=10 minutes cooking time minus four minutes equals six minutes in the oven.
  8. Using oven mitts, remove from pan from oven, transfer fish to serving plate with spatula. Serve with the orange, fennel and kalamata salad.

DSC_7614a

DSC_7631a

July 28, 2016 Ginger Cucumber Salad with Scallops

DSC_7580aOur current scorching, almost 100 degree temperatures with no end in sight, call for a minimum of time cooking over a hot stove. This recipe, from Mark Bittman’s Minimalist column in the New York Times is just what I was looking for. Ginger cucumber salad with scallops combines sweet buttery scallops with a crisp refreshing cucumber salad.

The cucumber salad is very simple and good in it’s own right. To get the thinnest cucumber and onion slices possible, use a mandoline. Since I am using smaller just picked cucumbers from the garden, there is no need to seed them, but I do prefer to peel them and leave strips of green skin. A classic dressing of rice wine vinegar, fresh grated ginger, sugar and salt provides a quick pickle for the cucumber slices. Remember to use plain rice vinegar, seasoned rice vinegar is flavored with sugar, salt and sometimes MSG. Plain rice vinegar is just mildly acidic and allows the cook to choose the amount of seasoning in the dish. A two inch piece of ginger translates into about two tablespoons. That might seem to be a bit too much but it is mellowed out with the other ingredients. If you are not sure, hold back a little and taste first.

While the cucumbers are marinating, preferably in the fridge, sear the scallops. Use a large non stick pan and brush with two tablespoons of a neutral oil, like grapeseed or canola, olive oil would compete (and win) against the delicate flavor of the scallops. When the oil starts to sizzle, add the scallops like the numbers on a clock starting at the top and going around, putting any additional scallops in the middle. If your pan isn’t large enough to cook all the scallops in one batch, divide them into two. Give the scallops room to sear, if they are too close they will steam. Check the first scallop, (twelve o’clock) after two minutes, if there is a nice brown crust, it’s time to flip. Continue checking around the clock until all the scallops are flipped. Repeat the step for the second side, this time moving the finished scallops to a plate.

The remaining oil, thinly sliced onion and turmeric are added to the same pan, no need to wash in between. Turmeric is the spice that gives Indian curries their vibrant color and adds warmth and a slightly bitter taste to dishes. The medical component in turmeric, curcumin, is used to make a wide variety of medicines as an anti inflammatory agent. The addition of turmeric is optional but adds another dimension to the salad.

Don’t skip the toasted sesame seeds, they add their own fragrance and just a little crunch. Stir the sauteed onions into the cucumber salad, top with the scallops and serve.

Seared Scallops with Ginger Cucumber Salad

Serves 2-3

Ingredients

  • 1 ¼ lbs small cucumbers
  • ½ c rice vinegar (not flavored)
  • 2-inch piece of ginger, minced or finely grated
  • 2 T sugar
  • 1 t salt
  • 3 T canola oil
  • 1 lb medium to large scallops
  • 1 medium onion, thinly sliced
  • ½ t ground turmeric
  • 2 T toasted sesame seeds

DSC_7572a

DSC_7573a

Directions

  1. Slice cucumbers thinly, a mandolin  does the best job, if the cucumbers are large, peel and seed before slicing.
  2. Combine rice vinegar, ginger, sugar and salt and toss with cucumbers. Let stand 30 to 60 minutes.
  3. Put 2 tablespoons oil in a large non stick skillet over medium high heat. When the oil starts to sizzle add the scallops. Sear on first side for two minutes, flip to the other side and  sear for about two minutes. Remove scallops to a plate.
  4. Add the remaining oil, then add the onions and turmeric. Cook until the onion softens, about five minutes.
  5. Toast sesame seeds in a small dry skillet until fragrant and brown, three to four minutes. Stir the onions into cucumbers, top with scallops, garnish with sesame seeds and serve.

DSC_7576a