April 22, 2017 Butternut Squash Bread and Rolls

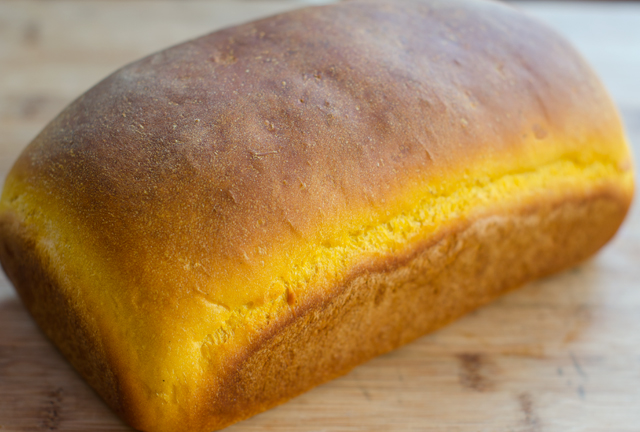
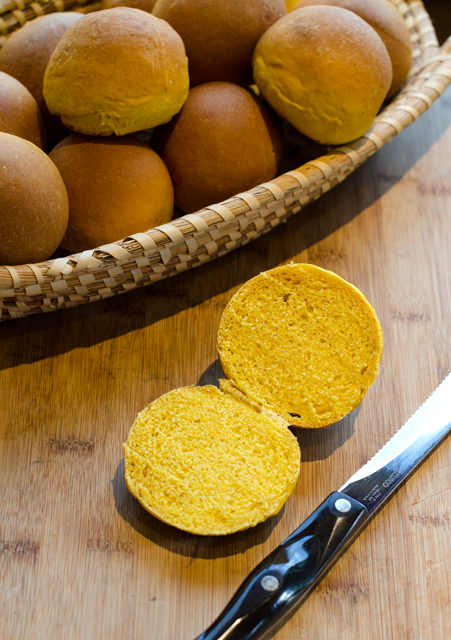
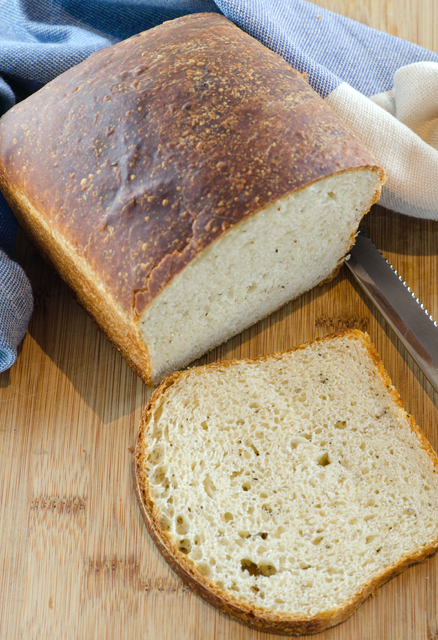
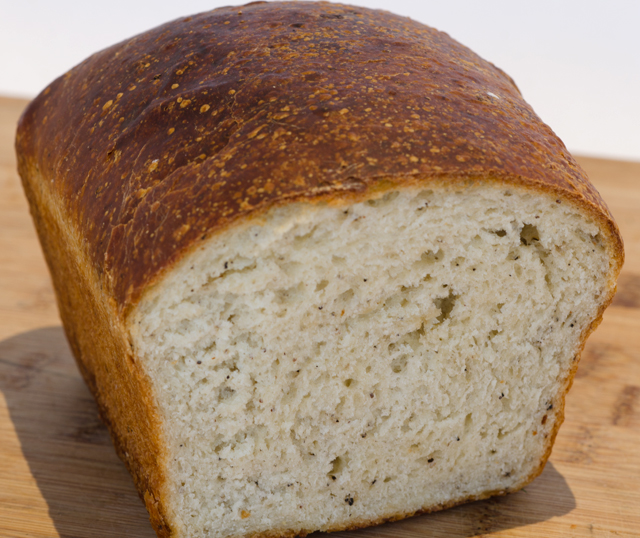
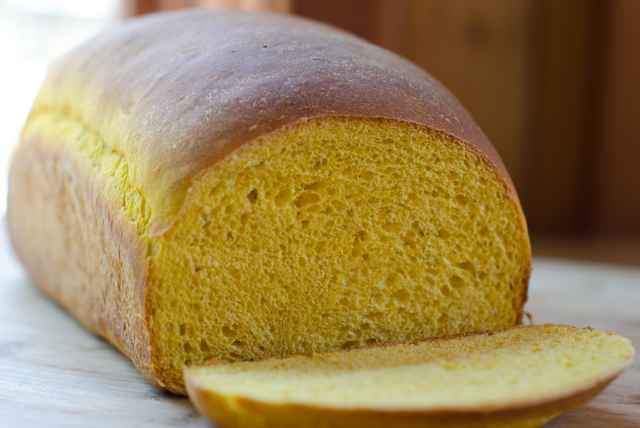
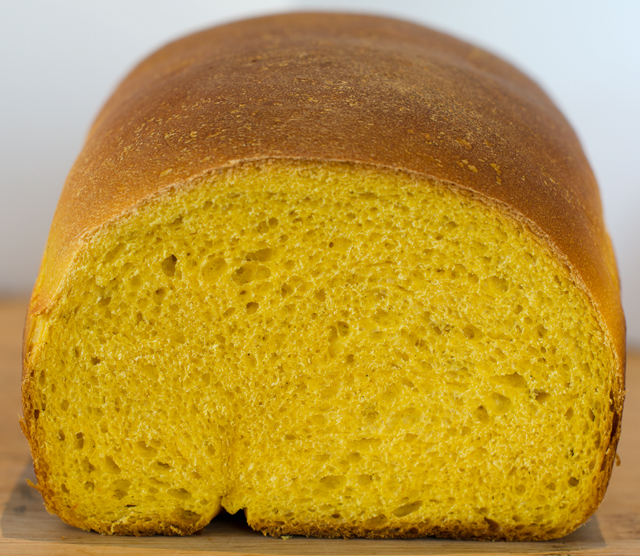
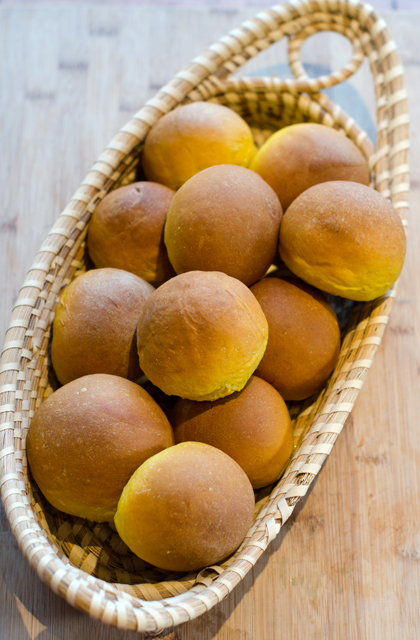
You might expect a recipe like this to be posted around Thanksgiving, but delicious homemade butternut squash rolls were the accompaniment to asparagus soup for Easter dinner. Usually the squash of choice in both sweet and savory breads is pumpkin, since I am still chipping away at my stash of butternut squash, it was an easy substitution.

I cut the squash in half lengthwise and baked it on a parchment lined baking sheet, cut side down at 375°F until it was very soft, about 45 minutes. I scooped out the squash then cooked it down a bit to get rid of any additional moisture to make a nice thick puree.

I slightly adapted a recipe from the King Arthur Flour site, with encouragement from a rating of 4.8 out of 5 stars and 106 positive reviews. The only problem was that the ingredients were a bit too much for my Kitchen Aid mixer. Once the initial ingredients were mixed together I separated them into two smaller pieces so they could be kneaded in the mixer without taxing it too much. I cut back on the sugar called for in the original recipe, since I was not attempting to make a sweet bread recipe and unlike pumpkin, butternut squash puree has some natural sweetness.
The bread and rolls turned out great, I served the rolls with the soup, the bread is well wrapped, well labeled and frozen for future use. I’m thinking bread pudding sometime soon.

Butternut Squash Bread and Rolls

Makes two loaves or 1 loaf and a dozen rolls

Ingredients

  • 2 T active dry yeast
  • ½ c lukewarm milk
  • 2 large eggs
  • 1 ½ c butternut squash puree
  • 2 T vegetable oil
  • 6 ½ c unbleached all-purpose flour (I prefer King Arthur)
  • ¼ c brown sugar
  • 2 ½ t salt
  • ½ t ground ginger
  • ½ t ground cardamom

Directions

  1. Place all the ingredients into a large bowl of a stand mixer and combine ingredients using the flat beater. Alternately, this could be done by hand or in a bread machine.
  2. Once the ingredients are thoroughly combined, replace the flat beater with the dough hook and knead the dough until it is smooth and soft. I needed to do this in two batches.
  3. Put the dough into a lightly greased bowl. Cover and let dough rise until doubled, 60 to 75 minutes.
  4. Gently deflate the dough and turn it out onto a lightly oiled work surface. Divide it in half.
  5. Shape the dough into loaves or rolls. The loaves can be placed into lightly greased 9″ x 5″ loaf pans or rolls placed on parchment lined baking sheets.
  6. Cover the pans/baking sheets and let loaves/rolls rise until doubled, about 45 minutes. Toward the end of the rising time, preheat the oven to 350°F.
  7. Bake the bread for 30 to 35 minutes. The crust will be a deep golden brown and a digital thermometer inserted into the center will register 190°F. Bake rolls for about 20 minutes until golden brown.
  8. Remove bread and rolls from oven and turn out onto a wire rack to cool.  Cool completely and store, well wrapped at room temperature for several days. Freeze for longer storage.

May 10, 2015 Raincoast Crisps with Raisins and Rosemary

DSC_2581aThere’s a cracker I love that I have to buy whenever I stop in at Whole Foods, Raincoast Crisps. Created by Parisian trained chef Lesley Stowe, she started her own cooking school and catering company in Canada’s raincoast, Vancouver, over 25 years ago. The crisps originated from a bran bread that she served in her catering business with smoked salmon. Always looking for new and original ideas, on one occasion she sliced the bread and dried it out. It was met with approval from her kitchen staff so she decided to “pump it up” with additional ingredients.  That was the beginning of the Raincoast Crisp.

The crisps are toasty and nutty, loaded with ingredients like pumpkin seeds, raisins, and pecans.  They are delicious to nibble on their own or maybe just a spread of soft cheese or your favorite preserve. One never tastes like enough and it’s easy to justify munching a box full because they are so good.  So what’s the problem? At 7.99 and up per 6 ounce box they are a pricey indulgence. So some intrepid bloggers came along and cracked the code and a rather similar recipe is available to any one who is able to whip up a quick bread.

The DIY recipe is very simple to make. Stir together the ingredients and bake in mini loaf pans. Alternately you could bake them in two square cake pans for longer skinny slices. Be sure to thoroughly cool the loaves after baking before proceeding to slice. You could give them a short stay in the freezer to firm them up or just wait till the next day to proceed with the recipe.

The next step is to slice the crackers as thinly as possible. Most of recipes I read said that it makes about 8 dozen crackers. That meant I needed to make 24 slices from each of the 4 loaves. I came fairly close, or maybe that had something to do with slices I had to “test” before baking! I used my thin blade serrated Cutco knife to make the thinnest and most even slices. I experimented with a food slicer which was ok, it’s important to maintain even pressure to keep the slices neat.

Bake the slices like super thin biscotti until they are crisp and golden. Now that I know the proportions of the recipe I am looking forward to customizing it.  Different flours,  dried fruits, spices and nuts, the possibilities are endless.  I served mine with a delicious soft goat cheese from Giggling Goat Dairy, a new vendor at my local farmers market in Wrightstown. The goat dairy is located in Dublin Pa and they make and sell fresh French-style goat cheese known as chèvre, a traditional style Feta as well as spreads and dips. I’m certain I will be frequenting their stand quite often this summer.

Raincoast Crisps with Raisins and Rosemary

Makes about 8 dozen

Ingredients

  • 2 c flour
  • 2t baking soda
  • 1t sea salt
  • 2c buttermilk
  • 1/4c brown sugar
  • 1/4c honey or maple syrup
  • 1c raisins
  • 1/2c lightly chopped pecans
  • 1/2c roasted unsalted pumpkin seeds
  • 1/4c sesame seeds
  • 1/4c flax seeds
  • 1T chopped fresh rosemary

Directions

  1. Preheat oven to 350°F.
  2. Stir together flour, salt and baking powder in a large bowl. Add the buttermilk, brown sugar and honey and stir to combine. Add the raisins, nuts, pumpkin seeds, sesame seeds. flax seed and rosemary and stir until all the ingredients are thoroughly combined.
  3. Pour the batter into 4 mini loaf pans that have been sprayed with nonstick spray. Bake loaves for 30 to 35 minutes, rotating halfway during baking time. The loaves should be golden and springy to the touch. Remove loaves from the pans and cool on a wire rack.
  4. Allow the loaves to cool completely, then freeze for about an hour. This will allow you to slice the loaves as thinly as possible. I used a serrated edge knife for the neatest cut.
  5. Place the slices on baking sheets that have been lined with parchment paper. Bake the slices at 300°F for about 15 minutes, then flip them over and bake for another 10 minutes until crisp. Cool completely and store in an airtight container.
DSC_2566a
Slices on a parchment lined sheet ready for their second bake.
Delicious on their own or with a spread of goat cheese, this is the fresh garlic peppercorn from Giggling Goat Dairy.

DSC_2584a


April 10, 2015 Cheddar Pepper Bread

DSC_2288a

Back in the seventies, my early forays into bread baking were less than successful. Armed with my Betty Crocker and Good Housekeeping cookbooks I made multiple attempts at white, wheat and whole grain breads. My biggest problem then was yeast and my lack of success in proofing it.  My loaves would turn out dense and leadened, thrown outside as crumbs for the birds. My dad used to say, the birds wouldn’t even eat my bread, it was too heavy for them to  fly away with!

But I was determined to find success and stuck with it. The early eighties introduced a new bread making tool, the food processor. The processor was capable of kneading the dough in a fraction of the time needed to do it by hand.  Many of the recipes I found back then were from a magazine called The Pleasures of Cooking. Published by Cuisinart founder Carl Sontheimer, it inspired and fed all aspects of my love of cooking.

Pleasures has been out of circulation for years but I still have all of my well used issues.  Many of the recipes became part of my catering repertoire, including several bread recipes. Although I use the stand mixer now for most of my bread recipes, I still pull out the food processor for classics like this. Cheddar pepper bread is still one of my favorites.  It is key to use an assertive “extra sharp” cheddar so that it’s flavor will shine through in the final product.  I served this along side the creamy leek and potato soup we had for Easter dinner. The recipe calls for the bread to baked in a loaf pan but it could be baked as a round loaf or even as rolls.

DSC_2278a

Cheddar Pepper Bread

Makes 1 1½ lb. loaf

Ingredients

  • 3oz extra sharp cheddar cheese
  • 1t instant dry yeast
  • 3 ½c all purpose flour
  • 2T unsalted butter
  • 1 ¼t cracked black pepper
  • 2t fine sea salt
  • ¼t hot pepper sauce
  • 1c warm water and a little more as needed

Directions

  1. Process the cheese with the medium disc of the food processor. Set aside.
  2. Place the yeast, flour, butter, black pepper, sea salt and hot pepper sauce in the bowl of a food processor fitted with the metal blade. Process the ingredients for about 20 seconds.With the food processor running, pour the water through the feed tube in a steady stream as fast as the flour absorbs it.
  3. After the dough cleans the sides of the bowl, add the shredded cheese, and process for  about 45 seconds more to knead the dough.
  4. Remove the dough from the processor, shape it into a ball and place it in a large ungreased bowl. Cover the bowl with plastic wrap and let the dough proof in a warm place for 1½ to 2 hours.
  5. Turn the dough onto a lightly floured surface and pat it down to deflate. Shape the dough into a loaf and place in a greased 8 by 4-inch loaf pan. Cover the pan with plastic wrap and let rise in a warm place until the center of the loaf rises up 1½ inches above the rim of the pan, 1 to 1½ hours.
  6. Preheat oven to 375°F. Bake in the center of the preheated oven for 30 to 35 minutes, rotating pan half way through the baking time. The loaf should be well browned and sound hollow when tapped.
  7. Remove the bread from the loaf pan and place on a wire rack to cool completely before storing.

DSC_2291a

December 2, 2012 Potato Rosemary Bread with Roasted Garlic


 I have always loved to make bread. Not that I was always good at it, in fact many of my first loaves were less than stellar. Armed with my Betty Crocker and Good Housekeeping cookbooks, I made multiple attempts at white, wheat and whole grain breads. My biggest problem was yeast, or my lack of success in proofing it. The loaves would turn out flat and leadened, thrown outside as crumbs for the birds. My father used to say, the birds wouldn’t even eat my bread, it was too heavy to fly away with! I am happy to say that my tenacity paid off and have made many delicious loaves since those days. 

 I have a sizable collection of books dedicated to breads in my cookbook library. One of my favorites is The Bread Bakers Apprentice authored by Peter Reinhart, former professional baker and current baking instructor at Johnson and Wales University. The first half of the book is set up like a well written text book. In this section he examines bread making through mastering the twelve stages of baking.  Reinhart’s desire is to empower his readers not to be dogmatic but to follow the “spirit of the law”; bakers who understand their options and thus will be able to bring about their desired outcomes. The second half are the recipes or formulas as he refers to them, with accompanying beautiful photography.
 
It was a cup of leftover mashed potatoes that inspired me to make his Potato Rosemary bread for Thanksgiving dinner.  The bread is a two day process. The first day, the biga is made, a preferment of bread flour, water and yeast that rises once and ferments overnight in the refrigerator. The second day the biga is mixed into the other ingredients to make a delcious fragrant loaf. Scented with fresh rosemary, the potatoes give the bread a soft, tender texture and the optional roasted garlic gives it an extra dimension of flavor. The roasted garlic is easy to do. My method is to cut enough of the tops off of the garlic to expose the cloves. Place the garlic on a sheet of aluminum foil large enough to wrap them in. Drizzle a little olive oil over the cloves, wrap them up and bake in a 375F oven for about 45 minutes. The fragrant toasty brown cloves will easily slip out of their skins. Potato rosemary bread is a fantastic recipe that will complement your dinner table on any occasion.


Biga, is the Italian version of a preferment. It improves the flavor and structure of the bread.


Roasted garlic adds another dimension of flavor.


The biga after a rise and an overnight ferment in the refrigerator.
Seven ounces of the biga go into this recipe. Refrigerate or freeze the remainder for another use.


The bread is shaped into two round loaves or boules and placed on a parchment lined baking sheet dusted with cornmeal.
Allow the finished loaves to cool for at least an hour before serving.

 Potato Rosemary Bread
from The Bread Baker’s Apprentice by Peter Reinhart

Days to make: 2
Day 1: 2 1/2 to 4 hours biga.
Day 2: 1 hour to de-chill biga; 12 minutes mixing; 4 hours fermentation, shaping and proofing; 20 to 45 minutes baking.

Ingredients for the biga

  • 2 1/2c unbleached bread flour
  • 1/2t  instant yeast
  • about 1c  of water at room temperature

 Ingredients for the bread

1 1/4c  Biga
3 c plus 2T unbleached bread flour
1 1/2 t salt
1/2 t black pepper, coarsely ground (optional)
1 1/4 teaspoons Instant yeast
1 c mashed potatoes
1 T olive oil
2 T coarsely chopped fresh rosemary
3/4 c plus 2T to 1c water, at room temperature (or warm if the potatoes are cold)
4T coarsely chopped roasted garlic
Semolina flour or cornmeal for dusting
Olive oil for brushing on top

Biga

Directions

  1. Stir together the flour and yeast in a 4-quart bowl (or the bowl of an electric mixer). Add the water, stirring until everything comes together and makes a coarse ball (or mix on low speed for 1 minute with the paddle attachment). Adjust the flour or water, according to need, so that the dough is neither too sticky nor too stiff. (It´s better to err on the sticky side, as you can adjust easier during kneading.)
  2. Sprinkle some flour on the counter and transfer the dough to the counter. Knead for 4 to 6 minutes (or mix on medium speed with the dough hook for 4 minutes), or until the dough is soft and pliable, tacky but not sticky. The internal temperature should be 77° to 81°F.
  3. Lightly oil a bowl and transfer the dough to the bowl, rolling it around to coat it with oil. Cover the bowl with plastic wrap and ferment at room temperature for 2 to 4 hours, or until it nearly doubles in size.
  4. Remove the dough from the bowl, knead it lightly to degas, and return it to the bowl, covering the bowl with plastic wrap. Place the bowl in the refrigerator overnight. You can keep this in the refrigerator for up to 3 days, or freeze it in an airtight plastic bag for up to 3 months.

Dough

Directions

  1. Remove the biga from the refrigerator 1 hour before you plan to make the bread and weigh out the portion you need, the above recipe makes more than twice that amount. Refrigerate or freeze the remainder for another recipe. 
  2. Stir together the flour, salt, black pepper, and yeast into a 4-quart mixing bowl (or the bowl of an electric mixer). Add the biga pieces, mashed potatoes, oil, rosemary and 3/4 cup plus 2 tablespoons water. Stir with a large spoon (or mix on low speed with the paddle attachment) for 1 minute, or until the ingredients form a ball. Add more water, if neccesary, or more flour, if the dough is too sticky.
  3. Sprinkle flour on the counter, transfer the dough to the counter, and begin to knead (or mix on medium speed with the dough hook). Knead for about 10 minutes (or 6 minutes by machine), adding more flour if needed, until the dough is soft and supple, tacky but not sticky. It should register 77° to 81°F. Flatten the dough and spread the roasted garlic over the top. Gather the dough into a ball and knead it by hand for 1 minute (you will probably have to dust it with flour first to absorb the moisture from the garlic). Lightly oil a large bowl and transfer the dough to the bowl, rolling it around to coat it with oil. Cover the bowl with plastic wrap.
  4. Ferment at room temperature for about 2 hours, or until the dough doubles in size.
  5. Remove the dough from the bowl and divide it into 2 equal pieces. Shape each of the pieces into a boule. Line a sheet pan with baking parchment and dust lightly with semolina flour or cornmeal. Place the dough on the parchment, separating the pieces so that they will not touch, even after they rise. Mist the dough with spray oil and cover loosely with plastic wrap.
  6. Proof at room temperature for about 2 hours or until the dough doubles in size.
  7. Preheat the oven to 400°F with the oven rack on the middle shelf. Remove the plastic from the dough and lightly brush the bread with olive oil. You don´t need to score this bread, but you can if you prefer.
  8. Place the pan in the oven. Bake for 20 minutes, then rotate the pan 180 degrees for even baking. The loaves will take 35 to 45 minutes total to bake. The loaves will be a rich golden brown all around, and the internal temperature should register at least 195°F and make a hollow sound when thumped at the bottom. If the loaves are fully colored but seem too soft, turn off the oven and let them bake for an additional 5 to 10 minutes to firm up.
  9. Remove the finished loaves from the oven and cool on a rack for at least 1 hour before serving.

November 12, 2012 Cinnamon Swirl Bread


Nothing makes a house smell more warm and inviting than the aromas that fill the kitchen when fresh bread is baking. Even more so when that bread is redolent of the sweet and spicy fragrance of cinnamon. This recipe from Fine Cooking for cinnamon raisin swirl bread tastes as good as it smells. A tender lightly spiced dough is studded with raisins and filled with a swirl of cinnamon sugar. I made this bread on a Tuesday evening to share with my Wednesday morning Bible study friends. We were having brunch, as we often do, to commemorate the start of a new study and a new year. A Facebook post of the sliced bread on a Tuesday night received seventeen positive comments by the next morning.
Homemade bread like this merits some homemade butter. I have been making it since my catering days, both plain and fruit butters to accompany mini muffins and quick breads.  It’s very easy to do, all you need is some heavy cream and a food processor. Pour the cream in the bowl of a food processor fitted with the metal blade. Turn on the processor and let it go to work. In about 4-5 minutes the liquid (which is buttermilk) will separate from the milk solids and you will have butter.  The yield will be about one half the amount of cream used, so one cup of cream will result in a half cup of butter. For the best results be sure to use cream that is not ultra pasteurized or has fillers. The butter can be embellished with a little salt or a little jam to make a fruit butter. Be patient and wait until the bread cools before slicing. Any leftovers, if you have any, would make wonderful French toast or bread pudding.  

Cinnamon Swirl Raisin Bread

Makes 2 loaves

Ingredients

For the bread

  • 2 cups dark raisins
  • light-flavored oil to grease the bowl (such as canola or grape seed)
  • 4 cups unbleached, all-purpose flour plus more for dusting (King Arthur is my choice)
  • 2T sugar
  • 2T cinnamon
  • 2 1/4t  instant yeast
  • 2 t fine sea salt
  • 3/4c water at room temperature
  • 1/2 cup whole milk
  • 1 large egg
  • 5T unsalted butter, softened, 3T for the bread, 2T to brush the finished loaves, plus more to grease the pans

For the Cinnamon sugar swirl

  • 4T cinnamon
  • 4T sugar
  • 2T unsalted butter

Directions

  1. Plump up the raisins. Put them in a large measuring cup or bowl and add enough hot water to cover them. Allow to sit for five minutes and then drain them.
  2. In the large bowl of a stand mixer fitted with the paddle attachment, combine the flour, the sugar and cinnamon, the yeast, and salt. Mix until well combined. Add the milk, egg, 3 tablespoons of the butter, and 3/4 cup room temperature water. Mix until well combined, until the dough comes together. Change over to the dough hook and continue to mix until the dough is smooth and slightly sticky. Add the raisins to the dough and gently knead in by hand.
  3. For the first rise: Turn the dough out onto a well-floured surface, roll it into a ball. Clean the bowl you were just using, lightly oil it, and put the dough in the oiled bowl. Cover loosely with plastic wrap and let sit at room temperature until the dough looks slightly puffy, about 30 minutes.
  4. For the second rise: On a well-floured surface, use your hands to flatten and spread the dough out until it’s about 3/4 inch thick. Fold the dough in half from top to bottom, then in half again from left to right. Return the dough to the bowl, cover, and let sit until it has risen slightly, about 30 minutes more.
  5. For the third rise: Lightly grease two 8″ x 4″ loaf pans with butter. In a small bowl, combine the remaining 4T each of cinnamon and sugar; set aside. Melt 2T butter in a small saucepan or a microwave; set aside.
  6. On a lightly floured surface, divide the dough in half and use a rolling pin to shape each half into an 8 1/2 x 16 inch rectangle that is 1/4 inch thick. Use a pastry brush to spread the melted butter on the dough. Sprinkle the cinnamon sugar mixture evenly over both rectangles.
  7. Starting from the short side, gently roll each rectangle into an 8-1/2-inch-long cylinder. Put the cylinders in the pans, seam side down. Cover loosely with plastic wrap. Let rest at room temperature about 60-90 minutes. The dough will spring back when lightly poked.
  8. Bake: Position a rack in the center of the oven and heat the oven to 375°F. Bake the loaves, rotating and swapping the positions of the pans halfway through baking, until dark brown and hollow-sounding when thumped on top and an instant-read thermometer inserted in the center of the loaves registers about 190°F, 30 to 35 minutes. Transfer the loaves in their pans to a rack.  
  9. Melt the remaining butter and use it to brush the tops of the loaves. When cool enough to handle, tip the loaves out onto the rack to finish cooling. Try and wait before slicing into the bread!
  10. Bread will stay fresh in an airtight container for five days, if you can make it last that long.
 

Rolling out the dough.


Cinnamon raisin loaves before their final rise.


April 18, 2012 Italian Easter Cheese Bread

Italian cheese bread-crescia al formaggio


A good soup deserves a good bread and so it was with the Italian Wedding Soup. Staying with the Italian theme I found a recipe for Italian Easter Cheese Bread. Crescia al Formaggio, is a crusty bread that is fragrantly cheesy but dry in texture.  The bread originates from Umbria in the central part of Italy where it is often baked in outdoor stone ovens as part of the Easter Sunday lunch. It is a golden brioche-like dough  enriched with eggs.  If you want to be authentic it should be baked in a terra cotta pot, previously unused of course, with the drainage hole plugged up.  I chose the also traditional pandoro or star pan, but any deep round pan will do . “Crescia” refers to the way the dough domes or crests over the pan it is baked in. Leftover bread (if there is any) would make excellent grilled cheese sandwiches or even croutons. I plan on making it again in the summer for tomato sandwiches.

The bread after the second rise.

Italian Easter Cheese Bread

from the King Arthur Flour Website

Dough:

  • 2 1/2 cups unbleached all purpose flour
  • 1 1/4 t instant yeast (SAF is my favorite)
  • 3 large eggs at room temperature
  • 1 large egg, separated, reserve the white for the glaze
  • 1/4 or more lukewarm water
  • 1/4 cup (4 tablespoons) softened unsalted butter
  • 1 t salt
  • 1t freshly ground pepper
  • 1 1/4 cups freshly grated cheese, Parmesan, Romano, Asiago, use one, two or a combination of all three

Glaze:

  • reserved egg white (from above)
  • 2t cold water

Directions:

  1. Combine all ingredients except  cheese in the bowl of an electric stand mixer, beat on medium speed for 10 minutes, until the dough becomes satiny and shiny. This dough is very sticky so you will need to stop the mixer to scrape the sides and bottom of the bowl several times during the mixing process.
  2. Add the cheese, beat until well incorporated.
  3. Scrape the dough into a lightly greased bowl, cover the bowl, and set it aside to rise for 1 hour; it doesn’t rise much. Gently deflate the dough, turn it over, return it to the bowl and allow it to rise for another hour, again it does not rise very much.
  4. Oil your hands. To make the traditional round loaf, form the dough into a ball, and place it in a greased deep round pan like a souffle dish, panettone pan or the pandoro pan. The dough could also be braided and baked in a 9 x 5 loaf pan.
  5. Cover the bread lightly, plastic wrap or a clean cloth dishtowel is what I choose. Allow the loaf to rise for at least 2 hours or longer. The dough should be noticeably puffy, but not doubled in size.
  6. To bake the bread: Put your oven rack in it’s lowest position and preheat oven to 425°F
  7. Whisk reserved egg white with the water and brush the top of the loaf.
  8. Place the bread in the oven and bake for 15 minutes.
  9. Reduce the temperature to 350°F, tent with aluminum foil and bake for an additional 30-35 minutes until it is a deep golden brown and an instant read thermometer registers 190°F. The braided loaf will take less time.
  10. Remove the bread from the oven, let cool in the pan for 5 minutes. Then turn the loaf onto a cooling rack to cool completely before slicing.
  11. Store airtight at room temperature for several days. Freeze tightly wrapped for longer storage.

Makes one loaf

My personal notes: I made this bread on a day with very low humidity and I found I needed more water than the original recipe called for to achieve the sticky consistency. I also did the second rise overnight in the refrigerator before forming the bread and that worked fine.

April 8, 2012 Leek and Fontina Focaccia

Friday night’s supper of a mussel, tomato and kale stew needed something to mop up all the delicious juices.  I decided on a focaccia with some fresh seasonal touches. Focaccia, an Italian bread can be traced back to the ancient Etruscans, who settled in northern Italy. The word focaccia derives it’s name from the word focus, which in Latin means hearth. In a time when ovens were uncommon, flat rounds of dough were cooked directly on the hearth. What makes pizza different from focaccia? Pizza is Neapolitan from southern Italy  and has a thinner crust while focaccia is thicker and from the north of Italy, Liguira.

The Bread Baker’s Apprentice was an excellent choice for my recipe. Author Peter Reinhart is a baking instructor at Johnson and Wales. Mr. Reinhart’s abilities as a teacher shine through in his books. His recipe doesn’t rely just on the toppings to make the finished product, but on a flavorful crust with “open translucent holes” as he calls them, like a ciabatta. This requires a fermented dough and I went with the quicker method (not using a starter which would have added an extra day to the process) because of time constraints. I chose a topping of sauteed leeks from the garden, fontina cheese and a sprinkling of garlic chives to make a very tasteful accompaniment to our stew.


Focaccia

Adapted from The Bread Baker’s Apprentice
Makes one 17 by 12 focaccia

  • 4 cups unbleached high gluten or bread flour
  • 1 cup  King Arthur white whole wheat flour
  • 2 t salt
  • 2 t instant yeast
  • 6T olive oil
  • 2c room temperature water
  • 1/4 to 1/2c herbed olive oil (recipe to follow)
  • 3-4 leeks, thinly sliced and sauteed until soft, not brown, to make 1 1/2 cups
  • 1 cup grated fontina cheese.
  • 1/2 c finely snipped garlic chives
  1. Stir together the flours, salt and yeast in the bowl of a stand mixer. Add oil and water mixing on low speed with the paddle attachment for 3-5 minutes, until the dough is smooth and ingredients are thoroughly mixed. Switch over to the dough hook attachment and mix on medium speed until you make a smooth sticky dough,  5-7 minutes. The dough will clear the sides of the bowl but stick to the bottom of the bowl.
  2. Sprinkle flour on your countertop in a 6″ square. Using a spatula dipped in water, transfer the sticky dough to the bed of flour. Dust liberally with flour and pat dough into a rectangle. Cover loosely with a kitchen towel and wait five minutes for the dough to relax. This is a good time to clean your very sticky mixer bowl and beaters before they are coated with hard, gluey flour.
  3. Coat your hands with flour and stretch the dough from end to end until it is twice it’s size. Fold it letter style over itself to return it to it’s rectangular shape. Lightly brush the dough with olive oil, dust with flour, and loosely cover with kitchen towel.
  4. Let rest for 30 minutes. Repeat the stretching and folding procedure in step three. After another 30 minutes, repeat the step again.
  5. Ferment the covered dough on the counter for about an hour. It will puff up but not necessarily double in size.
  6. Line a 17 by 12 baking sheet with parchment paper. Drizzle with olive oil and spread with a brush to cover the surface. With lightly oiled hands, transfer the dough from the counter to the baking sheet, maintaining the shape as much as possible. Spoon herbed oil (see accompanying recipe) to cover over the dough.
  7. Now for the fun part, with your fingertips, dimple the dough as you spread it out to cover the baking sheet. If it doesn’t reach the edges, don’t worry, the dough will expand as it proofs. Use more herbed oil as needed to coat the dough.
  8. Cover the pan with plastic wrap and refrigerate overnight.
  9. Remove the baking pan from the refrigerator several hours before baking. Drizzle additional herbed oil over the surface, it will be absorbed by the dough.
  10. At this point the sauteed leeks can be scattered over the surface of the dough. Cover the dough again with plastic wrap and proof at room temperature for several hours, until the dough doubles in size, about 1 inch in thickness.
  11. While your dough is proofing, preheat oven to 500F with the rack on the middle shelf.
  12. Place the pan in the oven. Lower oven setting to 450F and bake for 10 minutes. Rotate the pan 180 degrees and continue baking the focaccia for another 5-10 minutes, until it turns a light golden brown. At this time sprinkle the fontina on the focaccia and bake for a few more minutes, watch closely, until the cheese is melted, not burnt! At this point I scattered the garlic chives on, the melted cheese helps them to stick.
  13. Remove pan from the oven and immediately transfer the focaccia out of the pan and onto a cooling rack, I did this with two flat spatulas. If the parchment is stuck on the bottom, carefully remove it by lifting the corner of the focaccia and gently peel off.
  14. Resist temptation and allow the focaccia to cool for 20 minutes. Now you are ready to slice and serve.

Herbed Oil

While your dough is fermenting warm 1 cup olive oil to about 100F. Add 1/2 cup chopped garlic chives. Cover and allow to sit for an hour before using. I strained the oil into a clean canning jar before using. This recipe could be done with other herbs such as basil, rosemary, or a combination of herbs. Store remaining oil in the refrigerator and use within two weeks.