November 26, 2017 Butternut Squash Gratin with Rosemary Breadcrumbs


When it comes to Thanksgiving dinner I am a traditionalist. For the main course, it’s always a juicy roast turkey and another one hot off the smoker. Not to mention the additional variations we tried in previous years, wrapped in puff pastry à la Martha or cooked outdoors in a deep fryer, not advisable on a windy day on a wooden deck. But when it comes down to it, I am most excited about the side dishes. For many years we hosted Thanksgiving dinner for family and friends and I was driven to make countless side dishes featuring every fall vegetable I could think of.

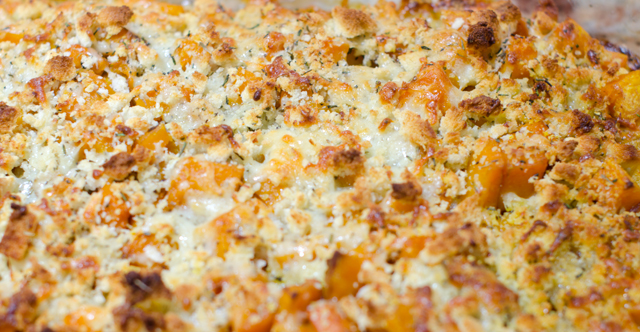
Now we are part of a collaborative effort of family, friends, and friends who feel like family. Our offering is a smoked turkey and a few side dishes. Fortunately I was able to draw from the bounty of our garden to make a butternut squash gratin. At Thanksgiving dinner I was asked what a gratin is and I shared the following. A gratin is always baked and/or broiled in a shallow dish. The topping is traditionally cheese and/or breadcrumbs that should get crispy in the cooking process. Gratin is derived from the French word gratiner-to broil.

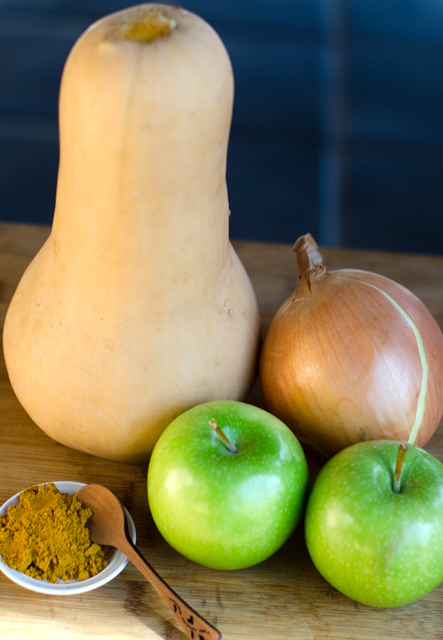
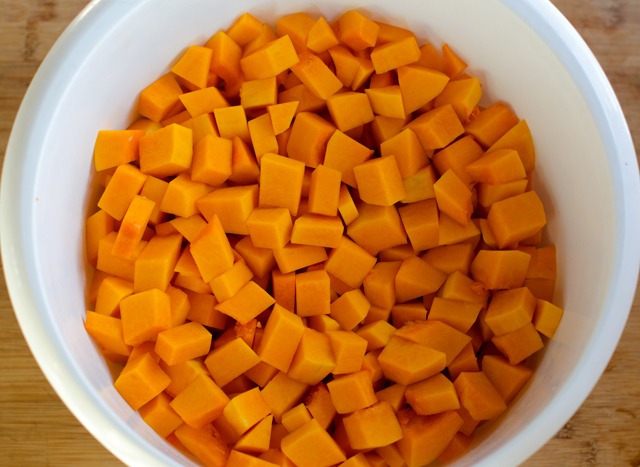
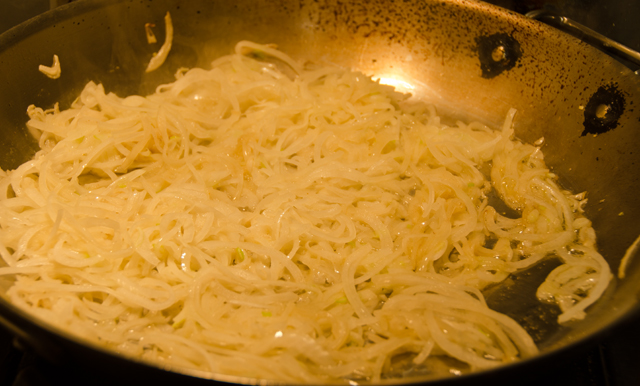
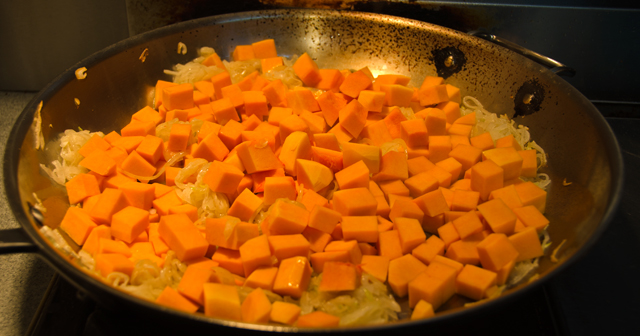
This recipe begins with lots of thinly sliced onions sautéed in butter until softened and golden brown. Butternut squash cubes are added next and sautéed along with the onions until both are caramelized. This recipe can be made much easier with the advent of peeled, seeded and cubed butternut squash, available in many supermarkets. As for me I will be hacking away at my stash of butternut squash all the way to spring.

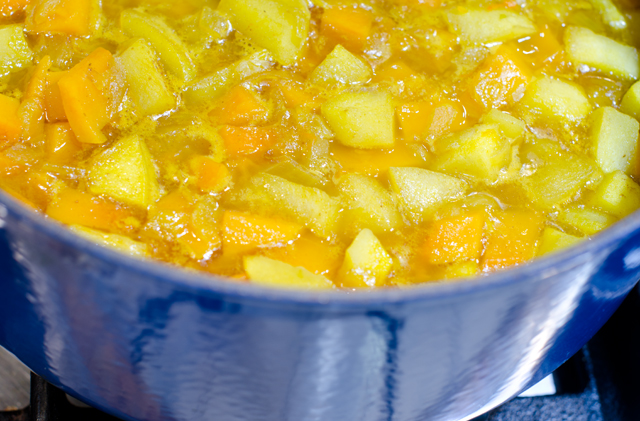
Pour the vegetable mixture into the buttered baking dish, cover and bake. Another plus is this step can be done a day ahead, just cool and refrigerate until you are ready to finish the dish. Make the breadcrumb mixture ahead as well and store separately in the refrigerator. If you are making components ahead of a special dinner, label them well so that your well-meaning kitchen help doesn’t mix them up! On the day you are cooking the dish, reheat for about 10 minutes, sprinkle with breadcrumb, cheese and herb mixture. A sharp cheddar is a good contrast to the sweetness of the butternut squash. Not just for your holiday table, this would be great as a side dish for weeknight suppers, any fall gathering or even as a brunch dish.

Saute the onions.
Next in is the cubed butternut squash.
The vegetables are placed in a 13×9 glass baking dish
Joe picked fresh rosemary for the breadcrumb topping.

Butternut Squash Gratin with Rosemary Breadcrumbs

Serves 6-8 as a side dish

Ingredients

  • ¼ c (½ stick) unsalted butter
  • 4 c thinly sliced onions
  • 2½ to 3 lbs butternut squash, peeled, seeded and cut into ¾ inch cubes
  • 1 t sugar (optional)
  • ½ t salt
  • ½ t freshly ground black pepper
  • ¾ c chicken broth
  • 2 c bread crumbs made from soft white bread
  • 2 c packed grated sharp white cheddar cheese
  • 1 ½ T chopped fresh rosemary
  • ½ t dried thyme

Directions

  1. Preheat oven to 350°F. Butter 13x9x2-inch glass baking dish.
  2. Melt butter in a large heavy skillet over medium high heat. Add onions; sauté until onions are light golden about 8 minutes. Add squash; sauté 4 minutes. Sprinkle sugar, salt and pepper over vegetables; sauté until onions and squash begin to caramelize, about 5 minutes
  3. Spread vegetable mixture into prepared dish. Pour chicken broth over. Cover tightly with foil and bake 45 minutes. (Squash mixture can be made 1 day ahead. Cool, then cover and refrigerate. Reheat in a 350° oven until heated through, about 10 minutes.)
  4. Increase oven temperature to 400°F. Mix breadcrumbs, cheese, rosemary and thyme in a medium bowl. Sprinkle over gratin.  Bake uncovered until top is golden brown and crisp, about 30 minutes.
Delicious!

November 18, 2017 Curried Butternut Squash Soup


A reluctant fall has finally settled in and made itself at home in Bucks County. We have experienced our first killing frost, officially ending the growing season. One of the last survivors of the garden is the kale. Cold weather just seems to make it sweeter. I have a sinkful soaking right now, reviving it for tonight’s dinner. We also have a wheelbarrow full of butternut squash in the garage that was harvested before the frost.

Fortunately butternut squash stores well in a cool basement, so I will be able to use it through to next spring. I cube and roast it to add to our green salads, butternut squash lasagna is a new favorite, and of course, soup. Smooth and silky butternut squash soup is a cold weather favorite. I have shared several recipes for butternut squash on this blog but this is the original, the recipe I have been making for over thirty years.

When I first discovered my love for cooking one of the first cookbooks in my library was The Silver Palate cookbook. Silver Palate’s recipe for curried butternut squash soup was a constant on our Thanksgiving table for many years. This velvety rich soup has just the right combination of sweet, tart and spicy and was met with rave reviews from friends and family alike.

Begin the recipe by sautéing chopped onions and curry powder in sweet (unsalted) butter. If your curry powder has been sitting in the back of your spice cabinet for longer than you can remember, it’s time to invest in a new jar. There is no one formulation for curry powder and each variety can have different component spices in differing amounts. For this soup the best choice is sweet curry powder. It will give you a wide range of flavors without too much heat. One large onion yielded the two cups I needed. The covered pan will allow the onions to cook slowly,  give them a stir every five minutes or so to keep them from sticking to the pan.

While the onion is cooking, peel and cube the butternut squash. The medium-large squash I used weighed in at 3.3 lbs and yielded about 6 cups of peeled, cubed squash. Add squash cubes, apple and chicken stock, bring to a boil and cook until squash and apples are tender. Purée the soup in a food processor or blender. Return the soup to the pot, add apple juice or cider and season with salt and pepper. Serve piping hot with a garnish of a tangy freshly grated green apple.

Over the years this recipe this soup has become less of a project for the home cook. Don’t feel like chopping a large unwieldy squash? You can buy peeled and chopped squash at most grocery stores. Does the thought of straining and pouring hot soup into a blender make you just a little nervous? An immersion blender eliminates this step. If you make this soup ahead of time, cool it and store in the fridge.  When you reheat the soup you may thin to thin it out a bit with a little more stock.

The most amazing thing about this recipe is you have made a rich, creamy soup without a drop of cream or milk. Perfect for the holidays or great alongside a sandwich of leftover turkey.

The primary players.
A three pound squash yielded about 6 cups of cubes.
Simmering on the stove top.
I pureed my soup in the food processor but a blender or immersion blender works too.

Curried Butternut Squash Soup

Serves six

Ingredients

  • 4 T unsalted butter
  • 2 c finely chopped onions
  • 4-5 t sweet curry powder
  • 3 lb butternut squash
  • 2 tart apples, peeled, cored and chopped
  • 3 c chicken stock
  • 1 c apple juice or cider.
  • kosher salt and freshly ground pepper to taste
  • 1 shredded unpeeled tart apple (garnish)

Directions

  1.  Melt the butter in a 5 quart Dutch oven. Add chopped onions and curry powder and cook, covered, over low heat until onions are tender, about 25 minutes.
  2. While the onions are cooking peel the squash, scrape out the seeds and chop the flesh into 1″ cubes.
  3. When the onions are tender, pour in the stock, add squash and apples, and bring to a boil. Reduce heat and simmer, partially covered, until squash and apples are very tender, about 25 minutes.
  4. Pour the soup through a strainer, reserving the liquid, and transfer the solids to a bowl of a food processor. Add 1 cup of the cooking stock and process until smooth.
  5. Return the puréed soup to the pot and apple juice and the remaining cooking liquid, about 2 cups, until the soup is of the desired consistency.
  6. Season to taste with salt and pepper, simmer briefly to heat through, and serve immediately, garnished with shredded apple.

November 9, 2017 Buckeye Candy

We had the pleasure of a visit recently from our dear friends Bill and Wilma. The main reason for their trip from sunny south Florida was to attend the wedding of a friend’s son. Along with wedding festivities, they spent time enjoying some Bucks County sightseeing, dining and spending time with friends, including us. Wilma was also fortunate enough to get excellent tickets to see her beloved Ohio State Buckeyes football team play Penn State on their home field in Columbus Ohio.

The Ohio Buckeye is one of 13 tree species of the genus Aesculus, also known as buckeye or horse chestnut and the state tree of Ohio. Ohio State adopted the buckeye as its official nickname in 1950 though it had been in common use for many years before. The name came about because the nuts of the tree are shiny dark brown with light tan patches resembling the eyes of a deer, a buck eye. The nuts are inedible but folklore says carrying one in your pocket wards off bad luck.

Though the buckeye nut is “mildly” poisonous, its namesake confection is quite delicious. Buckeye candy has a peanut butter fudge like filling that is partially dipped in melted chocolate, leaving a circle or “eye” of peanut butter visible. They are very easy to make and you may already have the ingredients in your pantry. The first step is to combine peanut butter, butter, confectioners’ sugar, vanilla and salt with the paddle attachment of a stand mixer.

The most time-consuming, but not hard, part of the process is rolling the peanut butter mixture into balls. Give the balls a short chill in the freezer to firm them up before the next step. Melt chocolate, morsels are fine, with a tablespoon of coconut or vegetable oil. Adding a little oil makes the chocolate glossier and makes the buckeyes firmer when they’re outside the fridge.

Stick a toothpick into a peanut butter ball and give it a generous dunk in the chocolate. Don’t submerge it, leave the top quarter undipped. This spot is what makes a buckeye a Buckeye! Transfer the buckeyes to the prepared baking sheet. Pull out the toothpick and carefully smooth over the hole. Chill the buckeyes overnight in the fridge for the best results. Store in an airtight container in the refrigerator.

The game? Ohio State pulled off an exciting fourth quarter come from behind win beating Penn State, final score 39-38.

Dipping the buckeyes.
Ready for a chill.

Buckeyes

Makes about 30 pieces

Ingredients

  • 2 c confectioners’ sugar
  • 1 c smooth sweetened peanut butter
  • 4 T melted unsalted butter
  • 1 t vanilla extract
  • ¾ t kosher salt
  • 6 ounces semi sweet chocolate
  • 1 T coconut oil

Directions

  1. Line a rimmed baking sheet with parchment paper. In a large bowl, with an electric mixer on medium, beat the confectioners’ sugar, peanut butter, butter, vanilla and salt until smooth and uniform, about 1 minute.
  2. Portion the mixture into 1 tablespoon balls. Roll the balls into neat circles between your palms. Transfer to the prepared baking sheet, cover with plastic wrap and chill in the freezer until firm, about 30 minutes.
  3. At the end of the chilling time, prepare the chocolate. In a small microwave safe bowl, melt the chocolate and coconut oil in short bursts, stirring often. If the chocolate becomes too thick during the dipping process, it can be liquefied again in the microwave.
  4. Use a toothpick to skewer one ball at a time, and dip it into the melted chocolate, leaving a small circle of the peanut butter mixture exposed at the top and allowing any excess chocolate to drip into the bowl. Transfer buckeyes to the prepared baking sheet and remove the toothpicks. Repeat with the remaining balls, returning them to the freezer for a few minutes if they become too soft to work with. Smooth over the holes left by the toothpick with a small offset spatula or your finger. Chill in the refrigerator until the chocolate is firm, about 30 minutes but if you can, overnight is best.

A little extra chocolate and some chocolate dipped potato chips.