June 24, 2018 Carrot Top Chimichurri Sauce

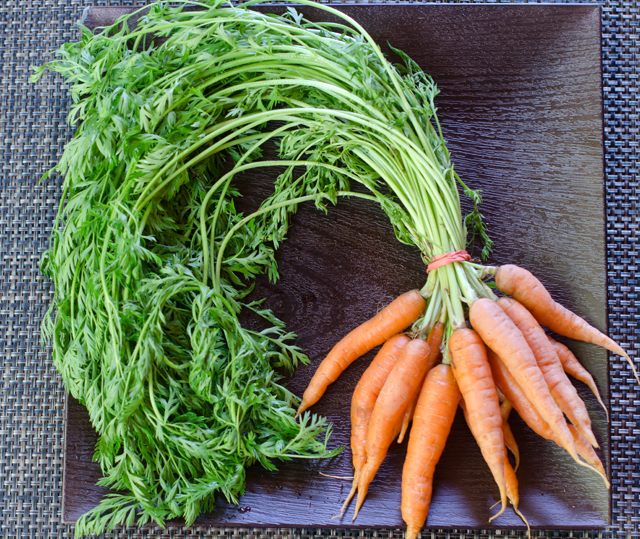
When I exercise on our elliptical machine I catch up on my version of “must-see t.v.”. Right now I am watching the current season of Iron Chef America. For those not familiar with the show, two chefs,  a world-class “Iron Chef”  competes against an up and coming chef. The chefs create a menu in one hour from appetizer to dessert that prominently features that week’s secret ingredient. Two weeks ago it was ” Battle Kobe Beef”. This weekend I tuned into “Battle Carrot”. The show is fun to watch and also stimulates my own creativity in the kitchen. I’m pretty sure when I went to the farmers market after my workout I had carrots on the brain. So along with all the other goodies I found, a lovely bunch of recently harvested carrots went into my bag.

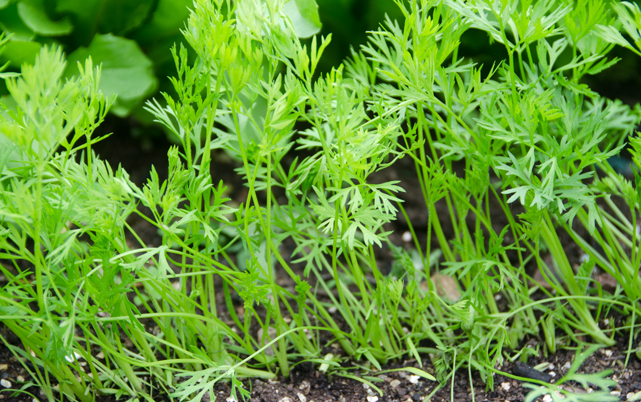
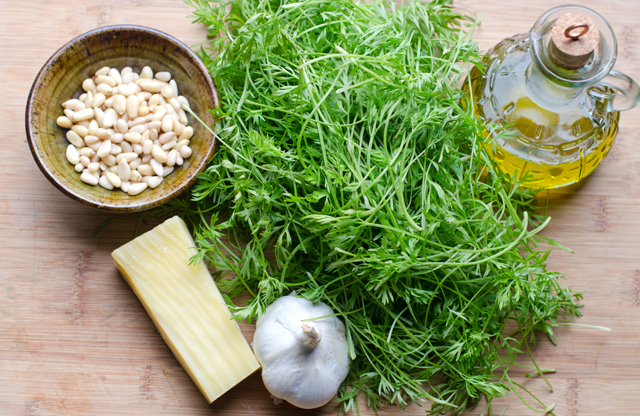
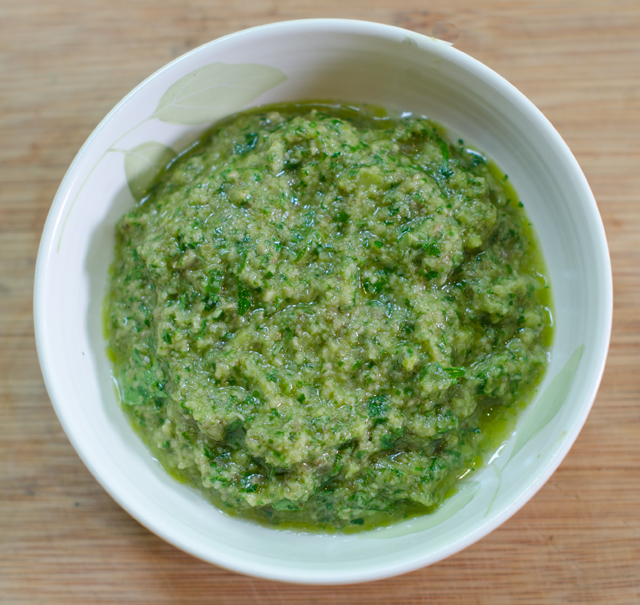
My plan was to roast the carrots and in the spirit of “root to stem” cooking, use the greens as well. Carrot tops are edible and rich in vitamins A,C, calcium, iron and dietary fiber. They have an earthy, herbal, slightly bitter taste. Carrot top pesto was a success last year, this time I was looking for something a little bit different. Chimichurri sauce was a natural for this dish. This rich herby sauce from Argentina was already a favorite of ours. I have served as an appetizer at parties, spooned over rare beef tenderloin on crostini. It was easy enough to swap out the parsley in the original recipe for carrot tops. After all they are both members of the same plant family, along with fennel, dill  and coriander.

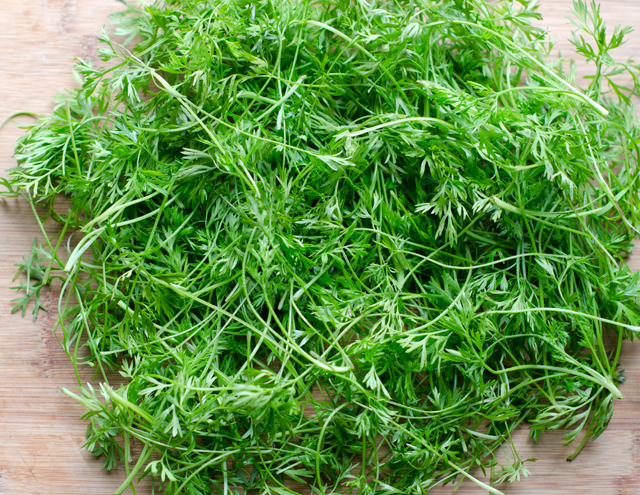
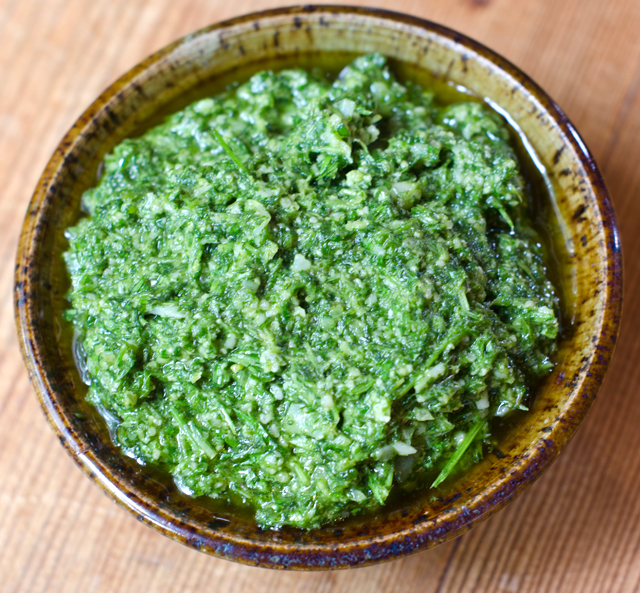
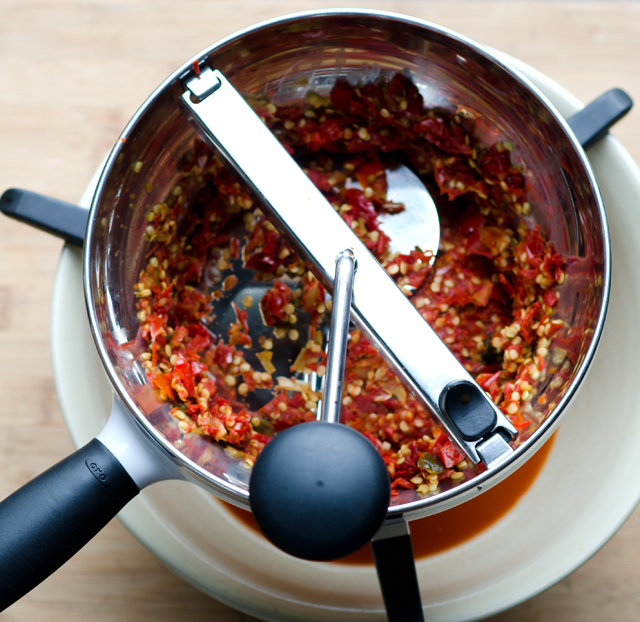
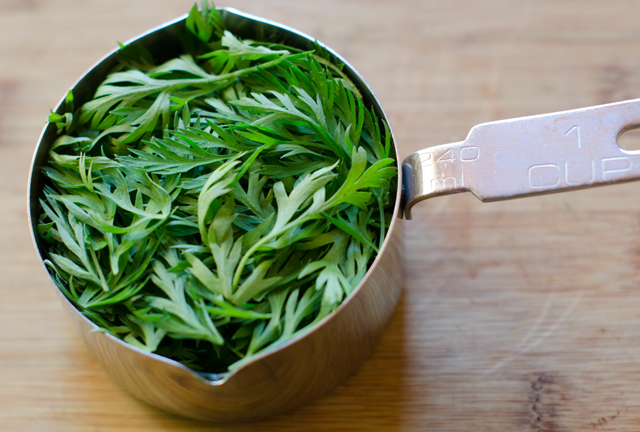
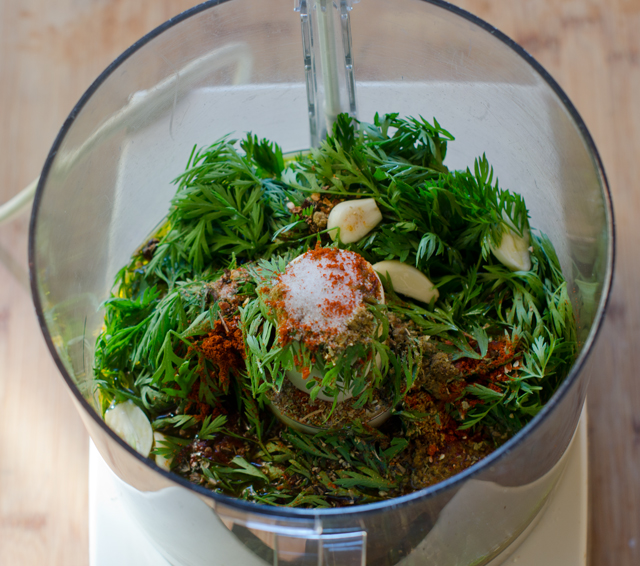
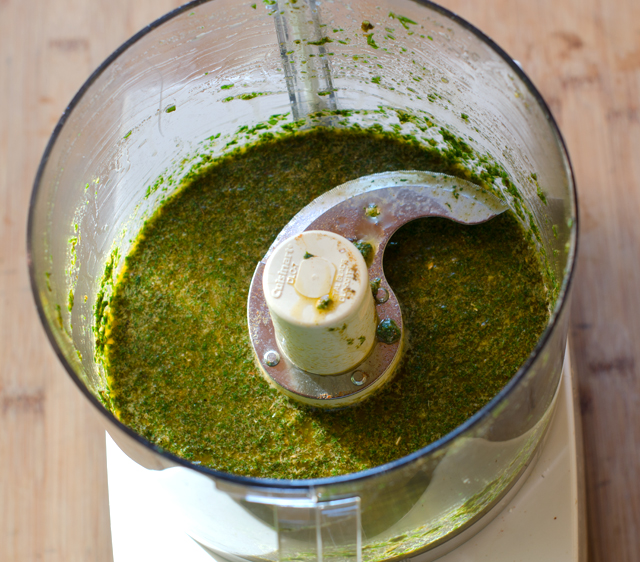
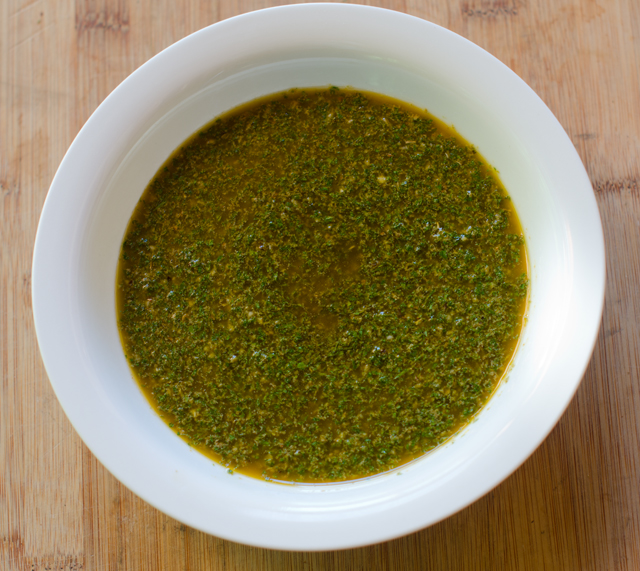
Wash the greens well and pat dry with paper towels. The most time-consuming part of this recipe is separating the leaves from the slightly harder stems. Aim for a lightly packed cup, if you want this thicker to use as a dip, either cut back on the olive oil or add a quarter cup more of leaves. Blend all of the ingredients until smooth in a food processor. Taste and adjust the seasonings. Give the chimichurri at least an hour to fully combine the flavors, over night is even better. If you don’t have carrot tops, substitute the traditional parsley or a combination of parsley and cilantro.

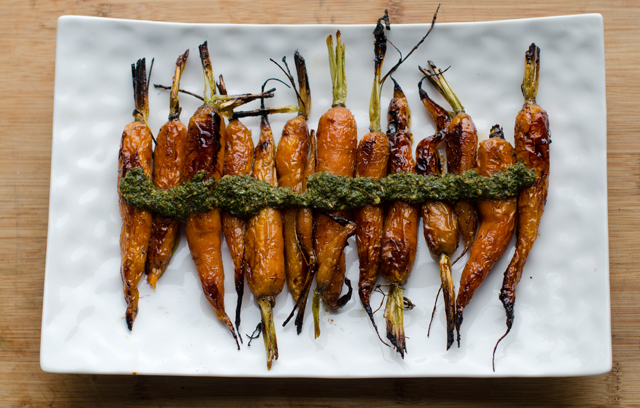
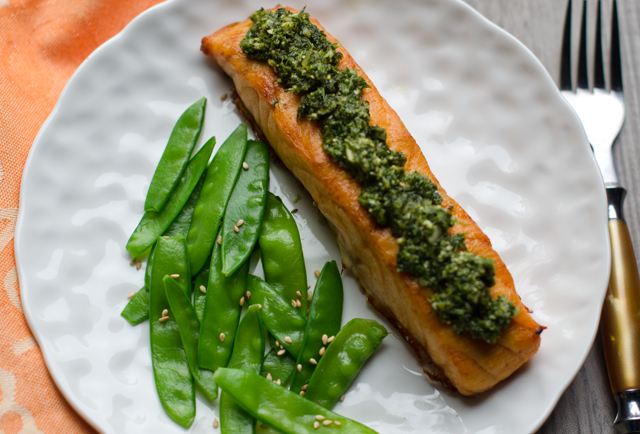
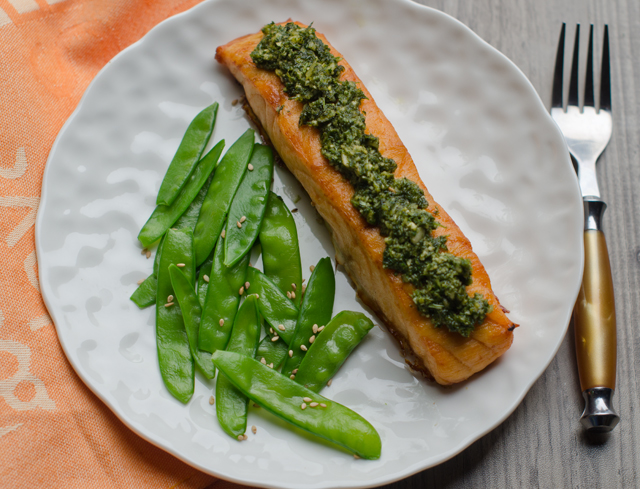
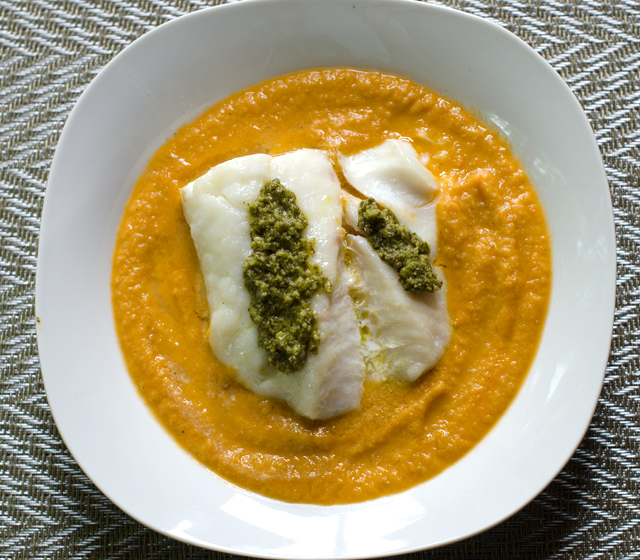
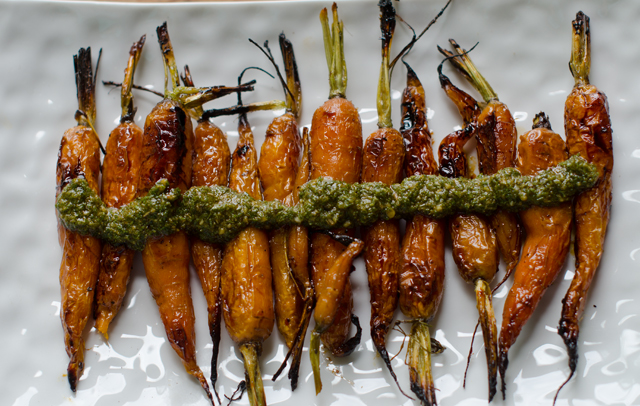
I served my chimichurri over roasted carrots. Traditionally this is served with steak but I think it would be just as good as a sauce with grilled chicken or lamb chops. Store in the refrigerator in an airtight container for up to a week.

A cup of lightly packed carrot leaves.
Everything goes in the food processor.


Carrot Top Chimichurri Sauce with Roasted Carrots

Makes about a cup

Ingredients for Chimichurri Sauce

  • 1 c lightly packed fresh carrot top leaves
  • ¾ c extra virgin olive oil
  • 3 T red wine vinegar
  • 1 T dried oregano
  • 2 t ground cumin
  • 1 t salt
  • 3 cloves garlic, peeled and roughly chopped
  • ½ t smoked paprika
  • ½ t dried crushed red pepper

Directions

  1. Combine all of the ingredients in a food processor and blend until smooth.
  2. Refrigerate for at least one hour but tastes even better the next day. Store in an airtight container. Use within a week.
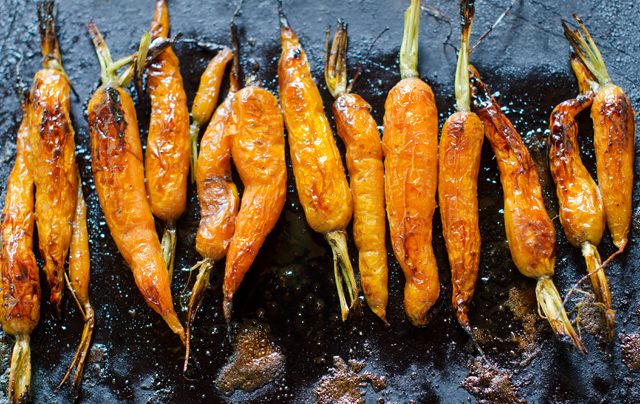
Roasted Carrots

Ingredients

  • 1 lb fresh carrots, scrubbed well, tops reserved for chimichurri sauce
  • 1 T extra virgin olive oil
  • 1 T honey
  • Kosher salt and freshly ground black pepper

Directions

  1. Preheat oven to 425°F. Coat a large baking sheet with non stick spray.
  2. In a bowl large enough to accommodate the carrots, mix together the olive oil and honey.
  3. Add the carrots to the bowl and toss them with the oil and honey. Salt and pepper to taste.
  4. Spread carrots evenly on the baking sheet and use a spatula to scrape the rest of the honey-oil mixture over the carrots.
  5. Roast carrots for about 15 minutes, shaking pan halfway through the cooking process for even browning.
  6. Remove carrots from oven, allow to cool slightly.  Serve carrots topped with chimichurri sauce.


June 11, 2017 Carrot Top Pesto

Spring is an ideal time for planting root vegetables like turnips, beets and carrots. They especially love the cooler temperatures that we have been blessed with this spring. We try to be frugal with seeds, so the ones that aren’t planted are saved from season to season. I catalog them alphabetically like a card file in clamshell plastic containers that in a previous life held spinach or lettuce from a big box store. I use 3×5 cards to separate them into specific categories, beets, cucumbers, fennel etc. This year I even did a little clean up, getting rid of all packets before 2013.

Last year a friend gave Joe quite a few packets of carrot seeds he purchased on sale. Some were planted but most went into storage in the fridge over the winter. He wasn’t certain how many of them would germinate this season so he planted them very densely. As luck would have it, every carrot seed germinated.  Now it was time for some serious thinning.

Thinning is a necessary step in vegetable gardening if you want to have mature healthy plants. This can be done in stages. Armed with my Cutco scissors, I did the first thinning when the plants were about four inches tall. Pulling out the unwanted seedlings can often pull out the ones you wanted to leave growing. I snipped the plants at the soil line. With a colander full of the lacy feathery tops I thought about how I could use them. I remembered that parsley and carrots are related so I tasted a few of them. They have an herbaceous flavor, that to me was reminiscent of parsley.

I have made pesto with basil and arugula, why not carrot tops? I used a basic formula that I have used to make other types of pesto, herbs or a green, in this case carrot tops, garlic, nuts, a hard cheese and olive oil. Baby carrot greens are more delicate in flavor and are a special reward for the gardener. Organically grown full-sized carrot greens can be used too, eliminating any thick stems. I used my pesto as a topping for roasted salmon. It would work with chicken breasts and of course, roasted carrots.

Time to thin the carrots.
The first thinning of carrot greens.

Carrot Top Pesto

Makes about a cup

Ingredients

  • 3 cups lightly packed carrot tops
  • 1 clove of garlic
  • 3 T pine nuts
  • ¼ c extra virgin olive oil, more if needed to make a paste
  • ¼ c grated Parmesan cheese
  • Kosher salt and pepper to taste

Directions

  1. Place the carrot tops, garlic and pine nuts in the bowl of a food processor.
  2. Pulse until coarsely chopped. With the motor running, slowly add olive oil until a paste forms. Add cheese and pulse several times to combine.
  3. Season with salt and pepper to taste. Use immediately or cover tightly with plastic wrap and refrigerate for up to 2 days.

May 30, 2017 Baked Halibut with Bouillabaisse Sauce and Green Olive Tapenade

Fish is on the menu at our house three nights a week and though the method of cooking is usually the same, I am always looking for new ways to complement it. This recipe, Baked Cod Fillet with Bouillabaisse Sauce with Green Olive Tapenade from the April issue of Food and Wine seemed to fit that bill. It combines the classic flavors of bouillabaisse: fennel, garlic, saffron and tomatoes, to make a delicious sauce along with a quick briny olive tapenade.

The origins of bouillabaisse can be traced as far back as the ancient Greeks and was the humble fare of fishermen in Provence, specifically from the port city of Marseille. The best of the catch would be sold to restaurants while the less desirable bony rockfish and shellfish would become part of the fisherman’s dinner, a stew cooked with sea water and simmered over an open fire. Bouillabaisse has come a long way since then to become one of the most iconic French dishes.

The first step of the recipe is to chop the fennel, leek, onion and celery. This can be done by hand or a food processor makes quick work of this step. Just be certain that all pieces are relatively the same size to ensure even cooking. Sauté the vegetables over medium heat until softened then add the garlic and saffron. Saffron adds a subtle flavor and aroma and its beautiful golden color. At about forty dollars a bottle, Pernod is an ingredient I could not justify buying since I was only using a few tablespoons. It adds a subtle anise flavor so if you have some on hand, by all means use it. Add dry white wine and vermouth to the pot and reduce the liquid by half. Next into the pot are halved and smashed cherry tomatoes, grape tomatoes are an acceptable substitute here.

The next step is to make fish stock. I am fortunate to have an outstanding fish market that supplies me with fish bones and heads needed for stock making. If making fish stock would stop you from making this recipe, substitute clam broth or  fish bouillon.  Always taste products like this first, since they can be salty. After the sauce cooks, cool slightly and carefully discard the fish bones if using. Use an immersion blender to puree the sauce then pass it through a food mill into a sauce pan. Keep the sauce warm over low heat.

The green olive tapenade is very easy to do and adds a briny contrast to the rich sauce. Cook the fish according to your favorite method, we use the Canadian fisheries method with consistent results. The sauce and the tapenade can be made several days ahead making this an impressive recipe for entertaining.

Baked Halibut with Bouillabaisse Sauce and Green Olive Tapenade

Serves four

Ingredients for the sauce

  • 4 T extra virgin olive oil, divided
  • 1-1 lb fennel bulb, trimmed and finely chopped
  • 1 large leek, trimmed and finely chopped, white and light green parts only
  • 1 medium white onion, finely chopped
  • 2 celery ribs, finely chopped
  • 2 garlic cloves, finely chopped
  • ¼ t saffron threads
  • 2 T Pernod or pastis (optional)
  • ¾ c dry white wine
  • ¾ c dry vermouth
  • 1 pint cherry tomatoes, halved and smashed
  • ½ t smoked paprika
  • 2 lbs white fish bones, rinsed and dried
  • 2 t fresh lemon juice (plus more for drizzling)
  • Kosher salt
  • Four 6-oz. white fish fillets like cod, halibut, grouper

Directions for the sauce

  1. In a large enameled cast-iron casserole, heat 2 tablespoons of the olive oil. Add the fennel, leek, onion and celery and cook over moderate heat, stirring occasionally until the vegetables are softened, about 8 minutes.
  2. Stir in the garlic and the saffron and cook until fragrant, about 2 minutes
  3. Add the Pernod (if using) and cook until the liquid has evaporated, about 2 minutes. Add the wine and vermouth and cook until the liquid is reduced by about half, about 8 minutes. Add the tomatoes and paprika and simmer over medium heat until the liquid is reduced by half, about 5 minutes.
  4. In a large skillet, heat 2 tablespoons of the olive oil. Add the fish bones and cook over medium high heat, turning once, about 5 minutes.
  5. Transfer the bones to the casserole and add two cups of water. Cover partially and simmer over moderately low heat for 30 minutes. Let the sauce cool slightly then discard the fish bones.
  6. Using an immersion blender puree the sauce, then strain through the fine mesh of a food mill into a medium saucepan. Add 2 teaspoons lemon juice, season with salt and keep warm.

Ingredients for the Green Olive Tapenade

  • ¼ c green pitted olives
  • 2 T rinsed and drained capers
  • 2 T flat leaved parsley
  • 2 T extra virgin olive oil
  • 1 ½ T fresh lemon juice
  • kosher salt and freshly ground pepper

Directions for the Green Olive Tapenade

  1.  Place the first five ingredients in the bowl of a mini food processor and pulse until combined and roughly chopped. Season to taste with salt and pepper.

Cooking the Fish

  1. Preheat oven to 450°F.
  2. Coat a shallow baking dish with non stick spray. Season the fish fillets with salt.
  3. Measure your fish fillets at the thickest point. Bake the fish for 10 minutes for every inch of thickness.

Finishing the Dish

  1. Ladle the sauce into 4 shallow bowls and top each one with a cod fillet Spoon the tapenade over the fish. Drizzle with more olive oil and lemon juice. Serve immediately.

March 21, 2017 Creamy Poblano Chicken

I didn’t think the day would come, but I finally exhausted my supply of freezer pesto. I’ve been using it this winter to top boneless chicken breasts before baking as an easy weeknight supper. A little looking around the freezer and I found the ingredients for this new impromptu sauce. Chicken with poblano cheese sauce is loosely based on a Mexican classic. Poblano peppers have a dark green skin and if left to ripen further on the vine will turn red. They are somewhat heart-shaped, 3-6 inches long and 2-3 inches wide. Poblano peppers are rich and flavorful with a mild to medium heat.

This recipe can be made as mild or as spicy as you like, depending on the number of poblanos added to the sauce. Since most recipes begin with roasted and peeled poblanos, there are several methods for roasting. If you have a gas stove as I do, they can be roasted on an open grated grill known as an asador. If you don’t have a gas stove they can be broiled on a foil lined baking sheet. With either method, turn them often so they char evenly. Put the chilis in a bowl while they are still hot and cover tightly with plastic wrap. Let them rest until they are cool enough to handle, 15-20 minutes. Pull on the stem to remove the seed core and cut the chile open to remove any additional seeds and ribs. Remove the skin by running your hands down the chile, use a damp paper towel to remove any skin that won’t easily come off. Resist rinsing the chiles, you will dilute the flavor.

The base is cauliflower Alfredo sauce, a recipe from the blog two summers ago. I wasn’t certain if this would be good to freeze, but I’m pleased to say it reheated well. Since my first step was to see if the sauce held up to freezing, I started with a cup of the cooled down sauce in the food processor. To this I added several roasted poblanos, from the end of last years garden, also from the freezer.

I puréed the sauce, along with a cup of raw spinach leaves, a teaspoon of ground cumin, salt and pepper. Start with one stemmed and seeded poblano, cut into strips and add more as desired just to give a little kick of heat. I topped chicken breasts with this sauce, covered with foil and baked for 23 minutes. After 23 minutes, I took out the chicken, removed the foil and topped with grated cheese and placed under the broiler. Delicious and the chicken is cooked perfectly! Next time I might add some roasted garlic too. This sauce would also be good to top chicken enchiladas or even as a dip for veggies.

Creamy Poblano Chicken

Serves 4

Ingredients

  • 1-1 ½ c cauliflower Alfredo sauce
  • 2-3 roasted poblano peppers
  • 1 c raw spinach leaves
  • 1 t ground cumin
  • kosher salt and freshly ground pepper
  • 2 lbs boneless skinless chicken breasts, remove tenderloin if attached, breasts cut in equal halves
  • ½c or more shredded cheese, a Mexican blend is good here, mozzarella is fine as well
  • Non stick spray or oil to coat baking dish.
Cut large breast pieces in half.
It’s best to cut on an angle to get even pieces.
Poblano peppers add just the right amount of heat.
I like to cook them on the stovetop on an asador.


The sauce can be made easily in a food processor or blender.

Coat the breast pieces evenly with the sauce.
Cover the chicken tightly with foil before cooking. Be careful of the steam that will escape after cooking.
After cooking they will shrink a bit.
Turn the broiler on and sprinkle chicken with cheese.
The finished product!

Directions

Preheat oven to 375°F

  1. Put the first four ingredients in the bowl of a food processor or blender and pulse until all ingredients are incorporated. Taste for seasoning and add another poblano if desired. Season with salt and pepper to taste. Scrape sauce from processor into a bowl and set aside.
  2. Spray a 9″ X 11″  baking dish with non stick spray or coat lightly with olive oil.
  3. Remove tenderloins from chicken breasts if still attached. Cut each breast in half to make even (as possible) pieces. Place the chicken breast pieces in the baking dish.
  4. Cover each piece generously with the sauce. Cover the baking dish with foil and bake for 23 minutes. Remove baking dish from oven, take off the foil and set oven to broil. Sprinkle cheese over chicken breasts and return baking dish without the foil to the oven. Broil until the cheese is melted and starts to brown in spots, 3-4 minutes. Watch closely. Serve with cauliflower rice to sop up the juices.

October 8, 2015 Homemade Sriracha Sauce

DSC_4847aOver the years I have made my share of homemade condiments.  Joe’s ability to produce an abundant harvest from our garden often has me looking for ways to preserve some of that bounty for the fall and winter months.  I have made my own ketchup, chili sauce and tomato paste from the tomatoes in our garden. Not to mention homemade mustard, jams, chutneys and  preserved lemons. In fact the first cookbook that Joe ever bought me, even before we were married was Better Than Store Bought, a classic to this day for the DIY cook.

The latest to be added to my homemade list is sriracha. As long time fans of Thai cuisine, sriracha has been on our food radar since the early eighties. We love the spicy, garlicky, slightly sweet sauce that was a table condiment at our local Thai restaurant. Back then I would have to travel to local Asian markets to find the thick red sauce that came in a squeeze bottle with a green cap and a rooster on the label. We, and obviously many others, were definitely on to something, over the years the popularity of sriracha has grown by leaps and bounds. Now it can be found in supermarkets everywhere and sriracha flavors products as diverse as popcorn, potato chips, beer and lip balm.

It was first produced in the United States by a Vietnamese immigrant, David Tran, who was unable to find a hot sauce he liked.  He developed and named his sauce after one that he tasted in the Thai southern coastal city of Si Racha, where it was made for dishes served at local seafood restaurants. The success of Mr. Tran’s company Huy Fong Foods, named for the boat that brought him to the United States, is legend. Since 1980 sales of sriracha have increased by 20% a year without paid advertising. Unlike other hot sauces, sriracha is made with fresh chilies, Tran says this is what separates sriracha from the competition. So with a large crop of hot peppers in many varieties, I set out to make my own version of sriracha. I looked at quite a few recipes, some promising sriracha in twenty minutes, that might be fine for some, but I knew that fermentation is one of the steps that makes sriracha unique and since I had the time and an abundant supply of peppers, why take any shortcuts? I chose a recipe from Serious Eats, a blog that is dedicated to “definitive recipes, hard core food science, trailblazing techniques and innovative guides to essential food and drink anywhere and everywhere.” Sounds good to me.

My first consideration was the variety of pepper to use. The Serious Eats recipe used red jalapenos but in one of the reader comments I learned that serranos were the original peppers Huy Fong used to make sriracha until the late nineties. The change to jalapenos was due to production costs. Since I had more than enough serranos, I chose them for my recipe. Since the serrano pepper is hotter than the jalapeno you may want to adjust your recipe accordingly, I didn’t. The peppers are left whole with the stems are snipped with the crown remaining. This brings a floral component to the finished product. As with all hot pepper recipes, take the usual precautions, wear rubber gloves when making the recipe, don’t rub your eyes, and so on. The recipe is very simple with very little handling of the product, peppers, peeled garlic cloves, brown sugar and salt are pulsed to a fine texture in a blender or food processor.

The mixture is transferred to a clean jar, covered and sits at room temperature.  I checked the mixture daily to check for little bubbles forming at the bottom of the jar, indicating fermentation. The recipe indicated that the fermentation would begin in 3-5 days, my peppers only began to ferment after 7 days. I will attribute that to the freshness of my peppers. Since my peppers were picked the day I tried the recipe, they were days fresher than any hot pepper purchased in a grocery store.  My fermentation was complete in 10 days. I carefully transfered the chopped chili mixture to the bowl of a food processor, my blender is too small, added the distilled white vinegar and pureed it until smooth. The recipe suggests transferring the mixture to a mesh strainer over a medium saucepan and using a rubber spatula to push the pulp through. I wasn’t getting a thick enough consistency  so I transferred the peppers to the food mill with a medium disc which gave me a product that resembled sriracha, though a bit more chunky.  The mixture is placed in a saucepan, brought to a boil, then simmered until the sauce clings to the back of a spoon, 5 to 10 minutes. Transfer sauce to clean jars and store in the refrigerator for up to six months.

I am very pleased with the consistency of my sriracha, the food mill made that part of the process much easier than the strainer. Since we have other varieties of hot peppers I may try the same recipe with different peppers.

Just picked serrano peppers for my sriracha sauce.


Sriracha Sauce

Recipe slightly adapted from Serious Eats

Ingredients

  • 1 1/2 lbs red jalapeños (or serranos), stems snipped off, leaving green tops intact
  • 6 cloves garlic, peeled
  • 4 tablespoons light brown sugar
  • 1 tablespoon Kosher salt
  • 1/2 cup distilled white vinegar

Directions

  1. Place peppers, garlic, sugar, and salt in bowl of a food processor fitting with steel blade. Pulse until chilies are very finely chopped, stopping to scrap sides of bowl as necessary. Transfer mixture to a clean jar, cover, and let sit at room temperature.
  2. Check jar each day for fermentation, when little bubbles start forming at bottom of jar, about 3-5 days. Stir contents each day, continuing to let ferment until chilies are no longer rising in volume, an additional 2-3 days.
  3. Transfer chilies to jar of a blender or food processor, add in white vinegar, and puree until completely smooth, 1-3 minutes. Transfer to a mesh strainer set atop of a medium saucepan. Strain mixture into saucepan, using a rubber spatula to push trough as much pulp as possible, only seeded and larger pieces of chilies should remain in strainer. I found that a food mill with the medium disc made this easier.
  4. Bring mixture to a boil, reduce heat, and simmer until sauce thickens and clings to a spoon, 5 or 10 minutes. Transfer to an airtight container and store in refrigerator for up to 6 months.
Pureed peppers, garlic, brown sugar and kosher salt ready to be fermented.
The food mill gave me the consistency that I was looking for.
My finished product was thick even before cooking.

DSC_9193a