July 21, 2017 Spicy Chipotle Shrimp with Zucchini and Chorizo


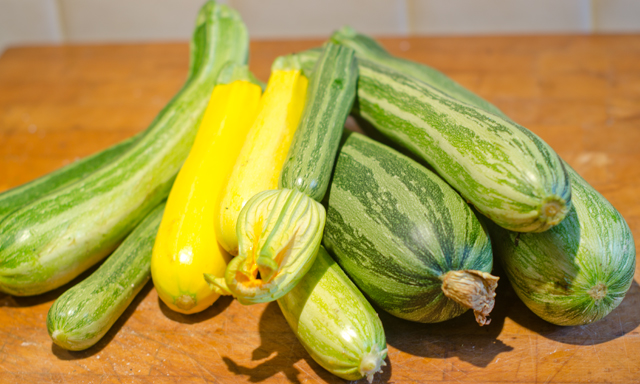
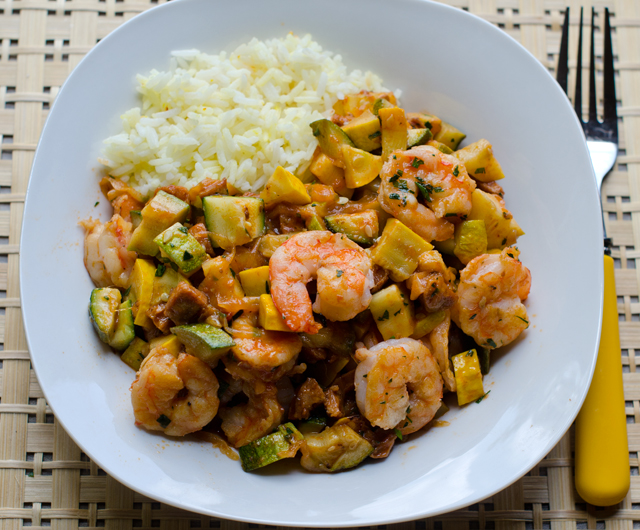
Spicy chipotle shrimp with chorizo and zucchini is an entrée that is flavorful, easy to prepare and uses only one pan. If that isn’t enough, it’s a great way to use that July abundance of zucchini and yellow squash from your garden or farmers market.

I always have some frozen shrimp on hand for a quick dinner. Though my local seafood market on occasion has fresh (never frozen) Florida shrimp, in my area of the country (mid-Atlantic) frozen shrimp is not a bad thing. The shrimp you see sitting on ice at the supermarket seafood counter have been thawed out. Convenient yes, but you can’t be certain how long they have been sitting there. I prefer to buy individually quick frozen (IQF) shrimp in 1 or 2 pound plastic bags, then I can just defrost what I need in 15-20 minutes. I prefer larger shrimp because there is less of a chance to overcook them. Look for the count of shrimp per pound, in this case 21-25 count, rather than a size designation like extra-large or jumbo.

Easy peel, meaning the shell is split down the back and deveined is the easiest way to make this or any recipe calling for shrimp. Always devein shrimp before cooking, many an eliminated Chopped contestant rues the day they didn’t. It’s not hard to do, either use a small pairing knife or the tool specifically made for that purpose. It’s not actually a vein but the shrimp’s digestive tract and when it is dark in color,  it is filled with grit. Removal is not essential, nor will it make you ill, deveining just makes for a more attractive presentation.

Pat the shrimp completely dry with paper towels before cooking. Any extra moisture on the surface of the shrimp prevents them from searing and browning. Preheat your skillet for a few minutes before adding the oil. Wait a minute until the oil is shimmering before adding the shrimp. Place the shrimp in a single layer, leaving a little space between each. Don’t be tempted to flip the shrimp too soon, give them time to brown on the first side, a little pink will start to show, now flip. You want the shrimp to be slightly underdone since they will be added back to the pan later.

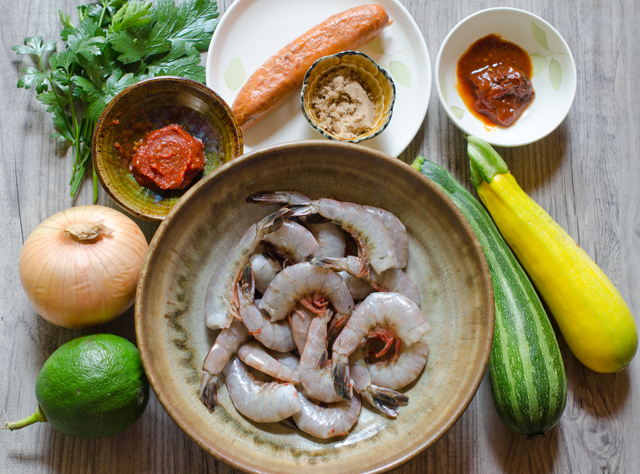
Transfer the shrimp to a plate, add the second 2 tablespoons of oil to the pan along with the diced chorizo. Spanish chorizo is a dried and cured (fully cooked) pork sausage seasoned with smoked paprika, garlic and other herbs. There is also Mexican chorizo that comes in casings and must be cooked before eating. It is used in tacos, tortillas and often served at breakfast with eggs. I would definitely say that the Spanish chorizo is the best choice here.

Add the cubed zucchini, onion and yellow squash, cook until the zucchini starts to brown, 3-4 minutes. Now it’s time to add the broth mixture. A chipotle chili and adobo sauce give it a real kick and the tomato paste and brown sugar mellow out the heat. Chipotles are small jalapeños that are dried by a smoking process that gives them a dark color and a distinct smoky flavor. They are canned in a red sauce, adobo, that has a smoky flavor as well. Start with the quantity given in the recipe and if you really like it hot, add a little more. Just remember it’s easier to add heat than take it away. Since you will not be using the entire can, store the remaining chilis in adobo in a well labeled plastic container or zip-loc bag in the freezer. I wasted too many opened cans of chilis before I got in this habit.

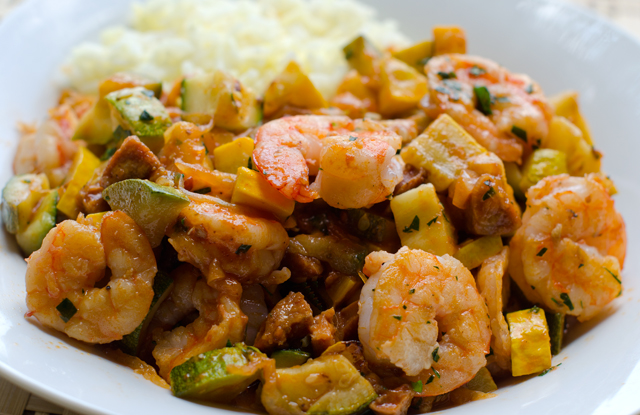
Bring the sauce to a boil, then reduce it to medium low and add the shrimp back in along with the lime juice and parsley. Cook for an additional 2-3 minutes, the zucchini should be tender and the shrimp opaque throughout. You can check for doneness by cutting a shrimp in half at its thickest point. It should be creamy white, firm and springy but still moist. You can add some strips of red pepper to the recipe and swap out cilantro for the parsley. Give a final seasoning with salt, pepper and more lime juice. Serve immediately garnished with the rest of the parsley on a bed of rice.


Spicy Chipotle Shrimp with Zucchini and Chorizo

Serves 2-3

Ingredients

  • ½ c low-salt chicken broth
  • ½ small chipotle, seeded and minced, plus 2 T adobo sauce (from a can of chipotles in adobo
  • 1 T tomato paste
  • 1 t brown sugar
  • 1 lb shrimp (21-25 per lb), peeled, deveined, rinsed and patted dry
  • 1 t kosher salt; more as needed
  • Freshly ground black pepper
  • ¼ c olive oil, divided
  • ¼ lb chorizo, cut into ¼ inch dice, a little less than a cup
  • 3 c combination of zucchini and yellow squash, cut into ½ inch dice
  • 1 cup thinly sliced yellow onion
  • ¼ c chopped parsley or cilantro
  • 2 T fresh lime juice; more as needed

Directions

  1. In a one cup measure, whisk together chicken broth, chipotle, adobo sauce, tomato sauce and brown sugar.
  2. Sprinkle the shrimp with a ¼ t salt and a few generous grinds of black pepper. Put a skillet (not non-stick) over medium high heat, when the skillet is hot, add 2 tablespoons oil. When it starts to shimmer, add the shrimp in a single layer. Cook the shrimp undisturbed until it browns nicely, a little less than 2 minutes. Flip and brown the shrimp on the other side, about 1 ½ minutes. Transfer the shrimp to a plate, it should be slightly under cooked.
  3. Add the remaining 2 tablespoons oil and the chorizo to the pan and cook, tossing occasionally, until it starts to brown, about 1 minute. Add the zucchini, yellow squash and onion, sprinkle with a little salt. Cook, tossing frequently, until the zucchini starts to brown and is tender, about 4 minutes.
  4. Add the broth mixture to the skillet and bring to a boil. Reduce the heat to medium low. Stir in the shrimp, half of the parsley and the lime juice.
  5. Cook, stirring often, until the zucchini and squash are tender and the shrimp are opaque, 2-3 minutes. Cut one in half to check if necessary. Season to taste with salt, pepper and more lime juice. Serve immediately, sprinkled with the remaining parsley.
One day’s pick of zucchini and yellow squash.


July 15, 2017 Tomato Salads

This is a space to record Joe’s creative tomato salads throughout the summer. The pictures won’t always be the best since they are taken in the kitchen. Just a way to commemorate these wonderful salads.

July 10 salad – Sun Gold, Gold Nugget and Super Sweet tomatoes, raspberries, purple basil, mozzarella with peach vinegar and blood orange olive oil.

July 12 – Sun Gold tomatoes, ricotta and purple basil with peach vinegar and blood orange olive oil.

July 15 – Super Sweet 100’s, Sun Gold, Gold Nugget, Snow Cherry, Chocolate Cherry, Fourth of July, mozzarella, purple basil, raspberries, blueberries, Cascadian raspberry vinegar, Persian lime oil.

July 16 – Brandywine, Sun Gold, Super Sweet, Gold Nugget, Snow Cherry, Chocolate Cherry, purple basil, mozzarella, ricotta, Parmesan, purple basil, Cascadian raspberry vinegar, Persian lime oil.

July 17 – Fourth of July, Gold Nugget, Snow Cherry, Super Sweet, burrata, Persian cucumbers, purple basil, Cascadian raspberry vinegar, Persian lime oil.

August 14

August 16

August 17

July 12, 2017 Swiss Chard Quesadillas

Tuesday evening is Joe’s night to work late and although we don’t sit down for dinner when he comes home, I like to have a little snack ready. We sip a little wine, catch up on the days activities, maybe watch some television in the kitchen. This quesadilla was inspired by what I had in the fridge and the garden that summer evening. I have used spinach in a quesadilla in the past, why not some Swiss chard this time? A little sweet onion, sautéed until caramelized would be a good contrast to the earthy flavor of chard. All I needed now was a wrapper and some queso. I didn’t have tortillas on hand but I did have some sandwich wraps that could fill in. I always have several varieties of cheese in the fridge, the sharp flavor of cheddar worked well here.

We are still in the process of thinning the chard plants out. They are supposed to be 9-12 inches apart so it didn’t take long to pick what I needed. The chard is still relatively young so it wouldn’t need the long cooking that late summer chard does. I discuss basic chard preparation in this post. I also used some of the finely chopped stems for texture and their brilliant color.

I think a sweet onion works best with this flavor combination. I used a Vidalia, but whatever variety your market is featuring this week is fine. Sweet onions are low in pyruvic acid, the component that makes your eyes tear. I recently read that one of the best ways to store Vidalias is wrapped separately in a paper towel and stored in the refrigerator. I will be trying this method out.

If you are making a quesadilla you can’t forget the queso. If you prefer not to use cheddar, a Jack cheese would be a good choice too. I served the quesadillas plain, sour cream or a tomatillo salsa would be a good accompaniment. Next time I might add a few slivers of pickled jalapeno to the mix. Cooked black beans would be a good addition or some sautéed mushrooms. This recipe is just based on what I had on hand that evening. Golden crisp on the outside with healthy greens, a little sweetness from the onion with the creaminess of cheddar, this is a winning combination for a quick and delicious light meal or snack.


Swiss Chard Quesadillas

Makes two 8″ quesadillas

Ingredients

  • 16-18 medium to small chard leaves
  • 1 medium sweet onion
  • Extra virgin olive oil
  • Butter
  • Tortillas or wraps
  • ½-1 cup shredded cheese, I used cheddar, mozzarella or jack works too

Directions

  1. Wash chard leaves in several changes of water. Separate the chard leaves from the stems. Chop the leaves roughly. You should have 5 cups loosely packed leaves and ½-1 cup finely diced chard stems.
  2. Heat a tablespoon of olive oil in a 10 inch non stick skillet over medium high heat. Add stems and a sprinkle of salt and cook until softened, 3-4 minutes.
  3. Add the chard leaves and the water that still clings to the leaves and cook until wilted. Add a tablespoon more of water if necessary to wilt the leaves. Move stems and leaves to a plate and keep warm.
  4. Slice a medium onion very thinly, a mandolin or food processor is good for this. You should have 3 cups loosely packed thin slices.
  5. Wipe out the pan, add another tablespoon of oil and heat over medium high heat, cook onion until softened and brown. Reduce heat to medium if necessary. This should make about 1 cup of caramelized onion.
  6. Let the skillet cool off a bit and wipe out with a paper towel. Over medium high heat melt a teaspoon or so of butter and a little olive oil. When the butter is melted, add the first wrap or tortilla, spread out one half of the chard over this as evenly as possible.
  7. Evenly spread the cooked onions over the chard and then sprinkle the cheese over. Place the second wrap over the cheese and press down with your hand or a spatula to melt the cheese and make it adhere.
  8. Cook for 2-3 minutes on the first side, it’s okay to peek to make sure it isn’t browning too much. With the help of the spatula, flip and cook on the other side, about 2 minutes, adding a little more butter and oil if necessary.
  9. Move the quesadilla to a platter and keep warm, repeat cooking process with the second quesadilla. Cut quesadillas into wedges 4 to 8 pieces as desired.  Serve warm.
Chop the stems.
Sweet onion sautéed until golden brown.
Sautéed chard and stems are first to go on.
Then the sautéed onion.
Then a sprinkling of cheese.
A second tortilla or wrapper in my case, goes on top. Press down to help the cheese adhere. This was taken after this first quick flip.
Let it get golden brown.

July 4, 2017 Quick Pickled Baby Beets

The hot days of July are upon us so it’s time to harvest the root crops planted in early spring. that are still in the ground. We said good-bye to the radishes several weeks ago after the first heat wave of the summer. Warm temperatures cause radishes to bolt and become woody in texture. They will be planted at the end of summer for a fall harvest. The first planting of Japanese turnips have been harvested and now it’s time to harvest the rest of the beets.The”life cycle” of our beet consumption began with very small thinnings we add raw to our salads. The second thinning produces slightly larger leaves the size of spinach that are sautéed in olive oil with a little garlic and red pepper flakes for a wonderful side dish. Baby beets are sliced as thinly as possible or julienned and added to green salads.The Chiogga beets look pretty in salads, a slice looks like a candy cane bulls-eye and the Golden beets bring a pop of bright yellow.

I love beets, especially pickled ones. I have canned pickled beets in past summers for long storage, this year I thought I would make refrigerator pickles. Quick pickled baby beets couldn’t be simpler to make. These refrigerator pickles require very little prep and they are ready to eat after a few hours in the brine. Divide your beets by colors or they will bleed into each other. The brine is a touch sweet with a little spice. These pickles will last for several months in the refrigerator.

Just picked beets from the garden.
After a good clean up.


Quick Pickled Baby Beets

Makes 2 pint jars

Ingredients

  • 1 lb baby beets,  separated into colors
  • 1 c white wine vinegar
  • 2 t kosher salt
  • ½ c sugar
  • 2 T honey
  • Fresh ginger slices
  • 1 t coriander seed
  • 1 t black peppercorns
Trimmed and ready for pickling.

Directions

  1. Wash beets well, trim off the leaves and leave about an inch of stem on the beets. Separate beets into colors if you don’t want them to bleed into each other.
  2. Bring a medium pan of water to a boil. You can put all the beets of one variety in the pan, start checking the smaller beets at the two minute mark. Beets should be easily pricked with the tip of a knife, larger beets will take a few more minutes.
  3. Drain beets well in a colander. Place in a heat proof container like a canning jar, separating out the varieties.
  4. Combine vinegar, salt, sugar, honey and spices and bring to a boil. Pour the hot canning liquid over the beets and set aside to cool. Once cool, store in the refrigerator.