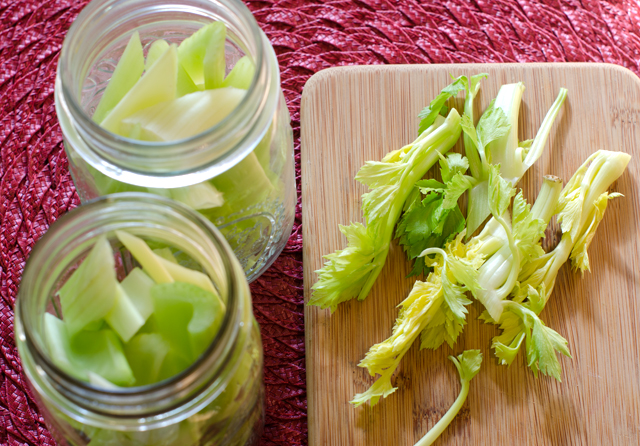
As mentioned in my previous post, from day one, the traditional accompaniments for buffalo wings have been celery sticks and blue cheese dressing. Last week, we were pleasantly surprised with the sweet pickled celery served with the buffalo cauliflower at The Vault. It requires no special canning equipment and you can make it in small batches. No delayed gratification here, you can enjoy it as soon as the canning liquid cools.
This quick and easy recipe is courtesy of celebrity Chef Gordon Ramsay. I have been enjoying the most recent season of Ramsay’s reality cooking competition, MasterChef, while I exercise on the elliptical machine. For some reason our new Xfinity cable box saved several seasons of MasterChef as something we might enjoy. Well I am happy to say “cable box, you get me.” With all of his swearing and in your face style with the contestants, I forgotten what an amazing chef he is.
This recipe is from Ramsay’s Ultimate Home Cooking cookbook and was an accompaniment for buttermilk fried chicken. Interesting, since the episode I watched today featured a fried chicken challenge for the losing team on MasterChef. No chicken here, just pickled celery.
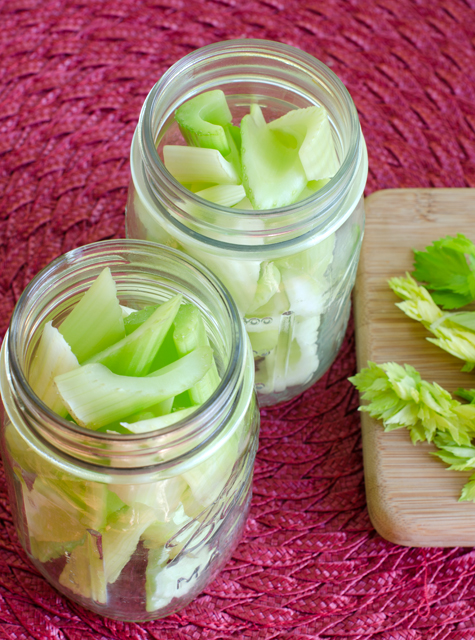
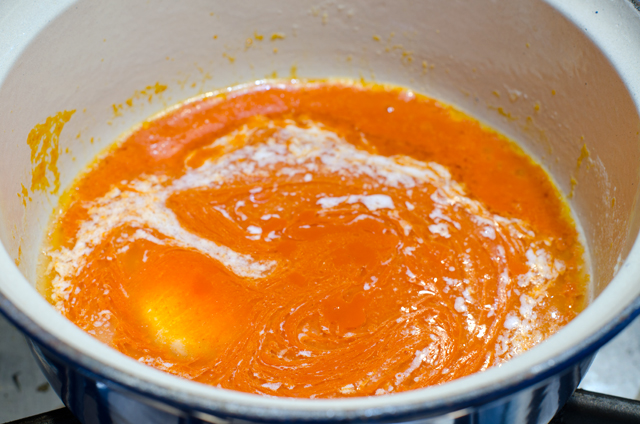
Start with a head of celery, separate into individual ribs or stalks, remove any strings and wash and rinse well. Cut celery on the diagonal into one inch lengths and place in pint jars with lids that have been sterilized with hot soapy water. Over medium high heat make a simple syrup of equal parts 1 cup water to 1 cup sugar. Stir to dissolve the sugar. Add peppercorns, herbs and vinegar and bring mixture to a boil. Carefully pour the hot liquid over the celery filled jars. The celery will cook a bit, shrink and resettle from the hot liquid. You will be able to add more celery when this happens. When the liquid cools, the celery is ready to eat. It will be even better if you have time to refrigerate it overnight.
Great as an accompaniment to buffalo cauliflower, an antipasto platter or chopped finely and added to chicken or egg salad.
Sweet Pickled Celery
Ingredients
1 medium bunch celery
1 c water
1 c sugar
1 t black peppercorns
1 t mustard seeds
1 t fennel seeds
½ t cloves
½ t salt
6 T white wine vinegar
Directions
Cut celery into individual stalks, wash and cut into one inch long diagonal pieces and place into sterilized pint canning jars. Fill the jars to the top. Keep extra celery aside to add later.
Create a simple syrup of one cup water and one cup sugar. Add to a medium size pot along with the peppercorn, mustard and fennel seeds, cloves, salt and white wine vinegar. Over medium high heat, stir to dissolve sugar and bring to a rolling boil.
Carefully pour the hot liquid into the canning jars. Wait a minute or two, the hot liquid will cook the celery a bit and shrink it, leaving more room for additional celery left over from the first step. Pack the celery in tightly, covered with the pickling liquid.
As soon as the liquid cools, the celery can be eaten. Even better if you refrigerate it overnight.
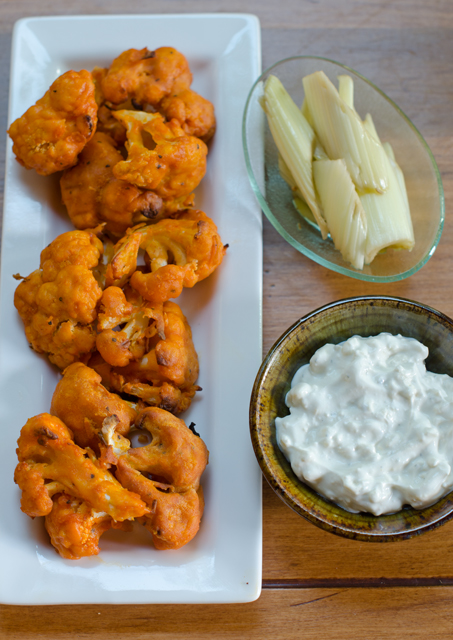
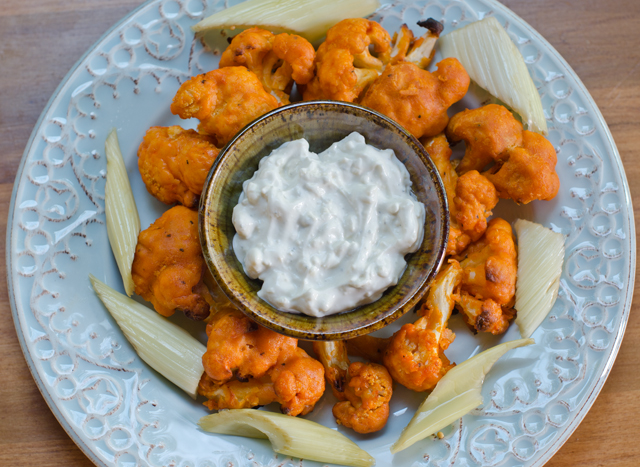
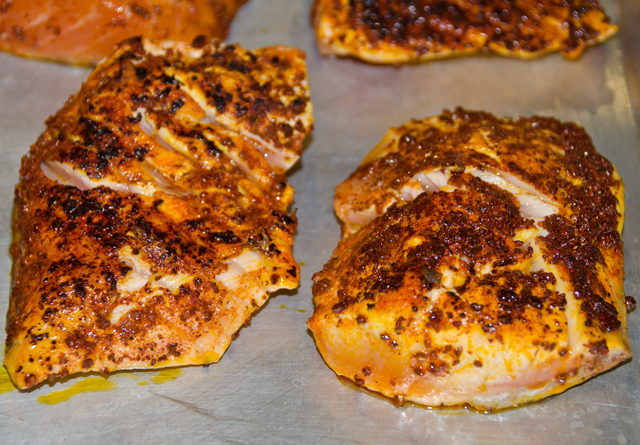
The final product served with blue cheese sauce and pickled celery.
Inspiration for the recipes at Sue’s Seasonal Palate comes from many sources. Sometimes it’s a magazine article I’ve read, an intriguing recipe from the internet or a dish I’ve recently tried in a restaurant. The latter was the case for this recipe.
Last weekend we got together with some long time friends at a popular brewpub called The Vault. It’s located in a former bank built in 1889 in the historic borough of Yardley Pennsylvania. The owners of the Vault bring their own brand of sophistication to the brewpub concept and have turned it into an experience that is unique. No deafening pop or rock music or a bank of televisions tuned to the latest sports programs, they have chosen to feature live and recorded jazz that enhances the relaxed atmosphere and is more conducive to conversation. The beer is brewed on premises and the offerings from the kitchen are made in-house or sourced locally. Both the kitchen and the brewery are open to view. Though I am more of a wine drinker I really enjoyed the Sweet Potato Ale. The menu includes a nice selection of starters along with sandwiches, interesting salads and pizzas from their wood fired oven. The menu is definitely a cut above the average pub fare and one of their appetizers made me want to recreate it at home.
Our server suggested we start off with an appetizer of buffalo cauliflower to share for the table while we were pondering our other food choices. For a brief history of the buffalo wing we only need to go back to 1964 where they originated in, no surprise here, Buffalo, New York. The story has several versions but the most popular and my favorite, is that one evening, Teressa Bellissimo, co-owner of the Anchor Bar was challenged to whip up a late night snack for her son and his friends. “Mother Teressa” found some large chicken wings that had been deemed too meaty for the stockpot. Bellissimo chopped the wings into two sections, deep-fried them and tossed them with some hot sauce. She served them with celery that was part of the Anchor Bar’s antipasto and some of the house blue cheese dressing. The wings were reported to be an immediate local success and the first official Chicken Wing Day was celebrated on July 29, 1977. Over fifty years later they are a national favorite consumed everywhere from bars, to sporting venues to “competitive eating events” like the Philadelphia Wing Bowl and Buffalo’s annual National Buffalo Wing Festival.
It wasn’t enough for cauliflower to be a substitute for mashed potatoes, couscous and even pizza crust, the versatile vegetable takes the place of chicken wings in this recipe. The Vault’s buffalo cauliflower is described on the menu as buttermilk cauliflower, house buffalo sauce, chive sour cream and the real surprise, sweet pickled celery. The calorie count for six pieces of deep-fried chicken wings at one website I looked at was 616. Though I have nothing against traditional buffalo wings I also thought this recipe was worth the somewhat healthier do-over.
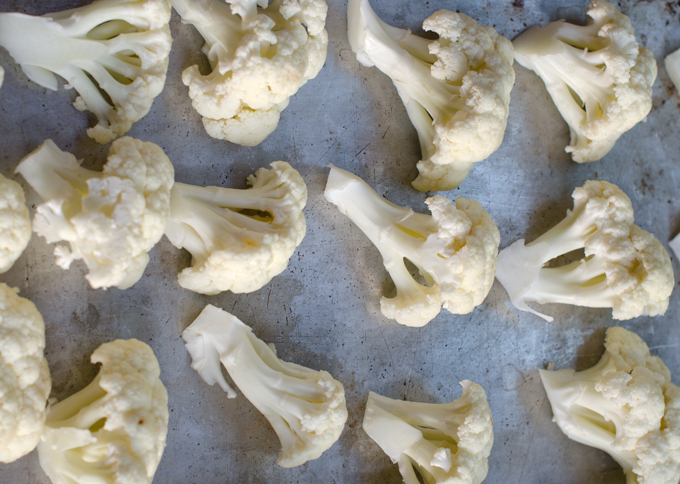
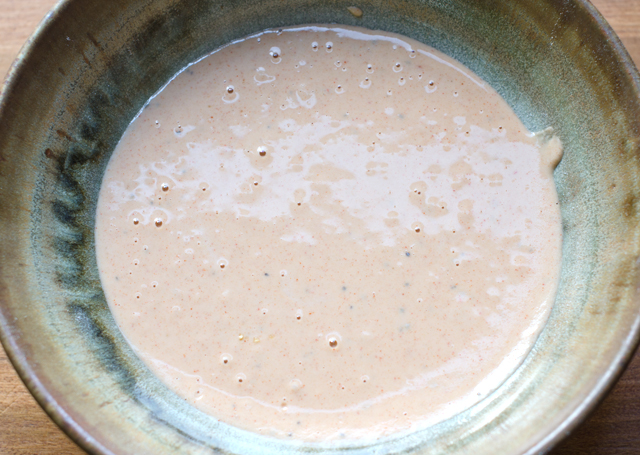
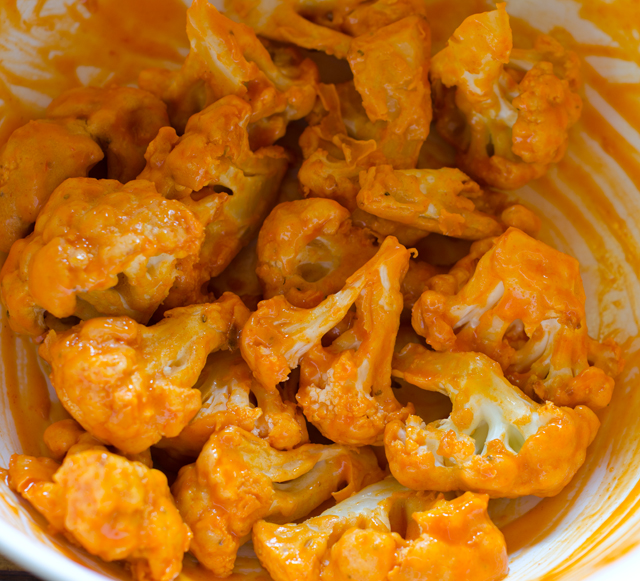
Start with a large head of cauliflower and break into chicken wing size florets. I was aiming for 1½ in by 2½ inches in length, you should have 5 to 6 cups of “wings” and probably more. Some recipes I found called for the cauliflower to be roasted with olive oil, salt and pepper. I wanted the florets to have a bit more substance so I coated the cauliflower with a simple batter of flour, milk and spices. Substitutions can be made here, almond milk for vegans, rice flour for a gluten-free diet. If you use rice flour as I did, you may need to thin the batter out a bit more.
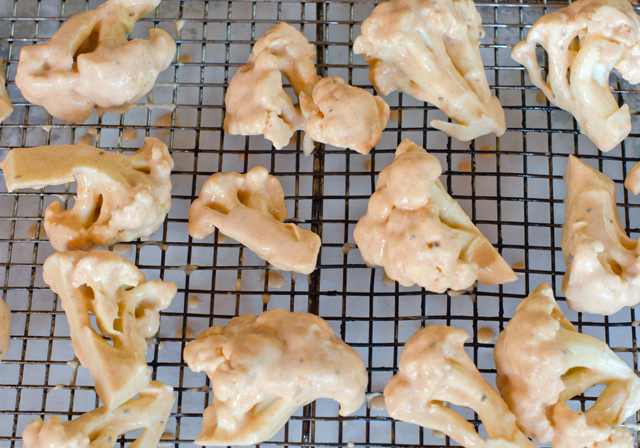
I tried at first to dip the pieces by using the handle at the bottom of my cauliflower “wing”. This turned out to be a very messy approach., It is easier to use tongs to dip the individual pieces in the batter. Dip each piece thoroughly, lift out and allow the excess batter to drip back into the bowl. To minimize clean up, line the baking sheet with foil or parchment. Since several of the blogs I read mentioned excess batter clumping up and sticking to the baking sheet, I chose to place the florets on a wire rack thoroughly sprayed with Pam over the baking sheet. Preheat oven to 425°F, (convection heat) and bake for about twenty minutes or until golden. I flipped the pieces halfway through the baking process.
While the cauliflower is baking, melt the butter in a small saucepan over medium heat. Add the hot sauce and stir to combine. In a medium bowl, combine the cooked cauliflower and sauce, toss gently to combine. Place the cauliflower back on the baking sheet and bake for another 10 minutes, until the cauliflower begins to crisp. Serve immediately with plain or sweet pickled celery and blue cheese dressing or sauce.
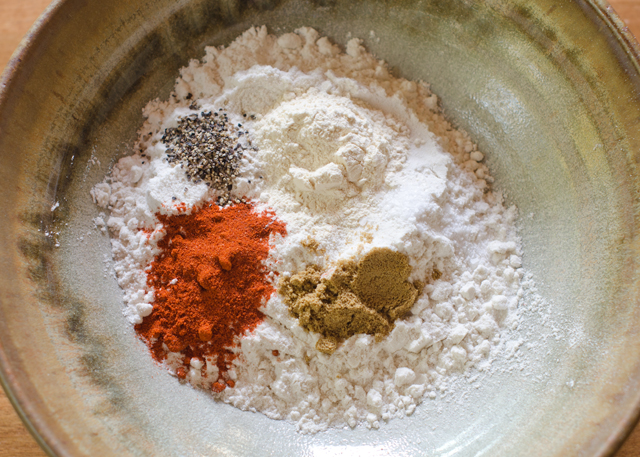
Cauliflower pieces shouldn’t be too small.Ingredients for the batter.A simple batter of flour, spices and milk.Dip cauliflower pieces in the batter. Place on a wire rack above the parchment lined baking tray for easy clean up.While the cauliflower is baking, stir together melted butter and hot sauce.After the cauliflower has baked to a golden brown, mix with hot sauce and butter. Bake until crisp.The final product served with blue cheese sauce and pickled celery.
Buffalo Cauliflower Bites
Serves four or two very hungry people
Ingredients
1 c flour, can be all-purpose, whole wheat, brown rice etc.
1 c milk, almond milk or water
1 t garlic powder
1 t cumin
1 t smoked paprika
1 tsp. salt
½ t ground paprika
1 head cauliflower,cut into florets
½ c hot sauce (I used Franks Original)
3 T butter
Directions
Preheat oven to 425°F. Line a large baking sheet with parchment paper or foil. Spray a large wire rack with cooking spray to place over the baking sheet.
Combine flour, water, spices, salt and pepper in a large bowl and stir until smooth. Using tongs, dip cauliflower pieces in the batter. Coat well, lift out and allow the excess to drip back into the bowl.
Arrange cauliflower in a single layer on the wire rack that is on top of the baking sheet. Bake 20 minutes or until golden.
In a small saucepan, melt the butter, add the hot sauce and stir to combine. Pour evenly over cauliflower. Toss gently until cauliflower is evenly coated.
Bake 10 minutes or until cauliflower begins to crisp, rearranging florets occasionally if needed. Serve with celery and blue cheese dressing.
Joe begins planning the vegetable garden right after the Christmas holidays. As always, he asked me if there was anything I wanted to add this year. I knew right away I wanted him to grow butternut squash. They were never planted before because the vines need considerable room to grow. Since the ever-expanding garden now includes an area near the orchard and the berry bushes, there would be some more room available. Last year he grew some loofah and bird house gourds in that area but since they were not going to be repeated, butternut squash got the okay.
Butternut is a variety of winter squash. The name is a bit of a misnomer however, since all winter squashes are frost tender (the plants will die with the first frost) warm season (seeds must be planted when the soil temperature is above 65°) annuals (plants that complete their life cycle in one growing season). With a growing season of 110-120 days for full maturation, they are harvested in the fall and can be kept well through the cold winter months, hence the name. Summer squash like zucchini and yellow crookneck are harvested all summer long while the fruit is still immature and the skin is still tender. Not counting the ones that “get away” and could fill in for baseball bats. And yes, botanically speaking, both winter and summer squash are fruit since they develop from a flower and are the part of the plant that contains the seeds. Winter squash should only be harvested when fully mature. When winter squash is mature, the stem end will turn from green to brown and will appear that the stem is beginning to dry out. The skin should look dull, not shiny and it should be difficult to dent the squash skin with your fingernail. Winter squash do not require refrigeration but should be stored in a cool dark area.
Last weekend the harvest was finally ready and Joe brought them in by the wheelbarrows full, 60 in all. Some of the squash were slightly damaged and they will be the ones I use first. Some I will give away to friends and the rest we are storing on shelves in our basement.
Low in fat and rich in vitamins A, C, fiber and antioxidants, butternut squash is a great addition to many recipes. I like to roast cubes of butternut squash to add to my fall salads.The butternut squash seeds can be tossed with olive oil and salt and roasted for a crunchy snack or a salad topper.
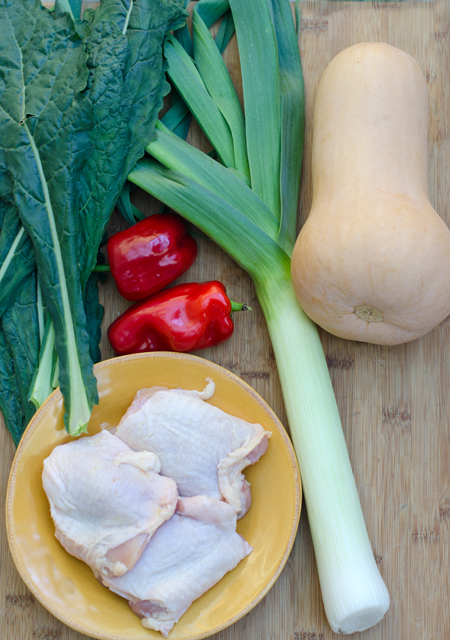
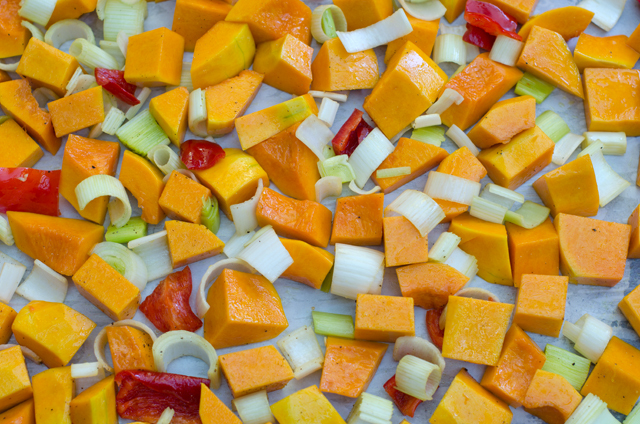
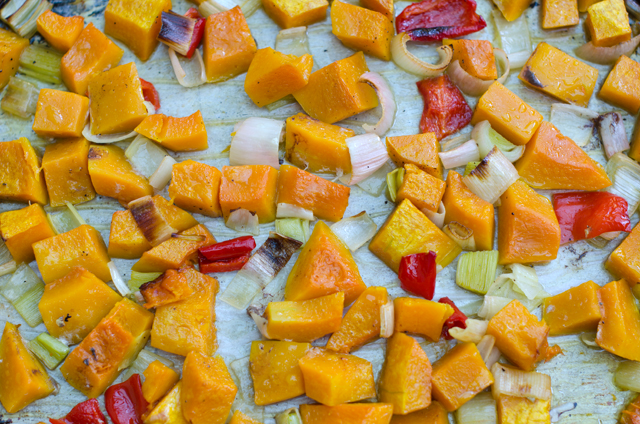
Because of fall’s chilly temperatures, I wanted to make a more substantial main course soup. I liked the idea of roasting the vegetables on the baking sheet to bring out their natural sweetness. For easy clean up, I lined the baking sheet with parchment paper. The leek, pepper and squash should be cut into pieces all relatively the same size so they cook evenly. A medium dice works best here, about 1 to 1 ½ inches. Toss the vegetables with olive oil and spread out evenly on a baking sheet, don’t overcrowd. Arrange the chicken thighs on top of the vegetables and season everything with salt and pepper. I think chicken thighs are the best choice for this recipe, the skin keeps the meat moist during the roasting process. Rotate the pan halfway during the cooking process to ensure even cooking.
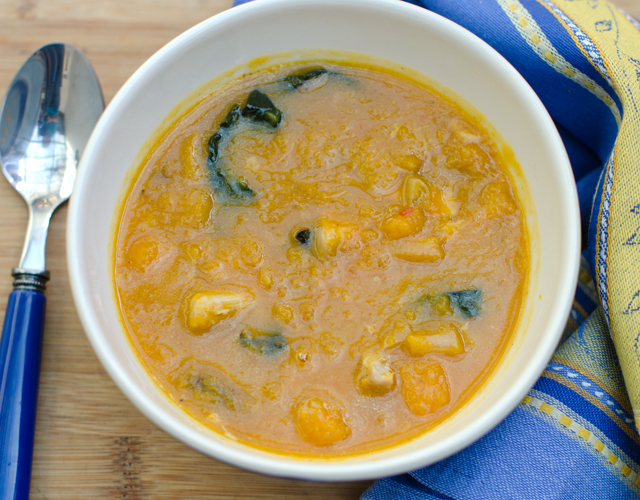
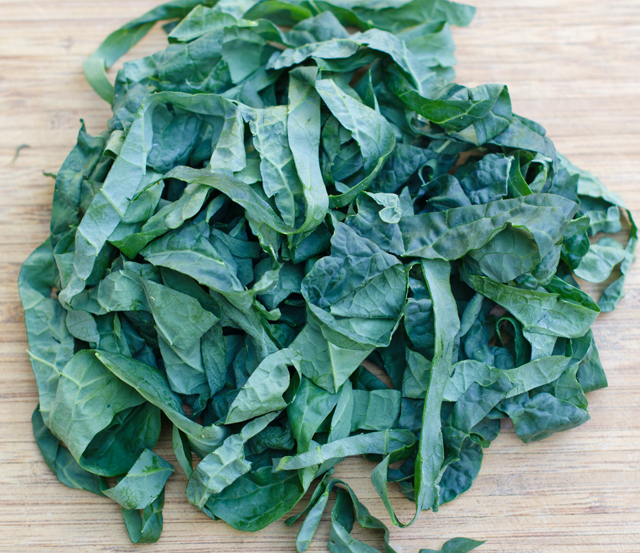
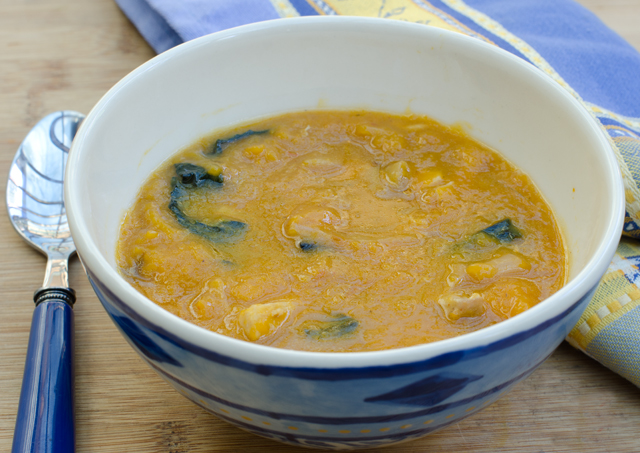
Transfer the chicken thighs to a plate to cool and add the roasted vegetables to a pot along with the chicken broth and spices. Simmer over medium heat and use a potato masher or the back of a wooden spoon to mash-up some of the vegetables to give the soup a thick, chunky texture. Shred the chicken into bite sized pieces, discarding the skin and bones. Add to the soup and stir in fresh lemon juice, salt and pepper to taste. When the soup is almost done stir in the kale ribbons and cook until they are wilted, an additional five minutes. Additional add ins for this soup could include cannellini beans and fire roasted diced tomatoes. The soup can be frozen or stored in the fridge for several days.
Roasted Chicken and Butternut Squash Soup
Serves four to six
Ingredients
6 bone-in skin-on chicken thighs
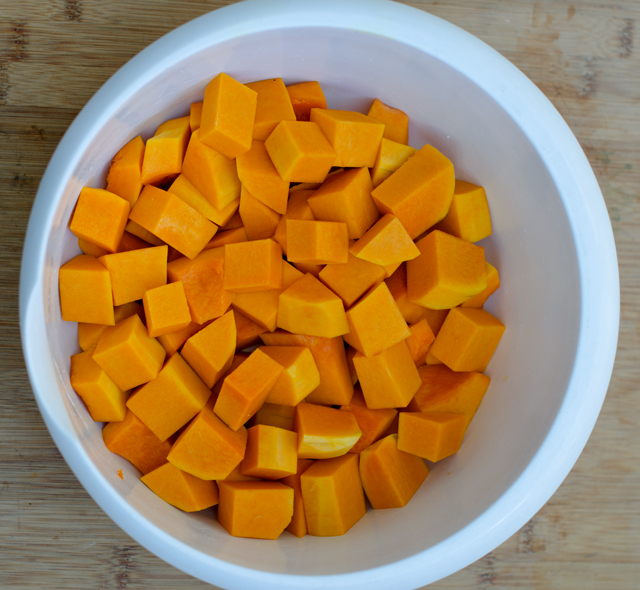
1 medium butternut squash, (2½ to 3 lbs) peeled, seeded and diced medium
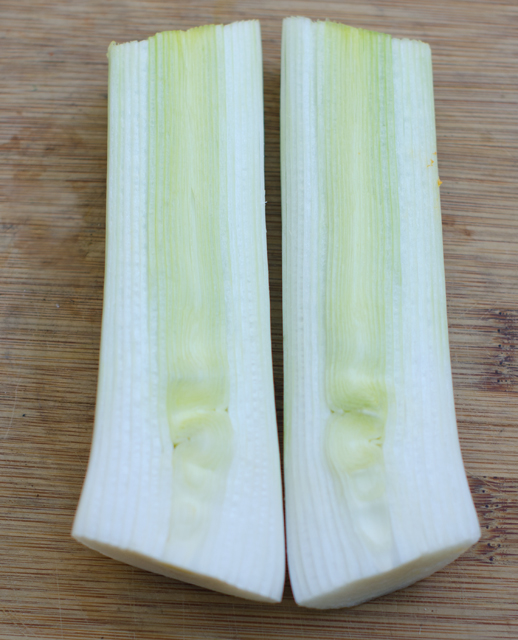
1 medium leek, sliced medium
1 small red pepper, diced medium (I added a red poblano too for a little kick)
2 T extra virgin olive oil
Kosher salt and freshly ground pepper
4 c low sodium chicken broth
¼ t ground cumin
¼ t ground coriander
¼ t smoked paprika
2-3 cups of thinly chopped kale (avoid thick stems)
2 T fresh lemon juice
Fresh parsley or coriander (optional)
Directions
Preheat oven to 425°F. In a large bowl toss the squash, red pepper and onion with the olive oil. Spread evenly on a large baking sheet. Arrange the chicken thighs on top, spacing out evenly. Season everything with salt and pepper.
Roast until the squash and chicken are cooked through, rotating pan halfway through the cooking process.
Transfer the chicken to a plate, loosely cover and let cool. Transfer squash and onions to a medium pot and broth, cumin, coriander and smoked paprika. Simmer over medium high heat.
With a potato masher or the back of a wooden spoon, mash some of the vegetables until soup is thick and chunky.
Discard the skin and bones from the chicken, cut meat into small pieces and add to the soup. Stir in lemon juice and season with salt and pepper.
Stir in the thinly chopped kale and cook for five minutes more, until the kale is wilted. Taste and adjust seasonings, To serve, top with fresh parsley or cilantro.
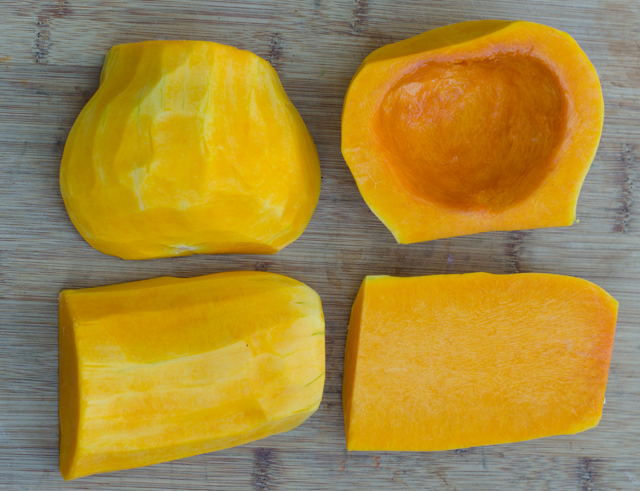
Preparing the butternut squash.
I used a leek from the garden but an onion will work as well.Lining the baking sheet with parchment makes for easy clean up.The “after” picture.Kale ribbons only need about five minutes to wilt into the soup.
Recently we spent a week in sunny Orlando Florida. The reason for our trip to this area after an absence of over twenty years was the FMX or Family Medicine Experience. It’s the yearly meeting of the American Academy of Family Practice to which Joe became a fellow this year. It’s an opportunity for him to obtain continuing medical education with just a little bit of a vacation. One of the highlights of the recreational part of our trip was an excursion one late afternoon/early evening to a Florida winery, Quantum Leap, followed by a cooking class conducted by Cuisiniers Catering Company at the East End Market in Audubon Park Florida.
“A winery in Florida?” you say. On a previous trip to south Florida we visited a winery that made from wine from tropical fruit. Quantum Leap is quite different, they describe themselves as a winery with “a sustainable focus and global reach”. They grow no grapes of their own, instead they buy sustain ably grown, good quality juices from producers all over the world and bring them to their facility. It is here the wine is made, the juices are blended and the wine making process is completed. Matt Uva, tasting room manager and brand ambassador for Quantum Leap was the very knowledgeable guide for our visit. He shared the history of the winery and lead our group through a tasting of several of the wines. one of which we purchased for later. We enjoyed the wine, the art on the walls and the fact that they are a dog friendly winery, with several rescues, AKA the Quantum Leap pack who might just be there when you visit.
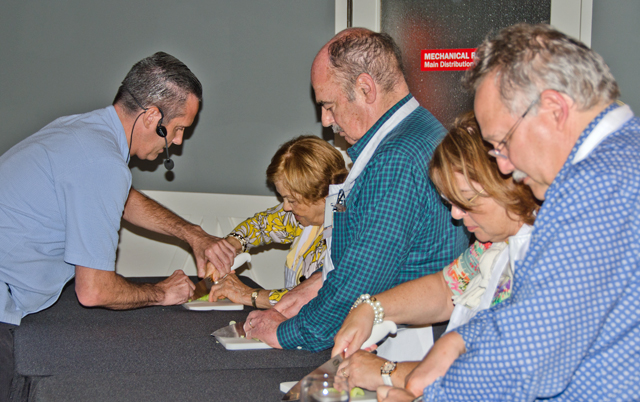
The next stop on our trip was the East End Market, a food court/neighborhood market. On the first floor artisanal vendors offer up fresh-baked bread, gourmet cheeses, juices and smoothies, sushi, craft roasted coffee, local produce and much more. We spent a little time there checking out the vendors but soon moved to the second floor to the kitchen of Cuisiniers Catered Cuisine and Events for a hands-on cooking class. Chef Jamie McFadden, award-winning executive chef and founder of Cuisiniers and his staff broke us off into teams and lead us through three different cooking stations. The instructors were informative and very patient. Even for experienced cooks like Joe and myself, it is always good to hone one’s skills.
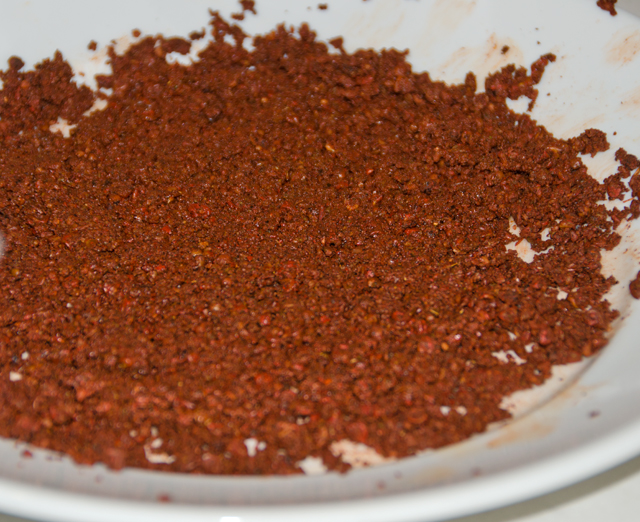
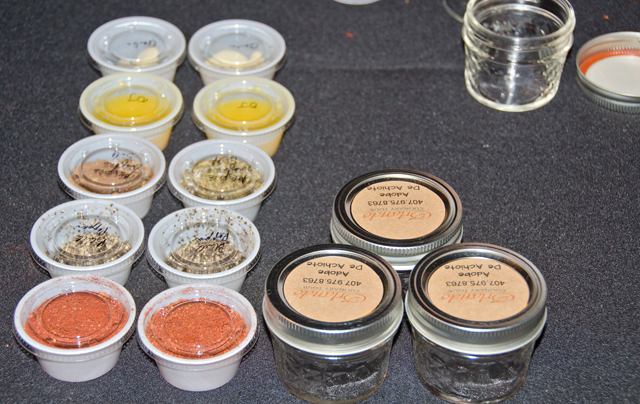
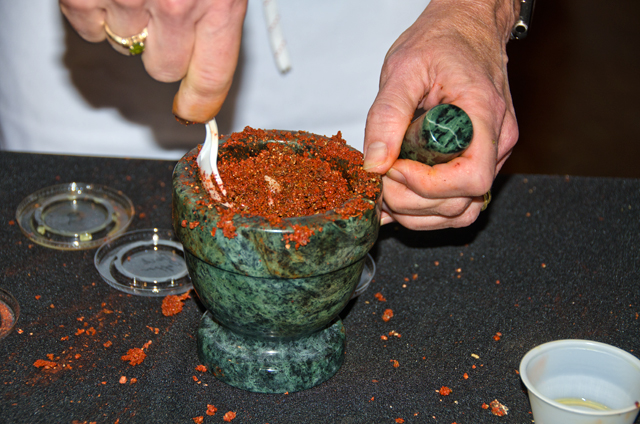
One of the stations gave us the opportunity to work out our arm muscles with a mortar and pestle to make a garlicky achiote seasoning rub. Achiote, also known as annatto seeds, imparts a red color to foods as well as its earthy flavor. It has been dubbed “poor man’s saffron” in Latin American cuisine. For many years we have cooked annatto seeds in oil, and used the strained oil to brush on whole roasted pig. We donned disposable gloves so the annatto seeds wouldn’t stain our hands. All of the ingredients for the rub were pre-measured out in small disposable containers. As a former caterer I appreciated the efficiency of this step. We dumped the whole dried spices in the mortar first and crushed them into a powder, next the allspice and oregano were added. Finally the whole garlic and orange juice were added to make a paste. The hardest part was keeping everything in the mortar, just wished it had been a little bit bigger.
We were then able to enjoy the fruits of our “labor” with a delicious buffet style dinner in the well-appointed dining room. We started with a wonderful salad of field greens, dried cranberries, cashews with blue cheese and honey vinaigrette. It reminded me of a salad I would make at home. Our main courses were an Indian curry rubbed rack of lamb, jerk chicken and salmon with the achiote rub we just made. Whipped potatoes and grilled vegetables rounded out the dinner portion of our meal.
Our final lesson was a mixology session. At each place setting was a glass of blackberry shrub, often referred to as a “drinking vinegar”. This version is cold process, which means the berries are not cooked. They are mixed with sugar and refrigerated for 24 hours. The berries are strained out and red wine vinegar is added. Pour this into a clean glass bottle and refrigerate this mixture for four weeks (patience please!) Your efforts will be well worth it, the vinegar mellows out and blends nicely with the fruit. It’s a refreshing sipper on its own mixed with some club soda, but a little vodka, rum or vermouth make it a delicious cocktail. Our meal finished with a dessert of sticky toffee pudding, another personal favorite of mine.
We left the Cuisiniers kitchen and boarded our bus back to the hotel, full and happy with not only a recipe sheet to recreate some of the evenings dishes but with a container of garlicky achiote rub. What we needed to remember here was; #1 be sure that this perishable rub was kept in our hotel room refrigerator and #2 with all the flurry of last-minute packing, not to leave this wonderful rub behind for the hotel maids! I am happy to say that we brought home both containers and we used it the evening we got home for some veal chops on the grill the first night and salmon the following night.
Garlicky Achiote Seasoning Rub
Serves four
Ingredients
2 T annatto or achiote seeds
2 t ground allspice
1 T black peppercorns
2 t dried oregano
3 whole peeled garlic cloves
1 t kosher salt
2 T orange juice
Directions
Place the dry whole spices into a mortar and crush with a pestle until they become a fine powder.
Add the other spices and grind again.
Add the whole garlic and orange juice and make into a paste. Store in a covered container for several days.
As Jimi used to say, “are you experienced?”
The logo for Quantum Leap winery.Behind the scenes at Quantum Leap.
Matt Uva, our guide for our visit to Quantum Leap.Uva is the Italian word for grape, coincidence? I think not!!
Ready to cook!
Chef Jamie leading a group at the knife station.
Achiote or annatto seeds are popular in the cuisine of Latin countries.All of the rub ingredients were measured out and ready to go. We took our rub home in cute little canning jars.
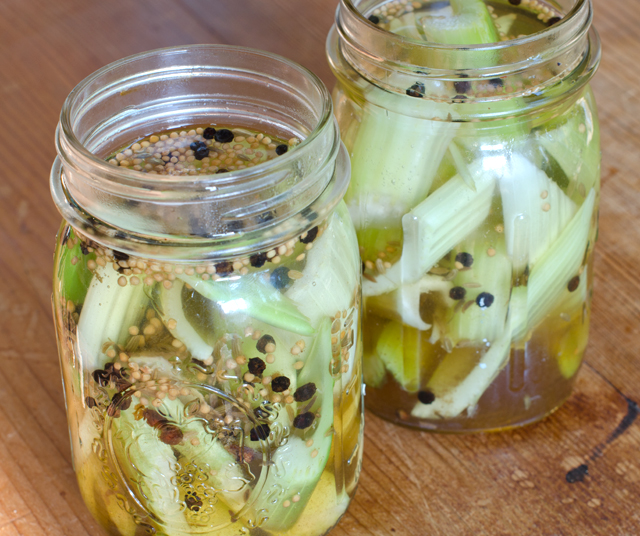 As mentioned in my previous post, from day one, the traditional accompaniments for buffalo wings have been celery sticks and blue cheese dressing. Last week, we were pleasantly surprised with the sweet pickled celery served with the buffalo cauliflower at The Vault. It requires no special canning equipment and you can make it in small batches. No delayed gratification here, you can enjoy it as soon as the canning liquid cools.