November 27, 2015 Roasted Beet Salad with Beet Pesto, Goat Cheese and Hazelnuts

DSC_5227aAt the end of September we took a week long trip to Denver Colorado. Part of the time was fun, visiting Garden of the Gods, Pikes Peak, Rocky Mountain National Park, and the Denver Arboretum. Part of the time was study, well at least for Joe, he was attending the Family Medicine Experience, gaining CME (continuing medical education) in anticipation of the boards he took last week. All of the week was fun for me, I visited a local winery and a teahouse, went to Red Rocks, toured the Coors brewing facility (free samples) and went to a Mexican cooking demonstration at a Denver restaurant.

One of my main jobs in anticipation of any trip we take is to choose the restaurants we will enjoy that week. I take my responsibility seriously, and it took some arduous research to find the best restaurants. This was not our first trip to Denver, previous trips included dinners at the then trendy Rattlesnake Club, now closed and The Fort, a restaurant that serves “new foods of the old west”. On a more recent trip in 2004, we were one of the first to dine at the newly opened Frasca Food and Wine, now considered by many to be one of the best restaurants in the country. So the pressure was on.

I skip over the ads at the top of the search engine, any restaurant can call themselves “the best” and Trip Advisor is okay but sometimes a family friendly or a breakfast only spot can be at the top of the list. I prefer to look at the reviews of the local city magazine when I do this type of research, for that I turned to 5280 magazine which refers to Denver’s mile high altitude and their yearly ranking of the 25 best restaurants. I skipped over the restaurants that weren’t in Denver (sorry Frasca!) also steakhouses and sushi bars because I didn’t think they would provide enough of the local flavor.  I read the reviews, perused the menus and  looked for where they were in proximity to our hotel, we didn’t necessarily want to be driving all night to get to our destination.

I discovered there are a surprising amount of restaurants whose names include the word “and “, Stoic and Genuine, Beast and Bottle, Colt and Grey were all restaurants we ate at. That doesn’t include Work and Class, Olive and Finch, Hutch and Spoon. Definitely a trend.

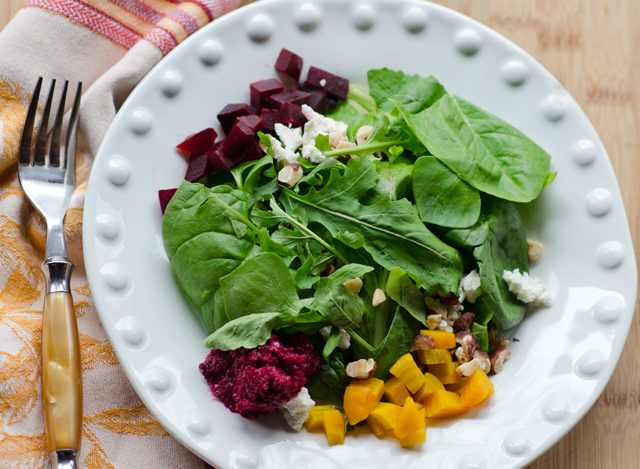
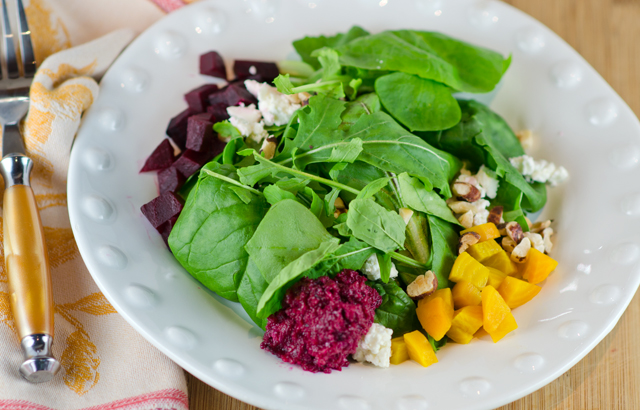
Another trend, and one we definitely approve of, is the number of farm to table restaurants. Although we had enjoyable experiences at all of the restaurants we dined at, the one that really reminded us of eating at home was Root Down, an award winning “field to fork” restaurant, housed in what was once a circa 1953 gas station. Every course was thoroughly enjoyed and documented with a photo on the IPad. One of our favorites was a dish that Joe had, a roasted baby beet salad. The beets, both red and golden were served on a bed of arugula with goat cheese and toasted hazelnuts. There was a dollop of beet pesto (!) and the dressing was a basil vinaigrette artfully drizzed in circles on the plate.

Now, the job would be interpreting the dish at home. The beet harvest in the Kipp garden was over so my beets came from the farmers market (red) and the supermarket (golden).Since I was using greens from our garden greenhouse I had a varied selection to choose from, spinach, leaf lettuces, claytonia, upland cress and yes, some arugula. The cheese varied in the Instagram pictures I saw, sometimes it was a slice of a creamy goat cheese, other times it was crumbles of  chevre. The cheese on the salad at  Root Down was from Broken Shovel Farm, a local supplier. I used a chevre from Giggling Goat Dairy,  a supplier I became familiar with this summer at our local farmers market.  I stayed with toasted hazelnuts, but I think walnuts would work just as well.

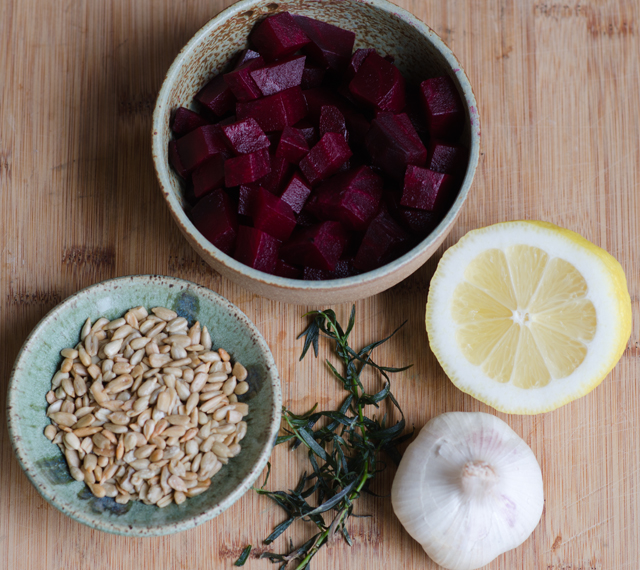
Beet pesto was new for me and at first I wasn’t quite sure what qualified this as a pesto. It is usually a sauce that combines an herb, most often basil, with nuts, olive oil and cheese. The definition of the word that pesto originates from is pestare which means to pound or to crush, so it does qualify as a pesto.  I combined cooked beets, a dash of red apple balsamic, toasted unsalted sunflower seeds, a little lemon juice and extra virgin olive oil. It turned into a delcious vibrant magenta sauce that would be great as a dip, tossed with pasta or as a sandwich spread.
I changed the vinaigrette to accompany the salad from basil, not in season now and not my first choice with beets to a tarragon vinaigrette. The anisy tarragon contrasts beautifully with the natural sweetness of the beets.

Roasted Beet Salad with Beet Pesto, Goat Cheese and Hazelnuts

For the Roasted Beets

Ingredients

  • 1½ lb. each red and golden beets

Directions

  1. Preheat oven to 425°F. Wrap beets in foil packets, separating by color. Place on a baking sheet; bake until beets are slightly soft to the touch, 45 minutes to 1 hour depending on their size. Cool beets in packets, then rub off skins (use a paring knife for tough spots).
DSC_5086a
Ingredients for the beet pesto.

For the Beet Pesto

Ingredients

  • 1c cooked, roughly chopped red beets
  • 1 clove garlic, minced
  • 1/3c roasted unsalted sunflower seeds
  • 2T tarragon leaves
  • 1T apple balsamic vinegar
  • 1T lemon juice
  • 1/4c extra virgin olive oil

Directions

  1. Place all of the ingredients in a food processor and blend until smooth.

For the Vinaigrette

Ingredients

  • ¼c apple vinaigrette or a white balsamic
  • ½c roughly chopped red beets
  • 1t honey
  • 1/3c extra virgin olive oil
  • 2T tarragon leaves

Directions

  1. Combine all ingredients in a small food processor and process until well combined

Assembling the Salad

Ingredients

  • 6-8 c Baby arugula- I used a combination of greens from our greenhouse that included arugula
  • ½c toasted chopped hazelnuts
  • 4oz crumbled goat cheese
  • Roughly chopped roasted red and golden beets (from the first step)
  • Freshly ground black pepper

Directions

  1. Add arugula to salad plates. Top with goat cheese, hazelnuts and chopped beets.
  2. Add a dollop of beet pesto to the plate
  3. Serve vinaigrette on the side.
  4. Add a grind of black pepper to each salad as desired.

DSC_5231a

November 21, 2015 Sheet Pan Chicken Thighs with Delicata Squash, Fennel and Grapes

DSC_5102aHere is another no fuss sheet pan supper, this time from the Epicurious website. The star of the show, bone in chicken thighs, are paired with a different cast of characters, red grapes, fennel and delicata squash.

Fall is prime season for grapes, the fruit that is harvested now has been hanging on the vine all summer. This translates into succulent fruit with high sugar content and complex flavors. Roasted grapes are delicious and I doubled the amount from the original recipe. Crunchy and a little bit sweet, fennel is in season now and through early spring. I love it’s licorice flavor raw in salads and roasting fennel caramelizes it and mellows out it’s sweetness.  Delicata is the smallest of the winter squashes, usually weighing between 1/2 to 1 pound each. They are cylindrical in shape with yellow or cream colored skin with slight ribbing and dark green stripes. Unlike other winter squashes, the skin of the delicata is edible and has fewer seeds, making them easier to prepare.

The recipe starts with a flavorful rub that includes cumin, coriander, (my addition) brown sugar, salt, black and cayenne pepper. Half of the rub is tossed with the vegetables, the other half with the chicken thighs. You can do this step ahead earlier in the day and assemble the ingredients on the sheet pan before you are ready to roast. Space the components evenly on the baking sheet so all the ingredients get nice and brown. For even cooking, rotate  the pan halfway through the cooking time.  Be sure to use skin on bone in chicken thighs, even if you don’t eat the skin, it protects the meat while it is cooking.  As I previously posted, an instant read thermometer will give you the best results.

DSC_5042a

DSC_5077a

Sheet Pan Chicken with Delicata Squash, Fennel and Grapes

Serves four

Ingredients

  • 1T brown sugar
  • 1T ground cumin
  • 1T ground coriander
  • 1T kosher salt
  • 1T freshly ground black pepper
  • ¼t cayenne pepper
  • 1 delicata squash, about 1½lbs, halved lengthwise, seeded and cut into ¼” half moons
  • 1 fennel bulb, about ½lb, cut in half lengthwise, seeded and cut into half moons
  • 2c seedless red grapes
  • 1T olive oil
  • 2 lb. bone-in skin on chicken thighs (5-6 pieces)
  • 1/4c torn fresh mint leaves

DSC_5074a

Directions

  1. Preheat oven to 425°F with the rack in the lower third of the oven.
  2. Mix the first six ingredients in a small bowl. Toss squash, fennel and grapes with oil and half of the spice mixture. Arrange in a single layer on a sheet pan.
  3. Rub chicken thighs evenly with the remaining spice mixture. You can prepare both components several hours in advance and store in the refrigerator. Bring the chicken out about 20 minutes before proceeding with the recipe.
  4. Arrange the chicken thighs skin side up on top of fruit and vegetables. Roast until skin is browned and an instant read thermometer inserted into the thickest part of the thigh reads 165°F, about 25 minutes to one half hour.
  5. Divide chicken, fruit and vegetables between four plates and top with mint.

DSC_5101a

November 12, 2015 Okonomiyaki or Japanese Pancake

DSC_5036a“Okimiaki” was the one word message Joe sent me one Tuesday night during his office hours. My response, “huh?” seemed appropriate, poor guy, he has been working too much I thought. His response was “Japanese pancake made w cabbage- I want to make them”.

Okay, that was a new one for me, I thought I knew quite a bit about Japanese cooking so I did what everyone does these days, I Googled it. No appropriate response for the okimiaki spelling but when I googled “Japanese pancake” I started getting some information.

Joe heard about the Japanese pancake from a patient of his who is a chef and a writer. She and some friends were making them for a party. It was something new for both of us. I have quite a few Japanese cookbooks that go beyond the typical sushi and sashimi recipes, none gave any reference to Japanese pancakes or okonomiyaki as they are also called. I even called on a friend who travelled to Japan this past spring to see if she could give me any insight but she was not familiar with this now puzzling dish.

I learned that okonomiyaki is Japanese street food made popular in the cities of Osaka and Hiroshima. Because of it’s shape, it is sometimes referred to as Japanese pizza or pancake in the United States. The ingredients in an Osaka style okonomiyaki are mixed together while the ingredients in a Hiroshima style are layered and topped with noodles and a fried egg. Okonomi is translated “what you like” and “yaki” is grilled or cooked, so okonomiyaki is essentially “cooked as you like it.”  The one thing they all have in common is a pancake like batter and shredded cabbage, the rest is up to the cook to make the pancake “as they like it”. There is special okonomiyaki flour, the only difference I could find in it were the special seasonings and possibly some powdered yamaimo, Japanese yam. Yamaimo’s gelatinous texture gives the pancake added fluffiness.

The “as you like it” aspect can get interesting and I have seen recipes include shrimp, squid, pork belly, cheese and vegetarian options. How you top your pancake is equally important and might include chopped scallions, sesame seeds with a flourish of okonomi or tonkatsu sauce and Kewpie mayonnaise. Bottled tonkatsu with the red bull dog on the label is also labeled “vegetable and fruit sauce” but you have to read down the list of ingredients a bit to find either. I presume the brown color is from the prune paste. There are also recipes on line for tonkatsu sauce. You will find Kewpie mayonnaise on the Asian aisle in larger supermarkets. It has a Kewpie doll with outstretched arms on the package. It differs from our good old fashioned Hellman’s with it’s use of rice vinegar, giving it more tang and MSG to up the umami flavor.

I spent quite a bit of time contemplating what recipe to use. I wanted to stay fairly basic for our first attempt and decided on an Osaka style recipe from Serious Eats. We, or as I should really say, Joe made them on a sashimi night which is a weekend night when we recreate some of our favorite sashimi recipes using salmon, scallops and tuna. His efforts turned out quite good, the first was topped with bacon, then he got a little more creative and topped the second with seared tuna. We finished them off with tonkatsu sauce, mayo (not Kewpie) with sriracha, toasted sesame seeds and pickled ginger. The combination of the crispy exterior and soft interior is quite addictive and very filling. We had enough for a breakfast okonomiyaki for Joe and smaller ones for dinner the next day. Would we try them again? Not every week, but definitely.

Okonomiyaki

Makes 4 large pancakes

Ingredients

  • 2 cups all-purpose flour
  • 1 1/3 cups dashi or low-sodium chicken stock
  • 4 large eggs, beaten
  • 8 cups finely chopped cabbage-we used a combination of green and red
  • 2 cups chopped raw shrimp or baby shrimp
  • 8 scallions, sliced, divided
  • Kosher salt, to taste
  • 8 slices bacon, sliced in half- the second, slices of seared tuna
  • 2 tablespoons vegetable oil
  • Kewpie Mayonnaise or sriracha mayo
  • Okonomiyaki or tonkatsu sauce
  • Toasted sesame seeds
  • Pickled ginger

Directions

  1. In a large bowl whisk together flour, dashi or stock, and eggs. Add chopped cabbage and mix so that the cabbage is gently folded into the batter. Fold in shrimp and scallion whites then season with salt.
  2. Heat 1/2 tablespoon vegetable oil in a large non-stick skillet over medium high heat until shimmering. Add 1/4 of the batter, gently pushing the batter down with a spatula until flattened. Cook until underside is browned, about 4 minutes, then place 4 pieces of halved bacon on the top side. Gently flip the pancake so that the side with the bacon is now cooking. Cook until the bacon is crisp and the pancake is cooked through, about 5 more minutes. Serve immediately with mayonnaise, okonomiyaki sauce, toasted sesame seeds, pickled ginger, and scallion greens. Repeat with remaining pancakes.

    DSC_5024a

    DSC_5027a

    DSC_5028a

    DSC_5031a


November 8, 2015 Curried Chicken with Cauliflower, Apricots and Olives

DSC_5012aStep aside slow cookers, move over microwaves, there’s  a new method for getting dinner on the table in a hurry, sheet pan suppers. It provides the busy weeknight cook with easy preparation, the convenience of cooking everything on one pan and makes clean up a snap.

The sheet pans I have stood the test of time, they have served me well for over 25 years.  They may have a little more “character” than a new one but they still do the job. As a caterer I used them constantly, for roasting vegetables and meats, baking cookies, rolls and countless hors d’oeurves. Actually the correct name is a half sheet pan, usually 13″x18″ in dimension,  just the right size to fit in most standard ovens. A full sheet pan is18″x26″, the size fits the rack in a commercial oven. Don’t confuse a jelly roll pan with a sheet pan, jelly roll pans are flimsy and you would need to double them up and you still wouldn’t achieve the same sturdiness. A sheet pan is an inexpensive addition to your cooking equipment. You will find them in both restaurant equipment stores or in the catering aisle of any big box store. Choose one that is aluminum or stainless steel, they hold up well under high heat cooking. I would not recommend a non stick sheet pan, the surface will eventually erode and could possibly contaminate the food you are cooking.

Curried Chicken Thighs with Cauliflower, Apricot and Olives is from Molly Gilbert, author of Sheet Pan Suppers. She calls this a riff on the classic eighties Silver Palate recipe for Chicken Marabella. In Ms. Gilbert’s version the flavor profile moves from Meditteranean to Moroccan, the capers in the original recipe are gone, the olives remain and the prunes have been replaced with dried apricots.

Start the recipe by combining the chicken thighs with half of the curry powder and smoked paprika, oil, vinegar, cinnamon, cayenne and salt. I think it’s beneficial for a  recipe that uses an ingredient in two different steps to read, 4 teaspoons curry powder, divided. That would be helpful for the cook, (and we all do it) who maybe isn’t reading the recipe that carefully.

Next is the issue of curry powder, a blend of many spices that can range in flavor from very mild (sweet) to the Madras blend which is quite hot. I think the sweet curry powder is the right choice for most palates making this recipe. The paprika called for in the recipe is smoked, giving another interesting flavor dimension to the dish.

Toss the chicken with the spices, cover and refrigerate for at least eight hours but preferably overnight. The recipe calls for boneless skinless chicken thighs, I used bone-in thighs because I felt they would hold up better to the high heat cooking. When you are ready to cook, place the rack in the center of the oven. The recipe calls for a 450°F oven but I reduced mine to 425°F since I was roasting with convection heat.

A large head of cauliflower translated into about eight cups for me.  I like to cut the head in half and then into quarters through the core. Then I separate the florets from the central stem and break the florets into smaller, relatively equal sized pieces. Toss the cauliflower with the remaining oil, curry powder, paprika and salt to evenly coat. Spread the cauliflower evenly on the sheet pan in a single layer and add the chopped apricots and olives. Soak the apricots for five minutes to soften, anything longer will turn them mushy. I used Castelvetrano olives, my personal favorites and easy to find on the Mediterranean bar of any good supermarket.

Remove the chicken from the marinade and space the pieces evenly over the cauliflower. Add the apricots and olives to the baking sheet. You might want to tuck some of them under the chicken since they get quite brown. Roast, rotating the pan halfway through the cooking time. I used an instant read thermometer and my chicken pieces were done in a little less than a half hour. If you are not using a convection oven it may take a little longer but no matter what, the instant read thermometer is always key to getting the best results.

This is a great weeknight supper because everything can be ready in advance, chicken marinated, cauliflower, apricots and olives prepped. At dinnertime get everything ready to cook while your oven preheats. A simple salad will complete the meal.

Curried Chicken with Cauliflower, Apricots and Olives

Serves 4

Ingredients

  • 8 bone-in chicken thighs (about 2lbs)
  • ¼c extra virgin olive oil, divided,  2T chicken, 2T cauliflower
  • 1T apple cider vinegar
  • 4t sweet curry powder, divided, 2t chicken, 2t cauliflower
  • 1t smoked paprika, divided, ½t chicken, ½t cauliflower
  • ½t ground cinnamon
  • ¼t cayenne pepper
  • Kosher Salt
  • 1 large head cauliflower, cut into bite-sized florets
  • ¾c chopped dried apricots, soaked in hot water for 5 minutes and drained
  • 1c pitted green olives, halved
  • ½c chopped fresh cilantro or parsley
  • 1 large lemon cut into wedges
DSC_5006a
Toss the cauliflower with curry powder, cinnamon, smoked paprika, cayenne pepper and salt.
Everything ready to go on the sheet pan.

Directions

  1. Combine the chicken thighs with 2T oil, the vinegar, 2t curry powder, cinnamon, cayenne and ¾t salt in a medium bowl, tossing to coat. Cover and refrigerate for at least 8 hours and up to overnight.
  2. Position the oven rack in the center and preheat oven to 450°F (425°F if using convection heat). Line a large sheet pan with parchment paper. Combine on the pan, the cauliflower with the remaining 2T oil, 2t sweet curry powder, ½t paprika and ¾t salt, tossing to coat. Be sure the cauliflower is spread out evenly.
  3. Add the apricots and olives and spread them evenly on the pan.
  4. Remove the chicken thighs from the marinade and place them evenly spread over the cauliflower. Roast, rotating the pan halfway through the cooking time, between 30-35 minutes. Remove the chicken from the pan and toss the cauliflower with the pan drippings. Serve chicken and cauliflower with a sprinkle of cilantro or parsley  and lemon wedges on the side.

DSC_5019a