January 31, 2017 Baked Shrimp Toasts

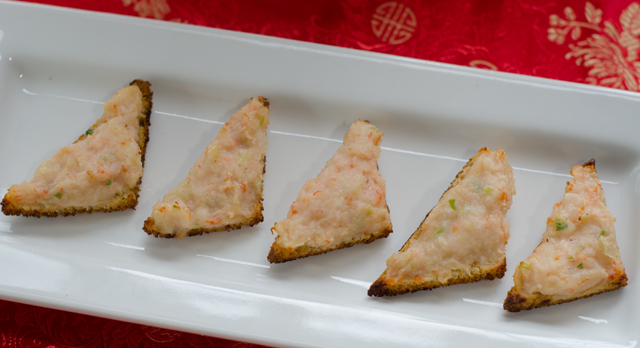
Shrimp toasts, bite-sized triangles of bread topped with shrimp paste are a popular dim sum item and a new addition to our Chinese New Year celebration. It is said the dish originated in Guangzhou (Canton) in China nearly a hundred years ago. There are others who claim it is a hybrid of a traditional Chinese shrimp recipe and bread, not native to China but introduced by foreign travelers to Hong Kong. I chose to use a recipe from Susannah Foo, a popular and highly acclaimed Philadelphia chef who eponymous restaurant closed in 2009. Shrimp toasts are often fried, this version is baked and can be made ahead and frozen, a big plus when you are serving an extensive menu. This year we celebrate the year of the rooster, which comes after a monkey year and before a dog year. Roosters are said to honest, bright, communicative and ambitious.

Baked Shrimp Toasts

Makes 3 dozen or more

Ingredients

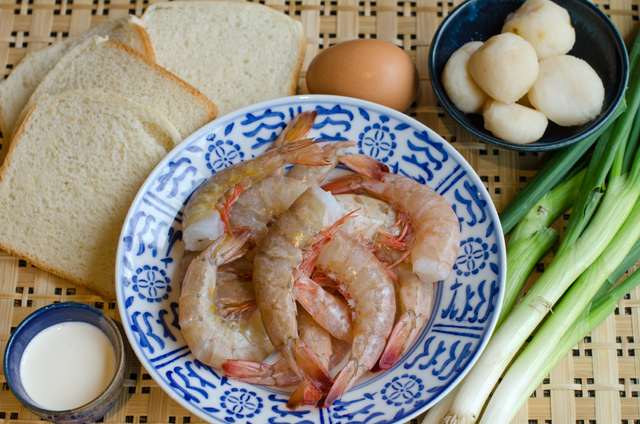
  • 10 to 12 slices thinly sliced white bread, crusts removed
  • 1 large egg white
  • 1 lb medium or large shrimp, peeled and deveined
  • 2 T heavy cream
  • 1 T vodka
  • 1 t kosher salt
  • ½ c chopped water chestnuts
  • 2 scallions, minced

Directions

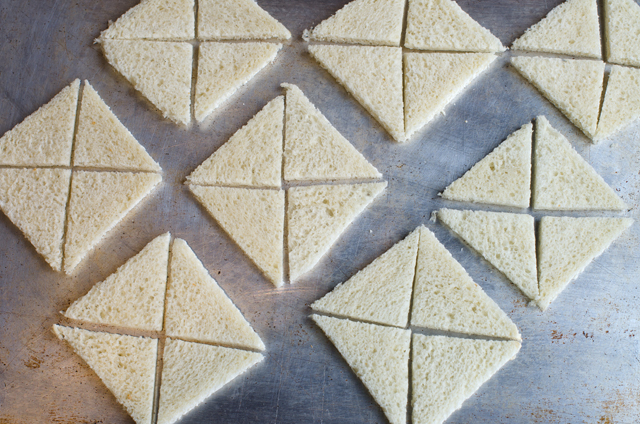
  1. Preheat oven to 250° Cut each piece of bread into 4 triangular pieces. Place on a baking sheet and bake for about twenty minutes, until the bread is dry but not browned; leave oven on.
  2. While the toast is drying, beat the egg white lightly. Dry the shrimp well with a paper towel and place in a food processor; puree.
  3. Add the egg white, cream, vodka and salt. Process until just pureed. Transfer to a bowl.
  4. Add the water chestnuts and scallions to the shrimp mixture and mix just until all the ingredients are combined.
  5. If you are baking the shrimp toasts immediately, increase the oven temperature to 375°F and coat a baking sheet lightly with non stick spray.
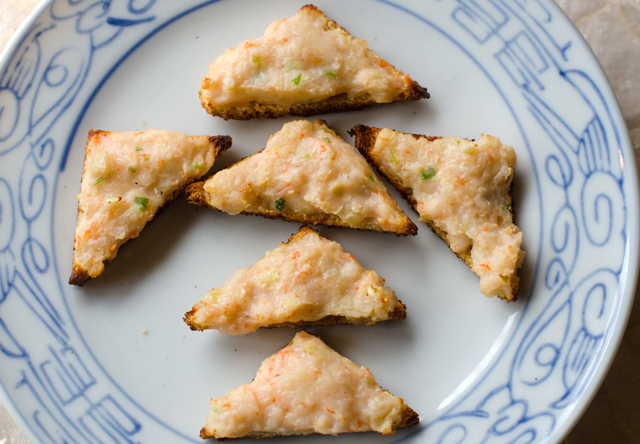
  6. Spread 2 heaping teaspoons of the shrimp mixture on each piece of bread. Repeat with the remaining triangles.
  7. At this point, the shrimp toast can be frozen for later use. Place the triangles on baking sheets and freeze. Once frozen, remove from the baking sheets, place in freezer bags and return to the freezer.
  8.  Bake frozen shrimp toasts directly from the freezer, about 10 minutes, the shrimp will be cooked through, all the ingredients hot and the toast is golden brown on the bottom. Triangles that were not frozen will take a little less time.

February 9, 2014 Green Tea Creme Brulee

DSC_4464a

We ushered in the year of the horse with our usual Chinese New Year dinner. This year’s celebration was considerably smaller than previous years in the number of guests but not in the number of courses. For the conclusion of our meal, I like to take a non traditional approach with dessert, incorporating Chinese flavors into dishes familiar to Western palates.

In my readings I have learned that the Chinese do not usually have desserts at the end of a typical meal, opting for fresh fruit if anything at all. Sweets are often enough enjoyed at tea time, often sweetened and candied fruits made into sweet soups and cakes. Exotic Chinese desserts for special occasions like birds nest soup double boiled in coconut milk or glutinous rice and wheat soup would be a bit esoteric and even too sweet for Western palates. So I like to keep it simple, spicy ginger cookies in the shape of the celebrated animal of the year, ice cream and sorbets featuring everything from red beans to tangerines.

This year I decided on a rich and satisfying green tea crème brûlée.  Crème brûlée, translated “burnt cream” is a rich custard topped with a layer of caramelized sugar. A custard is a combination of eggs or egg yolks and milk or cream baked gently until it sets. Sweet custards, crème brûlée or crème caramel, custard based ice creams and pots de creme contain sugar. Custards can be savory as well, like quiches, that combine cream or milk and eggs with cheese.

Crème brûlée can be baked in small individual dishes or in one low sided round or oval dish. A large surface area is desirable to maximize the caramelized sugar crunch that contrasts so well with the creamy custard underneath. The basic custard can be a blank canvas to showcase other flavors. Typically the custard is flavored with a vanilla bean but to give it an Eastern flair I infused it with green tea as well. I chose a gunpowder green that imparts a slightly smoky flavor. Infusing tea bags in warmed cream for about a half hour gave me the flavor I was looking for.

Crème brûlée is baked in a bain marie or water bath. The custards are placed in a larger pan that is filled halfway up the sides of the dish or dishes with very hot tap water. This protects the crème brûlée  from the direct heat of the oven. A tea towel in the bottom of the pan gives more stability and individual ramekins are less likely to dance around. Since oven heat can be notoriously inconsistent from one area to the next, the bain marie helps distribute the heat more evenly so that each custard cooks at the same rate.

Clear a generous spot on your countertop right next to the oven with potholders at the ready. It can be quite a feat removing the baking pan half filled with water and the custards. When the crème brûlée is done it should be removed immediately from the bain marie, a good pair of tongs make this easy, place on a wire rack and cooled for about a half hour at room temperature and refrigerated, preferably overnight.  Covered with plastic wrap they can sit in your refrigerator for several days, a bonus to the busy cook.

When you are ready to serve the dessert, prepare the sugar glaze.  I prefer turbinado or Demerara sugar to sprinkle on the crème brûlée. They are both minimally refined sugars and their large crystals are easier to spread and give it an extra crunch. Sprinkle a light layer of sugar evenly over the top. We started originally with the smaller propane torch sold in kitchen stores but have found the larger propane torch does the job in a lot less time. Place the finished desserts back in the refrigerator to chill for about a half hour.

The Chinese believe that dietary balance is achieved through moderation. One should leave the table satisfied, not satiated. Green tea creme brulee is a dessert that does this quite nicely.

DSC_4450a
I find it easiest to pour the hot tap water from a very narrow sprout, like a watering can, done slowly the water won’t slosh onto the crème brûlée.

Green Tea Crème Brûlée

Serves eight

Ingredients

  • 4 c heavy cream, chilled
  • 2/3 c granulated sugar
  • pinch table salt
  • 10 tea bags- I used Numi Gunpowder Green
  • 12 large egg yolks
  • 1t  vanilla bean paste or vanilla extract
  • 8 – 12 teaspoons turbinado sugar or Demerara sugar
Directions
  1. Adjust oven rack to lower-middle position and heat oven to 300° F.
  2. Combine 2 cups cream, sugar, and salt in medium saucepan; add tea bags and bring mixture to boil over medium heat, stirring occasionally to ensure that sugar dissolves. Take pan off heat and let steep 30 minutes to infuse flavors.
  3. While the tea bags are steeping, place kitchen towel in bottom of large baking dish or roasting pan and arrange eight 4- to 5-ounce ramekins (or shallow fluted dishes) on towel.
  4. After cream has steeped, remove tea bags and squeeze bags with tongs or press into mesh strainer to extract all liquid. Stir tea liquid and remaining 2 cups cream into steeped cream to cool down mixture. Whisk yolks and vanilla extract in large bowl until broken up and combined. Whisk about 1 cup cream mixture into yolks until loosened and combined; repeat with another 1 cup cream. Add remaining cream and whisk until evenly colored and thoroughly combined. Strain through fine-mesh strainer into 2-quart measuring cup,  discard solids in strainer. Pour or ladle mixture into ramekins, dividing it evenly among them.
  5. Carefully place baking dish with ramekins on oven rack; pour very hot tap water into dish, taking care not to splash water into ramekins, until water reaches halfway up the height of ramekins. Bake until centers of custards are just barely set and are no longer sloshy and digital instant-read thermometer inserted in centers registers 170°F to 175°F degrees, 30 to 35 minutes (25 to 30 minutes for shallow fluted dishes). Begin checking temperature about 5 minutes before recommended time.
  6. Transfer ramekins to wire rack; cool to room temperature, about 2 hours. Set ramekins on rimmed baking sheet, cover tightly with plastic wrap, and refrigerate until cold, at least 4 hours or up to 4 days.
  7. Uncover ramekins; if condensation has collected on custards, place paper towel on surface to soak up moisture. Sprinkle each with about 1 teaspoon turbinado sugar (1 1/2 teaspoons for shallow fluted dishes); tilt and tap ramekin for even coverage. Ignite torch and caramelize sugar. Refrigerate ramekins, uncovered, to re-chill, 30 to 45 minutes (but no longer); serve.
DSC_1033a
Sometimes I do “minis”. Just a taste when I am serving more than one dessert at this large meal.

February 29, 2012 A Leap Year Post

Happy Leap Day! In a bit of a leap year stretch I am going back again to Chinese new year for this post. One of the courses we include each year is Mongolian Hot Pot. Hot pot is a method of cooking thinly sliced meats, seafood and vegetables in a simmering broth.The Chinese have been using this cooking method since the Tang dynasty over a  thousand years ago. The ingredient possibilities are endless, but since this is one of many courses we have narrowed the choices down for our party to thinly sliced chicken breast, various seafood; littleneck clams, cockles, shrimp, scallops, monkfish, mussels and produce such as snow peas, mushrooms and sprouts. The morning of the party we went to Hellers Seafood for our order. Today, Joe spotted something in the refrigerated case that we don’t see every week. Fresh Florida frogs legs, not something that would appeal to me, or to most people I thought, but Joe insisted we get some. At least he and Alfred would enjoy them. So the legs had their own special tray to pass between the three hot pots. Surprisingly quite a few people were adventuresome and tried the frogs legs. Tastes like chicken I have been told…

Basic Recipe for Hot Pot

Equipment needed

  • A portable burner
  • Butane fuel canister for the portable burner
  • Cooking pot for the simmering broth
  • Utensils- Chopsticks and tongs to put the uncooked food in the broth, Chinese wire strainers or slotted spoons for retrieving cooked food from the broth
  • Bowls, spoons and a discard plate for the shells

    A tray of ingredients ready for the hot pot.

For hot pot cooking

  • Homemade chicken broth or low sodium canned is okay
  • Thinly sliced chicken breast
  • Chunks of mild white fish, monk, halibut etc
  • Mussels
  • Clams
  • Shrimp-we use medium, shell-on
  • Scallops
  • Mushrooms-we have used enoki, shiitake, oyster
  • Bean Sprouts
  • Snow peas
  • Baby spinach leaves
  • Coriander leaves
  • A few hot peppers

Accompaniments

  • Soy sauce
  • Hoisin sauce
  • Chili garlic sauce
  • Sesame oil

This year Joe made his own unique accompaniments; coriander mustard sauce, spicy sesame sauce, spicy Szechuan peanut butter sauce and Szechuan pepper salt.  They are worthy of their own post.

Bring a large pot of chicken broth to a simmer. There should be enough stock to fill all of the pots for table side dining 2/3 of the way full and more for replenishing. The food to be cooked should be prepped and on a tray. Do this several hours in advance, cover food with plastic wrap and refrigerate. Four diners per pot seems to work best. Slower cooking items like the clams and mussels should go in first, the vegetables toward the end. Eat as you go. It’s a fun way for a group to cook together. Add some pre-soaked rice noodles to the broth at the end  to make a flavorful soup.

The texture of frogs legs is said to be like chicken wings.

February 19, 2012 Dumpling Making

For the past seven years I have made many wrapped hors d’oeuvres for our Chinese New Year party. The food for this holiday is all about symbolism. Spring rolls represent wealth because they are said to look like gold bars. Dumplings look like gold coins and their round shape signifies family reunion. Chinese wrappers are a breeze to work with. I probably should qualify that statement. As a caterer, I am certain I made thousands of appetizers and entrees over the years with phyllo dough. Phyllo can be quite temperamental, it tends to crack,dry out and sometimes disintegrate if not handled properly. Pre made won ton, and spring roll wrappers were much easier to use. In addition to covering them with a damp towel when working with them the only thing I had to learn about these wrappers were the shapes and how to wrap them correctly. So the next challenge was to make my own wrappers. Last year I made Shanghai Soup Dumplings and this year I was ready to improve upon my fledgling ability.   I read and watched many tutorials on dumpling making, realizing this wasn’t a skill  I would develop overnight. The website I found to be the most helpful was www.asiandumplingtips website of cooking teacher and cookbook author, Andrea Nguyen. Because of the amazingly clear information on the website I purchased her book, Asian Dumplings. I feel I have only scratched the surface in dumpling making but at least I have learned to make my own. I am not including any recipes with this post, visit her website and purchase her book, she is a excellent teacher.


Dumplings and potstickers ready for the steamer and frying pan.

 A Shanghai soup dumpling from Chinese New Year 2011

 The steamed dumplings had a vegetable filling of spinach, carrot, and shiitake mushrooms.

February 15, 2012 Strange-Flavor Eggplant

A dish that I have to make every year for the Chinese New Year celebration is strange-flavor eggplant. It is Joe’s absolute favorite and I must admit, because it is a dish that benefits from being made several days in advance, I occasionally forget to put it out with all the other side dishes.

Strange flavor eggplant was made famous by the late Chinese scholar, chef and restaurant owner, Barbara Tropp. I have enjoyed reading and cooking many dishes from both her books, The Modern Art of Chinese Cooking and China Moon, named for her Chinese bistro. It is in China Moon, that she shares the recipe for Strange Flavor Eggplant in a chapter entitled, “Nuts, Pickles and Nibbles”.  Ms Tropp says of strange flavor, “a classic name  for a series of Chinese dishes that typically employ a mixture of vinegar, sugar and chili, this is strange as in “wonderful, unique or ineffable”. Fushcia Dunlop in her book “Land of Plenty” describes strange-flavor as one of the 23 flavors of Sichuan. “It is the harmonious mixing of salty, sweet, numbing, hot, sour, fresh-savory and fragrant notes,” she states.

The flavor is not so strange, but quite addictive. The texture is reminiscent of eggplant caviar, it can be eaten as a side vegetable or as a dip, as she suggests with garlic croutons. Hopefully this summer  I will remember to make strange flavor when our garden is producing copious amounts of eggplant.

The cooked eggplants remind me of deflated balloons!

The eggplants were easy to peel, be sure to let them cool first!

Cooking the eggplant with the sauce and aromatics

This year the strange-flavor eggplant made it to the table!

An assortment of beautiful eggplant from a previous season’s garden.

Strange-Flavor Eggplant from the China Moon Cookbook

She says this will keep in the refrigerator for up to a week, but it never lasts that long for us! I usually make a double batch.

Ingredients

  • 1 to 1 1/4 pounds large eggplant (Italian or globe)
  • 2 Tablespoons corn or peanut oil
  • 1/2 teaspoon sesame oil
  • thinly sliced green and white scallion rings for garnish

Aromatics

  • 1 tablespoon finely minced garlic
  • 1 tablespoon finely minced fresh ginger
  • 1/4 cup thinly sliced green and white scallion rings
  • 1/4 to 1/2 teaspoon dried red chili flakes

Sauce

  • 3 tablespoons soy sauce
  • 3 tablespoons packed brown sugar
  • 1 teaspoon unseasoned Japanese rice vinegar
  • 1 tablespoon hot water

Preheat the oven to 475F. Position the rack in the center position.

  1. Prick the eggplant well in several places with a fork or the tip of a sharp knife and remove the leaves. Bake on a baking sheet, turning once, until fork-tender, 20 to 40 minutes, depending on the size.
  2. While still warm, remove the stem end and the peel, scraping off and retrieving any pulp. Chop up the pulp and process the pulp and any thick baking juices in a food processor or blender until nearly smooth.
  3. Combine the aromatics in a small dish. Combine the sauce ingredients in a small bowl, stir to dissolve the sugar.
  4. Heat a wok or large heavy skillet over high heat until hot enough to evaporate a bead of water on contact. Add 2 tablespoons corn oil, swirl to glaze the pan, reduce heat to medium high. When hot enough to foam a scallion ring, add the aromatics and stir-fry until fragrant, about 15 seconds, adjusting the heat so they sizzle without scorching.  Add the sauce ingredients and stir until simmering. Then add the eggplant, stir well to blend, and heat through.  Remove from heat and adjust seasonings accordingly. Stir in sesame oil.
  5. Allow to cool, stirring occasionally. It will achieve fullest flavor if the eggplant is refrigerated overnight. Serve at room temperature with a sprinkling of scallions.

February 13, 2012 Red Bean Ice Cream

Birds nests, lily bulbs and red beans are just a few of the not so common ingredients in Chinese sweets. Chinese dinners usually end with fruit and traditionally sweets are not served with meals but with afternoon tea. Ice cream certainly wouldn’t be on any list of classic Chinese sweets, so for our Chinese New Year Celebration I thought I would put an Eastern twist on a Western classic.

Adzuki beans are used in Asian desserts such as red bean soup or glutinous rice balls filled with red bean paste. Adzuki beans originated in China and are harvested in November and December. They are believed to strengthen the heart and aid circulation and fatigue.  I thought it would be fun to feature these small reddish-brown beans in ice cream.

Some of the recipes I saw started with a pre-made paste that is available in  Asian groceries but I wanted my beans to have a little more texture I started with a fresh vacuum-packed container of beans. As with any recipe, older beans could lose moisture and require a longer cooking time.

Fresh adzuki beans ready for an over night soak.

They took a little longer than I expected, but now at the right consistency.

The finished product, creamy with a bit of texture from the beans.

Sweet Adzuki Bean Paste

  • 1 cup adzuki beans
  • 1 cup sugar
  • pinch of salt

1. Rinse beans, cover with water in bowl and soak overnight.

2. Drain beans, rinse well. Put beans in saucepan and add water to cover. Bring to a boil and drain.  Return to the saucepan and add water to cover by 1 inch. Bring to the boil and then simmer, skimming any scum from the surface. Continue to simmer until beans reach desired softness, 30-45 minutes.

3. Add sugar, stirring to dissolve and bring to a boil. Reduce heat to low and simmer covered, stirring frequently until beans thicken, at least another 30 minutes. Stir beans frequently so that beans do not stick to the bottom of the pan. Remove from heat, add a squeeze of lemon and a  pinch of salt and stir well. Cool to room temperature before adding to ice cream base.

Makes about 2 1/2 cups.

Using the formula from Fine Cooking Homemade Ice Cream Recipe Maker

Adzuki Bean Ice Cream

  • 2 cups heavy cream
  • 1 cup whole milk
  • 1/2 cup sugar or to taste
  • 5 egg yolks
  • 2 cups adzuki bean paste
  • 1 teaspoon vanilla extract

1. Prepare an ice bath by filling a large metal bowl with several inches of ice water. Set a smaller bowl in the ice water. Pour one cup of heavy cream into the inner bowl. Set a strainer on top. Whisk the egg yolks in a separate bowl.

2. Warm one cup of cream with the milk and sugar in a medium saucepan until tiny bubbles form around the edge of the pan. In a steady stream pour half of the warm cream mixture into the egg yolks, whisk constantly to prevent eggs from curdling.

3. Pour egg mixture back into the saucepan and cook over low heat, stir constantly and scrape the bottom with a rubber spatula until the custard thickens. I like to use my thermapen thermometer to monitor this process closely. The temperature should read 175-180, don’t overheat or the custard will curdle and become sweetened scrambled eggs. Immediately strain the custard into the chilled cream. Once the mixture has cooled, add  teaspoon of vanilla extract and two cups of the sweetened adzuki beans. Transfer adzuki custard to refrigerator to chill overnight or at least 4 hours.

4. Freeze custard in your ice cream maker according to manufacturer’s directions.

Additional note-check the custard before freezing to make sure it is at your desired sweetness level, if not, add a tablespoon or so of honey or agave sweetener.

February 7, 2012 Blood Orange Sorbet

Citrus fruit plays a prominent role in the symbolism associated with Chinese New Year. The words for tangerine and orange sound like the words for luck and wealth respectively in Chinese.  I like to offer a cooling citrus sorbet as one of my dessert choices after a multi-course dinner.  In past years we have enjoyed tangerine and cara-cara oranges and this year I decided on the blood orange. Red is considered to be a lucky color in China, though I would say the color of the blood orange is a cross between crimson and magenta.  Blood oranges are a bit smaller than the average orange and the blush of the skin is an indication of the crimson flesh inside. The color is due to a pigment called anthocyanin, an antioxidant not usually found in citrus but in red fruits such as cranberries and cherrries. Blood oranges grown in both Florida and California are available in many markets from December to May and I decided to take advantage of them in the year of the dragon.

Notice the pitted texture and reddish tinge to the skin.


The flesh inside is a surprising contrast the mostly orange skin.

I purchased my Cuisinart juicer many years ago when a client requested fresh-squeezed orange and grapefruit juice for her wedding reception. I don’t use it every day but it does come in handy when breaking down large quantities of citrus.

The recipe I used didn’t require straining, but I prefer to remove the tiny seed bits for a smoother texture.

Blood orange sorbet freshly made from the Il Gelato ice cream maker.

Blood orange sorbet, a refreshing treat after any meal.

Blood Orange Sorbet  -recipe adapted from Cooks Illustrated and David Lebovitz

  • 6 blood oranges
  • 1/4c sugar for 1 cup of juice
  • 1T vodka or Grand Marnier

1. Juice the blood oranges and measure the juice. I found that six blood oranges gave me about 1 3/4 cups of juice. Strain juice if a smoother texture is desired.

2. For each cup of juice, use 1/4 cup granulated sugar. For example 3 cups of juice=3/4 cup of sugar.

3. Put the sugar in a small, non-reactive saucepan. Add enough juice to moisten the sugar very well. Heat, stirring frequently, until the sugar is completely dissolved.

4. Stir the sugar back  into the reserved blood orange juice. Add about a tablespoon or so of either vodka, Cointreau or Grand Marnier. The addition of a small amount of alcohol will lower the freezing point of water, improving the texture of your final product. Also be certain the mixture is thoroughly chilled before pouring in your ice cream maker. Churn until frozen and transfer the sorbet into a container. Seal and transfer container to freezer for several hours to allow sorbet to firm up.

February 2, 2012 Year of the Dragon Cookies

For the past six years we have been celebrating Chinese New Year with a small group of friends. Chinese new year  begins with the second new moon after the winter solstice, during those typically snowy days that  occur after Christmas and before the spring thaw. In 2012, Chinese New Year of 4710  began on January 23rd. Because of schedules and other commitments we will be having our Chinese new year dinner in February.  The Chinese calendar is represented with twelve animals. Chinese legend recounts the story of the animal kingdom in a race to meet the earth god, and the first twelve animals were rewarded with their own year, hence a twelve year cycle. We have celebrated the year of the dog, pig, rat, ox, tiger, rabbit and 2012, the year of the dragon. Each year I make ginger cookies in the shape of that year’s animal.

Ingredients ready for the food processor. This dough could also be made in a stand mixer.

Gingerbread dough is rolled between wax or  parchment paper and chilled before cutting out desired shapes.

I purchased my dragon cookie cutter from cheapcookiecutters.com

Cookies are baked on parchment lined sheets spaced out to allow them to puff up.

Gingerbread Cookies -adapted from Cooks Illustrated

  • 3 cups all-purpose flour
  • 3/4 cup firmly packed dark brown sugar
  • 1 tablespoon ground cinnamon-I prefer the Chinese Tung Hing variety from Penzey’s
  • 1 tablespoon ground ginger
  • 1/2 teaspoon five spice powder
  • 1 tablespoon white pepper
  • 1/2 teaspoon salt
  • 1 teaspoon baking soda
  • 12 tablespoons unsalted butter cut into 12 pieces and softened slightly
  • 3/4 cup unsulphured molasses
  • 3 tablespoons milk or cream

1. Process flour, sugar, cinnamon, ginger, five spice powder, white pepper, salt, white pepper and baking soda in a food processor fitted with the metal blade until combined, about 10 seconds. Scatter butter pieces over the flour mixture and process until mixture resembles fine meal, about 15 seconds. Add the millk and molasses in a constant stream while the machine is running, process until dough is evenly moistened and forms a soft mass, about 10 seconds.

2. Scrape dough onto work surface, divide in half. Working with one portion of dough at a time, roll 1/2 inch thick between two large sheets of parchment or wax paper. Place rolled dough on a cookie sheet and chill in freezer for about 15-20 minutes, until firm.  If time allows, refrigerate the dough overnight.

3. Adjust oven racks to upper and lower middle positions and heat oven to 350 degrees, I used 325 at the convection setting. Line several cookie sheets with parchment paper.

4. Remove one dough sheet from the freezer, place on work surface. Peel off the top and bottom sheets of wax paper. Cut dough into desired cookie shapes and transfer the cookies to the lined parchment sheets, a thin metal spatula will do this nicely. Space cookies out enough for them to expand while baking, about an inch apart. Re roll scraps, freeze again if too soft, then cut out remaining cookies. Bake cookies until set in centers and dough barely retains imprint when touched very gently with fingertip, 8 to 11 minutes. Rotate cookie sheets front to back and top to bottom halfway through baking time. Do not over bake. Cool cookies on sheets for about 3 minutes before moving them with a metal spatula to cool to room temperature.

Additional notes-if you like your cookies spicier, another tablespoon of either black or white pepper could be added, I have even added a teaspoon or so of fresh ginger on occasion. I also like to chill my unbaked cookies before baking so they don’t turn into amorphous blobs! Light or dark brown sugar could be used, unless you just bought your sugar, it may need a minute or so in a bowl covered with a moist paper towel to soften it.