February 21, 2016 Carrot Cake Sandwich Cookies

DSC_5967aCarrot cake is hands down my favorite dessert. Not just any carrot cake, the legendary creation made popular by a Philadelphia restaurant of the late seventies and early eighties, Frog/Commissary. Frog was the more formal dining restaurant (we ate their once) and the Commissary was a cafeteria style establishment.  The Frog Commissary cookbook was one of the first I owned and I am on my second copy, the first fell apart from constant use. I used many of the recipes over the years for parties and in my catering business. Though I don’t use it very much now (I should..), the recipes still feel as contemporary as they did over thirty years ago.

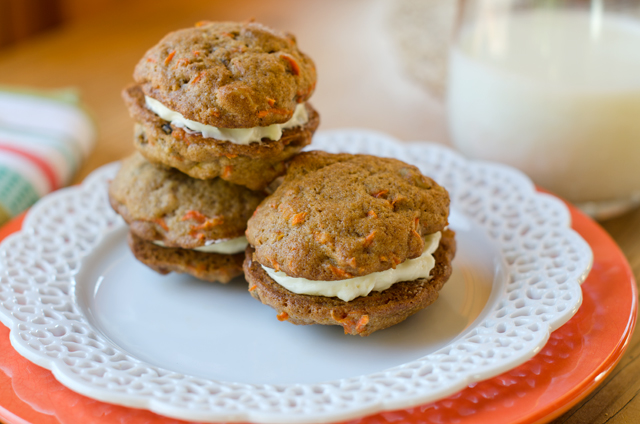
What can you say about a cake that uses a pound (4 cups) of carrots? Does that count as your vegetable for the day? The cake is cut into three layers and filled with a rich pecan cream concoction made with lots of butter, heavy cream and sugar. There’s always enough filling leftover for later to warm up a little to  pour over ice cream.  The tangy cream cheese and confectioner’s sugar frosting covers the cake and it is gilded with toasted coconut on the sides. I have never claimed to be a pastry chef, but I learned how to make icing “carrots” to embellish the carrot cakes I made. It was the first thing Joe ever made for me on my birthday, long before we were married. I must say I was more than a little impressed. Years later as a caterer I was asked to make this cake countless times, appearing as everything from the wedding cake itself to miniature carrot cake cupcakes on dessert buffets.

Coincidentally it is also the favorite cake of my brother. My brother and sister in law joined us for dinner to celebrate his birthday. My sister in law makes the cake for his birthday every year (a true gift of love!) Not wanting to duplicate her efforts, after all it can easily serve 12 people, I was looking for an alternative. Not just a reworking of the original recipe but something just a little different. Carrot cake bars? Too similar. Carrot cake ice cream? Interesting but that would need more time for experimentation.

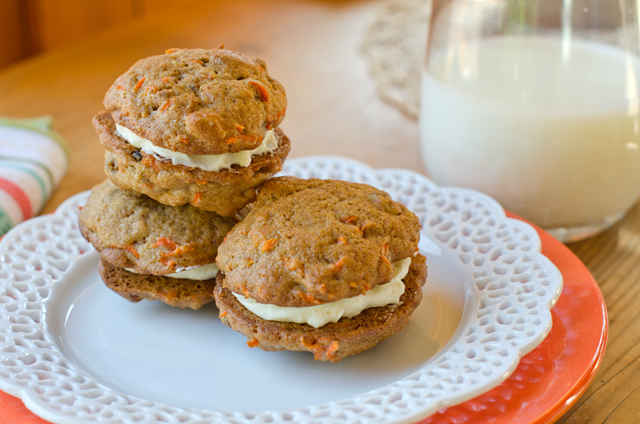
I decided on a recipe for carrot cake sandwich cookies I found on the Epicurious website, originally published in the April 2004 issue of Gourmet magazine. It was a much reviewed (241 to be exact) recipe with most of the comments on the positive side. After reading some of the comments I did make a few simple changes to the recipe. First was to line the baking sheets with parchment rather than butter them, I thought it would solve the spreading problem many reviewers encountered and make it easier to transfer the cookies. I also refrigerated the cookies on the baking sheets for a half hour before baking, also because so many reviewers felt the cookies spread too much.  The not overly sweet cream cheese and honey filling was perfect for the cookie. I just increased the honey to my taste, one-third cup. Unless all of your cookies are the same in size, one last suggestion would be to match up the base of the cookies size wise before filling them.

DSC_5964a

Carrot Cake Sandwich Cookies

Adapted from  Epicurious

Makes about 2 dozen sandwich cookies

Ingredients for the cookies

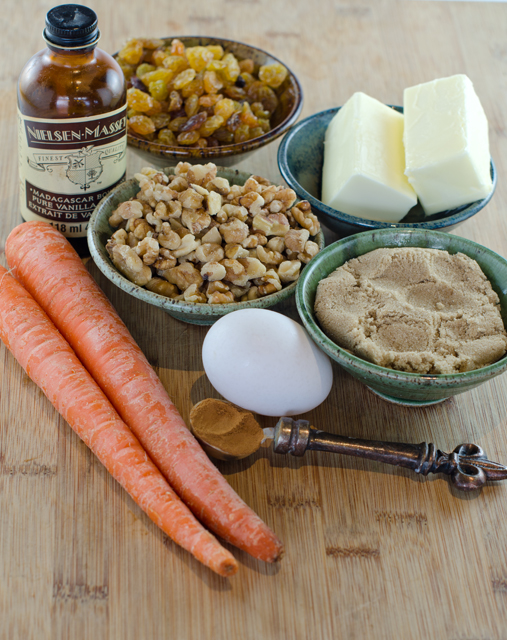
  • 1 1/8 c all purpose flour
  • 1 t cinnamon
  • ½ t baking soda
  • ½ t salt
  •  ½ c unsalted butter (1 stick)
  • 1/3 c plus 2 T packed light brown sugar
  • 1/3 c plus 2 T granulated sugar
  • 1 large egg
  • ½ t vanilla
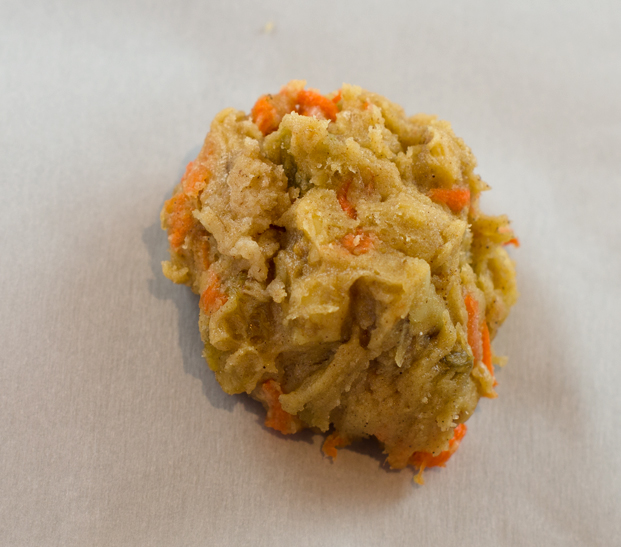
  • 1 c coarsely grated carrots (about 2 medium)
  • 1 c walnuts, chopped
  • 1/2 c golden raisins

DSC_5941a

Ingredients for the filling

  • 1 8 ounce package cream cheese
  • 1/3 c honey

Directions

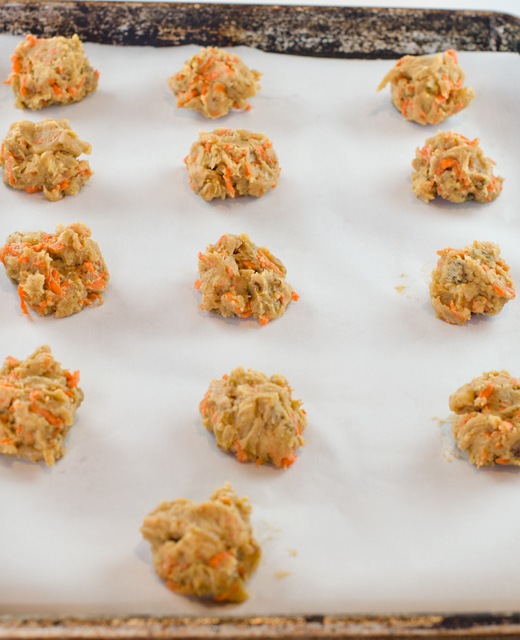
  1. Put oven racks in upper and lower thirds of oven and preheat oven to 375°F Line two large baking sheets with parchment paper.
  2. Whisk flour, cinnamon, baking soda and salt together in a bowl.
  3. Beat butter, sugars, egg and vanilla together in a bowl with an electric mixer at medium speed until pale and fluffy, about 2 minutes. Mix in carrots, nuts and raisin in with a wooden spoon or a mixer at low speed. Then add flour mixture and beat with mixer until just combined.
  4. Drop 1 ½T batter per cookie 2 inches apart on baking sheets and place sheets in the refrigerator to firm up for about ½ hour.
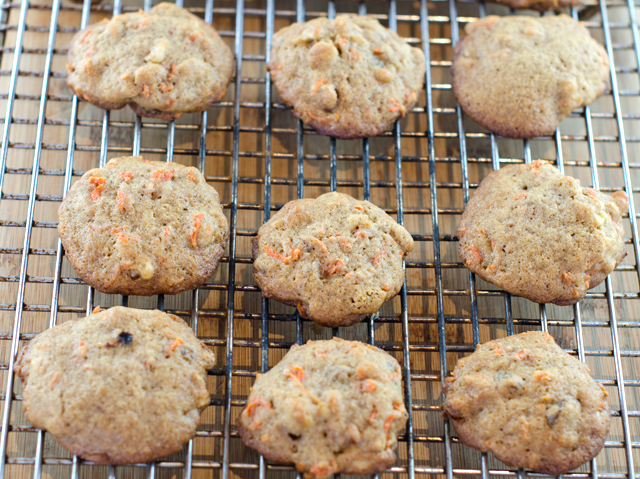
  5. Bake cookies, switching position of sheets halfway through baking, until cookies are lightly browned and springy to the touch, 12-14 minutes total. Cool cookies on baking sheet for a few minutes, then with a spatula move the cookies to racks to cool completely.
  6. For the filling: while the cookies are baking, blend cream cheese and honey with a mixer or food processor until smooth.
  7. Sandwich flat sides of cookies together with a generous tablespoon of cream cheese filling in between.

DSC_5942a

DSC_5948a


DSC_5954a

DSC_5966a

January 17, 2015 Hazelnut-Orange Biscotti

DSC_0769aWhen it comes to cookies, at the top of the list of my personal favorites is biscotti.  Almond biscotti were on the menu  for a light nibble after our seven fishes dinner and I am making hazelnut orange biscotti for a pasta making dinner this weekend. Biscotti originated in medieval Italy as a long shelf life food for Roman soldiers and travelers. It is thought that both Christopher Columbus and Marco Polo relied on biscotti for sustenance on their long journeys. The word derives from bis, Latin for twice and cotto for baked. The basic recipe is simple, dough is formed into logs, baked and cooled, sliced and baked again.

Hazelnuts, are also known as filberts.  Twenty five percent of the world’s hazelnut production goes to the manufacturing of Nutella, a very popular creamy chocolate hazelnut spread. Hazelnuts may a bit harder to find than, lets say walnuts or almonds, but many large supermarkets stock them. When I can I like to buy nuts from a bulk bin to ensure their freshness. I baked the hazelnuts in a 350°F oven for 10 minutes, shaking the pan every few minutes and rotating the pan each time. The nuts will start to exude their oil and your kitchen will smell heavenly.  Transfer lightly toasted nuts to a tea towel to cool, then fold over half the towel and rub gently, back and forth to remove as much skin as possible. Don’t worry if some of the nuts refuse to be skinned, the toasting has made the tannins in the skin less bitter and will add some color and depth of flavor. The nuts should only be lightly toasted since they will be going back into the oven to be baked again in the biscotti. Some of the toasted nuts are finely ground and added to the flour mixture, the rest are coarsely chopped and are folded in at the end of the recipe. Be sure not to take the finely ground nuts too far or you may be left with hazelnut butter.

A little bit of fresh rosemary is included with the dry ingredients. If you don’t have access to fresh, a smaller amount of dried will do or you could eliminate it all together. Flour, rosemary, baking powder and salt are combined in bowl of a food processor. Be sure to check the expiration date on your baking powder.  If the date has passed or is soon approaching, there is a simple test you can do to see if it will still do the job. Baking powder  is a chemical leavener that reacts to temperature so just drop a little into a glass of hot water. If it bubbles up, you are good to go! Process these ingredients then transfer to a bowl.

Two eggs are now added to the empty bowl  and  processed until light in color and doubled in volume. I improvised a paper cone for the feed tube to make it easier to add the sugar gradually. This was much neater than using a measuring cup. The melted butter, orange zest, orange liqueur and vanilla extract are added and processed until combined.  The wet ingredients are transferred to a bowl and the flour mixture and hazelnuts are gently folded in.  I find that a large bowl and the largest spatula you have will make this easier. Lift up from the bottom of the bowl and fold over. Whatever you do, resist the temptation to stir the ingredients!

Flour your hands before forming the dough into two logs the size of the 8×3 inch template. Brush the logs with egg white wash, this will give the cookies sheen. Bake the logs for about 25 minutes, cool and cut into 1/2′ slices. I find a serrated knife works best for this. Time for the cookies to go back into the oven. Bake cookies until crisp and golden brown on both sides. Cool completely before serving.  The cookies will be great at this point but you can also take them one step further by dipping the cookies in bittersweet chocolate and sprinkling with toasted hazelnuts.

Oh, by the way, biscotti is the plural form of the word, like a batch of cookies. If you only have one left it’s a biscotto and it’s time to fill the cookie jar again.DSC_0672a

Hazelnut-Orange Biscotti

from Cooks Illustrated November 2012

Makes 30 cookies

Ingredients

  • 1 1/4c hazelnuts, lightly toasted and skinned
  • 1 3/4c all purpose flour
  • 1/2t finely minced dried rosemary
  • 2t baking powder
  • 1/4t table salt
  • 2 large eggs, plus 1 egg white beaten with a pinch of salt
  • 1c granulated sugar
  • 4T unsalted butter, melted and cooled
  • 1T grated orange zest
  • 1 1/2t orange flavored liqueur (Grand Marnier, Triple Sec)
  • 1/2t vanilla extract
  • Vegetable oil spray

Directions

  1. Adjust oven rack to middle position and heat oven to 325°F. Using a ruler and marker, draw two 8 by 3-inch rectangles, spaced 4 inches apart on a piece of parchment paper. Grease baking sheet and place parchment on it, ink side down.
  2. Pulse 1 cup hazelnuts in food processor until coarsely chopped, 8 to 10 pulses; transfer to a bowl and set aside. Process remaining 1/4 cup hazelnuts in food processor until finely ground, about 45 seconds.
  3. Add flour, rosemary, baking powder, and salt; process to combine, about 15 seconds. Transfer the flour mixture to a bowl.
  4. Process 2 eggs in the now empty food processor until lightened in color and almost doubled in volume, about 3 minutes. With processor running, slowly add sugar until thoroughly combined, about 15 seconds. Add melted butter, orange zest, orange liqueur and vanilla; process until combined, about 10 seconds.
  5. Transfer egg mixture to a large bowl. Sprinkle half of the flour mixture over the egg mixture and, using a large spatula, gently fold until just combined. Add remaining flour mixture and chopped hazelnuts and gently fold until just combined.
  6. Divide batter in half. Using floured hands, form each half into an 8 by 3 inch rectangle, using the lines on the parchment as a guide. Using a medium rubber spatula lightly coated with spray, smooth the tops and sides of the rectangles. Gently brush the tops of the loaves with the egg white wash. Bake until the loaves are golden and just beginning to crack on top, 25-30 minutes, rotating pan halfway through baking.
  7. Let loaves cool on baking sheet for 30 minutes. Transfer loaves to cutting board. Using a serrated knife, slice each loaf on a slight diagonal into 1/2 inch thick slices.  Lay slices, cut side down, about 1/4 inch apart on wire rack set  in rimmed baking sheet. Bake until crisp and golden brown on both sides, about 30 minutes, flipping slices halfway through baking. Let cool completely before serving. Biscotti can be stored in an airtight container for up to 1 month.

  8. To further embellish the cookies, melt some bittersweet chocolate, about four ounces in a small pan over another pan of simmering water. This is known as a double boiler.  Line a small dish with a sheet of waxed paper to catch the drippings. Hold the cookie in your non dominant hand over the dish. Use a wooden spoon to evenly drizzle melted chocolate over half of the cookie. Then immediately sprinkle some finely chopped hazelnuts on top. Let the chocolate dry thoroughly on a rack over a sheet pan that has been lined with parchment to catch any additional drippings. Store cookies in an airtight container.

DSC_0761a

DSC_0573a
After three minutes the eggs are light in color and doubled in volume.
DSC_0577a
After the cookies cool cut into 1/2″ slices.
DSC_0578a
The cookies are placed cut side down on a wire rack set in a baking sheet. Bake until crisp and golden brown on both sides.

DSC_0669a

DSC_0673a


January 19, 2014 Chocolate Dipped Coconut Macaroons

DSC_4413a

The assignment was for a “pick-up” dessert for the wedding shower I was co-hosting with three other friends. Looking for something easy to handle, My mind went first to bar cookies; brownies, blondies, maybe something using a little dulce de leche. Then in the cookbooks and magazines I was looking at I saw it, macaroons, nothing fancy for certain, but a cookie I had been meaning to try.

Macaroons had their ancient roots in amaretti, traditional almond meringue cookies  made from almonds, egg whites and sugar. Possibly originating in an Italian monastery, the name is derived from the Italian “ammacare” meaning to crush or beat, referring to the main ingredient of amaretti, ground almonds.

Tradition says that macaroons arrived in France by way of two Benedictine nuns seeking asylum during the French Revolution. The nuns, referred to as the “Macaroon Sisters” paid for their housing, baking and selling the confection.

Since the leavening in these cookies comes from egg whites, not flour, they were adopted by Italian Jewish bakers as a Passover sweet. The move in later years to shredded coconut was either the product of adventurous bakers or possibly because the almond cookies were often too delicate to transport and coconut made for a sturdier cookie.

The French translation of macaroon is macaron. The macaron is an entirely different cookie with essentially the same basic ingredients. The macarons we have come to be familiar with in the last few years are the multicolored darlings of the Parisian pastry shop. They are an elegant cookie, with a crisp smooth meringue exterior and a filling sandwiched between the layers. Macarons can be filled with jam, fruit curd, ganache or any variation of buttercream.

This recipe is a very easy to make coconut macaroon. The sweetness of the shredded coconut is balanced with the slightly tart dried cranberries and almonds. Like most macaroons, they are gluten free. Though the recipe called for the cookies to be shaped into pyramids, I scooped them out into balls and flattened the bottom. I drizzled bittersweet chocolate over the top, I think they look like little berets. You could also dip the bottoms in chocolate for a neater presentation. The one problem I had with the recipe is a continuation of the ever shrinking package size. The recipe calls for 3 cups or 8 ounces of sweetened shredded coconut. The standard package of that size now is 7 ounce or 2 2/3rds cups. You can decide if you need to buy another bag, I didn’t.  Variations are endless. A tropical version using chopped dried papaya and macadamia nuts drizzled with white chocolate sounds like a delicious possibility to me.

DSC_4403a
Cookies ready to bake on a parchment lined baking sheet.

Chocolate Dipped Coconut Macaroons

Makes about two dozen medium sized macaroons

Ingredients

  • 3 c (lightly packed) sweetened shredded coconut
  • 3/4 c sugar
  • 3/4 c egg whites (about 6 large)
  • 1/3c sweetened, dried cranberries, roughly chopped
  • 1/4c sliced almonds
  • 1 3/4 t vanilla extract
  • 1/4 t almond extract
  • 9 ounces bittersweet (not unsweetened) or semisweet chocolate, chopped
  • 6 T heavy whipping cream


Directions

  1. Mix first 5 ingredients in heavy large saucepan. Cook over medium heat until mixture appears somewhat pasty, stirring constantly, about 12 minutes. Remove from heat.
  2. Mix in 1 1/2 teaspoons vanilla extract and 1/4 teaspoon almond extract. Spread out coconut mixture on large baking sheet. Refrigerate until cold, about 45 minutes.
  3. Preheat oven to 300°F. Line another baking sheet with parchment. Press 1/4 cup coconut mixture into pyramid shape (about 1 1/2 inches high). Place on prepared sheet. Repeat with remaining coconut mixture. Bake cookies until golden, about 30 minutes. Transfer cookies to rack and cool.
  4. Set cookies on rack over rimmed baking sheet. Stir chocolate and cream in heavy medium saucepan over medium heat until melted and smooth. Remove from heat. Mix in remaining 1/4 teaspoon vanilla extract. Spoon glaze over cookies, covering almost completely and allowing chocolate to drip down sides. Refrigerate until glaze sets, at least 2 hours. (Can be made 1 day ahead. Transfer cookies to airtight container and keep refrigerated.)

DSC_4420a

February 2, 2012 Year of the Dragon Cookies

For the past six years we have been celebrating Chinese New Year with a small group of friends. Chinese new year  begins with the second new moon after the winter solstice, during those typically snowy days that  occur after Christmas and before the spring thaw. In 2012, Chinese New Year of 4710  began on January 23rd. Because of schedules and other commitments we will be having our Chinese new year dinner in February.  The Chinese calendar is represented with twelve animals. Chinese legend recounts the story of the animal kingdom in a race to meet the earth god, and the first twelve animals were rewarded with their own year, hence a twelve year cycle. We have celebrated the year of the dog, pig, rat, ox, tiger, rabbit and 2012, the year of the dragon. Each year I make ginger cookies in the shape of that year’s animal.

Ingredients ready for the food processor. This dough could also be made in a stand mixer.

Gingerbread dough is rolled between wax or  parchment paper and chilled before cutting out desired shapes.

I purchased my dragon cookie cutter from cheapcookiecutters.com

Cookies are baked on parchment lined sheets spaced out to allow them to puff up.

Gingerbread Cookies -adapted from Cooks Illustrated

  • 3 cups all-purpose flour
  • 3/4 cup firmly packed dark brown sugar
  • 1 tablespoon ground cinnamon-I prefer the Chinese Tung Hing variety from Penzey’s
  • 1 tablespoon ground ginger
  • 1/2 teaspoon five spice powder
  • 1 tablespoon white pepper
  • 1/2 teaspoon salt
  • 1 teaspoon baking soda
  • 12 tablespoons unsalted butter cut into 12 pieces and softened slightly
  • 3/4 cup unsulphured molasses
  • 3 tablespoons milk or cream

1. Process flour, sugar, cinnamon, ginger, five spice powder, white pepper, salt, white pepper and baking soda in a food processor fitted with the metal blade until combined, about 10 seconds. Scatter butter pieces over the flour mixture and process until mixture resembles fine meal, about 15 seconds. Add the millk and molasses in a constant stream while the machine is running, process until dough is evenly moistened and forms a soft mass, about 10 seconds.

2. Scrape dough onto work surface, divide in half. Working with one portion of dough at a time, roll 1/2 inch thick between two large sheets of parchment or wax paper. Place rolled dough on a cookie sheet and chill in freezer for about 15-20 minutes, until firm.  If time allows, refrigerate the dough overnight.

3. Adjust oven racks to upper and lower middle positions and heat oven to 350 degrees, I used 325 at the convection setting. Line several cookie sheets with parchment paper.

4. Remove one dough sheet from the freezer, place on work surface. Peel off the top and bottom sheets of wax paper. Cut dough into desired cookie shapes and transfer the cookies to the lined parchment sheets, a thin metal spatula will do this nicely. Space cookies out enough for them to expand while baking, about an inch apart. Re roll scraps, freeze again if too soft, then cut out remaining cookies. Bake cookies until set in centers and dough barely retains imprint when touched very gently with fingertip, 8 to 11 minutes. Rotate cookie sheets front to back and top to bottom halfway through baking time. Do not over bake. Cool cookies on sheets for about 3 minutes before moving them with a metal spatula to cool to room temperature.

Additional notes-if you like your cookies spicier, another tablespoon of either black or white pepper could be added, I have even added a teaspoon or so of fresh ginger on occasion. I also like to chill my unbaked cookies before baking so they don’t turn into amorphous blobs! Light or dark brown sugar could be used, unless you just bought your sugar, it may need a minute or so in a bowl covered with a moist paper towel to soften it.