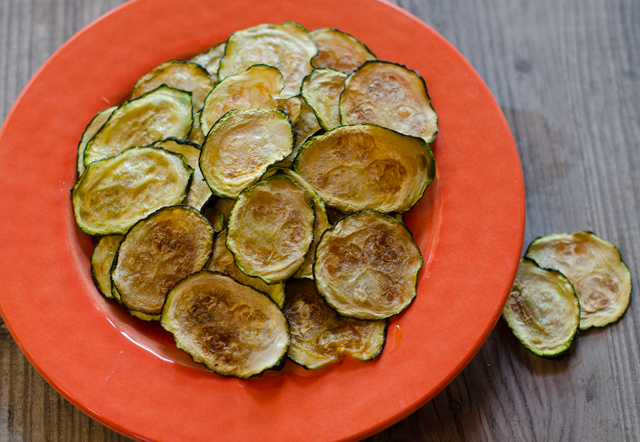
Fellow vegetable gardeners, we’ve all done it. You diligently pick small to medium-sized zucchini, sometimes even with the blossom still in tact. Then it happens, you get busy doing other things, it rains for several days or you just forget. The once compact little fruits now resemble a major league baseball bat. If you are running out of ideas, zucchini chips are a quick and easy way to use up “the ones that got away”.
This recipe works best with medium to large zucchini because the chips shrink as they bake. Slice into 1/8 inch rounds, a mandolin works best here for uniform slices. Place the slices on paper towels and top with another layer of paper towels. Press down lightly to remove excess liquid. Move the slices to parchment lined baking sheets that have been lightly coated with olive oil or olive oil spray. I used half sheet pan (18×13) sized trays. Brush rounds lightly with extra virgin olive oil and season lightly with salt or your favorite seasoning blend. Bake in a 235°F oven for about 1 ½ hours, rotating trays at the half way point. If some of the chips are not ready, remove the crisp chips and put the damp chips back in the oven to finish baking. Let the chips cool a bit before devouring. Enjoy warm or at room temperature. Chips can be stored in zip-lock bags, that is, if any are left over.
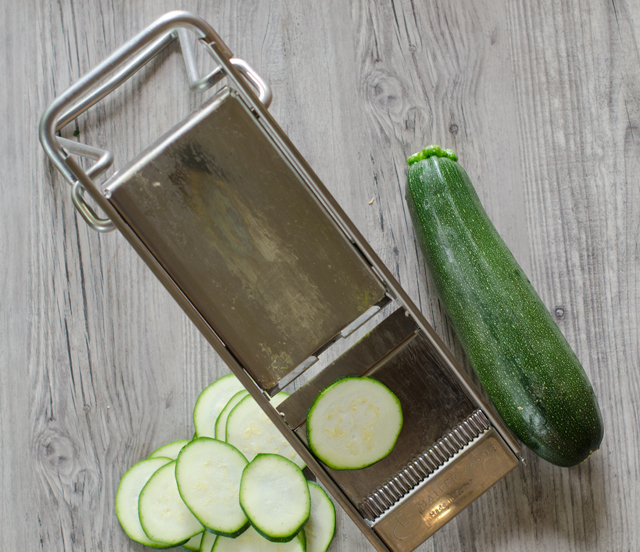
A mandolin is perfect for achieving even slices.
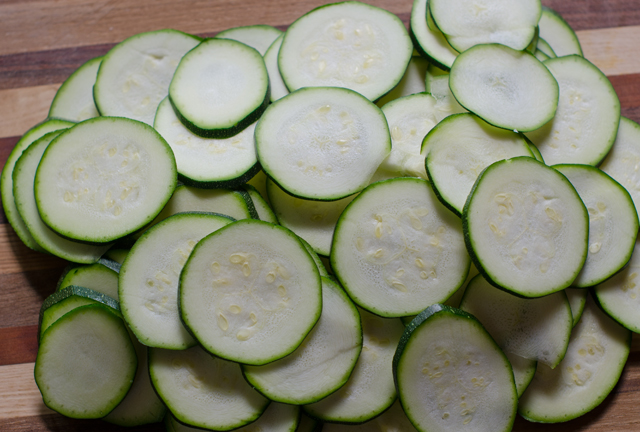
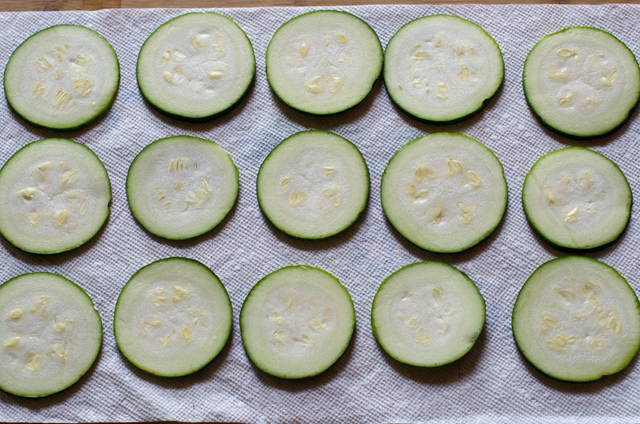
Line zucchini slices on paper towels to blot excess moisture.
Zucchini Crisps
Makes about 80 crisps
Ingredients
2 or 3 medium to large zucchini
Extra virgin olive oil
Kosher Salt and any spice mix
Directions
Preheat an oven to 235°F (convection is best). Cover two large baking sheets with parchment and lightly coat with olive oil or olive oil spray.
Wash and dry off the zucchini and cut off the stem end. Thinly slice (1/8 inch) the zucchini, a mandolin makes this easy.
Lay the slices out on paper towels and cover the slices with a second layer of paper towels.
Press down lightly on the paper towels to blot up excess moisture.
Place the sliced zucchini on the baking sheets, being careful not to overlap.
Brush the slices lightly with extra virgin oil and sprinkle with salt.
Bake until crisp and golden, 1½ to 2 hours, At the halfway point, switch the pans around to ensure even baking.
Our spring vegetable garden includes several varieties of lettuce, spinach, radishes, Japanese turnips, beets, kohlrabi, sugar snap peas and cooking greens. However there is one spring vegetable that we don’t grow that makes my trip to the farmers market worthwhile, fresh local asparagus. Asparagus is a real sign that spring is here. and the season is fleeting. I will serve it roasted, grilled, raw in salads, in stir fries and a new way (at least for me) I heard about from a new “friend”, Alexa.
Alexa is a digital assistant that performs tasks, like turning on Sirius radio when I’m in the kitchen. “Alexa, play Seventies on Seven”. You can ask her the score of the game, will it be sunny today and even turn the lights on if you have the right smart home device. Our Amazon Echo has a screen that always shows the time, weather and rotating news headlines, fun facts and even recipes. One afternoon I noticed that a recipe for oven baked asparagus fries popped up. I was too busy at the time but thought that this was one I needed to try. On line I found many recipes, this is my interpretation of this popular dish.
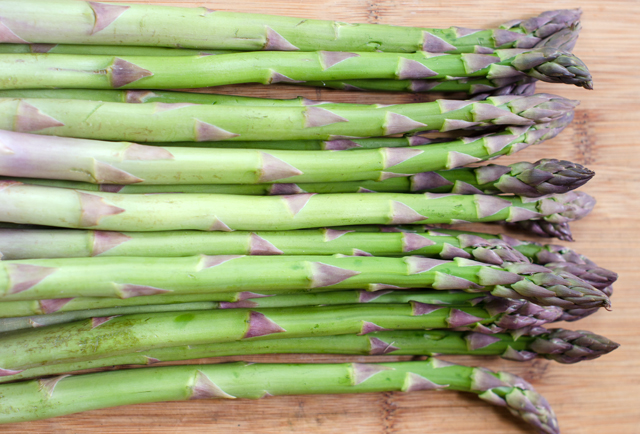
Look for medium-sized asparagus for this recipe, twenty spears weighed about a pound. If you are storing the asparagus for any length of time, leave the rubber band on, trim about an inch off the bottom. Stand the spears up in a jar with about two inches of cool water and cover loosely with a plastic bag.
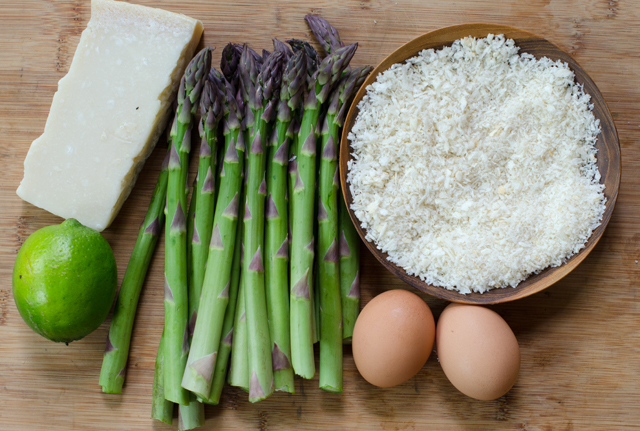
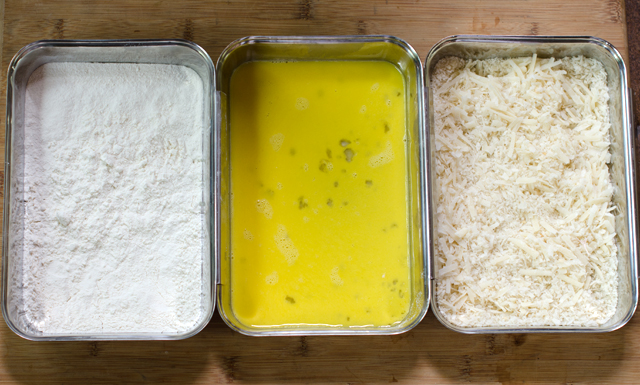
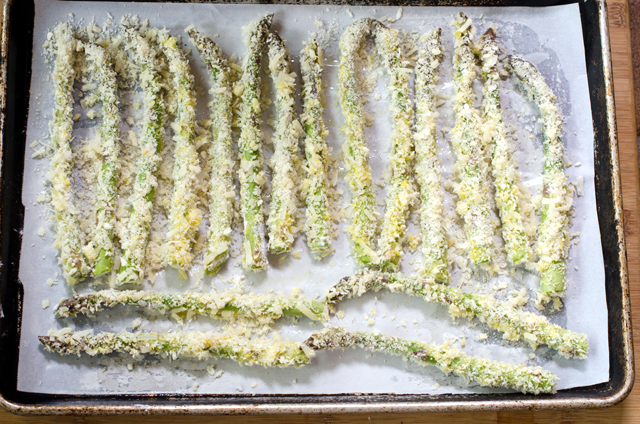
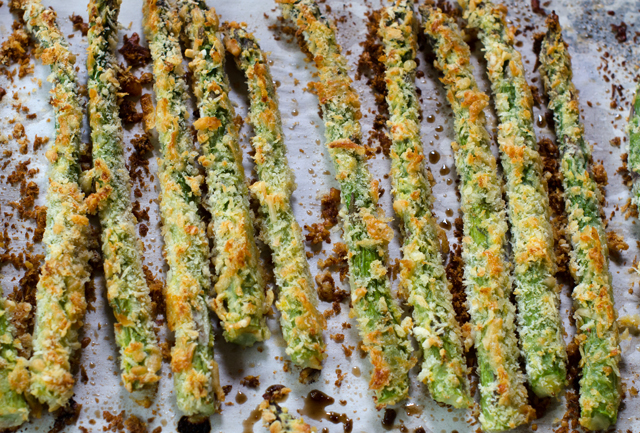
When you are ready to proceed with the recipe, preheat the oven to 425° F. Line a large baking sheet with parchment paper or foil for easy clean up and brush with a tablespoon of oil or coat lightly with cooking spray. Set up your breading station by lining up three containers that are long enough to accommodate the asparagus spears. Place the flour in the first container. Add the beaten eggs to the second container. Combine panko and Parmesan and season with salt and pepper for the third container. Trim off the tough ends and lightly rinse the asparagus. Coat the spears with flour, dip in the egg then turn to coat in the Parmesan panko mixture. Place on baking sheet, lining up in a row but not touching. Lightly coat the spears with olive oil cooking spray. Bake in preheated oven, turning spears over halfway during the cooking process to ensure even baking.
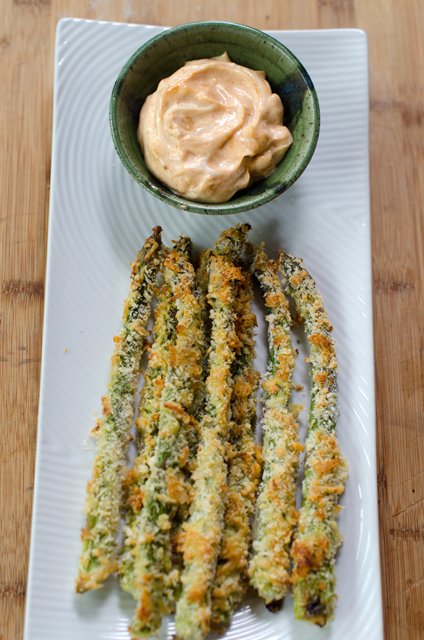
In the category of “in case you didn’t know” panko is a Japanese style white breadcrumb that is light and airy with a texture like crushed corn flakes. You can easily find them in the Asian section of your supermarket. I prefer to only put a third of the breadcrumb mixture in the dredging pan at a time. After you have rolled several eggy spears in the crumbs, they tend to make the crumbs wet, so adding more dry crumbs as needed makes the process easier and neater. Remember the rule of wet hand dry hand. Designate one hand to do the dry steps, flour and breadcrumbs and the other to do the wet step-the egg mixture.These are best served right from the oven. Serve plain or with smoked paprika aioli.
I love my Williams-Sonoma interlocking stainless steel pans for my breading station.Ready to go into the oven.Crispy, brown and delicious!
Baked Parmesan Panko Asparagus Fries
Serves four
Ingredients
1 lb asparagus-medium thickness
½ c or more unbleached all-purpose flour
2 eggs, beaten
1 T fresh lime juice
1 c panko breadcrumbs
1 c freshly grated Parmesan cheese
Kosher salt and fresh ground pepper
Non stick spray or olive oil
Directions
Preheat oven to 425°F. Line a large baking sheet with parchment and lightly coat with a tablespoon of olive oil or olive oil cooking spray.
Rinse the asparagus and snap or cut tough ends off.
In a large bowl stir with a fork to combine the Parmesan and panko
Set up your breading station: line up three shallow bowls or dishes that are long enough to accommodate the spears. Put the flour in the first dish. Place the beaten eggs in the second and lightly beat in the lime juice. Place the Parmesan panko crumbs in the third, season crumbs with salt and pepper to taste.
Dredge the spears first in the flour, dip in the egg mixture and roll in the crumbs to coat on all sides, pressing crumbs in.
Place asparagus on the prepared baking sheet, spears close together but not touching. Coat lightly with olive oil cooking spray.
Bake the asparagus until browned, crisp and crunchy, about 10-12 minutes. Flip spears over halfway through the cooking time for even baking.
Serve immediately with smoked paprika aioli or your favorite dipping sauce.
Smoked Paprika Aioli
Makes about a cup
Ingredients
4-5 cloves roasted garlic
¾ c mayonnaise (homemade or prepared)
1 t smoked paprika
1 t fresh lemon juice
Kosher salt and freshly ground pepper
Directions
To make roasted garlic, cut off top third of a head of garlic, drizzle with olive oil, wrap in foil and bake in a 375°F oven for about 40 minutes or until garlic is soft and brown.
With a fork, mash 4-5 roasted cloves in a medium bowl. Add mayonnaise, smoked paprika, lemon juice and whisk to combine. Adjust seasonings and salt and pepper to taste.
Refrigerate for at least an hour to meld the flavors.
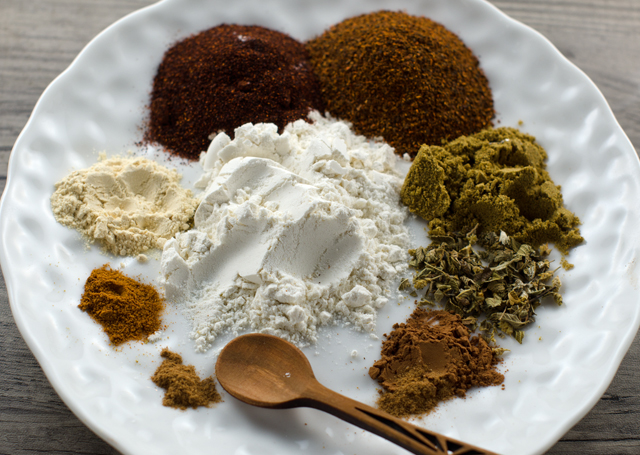
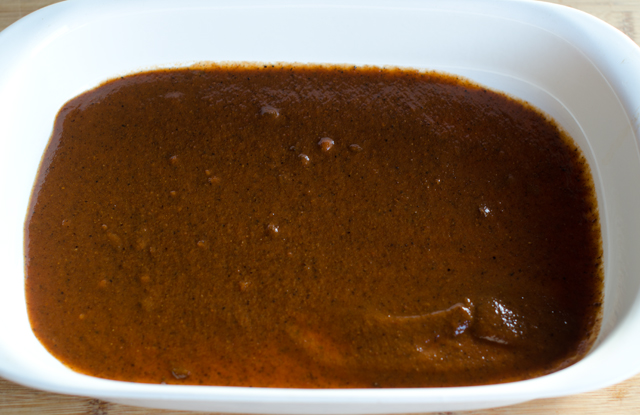
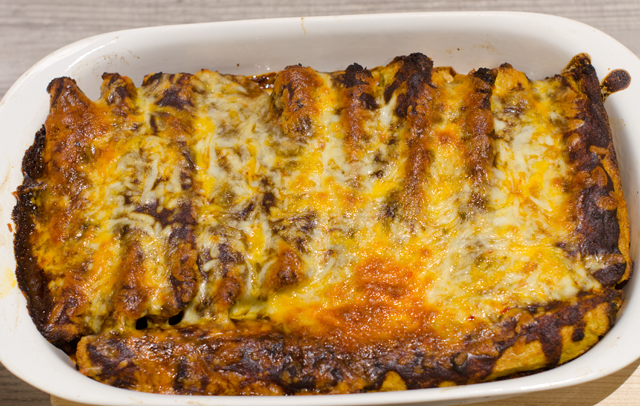
Now that I’ve mastered the cauliflower tortilla I thought it would be fun to try them in a chicken enchilada recipe. The “caulitillas” are just about the same size as a corn tortilla and not delicate as I was originally concerned, but very pliable and sturdy. Of course corn tortillas are what you would typically use and would be fine in this recipe. You can buy enchilada sauce in the supermarket but it’s quick and quite simple to make your own. You also can control the heat to your own taste. My advice would be to start out on the safe side with the amount of chili powder you add, you can always add more, it’s harder to tame the heat. I used a combination of regular and chipotle chili powder for its smoky quality. Measure out your ingredients before you start the recipe because you will be busy whisking to ensure a smooth sauce.
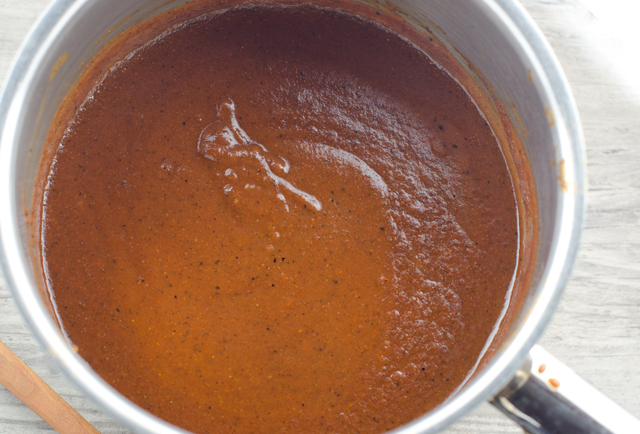
Heat the oil in a medium saucepan until it begins to sizzle. Add the flour and spices, whisking constantly until the spices become fragrant and deepen in color. Add tomato paste, tomato sauce and chicken stock and continue to whisk constantly to remove any lumps. Allow the sauce to come to a simmer, it will begin to thicken slightly. Taste sauce and adjust seasonings to your liking.
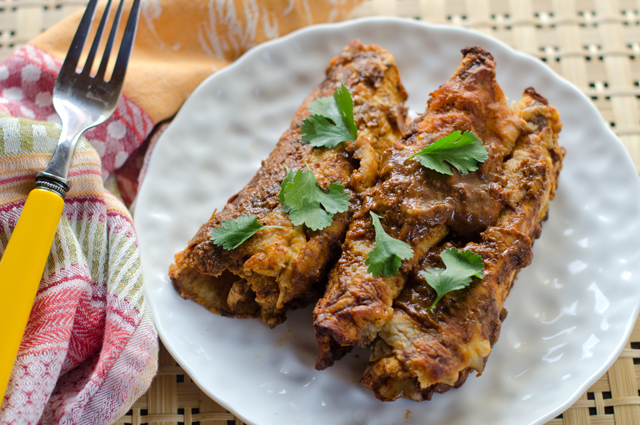
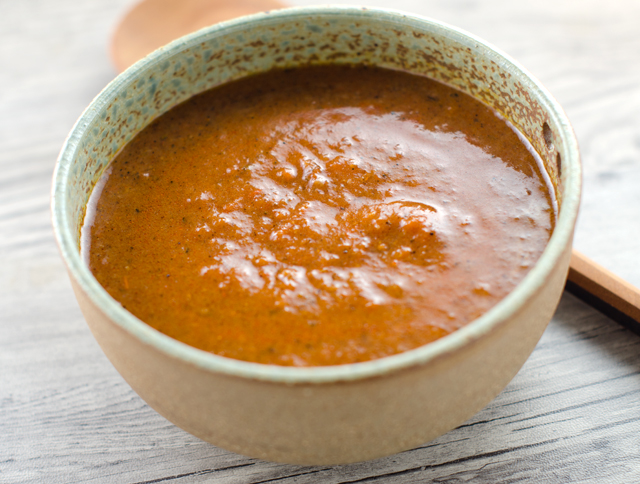
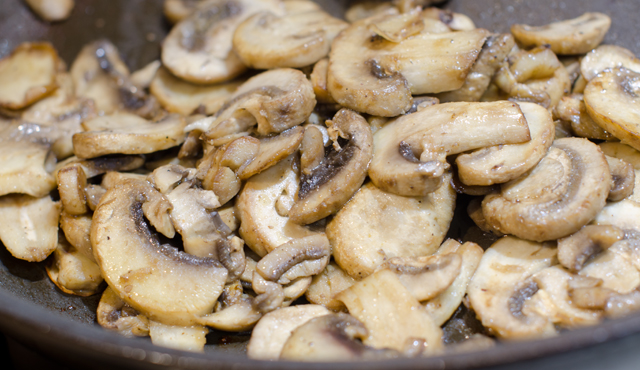
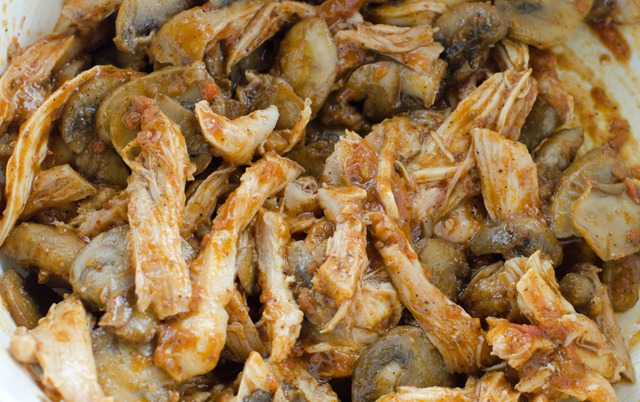
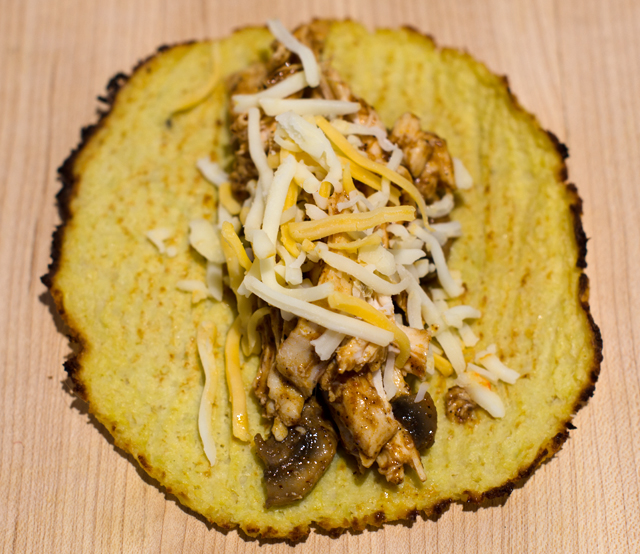
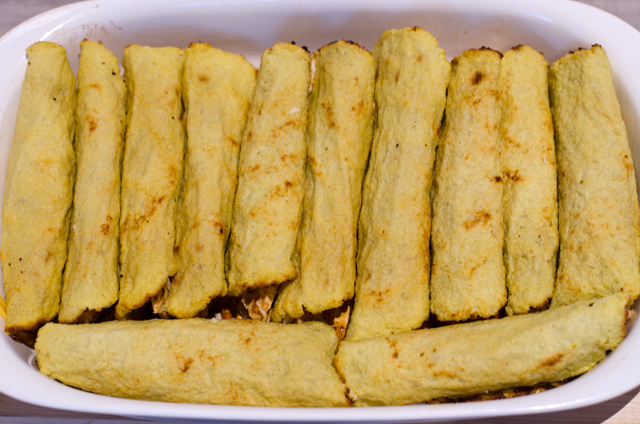
Now it’s time to assemble, you should have ready, a 9 x 13 inch baking dish, the tortillas, the warmed filling, the warmed sauce and shredded cheese. I chose to make a filling of shredded chicken and sautéed mushrooms but this sauce would be good with many filling combinations. Many recipes call for dipping the tortilla in the chili sauce. I thought that was too messy so I just put a thin layer of sauce in the bottom of my casserole dish.
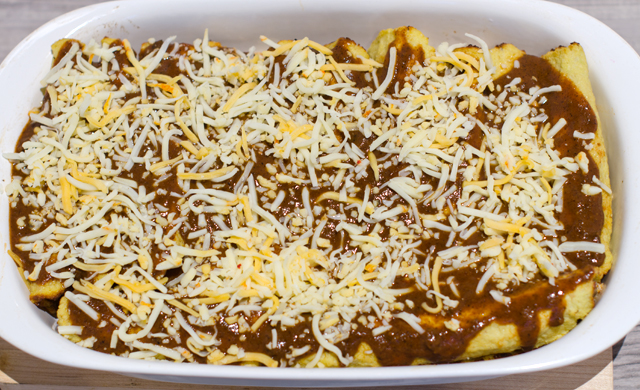
Lay out your tortilla and spread about two tablespoons of the filling down the center. Roll up the tortilla and place seam side down in the baking dish. Repeat with the remaining filling and tortillas. Top with additional sauce and shredded cheese and bake until the cheese is melted. Not the prettiest dish for certain, but definitely delicious. Leftovers heat up nicely.
Spices and flour for the chili sauce.Takes only ten minutes to make a delicious complex sauce.
Chicken and mushroom enchilada filling.Filling the “caulitilla”.A thin layer of sauce on the bottom of the baking dish.Rolled and filled tortillas ready to be topped with sauce.Next the sauce and cheese.Ready to dig into!
Chicken Enchiladas
Makes 10-12
Red Enchilada Sauce
Makes about 2½ cups
Ingredients
2 T vegetable oil (I used avocado)
2 T all-purpose flour
3 T chili powder-I used 2 T regular and 1 chipotle (Penzey brand)
1 ½ t ground cumin
½ t dried oregano (Mexican is best)
½ t kosher salt
1/8 t cayenne pepper
¼ t cocoa powder
pinch of cinnamon
3 oz tomato paste
2 c chicken or vegetable broth
½ to ¾ c tomato sauce
Directions
Measure out the flour and the spices into a small bowl. Whisk to combine.
In a medium saucepan over medium high heat, warm the oil until it begins to sizzle.
Add the flour/spice mixture and whisk constantly. Cook until fragrant and darkened in color.
Whisk in the tomato paste and sauce until thoroughly combined with the flour/herb mixture. In a steady stream, whisk in chicken broth.
Reduce heat to medium and let sauce come to a simmer. Cook 8 to 10 minutes, sauce will thicken slightly. If not using immediately you may need to thin it out with a little stock or water.
Remove the sauce from the heat and let cool slightly. Add salt and freshly ground pepper to taste.
Coat the bottom of the baking dish with a thin layer of the sauce.
Set up an assembly line to make the tortillas: corn or cauliflower tortillas, chicken mushroom filling, cheese and sauce.
Lay out a tortilla and place about 2 generous tablespoons of the filling down the center of the tortilla. Sprinkle a little cheese on top. Roll it up with your fingertips and place in the baking dish, seam side down. Continue rolling and filling the rest of the tortillas.
Pour the remaining sauce over the enchiladas and sprinkle with the remaining cheese. Bake for 20 minutes and serve immediately.
In addition to the gardens, we have a small orchard that includes a pear, apple, persimmon, Asian pear and most recently, fig trees. We are usually so busy harvesting from the garden that the orchard is all but forgotten and most of the fruit that falls from the trees goes to the deer. The persimmons are Cody’s special treat, I can honestly say I don’t understand that at all. The Asian pear is the most productive of the trees and this year I wanted to find a different way to use the fruit. Several years ago I canned about a half dozen jars of Asian pear chutney, this time I was looking for something new. My inspiration came at the local farmers market. A local orchard was selling dehydrated apples. Why not Asian pears?
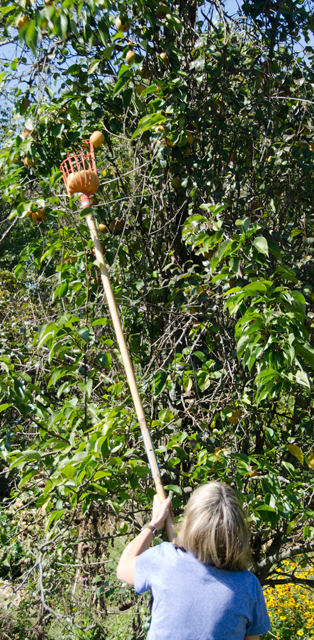
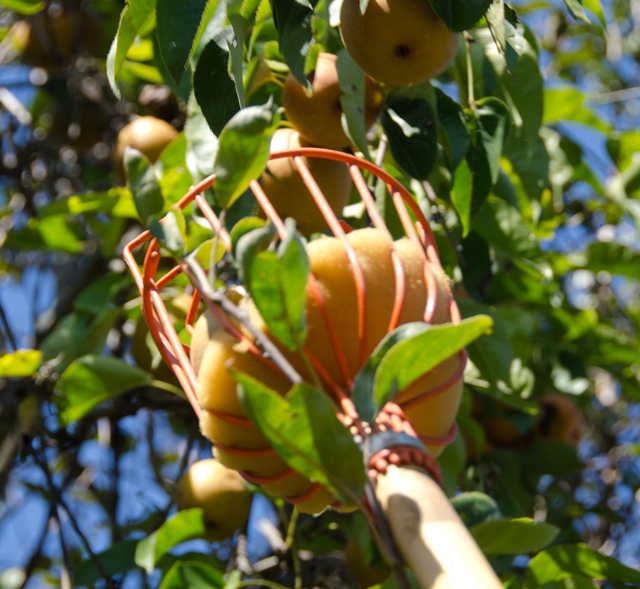
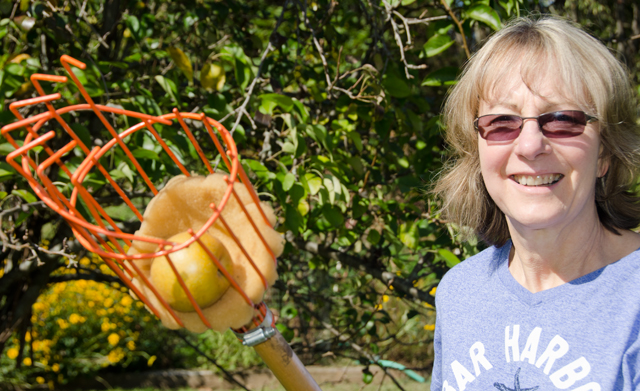
The task at hand now was to pick the pears. Some were accessible by hand, for the pears that were higher up the tree I needed a different approach. I turned to the aptly named fruit picker, a wire basket attached to a long pole. There are bent prongs at the top of the basket that allow you to pull the fruit off the branch. The bottom of the basket is cushioned with foam to prevent the fruit from bruising.
The Ball canning book states that drying food is easy but may require some trial and error. Various factors, the quality of the produce, drying methods, pretreatment techniques and climate can all affect the finished product. So it is necessary to follow the general guidelines and then make the necessary adjustments.
Successful home dehydration depends on three factors: heat, enough to force out moisture but not enough to cook the food, dry air, to absorb the released moisture and air circulation, to move the moisture away.
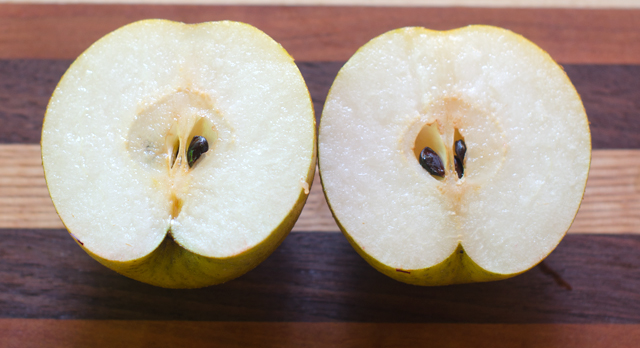
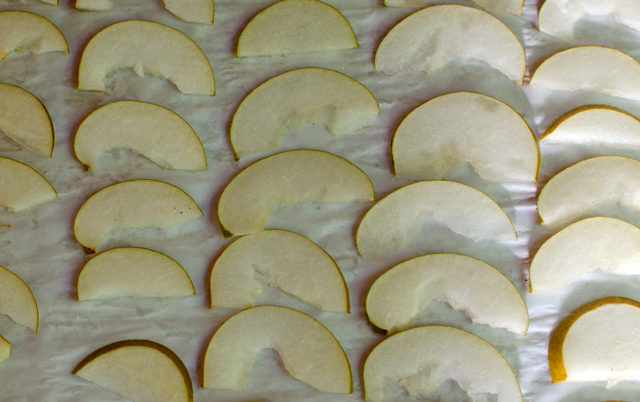
I started by washing and drying just a few pears, since this was just a test batch. I don’t own a dehydrator, but the lowest heat on our convection oven is 140°F, only 5 degrees higher than the recommended temperature of 135°F. I lined two large half-sheet pans (18″ x 13″) with parchment and began slicing the pears. Since the Asian pears from our tree were relatively small, I wanted to maintain the largest piece possible. I cut the pears in half lengthwise through the core and removed any blemishes. I discovered a melon baller was the right tool to scoop out the core.
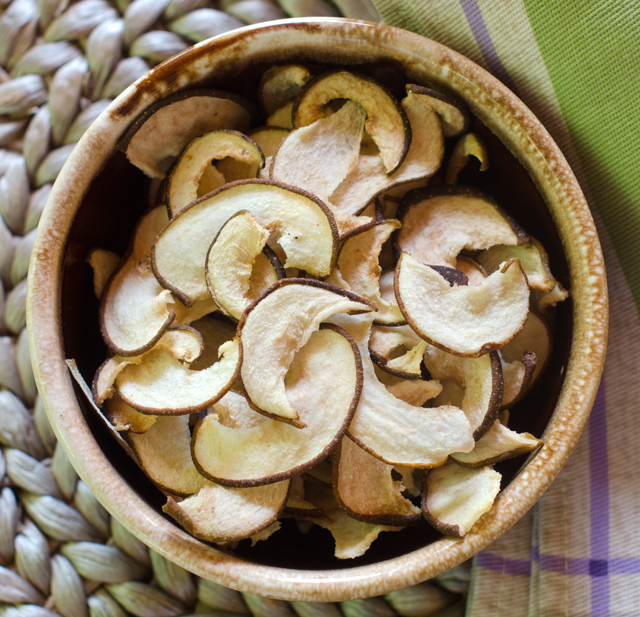
To peel or not to peel? That was the next question and for the first batch I decided not to. Another step that is optional is dipping. Dipping the fruit in diluted lemon juice prevents oxidation, which turns the fruit brown. I sliced the fruit with a sharp knife, about an quarter of an inch slice and spaced them evenly on the baking trays. I baked them in the convection oven for 5 hours, rotating the trays half way through the drying process. Then I turned the oven off and left the trays in the oven overnight. I was very pleased with the results. Most of the pieces look like slices of a mushroom cap and I will continue not peeling them. Asian pears are super sweet and drying them intensifies the sweetness. The consistency should be pliable, not crisp with no moisture pockets. Your time may vary, so check frequently. Great for snacking, store the pear chips in quart bags in the fridge and freezer.
Using the fruit picker.Success!
Dehydrated Asian Pears
Makes 70-80 pieces
Ingredients
4-5 Asian pears
Dipping solution of 1 c lemon juice to 1 qt water to prevent oxidation (if desired)
Directions
Place oven racks in upper and lower positions. Preheat convection oven to the lowest setting possible, 140°F in my case.
Line two half sheet pans with parchment paper.
Wash and dry pears, peel if desired. Remove any blemishes. Cut the pears in half lengthwise. Remove the stem and core. I found a melon baller worked well. Slice pears with a mandolin or sharp knife into ¼ inch pieces.
Soak fruit in dipping solution if desired, no longer than 10 minutes. Drain before drying well with paper towels.
Evenly space out the slices on the baking trays and dehydrate for about 5-6 hours. Leave in turned off oven overnight. The slices should be pliable and chewy with no moisture pockets.
Store in plastic quart bags in the refrigerator or freezer.
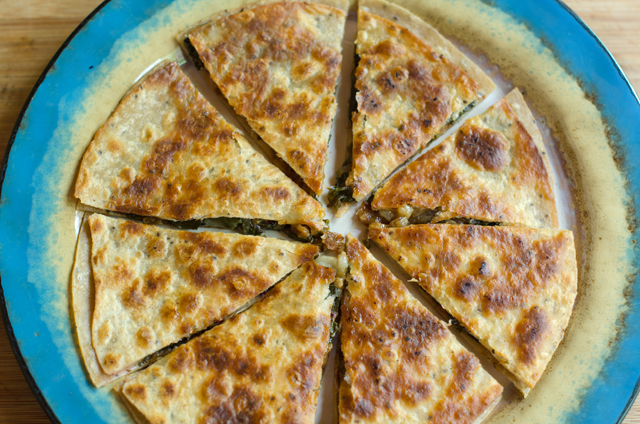
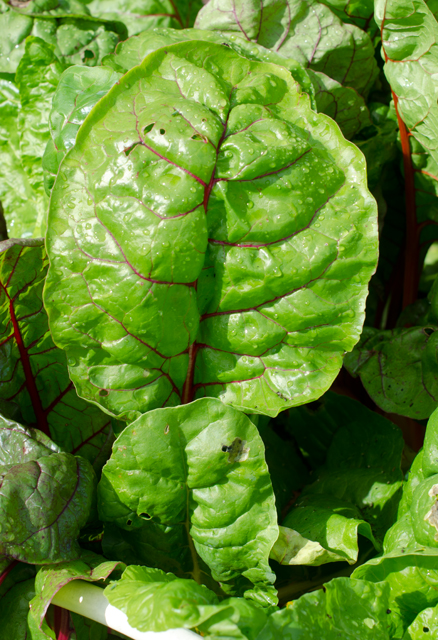
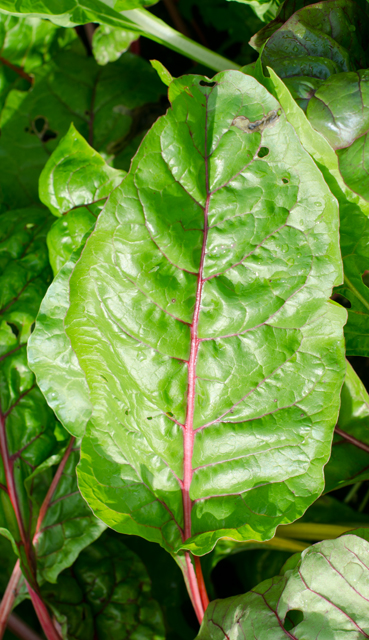
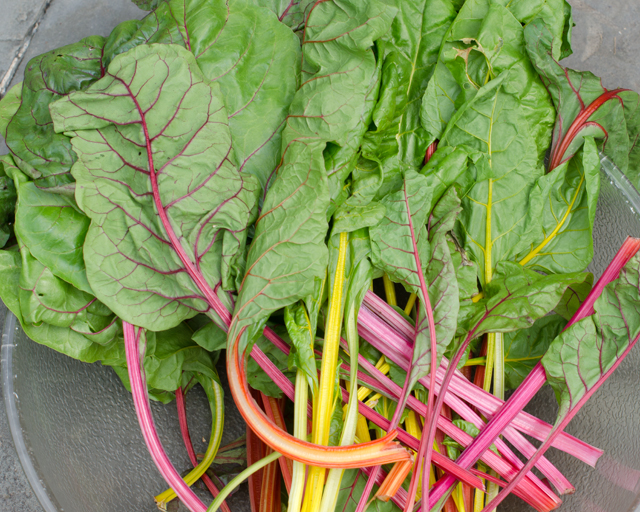
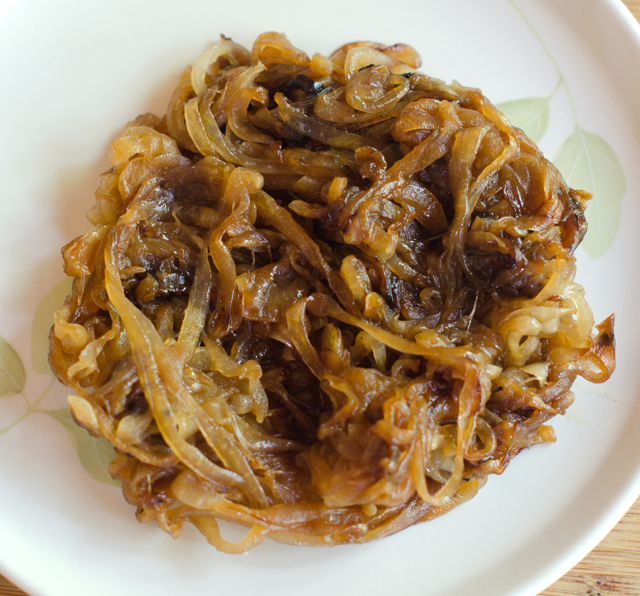
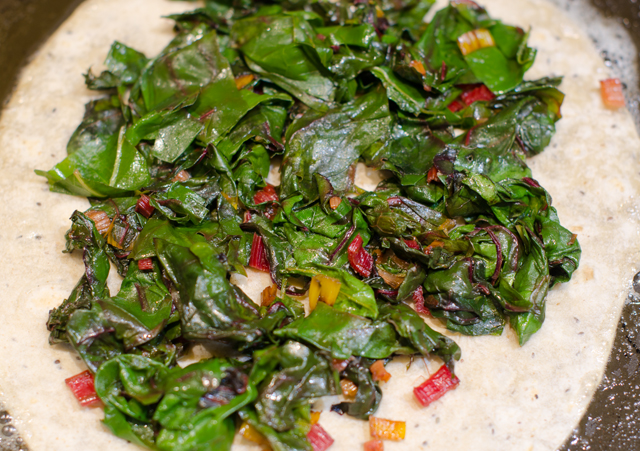
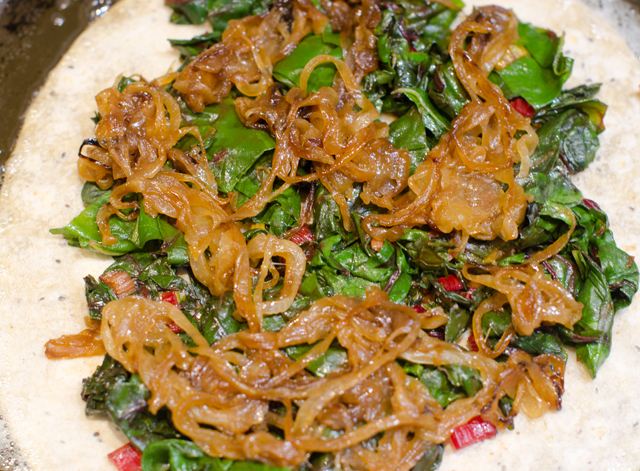
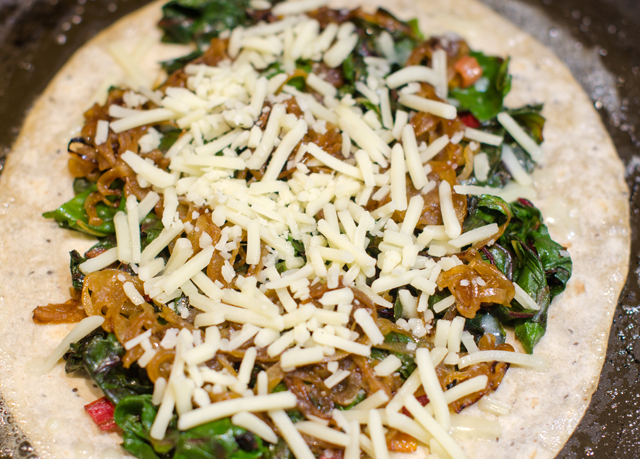
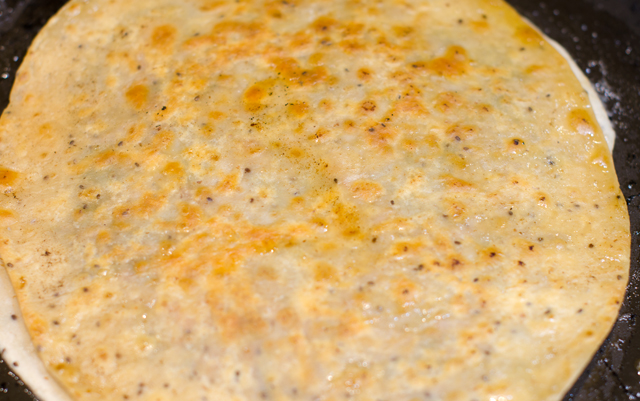
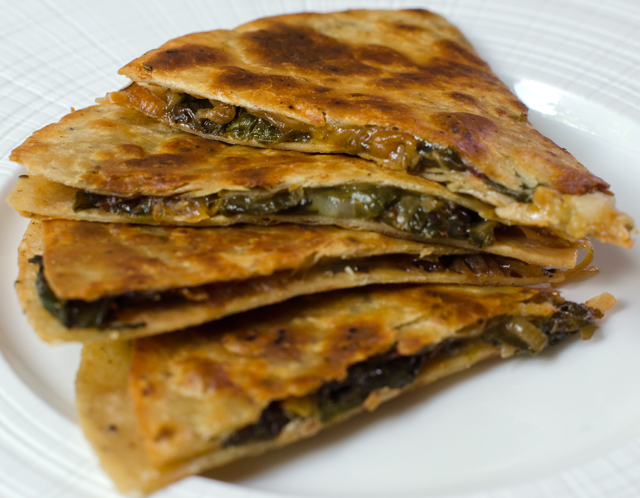
Tuesday evening is Joe’s night to work late and although we don’t sit down for dinner when he comes home, I like to have a little snack ready. We sip a little wine, catch up on the days activities, maybe watch some television in the kitchen. This quesadilla was inspired by what I had in the fridge and the garden that summer evening. I have used spinach in a quesadilla in the past, why not some Swiss chard this time? A little sweet onion, sautéed until caramelized would be a good contrast to the earthy flavor of chard. All I needed now was a wrapper and some queso. I didn’t have tortillas on hand but I did have some sandwich wraps that could fill in. I always have several varieties of cheese in the fridge, the sharp flavor of cheddar worked well here.
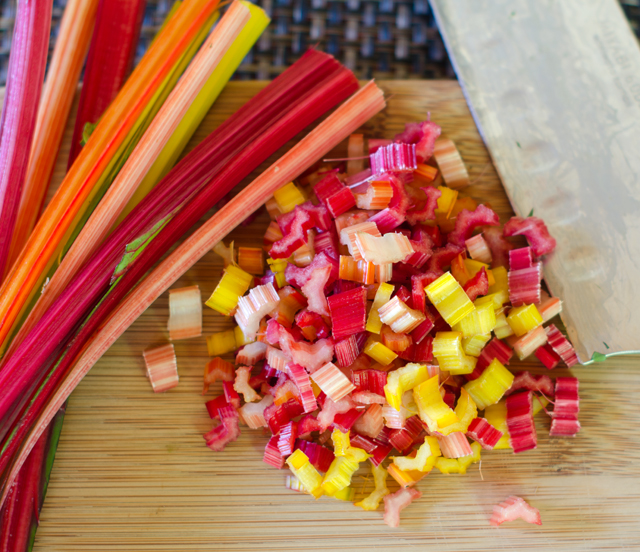
We are still in the process of thinning the chard plants out. They are supposed to be 9-12 inches apart so it didn’t take long to pick what I needed. The chard is still relatively young so it wouldn’t need the long cooking that late summer chard does. I discuss basic chard preparation in this post. I also used some of the finely chopped stems for texture and their brilliant color.
I think a sweet onion works best with this flavor combination. I used a Vidalia, but whatever variety your market is featuring this week is fine. Sweet onions are low in pyruvic acid, the component that makes your eyes tear. I recently read that one of the best ways to store Vidalias is wrapped separately in a paper towel and stored in the refrigerator. I will be trying this method out.
If you are making a quesadilla you can’t forget the queso. If you prefer not to use cheddar, a Jack cheese would be a good choice too. I served the quesadillas plain, sour cream or a tomatillo salsa would be a good accompaniment. Next time I might add a few slivers of pickled jalapeno to the mix. Cooked black beans would be a good addition or some sautéed mushrooms. This recipe is just based on what I had on hand that evening. Golden crisp on the outside with healthy greens, a little sweetness from the onion with the creaminess of cheddar, this is a winning combination for a quick and delicious light meal or snack.
Swiss Chard Quesadillas
Makes two 8″ quesadillas
Ingredients
16-18 medium to small chard leaves
1 medium sweet onion
Extra virgin olive oil
Butter
Tortillas or wraps
½-1 cup shredded cheese, I used cheddar, mozzarella or jack works too
Directions
Wash chard leaves in several changes of water. Separate the chard leaves from the stems. Chop the leaves roughly. You should have 5 cups loosely packed leaves and ½-1 cup finely diced chard stems.
Heat a tablespoon of olive oil in a 10 inch non stick skillet over medium high heat. Add stems and a sprinkle of salt and cook until softened, 3-4 minutes.
Add the chard leaves and the water that still clings to the leaves and cook until wilted. Add a tablespoon more of water if necessary to wilt the leaves. Move stems and leaves to a plate and keep warm.
Slice a medium onion very thinly, a mandolin or food processor is good for this. You should have 3 cups loosely packed thin slices.
Wipe out the pan, add another tablespoon of oil and heat over medium high heat, cook onion until softened and brown. Reduce heat to medium if necessary. This should make about 1 cup of caramelized onion.
Let the skillet cool off a bit and wipe out with a paper towel. Over medium high heat melt a teaspoon or so of butter and a little olive oil. When the butter is melted, add the first wrap or tortilla, spread out one half of the chard over this as evenly as possible.
Evenly spread the cooked onions over the chard and then sprinkle the cheese over. Place the second wrap over the cheese and press down with your hand or a spatula to melt the cheese and make it adhere.
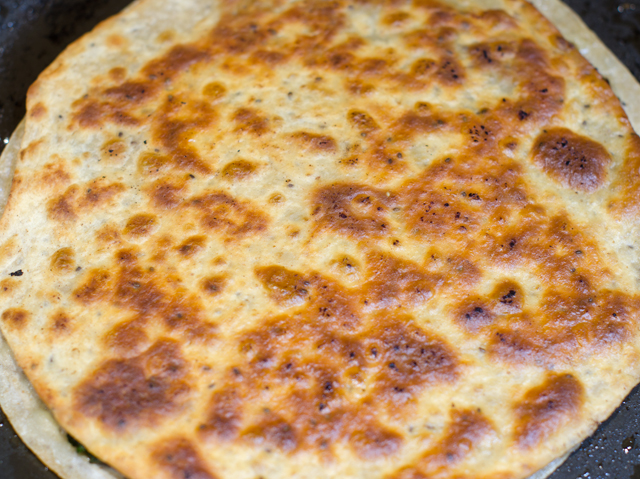
Cook for 2-3 minutes on the first side, it’s okay to peek to make sure it isn’t browning too much. With the help of the spatula, flip and cook on the other side, about 2 minutes, adding a little more butter and oil if necessary.
Move the quesadilla to a platter and keep warm, repeat cooking process with the second quesadilla. Cut quesadillas into wedges 4 to 8 pieces as desired. Serve warm.
Chop the stems.Sweet onion sautéed until golden brown.Sautéed chard and stems are first to go on.Then the sautéed onion.Then a sprinkling of cheese.A second tortilla or wrapper in my case, goes on top. Press down to help the cheese adhere. This was taken after this first quick flip.Let it get golden brown.
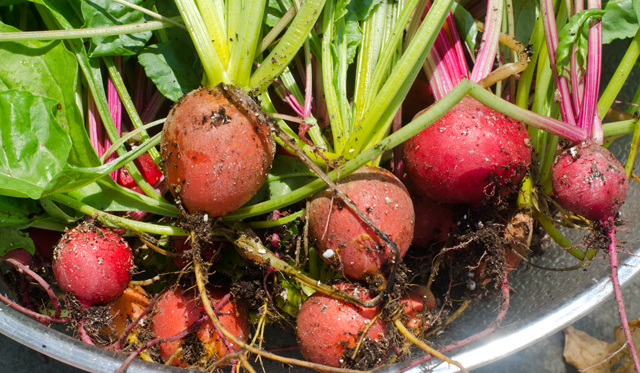
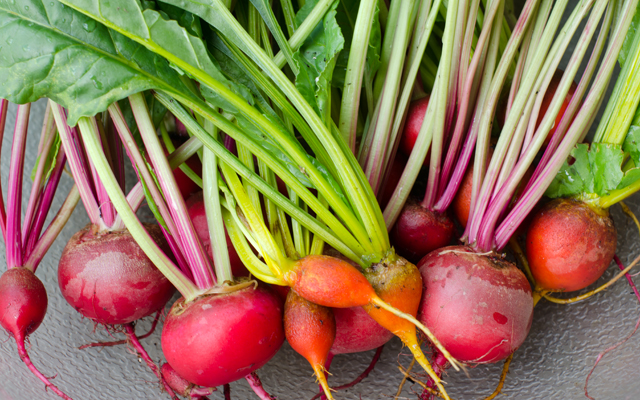
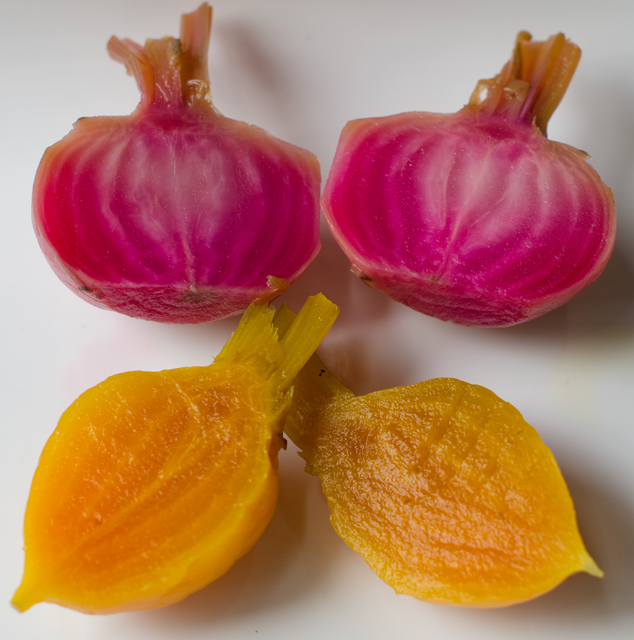
The hot days of July are upon us so it’s time to harvest the root crops planted in early spring. that are still in the ground. We said good-bye to the radishes several weeks ago after the first heat wave of the summer. Warm temperatures cause radishes to bolt and become woody in texture. They will be planted at the end of summer for a fall harvest. The first planting of Japanese turnips have been harvested and now it’s time to harvest the rest of the beets.The”life cycle” of our beet consumption began with very small thinnings we add raw to our salads. The second thinning produces slightly larger leaves the size of spinach that are sautéed in olive oil with a little garlic and red pepper flakes for a wonderful side dish. Baby beets are sliced as thinly as possible or julienned and added to green salads.The Chiogga beets look pretty in salads, a slice looks like a candy cane bulls-eye and the Golden beets bring a pop of bright yellow.
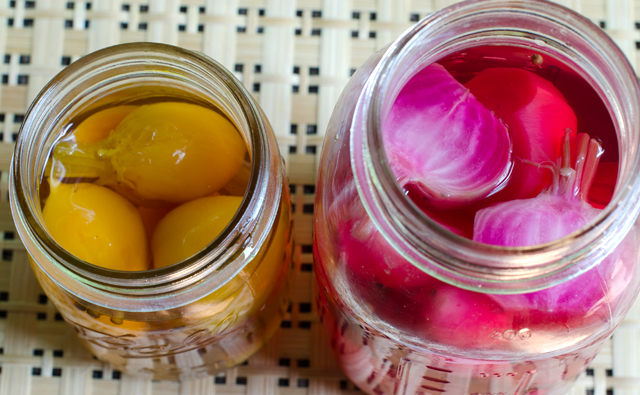
I love beets, especially pickled ones. I have canned pickled beets in past summers for long storage, this year I thought I would make refrigerator pickles. Quick pickled baby beets couldn’t be simpler to make. These refrigerator pickles require very little prep and they are ready to eat after a few hours in the brine. Divide your beets by colors or they will bleed into each other. The brine is a touch sweet with a little spice. These pickles will last for several months in the refrigerator.
Just picked beets from the garden.After a good clean up.
Quick Pickled Baby Beets
Makes 2 pint jars
Ingredients
1 lb baby beets, separated into colors
1 c white wine vinegar
2 t kosher salt
½ c sugar
2 T honey
Fresh ginger slices
1 t coriander seed
1 t black peppercorns
Trimmed and ready for pickling.
Directions
Wash beets well, trim off the leaves and leave about an inch of stem on the beets. Separate beets into colors if you don’t want them to bleed into each other.
Bring a medium pan of water to a boil. You can put all the beets of one variety in the pan, start checking the smaller beets at the two minute mark. Beets should be easily pricked with the tip of a knife, larger beets will take a few more minutes.
Drain beets well in a colander. Place in a heat proof container like a canning jar, separating out the varieties.
Combine vinegar, salt, sugar, honey and spices and bring to a boil. Pour the hot canning liquid over the beets and set aside to cool. Once cool, store in the refrigerator.
One of the highlights of last summer was our trip to the Food and Wine Classic in Aspen Colorado. It is touted as America’s premier culinary event, and certainly lived up to those expectations. We enjoyed three days of cooking demonstrations, wine tastings and best of all, the grand tasting pavilion. It was there that we, and 5000 other fanatical foodies sipped, savored and sampled our way around the massive white tents. One area we were certain to stop at during each grand tasting was to sample the offerings of Food and Wine magazines best new chefs. Everything we tried was imaginative and delicious as well. Not coincidentally, the July issue of Food and Wine magazine offered recipes from each of these up and coming chefs.
With memories of the wonderful small plates we enjoyed at the classic, it was time to try some of their dishes for ourselves. This summer I tried the rather ambitious, summer squash with lemon curd and citrus vinaigrette from chef Brad Kilgore. Joe was more interested in the Tuna Poke on Nori Crackers. This very simple version is from Ravi Kapur, chef at Liholiho Yacht Club, a San Francisco restaurant with Hawaiian, Indian and Chinese influences.
If you are not familiar with it, poke, pronounced POH-keh is a raw fish salad. Poke, means chop or chunk, which refers to the bite sized pieces the fish is cut into. It is commonplace in Hawaii, found everywhere from the deli departments of grocery stores to fine dining establishments.
The first time we tried it just for ourselves and the poke passed our taste test with flying colors. The nori crackers are a nice “cheffy” touch but speaking on behalf of the cleanup crew, messy and not necessary for the home cook. For this recipe, make the poke with sushi grade ahi tuna from the most reputable vendor you can find. The spicy mayo has only three ingredients, tamari, sriracha and mayo. So it’s very simple, finely chopped tuna, scallion, ginger, jalapeno, tamari and dark sesame oil combined in a bowl and seasoned with salt. Spoon the poke on black sesame crackers, I like the ones from Edward and Sons, easily found in large supermarkets. Dollop or pipe some of the spicy mayo on top. Garnish with some Asian microgreens and a few toasted sesame seeds. We have served it at two parties so far this year, both to rave reviews.
Tuna Poke
Serves 6-8
Ingredients for the Spicy Mayo
¼ c good quality mayonnaise
¼ t tamari
1 t sriracha (or to taste)
Ingredients for the Poke
12-oz sushi grade tuna cut into ¼-inch dice
4 t minced scallions
2 t minced peeled fresh ginger
2 t seeded and minced jalapeno
1 t tamari
½ t toasted sesame oil
Kosher salt
Black sesame crackers
Asian microgreens and toasted sesame seeds for garnish
Directions for the Spicy Mayo
In a small bowl whisk all the ingredients together until smooth.
Directions for the Poke
In a large bowl, fold all the ingredients except the garnishes together; season with salt.
Spoon the poke on the black sesame crackers and dollop with some of the spicy mayo. Garnish with sprouts and sesame seeds.
Inspiration for the recipes at Sue’s Seasonal Palate comes from many sources. Sometimes it’s a magazine article I’ve read, an intriguing recipe from the internet or a dish I’ve recently tried in a restaurant. The latter was the case for this recipe.
Last weekend we got together with some long time friends at a popular brewpub called The Vault. It’s located in a former bank built in 1889 in the historic borough of Yardley Pennsylvania. The owners of the Vault bring their own brand of sophistication to the brewpub concept and have turned it into an experience that is unique. No deafening pop or rock music or a bank of televisions tuned to the latest sports programs, they have chosen to feature live and recorded jazz that enhances the relaxed atmosphere and is more conducive to conversation. The beer is brewed on premises and the offerings from the kitchen are made in-house or sourced locally. Both the kitchen and the brewery are open to view. Though I am more of a wine drinker I really enjoyed the Sweet Potato Ale. The menu includes a nice selection of starters along with sandwiches, interesting salads and pizzas from their wood fired oven. The menu is definitely a cut above the average pub fare and one of their appetizers made me want to recreate it at home.
Our server suggested we start off with an appetizer of buffalo cauliflower to share for the table while we were pondering our other food choices. For a brief history of the buffalo wing we only need to go back to 1964 where they originated in, no surprise here, Buffalo, New York. The story has several versions but the most popular and my favorite, is that one evening, Teressa Bellissimo, co-owner of the Anchor Bar was challenged to whip up a late night snack for her son and his friends. “Mother Teressa” found some large chicken wings that had been deemed too meaty for the stockpot. Bellissimo chopped the wings into two sections, deep-fried them and tossed them with some hot sauce. She served them with celery that was part of the Anchor Bar’s antipasto and some of the house blue cheese dressing. The wings were reported to be an immediate local success and the first official Chicken Wing Day was celebrated on July 29, 1977. Over fifty years later they are a national favorite consumed everywhere from bars, to sporting venues to “competitive eating events” like the Philadelphia Wing Bowl and Buffalo’s annual National Buffalo Wing Festival.
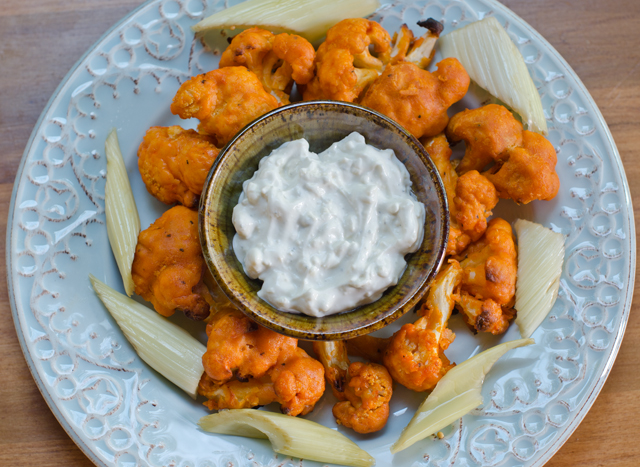
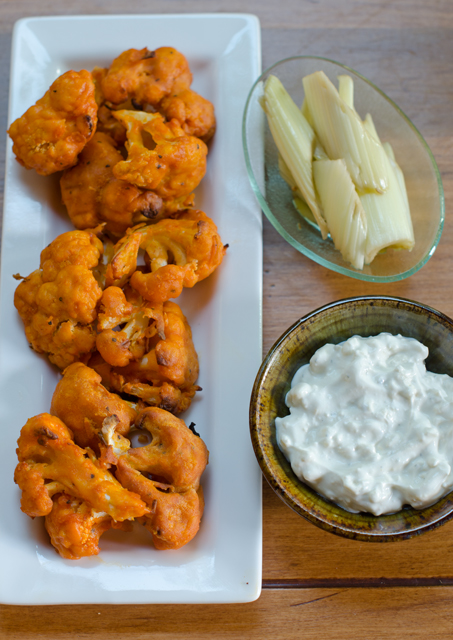
It wasn’t enough for cauliflower to be a substitute for mashed potatoes, couscous and even pizza crust, the versatile vegetable takes the place of chicken wings in this recipe. The Vault’s buffalo cauliflower is described on the menu as buttermilk cauliflower, house buffalo sauce, chive sour cream and the real surprise, sweet pickled celery. The calorie count for six pieces of deep-fried chicken wings at one website I looked at was 616. Though I have nothing against traditional buffalo wings I also thought this recipe was worth the somewhat healthier do-over.
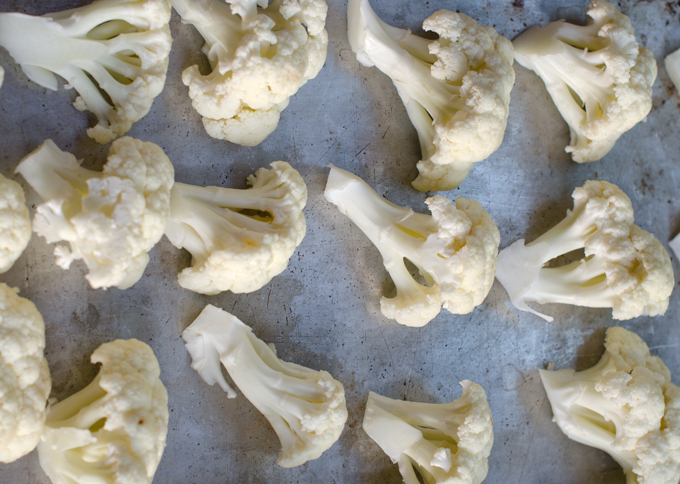
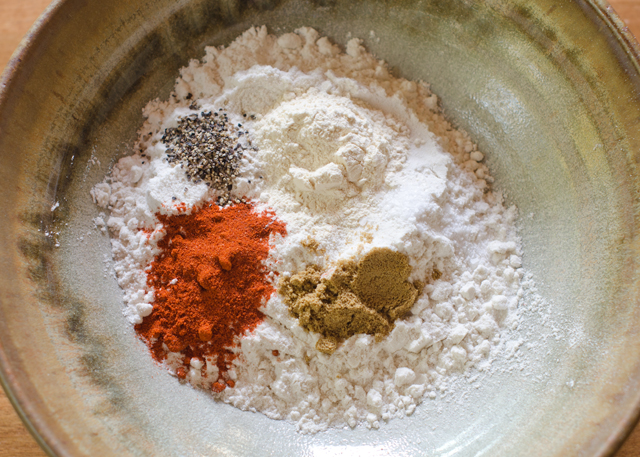
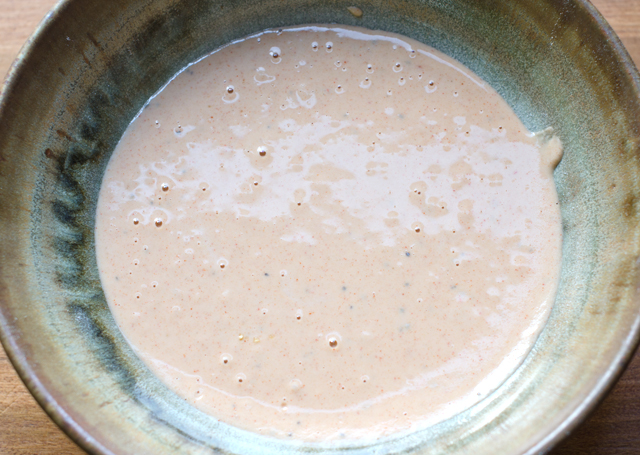
Start with a large head of cauliflower and break into chicken wing size florets. I was aiming for 1½ in by 2½ inches in length, you should have 5 to 6 cups of “wings” and probably more. Some recipes I found called for the cauliflower to be roasted with olive oil, salt and pepper. I wanted the florets to have a bit more substance so I coated the cauliflower with a simple batter of flour, milk and spices. Substitutions can be made here, almond milk for vegans, rice flour for a gluten-free diet. If you use rice flour as I did, you may need to thin the batter out a bit more.
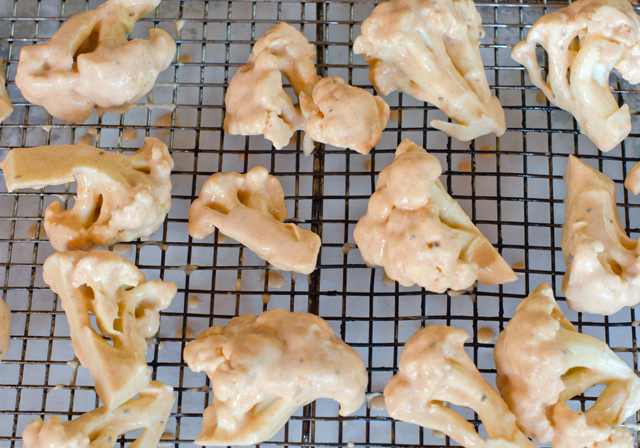
I tried at first to dip the pieces by using the handle at the bottom of my cauliflower “wing”. This turned out to be a very messy approach., It is easier to use tongs to dip the individual pieces in the batter. Dip each piece thoroughly, lift out and allow the excess batter to drip back into the bowl. To minimize clean up, line the baking sheet with foil or parchment. Since several of the blogs I read mentioned excess batter clumping up and sticking to the baking sheet, I chose to place the florets on a wire rack thoroughly sprayed with Pam over the baking sheet. Preheat oven to 425°F, (convection heat) and bake for about twenty minutes or until golden. I flipped the pieces halfway through the baking process.
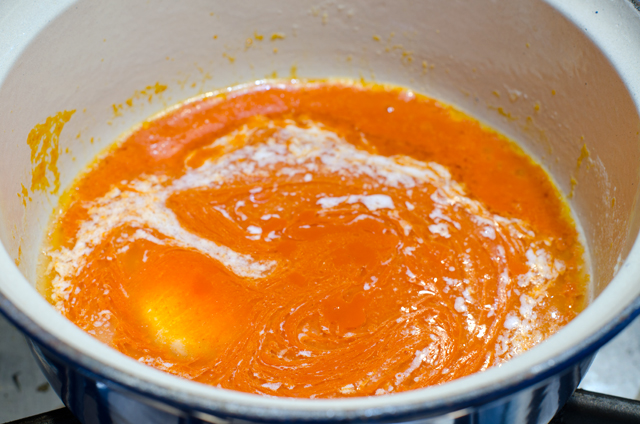
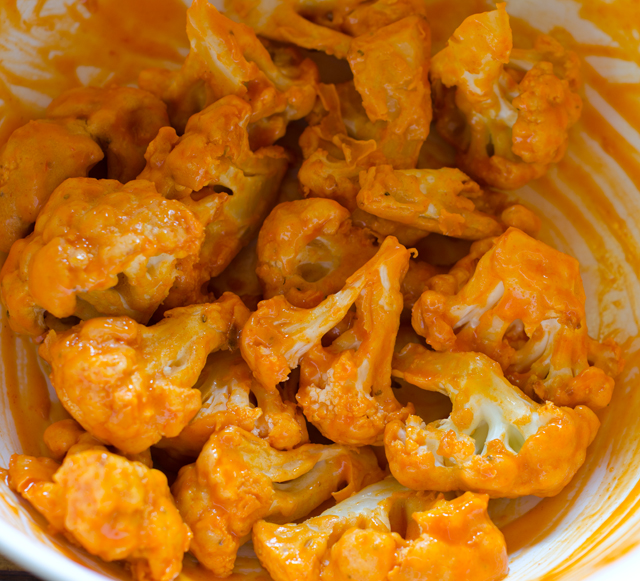
While the cauliflower is baking, melt the butter in a small saucepan over medium heat. Add the hot sauce and stir to combine. In a medium bowl, combine the cooked cauliflower and sauce, toss gently to combine. Place the cauliflower back on the baking sheet and bake for another 10 minutes, until the cauliflower begins to crisp. Serve immediately with plain or sweet pickled celery and blue cheese dressing or sauce.
Cauliflower pieces shouldn’t be too small.Ingredients for the batter.A simple batter of flour, spices and milk.Dip cauliflower pieces in the batter. Place on a wire rack above the parchment lined baking tray for easy clean up.While the cauliflower is baking, stir together melted butter and hot sauce.After the cauliflower has baked to a golden brown, mix with hot sauce and butter. Bake until crisp.The final product served with blue cheese sauce and pickled celery.
Buffalo Cauliflower Bites
Serves four or two very hungry people
Ingredients
1 c flour, can be all-purpose, whole wheat, brown rice etc.
1 c milk, almond milk or water
1 t garlic powder
1 t cumin
1 t smoked paprika
1 tsp. salt
½ t ground paprika
1 head cauliflower,cut into florets
½ c hot sauce (I used Franks Original)
3 T butter
Directions
Preheat oven to 425°F. Line a large baking sheet with parchment paper or foil. Spray a large wire rack with cooking spray to place over the baking sheet.
Combine flour, water, spices, salt and pepper in a large bowl and stir until smooth. Using tongs, dip cauliflower pieces in the batter. Coat well, lift out and allow the excess to drip back into the bowl.
Arrange cauliflower in a single layer on the wire rack that is on top of the baking sheet. Bake 20 minutes or until golden.
In a small saucepan, melt the butter, add the hot sauce and stir to combine. Pour evenly over cauliflower. Toss gently until cauliflower is evenly coated.
Bake 10 minutes or until cauliflower begins to crisp, rearranging florets occasionally if needed. Serve with celery and blue cheese dressing.
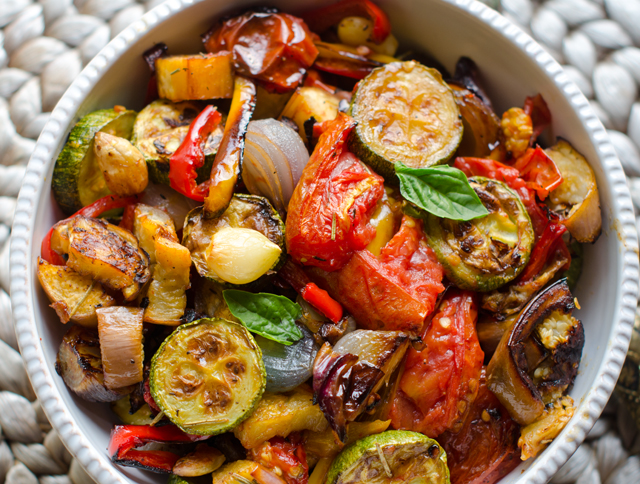
I love recipes that use the bounty of the garden in a single dish and ratatouille accomplishes that in a very delicious way. In case you didn’t know, ratatouille (rat-uh–too-ee), is a summer vegetable stew that had it’s origins in the Provencal city of Nice in southern France. Traditionally, each ingredient, eggplant, zucchini, peppers, onion, garlic and tomatoes, is cooked separately on the stove top and tossed together at the very end. So it’s really a sauté that is presented as a stew.
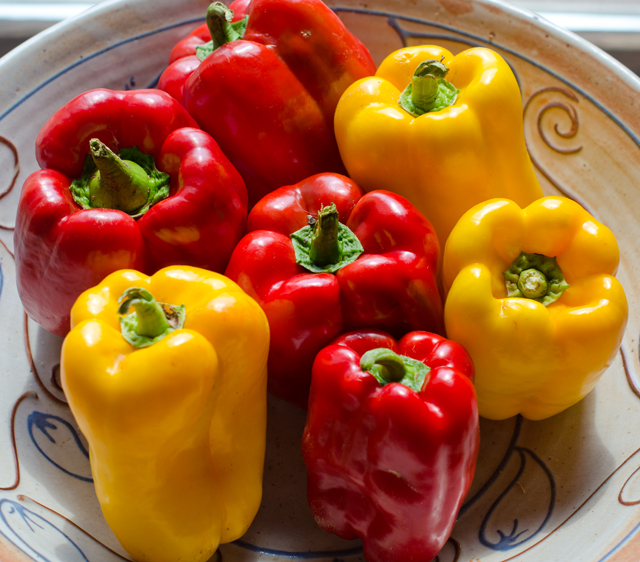
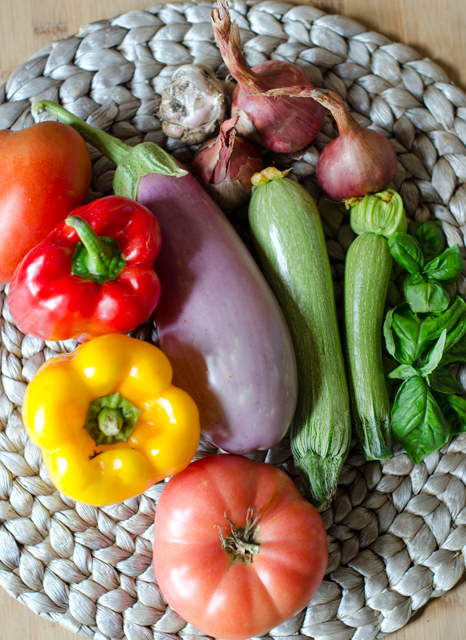
In this version the vegetables are tossed in olive oil and roasted in the oven, eliminating the time cooking over a hot stove. Our red and yellow bell pepper harvest is the earliest I can remember. They must like the hot temperatures and abundant rainfall this year. The orange Valencia peppers are not far behind. I prefer using Chinese or Japanese eggplants for their thin skin and milder flavor. I substituted shallots for onions since our harvest was so plentiful this year. The garlic was also from the garden, a first for us.
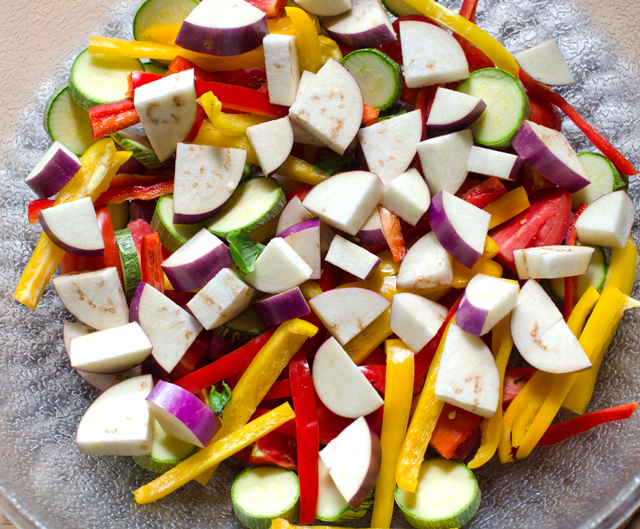
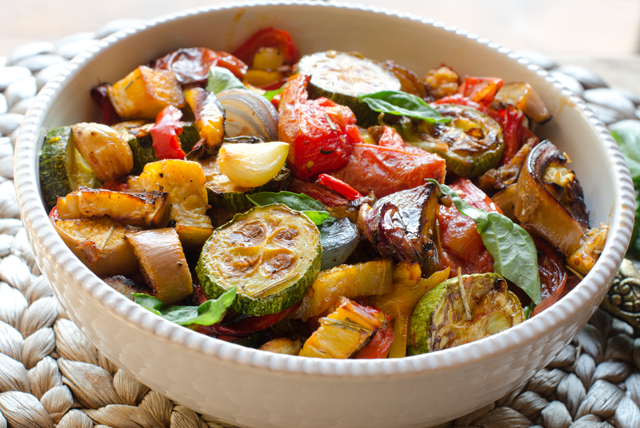
Cut the vegetables in similar size so they will get done at the same time. The smaller the cut, the less time it will take to cook. Lightly toss the vegetables with about a half cup of a good quality olive oil. Spread them out evenly over two large baking sheets. Rotate the baking sheets top to bottom and front to back half way through the cooking time. Roasting allows the vegetables to retain their shape and they take on a delicious toasted flavor. Move the cooked vegetables to a large serving bowl and tossed with a basil chiffonade. Chiffonade, translates “made of rags” from the French (of course!). It is a technique for cutting herbs and vegetables into long thin strips, in this case, basil.
Ratatouille can be used in many ways, a side dish, a topping for bruschetta, chicken or fish. We used it as the topping for an impromptu flatbread pizza. It can be served hot or cold and is even better the next day, if it lasts that long.
This season is the earliest we have had ripe bell peppers. I guess they really like the hot and rainy weather.Ingredients for the ratatouille, I substituted shallots for onions since Joe just harvested his crop.
Oven Roasted Ratatouille
Serves four (or two very generously)
Ingredients
2 small onions (about 5 oz. each), cut into ¼-inch-thick half-moons
2 bell peppers, red, yellow or orange, cored, seeded and cut into ¼-inch lengthwise strips
Japanese eggplant, about 1 lb, cut crosswise ½ inch thick rounds, then sliced in quarters
1 lb small to medium zucchini, trimmed and cut into ½ inch thick rounds
10 whole cloves garlic, peeled
½ c extra virgin olive oil, and more as needed
1 t chopped fresh rosemary
Kosher salt and freshly ground pepper
1½ lbs medium tomatoes (about 4), cored, and cut into 1/2-inch chunks
¼ c basil cut into a chiffonade
Toss the ingredients in a large bowl with olive oil, salt and pepper.Transfer the vegetables to two large baking sheets.
Directions
Place racks in the top and bottom thirds of the oven. Heat to 400°F. If using convection heat, 375°F.
In a large bowl, toss the onions, peppers, eggplant, zucchini, tomatoes, garlic, olive oil, rosemary, and 1-1/2 tsp. kosher salt and a grind of pepper. Spread the vegetables evenly over two large 12 x 16 sheet pans. Don’t spread the vegetables too thin or they may burn (they shrink a lot as they cook).
Roast, stirring the vegetables a few times and swapping the positions of the pans once, until the vegetables are slightly collapsed or shriveled, starting to brown, and very tender, about 35 minutes for my oven. It could take 10 minutes longer if you are not using convection heat.
Scrape all the vegetables and any juices into a serving bowl. Toss with the basil, taste for seasoning, and serve.
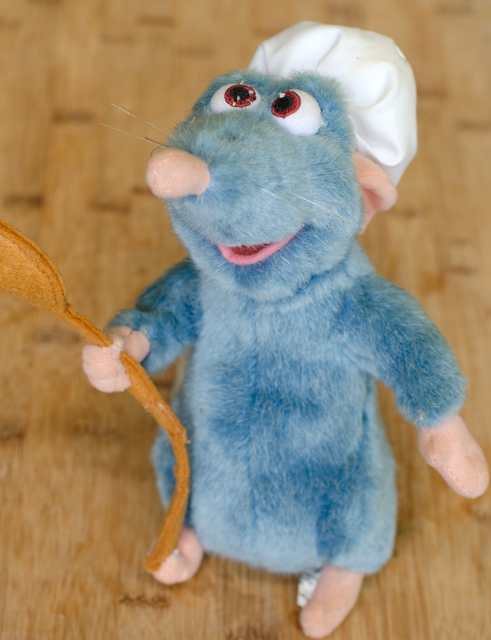
Ratatouille makes a great pizza topping.How could I resist posting a picture of Remy, the star of the movie Ratatouille who presides over my kitchen from his perch above.
I was excited to show my friend Leslie the puffed rice I made as a garnish for the Summer Squash Salad in the previous post. Leslie enjoys cooking and trying new things in the kitchen as much as I do. She asked a good question regarding puffed rice that I didn’t have an answer for, why can’t you just make it in a popcorn popper?
I did a little research and learned this. Only varieties of corn with hard, thick hulls can be popped. Popcorn kernels can be puffed or popped with something as simple as a kettle with hot oil and a lid or a popcorn popper that circulates hot air through the kernels. The hard outer shell encases the moisture in the kernel and allows it to be popped without exploding into pieces. Rice lacks this hard outer shell. So you can’t toss some cooked rice in the popcorn popper and expect it to pop.
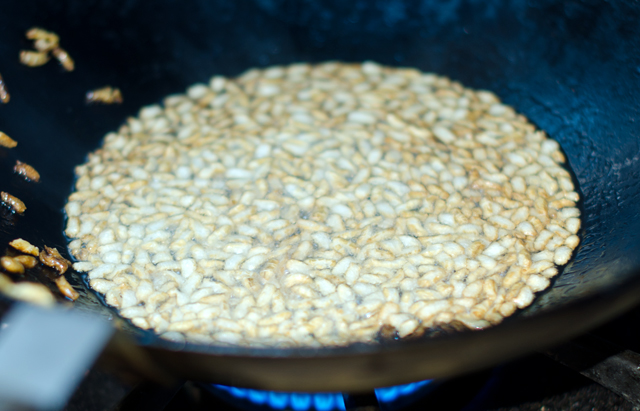
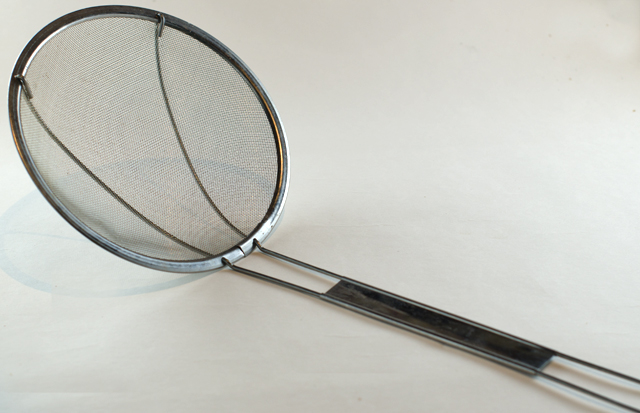
This recipe doesn’t require much work but does take a bit of time in preparation. Be certain the rice is completely dried out before puffing it in oil. I found that a wok and a fine Chinese strainer was the easiest way to get all the puffed kernels out before they get too brown. It’s an easy recipe and I think you will be pleased with the results.
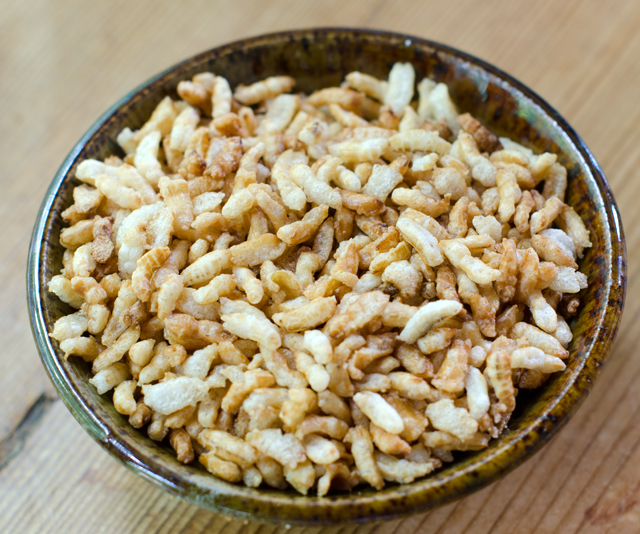
Puffed rice smells great, all warm and toasty. Use it as a salad garnish, out of hand snacking or put your own spin on a crispy rice sweet treat.
Puffed Rice
Makes about 3 cups
Ingredients
1 cup of short grain brown rice
1 ¾ cups of water
a pinch or two of sea salt
several cups of sunflower (or another) high-heat oil
Rice puffing up in the hot oil.This strainer is easy to find in Asian grocery stores and is relatively inexpensive.
Directions
Place the rice, water and salt into a medium saucepan. Bring to a boil, cover, and reduce to a simmer. Cook for 40 minutes. Remove from the heat and let it sit, covered, for another 10 minutes.
Preheat the oven to 250°F.
Spread the rice out evenly onto a large baking sheet. Bake (dehydrate) in the oven for 2 hours. The rice should be dry and hard when it’s done. Place the rice into the fridge to cool off for at least an hour. Or leave it in the oven (turned off of course) overnight to cool.
In a wok add enough oil so that it comes up to about ½” on the side, and heat the oil over medium heat until it’s shimmering, if you have a thermometer 375°F. Test to make sure it’s ready by adding a single piece of rice to the oil. If it sizzles all around the rice kernel, then it’s ready. Add about one quarter to one third of the rice to the pot and cook for ten to twenty seconds, just until the rice puffs up. This happens very quickly, and you do not want to overcook it, otherwise the rice will get too dark and will be too crunchy. Use a fine strainer to remove the rice and place it onto a paper-towel lined plate. Do this until all of the rice is puffed.