May 6, 2016 Cauliflower Pizza Crust

DSC_6789a
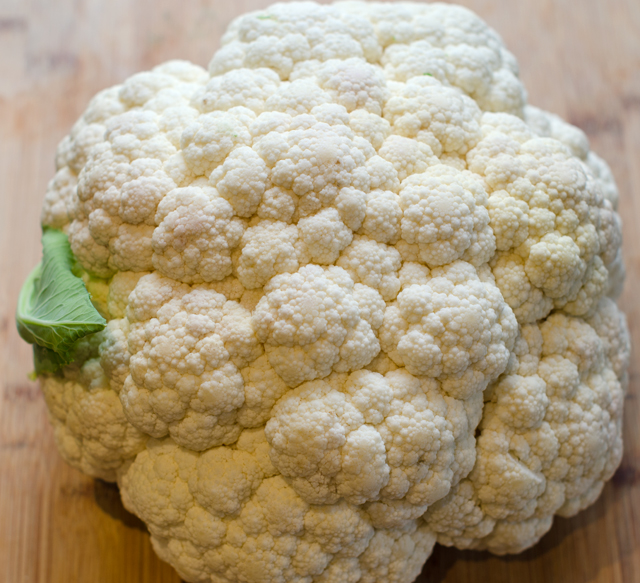
Consider the amazing versatility of cauliflower. Tossed with olive oil, salt and freshly ground black pepper and roasted until it is golden brown, it’s addictive as popcorn. It’s a delicious gluten-free substitute for mashed potatoes and couscous and the secret ingredient in a healthier version of Alfredo sauce.

In this recipe, the vegetable master of disguise is the basis for a pizza crust. I began my research by reading through about 20 recipes for cauliflower pizza I found online. They were written by cookbook authors, celebrity chefs and food bloggers. No two recipes were exactly the same and some were quite vague in their instructions. I used these recipes to construct my own version of a crust that works every time.

Line a pizza pan or a baking sheet with parchment paper. I used a nonstick spray on the corners to make sure it stayed in place. Preheat your oven to 425°F.

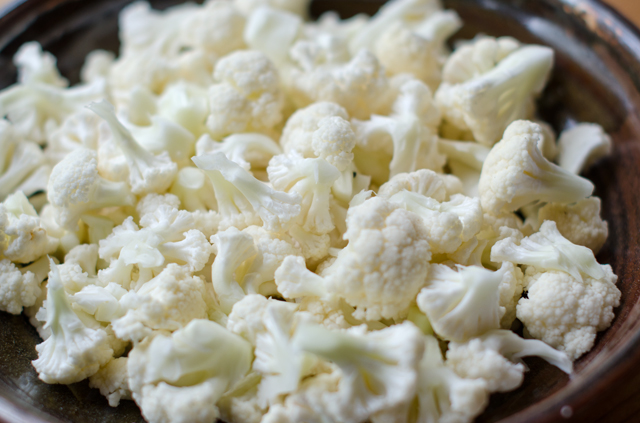
Start with a head of cauliflower, chop it into four cups of smaller florets, you want uniform pieces that won’t overwhelm your food processor.
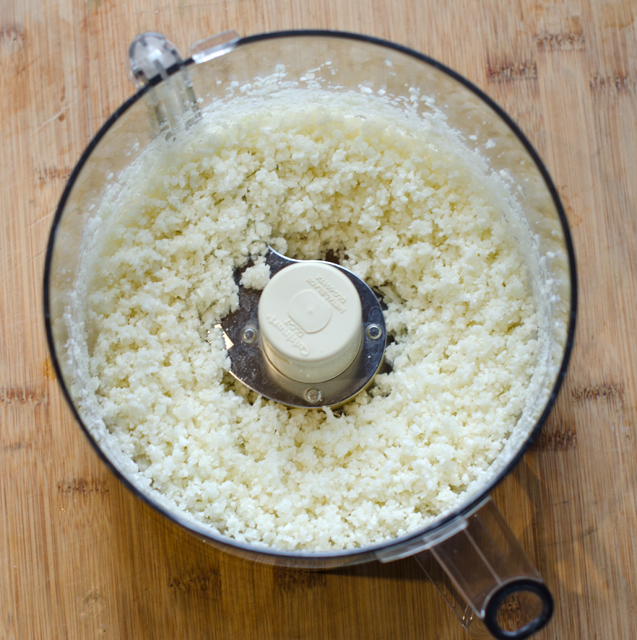
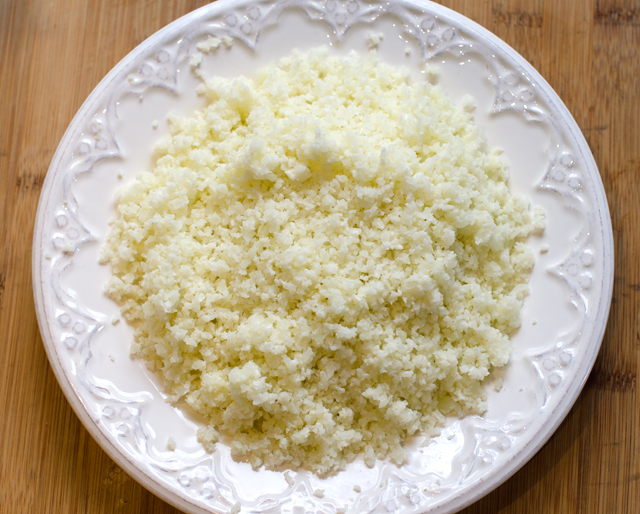
If you are using a hand grater leave the pieces larger and the stem attached so you don’t scrape your fingers. Save the stems for cauliflower mashed potatoes. Pulse the florets with the metal blade in the food processor until the cauliflower is the consistency of small grains of rice or couscous. Some writers referred to this as cauliflower “snow”. 4 cups of cauliflower florets yielded two and three-quarter cups of finely chopped cauliflower.

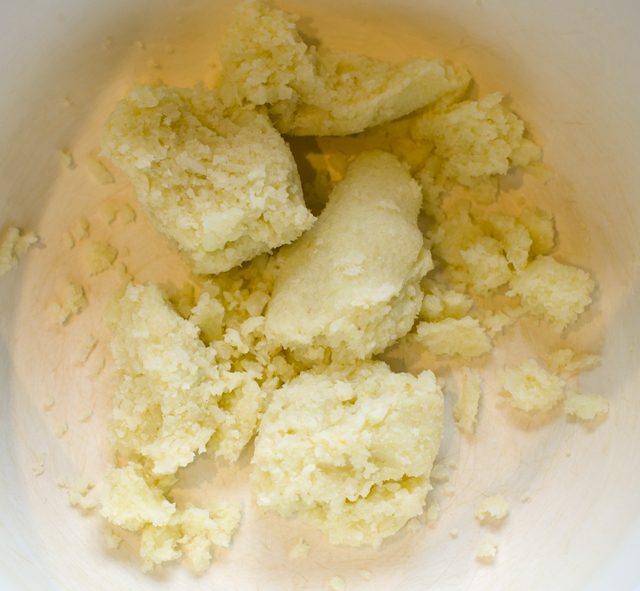
Cauliflower needs to be cooked to get rid of excess moisture. Some of the recipes I read called for sautéing the cauliflower on the stove top, others chose steaming and a few didn’t cook it at all. I am not a big fan of the microwave, but I feel it’s the easiest way to cook the cauliflower for this recipe and there is no need for additional water to be added. Place the cauliflower in a microwave safe container and cover with plastic. I cooked mine on the “fresh vegetable” setting for about six minutes. Let the cauliflower cool thoroughly before proceeding with the next step, if you don’t you could easily burn your fingers.

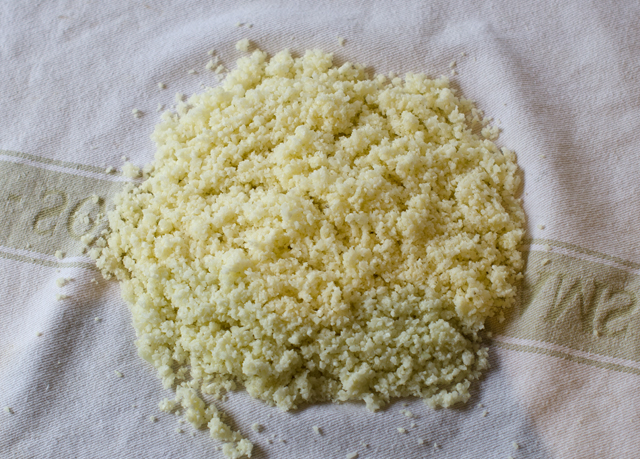
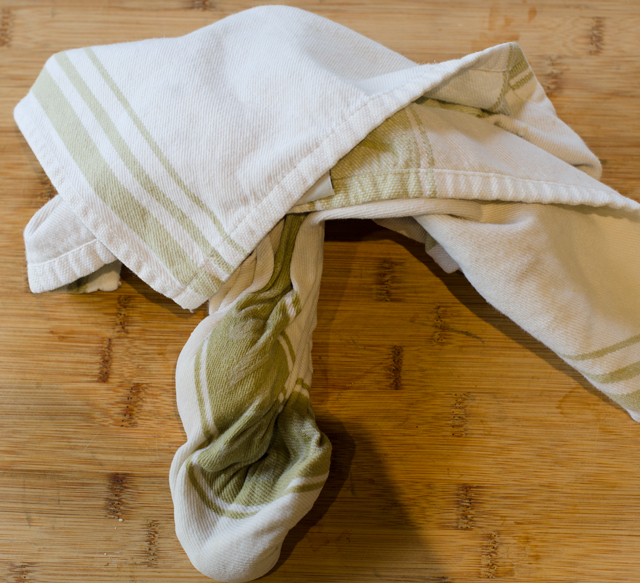
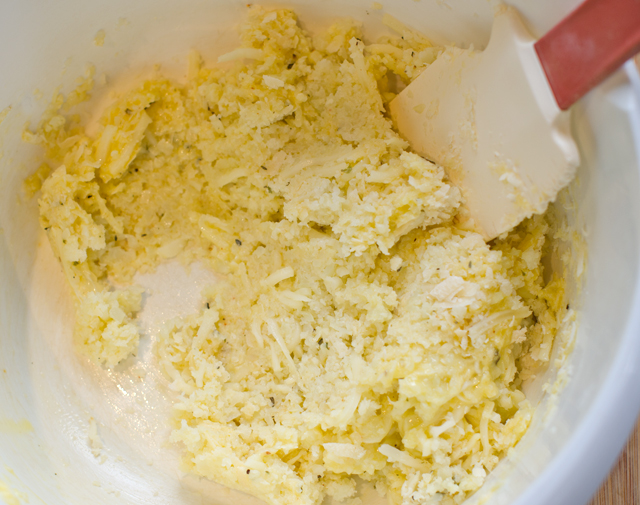
The next step is crucial to the success of this recipe. Dump the cauliflower into the center of a clean, cloth dish towel. Gather up the four corners and twist. Squeeze the bottom to extract as much liquid from the cauliflower as possible. When you think you’ve squeezed enough, squeeze one more time. Transfer the cauliflower pulp to a bowl, you should have about a scant cup. Add to this one lightly beaten large egg, a pinch of salt, three quarters of a cup of shredded mozzarella, half cup of shredded Parmesan cheese. Although not necessary you can add a half teaspoon each of dried oregano and basil. Mix first with a spatula to incorporate the ingredients, then mix with your hands for best results.

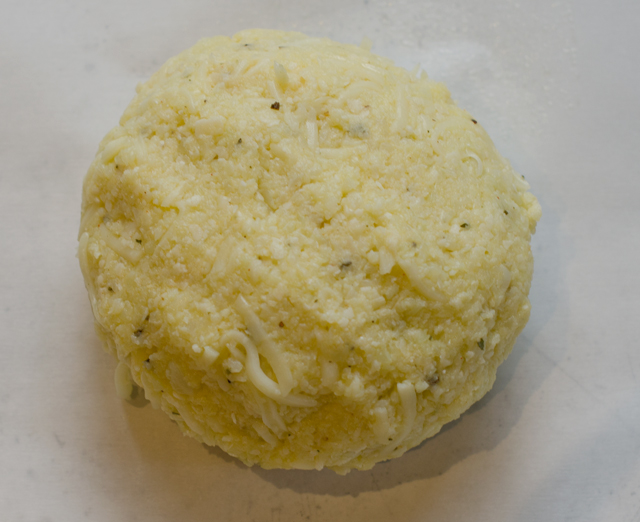
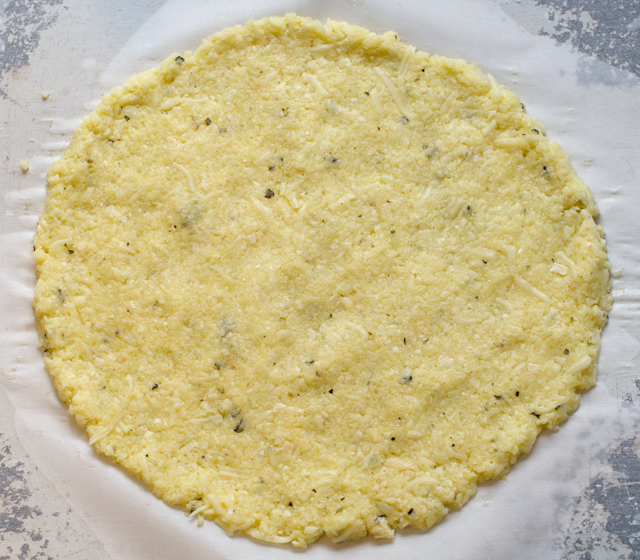
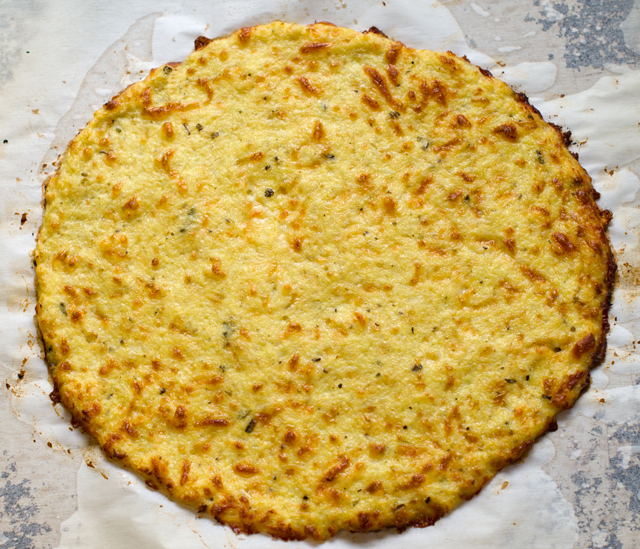
Form into a disk and place on the prepared baking sheet. Press out from the center evenly to make a 10 inch circle. Be sure that the crust is evenly pressed out, with no thin or thick spots. Some sources said to spray the surface of the parchment paper with nonstick spray but I didn’t and my results were fine. Place the baking sheet on the middle rack of your preheated oven. Bake until spotty brown, it took about 12 minutes in the convection oven, it may take you a little longer for a conventional oven.

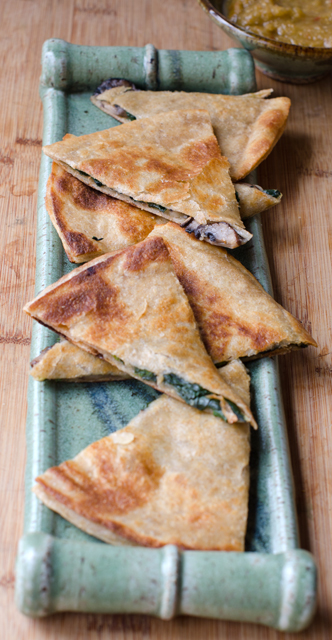
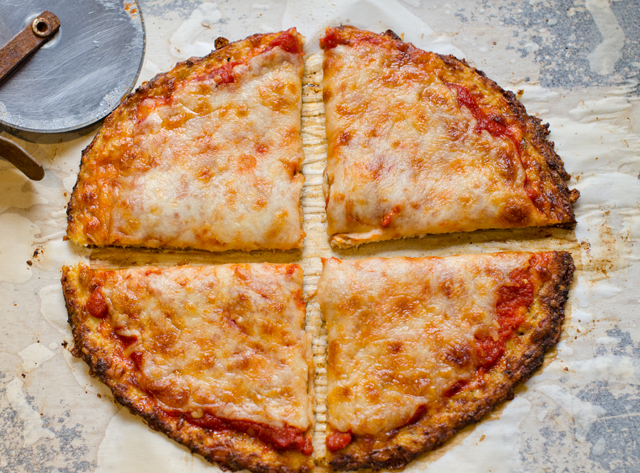
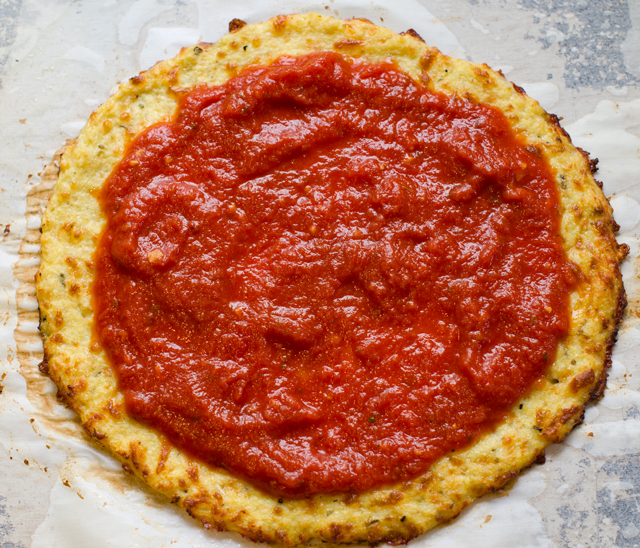
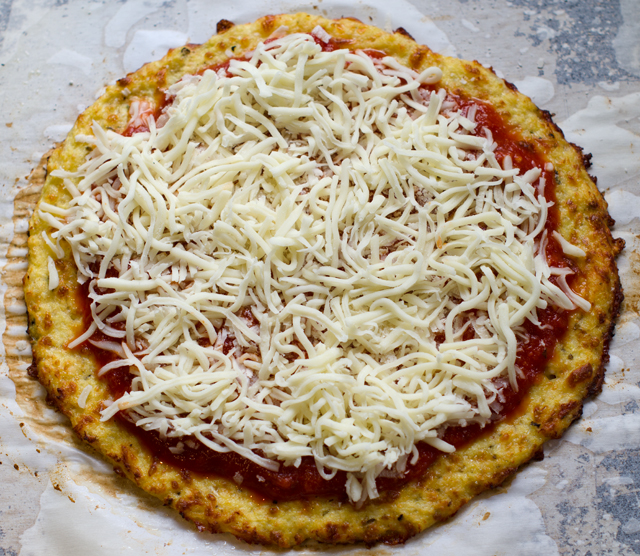
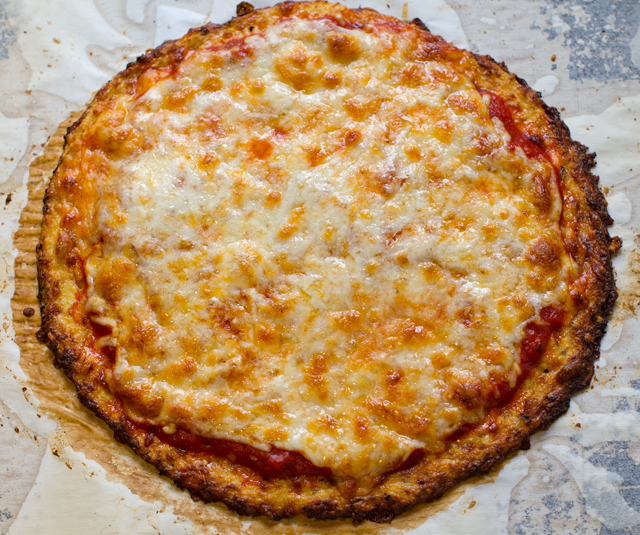
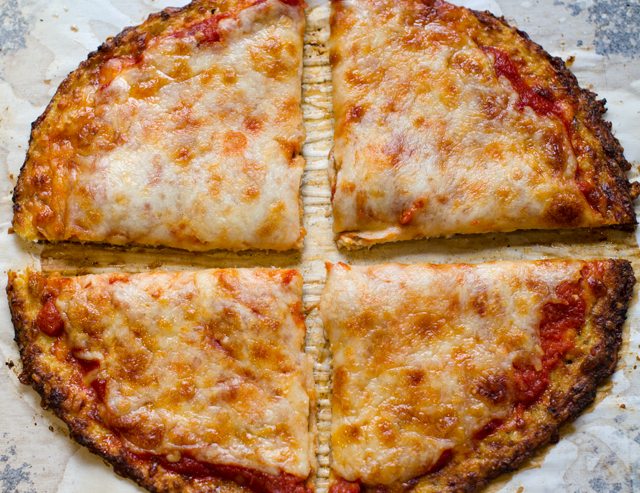
Remove baking sheet from the oven and add your favorite toppings. I made a basic tomato sauce and mozzarella cheese pizza. I baked it in the oven for another 10 minutes, until the cheese was melted and bubbly. I was able to cut the pizza with a wheel and the slices held together nicely.  The possibilities for toppings are endless. In about a month or so I will be topping this crust with basil pesto and thinly sliced zucchini.

DSC_6762a
Start with a large head of cauliflower, you won’t need it all.
DSC_6792a
Separate into smaller florets.
DSC_6766a
Add to the food processor with metal blade attached.
DSC_6767a
Process finely until you get rice or couscous like granules.
DSC_6771a
Now it is ready for the microwave.
DSC_6799a
Place the cooked cauliflower in the middle of a cotton dishtowel.
DSC_6801a
Squeeze to extract all the excess liquid.
DSC_6773a
You will be left with cauliflower “pulp”.
DSC_6774a
Mix in beaten egg, cheeses, salt and dried herbs.
DSC_6776a
Form it into a ball.
DSC_6778a
Flatten into a 10 inch round.
DSC_6779a
Bake at 425 F for ten to fifteen minutes, until starting to brown in spots.
DSC_6782a
Top with sauce.
DSC_6783a
And mozzarella cheese.
DSC_6785a
Bake for 10 minutes, until the cheese is bubbly.
DSC_6787a
Delicious!

Makes one 10″ round

Ingredients

  • 4 cups of cauliflower florets
  • 1 large egg, lightly beaten
  • ¾ c shredded low fat mozzarella cheese
  • ½ freshly grated Parmesan cheese
  • ½ t dried oregano
  • ½ t dried basil

Directions

  1. Line a rimmed baking sheet or pizza pan with parchment paper and preheat oven to 425°F.
  2. Chop cauliflower into 4 cups of smaller florets. Transfer to a food processor and pulse until the cauliflower is the consistency of rice or couscous, my finished product measured 2 ¾ cups. Alternately grate larger pieces on a box grater until you have 2 ¾ cups of finely grated cauliflower.
  3. Place in a large bowl and microwave on high for 6 minutes. Remove from oven and let cool.
  4. Dump the cauliflower into the center of a cotton dish towel, flour sack types are best. Draw up the corners and twist tightly. Squeeze the cauliflower in the dish towel to extract as much liquid as possible.
  5. Transfer the cauliflower “pulp” to a bowl. Next, add the beaten egg, cheeses and herbs. Combine with a rubber spatula and for best results, finish the mixing with your hands.
  6. Form into a disk and place on the prepared baking sheet or pan. Press out from the center to make an even 10″ round.
  7. Place baking sheet on the lower middle rack of the preheated oven. Bake until spotty brown, mine took about 12 minutes, the crust may be ready anywhere from 10 to 15 minutes.
  8. Remove crust from the oven and top with your favorite pizza combinations. Bake until cheese is melted and bubbly, another 10 minutes.


April 26, 2016 Spinach and Mushroom Quesadillas with Tomatillo Salsa

DSC_6739a

Still inspired by an abundance of, you guessed it, spinach, I was looking for yet another way to use our bounty. Inspiration this time came to me in the form of a quesadilla. Crispy on the outside and melted and creamy inside, spinach adds a healthy component to this popular dish. Quesadillas are easy and delicious any time of day, as a quick snack, lunch, even for breakfast. To accompany the quesadillas I made a simple tomatillo salsa.

With the exception of the cilantro and garlic, the ingredients for the tomatillo salsa came straight from our freezer. Preparing tomatillos for the freezer is easy, I remove the papery husks and freeze them whole and raw in quart bags. A previously frozen tomatillo will not hold up to roasting but are fine in raw preparations like this. The Numex Joe E. Parker pepper used in this recipe is an Anaheim style pepper with a long slender shape and mild heat. We have an interesting variety of frozen hot peppers from gardens past,  milder ones like Joe E Parker and poblanos to hotter ones, cayenne, jalapeno, serrano and Thai hot. The surprising thing is that freezing them does not diminish their heat in the least. When a recipe calls for several hot peppers, I start with one, it is much easier to add heat than to take it away.

As always, picking the spinach takes more time than most of the steps in the recipe. The filling is easy to make and used twelve cups of fresh spinach, a real plus for me. If you don’t have an abundance of spinach in your garden, use bagged baby spinach. The slightly more assertive flavor of cremini mushrooms compliments the spinach nicely.

The options for cheese are endless. I used pepper jack and cheddar cheese, a good melting cheese is important here. Choose a large heavy bottom skillet to cook quesadillas. Just a light brushing of oil in the pan is all that’s necessary to brown the tortilla and keeps it from getting greasy. You can either fold one tortilla in half or stack one on top of another. I press lightly on the quesadilla in the pan to allow the cheese to melt a bit and hold the layers together before it is flipped.  The pizza wheel is the perfect tool to cut it into portions. Finished quesadillas can be held in an oven on low heat for 20 minutes.

Spinach and Mushroom Quesadillas

Makes four 8″ quesadillas

Ingredients for the filling

  • 1½ T olive oil or bacon drippings
  • 8 oz mushrooms, button or cremini, stemmed and sliced
  • 2-3 cloves garlic, finely chopped
  • ¼ c finely chopped red onion
  • 12 c spinach, large stems removed

DSC_6706a

Directions for the filling

  1. In a large skillet heat the oil or bacon drippings over medium high heat.
  2. Add the mushrooms, stirring constantly, until they begin to brown.
  3. Add the onion and garlic and continue cooking, stirring frequently until it looks translucent.
  4.  Add the spinach by the handful, wilting it before adding more, until it is all used.  Do not overcook.  Season with salt to taste.

Ingredients for assembling the quesadillas

  • Eight 8″ soft tortilla or taco shells, I used whole grain
  • Olive Oil
  • 1½-2 c grated cheese, I used a combination of pepper jack and cheddar

DSC_6712a

DSC_6715a

Directions for assembling and cooking the quesadillas

  1. Preheat oven to 180°F.
  2. Place four tortillas on two baking sheets, divide evenly the spinach and mushroom filling and the grated cheese between them.
  3. Top with the four remaining tortillas and lightly press to seal.
  4. Place a 12″ heavy bottomed skillet over medium high heat.  Brush the skillet lightly with olive oil.
  5. Place the quesadillas in the skillet one at a time, pressing down lightly but firmly and cook for about 3 minutes on each side. You can peek by lifting up with a spatula to see if it is getting golden brown. Transfer the cooked quesadillas to a baking sheet and keep warm in the oven, lightly covered with foil.
  6. Slice each quesadilla into 6-8 wedges, a pizza cutter works well here, and serve hot with tomatillo salsa or your own favorite.

DSC_6719a

DSC_6723a

DSC_6733a


Tomatillo Salsa

Ingredients

  • 3 cloves garlic, peeled
  • 1 jalapeno pepper, stemmed and seeded and quartered
  • 1 Numex pepper, stemmed and seeded and quartered
  • ¼ c roughly chopped red onion
  • 1 lb tomatillos, husked, rinsed and cut into quarters
  • ¾ c loosely packed, lightly chopped cilantro

DSC_6702a

Directions

  1. With a food processor or blender running, drop in the garlic cloves one at a time letting each piece get finely chopped before adding the next. Add the peppers, onion,  tomatillos and cilantro and process until smooth.

DSC_6731a


March 24, 2016 Spinach and Roasted Garlic Hummus

DSC_6542aWhen I am looking for a snack, hummus is a healthy choice I feel good about adding to my shopping cart. But the truth is, it’s takes just minutes to make my own, and it’s healthier (no additives), tastier and cheaper too. The word hummus in Arabic means chickpea so strictly speaking, hummus is the term for a chickpea dip. Hummus bi tahini means chickpeas with tahini, a paste of ground sesame seeds.  Whether you add tahini or not, a basic hummus includes garlic, lemon juice, olive oil and salt.

One of my favorite food memories is a chickpea soup Joe made for me one Valentine’s Day. I absolutely love the sweet nutty flavor of freshly cooked chickpeas and in a perfect world I would always use them when I make hummus. However, dried chickpeas need to be soaked overnight, drained the next day and cooked for 1-3 hours, depending on freshness. I don’t always have time for that and the delayed gratification it requires.

However if you have the time, substitute one half the quantity of dried beans for the canned. The standard 15 ounce can of chickpeas drained is about 9 ounces or 1 ½ cups of beans. This translates into 4.5 ounces of dried beans or ¾ cup. Many cooks add a pinch of baking soda to tenderize dried beans to both the soaking and cooking water. The United States dried bean council (of course there’s one!) points out that it destroys part of the thiamine (aka vitamin B 1), making the amino acids less digestible and negatively affects the nutritional value. I’ll leave that heavy decision up to you.

A basic hummus recipe is easy and delicious and just the jumping off point for countless variations. I have previously shared a beet hummus recipe, this time I added fresh spinach and roasted garlic to the recipe.

If you are not already roasting garlic cloves, you should. It takes more time to get your oven up to temperature than in does to get this kitchen staple together. The first time I roasted garlic I winged it but I am pleased to say my uninformed guess was pretty much on target. This is the basic recipe; cut about the top quarter off each head of garlic with a sharp knife to expose all the cloves. Slowly pour olive oil over each head, letting it soak into and around the cloves. Wrap the prepared heads of garlic in foil and bake in a 425°F oven. Start checking the garlic at the 45 minute mark. The finished cloves should be soft, golden and slightly protruding from the skins. I always roast more than what I need, it will keep in the fridge for about a week, that is if it lasts that long. You can also freeze roasted garlic for several months.

Everything goes into the food processor or blender, except the reserved chickpea liquid. I added three cloves of roasted garlic to my basic hummus recipe, along with three loosely packed cups of spinach leaves. I added a half teaspoon each of some appropriate dried herbs, cumin, for it’s smoky flavor, smoked paprika also brings smokiness and a little heat. Sumac is the herb you may not be familiar with, it has a fruity astringent taste, milder than a lemon. I shared more background on it in this post. It is readily available from several of the herb and spice mail order sights.

Add the additional bean liquid to get it completely smooth and holds it’s shape. Taste and add more salt if needed. Transfer mixture into a serving dish. Garnish with a dash of olive oil and a sprinkle of smoked paprika. Serve at room temperature.

DSC_6534a

DSC_6538a

Spinach and Roasted Garlic Hummus

Makes about 2 cups

Ingredients

  • 1-15 ounce can garbanzo beans (chickpeas) drained and liquid reserved
  • 3-4 c spinach leaves, large stems removed
  • 1/3 c tahini
  • 3 T fresh squeezed lemon juice
  • 3-4 cloves roasted garlic, or to your taste
  • ½ t salt, and more to taste
  • 1 t each cumin, sumac and smoked paprika
  • 1-2 T extra virgin olive oil
  • A dusting of smoked paprika for the topping

DSC_6536aDirections

  1. Add all the ingredients to your food processor or blender. Pulse, adding additional bean liquid as needed to get the hummus completely smooth.
  2. Taste and add salt if desired.
  3. Scoop into a serving bowl and sprinkle top with smoked paprika and a little olive oil if desired.
  4. Serve with the dippers of your choice.

March 17, 2016 Spinach Pie

DSC_6530aFor once it looks like the groundhog was right, winter is over. Last week’s tease of highs in the 80’s has now settled back into a mostly rainy week with temperatures in the 50’s and 60’s. Spring arrives this weekend and it’s time to head back to the garden. Our garden’s first offering is spinach. Planted as a fall crop, it wintered over nicely in the greenhouse . It’s not the delicate baby spinach that you would want in a salad, but larger, very crinkly spinach, perfect for cooked dishes. I will attest that is still sweet and flavorful, after nibbling on some stems when I picked a large colander full today.

I found this recipe for Spinach Pie on the Epicurious website from a book called Irish Country Cooking, quite appropriate since St. Patrick’s Day is today. My choice was further confirmed when I read the author’s comment that three generations of her family have enjoyed this dish and this recipe was often made to use up her father’s seasonal harvest of spinach.

It takes a lot of spinach to make a pound, twelve cups to be exact. When that spinach is cooked down it will yield about a cup. Wash spinach in a large sink in several exchanges of cold water, those crinkles can hide a lot of dirt and debris. Remove any large stems and trim away any discolored leaves. The recipe called for steaming the spinach, I chose to cook it down in batches in a non stick skillet, which was just as easy. Drain spinach in a colander or better yet squeeze in your hands to remove excess moisture. Roughly chop spinach and in a large bowl combine with onion, beaten eggs and the cheeses. Mix well to be certain the spinach is mixed thoroughly with the other ingredients. Transfer this mixture to a quiche dish or individual dishes. If you like it could even be made in a crust. Different cheeses could be substituted as long as they have the same texture, cheddar for the mozzarella, I substituted ricotta for the cottage cheese. The addition of some chopped smoked salmon or a little crumbled sausage would be nice too.  A 10 ounce container of frozen spinach, thawed and well drained can be substituted for the fresh spinach.

Spinach pie is appropriate at any meal, breakfast, a light luncheon entree, a side at dinner. You could also bake this in a rectangular baking dish and cut it into small squares as an hors d’oeuvre. I barely made a dent into the spinach that’s in the greenhouse so it looks like I will be making this again in the weeks to come.

DSC_6460a

DSC_6462a

DSC_6485a

DSC_6490a

Spinach Pie

Ingredients

  • 1 lb 4 oz spinach, washed or a 10 ounce container of frozen chopped spinach, thawed and well drained of excess liquid
  • 1 medium onion, finely chopped
  • 2 eggs, beaten
  • 10 oz ricotta or cottage cheese (regular or low fat)
  • 10 oz freshly grated Parmesan cheese
  • Kosher salt and freshly ground pepper to taste
  • ¼ t freshly ground nutmeg

DSC_6515a

Directions

  1. Preheat oven to 350°F, 325°F if using convection heat
  2. Wilt the spinach in a large non stick saute pan with the water that is still clinging to the leaves, drain well and roughly chop.
  3. In a large bowl, mix the cooked spinach with the onion, beaten eggs and cheeses. Be sure that the spinach is thoroughly combined with the other ingredients. Season the mixture with salt, pepper and nutmeg.
  4. Transfer mixture to one or several smaller baking dishes that have been coated with non stick spray. Bake in preheated oven for 25 to 30 minutes.

DSC_6520a

DSC_6523a

DSC_6526a

DSC_6533a

January 21, 2016 Scallop Salad with Gremolata and Asian Vinaigrette

DSC_5726aThis is a twist on a recipe in the latest issue of Fine Cooking. In the Fine Cooking version, the scallops were tossed in a mixtue of citrus and Asian ingredients for a quick marinade. I wanted to make mine a salad so I patted the scallops dry, seared them and the marinade ingredients became the basis for an easy vinaigrette.
I love scallops for a quick meal and the jumbo sea scallops at Heller’s Seafood this week were pristine and just perfect. Wherever you shop, look for dry scallops. Wet scallops are soaked in a preservative phosphate solution. The solution preserves and whitens the scallops and causes them to absorb more water. So when you cook wet scallops they don’t brown as well or not at all because of the extra liquid. They can also have a soapy taste. Dry scallops are shucked and shipped packed on ice with no preservatives.  Therefore they have a shorter shelf life and are fresher when you buy them. Dry scallops come with a higher price tag, but they are fresher and you are not paying for water weight.

It’s fairly easy to tell the difference, wet scallops are bright white because of the phosphate solution and dry scallops are ivory or pinkish. Don’t hesitate to sniff them, the scallops should smell like the ocean.  When in doubt, ask, and if they don’t know, run! You shouldn’t be shopping there anyway.

Prepare scallops by first removing the tough abductor muscle, it peels off easily. Then I pat them dry on both sides with paper towels. I coat a non-stick skillet with a neutral oil (vegetable or canola). Be sure that your skillet will hold the scallops without crowding them, you want to sear, not steam them. I turn the heat up to high and wait for the first sizzle. I add the scallops to the pan in a clockwise fashion with any extras in the middle. That way I know what scallop has cooked the longest. Now is the hard part, cook the scallops without moving them until a little peek (lift up the spatula a bit) shows a deep golden crust. Be sure not to overcook, you want the middle to stay tender and sweet.  Two to three minutes per side will do.

Gremolata is made from parsley, garlic and lemon zest and is the traditional topping for braised veal shank or osso buco. This version takes on a definite Asian flair using cilantro, garlic, sesame seeds and lime zest. These flavors harmonize perfectly with the sweet scallops. The marinade for the scallops included mirin, lime juice, ginger and sesame oil. In case you didn’t know, mirin is a type of rice wine, like sake but mirin is sweet and has a higher alcohol content. When you are looking for sesame oil it should be the dark variety. Both mirin and dark sesame oil are readily available in the Asian section of the supermarket.  I used these flavors with a little additional honey to dress my salad greens with. I chose baby arugula, but a spring mix or baby spinach would work well too.

This dish comes together quickly, both the gremolata and the vinaigrette are easy to make. It is just important to take the time to cook the scallops correctly. This recipe can be doubled and is perfect for a first course or part of a small plates dinner.

DSC_5720a

DSC_5721a
Don’t crowd the pan, give the scallops room to brown, too close and they will steam.

Scallop Salad with Gremolata and Asian Vinaigrette

Serves 2

Ingredients for the scallops

  • ½ to ¾lb dry packed sea scallops (about 6)
  • A neutral cooking oil, canola for example
  • Salt and freshly ground pepper

Directions for cooking the scallops

  1. Remove the tough abductor muscle from the side of each scallop (some scallops are sold with the muscle already removed). If you feel any grit on the scallops, rinse them under cold water. Pat the scallops dry with paper towels; surface moisture impedes browning.
  2. Heat a 10- or 12-inch nonstick skillet over medium-high heat for 1 to 2 minutes. Add the oil and heat until quite hot. Pat the scallops dry once more and put them in the pan in a single, uncrowded layer. Season with salt and pepper and let sear undisturbed until one side is browned and crisp, 2 to 3 minutes. Using tongs, turn the scallops and sear until the second side is well browned and the scallops are almost firm to the touch, 2 to 4 minutes.
  3. Take the pan off the heat, transfer the scallops to a plate, and set them in a warm spot while you finish the other components of the recipe.

Ingredients for the sesame cilantro gremolata

  • ¼c finely chopped cilantro
  • 1T toasted sesame seeds
  • 2t finely chopped garlic
  • 1t lime zest

Directions for the sesame cilantro gremolata

  1. In a small bowl, combine the cilantro, sesame seeds, garlic and lime zest. Set aside.

Ingredients for the dressing

  • 3T mirin
  • 1t grated ginger
  • 2t fresh lime juice
  • 1t honey (or more to taste)
  • 3T sesame oil

Directions for the dressing

  1. In a small bowl whisk all the ingredients together. Set aside

Final Assembly of the salad

Ingredients

  • 4-5 cups of baby arugula, spring mix or baby spinach

Directions

  1. Place the greens in one medium or individual salad plates.
  2. Top with seared scallops
  3. Sprinkle gremolata on the scallops.
  4. Dress greens and scallops lightly with dressing.
  5. Serve immediately.

DSC_5731a

DSC_5735a


June 14, 2015 Crustless Spinach, Mushroom and Canadian Bacon Quiche

DSC_3155aConsider a humble little package of frozen chopped spinach, a convenience and a staple in many kitchens, including mine. You might be quite surprised how many cups of fresh spinach it takes to make that 10 ounce brick of frozen. That was the information I was looking for this week.

Our spinach plants are going to seed and it was time to do one last serious pick before pulling them out and getting the space ready for another planting. When picking spinach, especially in the extreme hot weather (95°F) it is important to not use a metal bowl or colander, they will put your freshly picked leaves into immediate wilt that will be hard to revive from.  I prefer using a clear plastic “pebble” bowl, sturdy hard plastic bowls I used in my catering business. I snip off the best leaves with scissors, leaving the plant and damaged leaves behind for the mulch pile. Next, I soak the spinach in a clean sink of cold water. I start the process by swishing the leaves around in the sink. I let them sit for a few minutes, the spinach will float to the top, and the dirt and debris will sink to the bottom.  Then I gently lift out the leaves and transfer them to a colander. I will repeat the process again to be sure all the dirt is removed. I refrigerated the spinach in the large bowls with some plastic wrap draped over the top.

Now it was time to find ways to use up this bounty.  Spinach is a powerhouse of nutrition, low in calories, a rich source of iron, vitamins A, C, and K, potassium, calcium and magnesium. End of the season spinach is still very good, but not necessarily something you would want to use in a salad. So I was on the hunt for recipes with cooked spinach. Frittata, quiche, spanakopita, all good choices but many recipes just call for that ubiquitous ten ounce package of frozen spinach. I needed to find the conversions to take that very large bowl to the amount of cooked spinach I needed.

Spinach is 90% water in composition and when cooked, 1 pound of fresh spinach is equivalent to 10 to 12 cups and will cook down to 1 cup. One 10-ounce package of frozen spinach is the equivalent of 1 1/2 pounds of fresh spinach or about 15-18 cups of spinach. In my pictures you will see a before and after of the spinach. To reduce it, I cooked the spinach in a 10″ sauté pan using just the water that clung to the leaves. Then I drained it thoroughly in a fine mesh colander, squeezed it dry and chopped it roughly.

My efforts paid off. With the spinach I picked, I was able to make all three, frittata, quiche and spanakopita. This quiche can be put together in minutes since the most time consuming part is eliminated, making the crust.  I added some sauteed sliced mushrooms and Canadian bacon. In case you didn’t know, American bacon comes from the fatty belly of the pig and Canadian bacon is cut from the loin.  Of course a 10 ounce package of frozen spinach can be substituted in this recipe. It makes a nice breakfast or light lunch and reheats well the next day.

DSC_3115a
Fifteen to eighteen cups of fresh spinach.
Cooks down to this!
Cooks down to this!

DSC_3148a

Crustless Spinach and Canadian Bacon Quiche

Makes 6-8 servings

Ingredients

  • 1c finely chopped onion
  • 1c sliced fresh mushrooms
  • 1T vegetable oil
  • 1 package (10 ounces) frozen chopped spinach or 1½c cooked and chopped fresh spinach
  • 2/3c finely chopped Canadian bacon
  • 5 large eggs
  • 3c shredded swiss cheese (other cheeses will work too like cheddar or Monterey Jack)
  • 1/8t freshly ground pepper

Directions

  1. In a large skillet, sauté onion and mushrooms in oil until tender.
  2. Add spinach and ham, cook and stir until the excess moisture is evaporated.  Cool slightly.
  3. Beat eggs, add cheese and mix well. Stir in spinach mixture and season with pepper; blend well.
  4. Spread evenly into a greased 9-inch pie plate or quiche dish.
  5. Bake at 350°F for 40 to 45 minutes or until a knife inserted near the center comes out clean.

DSC_3145aDSC_3162a


May 27, 2015 Radish Raita

DSC_2740aRaita is a yogurt based condiment or salad, Originating in India, it is served as a cooling counterpoint to spicy stews and curries. It is most commonly made with cucumbers, but I have seen recipes with beets, tomatoes, carrots and even pumpkins! In this recipe from Bon Appetit, crispy and slightly spicy radishes are combined with yogurt, herbs, red onion and a serrano chili.

Joe has already put in three separate plantings of radishes and with temperatures anticipated to reach 90 this week, it’s time to pick them before they get very hot and go to seed. Like all root crops, wash radishes well from any dirt that clings to them. This year we started saving the radish tops and use them in our cooked greens. I grated the radishes on a box grater, leave a little of the stem on to spare your fingers from hitting the sharp edge. Alternately you could use a food processor with the shredding disc in place. The recipe calls for a combination of mint and cilantro or just whatever one you prefer. This is good news for cilantro haters.

Joe isn’t the biggest fan of mint, most of the mint we grow gets fairly intense and can often overwhelm the other flavors in a dish.  He has given the thumbs up to Vietnamese mint, at least that’s what Well Sweep Herb Farm calls it. It’s botanical name is mentha x gracilis, but when I looked that up it gave the common name of ginger mint, another mint in our garden and one that certainly looks different than the Vietnamese. The mild flavor works well in this recipe.

This recipe comes together very quickly.I used standard garden radishes, daikon radishes would make this spicier. If you want to make this just a little bit ahead of the time you are going to use it, combine all the ingredients except the grated radishes.  They should be added at the last minute because if the radishes sit too long in the dish they will make it watery.  I served the radish raita as a topping for salmon. I am sure it work well with other types of fish, or even as a dip for vegetables.

The radishes are literally popping out of the ground.

DSC_2661a

DSC_2717a

Grated radishes remind me of chopped candy canes!
DSC_2744a
Ginger mint or menthe gentilis
DSC_2605a
Vietnamese mint or mentha gracilis


Radish Raita

Makes 1½ cups

Ingredients

  • 1c plain whole milk or low fat Greek yogurt
  • ½c chopped mint and/or cilantro
  • 1 serrano chile, seeded and finely chopped
  • 2T finely chopped red onion
  • 1T fresh lime juice
  • 1c coarsely grated red radishes
  • Kosher salt and freshly ground black pepper

Directions

  1. Mix together yogurt, mint, chile, onion and lime juice. Gently fold in radishes, season to taste with salt and pepper.

DSC_2726a

May 10, 2015 Raincoast Crisps with Raisins and Rosemary

DSC_2581aThere’s a cracker I love that I have to buy whenever I stop in at Whole Foods, Raincoast Crisps. Created by Parisian trained chef Lesley Stowe, she started her own cooking school and catering company in Canada’s raincoast, Vancouver, over 25 years ago. The crisps originated from a bran bread that she served in her catering business with smoked salmon. Always looking for new and original ideas, on one occasion she sliced the bread and dried it out. It was met with approval from her kitchen staff so she decided to “pump it up” with additional ingredients.  That was the beginning of the Raincoast Crisp.

The crisps are toasty and nutty, loaded with ingredients like pumpkin seeds, raisins, and pecans.  They are delicious to nibble on their own or maybe just a spread of soft cheese or your favorite preserve. One never tastes like enough and it’s easy to justify munching a box full because they are so good.  So what’s the problem? At 7.99 and up per 6 ounce box they are a pricey indulgence. So some intrepid bloggers came along and cracked the code and a rather similar recipe is available to any one who is able to whip up a quick bread.

The DIY recipe is very simple to make. Stir together the ingredients and bake in mini loaf pans. Alternately you could bake them in two square cake pans for longer skinny slices. Be sure to thoroughly cool the loaves after baking before proceeding to slice. You could give them a short stay in the freezer to firm them up or just wait till the next day to proceed with the recipe.

The next step is to slice the crackers as thinly as possible. Most of recipes I read said that it makes about 8 dozen crackers. That meant I needed to make 24 slices from each of the 4 loaves. I came fairly close, or maybe that had something to do with slices I had to “test” before baking! I used my thin blade serrated Cutco knife to make the thinnest and most even slices. I experimented with a food slicer which was ok, it’s important to maintain even pressure to keep the slices neat.

Bake the slices like super thin biscotti until they are crisp and golden. Now that I know the proportions of the recipe I am looking forward to customizing it.  Different flours,  dried fruits, spices and nuts, the possibilities are endless.  I served mine with a delicious soft goat cheese from Giggling Goat Dairy, a new vendor at my local farmers market in Wrightstown. The goat dairy is located in Dublin Pa and they make and sell fresh French-style goat cheese known as chèvre, a traditional style Feta as well as spreads and dips. I’m certain I will be frequenting their stand quite often this summer.

Raincoast Crisps with Raisins and Rosemary

Makes about 8 dozen

Ingredients

  • 2 c flour
  • 2t baking soda
  • 1t sea salt
  • 2c buttermilk
  • 1/4c brown sugar
  • 1/4c honey or maple syrup
  • 1c raisins
  • 1/2c lightly chopped pecans
  • 1/2c roasted unsalted pumpkin seeds
  • 1/4c sesame seeds
  • 1/4c flax seeds
  • 1T chopped fresh rosemary

Directions

  1. Preheat oven to 350°F.
  2. Stir together flour, salt and baking powder in a large bowl. Add the buttermilk, brown sugar and honey and stir to combine. Add the raisins, nuts, pumpkin seeds, sesame seeds. flax seed and rosemary and stir until all the ingredients are thoroughly combined.
  3. Pour the batter into 4 mini loaf pans that have been sprayed with nonstick spray. Bake loaves for 30 to 35 minutes, rotating halfway during baking time. The loaves should be golden and springy to the touch. Remove loaves from the pans and cool on a wire rack.
  4. Allow the loaves to cool completely, then freeze for about an hour. This will allow you to slice the loaves as thinly as possible. I used a serrated edge knife for the neatest cut.
  5. Place the slices on baking sheets that have been lined with parchment paper. Bake the slices at 300°F for about 15 minutes, then flip them over and bake for another 10 minutes until crisp. Cool completely and store in an airtight container.
DSC_2566a
Slices on a parchment lined sheet ready for their second bake.
Delicious on their own or with a spread of goat cheese, this is the fresh garlic peppercorn from Giggling Goat Dairy.

DSC_2584a


March 4, 2015 Turkish Tarator Sauce

DSC_1788a

What’s in a name? When it comes to food, it may depend on what country you are in. Tarator is a prime example of this. In the Balkans, it is a cold yogurt based soup made with cucumbers and seasoned with dill and lemon, similar to the ingredients in Greek tzatziki. In many Middle Eastern countries, Tarator is a sauce or a dip based on sesame tahini. The tarator of Turkey is a savory sauce, thickened with nuts and used with a wide variety of foods.

This recipe, a Turkish tarator sauce from Fine Cooking magazine is courtesy of  James Beard award winning chef Ana Sortum. Her travels as a young chef exposed her to the exciting, flavorful home cooking of Turkey. When she returned to Cambridge, Massachusetts, she opened her first restaurant, Oleana combinig the bold flavors of the eastern Mediterranean with farm fresh ingredients.

Tarator is very easy to make. As with many traditional sauces, it was first made with a mortar and pestle, but a blender brings this sauce together in less than five minutes. Nuts are the base of the sauce and provide it’s richness. I have seen everything from walnuts, to hazelnuts to pine nuts used in different versions of this recipe, blanched almonds are the chef’s choice in this recipe. Some recipes also include bread as an additional thickener but I found this unnecessary.  Combine nuts, olive oil, lemon juice, water and garlic in the food processor. Blend until smooth and thick, scrape down the sides several times during this process, it takes about 3 minutes.  Season to taste with salt and pepper. When serving, garnish with some toasted almonds.

Use good ingredients, not those nuts that have been sitting in your cabinet for months, fresh lemon juice and a quality extra virgin olive oil. I purchase my best oils from The Tubby Olive. Their oils are sourced from small farm producers and I am able to taste what I buy. Unfortunately not every bottle of olive oil labeled extra virgin, actually is.   If you are interested in some good information regarding the misrepresentation of the origins and quality of some brands of olive oil, check here.

Tarator is traditionally served with a wide variety of dishes, ranging from grilled eggplant, beets and fried seafood. I served it with roasted salmon and lightly blanched sugar snap peas.  It would also be a flavorful dip for crudite or a sauce for fried calamari.

Turkish Tarator Sauce

Makes about a cup

Ingredients

  • 1/2 c blanched whole almonds
  • 2T toasted and chopped almonds for garnish
  • 1/4c extra virgin olive oil
  • 2t fresh lemon juice
  • 1 1/2t chopped garlic
  • Kosher salt and freshly ground pepper

DSC_1779a

Directions

  1. In a blender, puree the whole almonds, olive oil, lemon juice, garlic and 1/2c water until completely smooth and thick, at least 3 minutes.
  2. Season to taste with salt and pepper. Sauce keeps covered and refrigerated up to 3 days.

DSC_1799a

DSC_1790a

February 17, 2015 Stovetop Smoked Salmon with Kaffir Lime Sauce

DSC_1253a


I discovered my love of cooking in the early eighties and a good time for me meant a trip to the cookware store. In those years I was the proverbial gadget queen. Some of them were good purchases, a KitchenAid stand mixer, food processors in different sizes, a serious ice cream maker, all very useful when I was catering. One purchase I made that was a good investment was a stovetop smoker. Made by the Camerons company, the one I purchased thirty years ago looks exactly the same as the one they sell today, at about the same price. The smoker is made from dishwasher safe stainless steel. It is a rectangular box (15″x11″) fitted with a wire rack that sits over a drip tray with a lid that slides on for a snug fit. The handles fold out from the side of the box and stay relatively cool during the cooking time but I would still advise using a potholder. One source said it easily fits over a burner but I have always used it over two burners.

I confess I haven’t used this smoker as much as I probably should. I have smoked cheese, shrimp and, of course, salmon. The Camerons company sells wood chips in oak, alder, hickory and cherry that I have used in the past. This time I chose a different smoking medium, tea. I followed a smoking formula that I have used previously with tea smoked chicken. Brown sugar is used because when sugar caramelizes it forms volatile compounds that enter the air as smoke. This gives the salmon a bittersweet caramel flavor. Rice adds it’s own flavor and absorbs the moisture the sugar creates. This is important because the smoking mixture should be as dry as possible, the goal is to create smoke, not steam. I chose Lapsang souchong, a black tea from the Fujian province of China and Joe’s favorite. The tea is dried over a smoking pine fire that gives it a sweet, clean smoky flavor. I also used some orange peel to add some of it’s aromatics.

The smoking medium is placed on the base, lining the bottom with foil makes for the easiest clean up. Next is the drip tray, then the wire rack. If you spray the wire rack with a little non stick spray it will make the salmon easy to remove. Place the salmon on the middle of the rack so that the smoke can circulate freely around it. Slide on the lid and close it completely. I turn the burners on to medium high until I see the first puffs of smoke wafting out, then I back it down to a low simmer. The guide states that for every 6 ounces of fish, allow ten minutes cooking time, so the one pound piece of salmon cooked in less than a half hour.

The salmon can be served as an appetizer or a main course. Serve with an accompanying sauce.  Horseradish and sour cream or tzatziki would be good choices. I made a sauce that I found on the Martha Stewart website using both lemongrass and kaffir lime leaves. Since I would venture to guess most people don’t have a stovetop smoker, though it is a good investment, a heavy pot or wok lined with foil with a rack that suspends the food over the smoking mixture and a foil lid would be a reasonable substitute.

The booklet that came with the smoker gives recipes for fish, poultry, meat, sausages, cheese and even eggs! It is also suitable for outdoor use, either over a campfire or on the rack of a barbecue. Quoting directly from the booklet it is, “perfect for slimmers” that’s how dieters are referred to in the U.K..  It describes the smoking technique as one that is “widely used in Europe” and it “puts pleasure back into eating.” I must agree, it is a healthy way of cooking and the salmon turned out moist and quite delicious, just lightly scented with smoke. I won’t wait so long in between next time to use the stovetop smoker.

Stovetop Smoked Salmon

Makes 1 pound

Ingredients

  • 1 lb. salmon fillet, pin bones removed
  • Kosher salt and granulated sugar

Smoking medium

  • 1/3c loose tea (I used Lapsang souchong, other aromatic teas could substitute)
  • 1/3c rice (any type)
  • 1/3c brown sugar
  • Several strips of orange zest.

Directions

  1. Check the salmon for any pin bones and sprinkle the surface generously with sugar and kosher salt. Place in refrigerator uncovered for one hour.
  2. Set up the smoker and line the bottom with foil for the easiest cleanup.
  3. Scatter the smoking ingredients over the bottom of  the pan.
  4. Place the drip tray over the bottom.
  5. Spray the food rack with non stick spray for easy removal of the fish
  6. Center the salmon on the rack so that the smoke will circulate around the fish easily.
  7. Slide the lid on and turn the burners on to medium high. As soon as you see the first puff of smoke, turn the burners down to a simmer. You should still see some smoke escaping, if not, turn the burners up a little.
  8. Smoke the salmon for about 25 minutes or to your desired doneness.
Sprinkle the salmon with kosher salt and a little sugar to bring out the moisture in the fish.


I still keep the smoker in the original box.
The smoking mixture of brown sugar, rice, Lapshang souchong tea and orange peel.
Center the salmon on the rack over the smoking medium.
Lapsang souchong tea has a smoky aroma.
Now we're smoking!
Now we’re smoking!
One pound of salmon will takes less than a half hour.


Kaffir Lime Sauce

Ingredients

  • 1T olive oil
  • 3 medium shallots, finely chopped
  • 3-4 stalks lemongrass, cut crosswise into 2-inch lengths
  • 6 kaffir lime leaves, fresh or dried, cut into thirds
  • 1T chili paste (I used sambal oelek)
  • 1/4c red wine
  • 1c canned crushed tomatoes
  • 2T heavy cream
  • Kosher salt and freshly ground pepper


Ingredients for the sauce.
Lemongrass
Lemongrass

Directions

  1. Heat olive oil in medium skillet over low heat. Add shallots and cook until soft and translucent, about 1 minute. Crush the lemongrass pieces and add to the skillet; cook for 30 seconds. Rub the lime leaves between your hands to bring out their aroma, add them to the skillet and cook 30 seconds more.
  2. Add chili paste and cook, stirring, until browned, about 15 seconds. Add wine and cook until reduced by half, about 2 minutes.
  3. Add tomatoes and bring mixture to a boil. Immediately reduce to a simmer and cook for 30 minutes. Strain mixture into a small saucepan through a fine mesh sieve; discard solids, I used a food mill for this step. Add cream to saucepan and place over medium heat. Cook sauce until liquid is reduced slightly, about 5 minutes. Serve warm.