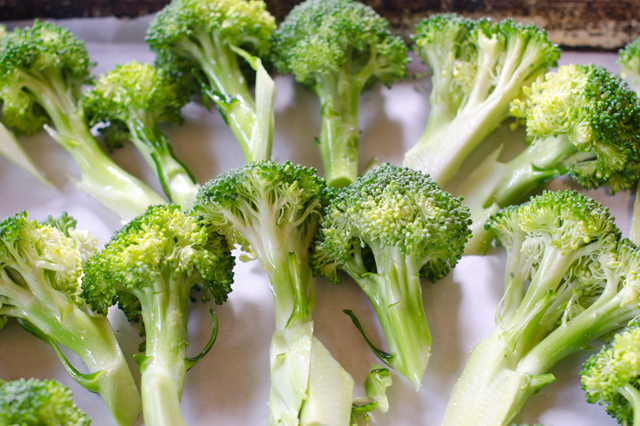
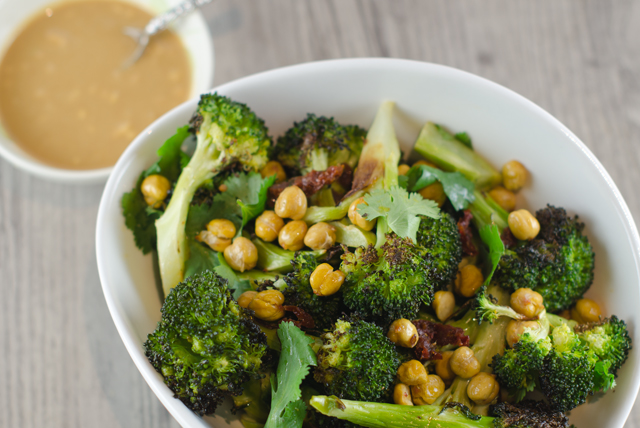
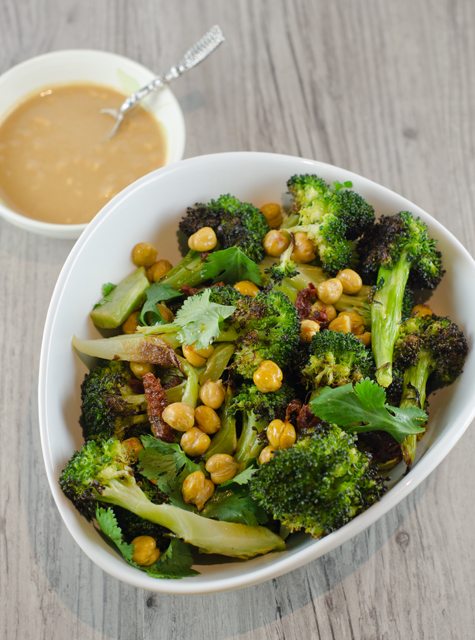
Broccoli is an all season favorite that usually has a place of prominence at the front of the produce aisle. I love to roast broccoli toss it with olive oil and sprinkle with salt and pepper. It’s so good we’re lucky it makes it to the dinner table. This time I used a little restraint and combined it with some roasted chickpeas, cilantro leaves and sun-dried tomatoes. A tahini dressing brings it all together and makes a wonderful winter side dish. If you don’t like cilantro, substitute flat leafed parsley.
Roasted Broccoli Salad with Tahini Lemon Dressing
Serves 4
Ingredients
1¼ to 1½ lbs broccoli crowns
2-3 T extra virgin olive oil
Kosher salt and freshly ground black pepper to taste
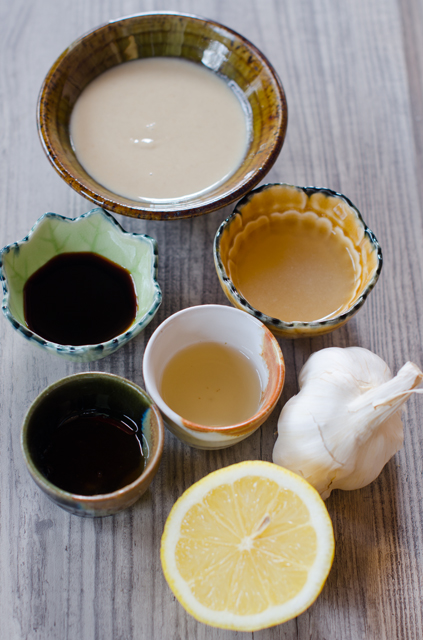
2 T tahini
1 ½ T lemon juice
2 t balsamic vinegar (white preferably)
1 t tamari
1 t honey
1 clove garlic, finely chopped
1 c chickpeas
1 c cilantro leaves
2 T finely chopped sun-dried tomatoes
Directions
Preheat oven to 425°F. Line a large baking sheet with parchment paper. Cut the broccoli into florets, including some of the stem. Place broccoli in a large bowl and toss with olive oil, salt and pepper. Move the broccoli to a baking sheet and place in an even layer.
Roast until the broccoli is nicely browned, stirring and flipping the pieces occasionally, check after 5 minutes. Roasting will take about 15 minutes total. Leave oven on.
While the broccoli is roasting, combine the dressing ingredients, tahini, lemon juice, balsamic vinegar, tamari, honey, chopped garlic in a small bowl. Stir to combine and add a little water if needed to thin the dressing.
Drain and rinse a can of chickpeas. Place them on clean cloth kitchen towel or paper towels to dry and roll gently to remove skin. Place chickpeas on the same baking sheet that the broccoli was on and roast until they turn golden brown in spots. Roll the chickpeas around on the sheet during the baking time to ensure even browning.
In a large bowl place the roasted broccoli, chickpeas, cilantro leaves and sun-dried tomatoes. Toss gently. Drizzle dressing on individual portions and serve immediately.
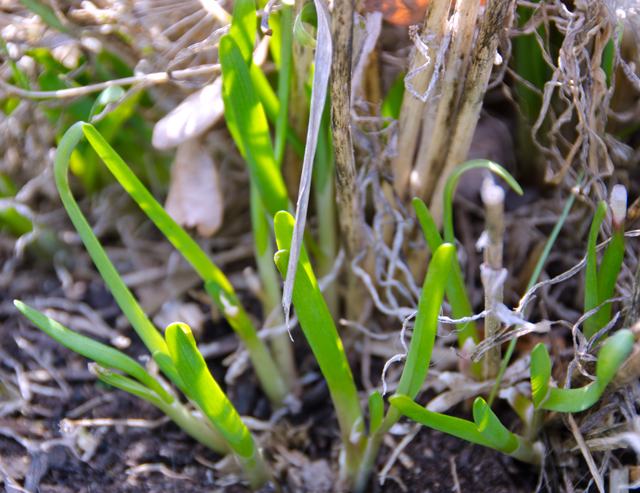
The last two days have brought us very pleasant but unseasonable temperatures in the seventies. While opening a window to let some fresh air in I spotted two pansy “volunteers” that had sprung up close to the house but not in an area where we normally plant anything. On a walk down to the garden I spotted the first dandelion. An early spring? Looks like even though the temperatures are going back into the forties by this evening. A few days of warmth is not enough to show evidence of new life in the garden. There are some beet greens and radicchio under a cold frame and I will take it on Joe’s word that there is miners lettuce and some kale in the greenhouse. I did see a bit of green in the circle garden, the beginning of the rebirth of the Chinese chives. In a month or two we will be pulling them out by the bucketfuls but for now it’s nice to see that first poke of green, letting us know that spring isn’t that far off. Until then my produce is from the local supermarkets and club stores.
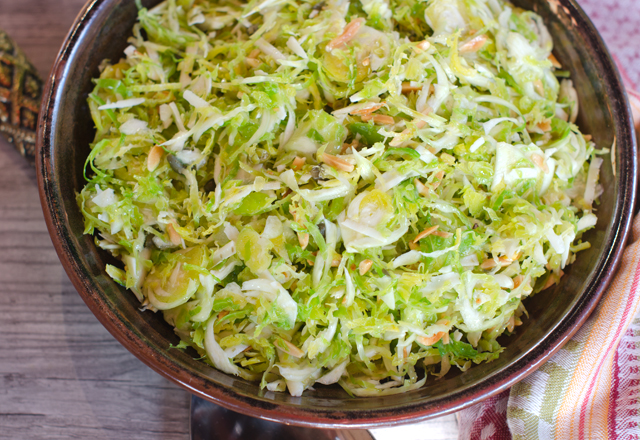
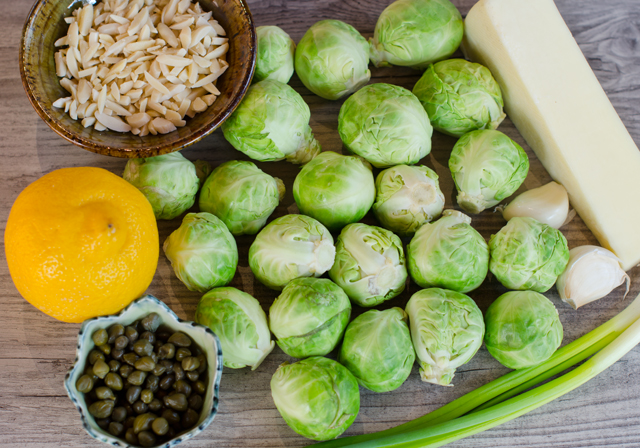
This Brussels sprouts salad is simple and delicious with a satisfying crunchy texture. The sprouts can be sliced in no time in the food processor, I used a 2 mm (thin) slicing disk or with a mandoline; trust me use the guard. If you want to work on your knife skills, slice them by hand. The dressing couldn’t be simpler, extra virgin olive oil, lemon juice, salt, pepper and capers. If you always wondered what those little green things are, capers are the unopened flower buds of Capparis spinosa, a prickly perennial shrub like bush, native to the Mediterranean and some parts of Asia. The buds are harvested, dried in the sun and then pickled in vinegar, brine or salt. The size of a caper can be as small as a green peppercorn, and as large as a small olive. The largest ones are usually served as part of an antipasto platter, the small ones are referred to as non pareils (French for without equal), the size best suited for this recipe. Many recipes call for rinsing them first but I would say taste them and decide for yourself. Rough chop the capers and add them to the dressing. Shredded Asiago cheese compliments the salad with it’s creamy nutty flavor. Finish the salad off with toasted slivered almonds and garnish with thinly sliced scallions. Leftovers are even better the next day.
Brussels Sprouts Salad with Lemon Caper Dressing and Asiago Cheese
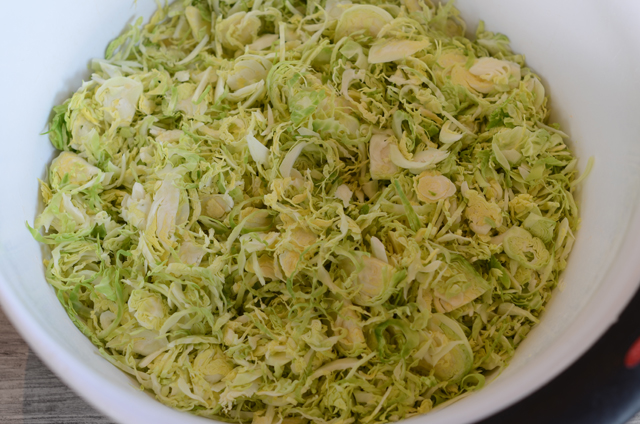
Shred the Brussels sprouts using the slicing disc of a food processor. You can also slice them by hand with a well sharpened knife or a mandoline slicer. Place shredded sprouts in a bowl large enough to toss them in.
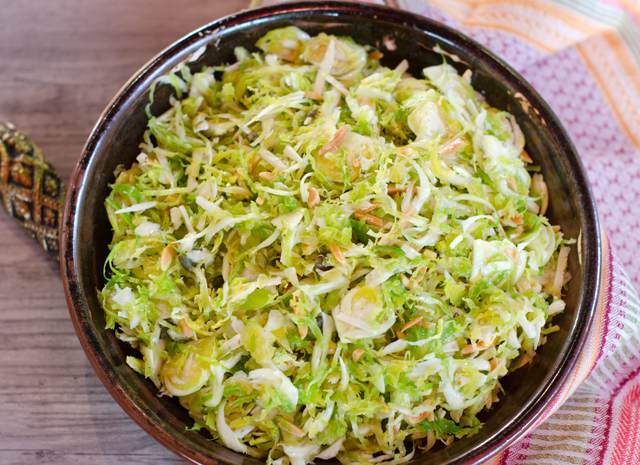
In a small bowl whisk together the olive oil, lemon juice and zest, capers, garlic, salt and pepper. Pour about two thirds of the dressing over the sprouts and toss. Add the toasted almonds and Asiago cheese and toss again. Taste and add more salt if needed and additional dressing if needed. Garnish with chopped scallions and serve immediately.
Add shredded Brussels sprouts to a large bowl and toss with dressing and other ingredients.
Pansies that came up in February.The first new growth of garlic chives. My garnish for the next Brussels sprout salad.
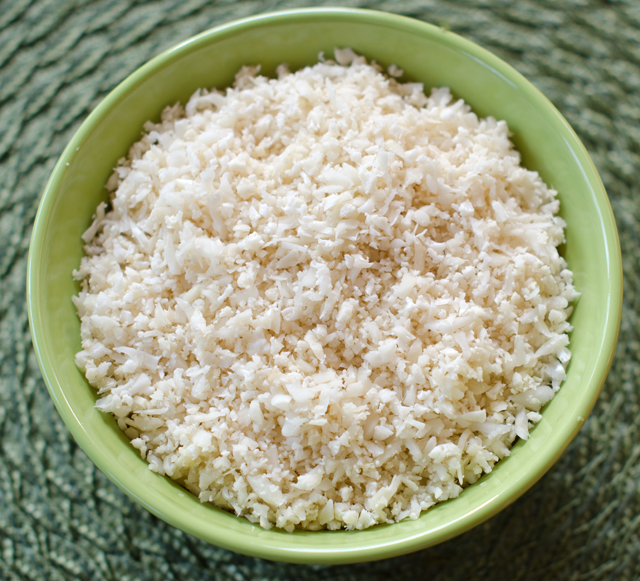
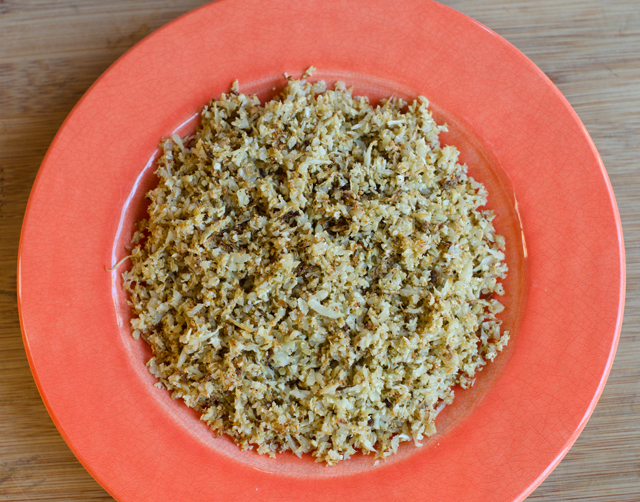
Toasted cauliflower rice takes plain cauliflower rice to the next dimension. If you are already making cauliflower rice, there’s not much more to do to give this “stand-in” a more rice like texture along with the nutty quality we love in regular rice. Make cauliflower rice either by pulsing it or using the shredding disc of the food processor. You can also go low-tech and grate the cauliflower on a box grater with the medium sized holes. I think it’s even more important to press out the additional liquid when you are making toasted cauliflower rice, so your rice will toast, not steam.
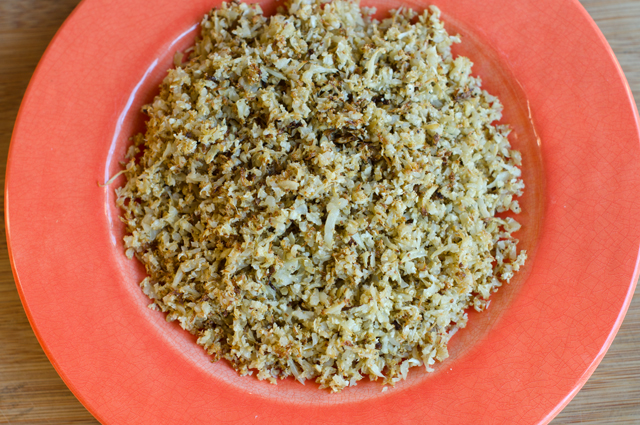
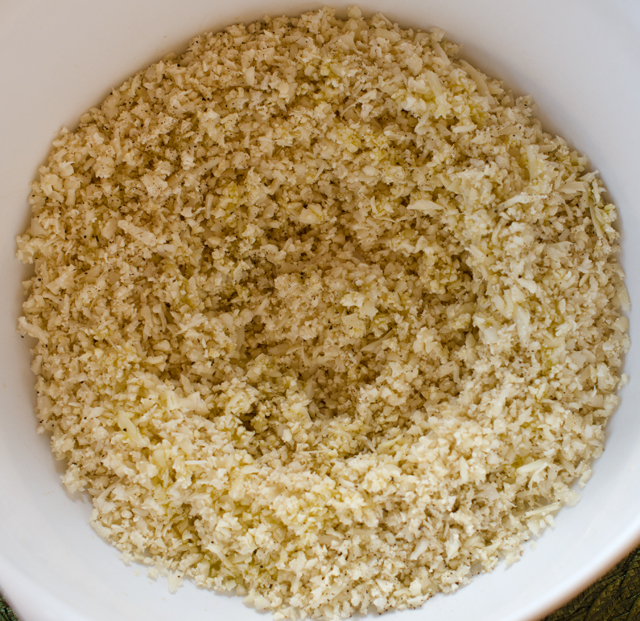
Put the cauliflower granules in a large enough bowl to mix it around, toss with a tablespoon or so of olive oil, a sprinkle of kosher salt and a grind of pepper (white pepper if you are fussy). Spread the riced cauliflower evenly over a lined baking sheet, foil works best here for easy clean up. A full head of cauliflower will probably take two baking sheets. Bake at 375°F convection heat for about twenty to twenty five minutes. I flipped the baking sheet from front to back and top to bottom at the halfway point and gave it several good stirs during the cooking time. The end product is toasty with an amazing rice like texture. Bake more than what you think you might need, it will shrink (after all cauliflower is 92% water) during the cooking process and yes, it is that good. Feel free to add any spices or add-ins to this dish. I served it with pesto chicken breasts to absorb the sauce but the possibilities are endless.
Oven Toasted Cauliflower Rice
Serves 2-4
Ingredients
1 head cauliflower
1 T olive oil
Kosher salt and pepper to taste
Plain cauliflower rice before toasting.Drizzle with olive oil, sprinkle generously with salt and pepper.Spread out evenly on a foil lined baking sheet. A whole head may take two sheets.
Directions
Preheat convection oven to 375°F. Cover two large, rimmed baking sheet with aluminum foil.
Break the cauliflower into florets, removing the stems. Place the florets in the food processor bowl and pulse until the cauliflower looks like rice. This takes about 10 to 15 one-second pulses. You may need to do this in two batches to avoid overcrowding.
Place the cauliflower rice in a large bowl, add olive oil, salt and pepper. Toss until the rice is coated with the oil. Spread in a single layer on the baking sheet and roast until tender, rotating the baking sheets halfway during the baking time. The rice is done when it starts to look golden in spots.
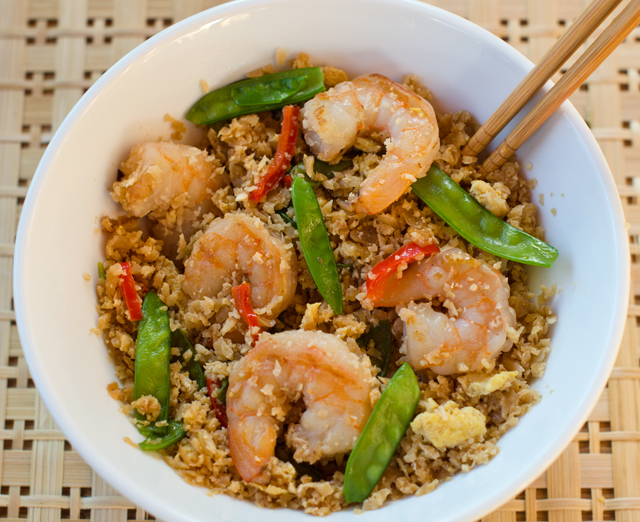
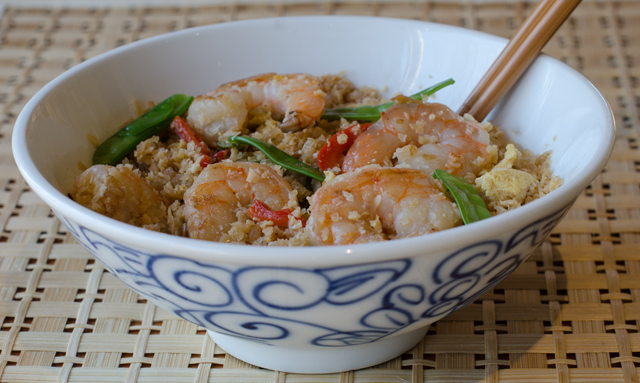
Cauliflower florets are a low carb substitute for white rice in this savory one pot, or should I say one wok, dish. It’s low glycemic, gluten-free and South Beach Diet friendly. Packed with juicy shrimp and colorful vegetables, this recipe is perfect for an easy go-to weeknight meal.
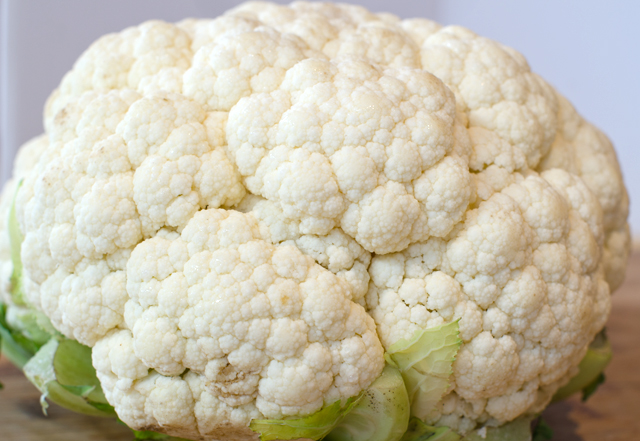
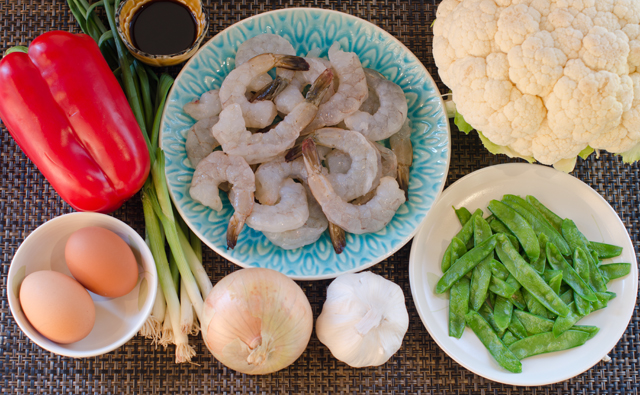
Cauliflower is sold by the head, not by weight. Depending on the time of year a standard head can vary greatly in size. Cauliflower is a cool weather crop in our area and harvested in the fall. When they appear at the farmers markets they can be huge, five pounds or more. In the winter months, imports from the West Coast are fairly small. The head I used weighed in at 2.13 pounds and half of the head made 5 cups, just what I needed for this recipe.
Stores like Trader Joe’s are now selling prepackaged cauliflower rice, but it’s easy enough to make your own. Cut the cauliflower into florets by quartering the head through the stem end and cut away the piece of core from each quarter. Then cut the cored cauliflower into florets. You can use a box grater with medium-sized holes or the food processor fitted with the grater blade. With both techniques you are aiming for little pieces the size of rice granules. I like to press out any additional moisture from the rice by placing it in a clean cotton tea towel and squeezing to remove remaining water. No excess moisture equals a dish that won’t turn out soggy.
As with all stir fry preparations, all of your ingredients should be ready to go when it’s time to cook. Trying to stay with a South Beach friendly preparation I used red pepper strips and snow peas. The peas were frozen from last year’s garden and perfect for a meal like this. Other possibilities are peas, carrots, and water chestnuts. Heat your wok, the pan is hot enough when a bead of water instantly sizzles and evaporates on contact. Once this happens, add one tablespoon of a neutral oil; peanut or canola are fine here. Swirl it around to thoroughly coat the pan. Add the shrimp all at once and spread them out over the pan so they are not overlapping. Cook shrimp on first side for one minute then flip and cook for thirty seconds. The shrimp should be almost cooked but not quite, they will finish cooking when you add them back to finish the recipe. Remove shrimp to a plate.
Add the eggs in next, stir and break them apart to get scrambled egg pieces. When the eggs are not quite cooked through, add them to the plate with the shrimp. Keep warm.
Wipe out your pan with a paper towel and return it to high heat. Add the second tablespoon of oil and swirl to coat the pan. The aromatics are in next, onion, garlic and ginger. Cook, stirring often until the onion is translucent, 3-4 minutes. Stir in your choice of vegetables and cook for another 3 minutes. Add the scallions and cook for 15 seconds. Add the cauliflower rice to the pan and sprinkle the tamari and sesame oil over the rice. Warm the cauliflower rice through and finally add in the shrimp and eggs. Let the shrimp and eggs heat back up and finish cooking. Toss to mix the rice evenly with all the ingredients. Taste for seasoning, adding more tamari and sesame oil if desired. Serve hot.
Shrimp Fried Cauliflower Rice
Ingredients
1 medium head of cauliflower
¾ to 1 lb medium uncooked shrimp, shelled and deveined
½ t kosher salt
Black pepper
2 tablespoons peanut oil, divided
2 eggs, beaten in a small bowl
1 small onion, finely chopped
2 cloves garlic, minced
4 scallions, minced
1-2 c vegetables, I used a combination of snow peas and red pepper slivers. Peas, carrots, water chestnuts can be used.
1 T tamari and more to taste
1 teaspoon and more toasted sesame oil
Directions
For the cauliflower rice, cut the cauliflower in half, cut out the core and discard. Cut the cauliflower into chunks. Place the cauliflower into a food processor and pulse until it’s the consistency of grains of rice. Alternately you can a small handheld cheese grater or a chef’s knife. Set aside 4-5 cups for this recipe.
Season shrimp with salt and pepper, set aside.
Heat a wok or large sauté pan on high heat. When the pan is hot enough for a bead of water to instantly sizzle and evaporate, add 1 tablespoon of the oil and swirl to coat pan. Add the shrimp, quickly spreading out around the pan so that they are not overlapping. Cook the shrimp untouched for a minute then flip over and let the other side cook for 30 seconds, or until about almost cooked through. Remove the shrimp from the pan onto a plate, leaving as much oil in the pan as possible.
Turn the heat to medium high and let the pan heat up again. Pour in the eggs, stirring in a quick motion to break up and scramble the eggs. When the eggs are almost cooked through, scoop out of the wok onto the same plate as the cooked shrimp.
Use a paper towel to wipe the pan clean and return to high heat with the remaining 1 tablespoon of cooking oil, swirling to coat. When the oil is very hot, add the garlic, ginger and onion to the skillet, and cook, stirring often, until onions have become translucent, about 3-4 minutes. Stir in red pepper strips and snow peas, and cook, stirring constantly, until vegetables are tender, about 3-4 minutes.
Add green onions and stir fry until fragrant, about 15 seconds. Add in the cauliflower rice and stir well to mix in the green onions throughout.
Drizzle the sauce all around the rice and toss. Add the cooked eggs, shrimp and sesame oil, tossing to mix the rice evenly with all of the ingredients. Finish cooking the shrimp and eggs and let everything heat back up again. Taste for seasoning and add additional tamari and sesame oil if desired. Serve hot.
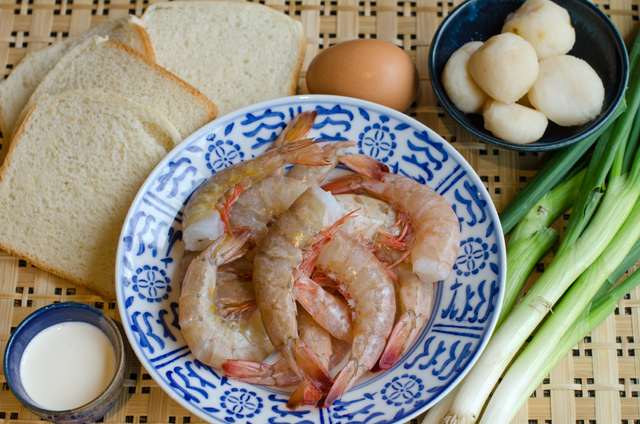
Shrimp toasts, bite-sized triangles of bread topped with shrimp paste are a popular dim sum item and a new addition to our Chinese New Year celebration. It is said the dish originated in Guangzhou (Canton) in China nearly a hundred years ago. There are others who claim it is a hybrid of a traditional Chinese shrimp recipe and bread, not native to China but introduced by foreign travelers to Hong Kong. I chose to use a recipe from Susannah Foo, a popular and highly acclaimed Philadelphia chef who eponymous restaurant closed in 2009. Shrimp toasts are often fried, this version is baked and can be made ahead and frozen, a big plus when you are serving an extensive menu. This year we celebrate the year of the rooster, which comes after a monkey year and before a dog year. Roosters are said to honest, bright, communicative and ambitious.
Baked Shrimp Toasts
Makes 3 dozen or more
Ingredients
10 to 12 slices thinly sliced white bread, crusts removed
1 large egg white
1 lb medium or large shrimp, peeled and deveined
2 T heavy cream
1 T vodka
1 t kosher salt
½ c chopped water chestnuts
2 scallions, minced
Directions
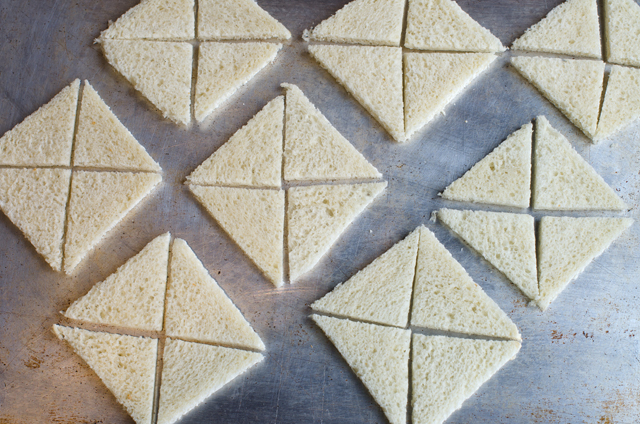
Preheat oven to 250° Cut each piece of bread into 4 triangular pieces. Place on a baking sheet and bake for about twenty minutes, until the bread is dry but not browned; leave oven on.
While the toast is drying, beat the egg white lightly. Dry the shrimp well with a paper towel and place in a food processor; puree.
Add the egg white, cream, vodka and salt. Process until just pureed. Transfer to a bowl.
Add the water chestnuts and scallions to the shrimp mixture and mix just until all the ingredients are combined.
If you are baking the shrimp toasts immediately, increase the oven temperature to 375°F and coat a baking sheet lightly with non stick spray.
Spread 2 heaping teaspoons of the shrimp mixture on each piece of bread. Repeat with the remaining triangles.
At this point, the shrimp toast can be frozen for later use. Place the triangles on baking sheets and freeze. Once frozen, remove from the baking sheets, place in freezer bags and return to the freezer.
Bake frozen shrimp toasts directly from the freezer, about 10 minutes, the shrimp will be cooked through, all the ingredients hot and the toast is golden brown on the bottom. Triangles that were not frozen will take a little less time.
Inspiration for the recipes I post originate from many different sources and this qualifies as the most unusual, my new car. In the first week of driving my 2015 Volvo I received this warning, AWD (all wheel drive) disabled, please schedule service. This was accompanied on the dashboard with the picture of the frame of a car with two wheels out of line. That was enough to get my attention. I had it in for service in less than a week of driving off the lot, only to have the same message reappear the day after the first service. So I needed to take it back in again. Nothing seemed wrong with the steering, and the warning would be on one day, and off the next. Of course the day I took it in the service light was out.
I am occasionally offered a loaner so I don’t have to wait on the car but that can also be a pain too, driving to the dealership, driving home, driving back and so on. So this time I thought I would just wait. I came prepared with a large stack of food magazines. The lounge is large and on this day, pretty full. The television was on and several of the men who were there seemed to be enjoying the banter on Live with Kelly. So I settled into my spot, pulled out my magazines and started reading as much as one can when the only available chair is right next to the television.
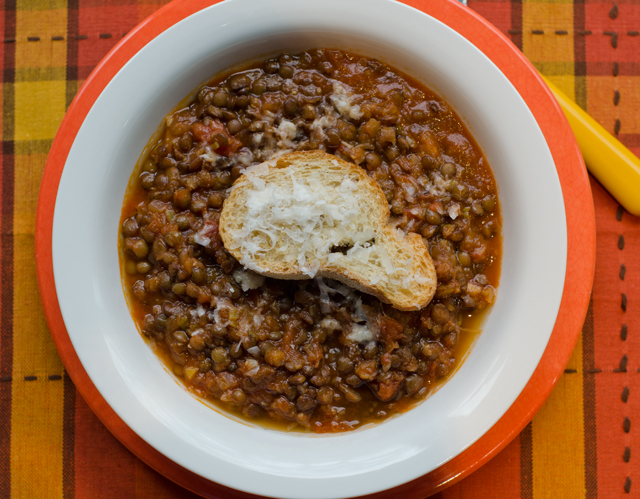
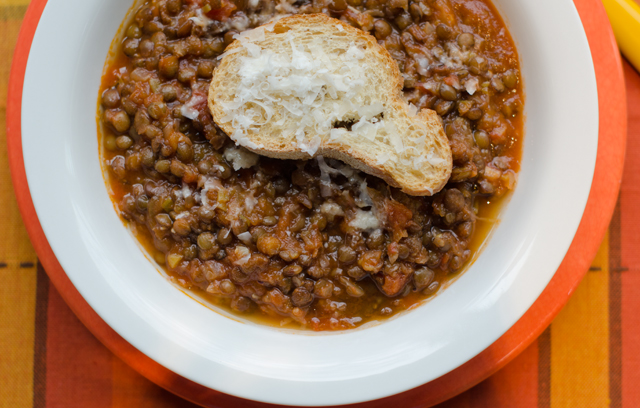
After Kelly comes Rachael, as in the Rachael Ray show. I don’t watch much daytime television but Rachael’s show isn’t too bad. After a very interesting segment on cutting edge skin care, celebrity cooking with folks I’ve never heard of (too many channels, too many “celebrities”) and how to get your house ready for a Super Bowl party, it was time for Rachael to cook. Her recipe grabbed my attention since Joe and I were both fighting the good fight against pretty nasty colds. We blamed each other for giving it but I think I know which one of us spends a lot more time around sick people! The night before per Joe’s request I made a chicken soup with veggies and ditalini pasta. Rachael’s recipe for tomato lentil soup looked fairly quick and just the thing for my Cold-Eze numbed taste buds.
This time of year there is nothing more comforting than a bowl of soup. Rachael calls this soup cheap, cheerful and filled with great nutrition. This recipe makes a lot of soup for two people, but as she points out, soup freezes beautifully. Perfect for a cold winter’s night or just the right thing when a cold is coming on.
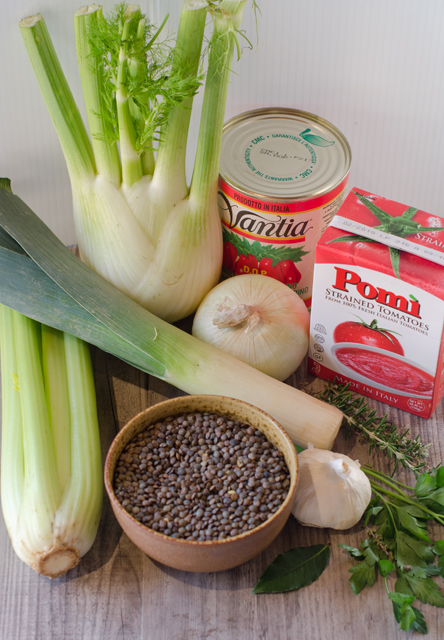
Start the recipe by cooking the lentils. Unlike other beans that need to soaked overnight, lentils just need to be picked through to remove stones and rinsed well in a colander. Put the lentils in a pan with water to cover by at least two inches, they will at least double in size. Add a clove of crushed garlic and salt and bring them to a boil. Reduce the heat to a gentle simmer and cook for thirty to forty minutes. You want tender, not crunchy or mushy lentils. I used the French Puy variety available from Bob’s Red Mill. If I used the lentils di Norcia referenced in recipe I would need to mail order them through Amazon, but at almost thirty dollars a pound, I will stick with French lentils. Lentils di Norcia are grown in the high plains (4500 ft) of the Apennine mountains of Central Italy. They are said to have thin skins and a soft consistency. I will never know….
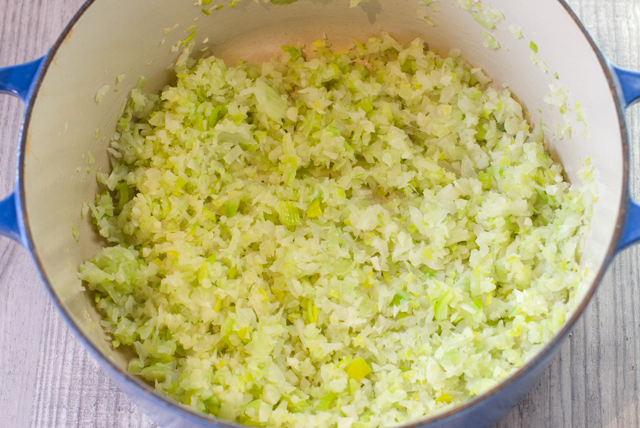
In a soup pot over medium high heat, add olive oil, she calls it “two turns of the pan”, which translates to approximately two tablespoons. The vegetables and herbs are added and partially cooked to soften. Add stock, she used vegetable to keep this a vegetarian dish, but chicken stock is fine with me. Next into the pot are the San Marzano tomatoes that we both like for their natural sweetness. Rachael pointed out that some canned tomatoes have the word San Marzano in the title but not in the can! Spin the can around and make sure it contains San Marzano tomatoes in the ingredients. Break the tomatoes up with a spoon, kitchen scissors or for the tactile inclined, with your hands. Rachael and her mom do it that way. Tomato passata, a new one on me, is next into the pot. Passata is uncooked tomato puree that has been strained of seeds and skins. It is very common in Europe. I found a product from Pomi brand tomatoes in an aseptic container referred to as strained tomatoes. Substitute tomato puree with no sugar added if you can’t find it, but I think it is worth searching out.
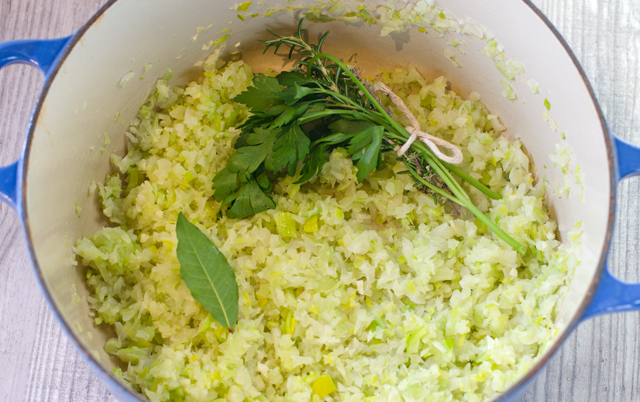
Add the cooled lentils to the pot and simmer to combine flavors and the thickness you desire. Remove the herb bundle and bay leaf before serving. This is a vegetarian dish but my husband is not. To make this more to his taste I added a few turkey meatballs at the end of cooking time. Rachael serves this soup with bruschetta, which really is, as she points out, just charred bread. She took a chunk of ciabatta and charred it over an open flame, then seasoned it with cut garlic, a good quality olive oil, flaky sea salt and chili flakes. This bread is ripped up in pieces to wipe the bottom of the bowl, in Italian that is called the scarpetta. Rachael tops the bowls of soup with grated Parmesan. Delicious!
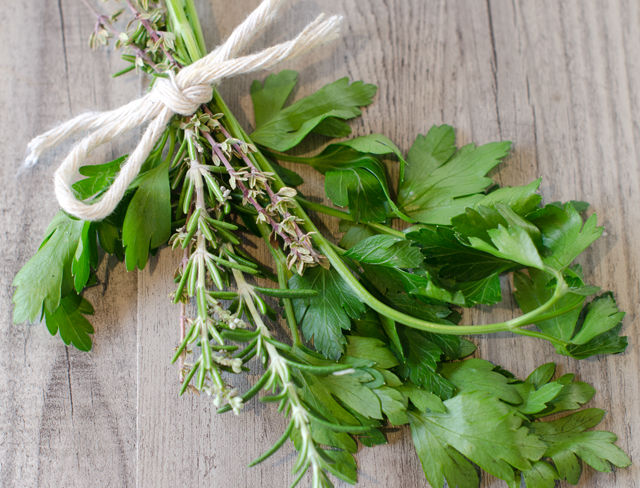
Saute the vegetables to soften.An herb bundle of parsley, thyme and rosemary.Add the herb bundle and a bay leaf to sauteing the vegetables.
Tomato Lentil Soup
Serves 6 or more
Ingredients
1 pound lentils, I used small French lentils
4 cloves garlic, 1 crushed and 3 chopped, divided
Salt
2 tablespoons olive oil
1 small bulb fennel, cut into small dice
1 leek, quartered lengthwise then chopped
2 to 3 ribs celery with leafy tops, chopped
1 onion, chopped
1 large bay leaf
Herb bundle of parsley, thyme and rosemary (a few sprigs of each)
Pepper
6 cups vegetable or chicken stock
2 cups passata or tomato purée
1 28-ounce can San Marzano tomatoes
Chili flakes and EVOO – Extra Virgin Olive Oil, to serve
Directions
Rinse lentils well and add them to a large pot with enough water to cover by about 2 1/2 inches. Add crushed garlic clove and bring to a boil. Add salt, reduce heat and simmer 30-40 minutes. Turn off heat and let lentils cool in any remaining liquid.
Heat a soup pot over medium-high heat with olive oil, 2 turns of the pan. Add chopped garlic, fennel, leeks, celery, onions, bay, herb bundle, some salt and pepper, and cook partially covered for 7-8 minutes to soften, stirring frequently.
Add stock, passata or purée, and tomatoes, breaking them up with a spoon or crushing them with your hands when you add them to the pot. Stir in cooled lentils; combine and simmer to combine flavors and until soup reaches desired thickness.
Remove bay and herb bundle, and serve in shallow bowls garnished with chili flakes and a swirl of extra virgin olive oil.
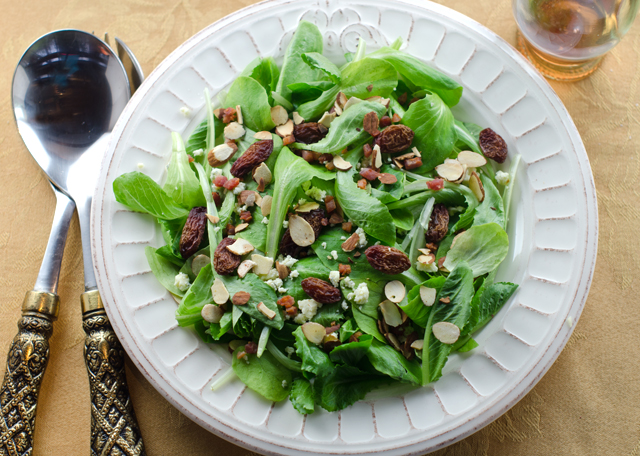
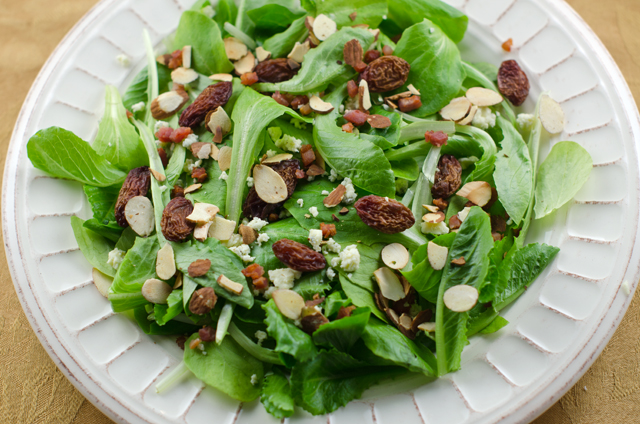
The holidays have been over for more than a week now and it’s time to put down the sweets and get back to healthy eating again. Salads are always an important part of our dinner and I am always looking for new ways to make them interesting and flavorful.
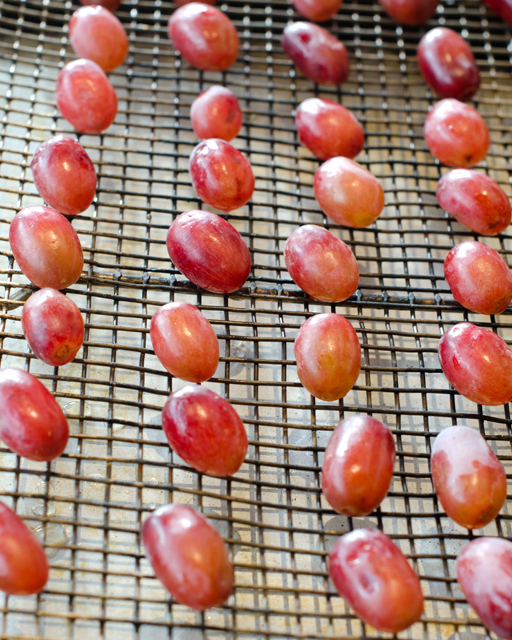
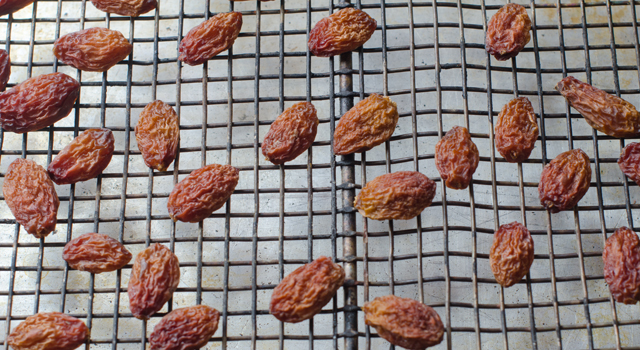
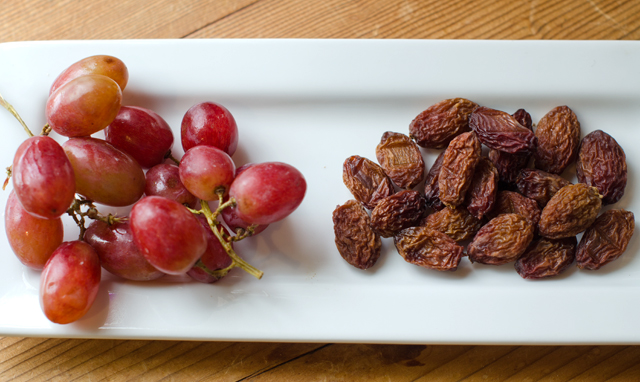
I recently saw a recipe for dried grapes and thought it would be fun to try. I used my own method of stemming and washing the grapes and drying them on wire rack over a baking sheet. Having a convection oven is a plus here. I achieved the right amount of shrivel and concentration of flavor in eight hours.
The preparation was simple and quick and was mostly hands-off during the process. I was very pleased with the results. To complement my new found ingredient, I made a salad of baby romaine, blue cheese, toasted almonds, dried grapes and some sauteed pancetta crumbles. The right combination of sweet, salty, crunchy, creamy and crispy.
Dried Grapes
Ingredients
A bunch of red seedless grapes
Directions
Preheat oven, convection is best here, to 185°F.
Stem and wash the grapes thoroughly. Shake off excess moisture in a colander.
Place a wire rack over a baking sheet. Distribute the grapes over the wire rack making sure there is space between each grape.
Place baking sheet in oven. Check occasionally and flip the sheet around, front to back to ensure even cooking.
The grapes will start to shrivel at the four hour mark and mine were done at eight hours. Store grapes in a container in the refrigerator.
Place stemmed and washed grapes on a wire rack over a baking sheet.The grapes are shriveled and very flavorful at eight hours.Before and after.
Winter Salad
Serves two
Ingredients
4-5 cups of baby romaine
¼ c crumbled blue cheese
¼ c toasted almonds
¼ c sauteed pancetta crumbles
Dried grapes to taste
3 T extra virgin olive oil
1 T balsamic vinegar ( I used cranberry pear)
¼ t Dijon mustard
Kosher salt and freshly ground pepper
Directions
Combine romaine, blue cheese, toasted almonds, pancetta crumbles and grapes in a bowl large enough to toss the ingredients.
Combine the olive oil, balsamic vinegar and Dijon mustard in a small bowl and whisk together. Add salt to taste. Toss salad with the vinaigrette and season with freshly ground pepper.
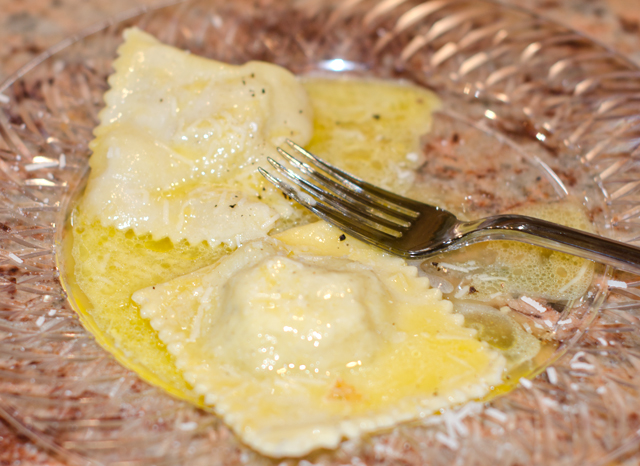
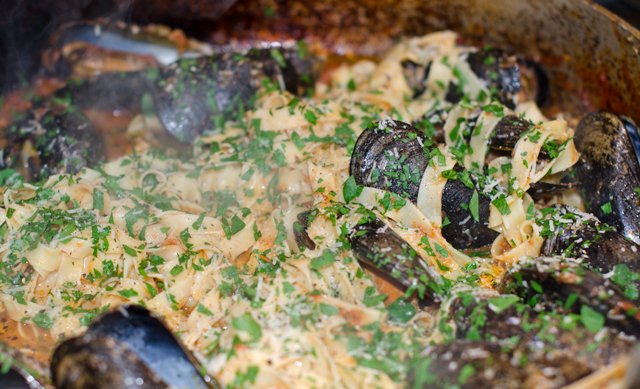
We have adopted the Italian/Italian American tradition of seven fishes and it has been our Christmas eve feast we share with friends for the past six years. I explained the tradition of the seven fishes in a post from 2012.
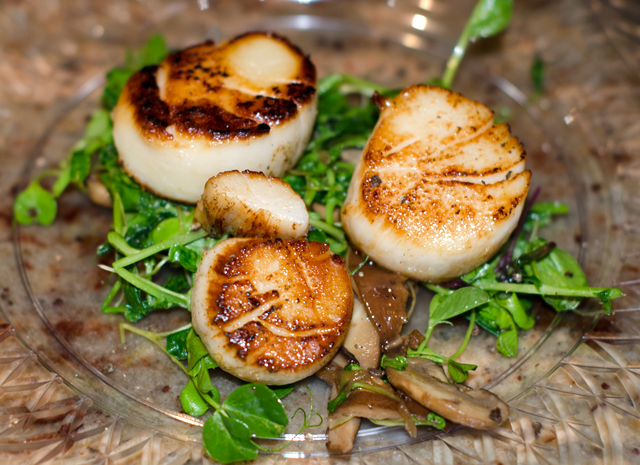
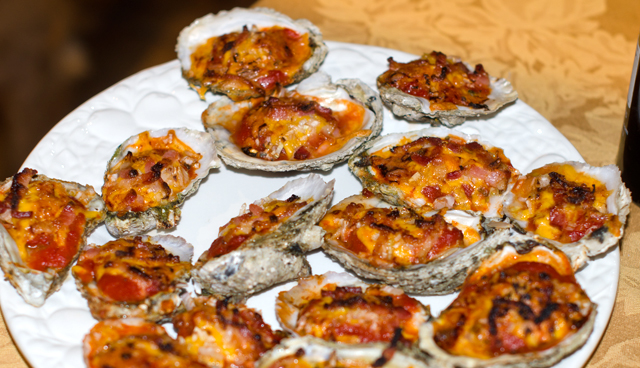
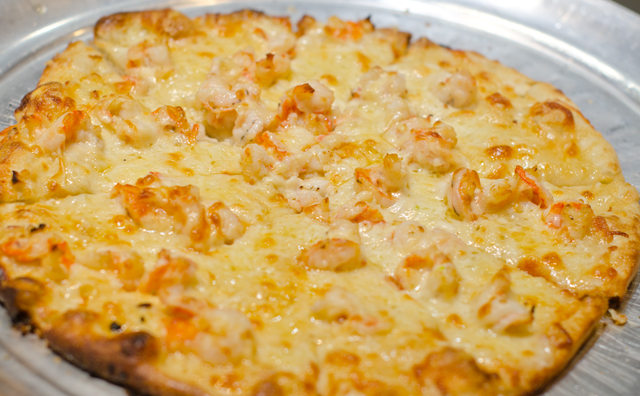
This year our seafood included oysters straight from the Chesapeake Bay courtesy of Nik. The extra large succulent oysters are enjoyed both raw with lemon and a splash of cranberry pear vinegar and baked a la Oysters Kenwood. We had a traditional (for us) shrimp scampi pizza as well as a newly inspired creation of a clam and bacon pizza. Both were delicious. We had a refreshing calamari salad, seafood stew, the best stuffed clams ever, just hope Joe remembers the recipe. Homemade pasta was served in two forms, mussels diavola with fettuccine and delicious crab ravioli served with a delicate lemon butter sauce. Golden brown seared scallops were served on a bed of microgreens with mixed sautéed mushrooms. The last course was swordfish skewers and pearl onions with a balsamic sweet and sour sauce. Some years Joe has cooked these in the fireplace grill but due to exceptionally warm weather this year they were cooked outdoors on the grill.
We start the party a little earlier each year, so that we aren’t finishing the last course at midnight. That actually happened the first few years. To finish things off, we left just enough room to finish off the meal with delicious Italian cookies and pastries from Chambersburg, an Italian neighborhood in Trenton, courtesy of Rich.
Nik power washes the oysters before they come inside for shucking..Joe and his wonderful stuffed clams.Stuffed clams had bacon in them too.Oysters Kenwood, oysters baked with tomato sauce, bacon and cheddar cheese. Delicious!!Shrimp scampi pizza.Clam and bacon pizza, this year’s new creation.Delicate crab ravioli with lemon butter sauce.Homemade fettuccine with mussels diavola.Seared scallops on a bed of microgreens and sautéed mushrooms.
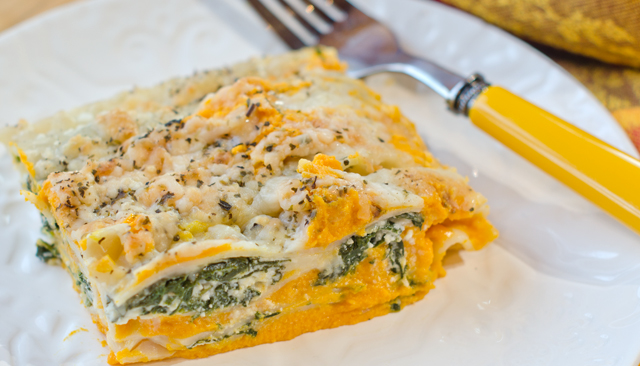
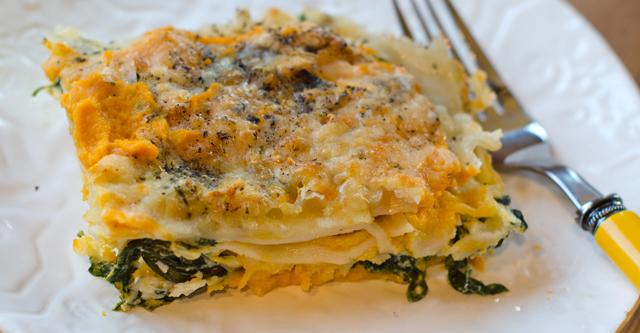
In this unique lasagna, perfect for the fall and winter months, a ricotta enriched butternut squash purée takes the place of a marinara sauce. A cheesy spinach filling complements the creamy squash for this satisfying and healthy vegetarian main dish.
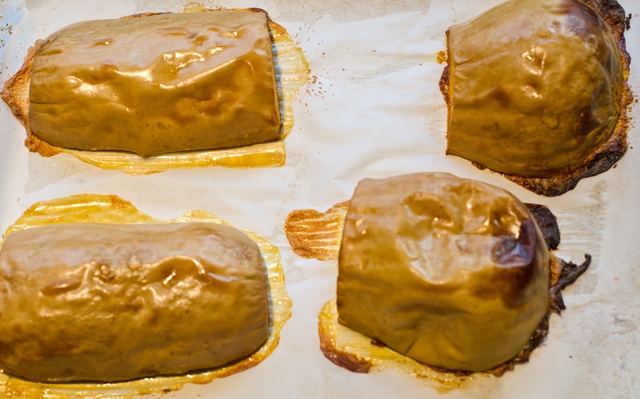
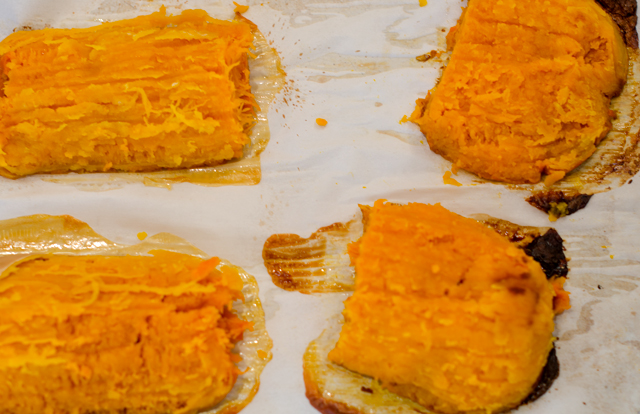
You will need a medium size butternut squash, weighing two and a half to three pounds. Cut the stem end off the butternut squash then cut the squash in half where the bulb end meets the neck. Cut both pieces in half lengthwise. scoop the seeds and fiber out of the bulb end, save seeds for later use. I rinse the seeds off and dry them between layers of paper towels. Toss with a little bit of olive oil and sprinkle with salt. Bake in a 375°F oven until they pop and become toasty brown. They are great for topping salads and for snacking.
Cover a large baking tray with parchment paper. Brush the squash pieces lightly with olive oil and place the four sections of squash cut side down on the baking sheet. Bake in a 375° oven for about 50 to 55 minutes, until the squash pierces easily with the tip of the knife. Let cool for 10 minutes, the skin should come off easily. Place the squash pieces in the bowl of a food processor fitted with the metal blade. If necessary, add a little additional liquid, purée until smooth, you will have about 2½ cups. Add 1 cup of ricotta cheese and purée again, season to taste with salt and pepper and a little freshly grated nutmeg.
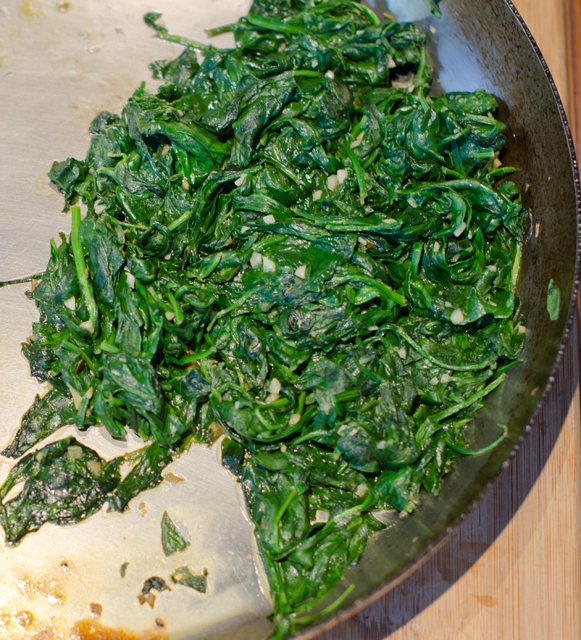
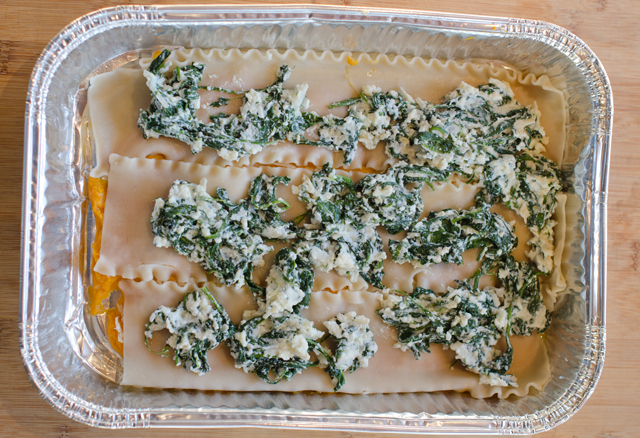
Place the spinach in a large bowl. Lightly rinse the spinach and toss in the bowl. The moisture will help wilt the spinach quickly. I used a 1 pound container of organic triple washed spinach. Finely chop two garlic cloves. Heat a large sauté pan over high heat and add the olive oil and swirl it around. Saute the garlic for a few minutes then add the spinach by the handfuls, adding more each time as it wilts down. After squeezing out any additional liquid, the end result will be one generous cup of spinach.
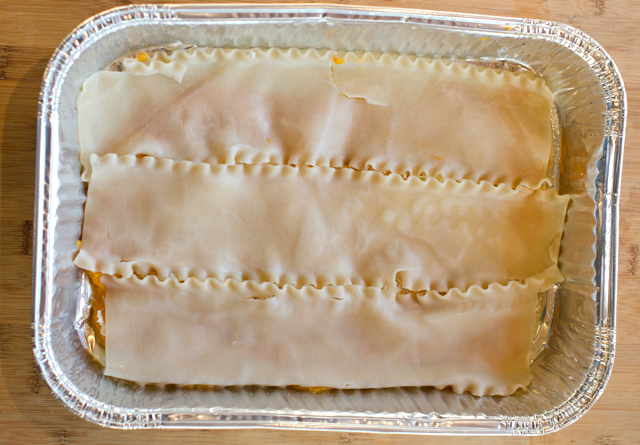
You can make this version with regular lasagna noodles or if you are following a gluten-free diet, I would recommend brown rice pasta noodles from Tinkyada, easily found in large grocery stores. They are actually good and have a nutty brown rice flavor. Follow package instructions with regular noodles, I would suggest cooking brown rice noodles for about 10 minutes, no longer. Drain them in a colander, rinse with cold water and dry on parchment lined baking sheets. I haven’t tried this recipe with no bake noodles, my suggestion would be just be certain that the ingredients in your lasagna are moist enough to cook the noodles properly. There are 14 noodles in the package of brown rice noodles, I cook them all in case of breakage. You can always make a lasagna roll up with any leftover purée and cheese.
In a medium bowl mix the well-drained garlic spinach with one and a quarter cups of ricotta cheese and a cup of mozzarella cheese or a cheese blend that you prefer. Season to taste with salt and freshly ground pepper.
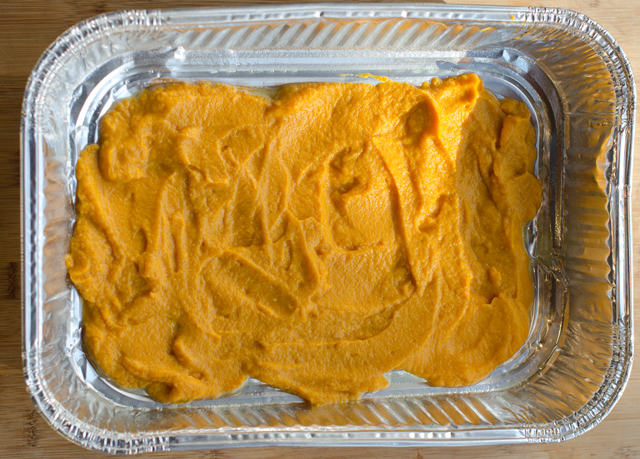
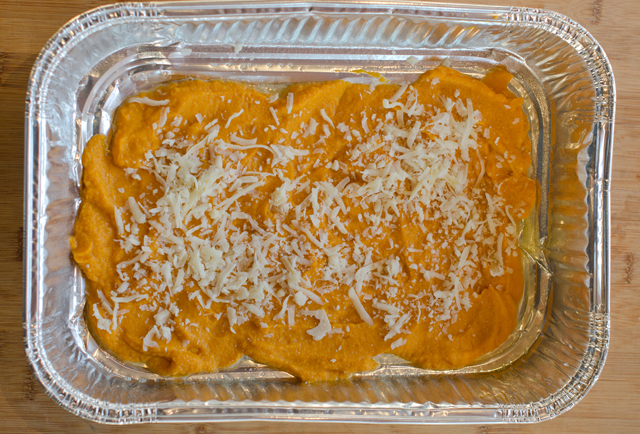
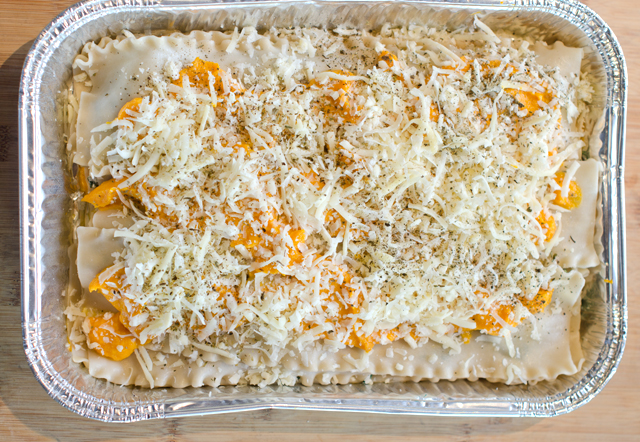
To assemble the lasagna, spray the bottom of your baking tray with nonstick spray.I used a disposable pan with dimensions of 11 x 8 x 2 . Spread one-third of the butternut squash mixture over the bottom of the tray. Top with three lasagna noodles. Dollop one half of the spinach cheese mixture over the noodles. Continue to layer and finish with the remaining butternut squash, sprinkle with a generous amount of cheese, and a sprinkle of dried basil and oregano. Cover with aluminum foil and bake for a half hour. After the half hour take off the foil reattach any cheese that has attached to the foil and bake uncovered for another 10 to 15 minutes.
Since lasagna is a time-consuming dish you could do this in stages, make the butternut squash puree one day, the spinach filling the next and assemble and cook on the third day. You could substitute frozen spinach rather than cooking down your own. Possible additions to the dish include sautéed onions, sage leaves, even toasted walnuts. Serve with a crisp salad of arugula, fennel and apples. As it is with all lasagna, it’s even better the next day.
One of our very own butternut squash.After baking, the skin pops off easily.Skin off, ready to puree.A large container of spinach cooks down to about a cup.First layer of butternut squash ricotta puree .Just a sprinkling of mozzarella cheese on top.Lasagna noodles next, these are the brown rice noodles.Next is the spinach and ricotta filling.Repeat layers and finish with squash puree, a generous sprinkling of cheese, dried basil and oregano.Out of the oven..
Delicious!!
Butternut Squash and Spinach Lasagna
Serves 6-8
Ingredients for butternut squash filling
1-3 lb butternut squash
Olive oil
1¼ c regular or low-fat ricotta cheese
½ t salt
¼ t freshly ground nutmeg
Ingredients for spinach layer
1 lb fresh spinach
1 t olive oil
2 t minced garlic
1 c regular or low-fat ricotta cheese
1¼ c mozzarella cheese
Kosher salt and freshly ground pepper to taste
To assemble the lasagna
1 lb lasagna noodles (regular or gluten-free)
Shredded mozzarella cheese
Shredded Parmesan cheese
Dried basil and oregano
Directions for making the squash puree
Preheat oven to 375°F.
Line a large baking sheet with parchment paper and spray lightly with nonstick spray.
With a sharp knife cut the squash in half where the neck meets the bulbous end. Cut both of these pieces in half lengthwise. Scoop out the seeds and reserve for toasting if desired.
Brush the cut sides lightly with olive oil and place the four squash pieces on a baking sheet cut side down. Bake in preheated oven 25 minutes, rotate and bake another 25 minutes. The squash should be easily pierced with the tip of a knife.
Cool the squash for about ten minutes, until it can be handled. Scoop out the flesh and place in the bowl of a food processor fitted with the metal blade. Puree squash until smooth. Add the ricotta cheese, nutmeg and salt and puree again. Taste and adjust seasonings. Add a little more ricotta if necessary, the puree should have the consistency of a thick marinara sauce. Set puree aside for the assembly. Leave oven on at 375° if you will be finishing the lasagna.
Directions for the spinach filling
Place the fresh spinach in a large colander that is set inside a large bowl. Sprinkle the spinach lightly with water and toss spinach lightly.
Heat olive oil in a 12″ saute pan. Add garlic and saute until light golden brown. Add the spinach by the handful, adding more as it wilts down. After draining the spinach of excess liquid, you will have a generous cup.
In a medium bowl combine spinach and garlic along with ricotta, mozzarella, salt and freshly ground pepper. Taste and adjust seasonings.
Directions for assembling the lasagna
Bring a large pot of lightly salted water to a boil over high heat. Add lasagna noodles and cook according to package directions. Stir noodles occasionally to prevent them from sticking. Drain well and rinse with cool water.
To assemble the lasagna, spray the bottom of the baking dish with nonstick spray. I used a disposable tray with dimensions of 8″ x 11″ x 2″.
Spread one-third of the butternut squash puree over the bottom of the pan. Sprinkle lightly with mozzarella cheese. Top with three lasagna noodles. Dollop one half of the spinach cheese mixture over the noodles, sprinkle lightly with mozzarella cheese. Top this layer with the second layer of noodles.
Spread your second layer of butternut squash over the noodles. Sprinkle with mozzarella cheese, then top with the third layer of lasagna noodles.
Top this with the remaining spinach cheese mixture and sprinkle with mozzarella cheese.
Top with the remaining butternut squash puree and spread evenly over the noodles. Sprinkle this layer generously with shredded mozzarella and Parmesan cheese. Sprinkle lightly with dried basil and oregano.
Cover the baking dish tightly with foil and bake for 30 minutes. After 30 minutes remove the foil, reattach any cheese clinging to the foil and continue to bake uncover for another 10 to 15 minutes. You can turn the broiler on for a few minutes if you want to brown the cheese.
When Christopher Kimball left Cooks Illustrated to start a new multimedia venture, Milk Street, that includes a website, cooking school, TV and radio show and print magazine I was curious how the new magazine would differ from Cooks Illustrated, the publication he founded over twenty years ago. I have always been a big fan of Cooks Illustrated and have saved every issue since the first one came out in 1993. Could I justify subscribing to one more cooking publication?
The magazines are about the same size, Cooks Illustrated is a tad longer and both are 32 pages long. Both accept no advertising, unless you count the subscription inserts. Cooks Illustrated uses mostly black and white photography and illustration with color photographs of all the finished dishes on the inside back cover. Color photographs abound in Milk Street, though they aren’t the life-sized glamour shots we see on many popular blogs, they are accurate representations of the finished dishes. One thing Milk Street does not have are the wonderful back cover illustrations of John Burgoyne that are a welcome part of each issue. Whether it is a page of eggplant varieties, classic American cookies, crustaceans or heirloom tomatoes I always look forward to seeing his detailed and realistic work. On the other hand, Milk Street has Christopher Kimball’s folksy and entertaining letters from Vermont.
Commenting on the new publication, Mr Kimball said that Milk Street would bring techniques from the world’s kitchens, focusing on simple dishes with easy to find ingredients. The term, “easy to find” has certainly changed since I started cooking over thirty years ago. The coconut milk and fish sauce I can find on any supermarket shelf now would have taken a special trip to an ethnic market back then. Although that was enjoyable and educational at the time, I appreciate the convenience now.
Looking at a recent issue of Cooks Illustrated I found recipes for shredded tacos, walkaway ratatouille, grilled pizza and paella on the grill, the typical representation of the Americas and western Europe. There is usually one recipe with an Asian influence, in this issue one for Korean fried chicken wings. Milk Street’s inaugural issue reflected the global emphasis they promised with recipes for harissa from north Africa, pie crust that uses a Japanese baking technique, Chinese white cooked chicken, Thai coleslaw, French carrot salad and the one I chose to make first, Pinchos Morunos.
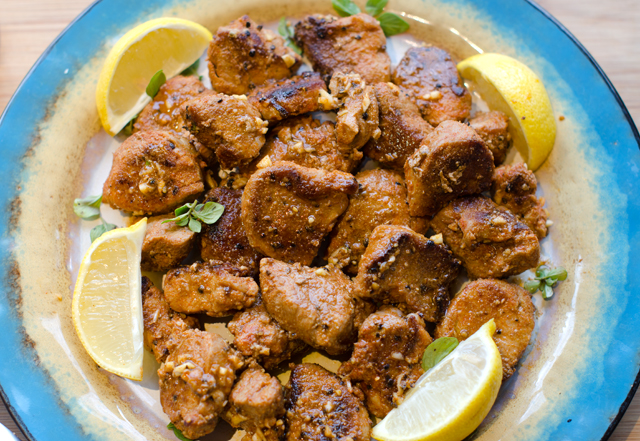
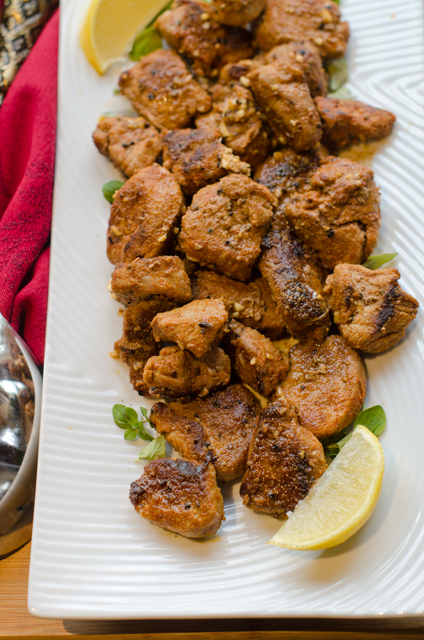
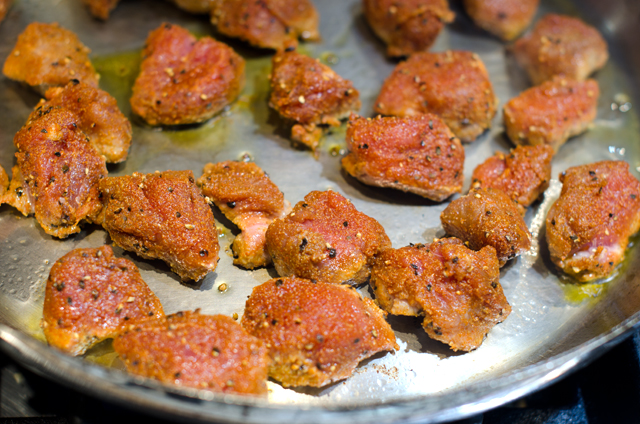
Pinchos morunos are grilled skewered meat kabobs. A pincho, or pintxo as it is called in Basque country, is a thorn or a spike. This can either refer to the skewer the meat is cooked on or the cocktail pick that is attached to a piece of bread when pinchos are served as part of a tapas menu. Morunos refers to the Moors who influenced Spanish food and culture for centuries. The meat in the original recipe was most likely lamb, the Moors were Muslim and did not eat pork. When the Spanish adopted this recipe, the meat of choice became pork. The meat was tossed with a Moroccan spice blend, ras el hanout. The term ras el hanout translates to “head of the shop” and refers to the best spices the shop has to offer. Ras el hanout can have as many as ten spices, this recipe streamlines that number to three, salt and pepper not included.
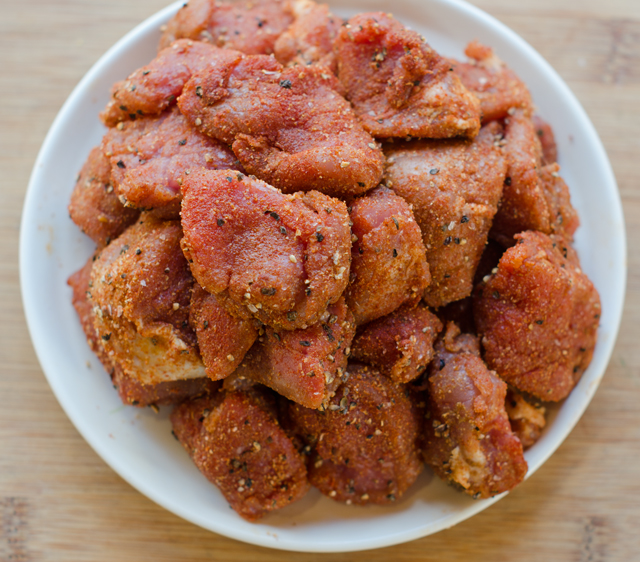
This version of pinchos morunos eliminates the skewers and brings the meat right to the saute pan. The pork is cut into 1 to 1 ½ inch cubes and tossed with a flavorful spice rub of cumin, coriander and smoked paprika. The cubes of pork are just the right size to absorb the rub and flavor the meat. The meat only needs to sit for about an hour before proceeding with the recipe. While the pork is absorbing the flavor of the spices, mix the garlic, lemon juice and honey in a small bowl.
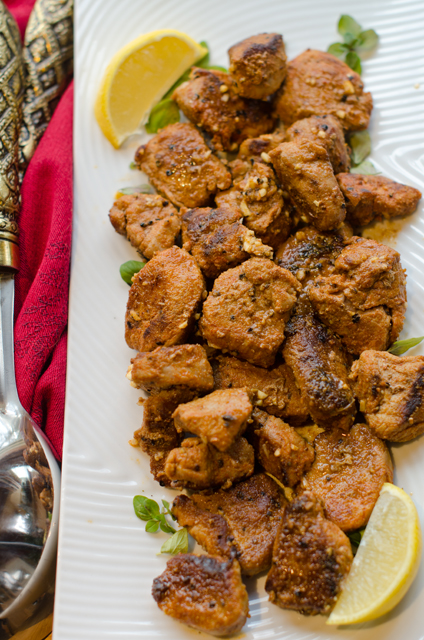
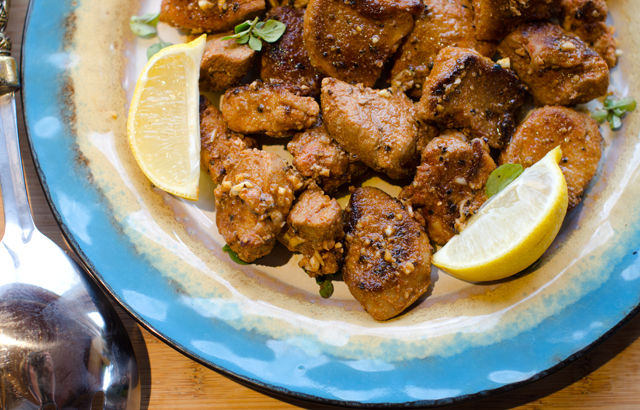
Place a large skillet over high heat, coat lightly with olive oil and heat until smoking. Add the seasoned pork cubes in one layer and cook without moving for about 3 minutes. You want all of the meat to develop a deep brown crust. Flip the pork with tongs and cook, turning the pieces occasionally as they continue to brown. The additional cooking time is 2-3 minutes, the pork will continue to cook even after you take it off the heat and you don’t want the pork to dry out. While the pork is still hot, pour the garlic, lemon, honey mixture over the meat and garnish with oregano. Serve immediately to optimally appreciate the flavors. You can prep the components of the dish earlier in the day. Cut the meat into cubes, cover with plastic wrap and make the spice blend and lemon honey mixture . An hour before serving, bring the meat out of the fridge and proceed with the recipe.
We have enjoyed this recipe several times for dinner. Serve with rice or couscous and a salad. It would also make a great hors d’oeuvre accompanied with a saffron aioli for dipping.
Pinchos Morunos
Serves 2-3
Ingredients
1½ t ground coriander
1½ t ground cumin
1½ t smoked paprika
¾t each kosher salt and fresh ground pepper
1 lb pork tenderloin, trimmed and cut into 1 to 1½ inch pieces
1 T lemon juice plus lemon wedges for serving
1 T honey
1 large clove of garlic, finely grated
2 T extra virgin olive oil
1 T chopped fresh oregano
Directions
Combine coriander, cumin, smoked paprika, salt and pepper in a medium bowl.
Add the cubed pork to the bowl and toss to coat thoroughly until no dry rub remains.
Let the pork sit at room temperature for 30 minutes and up to 1 hour.
While the pork is sitting at room temperature, combine the lemon juice, honey and garlic in another bowl.
In a large skillet over high heat, heat 1 tablespoon of the oil until smoking. Add the meat in a single layer and cook without moving until deeply browned on one side, about 3 minutes. Using tongs flip the meat over and continue to cook until browned on all sides, another 2-3 minutes.
Take meat off the heat and pour the lemon juice and garlic mixture over the meat and toss until evenly coated. Transfer the meat to a serving platter.
Drizzle the meat with the remaining olive oil, sprinkle with oregano and serve with lemon wedges.
Toss the pork cubes with the spice blend.Be sure the pork develops a nice crust on the first side.
 Broccoli is an all season favorite that usually has a place of prominence at the front of the produce aisle. I love to roast broccoli toss it with olive oil and sprinkle with salt and pepper. It’s so good we’re lucky it makes it to the dinner table. This time I used a little restraint and combined it with some roasted chickpeas, cilantro leaves and sun-dried tomatoes. A tahini dressing brings it all together and makes a wonderful winter side dish. If you don’t like cilantro, substitute flat leafed parsley.