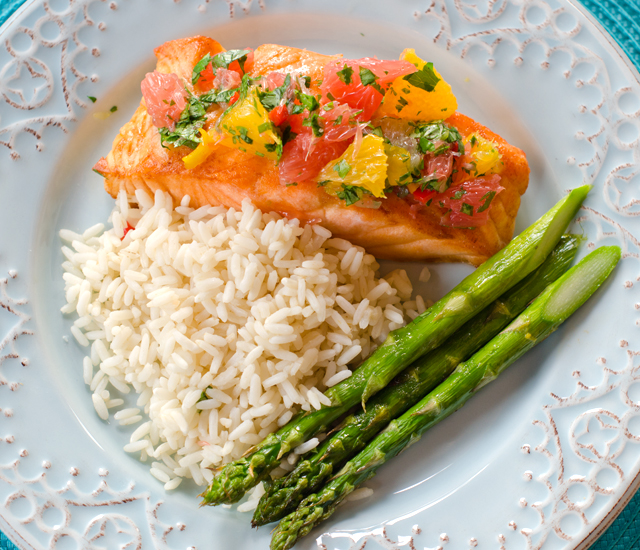
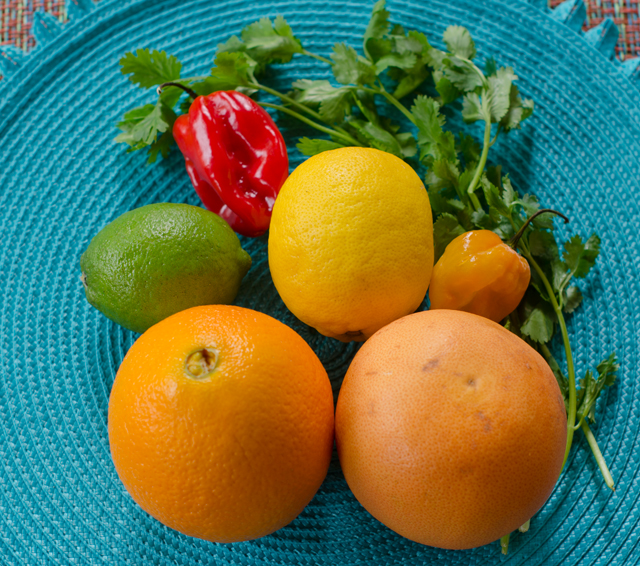
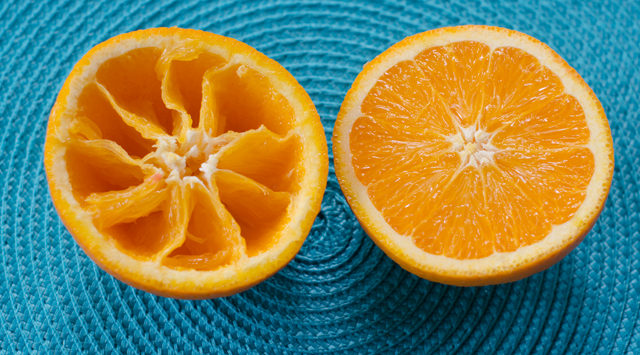
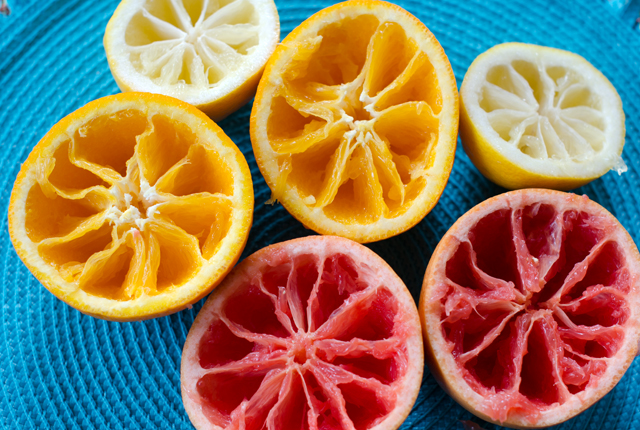
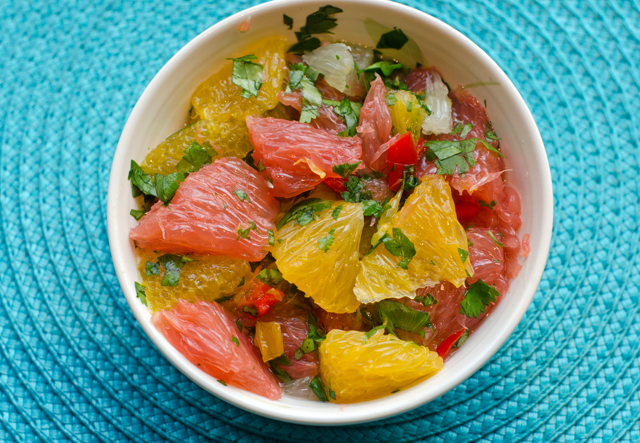
A vibrant combination of juicy grapefruit, orange, lemon and lime sections, accented with fragrant and spicy habanero pepper, the Yucatan peninsula is home to this colorful and healthy salsa. The Mayan name for this dish is Xec, pronounced, shek which roughly translates, “mixed”. It is an easy to prepare dish, all of the fruit is cut vertically and sectioned, the way you would cut into your morning grapefruit. If you prefer, the citrus could also be cut into supremes or segments.
The salsa gets its heat from habanero chiles. Lantern shaped and bright red, orange or yellow in color, the habanero is the hottest chile available in grocery stores. For perspective, a habanero registers in at 300,000 to 475,000 units on the Scoville scale, the standard for measuring the heat of a chili pepper, the jalapeno only 2,500 to 10,000 units. Treat all hot peppers with a certain amount of caution, wear gloves when working with them and keep your hands away from your face. It is best to add a little bit of chili pepper to see what your heat tolerance is before ruining a dish with too much at once.
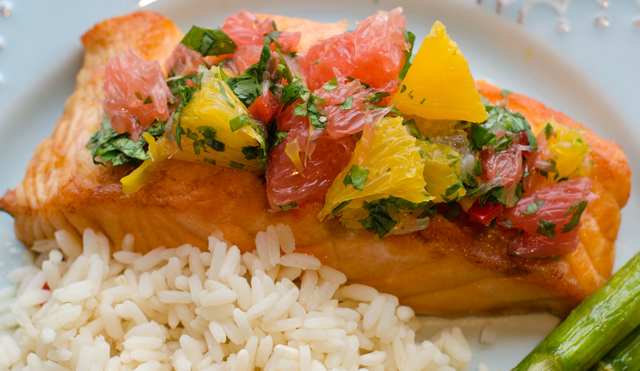
I am fortunate to have a supply of NuMex Suave Orange peppers from the garden to add to the salsa. NuMex Suaves have the citrusy flavor that most people miss in the habanero, without the numbing heat. I like this salsa with fish, but it would pair with chicken or pork as well.
Mayan Citrus Salsa (Xec)
Makes four servings
Ingredients
1 large orange
1 medium grapefruit
1 medium lemon
1 lime
Finely chopped habanero pepper (according to your heat tolerance)
1 NuMex suave pepper
½ c finely chopped cilantro
Salt to taste
A combination of sweet, tart and sour citrus, habanero and cilantro are the ingredients for xec.Section all the citrus the way you would a grapefruit.
Directions
Cut orange in half horizontally and section it as you would a grapefruit. Do this over a bowl to capture all the juice. Remove the seeds and combine flesh and juice in a bowl. Repeat with the grapefruit, lemon and lime. Stir in habanero, NuMex suave and cilantro. Season with salt.
Is there really a need for another recipe for butternut squash soup when there are already three other butternut squash soup recipes on the blog? Well, when you have a metal locker in the basement still half full of last year’s harvest, (in excellent condition I will add) there’s always room for one more soup. This time the squash isn’t blended into a silky purée resulting in a soup that’s perfect as a starter for an elegant meal, here the squash pulls double duty. The fat bulbous end becomes part of a squash “stock” and the neck is cut into chunks that are simmered in the stock to make this hearty main dish soup.
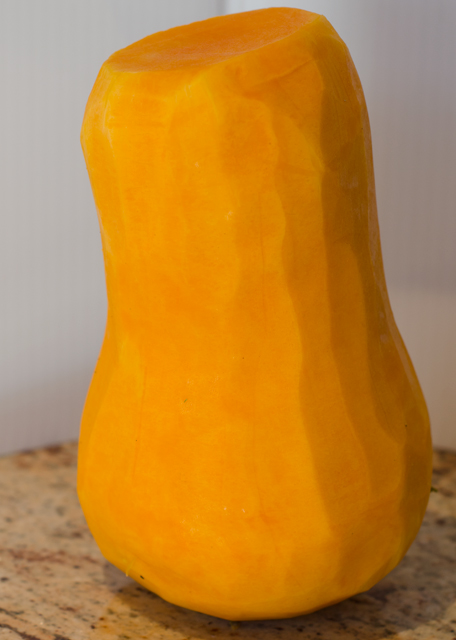
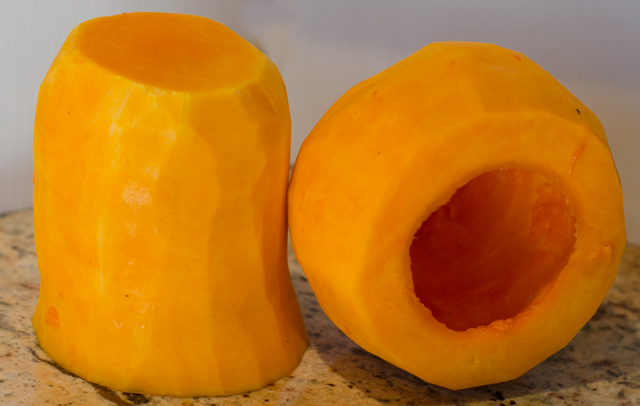
Start with a medium-sized squash, 2 to 2 1/2 lb, use a sharp knife to cut off a half inch piece at both ends. You can either cut the squash in half (approximately) where the neck meets the bulb or leave it whole for peeling. The next part I find easiest to do using a vegetable peeler, the inexpensive Kuhn Rikon ones are my favorite. A well sharpened chef’s knife works well too. Place the squash on its side and run the peeler down the length. This part goes quicker with the neck, the curved bottom takes a little more time, but with practice the whole process shouldn’t take more than ten minutes. Be sure to remove the white flesh and green fibers that are right below the skin’s surface. The squash should be completely orange after peeling. Scoop out the seeds and the fibrous pulp from the bulb end. I save the seeds for roasting as a garnish for soups and salads.
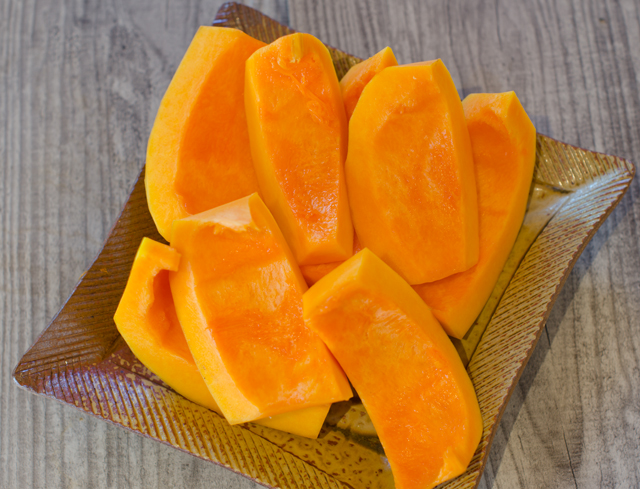
The bulb halves are cut into four chunks and combined in a saucepan with stock, water, butter and soy sauce or tamari. The soy brings a savory umami note to the natural sweetness of the squash and the butter adds richness. Cook until the squash is very soft and mash in the pan until broken down.
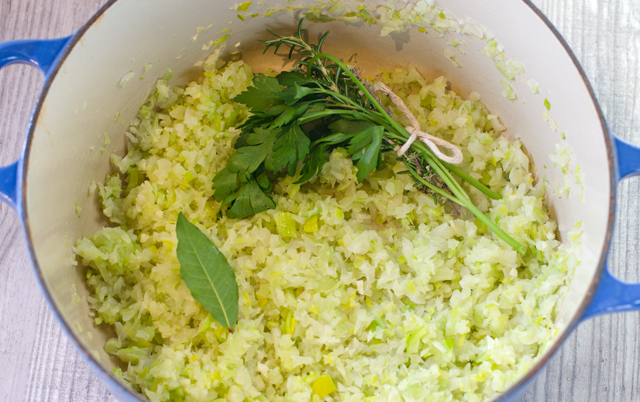
While the stock is cooking, cut the neck end into 1/3 inch cubes. Sauté leeks and tomato paste in a Dutch oven. The mild sweet onion flavor of the leeks complements the squash and the tomato paste adds a little umami to the mix. Add the garlic and squash pieces and cook, stirring occasionally. Pour in the squash stock, bring to a simmer, partially cover and cook for ten minutes. Canned cannellini beans are the last addition and add a hearty creaminess and some substance to the soup. Simmer until the squash is tender. You can serve it now or if you have the time, make the soup, cool, refrigerate and reheat and serve the next day. As with many soups and stews, the flavors have time to meld together and it even tastes better.
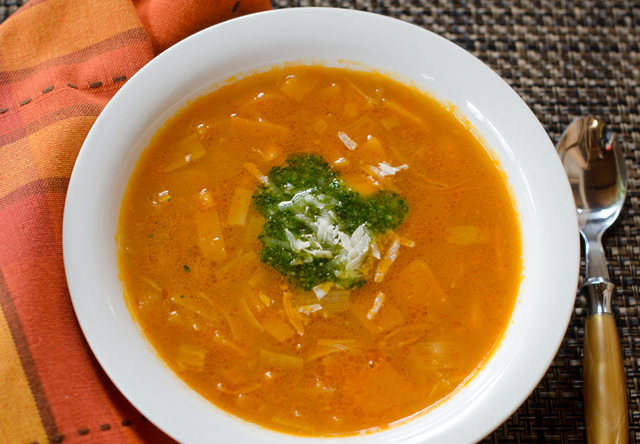
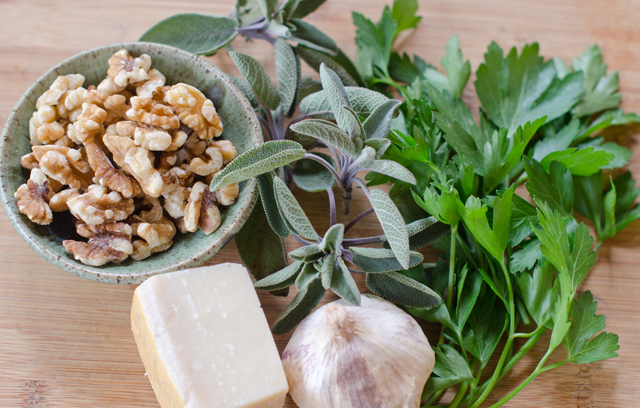
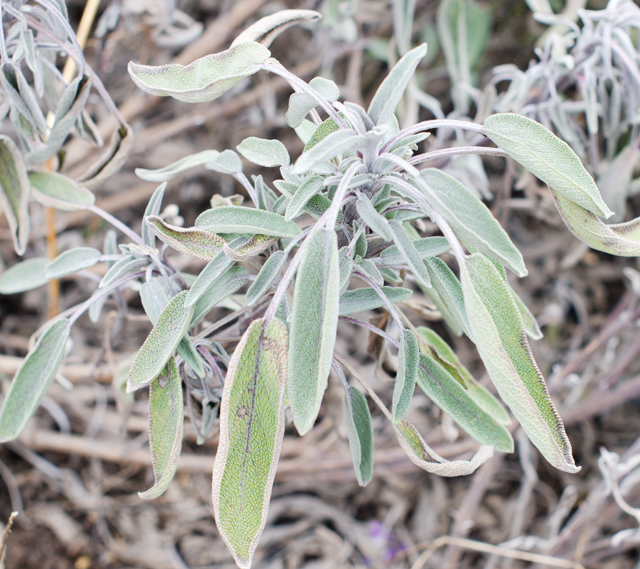
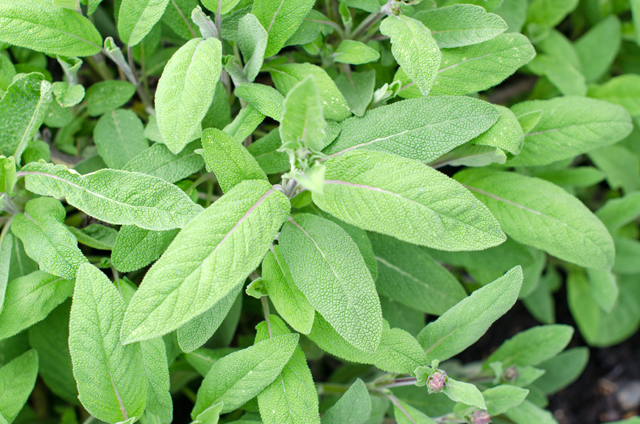
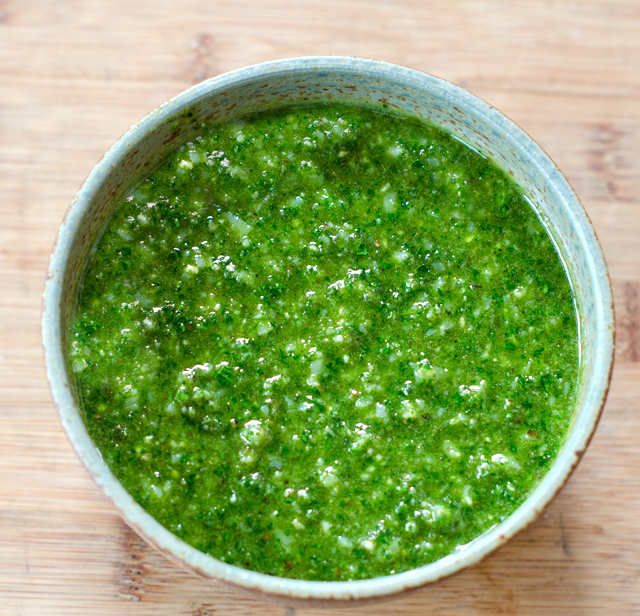
Don’t skip making the pesto, it is a wonderful addition to the soup. Sage and parsley replace the typical basil in this recipe. I’m glad that sage is one of the first herbs to perk up in the garden, in spite of the cold temperatures of late. I truly despise paying several dollars for a handful of less than perfect leaves when I can pick them fresh.
Butternut Squash Soup with Sage Pesto
Serves 6-8
Ingredients for soup
1- 2½ lb butternut squash
4 c broth, chicken or vegetable
3 c water
4 T unsalted butter
1 T soy sauce or tamari
1 T vegetable oil
1 lb leeks, white and light green parts only, washed thoroughly, sliced thin
1 T tomato paste
2 garlic cloves, minced finely
Kosher salt and freshly ground pepper
3-15 oz can cannellini beans
White wine vinegar to taste
Peeled whole butternut squash.
Cut the bottom into large chunks, they will become part of the squash stock.
Directions for soup
Using a vegetable peeler, remove the skin and the fibrous threads just below the skin, the squash should look completely orange, no white spots remaining.
Cut the squash in half where the neck and bulb meet. Cut the bulb section in half and remove the seeds and any strings. Save seeds for toasting if desired.
Cut each half into four sections. Place the squash sections, broth, water, butter and soy or tamari in a medium saucepan and bring to a boil over medium high heat. Reduce heat to a simmer, partially cover and cook for about 25 minutes or until squash is very soft.
Using a potato masher, mash the squash, still in the broth until it is broken down. Cover pan to keep warm and set aside.
While the broth is cooking, cut the neck of the squash into 1/3 inch pieces. Heat oil in a large Dutch oven over medium heat until shimmering. Add the chopped leeks and tomato paste and cook until the leeks are softened and the tomato paste darkens, about 5 minutes. Add garlic and cook until fragrant, 30 seconds. Add squash pieces, some salt and pepper and cook, stirring occasionally for 5 minutes.
Add squash broth and bring to a simmer. Partially cover and cook for 10 minutes. Add beans and their liquid, partially cover and cook, stirring occasionally, until the squash is tender 15 to 20 minutes.
Ladle soup into individual bowl, add a splash of white wine vinegar and dollop of pesto and an additional sprinkle of Parmesan cheese.
Sage Parsley Pesto
Ingredients for the Sage Parsley Pesto
½ c toasted walnuts
2 cloves of garlic, minced
1 c fresh parsley leaves
½ c fresh sage leaves
¾ c extra virgin olive oil
½ c grated Parmesan cheese
Salt and pepper to taste
Sage is one of the first perennial herbs to emerge in the herb garden.By the end of April, the sage will look more like this.
Directions for the Sage Parsley Pesto
Pulse walnuts and garlic in food processor until coarsely chopped, about 5-6 pulses.
Add parsley and sage to the bowl, with the processor running, slowly add oil and process until smooth, about 1 minute.
Transfer to a bowl, stir in Parmesan and add salt and pepper to taste.
Parsley mellows out the sage in this pesto, a combination I will definitely try again.
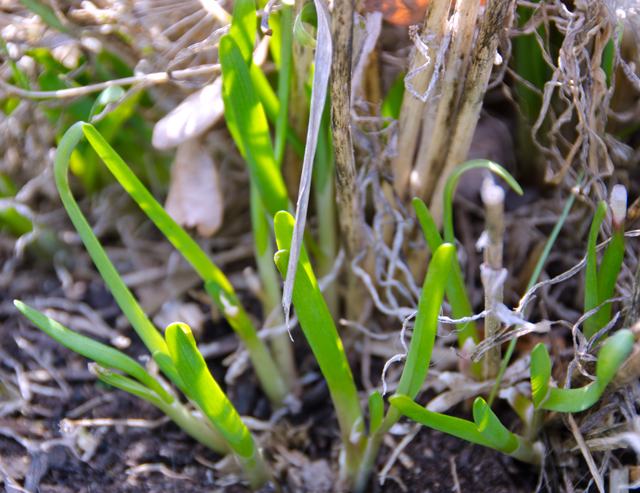
The last two days have brought us very pleasant but unseasonable temperatures in the seventies. While opening a window to let some fresh air in I spotted two pansy “volunteers” that had sprung up close to the house but not in an area where we normally plant anything. On a walk down to the garden I spotted the first dandelion. An early spring? Looks like even though the temperatures are going back into the forties by this evening. A few days of warmth is not enough to show evidence of new life in the garden. There are some beet greens and radicchio under a cold frame and I will take it on Joe’s word that there is miners lettuce and some kale in the greenhouse. I did see a bit of green in the circle garden, the beginning of the rebirth of the Chinese chives. In a month or two we will be pulling them out by the bucketfuls but for now it’s nice to see that first poke of green, letting us know that spring isn’t that far off. Until then my produce is from the local supermarkets and club stores.
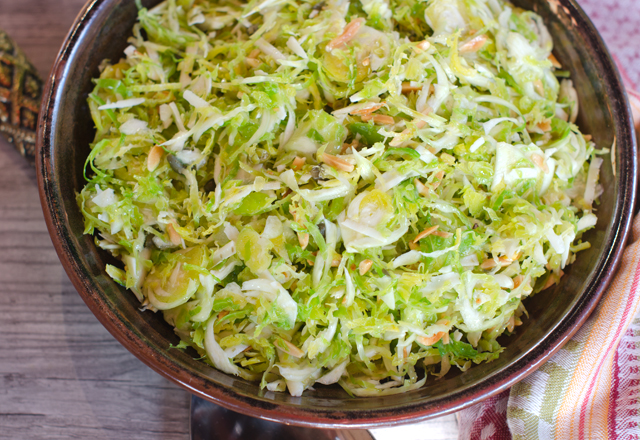
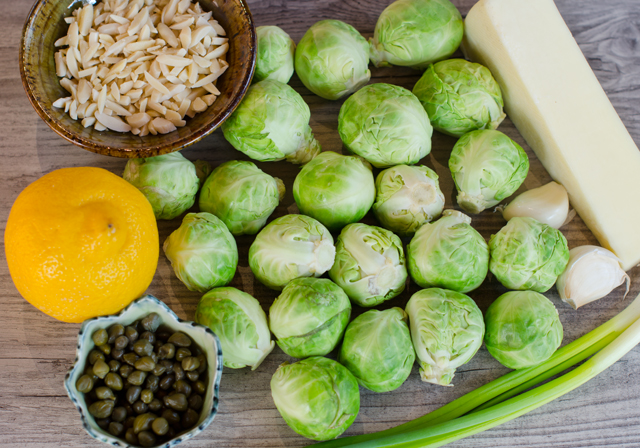
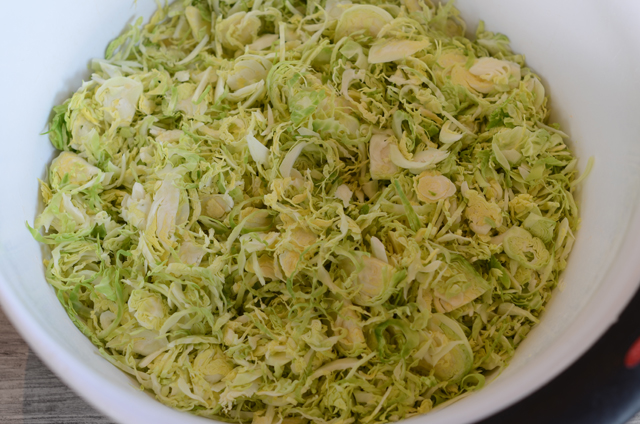
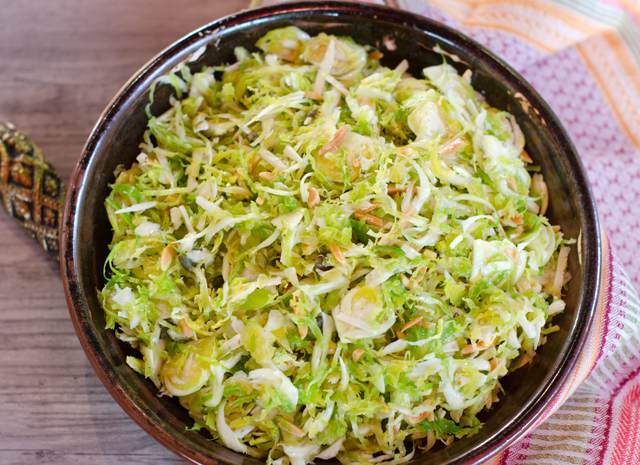
This Brussels sprouts salad is simple and delicious with a satisfying crunchy texture. The sprouts can be sliced in no time in the food processor, I used a 2 mm (thin) slicing disk or with a mandoline; trust me use the guard. If you want to work on your knife skills, slice them by hand. The dressing couldn’t be simpler, extra virgin olive oil, lemon juice, salt, pepper and capers. If you always wondered what those little green things are, capers are the unopened flower buds of Capparis spinosa, a prickly perennial shrub like bush, native to the Mediterranean and some parts of Asia. The buds are harvested, dried in the sun and then pickled in vinegar, brine or salt. The size of a caper can be as small as a green peppercorn, and as large as a small olive. The largest ones are usually served as part of an antipasto platter, the small ones are referred to as non pareils (French for without equal), the size best suited for this recipe. Many recipes call for rinsing them first but I would say taste them and decide for yourself. Rough chop the capers and add them to the dressing. Shredded Asiago cheese compliments the salad with it’s creamy nutty flavor. Finish the salad off with toasted slivered almonds and garnish with thinly sliced scallions. Leftovers are even better the next day.
Brussels Sprouts Salad with Lemon Caper Dressing and Asiago Cheese
Shred the Brussels sprouts using the slicing disc of a food processor. You can also slice them by hand with a well sharpened knife or a mandoline slicer. Place shredded sprouts in a bowl large enough to toss them in.
In a small bowl whisk together the olive oil, lemon juice and zest, capers, garlic, salt and pepper. Pour about two thirds of the dressing over the sprouts and toss. Add the toasted almonds and Asiago cheese and toss again. Taste and add more salt if needed and additional dressing if needed. Garnish with chopped scallions and serve immediately.
Add shredded Brussels sprouts to a large bowl and toss with dressing and other ingredients.
Pansies that came up in February.The first new growth of garlic chives. My garnish for the next Brussels sprout salad.
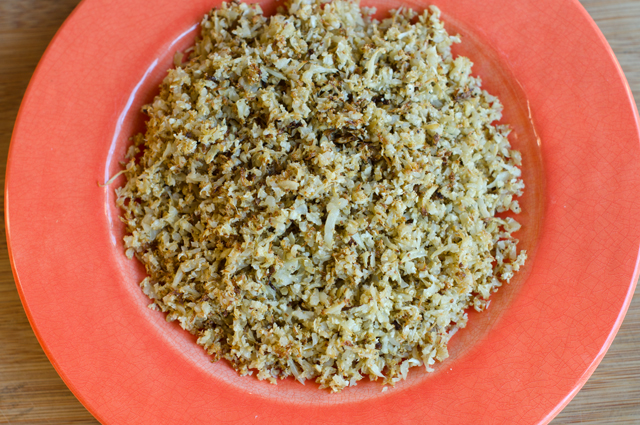
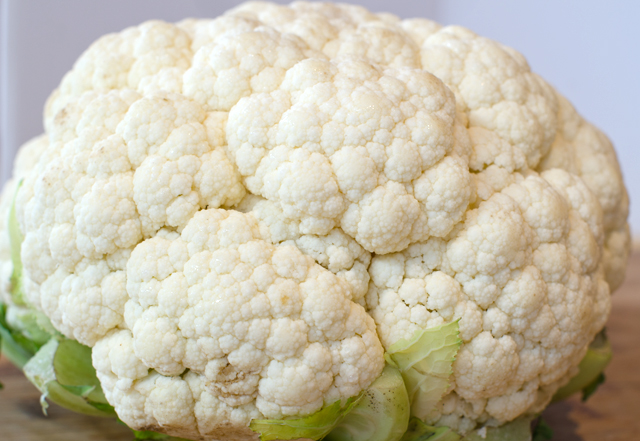
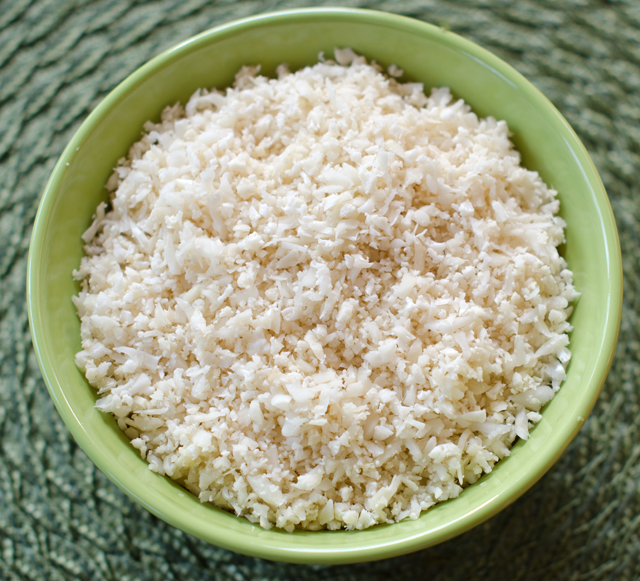
Toasted cauliflower rice takes plain cauliflower rice to the next dimension. If you are already making cauliflower rice, there’s not much more to do to give this “stand-in” a more rice like texture along with the nutty quality we love in regular rice. Make cauliflower rice either by pulsing it or using the shredding disc of the food processor. You can also go low-tech and grate the cauliflower on a box grater with the medium sized holes. I think it’s even more important to press out the additional liquid when you are making toasted cauliflower rice, so your rice will toast, not steam.
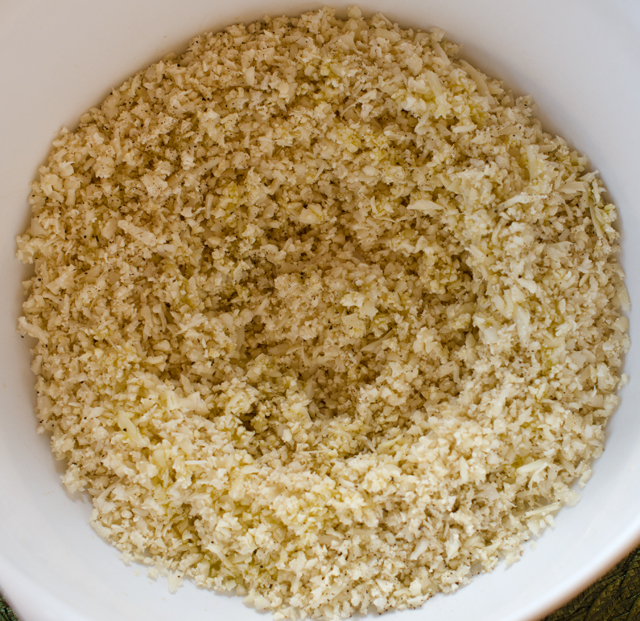
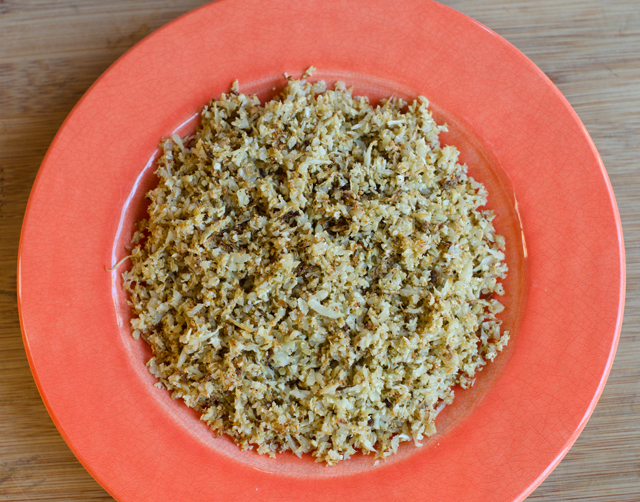
Put the cauliflower granules in a large enough bowl to mix it around, toss with a tablespoon or so of olive oil, a sprinkle of kosher salt and a grind of pepper (white pepper if you are fussy). Spread the riced cauliflower evenly over a lined baking sheet, foil works best here for easy clean up. A full head of cauliflower will probably take two baking sheets. Bake at 375°F convection heat for about twenty to twenty five minutes. I flipped the baking sheet from front to back and top to bottom at the halfway point and gave it several good stirs during the cooking time. The end product is toasty with an amazing rice like texture. Bake more than what you think you might need, it will shrink (after all cauliflower is 92% water) during the cooking process and yes, it is that good. Feel free to add any spices or add-ins to this dish. I served it with pesto chicken breasts to absorb the sauce but the possibilities are endless.
Oven Toasted Cauliflower Rice
Serves 2-4
Ingredients
1 head cauliflower
1 T olive oil
Kosher salt and pepper to taste
Plain cauliflower rice before toasting.Drizzle with olive oil, sprinkle generously with salt and pepper.Spread out evenly on a foil lined baking sheet. A whole head may take two sheets.
Directions
Preheat convection oven to 375°F. Cover two large, rimmed baking sheet with aluminum foil.
Break the cauliflower into florets, removing the stems. Place the florets in the food processor bowl and pulse until the cauliflower looks like rice. This takes about 10 to 15 one-second pulses. You may need to do this in two batches to avoid overcrowding.
Place the cauliflower rice in a large bowl, add olive oil, salt and pepper. Toss until the rice is coated with the oil. Spread in a single layer on the baking sheet and roast until tender, rotating the baking sheets halfway during the baking time. The rice is done when it starts to look golden in spots.
Inspiration for the recipes I post originate from many different sources and this qualifies as the most unusual, my new car. In the first week of driving my 2015 Volvo I received this warning, AWD (all wheel drive) disabled, please schedule service. This was accompanied on the dashboard with the picture of the frame of a car with two wheels out of line. That was enough to get my attention. I had it in for service in less than a week of driving off the lot, only to have the same message reappear the day after the first service. So I needed to take it back in again. Nothing seemed wrong with the steering, and the warning would be on one day, and off the next. Of course the day I took it in the service light was out.
I am occasionally offered a loaner so I don’t have to wait on the car but that can also be a pain too, driving to the dealership, driving home, driving back and so on. So this time I thought I would just wait. I came prepared with a large stack of food magazines. The lounge is large and on this day, pretty full. The television was on and several of the men who were there seemed to be enjoying the banter on Live with Kelly. So I settled into my spot, pulled out my magazines and started reading as much as one can when the only available chair is right next to the television.
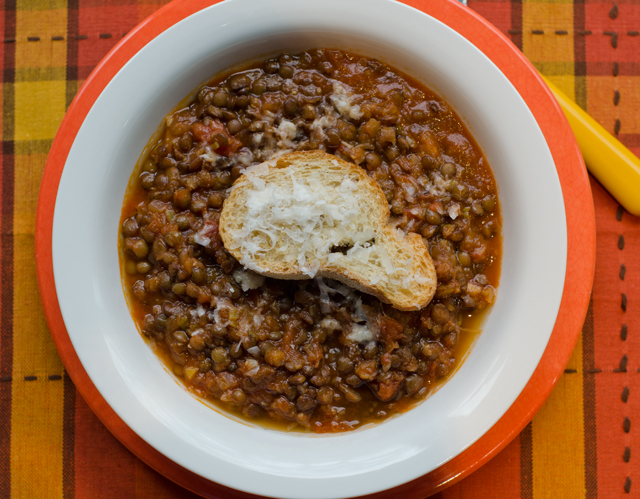
After Kelly comes Rachael, as in the Rachael Ray show. I don’t watch much daytime television but Rachael’s show isn’t too bad. After a very interesting segment on cutting edge skin care, celebrity cooking with folks I’ve never heard of (too many channels, too many “celebrities”) and how to get your house ready for a Super Bowl party, it was time for Rachael to cook. Her recipe grabbed my attention since Joe and I were both fighting the good fight against pretty nasty colds. We blamed each other for giving it but I think I know which one of us spends a lot more time around sick people! The night before per Joe’s request I made a chicken soup with veggies and ditalini pasta. Rachael’s recipe for tomato lentil soup looked fairly quick and just the thing for my Cold-Eze numbed taste buds.
This time of year there is nothing more comforting than a bowl of soup. Rachael calls this soup cheap, cheerful and filled with great nutrition. This recipe makes a lot of soup for two people, but as she points out, soup freezes beautifully. Perfect for a cold winter’s night or just the right thing when a cold is coming on.
Start the recipe by cooking the lentils. Unlike other beans that need to soaked overnight, lentils just need to be picked through to remove stones and rinsed well in a colander. Put the lentils in a pan with water to cover by at least two inches, they will at least double in size. Add a clove of crushed garlic and salt and bring them to a boil. Reduce the heat to a gentle simmer and cook for thirty to forty minutes. You want tender, not crunchy or mushy lentils. I used the French Puy variety available from Bob’s Red Mill. If I used the lentils di Norcia referenced in recipe I would need to mail order them through Amazon, but at almost thirty dollars a pound, I will stick with French lentils. Lentils di Norcia are grown in the high plains (4500 ft) of the Apennine mountains of Central Italy. They are said to have thin skins and a soft consistency. I will never know….
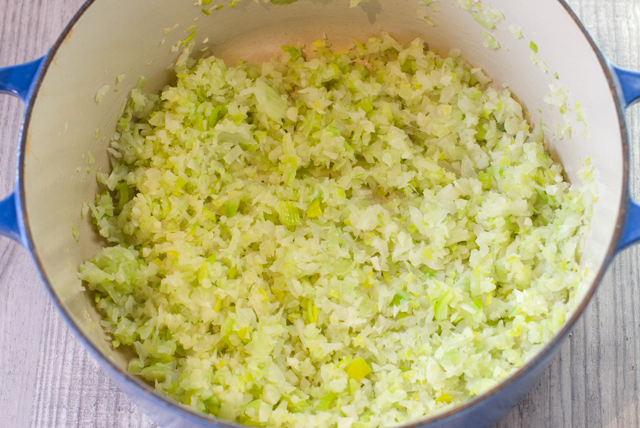
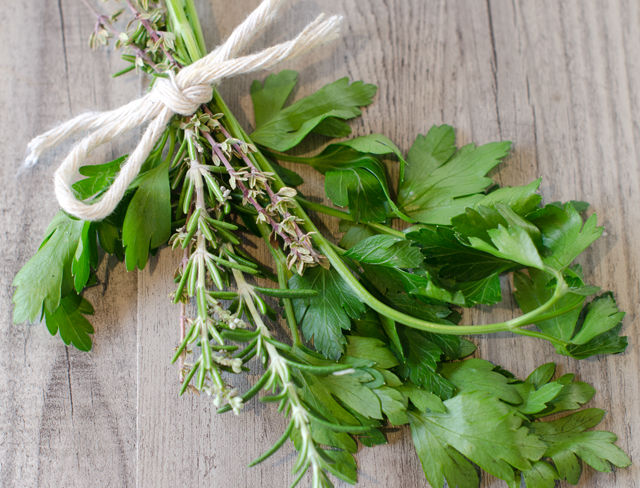
In a soup pot over medium high heat, add olive oil, she calls it “two turns of the pan”, which translates to approximately two tablespoons. The vegetables and herbs are added and partially cooked to soften. Add stock, she used vegetable to keep this a vegetarian dish, but chicken stock is fine with me. Next into the pot are the San Marzano tomatoes that we both like for their natural sweetness. Rachael pointed out that some canned tomatoes have the word San Marzano in the title but not in the can! Spin the can around and make sure it contains San Marzano tomatoes in the ingredients. Break the tomatoes up with a spoon, kitchen scissors or for the tactile inclined, with your hands. Rachael and her mom do it that way. Tomato passata, a new one on me, is next into the pot. Passata is uncooked tomato puree that has been strained of seeds and skins. It is very common in Europe. I found a product from Pomi brand tomatoes in an aseptic container referred to as strained tomatoes. Substitute tomato puree with no sugar added if you can’t find it, but I think it is worth searching out.
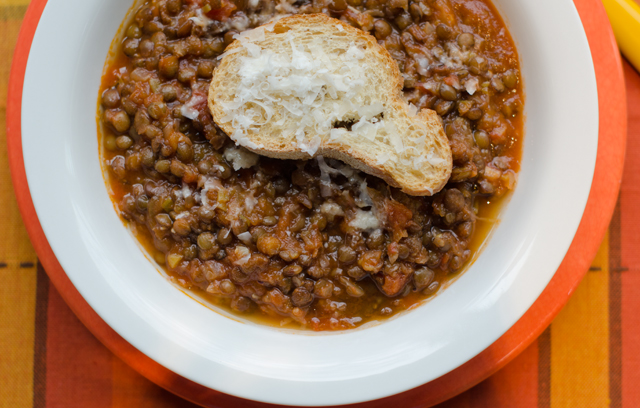
Add the cooled lentils to the pot and simmer to combine flavors and the thickness you desire. Remove the herb bundle and bay leaf before serving. This is a vegetarian dish but my husband is not. To make this more to his taste I added a few turkey meatballs at the end of cooking time. Rachael serves this soup with bruschetta, which really is, as she points out, just charred bread. She took a chunk of ciabatta and charred it over an open flame, then seasoned it with cut garlic, a good quality olive oil, flaky sea salt and chili flakes. This bread is ripped up in pieces to wipe the bottom of the bowl, in Italian that is called the scarpetta. Rachael tops the bowls of soup with grated Parmesan. Delicious!
Saute the vegetables to soften.An herb bundle of parsley, thyme and rosemary.Add the herb bundle and a bay leaf to sauteing the vegetables.
Tomato Lentil Soup
Serves 6 or more
Ingredients
1 pound lentils, I used small French lentils
4 cloves garlic, 1 crushed and 3 chopped, divided
Salt
2 tablespoons olive oil
1 small bulb fennel, cut into small dice
1 leek, quartered lengthwise then chopped
2 to 3 ribs celery with leafy tops, chopped
1 onion, chopped
1 large bay leaf
Herb bundle of parsley, thyme and rosemary (a few sprigs of each)
Pepper
6 cups vegetable or chicken stock
2 cups passata or tomato purée
1 28-ounce can San Marzano tomatoes
Chili flakes and EVOO – Extra Virgin Olive Oil, to serve
Directions
Rinse lentils well and add them to a large pot with enough water to cover by about 2 1/2 inches. Add crushed garlic clove and bring to a boil. Add salt, reduce heat and simmer 30-40 minutes. Turn off heat and let lentils cool in any remaining liquid.
Heat a soup pot over medium-high heat with olive oil, 2 turns of the pan. Add chopped garlic, fennel, leeks, celery, onions, bay, herb bundle, some salt and pepper, and cook partially covered for 7-8 minutes to soften, stirring frequently.
Add stock, passata or purée, and tomatoes, breaking them up with a spoon or crushing them with your hands when you add them to the pot. Stir in cooled lentils; combine and simmer to combine flavors and until soup reaches desired thickness.
Remove bay and herb bundle, and serve in shallow bowls garnished with chili flakes and a swirl of extra virgin olive oil.
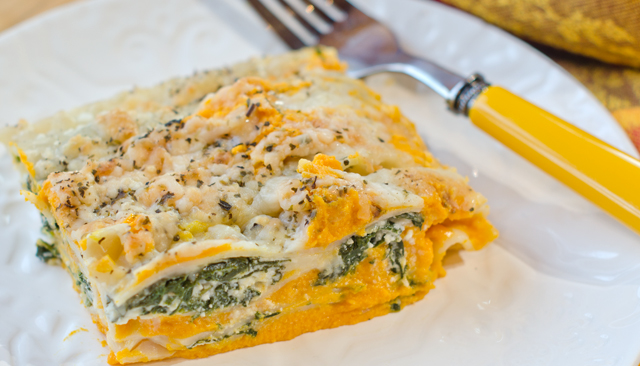
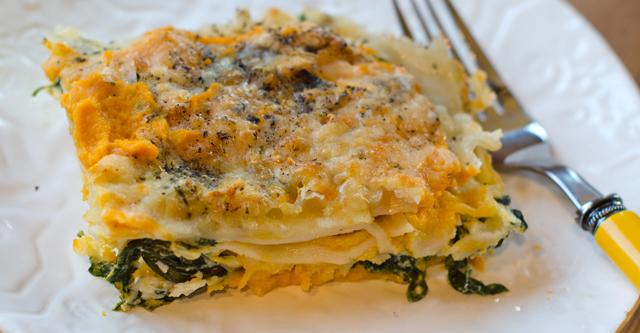
In this unique lasagna, perfect for the fall and winter months, a ricotta enriched butternut squash purée takes the place of a marinara sauce. A cheesy spinach filling complements the creamy squash for this satisfying and healthy vegetarian main dish.
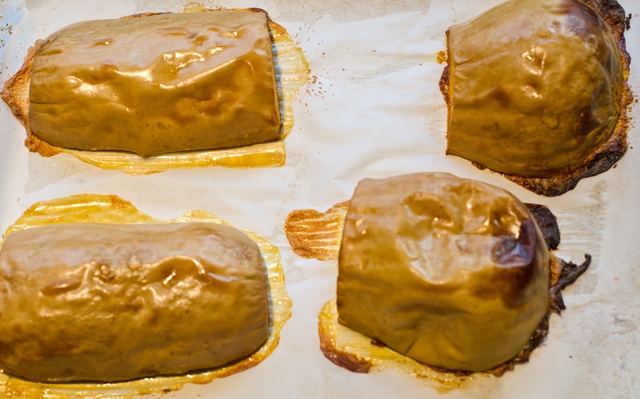
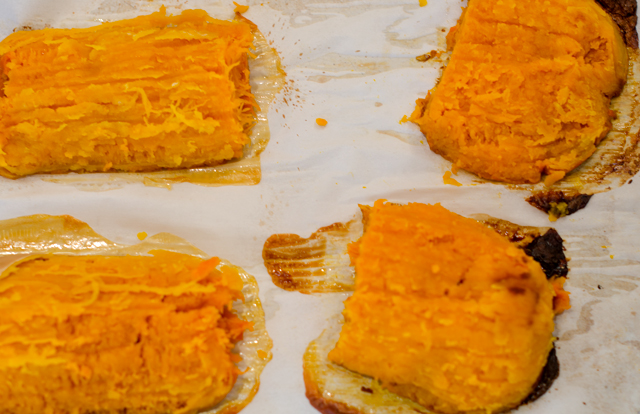
You will need a medium size butternut squash, weighing two and a half to three pounds. Cut the stem end off the butternut squash then cut the squash in half where the bulb end meets the neck. Cut both pieces in half lengthwise. scoop the seeds and fiber out of the bulb end, save seeds for later use. I rinse the seeds off and dry them between layers of paper towels. Toss with a little bit of olive oil and sprinkle with salt. Bake in a 375°F oven until they pop and become toasty brown. They are great for topping salads and for snacking.
Cover a large baking tray with parchment paper. Brush the squash pieces lightly with olive oil and place the four sections of squash cut side down on the baking sheet. Bake in a 375° oven for about 50 to 55 minutes, until the squash pierces easily with the tip of the knife. Let cool for 10 minutes, the skin should come off easily. Place the squash pieces in the bowl of a food processor fitted with the metal blade. If necessary, add a little additional liquid, purée until smooth, you will have about 2½ cups. Add 1 cup of ricotta cheese and purée again, season to taste with salt and pepper and a little freshly grated nutmeg.
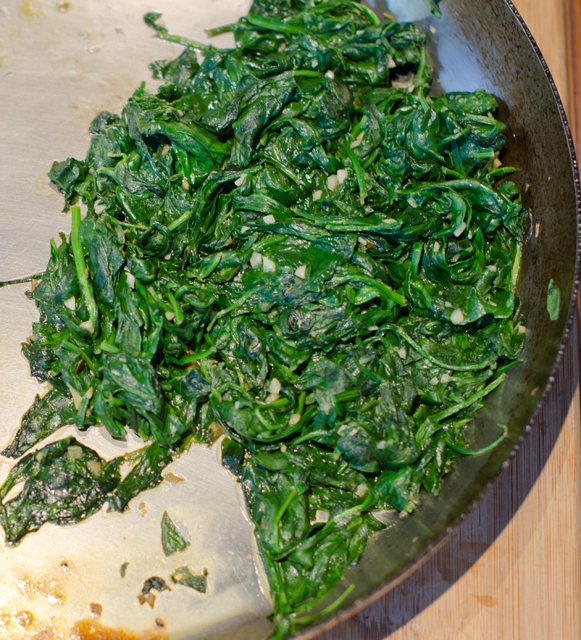
Place the spinach in a large bowl. Lightly rinse the spinach and toss in the bowl. The moisture will help wilt the spinach quickly. I used a 1 pound container of organic triple washed spinach. Finely chop two garlic cloves. Heat a large sauté pan over high heat and add the olive oil and swirl it around. Saute the garlic for a few minutes then add the spinach by the handfuls, adding more each time as it wilts down. After squeezing out any additional liquid, the end result will be one generous cup of spinach.
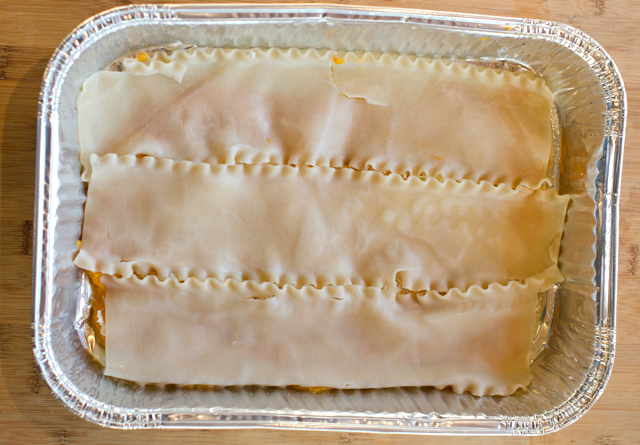
You can make this version with regular lasagna noodles or if you are following a gluten-free diet, I would recommend brown rice pasta noodles from Tinkyada, easily found in large grocery stores. They are actually good and have a nutty brown rice flavor. Follow package instructions with regular noodles, I would suggest cooking brown rice noodles for about 10 minutes, no longer. Drain them in a colander, rinse with cold water and dry on parchment lined baking sheets. I haven’t tried this recipe with no bake noodles, my suggestion would be just be certain that the ingredients in your lasagna are moist enough to cook the noodles properly. There are 14 noodles in the package of brown rice noodles, I cook them all in case of breakage. You can always make a lasagna roll up with any leftover purée and cheese.
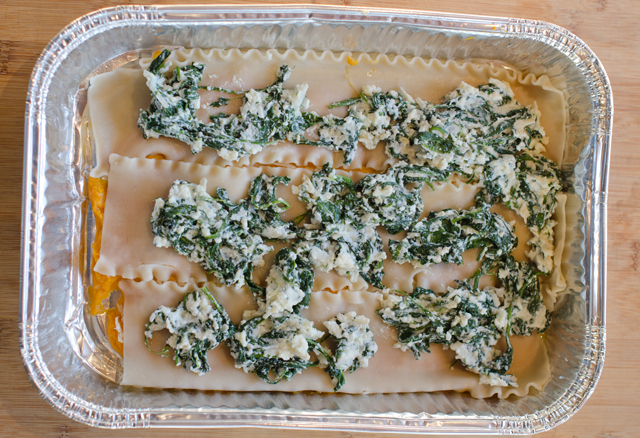
In a medium bowl mix the well-drained garlic spinach with one and a quarter cups of ricotta cheese and a cup of mozzarella cheese or a cheese blend that you prefer. Season to taste with salt and freshly ground pepper.
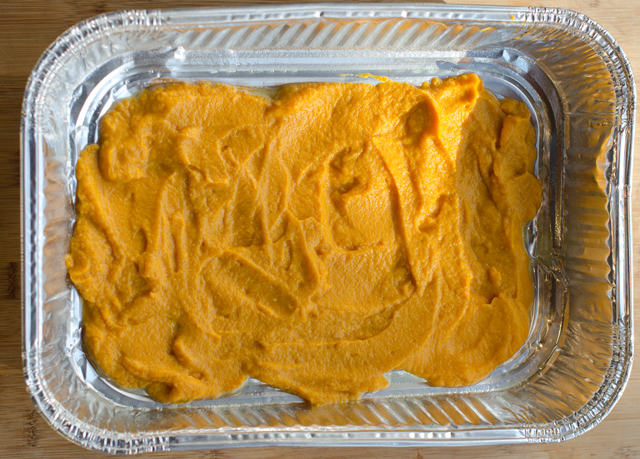
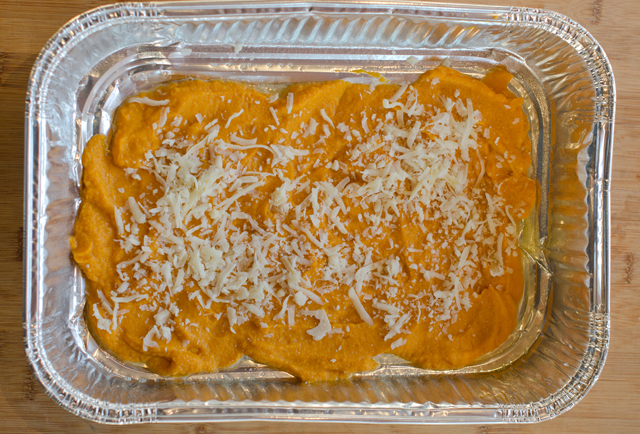
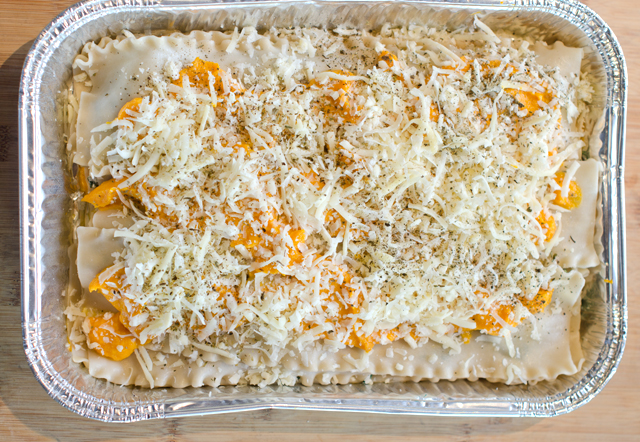
To assemble the lasagna, spray the bottom of your baking tray with nonstick spray.I used a disposable pan with dimensions of 11 x 8 x 2 . Spread one-third of the butternut squash mixture over the bottom of the tray. Top with three lasagna noodles. Dollop one half of the spinach cheese mixture over the noodles. Continue to layer and finish with the remaining butternut squash, sprinkle with a generous amount of cheese, and a sprinkle of dried basil and oregano. Cover with aluminum foil and bake for a half hour. After the half hour take off the foil reattach any cheese that has attached to the foil and bake uncovered for another 10 to 15 minutes.
Since lasagna is a time-consuming dish you could do this in stages, make the butternut squash puree one day, the spinach filling the next and assemble and cook on the third day. You could substitute frozen spinach rather than cooking down your own. Possible additions to the dish include sautéed onions, sage leaves, even toasted walnuts. Serve with a crisp salad of arugula, fennel and apples. As it is with all lasagna, it’s even better the next day.
One of our very own butternut squash.After baking, the skin pops off easily.Skin off, ready to puree.A large container of spinach cooks down to about a cup.First layer of butternut squash ricotta puree .Just a sprinkling of mozzarella cheese on top.Lasagna noodles next, these are the brown rice noodles.Next is the spinach and ricotta filling.Repeat layers and finish with squash puree, a generous sprinkling of cheese, dried basil and oregano.Out of the oven..
Delicious!!
Butternut Squash and Spinach Lasagna
Serves 6-8
Ingredients for butternut squash filling
1-3 lb butternut squash
Olive oil
1¼ c regular or low-fat ricotta cheese
½ t salt
¼ t freshly ground nutmeg
Ingredients for spinach layer
1 lb fresh spinach
1 t olive oil
2 t minced garlic
1 c regular or low-fat ricotta cheese
1¼ c mozzarella cheese
Kosher salt and freshly ground pepper to taste
To assemble the lasagna
1 lb lasagna noodles (regular or gluten-free)
Shredded mozzarella cheese
Shredded Parmesan cheese
Dried basil and oregano
Directions for making the squash puree
Preheat oven to 375°F.
Line a large baking sheet with parchment paper and spray lightly with nonstick spray.
With a sharp knife cut the squash in half where the neck meets the bulbous end. Cut both of these pieces in half lengthwise. Scoop out the seeds and reserve for toasting if desired.
Brush the cut sides lightly with olive oil and place the four squash pieces on a baking sheet cut side down. Bake in preheated oven 25 minutes, rotate and bake another 25 minutes. The squash should be easily pierced with the tip of a knife.
Cool the squash for about ten minutes, until it can be handled. Scoop out the flesh and place in the bowl of a food processor fitted with the metal blade. Puree squash until smooth. Add the ricotta cheese, nutmeg and salt and puree again. Taste and adjust seasonings. Add a little more ricotta if necessary, the puree should have the consistency of a thick marinara sauce. Set puree aside for the assembly. Leave oven on at 375° if you will be finishing the lasagna.
Directions for the spinach filling
Place the fresh spinach in a large colander that is set inside a large bowl. Sprinkle the spinach lightly with water and toss spinach lightly.
Heat olive oil in a 12″ saute pan. Add garlic and saute until light golden brown. Add the spinach by the handful, adding more as it wilts down. After draining the spinach of excess liquid, you will have a generous cup.
In a medium bowl combine spinach and garlic along with ricotta, mozzarella, salt and freshly ground pepper. Taste and adjust seasonings.
Directions for assembling the lasagna
Bring a large pot of lightly salted water to a boil over high heat. Add lasagna noodles and cook according to package directions. Stir noodles occasionally to prevent them from sticking. Drain well and rinse with cool water.
To assemble the lasagna, spray the bottom of the baking dish with nonstick spray. I used a disposable tray with dimensions of 8″ x 11″ x 2″.
Spread one-third of the butternut squash puree over the bottom of the pan. Sprinkle lightly with mozzarella cheese. Top with three lasagna noodles. Dollop one half of the spinach cheese mixture over the noodles, sprinkle lightly with mozzarella cheese. Top this layer with the second layer of noodles.
Spread your second layer of butternut squash over the noodles. Sprinkle with mozzarella cheese, then top with the third layer of lasagna noodles.
Top this with the remaining spinach cheese mixture and sprinkle with mozzarella cheese.
Top with the remaining butternut squash puree and spread evenly over the noodles. Sprinkle this layer generously with shredded mozzarella and Parmesan cheese. Sprinkle lightly with dried basil and oregano.
Cover the baking dish tightly with foil and bake for 30 minutes. After 30 minutes remove the foil, reattach any cheese clinging to the foil and continue to bake uncover for another 10 to 15 minutes. You can turn the broiler on for a few minutes if you want to brown the cheese.
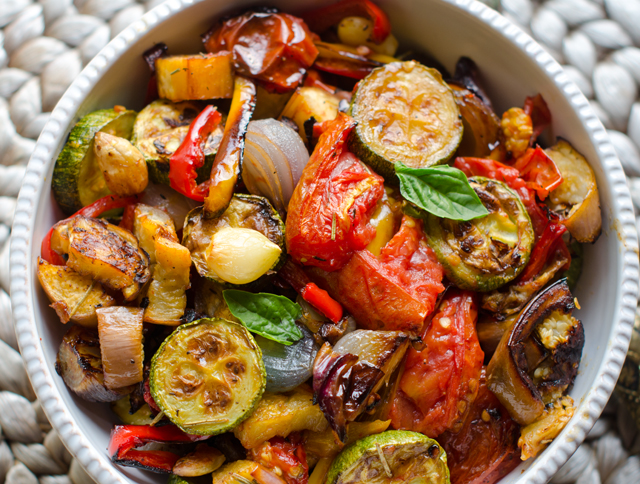
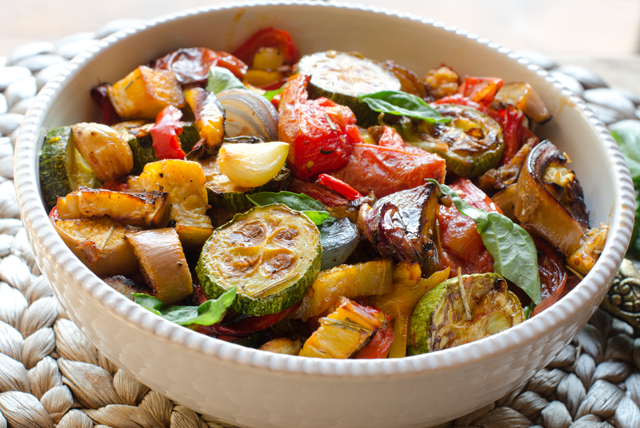
I love recipes that use the bounty of the garden in a single dish and ratatouille accomplishes that in a very delicious way. In case you didn’t know, ratatouille (rat-uh–too-ee), is a summer vegetable stew that had it’s origins in the Provencal city of Nice in southern France. Traditionally, each ingredient, eggplant, zucchini, peppers, onion, garlic and tomatoes, is cooked separately on the stove top and tossed together at the very end. So it’s really a sauté that is presented as a stew.
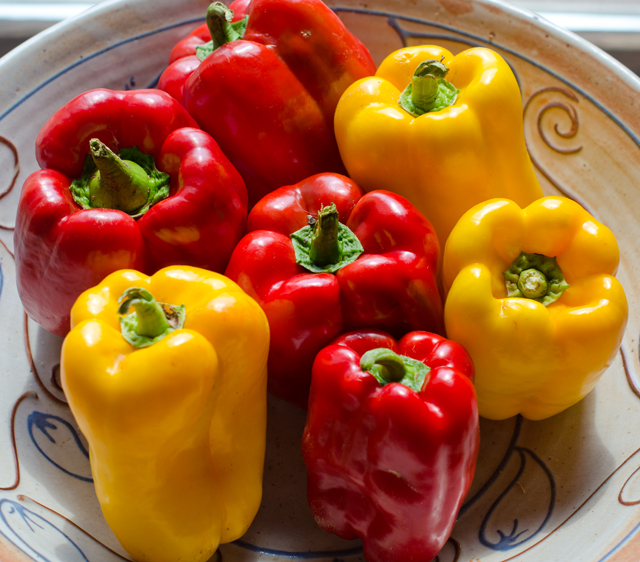
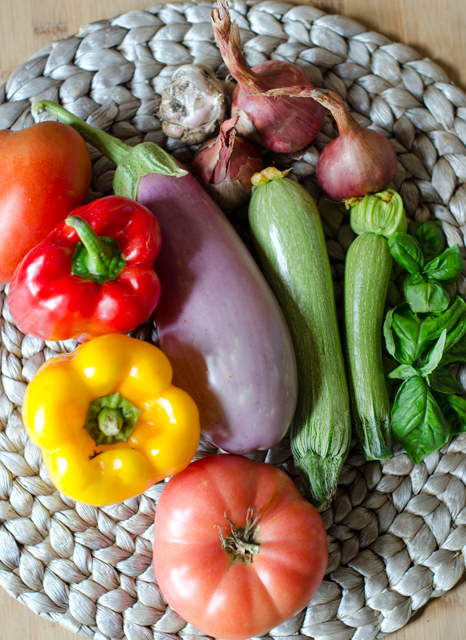
In this version the vegetables are tossed in olive oil and roasted in the oven, eliminating the time cooking over a hot stove. Our red and yellow bell pepper harvest is the earliest I can remember. They must like the hot temperatures and abundant rainfall this year. The orange Valencia peppers are not far behind. I prefer using Chinese or Japanese eggplants for their thin skin and milder flavor. I substituted shallots for onions since our harvest was so plentiful this year. The garlic was also from the garden, a first for us.
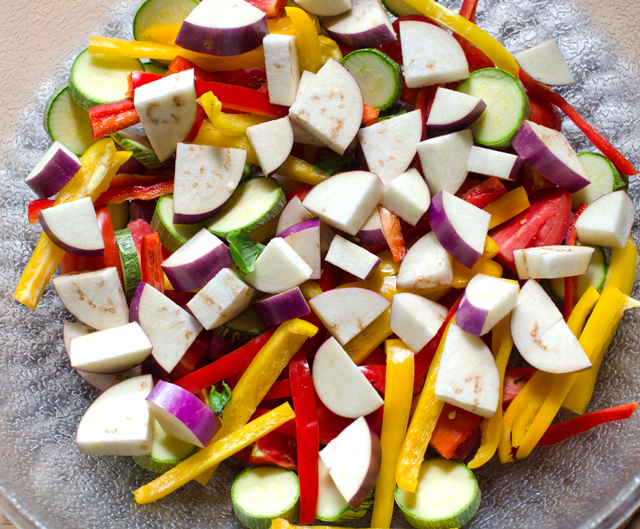
Cut the vegetables in similar size so they will get done at the same time. The smaller the cut, the less time it will take to cook. Lightly toss the vegetables with about a half cup of a good quality olive oil. Spread them out evenly over two large baking sheets. Rotate the baking sheets top to bottom and front to back half way through the cooking time. Roasting allows the vegetables to retain their shape and they take on a delicious toasted flavor. Move the cooked vegetables to a large serving bowl and tossed with a basil chiffonade. Chiffonade, translates “made of rags” from the French (of course!). It is a technique for cutting herbs and vegetables into long thin strips, in this case, basil.
Ratatouille can be used in many ways, a side dish, a topping for bruschetta, chicken or fish. We used it as the topping for an impromptu flatbread pizza. It can be served hot or cold and is even better the next day, if it lasts that long.
This season is the earliest we have had ripe bell peppers. I guess they really like the hot and rainy weather.Ingredients for the ratatouille, I substituted shallots for onions since Joe just harvested his crop.
Oven Roasted Ratatouille
Serves four (or two very generously)
Ingredients
2 small onions (about 5 oz. each), cut into ¼-inch-thick half-moons
2 bell peppers, red, yellow or orange, cored, seeded and cut into ¼-inch lengthwise strips
Japanese eggplant, about 1 lb, cut crosswise ½ inch thick rounds, then sliced in quarters
1 lb small to medium zucchini, trimmed and cut into ½ inch thick rounds
10 whole cloves garlic, peeled
½ c extra virgin olive oil, and more as needed
1 t chopped fresh rosemary
Kosher salt and freshly ground pepper
1½ lbs medium tomatoes (about 4), cored, and cut into 1/2-inch chunks
¼ c basil cut into a chiffonade
Toss the ingredients in a large bowl with olive oil, salt and pepper.Transfer the vegetables to two large baking sheets.
Directions
Place racks in the top and bottom thirds of the oven. Heat to 400°F. If using convection heat, 375°F.
In a large bowl, toss the onions, peppers, eggplant, zucchini, tomatoes, garlic, olive oil, rosemary, and 1-1/2 tsp. kosher salt and a grind of pepper. Spread the vegetables evenly over two large 12 x 16 sheet pans. Don’t spread the vegetables too thin or they may burn (they shrink a lot as they cook).
Roast, stirring the vegetables a few times and swapping the positions of the pans once, until the vegetables are slightly collapsed or shriveled, starting to brown, and very tender, about 35 minutes for my oven. It could take 10 minutes longer if you are not using convection heat.
Scrape all the vegetables and any juices into a serving bowl. Toss with the basil, taste for seasoning, and serve.
Ratatouille makes a great pizza topping.How could I resist posting a picture of Remy, the star of the movie Ratatouille who presides over my kitchen from his perch above.
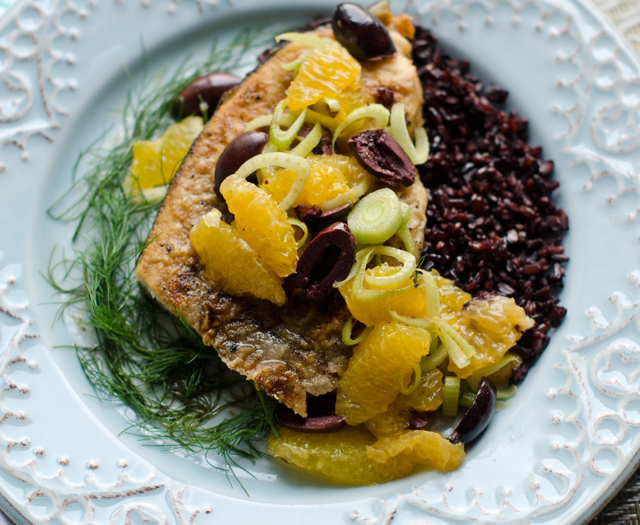
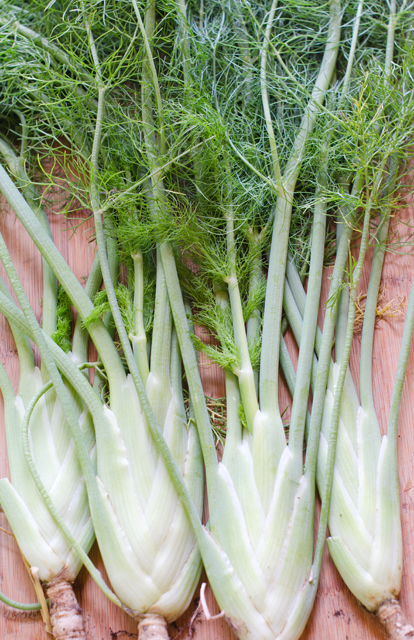
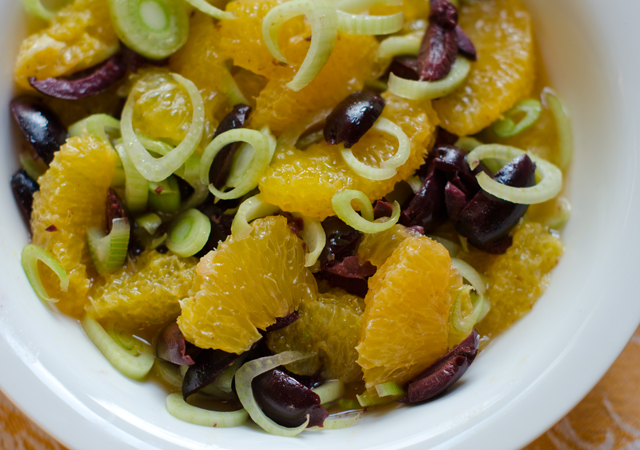
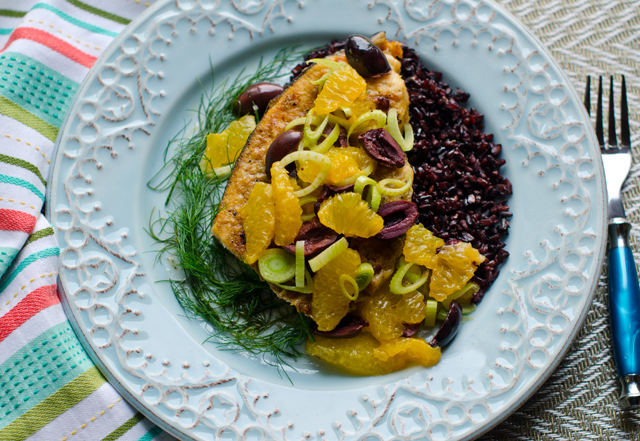
When I am looking for a quick and easy fish entree that comes together in about 15 minutes, swordfish is one of my first choices. I love it’s rich, meaty texture and like to balance it with something that is tart, a bit sweet and a little salty. This palate pleasing salad of oranges, fennel and olives takes it’s inspiration from Sicily.
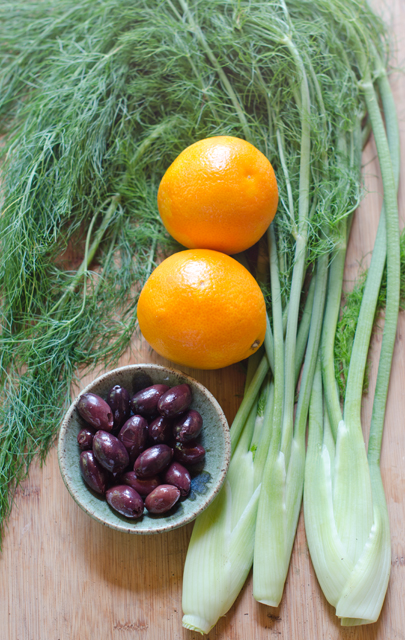
The orange supremes take some careful knife work but are worth the effort. Using your sharpest pairing knife, trim off the top and bottom of the orange. Rest the orange on one of the cut ends and trim off the peel and pith in large strips, carefully following the contours of the fruit. Cut the segments free from the membrane. Be sure to do this over a bowl to catch all the juices. Squeeze the remaining membrane to capture every last drop of juice. I reduced the juice in a small saucepan to intensify the flavor in the vinaigrette.
I think fennel is a greatly under used vegetable. Related to carrots, parsley, dill and coriander, it has a crunchy texture and refreshing licoricey flavor popular in Mediterranean cooking. To cut, trim the feathery foliage and stalks off where they meet the top of the bulb. The stalks and foliage can be used as a bed for cooking the fish. Cut the bulb in quarters lengthwise and cut out the core. Slice the sections thinly using a mandoline or a very sharp knife. I used fennel thinnings from the garden. They didn’t have a hard solid core so I used the entire fennel bulb.
Kalamata olives are almond shaped and dark purple in color. They are cured in a red wine vinegar brine that gives them a rich, fruity flavor. They are often found on the Mediterranean bar in many supermarkets. To pit olives, place them on a flat surface and lightly crush with the side of a broad flat chef’s knife. Remove the pit and cut the olives in half lengthwise.
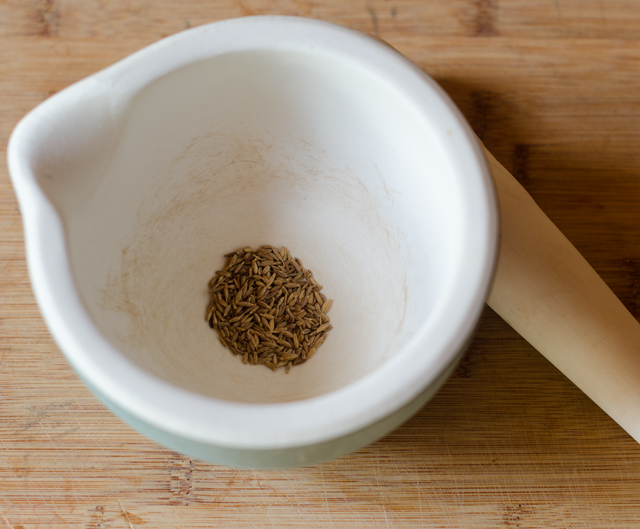
Cumin is one of my favorite spices and toasting cumin seeds really intensifies their flavor. Use a small dry skillet over medium to medium high heat. Keep the pan in constant motion, the seeds will darken and your kitchen will be filled with a warm toasty aroma. Immediately remove them from the pan and transfer to a bowl or a mortar and pestle. Crushing the toasted seeds brings out their flavor even more. If you don’t have a mortar and pestle, put the seeds in a plastic bag and crush them with the bottom of a heavy pan or a rolling pin.
Combine the reduced orange juice, toasted fennel and olive oil. Pour the dressing over the salad ingredients and lightly toss. Serve salad with the fish and garnish the plates with fennel fronds.
Orange, Fennel and Kalamata Olive Salad
Ingredients
1 small to medium fennel bulb
2-3 medium oranges
1//3 c kalamata olives, pitted and cut in half lengthwise
½ t cumin seed
2 T extra virgin olive oil
Kosher salt and pepper to taste
Directions
Cut the fennel in quarters lengthwise, removing the core. Thinly slice the fennel, preferably with a mandoline. You will need 1 cup.
Remove peel and pith from the oranges using a sharp paring knife. Working over a bowl to catch the juice, carefully cut between membranes, to remove segments. Squeeze remaining membrane to extract juice. In a small saucepan reduce the orange juice to two tablespoons. Set aside.
Toast the cumin seed in a small non stick saute pan until fragrant and toasted. Grind toasted cumin seed in a mortar and pestle. In a small bowl combine reduced orange juice, cumin and olive oil, stir together.
In a medium bowl combine the sliced fennel, orange segments, and olives. Pour the dressing over and lightly toss. Season to taste with kosher salt and pepper.
Baby fennel from the garden.
Ingredients
2- 6 oz swordfish steaks
Kosher salt and freshly ground pepper
Wondra flour
1 T each olive oil and unsalted butter
Directions
Preheat oven to 450°F.
Measure steaks using the Canadian method to calculate total cooking time.
Season swordfish steaks with salt and pepper. Dust with Wondra flour.
Heat an oven-proof saute pan over medium high heat.
Melt butter and oil in a saute pan large enough to hold the fish without crowding and small enough to fit in your oven.
Brown swordfish for two minutes on each side.
Move saute pan to oven. Finish in oven, subtracting four minutes from your total cooking time. For example 1″ fish=10 minutes cooking time minus four minutes equals six minutes in the oven.
Using oven mitts, remove from pan from oven, transfer fish to serving plate with spatula. Serve with the orange, fennel and kalamata salad.
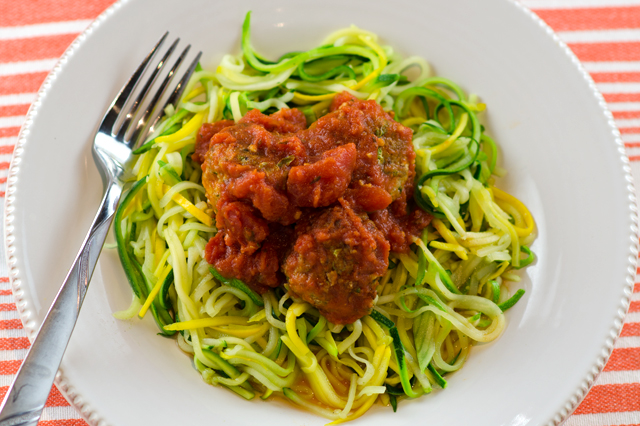
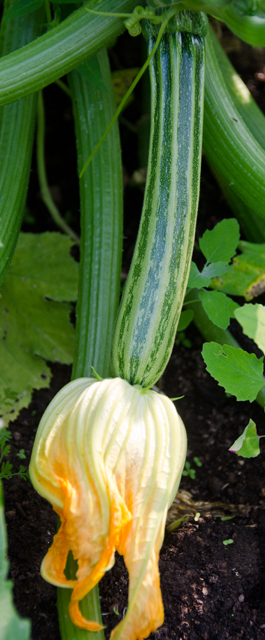
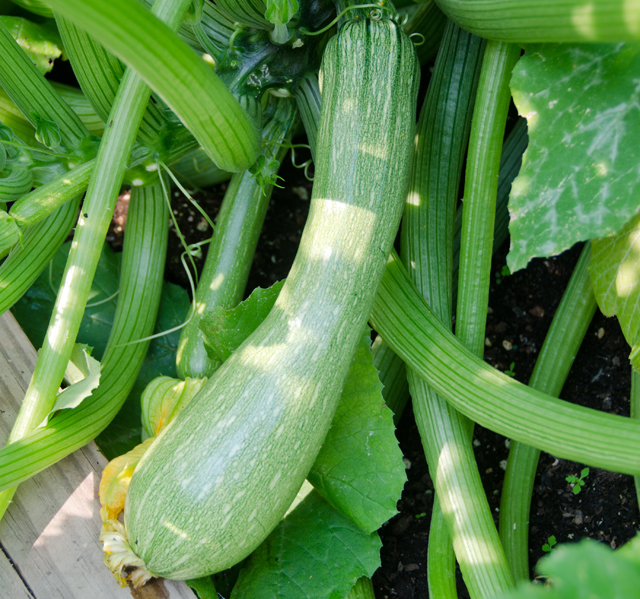
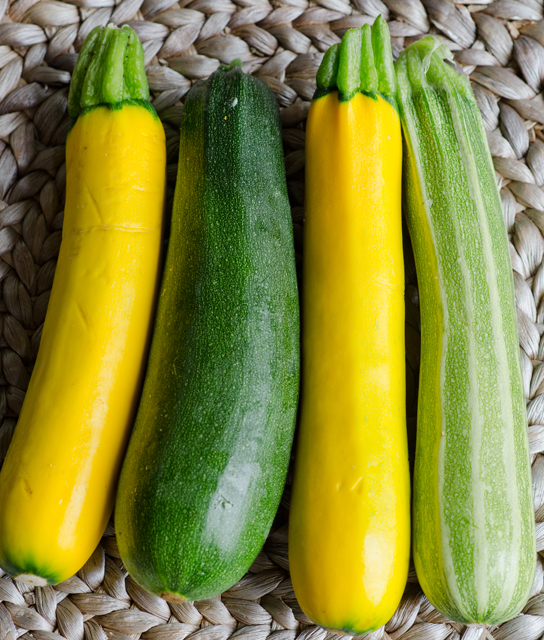
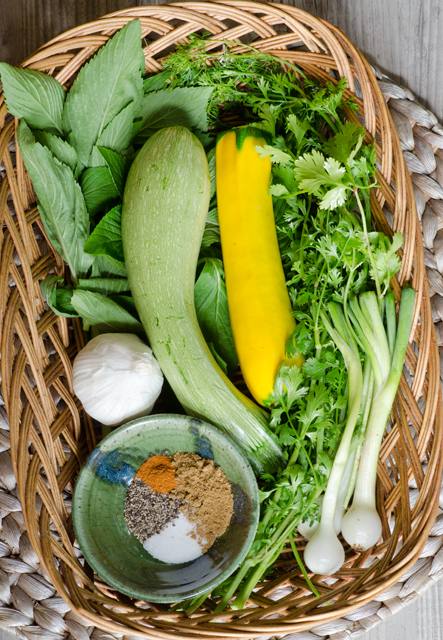
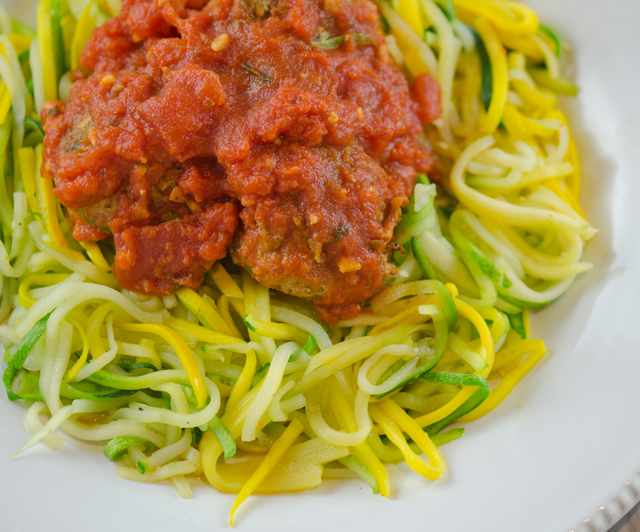
This year, after the holidays I was on the hunt for interesting healthy, flavorful recipes. I found just what I was looking for in turkey zucchini meatballs. The original recipe was for turkey and zucchini burgers from chef, restaurateur, and cookbook author Yotam Ottolenghi’s beautiful book, Jerusalem. Just like all the other recipes I have tried of his, the results were delicious.. It was easy enough to adjust the size of the original slider sized burgers to make into meatballs instead. Grated zucchini gives the typical ground turkey meatball the additional moisture that it needs. Since zucchini is 95% water, it is very important to squeeze all of the excess moisture out of the shredded zucchini so the mixture holds together well. The turkey and zucchini are combined with fresh cilantro and mint, along with garlic, cumin and spicy cayenne pepper to give them a little kick. I served them as suggested with a sauce of Greek yogurt, lemon and sumac. At that time in the middle of a cold snowy January I was bemoaning the fact that I had to buy the zucchini and the herbs and if it were July, well, those ingredients would be from our garden.
It’s July now and I remembered to make the turkey zucchini meatballs again, this time with our fresh picked zucchini and herbs from the garden. Back in January I also thought it would be a good summertime variation on the recipe to serve the meatballs with tomato sauce and zucchini “noodles”. Our zucchini vines are producing like mad, I am picking four to six zucchini and yellow squash a day. That doesn’t count the ones that hide under the large leaves and turn into baseball bats!
To make the “pasta” choose straight sided zucchini or yellow squash, preferably of a medium size in diameter, the longer the better. My tool of choice for making the strands is the Kuhn Rikon stainless steel julienne peeler. Steady the zucchini with one hand, start at the top, press the teeth of the peeler into the flesh and pull down. Keep shredding on all sides until you reach the seedy interior. Place the strands in a bowl and separate the strands that stick together with your fingers. I lightly salt my pile of “pasta” to extrude any excess liquid. I cook the strands in a saute pan, just long enough to warm them up a little and evaporate any additional excess liquid. I still want my zucchini to have a little crunch. If you prefer you can serve the meatballs with the pasta of your choice.
Our tomatoes are just starting to come in now, not quite enough to start making sauce. Until then I will use a good quality store brand. I like to warm the sauce and add the meatballs that I have kept warm after cooking them. Next time I will adjust the herbs in the meatballs for this dish, I think basil and a little oregano would complement the sauce and zucchini noodles nicely.
I love the different varieties of zucchini and squash we grow.This time I had our own zucchini and herbs for the meatballs. I substituted baby shallots for the green onions.
Turkey and Zucchini Meatballs
Serves 4-6
Makes 18-20 meatballs
Ingredients for Meatballs
1lb ground turkey, I used a 93/7 lean to fat ratio
2c grated zucchini-wrung out in a clean tea towel to remove excess moisture
3 scallions, white and green, thinly sliced
1 large egg
2T chopped mint
2T chopped cilantro
2 cloves garlic, crushed or finely chopped
1t ground cumin
1t table salt
1/2t freshly ground pepper
1/2t cayenne pepper
about 1/8c of a neutral cooking oil, canola, safflower
3-4 cups of your favorite tomato sauce, warmed
Directions
Preheat the oven to 425°F. In a large bowl combine all the ingredients for the meatballs, except the cooking oil. Mix well with your hands. Shape into 2″ balls. Place meatballs on a well greased baking sheet to ready for cooking. Pour enough oil into a large heavy frying pan to form a layer about 1/16 inch thick on the bottom of the pan. Heat over medium heat until oil is shimmering, sear the meatballs in batches on all sides. Cook each batch for about 4 minutes adding oil as needed, until browned.
Transfer the seared meatballs to a baking sheet and place in the oven for 5-7 minutes, or until just cooked through. Serve warm with tomato sauce
Ingredients for Zucchini “Noodles”
3-4 large straight sided zucchini and/or yellow squash
Kosher salt
I like making shreds with the julienne peeler, you could make them in a food processor with the shredding disk or a spiralizer tool I have seen in supermarkets.
Directions
Wash and trim zucchini and/or squash. Cut stem and root end off. On a cutting board, steady your squash with one hand and shred with a julienne peeler. Start at the top, press the teeth of the peeler into the squash and pull all the way down.
Shred on all sides of the squash until you reach the seeds. Repeat with the rest of the squash. Place the strands in a very large bowl, separate the strands that stick together and salt evenly. Let sit for 10 minutes to extrude any excess water.
Over medium heat cook the strands in a large sauté pan to warm up the squash and remove any excess water.
My local big box store always has one bargain that I can never pass up, sweet peppers. Six in a bag, two each of red, yellow and orange, they usually cost about 6.49. Supermarket sweet red peppers occasionally are on sale at a 1.99 per pound but can go as high as 4.99 a pound in the off season. Orange and yellow ones never seem to go on sale. Since we only have access to local and peppers from our garden only two months out of the year, I don’t mind buying them.
The peppers are grown in greenhouses in Canada and have consistent good flavor and texture. I like using them in salads, stuffing them with chili and cooking them on the grill. We had a few left over recently that weren’t grilled and was looking for a way to use them in the next several days. Then I remembered piperade.
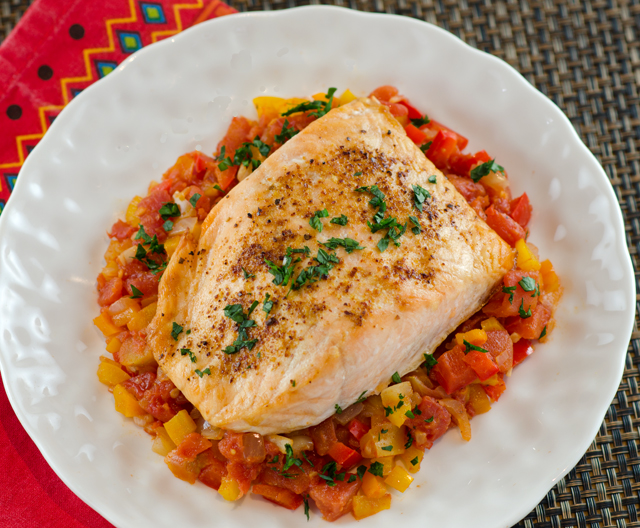
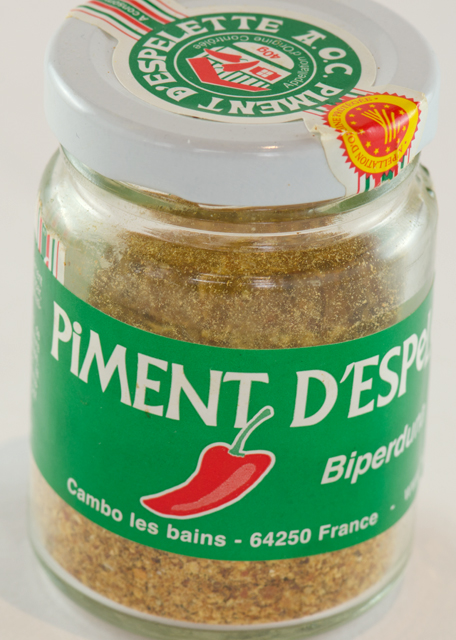
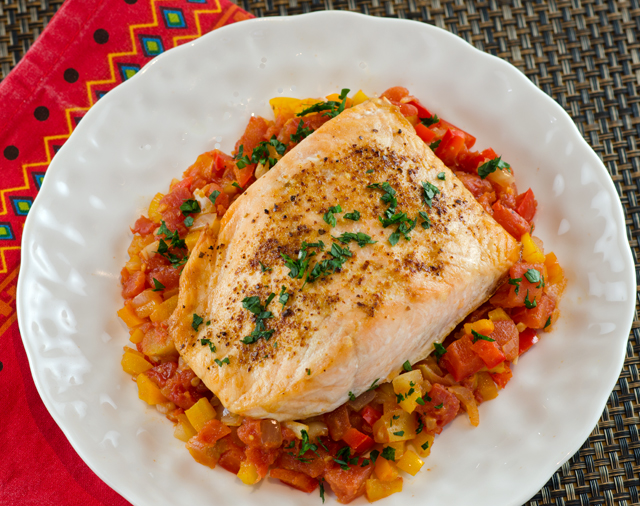
Classic piperade originates from the Basque country in the southwest region of France. It is a versatile preparation that compliments everything from eggs to chicken to fish dishes. A simple saute of bell peppers, onion and tomato, piperade is enlivened by the addition of piment d’espelette. Piment d’espelette is a pepper native to France in the Basque country. The flavor is fresh and fruity with just a hint of smoky heat.
Piment d’Espelette has AOC (appellation d’origine contrôlée) status. This is a protective designation of origin and means the pepper only comes from a 22 square kilometer region around the town of Espelette. The peppers are harvest by hand, air dried and finished in a kiln. They are sold dried, whole or pulverized into a flaky powder. Since we are not in tomato season I used diced canned tomatoes for this recipe. The once 16 ounce can has shrunk to 14.5 ounces, when will this madness stop? I used Hunts because Cooks Illustrated put them on top of their most recent testing. Their flavor was reported to be fresh, bright and sweet-tart. Sounds good to me.
Espelette pepper is sold by specialty grocers and can easily be found on line if you are an intrepid spice hunter like me. If not, substitute smoky paprika or Aleppo pepper with a dash of cayenne pepper. The piperade comes together easily. Saute an onion until translucent, add garlic, peppers and piment d’Espelette. Cook another minute until fragrant then add the tomatoes and their juice. Bring the mixture to a boil, season well and cook slowly for about 45 minutes or until the juices have thickened. Keep piperade warm while you cook the fish. Serve salmon on a bed of piperade and garnish with parsley. Serve leftover piperade with poached or scrambled eggs the next day.
I used finely chopped peppers and onion in my preparation.Piment d’Espelette is a protected designation meaning the peppers can only be grown in a specific location.
Salmon Piperade
Serves two
Ingredients
1T olive oil, plus 2t for cooking salmon
1 medium onion, diced small
1T finely chopped garlic
1 yellow pepper, diced (about ¾cup)
1 red pepper, diced (about ¾cup)
1 orange pepper, diced (about ¾cup)
1t or to taste, piment d’Espelette, substitute smoky paprika and a dash of cayenne if necessary, additional to sprinkle on fish before baking
1 14.5 ounce can of diced tomatoes
Kosher salt and freshly ground black pepper
2 6-ounce boneless skinless salmon fillets
1-2T chopped parsley
Directions
Heat 1 tablespoon of olive oil in a medium sauté pan over medium high heat. When the oil begins to shimmer, add the onion. Cook, stirring frequently until the onion is translucent, about 4-5 minutes.
Add the garlic, peppers and piment d’Espelette. Cook, stirring frequently until fragrant, about 1 minute. Add the tomatoes and their juices, season well with salt and pepper. Bring the mixture to a boil, lower to a simmer, cover and cook slowly for about 45 minutes, stirring every now and then.
Brush salmon fillets with olive oil, season with salt, freshly ground pepper and piment d’Espelette. Cook fish according to your favorite method, this is how we bake our fish. Spoon warm piperade on serving dish, nestle cooked fish on the piperade. Sprinkle with chopped parsley.