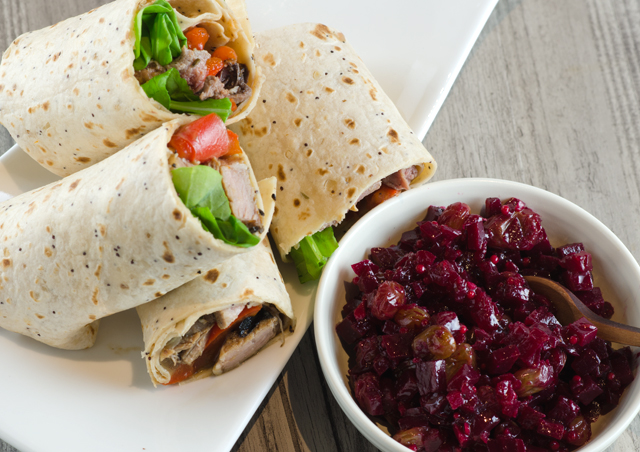
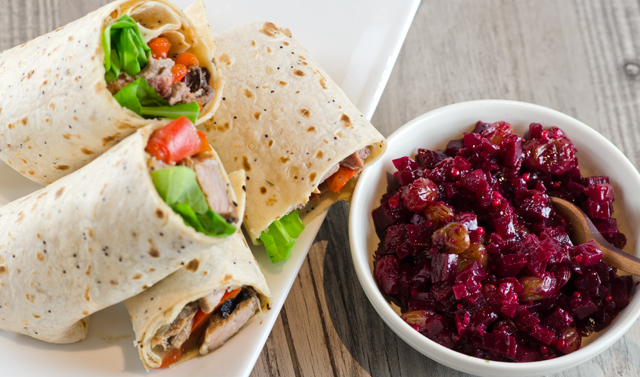
The good thing about cooking a ton of food for a holiday is that chances are, you will have lots of leftovers. The challenging part is finding ways to repurpose those leftovers into something different and delicious. Smoked turkey was good on a salad, leftover roasted vegetables topped our homemade thin crust pizzas. In previous years I made moussaka with leftover lamb, this year we decided on lamb wraps. In addition to the usual tzatziki sauce that I would serve with lamb, Joe suggested “something spicy.” I had some ideas but after googling it, found an interesting recipe for beet chutney.
As a beet lover, I enjoy their earthy quality and thought the sweet and sour quality of a chutney would be a nice contrast to the creamy coolness of tzatziki. The chutney comes together quickly and benefits from being made ahead, allowing the flavors to blend together. The recipes calls for a two inch diameter beet, which turned out to be just a little bit less than a cup. Tweak the sweet and sour elements to your own liking. I used golden raisins because that’s what I had on hand, dried cranberries might be nice as well. Dried cranberries would fit the color scheme and would fit right in with a Thanksgiving menu. The chutney would also be good as a appetizer on top of a cracker spread with goat cheese or Brie.
Beet Chutney
Makes about a cup
Ingredients
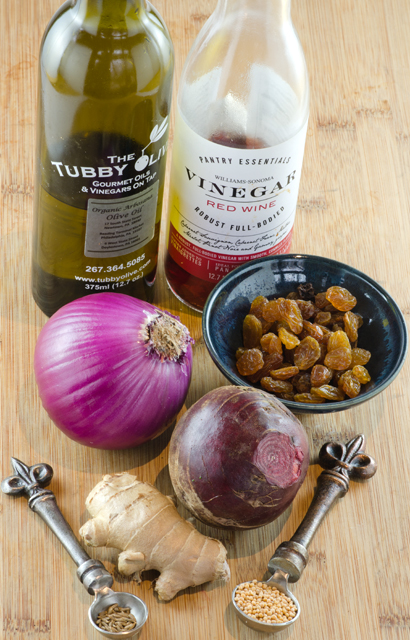
1/4c olive oil
1 ½c red onion
1 2-inch diameter red beet, peeled, cut into ¼ inch cubes
½c water
½c red wine vinegar
3T raisins (I used golden raisins)
3T sugar
2t chopped peeled fresh ginger
1t yellow mustard seeds
Pinch of cumin seeds
Directions
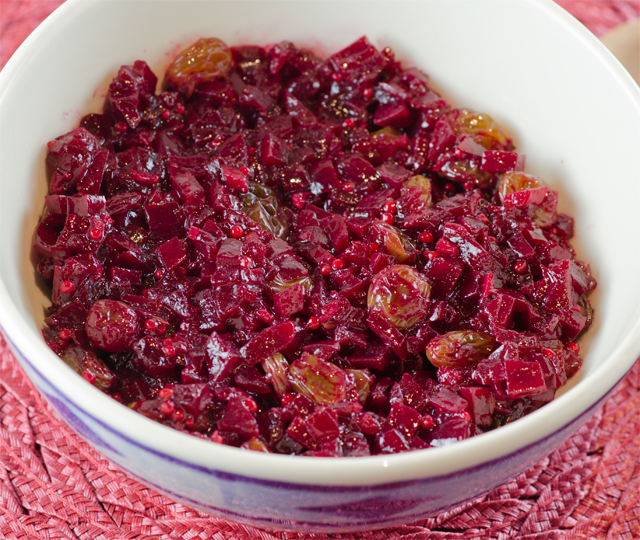
Heat olive oil in a heavy medium saucepan over medium heat. Add chopped red onion and beet cubes. Cook until onion is tender but not brown, stirring frequently, about 8 minutes
Add ½c water. Increase heat to high and boil until mixture is thick, about 5 minutes. Add vinegar, raisins, sugar, ginger, mustard seeds, and a pinch of cumin seeds. Reduce heat to medium-low and simmer until beet cubes are tender and the chutney is thick, stirring often, about 10 minutes. Adjust seasonings as needed and season to taste with salt and pepper. Cool.
What’s in a name? When it comes to food, it may depend on what country you are in. Tarator is a prime example of this. In the Balkans, it is a cold yogurt based soup made with cucumbers and seasoned with dill and lemon, similar to the ingredients in Greek tzatziki. In many Middle Eastern countries, Tarator is a sauce or a dip based on sesame tahini. The tarator of Turkey is a savory sauce, thickened with nuts and used with a wide variety of foods.
This recipe, a Turkish tarator sauce from Fine Cooking magazine is courtesy of James Beard award winning chef Ana Sortum. Her travels as a young chef exposed her to the exciting, flavorful home cooking of Turkey. When she returned to Cambridge, Massachusetts, she opened her first restaurant, Oleana combinig the bold flavors of the eastern Mediterranean with farm fresh ingredients.
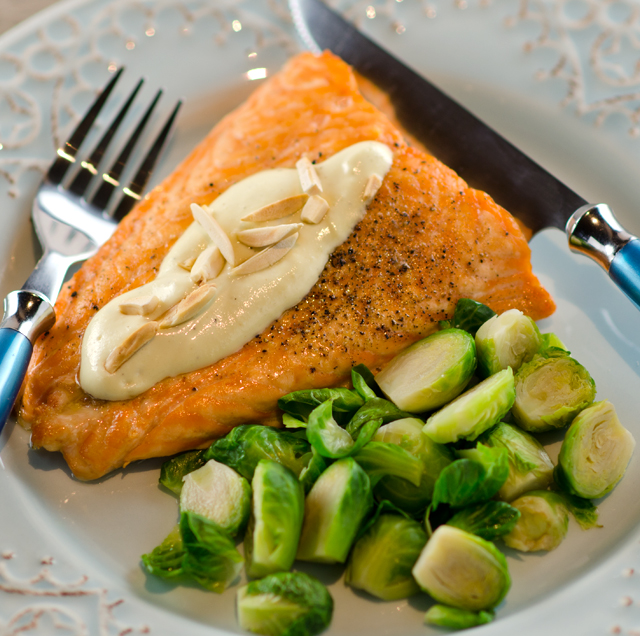
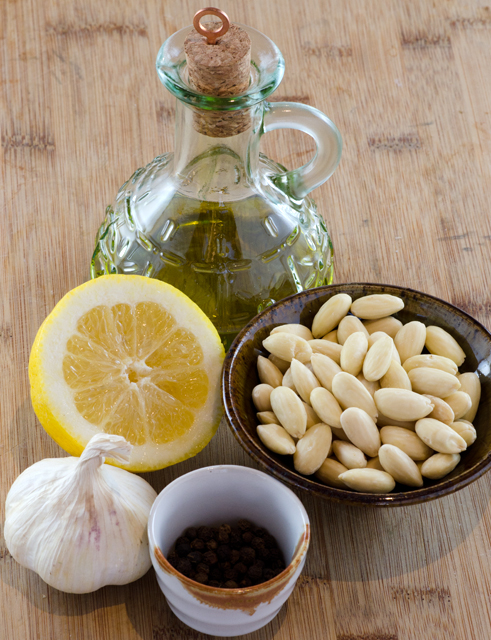
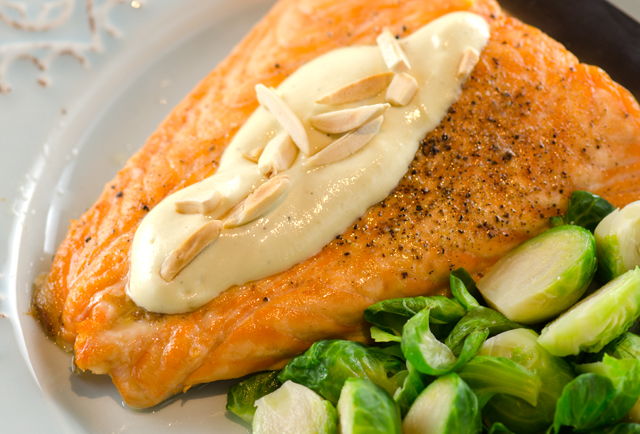
Tarator is very easy to make. As with many traditional sauces, it was first made with a mortar and pestle, but a blender brings this sauce together in less than five minutes. Nuts are the base of the sauce and provide it’s richness. I have seen everything from walnuts, to hazelnuts to pine nuts used in different versions of this recipe, blanched almonds are the chef’s choice in this recipe. Some recipes also include bread as an additional thickener but I found this unnecessary. Combine nuts, olive oil, lemon juice, water and garlic in the food processor. Blend until smooth and thick, scrape down the sides several times during this process, it takes about 3 minutes. Season to taste with salt and pepper. When serving, garnish with some toasted almonds.
Use good ingredients, not those nuts that have been sitting in your cabinet for months, fresh lemon juice and a quality extra virgin olive oil. I purchase my best oils from The Tubby Olive. Their oils are sourced from small farm producers and I am able to taste what I buy. Unfortunately not every bottle of olive oil labeled extra virgin, actually is. If you are interested in some good information regarding the misrepresentation of the origins and quality of some brands of olive oil, check here.
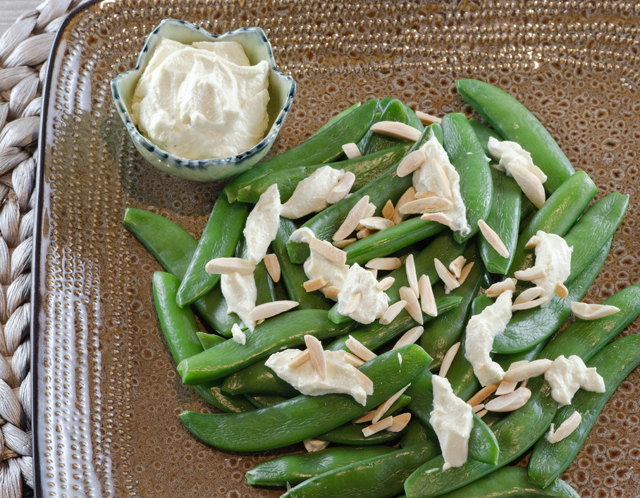
Tarator is traditionally served with a wide variety of dishes, ranging from grilled eggplant, beets and fried seafood. I served it with roasted salmon and lightly blanched sugar snap peas. It would also be a flavorful dip for crudite or a sauce for fried calamari.
Turkish Tarator Sauce
Makes about a cup
Ingredients
1/2 c blanched whole almonds
2T toasted and chopped almonds for garnish
1/4c extra virgin olive oil
2t fresh lemon juice
1 1/2t chopped garlic
Kosher salt and freshly ground pepper
Directions
In a blender, puree the whole almonds, olive oil, lemon juice, garlic and 1/2c water until completely smooth and thick, at least 3 minutes.
Season to taste with salt and pepper. Sauce keeps covered and refrigerated up to 3 days.
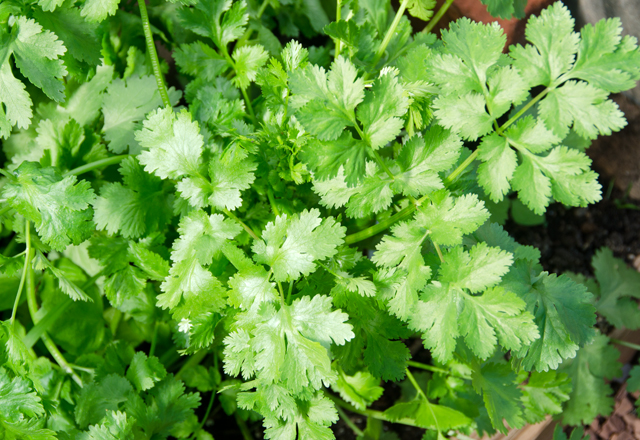
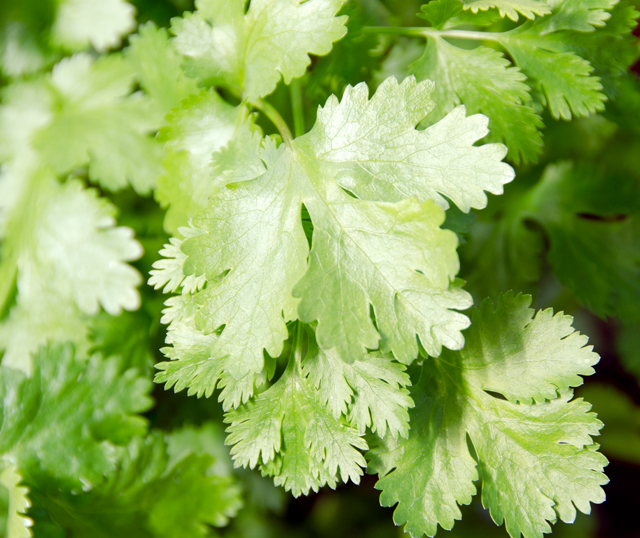
After spending some time weeding and watering in the greenhouse, Joe made an inspiring suggestion to me, “why don’t you make cilantro pesto sometime?” Now that the warmer temperatures have arrived, everything in the greenhouse is growing like mad. The lettuces are picture perfect and ready to harvest and a row of cilantro is at it’s best.
Cilantro, coriander, Chinese parsley, whatever you choose to call it, it’s one herb that people are rarely on the fence about. You either like it, or as I’ve heard often, feel it tastes like soap. Now maybe I haven’t consumed enough soap in my day, so I’m not sure what that’s all about.
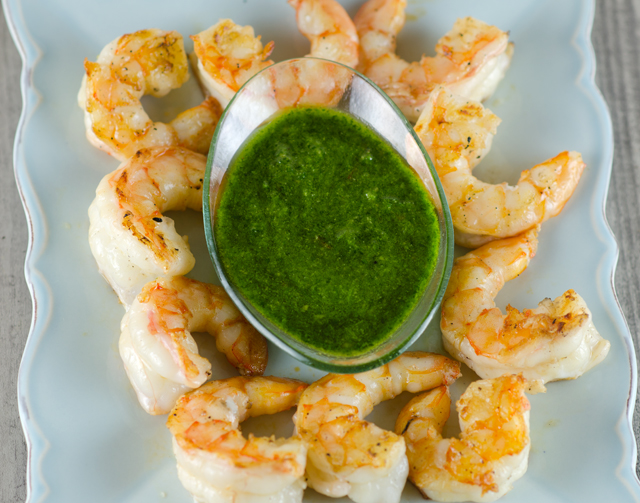
Cilantro is one of our herb garden staples. It’s versatility takes it from Mexican to Thai, from salsas to curries. I decided to make a pesto that would accompany fresh Florida shrimp I purchased at our favorite seafood market, Hellers. Fresh, meaning never frozen, a rarity in this area. I decided to keep the pesto simple, no cheese, so that the bright flavor of the cilantro would shine through. Cilantro is the only herb I know of where the tender, and I must emphasize tender, stems have the same flavor and can be used along with the leaves. Limes would usually be my citrus of choice with cilantro, but since, I didn’t have any, they are quite expensive now and the ones I have purchased recently haven’t been that good, a juicy lemon would fill in quite nicely.
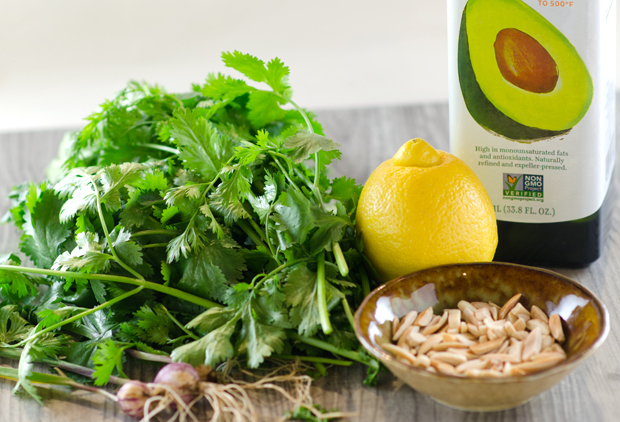
Toasted almond slivers added a subtle nutty quality to the pesto, walnuts or pine nuts are also good choices. I like to toast small quantities of nuts in a dry nonstick skillet on the stove top. I find that when I toast nuts in the oven I am opening the door so frequently to shake the pan to avoid spotty burning, it’s easier to do them on the stove.
I chose an oil relatively new to me, avocado oil. It is cold pressed, high in monounsaturated fats and vitamin E. It’s flavor is mild and buttery. It can be used for skin and scalp care as well, but mine will stay in the kitchen.
The cilantro pesto was an excellent accompaniment to the shrimp that I cooked in the grill pan. The addition of a little serrano pepper gave the pesto just enough heat.
As for some people’s dislike of cilantro, I read there is an essential oil found in the fresh leaves and unripe seeds that can be recognized immediately and not to everyone’s liking. It has to do with a genetic predisposition on how individuals perceive flavors. If you are a “hater” you are in good company. Julia Child is quoted as saying when asked what foods she hated most. “Cilantro and arugula, I don’t like at all. They’re both green herbs they have kind of a dead taste to me.” Harsh Julia, that’s just harsh. For the rest of us who enjoy the crisp, bright flavor of cilantro this is a simple recipe worth trying.
Cilantro Pesto
Makes about 1 cup
Ingredients
1 1/2c packed coarsely chopped cilantro leaves and tender stems
1/2c avocado oil
1/4c lightly toasted slivered almonds
1 medium clove garlic
1t cumin
1t chipotle chili powder
1/2t kosher salt
1/2t or more to taste finely chopped Serrano pepper
Directions
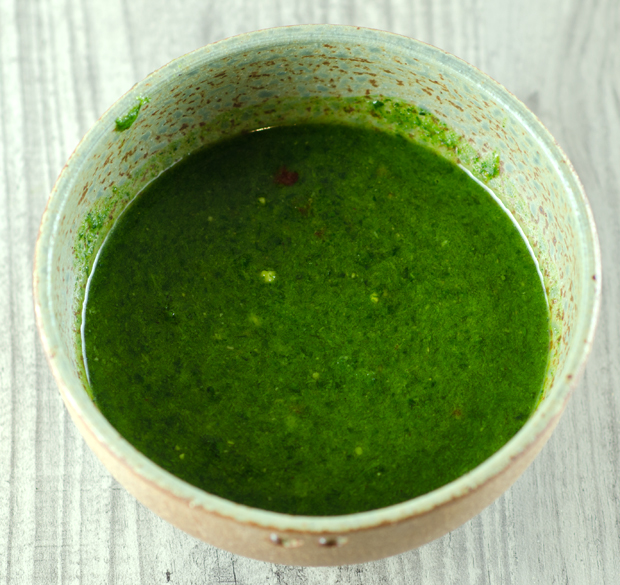
Combine all the ingredients in a blender and puree until smooth. Use immediately or up to three days.
Picasso, Renoir, Monet, artists with different styles but all started their paintings with the same thing, a blank canvas. A pizza dough can serve the same role. It becomes the canvas for the toppings you “paint” on your dough. An article in the March issue of Martha Stewart Living, “Modern Masterpizzas” featured pies that were inspired by artists from Picasso to Pollack. These unique brightly colored canvases were the inspiration for the pizza course that became part of the Valentine’s Day menu. Martha’s pizzas were abstract looking rectangular creations topped with everything from brussels sprouts and delicata squash to a slightly more conventional prosciutto and mozzarella pie.
Joe has always been quite the pizza master. His first job as a teenager was at the most popular pizza shop in the area where he worked his way up from dishwasher to pizza maker. One of his more surprising talents is spinning and throwing pizza dough. So I was certain he would be up to a pizza challenge. He has liked the dough that I have made for several years but decided to use the dough in Martha’s recipe. My dough uses unbleached all purpose flour, Martha’s dough uses bread flour and three times the amount of yeast in the recipe I use. I prefer instant dry yeast in all my pizza and bread recipes. Instant dry yeast does not need to be dissolved in warm water like active dry yeast and can be added with the other dry ingredients. Joe found the dough made with the bread flour tore easily. It definitely rose much more than the pizza dough I make. As Joe put it, dough made with bread flour is not a “spinning dough”. So he worked the dough into the pan, baked it a short time until he could remove the pan and allow the bottom of the crust to brown.
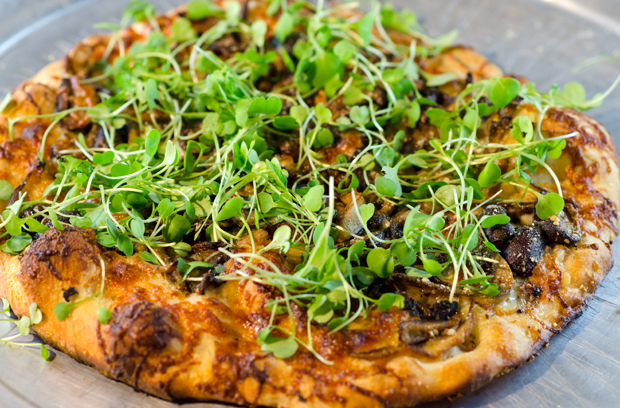
He made two different types of pizza for this occasion. One was topped with an assortment of mushrooms, cremini aka “baby bellas”, shiitake and oyster that were sauteed in butter, olive oil and garlic. After the pizza was removed from the oven, he scattered baby arugula leaves on top. The best of both worlds, pizza and salad.
The other pizza was topped with four Italian cheeses and pancetta. Like bacon, pancetta originates from pork belly. Bacon is cured by both brining and smoking. Pancetta is cured with salt and pepper but not smoked. Pancetta is readily available these days, even in the “big box” stores. I rewrap it from the original packaging and store it in the freezer for moments like this. Bacon or prosciutto could be substituted for a slightly different flavor profile.
When that pie came out of the oven, he drizzled a little honey over the warm pizza. The saltiness of the pancetta was the perfect contrast with the honey. Honestly, I think I could have eaten the whole pizza but used a little restraint, knowing I needed to save my appetite for the many courses yet to come.
Mushroom and four cheese pizza on the peel ready to slide back into the oven after a short prebake.The warm mushroom and cheese pizza is topped with baby arugula. Can’t wait for spring and our own greens!
1T extra virgin olive oil, plus more for brushing and bowl
Directions
In a large bowl, whisk together the flour and yeast. Slowly add water, mixing with a wooden spoon until incorporated. Stir in salt and oil. The dough will be lumpy and raggedy. Brush with oil. Cover bowl with a dry kitchen towel and let rest 1 hour.
Turn out dough onto a floured surface and pat with flour. Continue to flour your hands as you work. Holding two opposite sides, pull dough until about a foot long, then fold back onto itself and pinch ends together. Repeat 4 more times, rotating dough each time to stretch alternate sides, until it feels smooth.
Place dough in a well-oiled large bowl; brush with oil. Cover with plastic wrap and let rise in refrigerator until doubled in bulk, at least 24 hours and up to 48 hours.
Turn out dough onto floured surface. Cut into 3 equal parts; form into balls. Brush with oil; cover. Let rest 1 hour.
Place dough on fists and use knuckles to begin stretching dough from middle, rotating it slightly as you work. Set on surface and continue to stretch from all sides to form a rough 10-by-14-inch rectangle. Dough may tear at this point, just pinch it back together if that occurs.
Transfer dough to a lightly oiled 12 round or 9-by-13 inch rimmed baking sheet. Pull edges to fill pan.
Wild Mushroom and Four Cheese Pizza topped with Arugula
Ingredients
2 cloves garlic, finely chopped
1T olive oil
2T unsalted butter
8oz assorted mushrooms, about 3 cupes (Joe used porcini, oyster and shiitake)
1 1/2c shredded four cheese Italian blend.
Baby arugula or other micro green
One pizza crust from the preceding recipe
Directions
Place pizza stone on the bottom rack of the oven if using. Preheat oven to 500°F.
Over medium high heat melt butter and olive oil in a sauté pan. Add mushrooms and cook until softened, 7-9 minutes.
Brush pizza crust with a thin coating of olive oil. Evenly sprinkle cheese over the crust. Top with the sautéed mushrooms.
Bake until cooked through, the crust should be golden on the edges and the cheese should be golden brown in spots, about 15 minutes. Joe bakes his pizza on the sheet for about 5 minutes, uses a pizza peel to remove the pan and bakes the pie directly on the pizza stone until it is done. This allows the bottom of the crust to brown nicely.
Sprinkle arugula or micro greens over the warm pizza. Slice into 6 pieces and serve.
Honey Drizzled Pancetta and Cheese Pizza
Ingredients
1 1/2c shredded four cheese blend or mozzarella
Thinly sliced pancetta to cover the pizza
Honey
Directions
Place pizza stone on bottom rack of oven if using. Preheat oven to 500°F.
Sprinkle cheese evenly over the crust. Bake for about five minutes or until it is easy to remove crust from the pan with a pizza peel. Return pizza to oven and continue to bake for another five minutes.
Layer pancetta over the cheese and bake for another 5-7 minutes, until crust is golden around the edges.
Remove pizza from oven with a pizza peel and slide pizza onto a cutting board. Lightly drizzle honey over the pancetta. Slice into 6 pieces and serve.
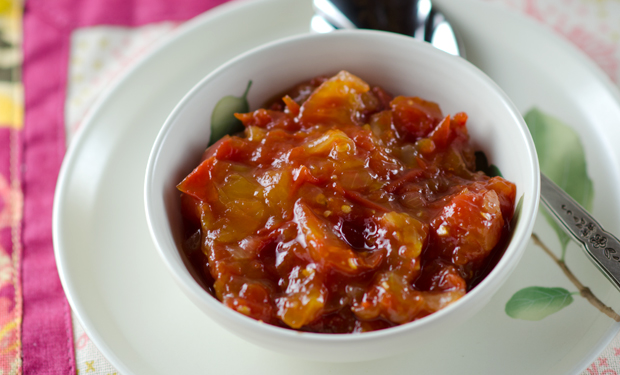
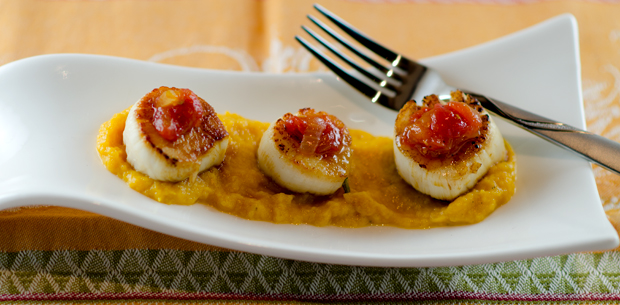
“Use us!” they seemed to call out, well not literally, I haven’t lost my mind yet. But every time I passed the small basket of the “last gasp” tomatoes that hung in there until late October I knew I should use them to commemorate the end of the season. Granted these survivors were not salad worthy, though red and ripe looking on the outside, inside they were a bit pale, even white in some sections. Several weeks ago I had torn out a recipe from the food section of the local newspaper that could fill the bill, Barnegat Light Scallops with Butternut Squash Puree and Tomato Jam. I knew I had the four cups of diced tomatoes needed so that’s where they would go.
Barnegat Light, the distinction of the scallops called for in this recipe, is located at the northern end of Long Beach Island, New Jersey. It’s home to “Old Barney” the second tallest lighthouse in the United States. Barnegat Light is one of the top fishing ports in the United States and home to a fleet of scallopers that bring in over 2 milllion pounds a year. This makes New Jersey the country’s second largest producer of scallops a year, just behind Masschusetts.
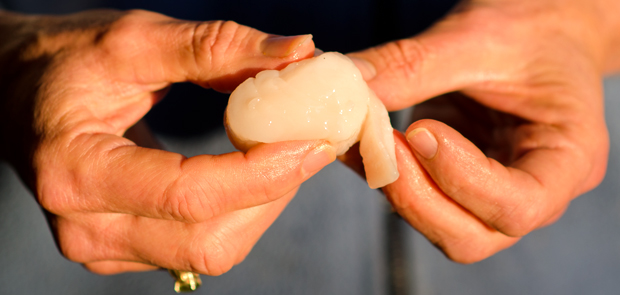
Whether your scallops have the Barnegat Light distinction or not, always cook with dry scallops. Dry scallops originate from boats that go out, shuck and ice their haul on board and return to shore the same day, hence the name “day boat”. Wet scallops come from boats that are out to sea for many days at a time. To preserve their catch, fishermen have to soak their scallops in a solution of sodium tripolyphosphate (aka STP) before they are frozen. STP causes scallops to soak up water before the freezing process. This plumps up the scallop by as much as 30% and increases the before sale weight and also the price you pay. Wet pack scallops will appear plumper and whiter when placed next to their dry counterparts. When cooked, they will exude all the excess slightly soapy tasting water when cooked and will become shrunken and rubbery before they even get to the carmelization stage.
To achieve perfectly caramelized scallops, first pat the scallops dry with paper towels, excess moisture will impede the browning process. Detach the tough abductor muscle from the side of the scallop with your fingers. Season the scallops lightly with salt and pepper. Heat a heavy bottomed pan over high heat for a minute or two. Add a thin film of flavorless oil (canola is my preference) and place the scallops in the hot pan, making sure not to crowd them. If the scallops are too close they will steam, not sear. Leave the scallops to sear undisturbed for two minutes. With tongs, gently lift one up to see if the desired caramelization has been achieved. Flip the scallops and allow them to cook for another 2 to 3 minutes.
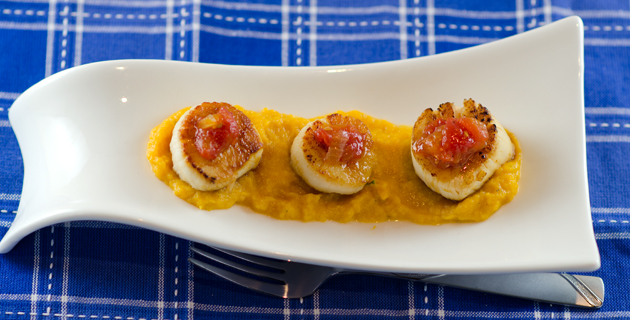
Tis the season for winter squash and they are appearing in abundance at my local farmers market. I just simply cut the squash in half, baked it at 375°F for a half hour. I pureed the squash with a little half and half, a little fresh nutmeg and a sprinkling of sage. Acorn or kabocha squash could easily fill in for the butternut. Cooking them slow and long, I coaxed as much flavor as possible out of my tomatoes. I was quite pleased with the results. Tomato jam would be a good accompaniment to a burger or a grilled cheese sandwich also. The mellow sweetness of the butternut squash complimented the nutty brown crust of the scallops. Inside the scallops were still tender and creamy and the tomato jam added a nice piquancy to the finished dish.
Barnegat Light Scallops with Butternut Squash Puree and Tomato Jam
Ingredients
12 medium sized dry pack scallops
1 medium butternut squash
1/2 to 1 c heavy cream or half and half
1/4t rubbed sage
1/4t freshly ground nutmeg
4c fresh tomatoes, finely diced
1 small sweet onion, finely diced
1c rice wine vinegar
1/2c water
1/2c sugar
Kosher salt and freshly ground pepper
Canola Oil
Directions
For the squash
Preheat oven to 375°F. Cut squash in half lengthwise. Place cut side down on a baking sheet.
Bake squash for about a half hour or until squash is easily pierced with a knife
Allow the squash to cool slightly. Scoop squash flesh into the bowl of a food processor. Add sage, nutmeg and just enough cream or half and half to make a smooth puree. Transfer puree to a small saucepan and keep warm over low heat, or store until ready to use.
For the tomato jam
Combine the tomatoes, onion, vinegar, water and sugar in a nonreactive saucepan, this is when I pull out the Le Creuset. Bring to a boil and reduce to a simmer.
Allow to cook down until thickened, this may vary depending on the water content of the tomatoes. Remove from heat and cool. Season with salt and pepper.
For the scallops
The small abductor muscle is tough, it is easy to pull off with your fingers.
Remove the small abductor muscle from the side of the scallop. Pat dry with paper towels and season lightly with salt and pepper.
Heat enough oil to film the bottom of a pan large enough to hold the scallops. If you don’t have one pan large enough, cook the scallops in two batches.
When the oil just begins to smoke, carefully place the scallops in the pan, being careful not to crowd them. Sear on each side until golden brown. Time will vary based on your stovetop, but the hotter and quicker the better.
To Plate
Place some puree on the bottom of a plate or bowl. Arrange three scallops on top of the puree and garnish with the tomato jam.
Recently we spent a week in sunny San Diego California. The reason for our trip was an educational conference for Joe and a much needed vacation for both of us. I had the pleasure of meeting in person, one of my favorite food bloggers, Denise Jones, photographer extrodinaire and the creator of There’s A Newf in my Soup. I have been corresponding with Denise off and on for several years and thought it would be great to meet her and her Newfoundland,Trapper in their beautiful hometown of Coronado California.
Since it had been about twenty years since we visited the area, I asked Denise for some dining recommendations in the area. In addition to her blog, Denise has been photographing and writing for Wine and Dine San Diego as well as assignments for other restaurants so I was certain she would know the best places. In her typical thorough fashion she gave us a list that covered every option from sushi to modern Italian to French bistro. None disappointed.
One of our favorites was a very unpretentious place, Carnitas’ Snack Shack located in the North Park (or North Pork as they like to call it) section of San Diego. Co owners Sara Stroud and Hanis Gavin offer “pork-centric” cuisine with tasty choices like a braised pork belly appetizer, a BLT with bacon and crispy ham, and carnitas tacos. They are open from 12 noon to midnight every day except Tuesday.
You know you’ve arrived when you see the pig that adorns the roof of the building. Diners line up and place their orders at the walk up window. You can either get your food for take out or eat it on the back patio adorned with a pig mural. The snack shack provided me with a uniquely California experience. I held our place in line while Joe shot video of our experience. (I never stop him, love the videos we have when we get home).
As I was the last person in a line of about a dozen or so, a “lost in the seventies” type stoner rode up on his bicycle. “Dude,” he asked me, “what are you getting to eat?” Not giving me a second to answer he continued, “you have to get the steak sandwich, I always get the steak sandwich, my friend, he’s going to meet me here, he won’t get the steak sandwich, it’s too hot for him, but I always get the steak sandwich.” He proceeded down the line, still straddling the bicycle asking what the other diners had in mind, he clearly loved that steak sandwich.
“Dude” he said as he regained his place in line behind me, ” I forgot my bicycle lock, do you think I could leave it by the front door of that house that says cats and dogs?” I pointed out to him that the house that had a sign out with cats and dogs on it was a veternarian’s office and he should probably hold on to his bike. The line grew behind us so he found new recruits to spread his gospel of the steak sandwich.
In addition to the heartier fare of burgers, pork sandwiches and BLTs they had some surprises on the menu. Watermelon salad with country ham, radishes and cherry tomatoes and a beet terrine. Our week in San Diego could be subtitled, the week of the beet salad. Roasted red and golden beets with goat cheese and mixed greens, beet salad with spinach, avocado and balsamic vinaigrette, baby chioggia beet and mache salad, all very good, but a beet terrine? I had to order it, the beet terrine was unique and quite delicious. Since I knew I would have an adequate supply of beets when I returned home, this would be something I would want to re-create.
This recipe really showcases the beets, so it is important that they are fresh from the garden or farmers market. That way their natural sweetness will shine through. I picked both Detroit Red and Golden beets for this recipe. After washing them, I trimmed back the stem and root ends. Since my beets were different sizes I wrapped them in foil packets according to their color (red beets bleed) and size. I roasted the beets at 375°F and started checking the packets with the smallest beets at around the 45 minute mark. I determined doneness by if the beet could be pierced easily with the tip of a sharp knife. Some of the larger beets took as long as an hour and fifteen minutes. I didn’t peel the beets before roasting, the skins slip off easily after they are cooked.
Trying to re-create the dish I had at Carnitas I added some spinach leaves to the layers of the terrine. I chose large leaves from the garden that I blanched for about 30 seconds, draining them and drying them flat on clean kitchen towels. Removing the center rib made for easier handling and placement of the leaves. Walnuts are always a good match with beets, I chopped about a half cup finely to sprinkle over each layer of spinach.
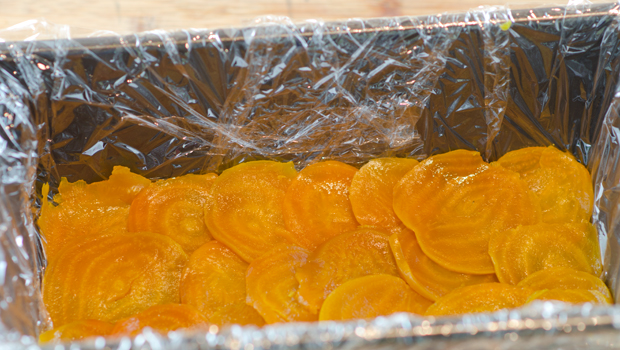
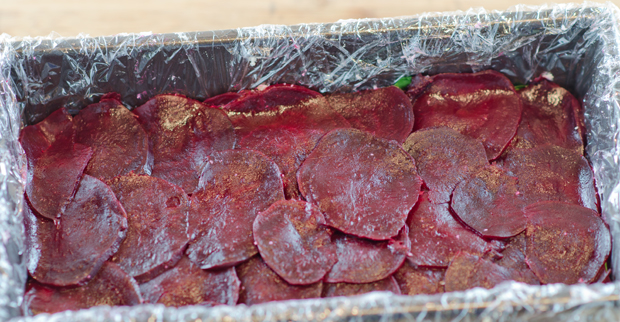
I chose my smaller Kuhn Rikon mandoline to get 2mm slices, first slicing the smaller quantity of Golden beets, keeping them on a separate plate, then the dark red. Short of wearing rubber gloves, It is inevetable that your hands, fingers, cuticles will turn bright red. Let the phone go to answering machine or you will be leaving a trail of red behind you. Next I lined a loaf pan with plastic wrap making sure there was excess wrap on all sides. I placed a layer of the Golden beets, overlapping when needed, to have a solid layer. I spread a thin layer (well, as thin as possible) of very soft goat cheese over the first layer of beets. You could choose plain or an herb variety, if you are ambitious, add your own combination of herbs. Minced garlic or lemon peel would be nice too. If the goat cheese doesn’t make a solid layer, that’s okay, it will spread out when the terrine is compressed. Two more layers of golden beets and goat cheese and I was ready for the red beets. Now I layered the red beets, goat cheese, then a few blanched spinach leaves and a sprinkling of chopped walnuts. My last layer was just a solid layer of beets. I pulled the excess plastic up and around and sealed the beets. Compressing is essential to a good terrine. I placed another loaf pan of equal size on the top of the beets. On that I placed my two kitchen bricks to weigh it down. The beet terrine should sit for at least two hours but is best if you let it sit in the fridge overnight.
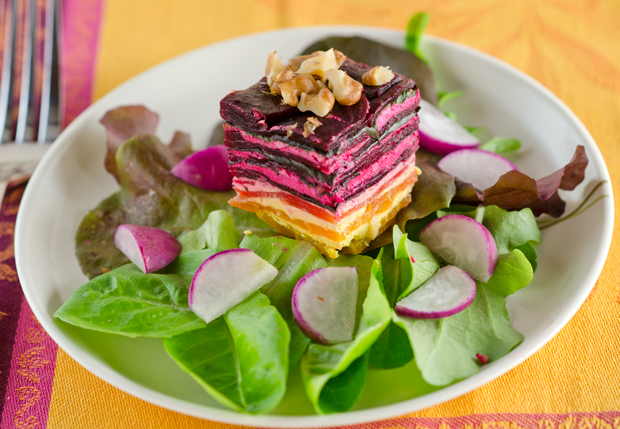
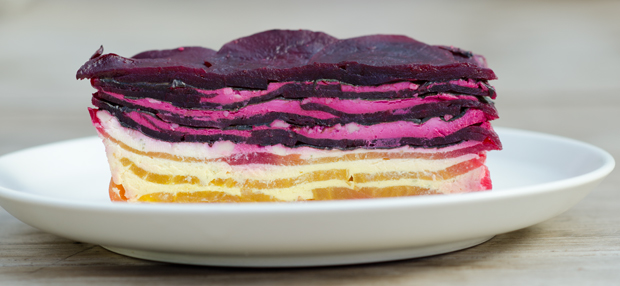
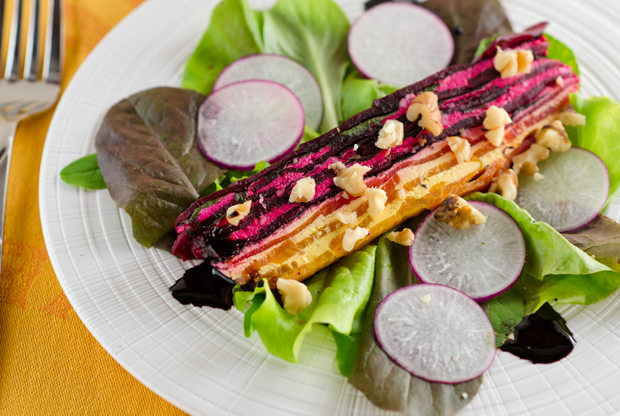
The next day it was very easy to unmold over a plate. Do the unmolding over a sink to collect the excess beet juice that will be in the bottom of the pan. The plastic wrap comes off easily and I found it best to slice it with a sharp, thin blade knife. Chef Hanis Cavin of Carnitas’ said, “when you only have one vegetarian item, it needs to be delicious.” Chef Cavin sources all local ingredients for his beet terrine. The portion size at Carnitas’ was larger and could be a vegetarian entree with a healthy slice of beet terrine served with frisee lettuce, radishes and a balsamic glaze. A balsamic reduction is simple. I poured a half cup of balsamic vinegar in a saucepan, brought it to a simmer and cooked it until it was reduced by half. The balsamic becomes syrupy and will harden if left to cool. It can be brought back to syrup over low heat.
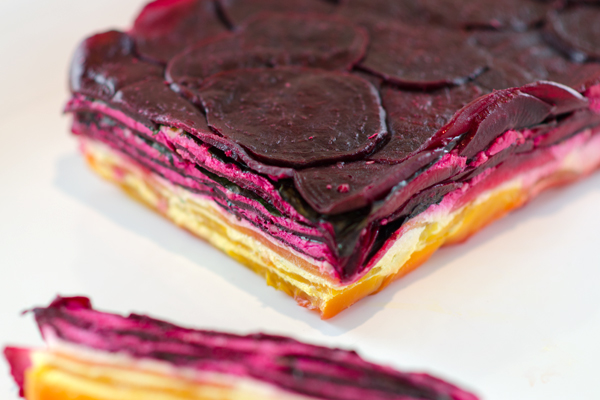
The terrine can be cut into squares for a more attractive presentation as a first course salad. I did not have frisee lettuce, but our new crop of lettuce greens along with some purple radishes would be just perfect. I dotted the balsamic reduction along the edges of the plate. A sprinkle of extra virgin olive oil, some sea salt and fresh ground pepper round out the presentation. Time consuming? Somewhat, but if all the components are ready to go you will have a beautiful dish the next day.
I think we ordered half the menu at Carnitas’ Snack Shack, I would recommend it highly. Seasonal fries were on closer inspection, seasoned fries (we both need to get our glasses changed). What I thought was an art gallery across the street with a painting of a leaf on the wall was actually a marijuana dispensary. The friend of the guy I met on line did show up. “Dude you know I can’t eat the steak sandwich, it’s too hot.” Fortunately for him, there are many delicious alternatives.
Sliced Detroit Red and Golden Beets.I used larger spinach leaves to line the terrine.Line a loaf pan with enough plastic wrap to come up over the sides. I placed the first layer of Golden beets as the base.Next, a layer of goat cheese.The final layer of red beets before I pulled the wrap over it.I weighted the terrine with another loaf pan and two of my “kitchen bricks”.It is only fitting that the side view resembles a bacon slice!
Summer is berry season and each month brings a new arrival. June is time for plump juicy strawberries. July brings succulent raspberries and blueberries. August brings one of my favorite berries, eggplant. A berry? you say. First, the members of the nightshade family, tomatoes, pepper and eggplants to name just a few, are actually fruit, not vegetables. Botanically speaking, fruit are seed bearing structures that develop from the ripened ovaries of flowers. But eggplant are not just any old fruit, they are considered berries because they are indehiscentwhich means they do not sprout open when ripe. With these technicalities aside, there are two burning questions that most people have when it comes to eggplant; should I salt or not? and are there male and female eggplants?
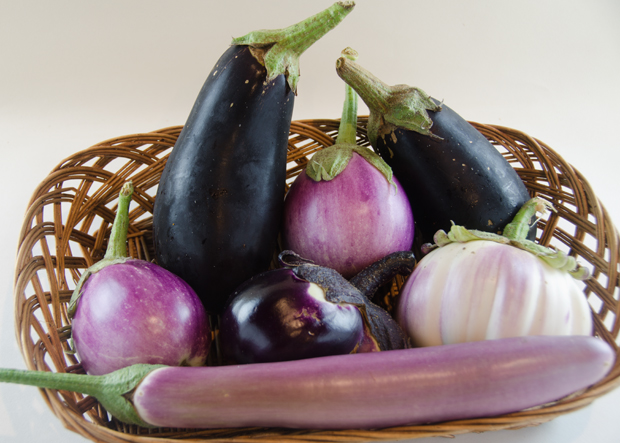
A round up of the varieties of eggplant we grow.
Young eggplants, picked fresh from the garden or purchased at the farmers market will not need salting. They will have thinner skin and fewer seeds. The bitterness originates in the seeds which contains nicotinic alkaloids. Did I mention tobacco is another member of the nightshade family? So the larger the eggplant, the greater the likelihood of it having more seeds. Salting, also known as degorging, is good for drawing out excess liquid from the eggplant so that it doesn’t absorb as much oil in the cooking process, but it is only successful in masking bitterness.
The male vs. female eggplant was a tale that even I fell victim to. I was surprised at the number of websites that propose the theory of male and female eggplants as fact. The story goes that a dash-shaped slit on the bottom of the fruit indicates a female eggplant and a deep round indent indicates a male. The male eggplant reportedly has fewer seeds and is more desirable. It’s debunking time again. Fruit, like eggplants develop from the female flower on the plant but have no sex of their own.
So, how do you choose the best eggplant? Look for eggplant that have smooth, bright, shiny skin. When you press on the skin it should spring right back. Select eggplant that are heavy for their size, indicating younger fruit. The calyx, the green leaves at the stem end should be fresh and green, not dried out and brown.
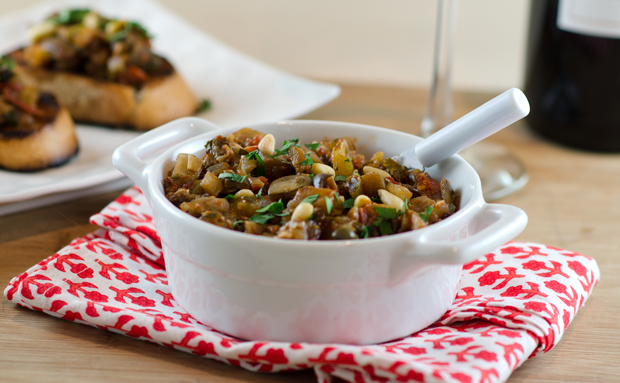
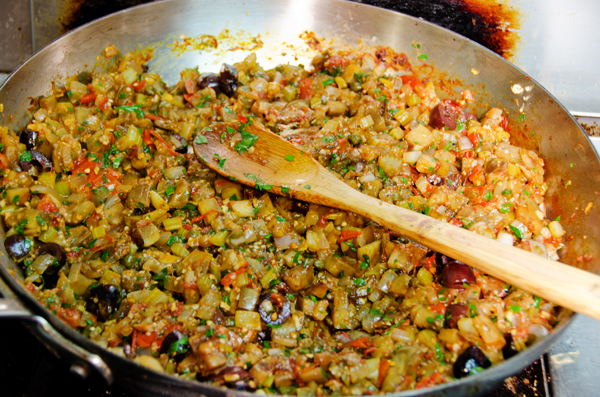
Our garden in the month of August yields an abundance of the nightshade family, tomatoes, peppers and eggplants. While our tomato harvest is better than last year, this has proven to be not the best year for eggplants and peppers. I wanted to take advantage of the eggplants we did grow and make one of our favorites, caponata.
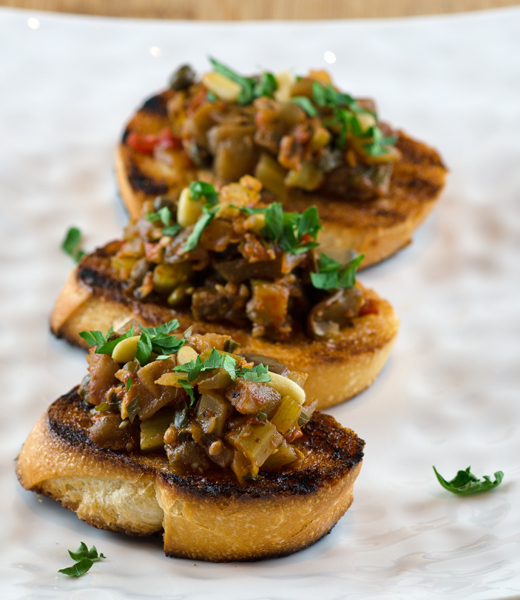
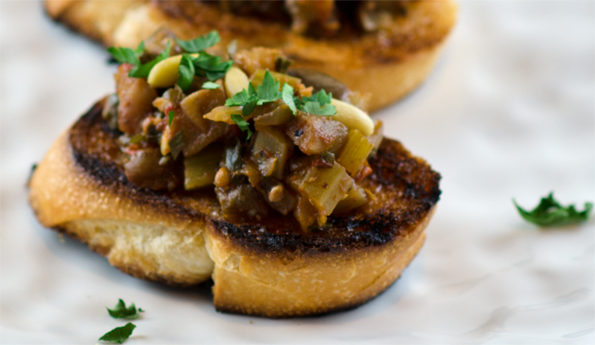
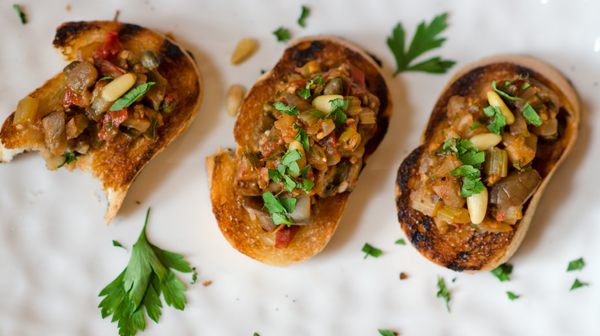
I posted a different recipe for caponata last year, this is one from my catering days. A great room temperature dish, caponata always tastes better the second day, after the flavors had the chance to meld. It is an agro dolce, a sweet and sour dish from Sicily that shows the influence of North African flavors on the region. Serve on grilled baguette slices and garnish with toasted pine nuts and chopped flat leafed parsley.
Eggplant Caponata
Serves 6-8 as a side dish
Ingredients
1/3c olive oil
3c diced eggplant
1 1/2c chopped onion
1c thinly sliced celery
2c chopped tomatoes
3T minced garlic
2T tomato paste
1/4c red wine vinegar
1c sliced green or black olives
1/3c capers, well drained
1 or 2 anchovies, drained and chopped
1T sugar
1/2t crushed red pepper flakes
1/2c minced flat leafed parsley
Kosher salt and freshly ground black pepper
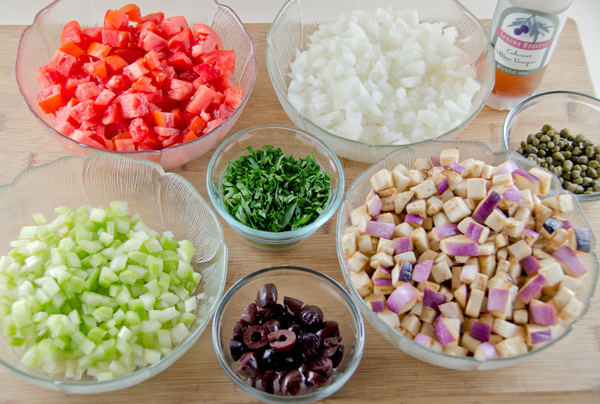
A lot of chopping but the dish comes together quickly after that.
Directions
Heat the olive oil in a large skillet. Add the eggplant and sauté until somewhat soft, 3-4 minutes. Add the onions, celery, tomatoes and garlic and cook for another 10-12 minutes, stirring occasionally.
Remove from the heat, add the remaining ingredients and toss lightly. Refrigerate until ready to serve, preferably the next day. Bring to room temperature before serving.
We plant beets in the garden in early spring. The first thinnings are one of the greens in our salads, later the slightly larger thinnings are sautéed with garlic as a side dish. The first harvest of the beets is just about completed and I was pleased to use them in a new way. We chose a Middle Eastern theme for the Sunday cookout and I learned from popular London chef and cookbook author, Yotam Ottolenghi, that beets have a strong presence in the cuisine in every ethnic group in Jerusalem. My first thoughts went to borscht, the hearty Eastern European soup often identified with the Jewish community made with beets and other root vegetables. In this recipe, Ottolenghi purees them to make the very delicious za’atar spiced beet dip with goat cheese and hazelnuts.
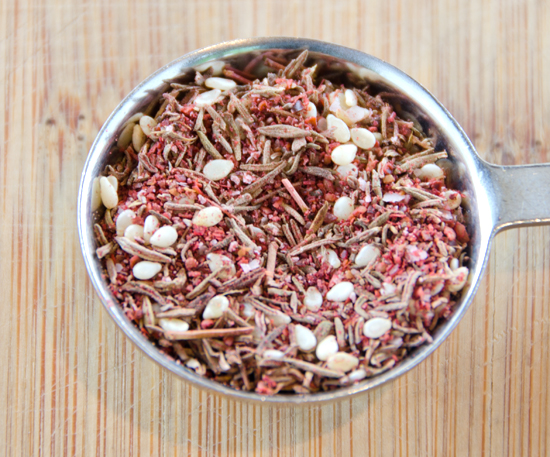
Za’atar is a Middle Eastern spice blend composed of dried thyme, sesame seeds and sumac. Though I’m sure everyone is familiar with the first two, sumac is a spice most of us are not acquainted with. When you say sumac to me, my arms develop a rash and start to itch and my first thoughts turn to poison sumac. Until recently all the “poisons,” oak, ivy and sumac were classified under the genus, Rhus, along with the varieties of sumac that do not cause skin rashes. In recent years the “poisonous three” were moved to a different genus, Toxicodendron, Latin for the word “poison tree”.
So on to sumac, it was first used by the Romans for it’s sour flavor before the arrival of lemons from Asia. Sumac is a decorative bush that thrives in the temperate and sub tropical climates of the Middle East and southern Europe. The dark purple berries are dried and ground have a fruity astringent taste. Along with dried thyme, sesame seeds (toasted or not), salt and with the occasional addition of marjoram, oregano or cumin, they compose this versatile, fragrant spice blend.
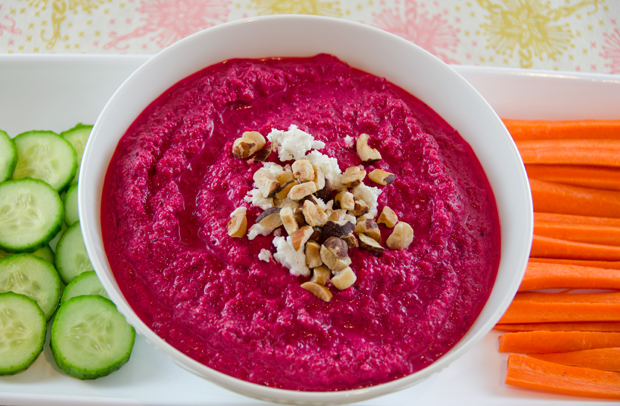
When it comes to cooking beets, my method of choice is always roasting, I think it brings out the sweetness in any root vegetable. Just scrub your beets very well, no need to peel now, cut off the root and stem ends, you can use the greens separately. Take a large piece of heavy duty aluminum foil and place the beets in the center. A sprinkle of salt, a little drizzle of olive oil, wrap them up securely, place on a baking sheet in case of drippings and into a 350°F oven they go. My beets are always different sizes, I check after the first hour and any that can be pierced easily with the tip of a knife are removed from the foil. Then back into the oven for the larger ones until all are ready. Once sufficiently cooled, the skin peels off easily with your now pink fingers. If that is an issue for you, I suggest rubber gloves! The beets are cut into manageable wedges along with garlic, a small hot pepper, I chose a tiny Thai pepper that provided all the heat I wanted, creamy plain non fat Greek yogurt, a little real maple syrup and the za’atar. A sprinkling of toasted hazelnuts and a little goat cheese “gild the lily” and make for a vibrantly colored, delicious dip to enjoy with raw vegetables or pita chips.
Up close and personal with za’atar, a Middle Eastern spice blend.
Za’atar-Spiced Beet Dip with Goat Cheese and Hazelnuts
Adapted slightly from Food and Wine Magazine Sept 2012
Makes 3 cups
Ingredients
6 medium beets (1 1/2lbs) trimmed
2 small garlic cloves, minced
1 small red chile, seeded and minced
1c plain Greek yogurt
3T extra-virgin olive oil
1 1/2T pure maple syrup
1T za’atar
Salt
1/4c roasted skinned hazelnuts, chopped
2T goat cheese, crumbled
Raw vegetables or chips for serving
Directions
Preheat the oven to 350°F. Wrap the beets securely in foil and bake for about an hour, until beets are tender. Let cool slightly.
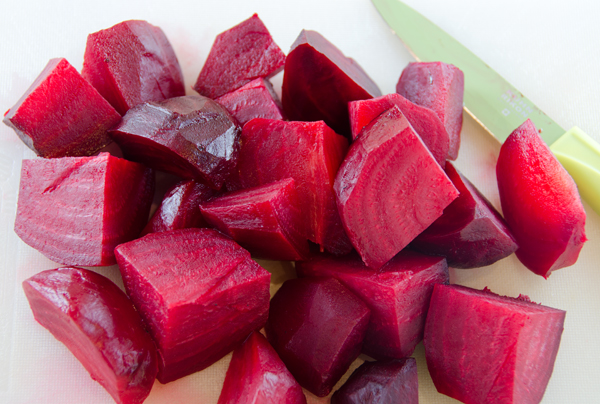
Peel the beets, cut into wedges and transfer to a food processor. Add the garlic, chile, yogurt and pulse until blended. Add the olive oil, maple syrup and za’atar and puree. Season with salt to taste. Scrape into a wide, shallow bowl. Scatter the hazelnuts and goat cheese on top and serve with raw vegetables or pita chips.
The root and stem ends of the beet are trimmed before weighing. Yes that is a baby scale!
The beets are peeled and cut into wedges before they go into the food processor.The beet dip is delicious with raw vegetables or pita chips.
Deviled eggs are a delectable treat and an excellent way to use up all those dyed eggs you might have left over from your Easter baskets. Recipes for stuffed hard boiled eggs have been in existence since the ancient Romans. They mashed the egg yolks with anchovies, olive oil, garlic, pepper and wine before stuffing them. The term “deviled” didn’t come into use until 18th century England. Deviled first refered to meat dishes and later to any variety of dishes prepared with hot seasonings like dried mustard or cayenne pepper.
Older eggs are the best for hard boiling. I learned that the hard way last year when the hard cooked eggs I was attempting to peel not only removed the shell but also a large portion of the egg white. To be certain that your hard boiled eggs are easy to peel, refrigerate them for a week to ten days before cooking. This allows the eggs to take in air, helping the membrane to separate from the shell.
There are many methods of hard boiling eggs. Every now and then I will come across the latest “fool proof” method only to be disappointed. I have always had success with a method I learned from Julia Child. In her book, The Way to Cook she shares the method developed by the Georgia Egg Board. The eggs are covered with cold water in a pan by about an inch, brought to a boil, removed from the heat and covered for exactly 17 minutes. Then the eggs are transfered to a bowl of ice water for two minutes. I like using my Chinese spider for this step. The chilling shrinks the egg from the shell. The water is brought back to the boil, the eggs are returned to the water for 10 seconds which expands the shell from the egg. The final step is to return the eggs to the ice water, gently cracking the shells in several places. I like to peel my eggs under cold running water, returning them to the bowl of ice water when done. Peeled eggs can be stored, submerged in fresh water for several days.
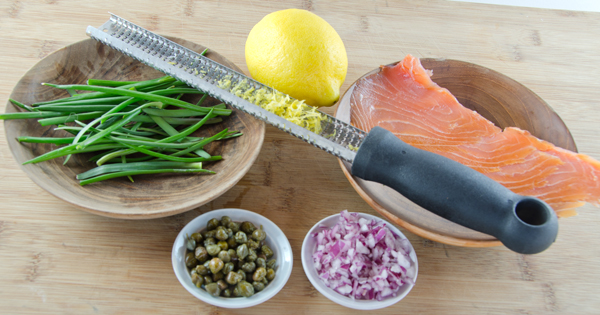
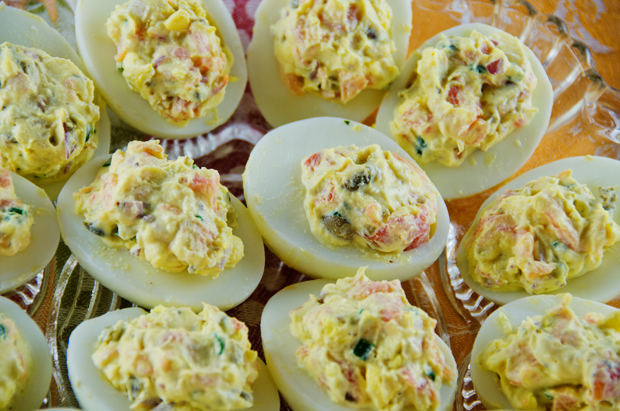
This recipe for smoked salmon deviled eggs could be called “everything but the bagel”, since all the components for the traditional bagel and accompaniments are there. Rich, smoky salmon, briny capers and the first of the season chives from the garden combine with the blank slate of the hard boiled egg. I prefer to keep my components chunky, but you could whiz them up in a food processor if you like to pipe your filling. These are always a big hit in my house. Easy to eat, even the avowed salmon haters enjoy them.
2T capers, rinsed and finely choppped (l like balsamic capers)
1T fresh lemon juice
1/2t packed finely grated lemon zest
Freshly ground black pepper
Directions
Hard boil eggs according to your method of choice. Peel and halve eggs lengthwise.
Remove the yolks and crumble them into a medium bowl.
Add the salmon, 3T of the chives, the mayonnaise, sour cream, onion, capers, lemon juice, zest and a grind of the black pepper to taste. Mix ingredients to combine thoroughly.
Mound the filling into the egg whites. Garnish with remaining chives and pepper to taste.
Dumplings are important part of the Chinese New Year menu. They are considered lucky because they resemble ancient Ming dynasty coins, silver and gold ingots called yuan bao. Dumplings symbolize wealth and hopes for a profitable future. Some cooks will hide a gold coin in a dumpling. The person who finds the coin will find good fortune in the new year, as long as they don’t bite down or swallow the coin!
Dumplings can be steamed, boiled or pan fried and can be wrapped in various styles. The wrappers are easily found in most supermarkets, usually near the produce section. Wonton wrappers are square and gyoza wrappers are round. I find the thickness of either depends on the manufacturer. Last year, needing a new challenge, I learned how to make my own. The dough is very simple, just flour and water, either cold or very hot, I had better results with the very hot water. Chinese cooks prefer Gold Medal all purpose bleached flour for dumpling making, its slightly lower gluten content produces the best results. Higher gluten flour produces a less than ideal tough chewy skin.
I like to make my filling first, preferably the day before I am filling the dumplings. Chilling makes it easier to handle and portion between the dumplings. For the dumpling wrapper recipe I chose to weigh my flour for the most accurate results. A cup of flour weighs 4.5 ounces, so 10 ounces is a generous two cups. I made my dough in the food processor, adding the just-boiled water slowly until it was absorbed by the flour. Because of the extremely dry conditions that day, I am certain the dough absorbed a bit more water than what would be typical Place the dough in a quart bag to let the gluten in the dough relax for at least an hour. Dumpling wrappers are rolled out the same way as the pork bun dough was in this post. After struggling with a standard rolling pin, Joe made me a small one that made the task much easier.
I made two varieties, potstickers and beggars purses. Potstickers are just that, dumplings that are browned on the bottom in a little oil first. Water is added to the pan, a lid is put on the pan and steam finishes them in the second part of the process. Dumplings of any variety can be frozen for future snacking. Just remember to spread the uncooked dumplings out on a lightly greased cookie sheet, making sure the dumplings are not touching. Place the cookie sheet in the freezer for several hours. Now the dumplings can be stored in freezer bags until you are ready to use them. Partially thaw before cooking the dumplings.
Weigh or measure out your flour and add to food processor bowl fitted with the metal blade.
With the machine running, slowly add the water through the feed tube allowing it to be absorbed by the flour until a ball is formed. Do not over process!
Place the ball of dough onto a work surface and knead until uniform and smooth. The dough should be firm and silky to the touch and not sticky.
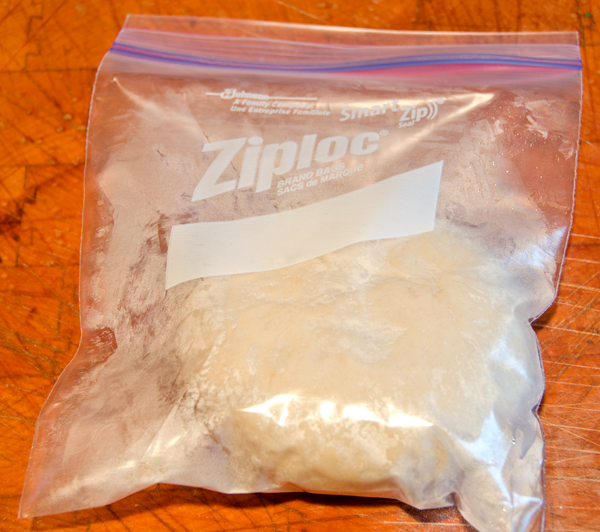
Place the dough ball in a quart-sized bag and seal. Let dough rest for at least an hour
After the rest, pull out the dough and cut it into 4 roughly equal sections. Roll each section into a 1-inch thick log, then cut each log into 9 pieces. Shape each piece into a thick coin or disc. Lightly flour the top and bottom of each disc.
I placed my discs between the front and back of a cut up quart sized freezer bag and stamped down with my marble mortar to make a circle.
Use a dowel rolling pin to press on just the outer edges of the disc. Roll back and forth once, then rotate the disc. Roll, rotate. Roll, rotate. Add a little flour if necessary to keep it from sticking and tearing.
You don’t want to make your wrappers too thin.They need to be thick enough to hold whatever filling you’re going to put in it. The final dumpling skin should be just over 3 inches in diameter. This recipe should make about 36 wrappers. Cover wrappers with plastic until using.
My repurposed baby scale gives exact measurements!
Dumpling dough just relaxing for a little bit.A marble mortar and a quart-sized freezer bag helped make my dumpling circles.
8 oz. peeled, deveined raw shrimp, coarsely chopped
3 medium scallions, thinly sliced
3 large cloves garlic, minced
2 T Shaoxing (Chinese rice wine) or dry sherry
1T grated fresh ginger
1 T soy sauce
2 t toasted Asian sesame oil
1/2 teaspoon granulated sugar
Freshly ground black pepper
36 very thin, 3-inch circular, store-bought pot sticker or gyoza wrappers
2 tablespoons peanut or vegetable oil
Directions
For the filling
In a medium bowl, toss the cabbage with 2 teaspoons salt and set aside for 30 minutes to release moisture. Wring out in a clean kitchen towel to extract as much liquid as possible.
In a large bowl, combine the cabbage with the pork, shrimp, scallions, garlic, Shaoxing, ginger, soy sauce, sesame oil, sugar, and 1/4 teaspoon pepper. Stir until well mixed. Refrigerate for at least 20 minutes and preferably overnight.
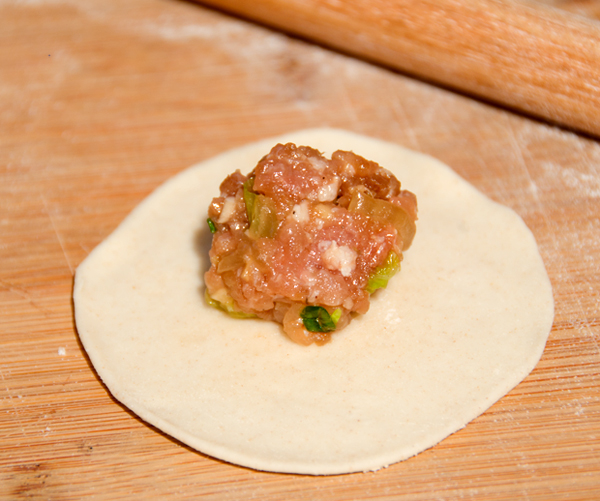
Pork and shrimp filling on a dumpling round.
To form the dumplings
Spoon 1 to 2 teaspoons of the filling onto a dough wrapper, fold it in half, and make your first pinch at the center of the curved edge and then pleat toward the center on both sides to create a rounded belly. This wider shape allows the dumplings to sit upright in the pan and form a flat surface for browning.
Repeat with the remaining wrappers and filling. As you work, arrange the filled dumplings in a single layer without touching on large plates, so they don’t stick together.
Heat 2 Tbs. vegetable oil in a heavy-duty 10- or 12-inch skillet over medium-high heat until shimmering. Working quickly and in batches if necessary (adding more oil for the second batch if needed), arrange the dumplings belly side down in concentric circles starting from the outer edge. Cook until golden brown on the bottom, 1 to 2 minutes.
Pour in about 1/2 cup water or enough to come about a third of the way up the sides of the dumplings, bring to a boil, cover, and cook until all of the water has been absorbed, 2 to 3 minutes. Remove the lid, reduce the heat to medium, and continue cooking just until the dumplings are dry and crisp on the bottom, 1 to 2 minutes. Loosen the dumplings from the pan with a spatula.
Invert the pan over a plate to flip the dumplings, browned side up, onto the plate (or transfer with a spatula). Serve immediately with your choice of dipping sauce.
Potstickers, ready to serve with some dipping sauce.