April 26, 2016 Spinach and Mushroom Quesadillas with Tomatillo Salsa

DSC_6739a

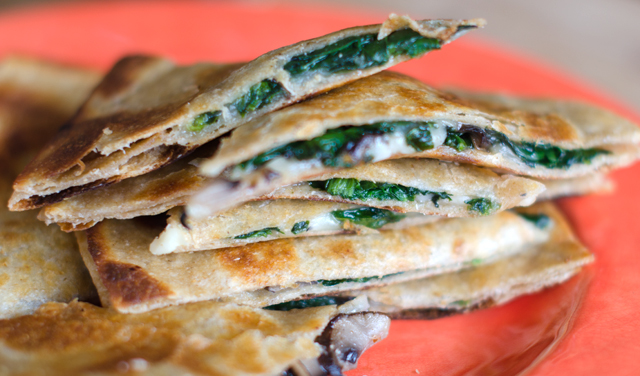
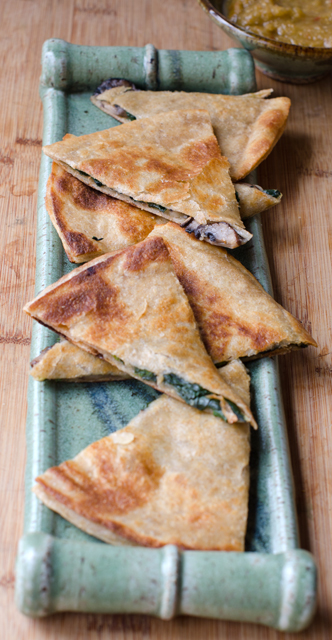
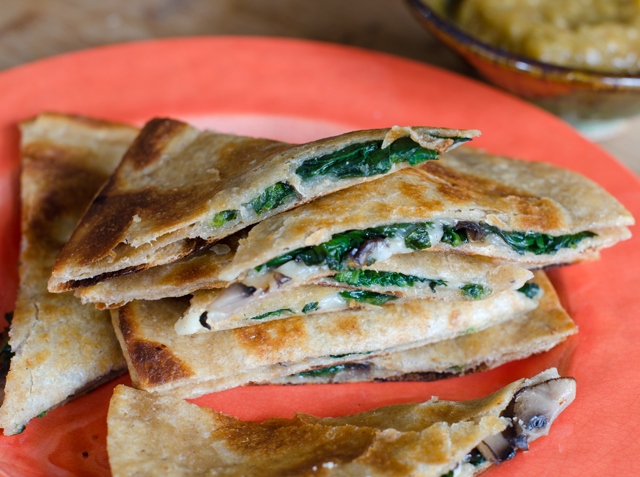
Still inspired by an abundance of, you guessed it, spinach, I was looking for yet another way to use our bounty. Inspiration this time came to me in the form of a quesadilla. Crispy on the outside and melted and creamy inside, spinach adds a healthy component to this popular dish. Quesadillas are easy and delicious any time of day, as a quick snack, lunch, even for breakfast. To accompany the quesadillas I made a simple tomatillo salsa.

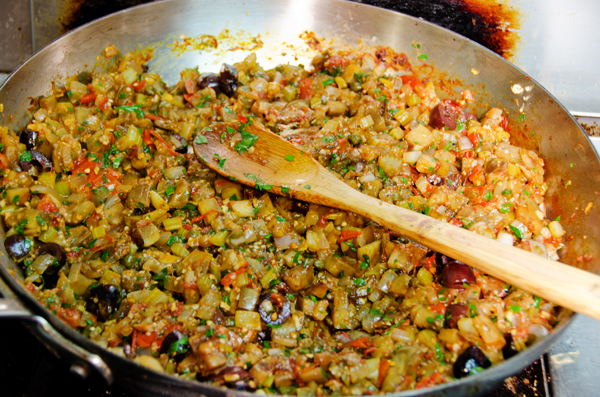
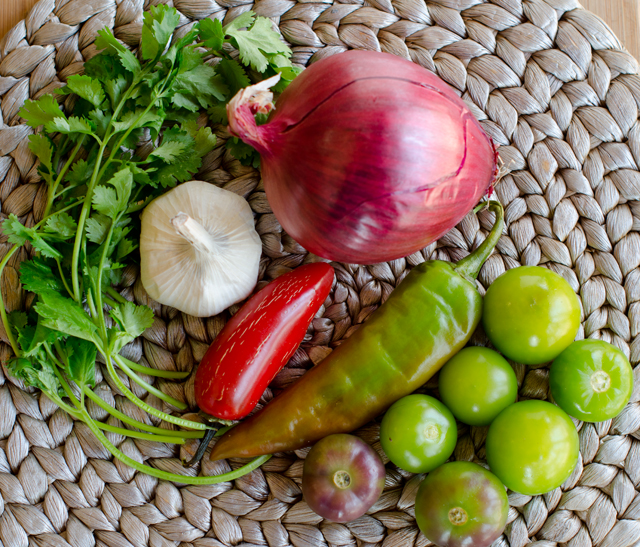
With the exception of the cilantro and garlic, the ingredients for the tomatillo salsa came straight from our freezer. Preparing tomatillos for the freezer is easy, I remove the papery husks and freeze them whole and raw in quart bags. A previously frozen tomatillo will not hold up to roasting but are fine in raw preparations like this. The Numex Joe E. Parker pepper used in this recipe is an Anaheim style pepper with a long slender shape and mild heat. We have an interesting variety of frozen hot peppers from gardens past,  milder ones like Joe E Parker and poblanos to hotter ones, cayenne, jalapeno, serrano and Thai hot. The surprising thing is that freezing them does not diminish their heat in the least. When a recipe calls for several hot peppers, I start with one, it is much easier to add heat than to take it away.

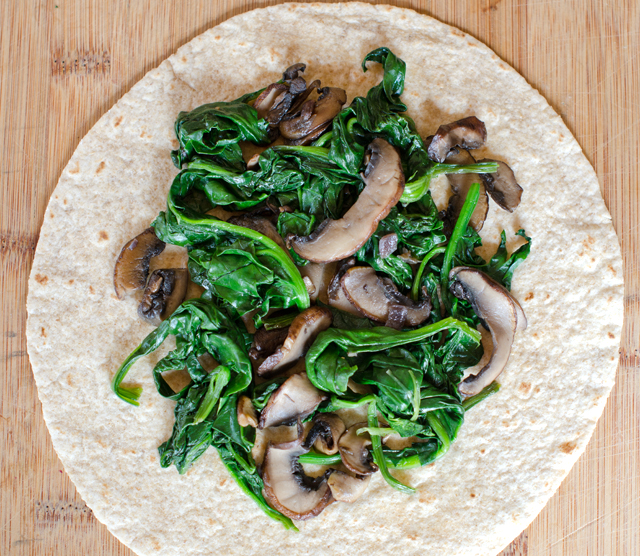
As always, picking the spinach takes more time than most of the steps in the recipe. The filling is easy to make and used twelve cups of fresh spinach, a real plus for me. If you don’t have an abundance of spinach in your garden, use bagged baby spinach. The slightly more assertive flavor of cremini mushrooms compliments the spinach nicely.

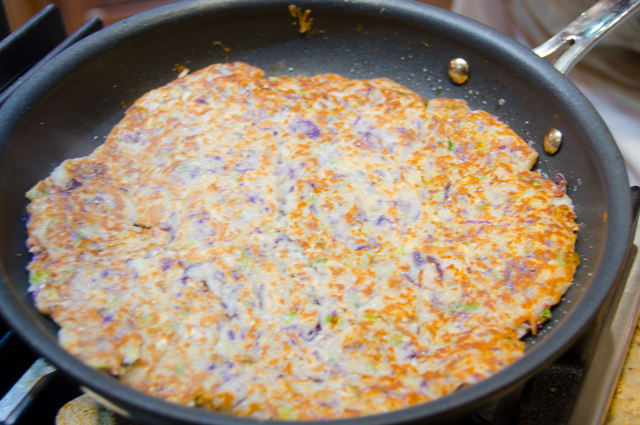
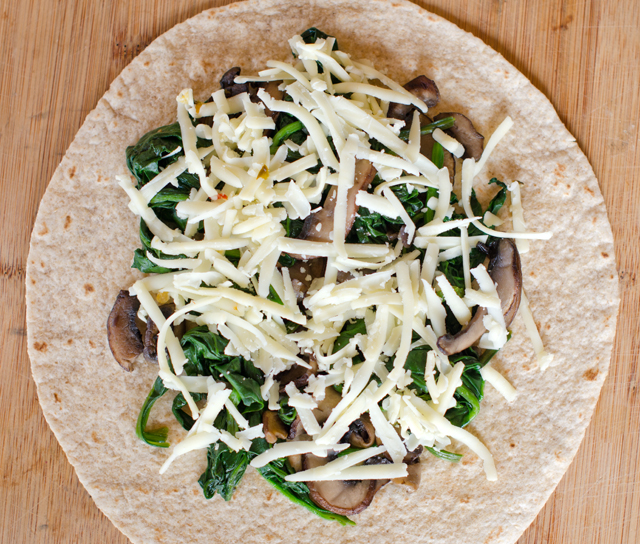
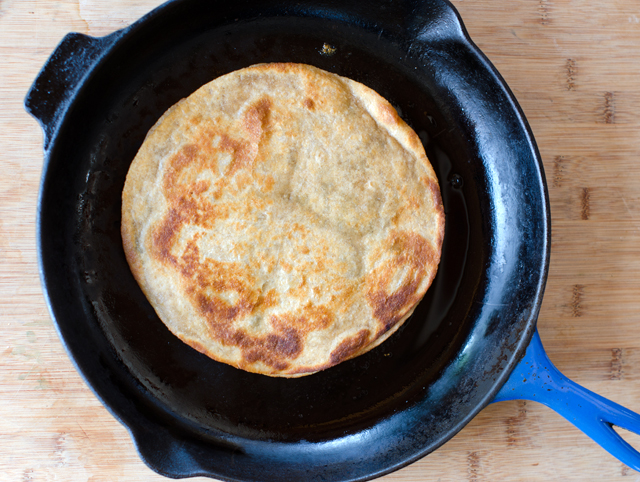
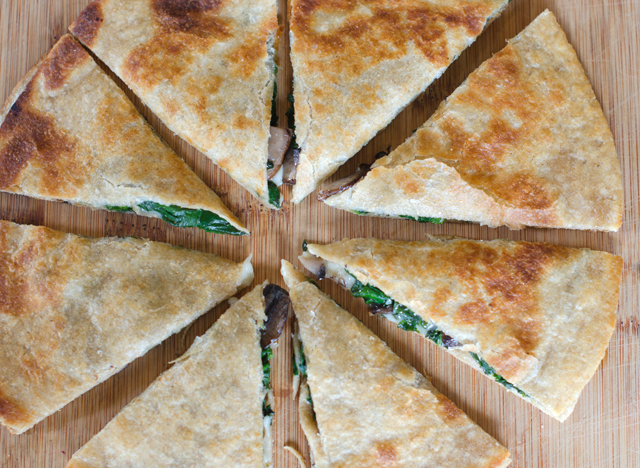
The options for cheese are endless. I used pepper jack and cheddar cheese, a good melting cheese is important here. Choose a large heavy bottom skillet to cook quesadillas. Just a light brushing of oil in the pan is all that’s necessary to brown the tortilla and keeps it from getting greasy. You can either fold one tortilla in half or stack one on top of another. I press lightly on the quesadilla in the pan to allow the cheese to melt a bit and hold the layers together before it is flipped.  The pizza wheel is the perfect tool to cut it into portions. Finished quesadillas can be held in an oven on low heat for 20 minutes.

Spinach and Mushroom Quesadillas

Makes four 8″ quesadillas

Ingredients for the filling

  • 1½ T olive oil or bacon drippings
  • 8 oz mushrooms, button or cremini, stemmed and sliced
  • 2-3 cloves garlic, finely chopped
  • ¼ c finely chopped red onion
  • 12 c spinach, large stems removed

DSC_6706a

Directions for the filling

  1. In a large skillet heat the oil or bacon drippings over medium high heat.
  2. Add the mushrooms, stirring constantly, until they begin to brown.
  3. Add the onion and garlic and continue cooking, stirring frequently until it looks translucent.
  4.  Add the spinach by the handful, wilting it before adding more, until it is all used.  Do not overcook.  Season with salt to taste.

Ingredients for assembling the quesadillas

  • Eight 8″ soft tortilla or taco shells, I used whole grain
  • Olive Oil
  • 1½-2 c grated cheese, I used a combination of pepper jack and cheddar

DSC_6712a

DSC_6715a

Directions for assembling and cooking the quesadillas

  1. Preheat oven to 180°F.
  2. Place four tortillas on two baking sheets, divide evenly the spinach and mushroom filling and the grated cheese between them.
  3. Top with the four remaining tortillas and lightly press to seal.
  4. Place a 12″ heavy bottomed skillet over medium high heat.  Brush the skillet lightly with olive oil.
  5. Place the quesadillas in the skillet one at a time, pressing down lightly but firmly and cook for about 3 minutes on each side. You can peek by lifting up with a spatula to see if it is getting golden brown. Transfer the cooked quesadillas to a baking sheet and keep warm in the oven, lightly covered with foil.
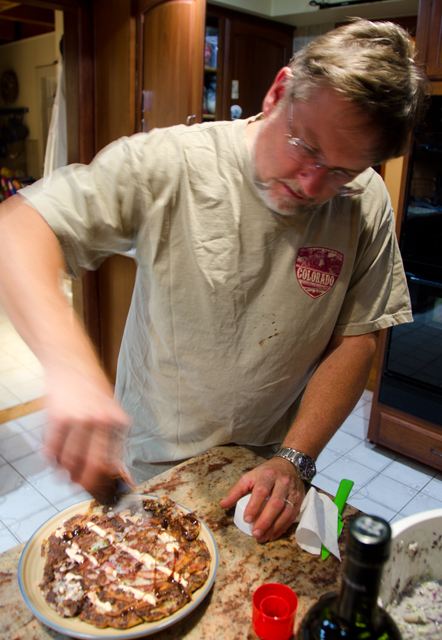
  6. Slice each quesadilla into 6-8 wedges, a pizza cutter works well here, and serve hot with tomatillo salsa or your own favorite.

DSC_6719a

DSC_6723a

DSC_6733a


Tomatillo Salsa

Ingredients

  • 3 cloves garlic, peeled
  • 1 jalapeno pepper, stemmed and seeded and quartered
  • 1 Numex pepper, stemmed and seeded and quartered
  • ¼ c roughly chopped red onion
  • 1 lb tomatillos, husked, rinsed and cut into quarters
  • ¾ c loosely packed, lightly chopped cilantro

DSC_6702a

Directions

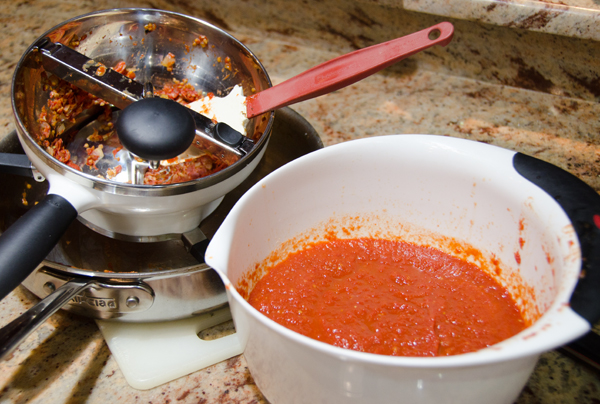
  1. With a food processor or blender running, drop in the garlic cloves one at a time letting each piece get finely chopped before adding the next. Add the peppers, onion,  tomatillos and cilantro and process until smooth.

DSC_6731a


November 12, 2015 Okonomiyaki or Japanese Pancake

DSC_5036a“Okimiaki” was the one word message Joe sent me one Tuesday night during his office hours. My response, “huh?” seemed appropriate, poor guy, he has been working too much I thought. His response was “Japanese pancake made w cabbage- I want to make them”.

Okay, that was a new one for me, I thought I knew quite a bit about Japanese cooking so I did what everyone does these days, I Googled it. No appropriate response for the okimiaki spelling but when I googled “Japanese pancake” I started getting some information.

Joe heard about the Japanese pancake from a patient of his who is a chef and a writer. She and some friends were making them for a party. It was something new for both of us. I have quite a few Japanese cookbooks that go beyond the typical sushi and sashimi recipes, none gave any reference to Japanese pancakes or okonomiyaki as they are also called. I even called on a friend who travelled to Japan this past spring to see if she could give me any insight but she was not familiar with this now puzzling dish.

I learned that okonomiyaki is Japanese street food made popular in the cities of Osaka and Hiroshima. Because of it’s shape, it is sometimes referred to as Japanese pizza or pancake in the United States. The ingredients in an Osaka style okonomiyaki are mixed together while the ingredients in a Hiroshima style are layered and topped with noodles and a fried egg. Okonomi is translated “what you like” and “yaki” is grilled or cooked, so okonomiyaki is essentially “cooked as you like it.”  The one thing they all have in common is a pancake like batter and shredded cabbage, the rest is up to the cook to make the pancake “as they like it”. There is special okonomiyaki flour, the only difference I could find in it were the special seasonings and possibly some powdered yamaimo, Japanese yam. Yamaimo’s gelatinous texture gives the pancake added fluffiness.

The “as you like it” aspect can get interesting and I have seen recipes include shrimp, squid, pork belly, cheese and vegetarian options. How you top your pancake is equally important and might include chopped scallions, sesame seeds with a flourish of okonomi or tonkatsu sauce and Kewpie mayonnaise. Bottled tonkatsu with the red bull dog on the label is also labeled “vegetable and fruit sauce” but you have to read down the list of ingredients a bit to find either. I presume the brown color is from the prune paste. There are also recipes on line for tonkatsu sauce. You will find Kewpie mayonnaise on the Asian aisle in larger supermarkets. It has a Kewpie doll with outstretched arms on the package. It differs from our good old fashioned Hellman’s with it’s use of rice vinegar, giving it more tang and MSG to up the umami flavor.

I spent quite a bit of time contemplating what recipe to use. I wanted to stay fairly basic for our first attempt and decided on an Osaka style recipe from Serious Eats. We, or as I should really say, Joe made them on a sashimi night which is a weekend night when we recreate some of our favorite sashimi recipes using salmon, scallops and tuna. His efforts turned out quite good, the first was topped with bacon, then he got a little more creative and topped the second with seared tuna. We finished them off with tonkatsu sauce, mayo (not Kewpie) with sriracha, toasted sesame seeds and pickled ginger. The combination of the crispy exterior and soft interior is quite addictive and very filling. We had enough for a breakfast okonomiyaki for Joe and smaller ones for dinner the next day. Would we try them again? Not every week, but definitely.

Okonomiyaki

Makes 4 large pancakes

Ingredients

  • 2 cups all-purpose flour
  • 1 1/3 cups dashi or low-sodium chicken stock
  • 4 large eggs, beaten
  • 8 cups finely chopped cabbage-we used a combination of green and red
  • 2 cups chopped raw shrimp or baby shrimp
  • 8 scallions, sliced, divided
  • Kosher salt, to taste
  • 8 slices bacon, sliced in half- the second, slices of seared tuna
  • 2 tablespoons vegetable oil
  • Kewpie Mayonnaise or sriracha mayo
  • Okonomiyaki or tonkatsu sauce
  • Toasted sesame seeds
  • Pickled ginger

Directions

  1. In a large bowl whisk together flour, dashi or stock, and eggs. Add chopped cabbage and mix so that the cabbage is gently folded into the batter. Fold in shrimp and scallion whites then season with salt.
  2. Heat 1/2 tablespoon vegetable oil in a large non-stick skillet over medium high heat until shimmering. Add 1/4 of the batter, gently pushing the batter down with a spatula until flattened. Cook until underside is browned, about 4 minutes, then place 4 pieces of halved bacon on the top side. Gently flip the pancake so that the side with the bacon is now cooking. Cook until the bacon is crisp and the pancake is cooked through, about 5 more minutes. Serve immediately with mayonnaise, okonomiyaki sauce, toasted sesame seeds, pickled ginger, and scallion greens. Repeat with remaining pancakes.

    DSC_5024a

    DSC_5027a

    DSC_5028a

    DSC_5031a


May 10, 2015 Raincoast Crisps with Raisins and Rosemary

DSC_2581aThere’s a cracker I love that I have to buy whenever I stop in at Whole Foods, Raincoast Crisps. Created by Parisian trained chef Lesley Stowe, she started her own cooking school and catering company in Canada’s raincoast, Vancouver, over 25 years ago. The crisps originated from a bran bread that she served in her catering business with smoked salmon. Always looking for new and original ideas, on one occasion she sliced the bread and dried it out. It was met with approval from her kitchen staff so she decided to “pump it up” with additional ingredients.  That was the beginning of the Raincoast Crisp.

The crisps are toasty and nutty, loaded with ingredients like pumpkin seeds, raisins, and pecans.  They are delicious to nibble on their own or maybe just a spread of soft cheese or your favorite preserve. One never tastes like enough and it’s easy to justify munching a box full because they are so good.  So what’s the problem? At 7.99 and up per 6 ounce box they are a pricey indulgence. So some intrepid bloggers came along and cracked the code and a rather similar recipe is available to any one who is able to whip up a quick bread.

The DIY recipe is very simple to make. Stir together the ingredients and bake in mini loaf pans. Alternately you could bake them in two square cake pans for longer skinny slices. Be sure to thoroughly cool the loaves after baking before proceeding to slice. You could give them a short stay in the freezer to firm them up or just wait till the next day to proceed with the recipe.

The next step is to slice the crackers as thinly as possible. Most of recipes I read said that it makes about 8 dozen crackers. That meant I needed to make 24 slices from each of the 4 loaves. I came fairly close, or maybe that had something to do with slices I had to “test” before baking! I used my thin blade serrated Cutco knife to make the thinnest and most even slices. I experimented with a food slicer which was ok, it’s important to maintain even pressure to keep the slices neat.

Bake the slices like super thin biscotti until they are crisp and golden. Now that I know the proportions of the recipe I am looking forward to customizing it.  Different flours,  dried fruits, spices and nuts, the possibilities are endless.  I served mine with a delicious soft goat cheese from Giggling Goat Dairy, a new vendor at my local farmers market in Wrightstown. The goat dairy is located in Dublin Pa and they make and sell fresh French-style goat cheese known as chèvre, a traditional style Feta as well as spreads and dips. I’m certain I will be frequenting their stand quite often this summer.

Raincoast Crisps with Raisins and Rosemary

Makes about 8 dozen

Ingredients

  • 2 c flour
  • 2t baking soda
  • 1t sea salt
  • 2c buttermilk
  • 1/4c brown sugar
  • 1/4c honey or maple syrup
  • 1c raisins
  • 1/2c lightly chopped pecans
  • 1/2c roasted unsalted pumpkin seeds
  • 1/4c sesame seeds
  • 1/4c flax seeds
  • 1T chopped fresh rosemary

Directions

  1. Preheat oven to 350°F.
  2. Stir together flour, salt and baking powder in a large bowl. Add the buttermilk, brown sugar and honey and stir to combine. Add the raisins, nuts, pumpkin seeds, sesame seeds. flax seed and rosemary and stir until all the ingredients are thoroughly combined.
  3. Pour the batter into 4 mini loaf pans that have been sprayed with nonstick spray. Bake loaves for 30 to 35 minutes, rotating halfway during baking time. The loaves should be golden and springy to the touch. Remove loaves from the pans and cool on a wire rack.
  4. Allow the loaves to cool completely, then freeze for about an hour. This will allow you to slice the loaves as thinly as possible. I used a serrated edge knife for the neatest cut.
  5. Place the slices on baking sheets that have been lined with parchment paper. Bake the slices at 300°F for about 15 minutes, then flip them over and bake for another 10 minutes until crisp. Cool completely and store in an airtight container.
DSC_2566a
Slices on a parchment lined sheet ready for their second bake.
Delicious on their own or with a spread of goat cheese, this is the fresh garlic peppercorn from Giggling Goat Dairy.

DSC_2584a


November 17, 2013 Eggplant “Pizzas”

DSC_3935a


Joe’s not so little greenhouse set out in the garden extended our growing season for some vegetables to the latest date ever. When he brought in the last of the peppers and eggplants on Sunday I knew I needed to find a special way to use them to commemorate the end of their growing season. The peppers, for the most part were transformed into one of his favorites, stuffed peppers and for the eggplant I turned to a recipe from Julia Child.

In her 1975 cookbook, From Julia Child’s Kitchen, among personal anecdotes  and recipes for Caesar Salad (yes, Mr. Caesar Cardini actually made this tableside for a young Julia and her family), consommés, stews and apple charlotte is this gem. Tranches d’aubergine a l’italienne might put off the average cook, but eggplant pizzas, now that’s something we can all relate to. The recipe made a second appearance as miniature eggplant pizzas in her 1989 work and one of my favorite go-to cookbooks, The Way to Cook.

The classic pear shaped variety of eggplant like Black Beauty works best here. I began by cutting the eggplants crosswise into 3/4 inch planks, the skin was relatively thin so I left it on.Then I salted the slices on both sides to extract excess liquid. This is a step I would skip in the summer when the eggplants are at their freshest and not very seedy. I let the eggplants sit for about a half hour and started my sauce.

The day before I defrosted two quart bags of my roasted tomatoes, a 28 ounce can of plum tomatoes or a store bought sauce can substitute here. Step one for me is to pour off the liquid that accumulates in the bag, a little lagniappe for the chef. It’s definitely not the prettiest, but it is the best tasting tomato juice you will ever try. I sautéed one finely chopped onion and two chopped cloves of garlic until softened but not brown, about five minutes. Then the tomatoes and the rest of the liquid are added to the pan, breaking up the larger chunks of tomatoes with the back of a wooden spoon. When the tomatoes have cooked down sufficiently, I put them through a food mill to strain out most of the seeds. This results in a smoother sauce.

The eggplant slices are patted dry and lightly brushed with olive oil. I baked the eggplant slices on a wire rack over a baking sheet so that both sides would cook evenly. As Julia says “not so long that the slices become mushy and lose their shape”. After twenty five minutes I removed the baking sheet from the oven and now set the oven to broil. I covered the slices with a generous coating of tomato sauce and sprinkled a combination of mozzarella and grated Parmesan. The “pizzas” are now returned to the oven until the cheese is melted and slightly browned. Julia suggests these as part of a vegetarian combination or arranged around a main event, be it an omelet, a steak or a roast lamb.

Eggplant pizzas would make a good snack or a light lunch with a salad. A recipe that’s vegetarian, low carb and gluten free, as always “Our Lady of the Ladle“, Julia was ahead of her time.


Julia Child’s Eggplant Pizzas

Ingredients

  • 2  large eggplants (about 1 lb. each)
  • 1T salt, for drawing water out of eggplant
  • 2T olive oil for brushing eggplant before roasting
  • 2 t Italian seasoning, for sprinkling on eggplant before roasting
  • 1/3 c freshly grated Parmesan
  • 1/3 c finely grated low-fat mozzarella

Sauce Ingredients

  • 1T olive oil
  • 1 small onion, finely chopped (about 1 cup)
  • 2 large garlic cloves, very finely chopped
  • 1 28 oz. can of plum tomatoes (or use 3 cups peeled and diced fresh tomatoes)
  • 1/2 t Italian seasoning
  • 1/4 t dried oregano

Directions

  1. Cut eggplant into 3/4 inch thick slices. Place eggplant pieces on a double layer of paper towels and sprinkle both sides generously with salt. Let the eggplant sit with the salt on it for about 30 minutes to draw out the liquid. (After the eggplant sits for 15 minutes, turn on the oven to 375°F.
  2. Make the tomato sauce while the eggplant sits. Heat 1 tablespoon of olive oil and sauté the onion and garlic just until it becomes softened and fragrant.   Add the diced tomatoes, Italian seasoning and oregano.
  3. Then let the sauce simmer on low until it’s thickened. Break up tomatoes with a fork while the sauce cooks. (You can add water as needed. Let sauce simmer until ready to put on eggplant slices.)
  4. After 30 minutes, pat the eggplant dry with paper towels. Brush both sides of the eggplant slices lightly with olive oil and sprinkle tops with Italian seasoning. Place eggplant slices on a wire rack over a baking sheet. Roast the eggplant about 25 minutes, but “not so long that the slices become mushy and lose their shape” as Julia says.
  5. While the eggplant roasts, combine Parmesan with mozzarella. After 25 minutes or when eggplant pieces are done, remove eggplant from the oven and turn oven setting to broil. Spread a few tablespoons of sauce on the top of each eggplant slice, sprinkle with thin basil slices and top with cheese blend. Put pizzas under the broiler until the cheese is melted and slightly browned.
DSC_3951a
We are still harvesting salad greens, spinach and arugula from the greenhouse.
DSC_3918a
Cooking down the roasted tomatoes.
DSC_3919a
Putting the cooked tomato sauce through a food mill makes a smoother sauce and eliminates most seeds.
DSC_3911a
Doesn’t look like the stuff in a bottle, but it is the best tasting tomato juice you will find.
DSC_3932a
Served with a simple salad of baby greens and radishes from the garden, eggplant pizzas make a delicious light lunch.


September 3, 2013 Eggplant Caponata revisited

DSC_2138a


Summer is berry season and each month brings a new arrival. June is time for plump juicy strawberries. July brings succulent raspberries and blueberries. August brings one of my favorite berries, eggplant. A berry? you say. First, the members of the nightshade family, tomatoes, pepper and eggplants to name just a few, are actually fruit, not vegetables. Botanically speaking, fruit are seed bearing structures that develop from the ripened ovaries of flowers. But eggplant are not just any old fruit, they are considered berries because they are indehiscent which means they do not sprout open when ripe. With these technicalities aside, there are two burning questions that most people have when it comes to eggplant; should I salt or not? and are there male and female eggplants?

DSC_2012a
A round up of the varieties of eggplant we grow.


Young eggplants, picked fresh from the garden or purchased at the farmers market will not need salting. They will have thinner skin and fewer seeds. The bitterness originates in the seeds which contains nicotinic alkaloids. Did I mention tobacco is another member of the nightshade family? So the larger the eggplant, the greater the likelihood of it having more seeds. Salting, also known as degorging, is good for drawing out excess liquid from the eggplant so that it doesn’t absorb as much oil in the cooking process, but it is only successful in masking bitterness.

The male vs. female eggplant was a tale that even I fell victim to. I was surprised at the number of websites that propose the theory of male and female eggplants as fact. The story goes that a dash-shaped slit on the bottom of the fruit indicates a female eggplant and a deep round indent indicates a male. The male eggplant reportedly has fewer seeds and is more desirable. It’s debunking time again. Fruit, like eggplants develop from the female flower on the plant but have no sex of their own.

So, how do you choose the best eggplant?  Look for eggplant that have smooth, bright, shiny skin. When you press on the skin it should spring right back. Select eggplant that are heavy for their size, indicating younger fruit. The calyx, the green leaves at the stem end should be fresh and green, not dried out and brown.

Our garden in the month of August yields an abundance of the nightshade family, tomatoes, peppers and eggplants. While our tomato harvest is better than last year, this has proven to be not the best year for eggplants and peppers. I wanted to take advantage of the eggplants we did grow and make one of our favorites, caponata.

I posted a different recipe for caponata last year, this is one from my catering days.  A great room temperature dish, caponata always tastes better the second day, after the flavors had the chance to meld. It is an agro dolce, a sweet and sour dish from Sicily that shows the influence of North African flavors on the region. Serve on grilled baguette slices and garnish with toasted pine nuts and chopped flat leafed parsley.

DSC_2117a


Eggplant Caponata

Serves 6-8 as a side dish

Ingredients

  • 1/3c olive oil
  • 3c diced eggplant
  • 1 1/2c chopped onion
  • 1c thinly sliced celery
  • 2c chopped tomatoes
  • 3T minced garlic
  • 2T tomato paste
  • 1/4c red wine vinegar
  • 1c sliced green or black olives
  • 1/3c capers, well drained
  • 1 or 2 anchovies, drained and chopped
  • 1T sugar
  • 1/2t crushed red pepper flakes
  • 1/2c minced flat leafed parsley
  • Kosher salt and freshly ground black pepper
DSC_2065a
A lot of chopping but the dish comes together quickly after that.

DSC_2069a


Directions

  1. Heat the olive oil in a large skillet. Add the eggplant and sauté until somewhat soft, 3-4 minutes. Add the onions, celery, tomatoes and garlic and cook for another 10-12 minutes, stirring occasionally.
  2. Remove from the heat, add the remaining ingredients and toss lightly. Refrigerate until ready to serve, preferably the next day. Bring to room temperature before serving.

DSC_2131a

DSC_2122aDSC_2145a-copy

September 25, 2012 Chard Chips and Pickled Chard Stems


When the new issue of Fine Cooking came last week I was ready to put it aside for a few weeks. The holiday desserts and side dishes looked very tempting, but the beginning of fall was just last Saturday and I am still enjoying cooking as much as I can with the harvest from our garden. As I quickly thumbed through the issue I happened to notice an article that interested me, “What We Are Cooking Now.” Specifically, what really caught my eye were Swiss chard chips. I had heard of kale chips, both the pricey little bags sold in health food stores and the homemade varieties that a friend introduced me to. So why not chard chips? We have three sections of chard of the Bright Lights and Rhubarb variety still producing, so I thought it would be fun to try my hand at this. Since I am a proponent of using both the chard leaves and the stems, I wanted to use the colorful stems in another healthy nibble so a refrigerator pickle seemed to be the best choice here.
My on-line research revealed many different approaches to making chard chips and after reading them all, came up with my own method. There are certain important things to remember if you are going to make chard chips. Wash the leaves thoroughly, chard leaves are usually very crinkly, and those crevices can be dirty. After washing the leaves, remove the stems, reserve if using. Spin the leaves dry in a salad spinner and use paper towels to remove any excess moisture. Any moisture left on the leaves will cause them to steam, not bake and crisp up. A  “bunch” is a non-specific term, to be exact as possible, I used 25 chard leaves that were about 12-14 inches long after stemming. When in doubt, keep the leaf pieces larger, 2 inch squares approximately. The leaves will break easily when they are dry and too many small pieces will give you chard crumbles or dust.  Place the dry leaf pieces in a large bowl and toss lightly with olive oil and your seasonings of choice. Start with a modest amount, about a tablespoon of oil, you can always add more, it’s not as easy to take it away. I used a little Espelette pepper olive oil, kosher salt, fresh ground pepper, a little garlic powder and a little plain olive oil to taste. I did not grease my baking sheet or use cooling racks to elevate the leaves. I did not crowd or overlap the leaves. I used four large baking sheets in two ovens, racks in the top and the bottom set to 275F on the convection bake setting. The caveat here is, know your own oven, my chips seemed to be ready quicker than most of the recipes I looked at, keep a watchful eye to ensure a crispy, not a burnt chip!
Chard Chips

  • 1 large bunch of chard, 25 leaves, 12-14 inches long
  • Olive oil
  • Seasoning of your choice, I used kosher salt, garlic powder and freshly ground pepper

Directions

  1. Preheat oven to 275F (convection bake). Put racks in the top and bottom of oven.
  2. Wash chard leaves thoroughly in several changes of water. Remove the stems from the leaves, reserve for chard stem pickles.
  3. Dry chard leaves, first in a salad spinner, then remove excess moisture with paper towels. Cut leaves into 2″x2″ pieces, or a size as close as possible, when in doubt, larger is better.
  4. Spread leaves on a large ungreased baking sheet, do not overlap or crowd. My leaves took up four sheets that I baked in two ovens.
  5. Bake chard for six to seven minutes, check to see how the leaves are drying, at this point I loosened the leaves with a spatula and my fingers and rotated the baking sheets, top to bottom and front to back.
  6. Bake for another six to seven minutes, chard should be crisp, not burnt.
Trimmed chard leaves ready to be tossed with olive oil and seasonings


Give the chard leaves enough room to ensure even baking.
Not the prettiest snack, but certainly tastes good!


Pickled Chard Stems

Colorful Bright Lights and Rhubarb chard stems are too pretty to waste.

Pickling shows off the brightly colored stems in another healthy nibble. Refresh the stems in some ice water to crisp them up and cut to even lengths to fit your canning jar. I chose pint jars but one cup sized jars would work as well. I used a basic refrigerator pickle recipe and added my own spice blend combination. Allow them to cure in the refrigerator for a few days, after three days they were ready. If your stems are wide, cut them in half lengthwise, there will be less chance for the stems to be stringy.

Quick Chard Pickle

Makes  2 pints

  • 2 pint canning jars and lids
  • Enough chard stems to pack tightly into the jars
  • 2c water
  • 1c rice wine vinegar
  • 1/4c granulated sugar
  • 1/2t cumin seed
  • 1/2t coriander seed
  • 1/2t fennel seed
  • 1 small piece of cinnamon stick about 2″
  • 1/2t pink peppercorns
  • 1/2t white peppercorns

Directions

  1. Sterlize two pint canning jars by washing them in hot soapy water, rinsing and drying them thoroughly. Crush spices in a mortar and pestle or small food processor. Distribute spices evenly between the two jars.
  2. In a medium saucepan bring two cups of water to a boil. Add vinegar, sugar and salt and bring the mixture back to a boil.
  3. Pack the chard stems in the jars as tightly as possible. Using a wide mouth canning funnel, pour the brine over the stems to cover completely. Place lids and bands on the jars and let cool. Refrigerate, chard pickles will be ready in a few hours but at their best in about two days.

    My spice blend ready to crush in the mortar and pestle.
Pickled chard stems ready for the refrigerator. Notice the classic Bicentennial Liberty Bell jar on the right.


September 19, 2012 Roasted Eggplant Caponata

The days are getting shorter, there is a chill in the morning air, only three days until the official beginning of autumn. Our summer vegetables are on the wane and this morning I harvested some of the last eggplants, peppers, fennel and tomatoes of the season. The sweet and sour flavors of eggplant caponata would be the right contrast to the richness of the king salmon we were having for dinner.
Caponata is a dish native to Sicily by way of the Arabs (then called the Saracens)  who ruled the island from the ninth to the eleventh century. Along with citrus fruits, pasta and eggplants, just to name a few, the Saracens brought the sweet and sour flavor combination to Sicily, the sour coming from vinegar and sweet from sugar or honey.  Among several theories, the word caponata came from the Sicilian dialect, capunata, the name for a sailor’s dish of a biscuit steeped in oil and vinegar, served with chopped vegetables.
The vegetables in my caponata were the “last gasp” of certain varieties we were growing. I used lavender-white Asian Bride  and magenta colored Beatrice eggplant, both ideal because of their thin skin (no peeling required), some small yellow Admiral peppers, and  a red Anaheim pepper that had just a little heat. Fennel isn’t typically an ingredient in caponata, but I thought the slight licorice flavor would add to the sweetness. The most time consuming part of the recipe is the hand chopping of the vegetables, a food processor is definitely not the right choice here. Unlike most of the recipes I make with eggplant, I salted the eggplant to eliminate any bitter flavors from these plants that had been on the vine for a while. Salting also prevents the eggplant from absorbing too much oil and becoming greasy. I decided to roast the vegetables in this recipe is to keep the olive oil to a minimum. I cut the vegetables a bit smaller than I would usually since I was using it as a topping for fish. Caponata is also wonderful scooped up with a pita, in a sandwich and as a topping for pasta. It is best made a day ahead so the flavors have time to blend. Caponata keeps about a week in the refrigerator, if it lasts that long.

Eggplant Caponata

Makes about 4 cups

  • 1 medium eggplant or a combination of smaller eggplants to equal about 1 1/2lbs, unpeeled, and trimmed
  • 3 ribs of celery cut into 1/2 inch dice
  • 1 small red onion cut into 1/2 inch dice
  • 1 small yellow pepper cut into 1/2 inch dice
  • 1 small red pepper cut into 1/2 inch dice
  • 1 small fennel bulb cut into 1/2 inch dice (optional)
  • Olive oil
  • 1 1/2 cups peeled plum tomatoes with juices or 1 14 oz can of diced tomatoes
  • 1T tomato paste
  • 2-3T Pomegranate red wine vinegar
  • 1-2t granulated sugar or honey
  • 2 anchovy filets, minced
  • 1/3 c green olives, pitted and slivered
  • 3T drained and rinsed balsamic capers
  • 2T chopped Italian parsley
  • Kosher salt and freshly ground pepper

Directions

  1. Preheat oven to 450F. Place racks in the top and bottom shelves of the oven.
  2. Cut the eggplant into 1-inch cubes. Place the cubes in a bowl, sprinkle with a tablespoon of  kosher salt. Spread the cubes on a baking sheet that has been lined with a paper towel. Allow cubes to sit for one hour. Pat cubes dry with paper towel and remove any excess salt. Do not rinse.
  3. Place the cubes in a bowl and toss with 1-2T of olive oil. Place cubes on a baking sheet, spread them out evenly, crowded vegetables will steam, not roast. Set aside. In another bowl, toss the celery, onion, fennel and peppers with another tablespoon or more of olive oil. Spread on another baking sheet, making sure that the vegetables are spread out evenly and not crowded.
  4. Place vegetables in preheated oven and cook for about 5 minutes. With a spatula, loosen them from the baking sheet to promote even browning and rotate the baking sheets, top and bottom as well as front and back. Continue to roast in the oven until vegetables are softened and browned around the edges. Start checking the pan after 5 minutes.
  5. Allow vegetables to cool on baking sheet. In a medium saute pan cook tomatoes and their liquid. Add tomato paste, red wine vinegar, sugar or honey and anchovies (if using) and stir to combine. Taste and adjust the sweet and sour flavor as desired.  Add the cooled vegetables, toss gently but thoroughly to combine. Add chopped olives, capers and chopped parsley. Taste and adjust seasoning as desired. Set aside to allow flavors to blend. Serve at room temperature as accompaniment to fish or chicken or with crusty bread or crostini.