May 30, 2015 Cucumber, Radish and Turnip Salad

DSC_2759a

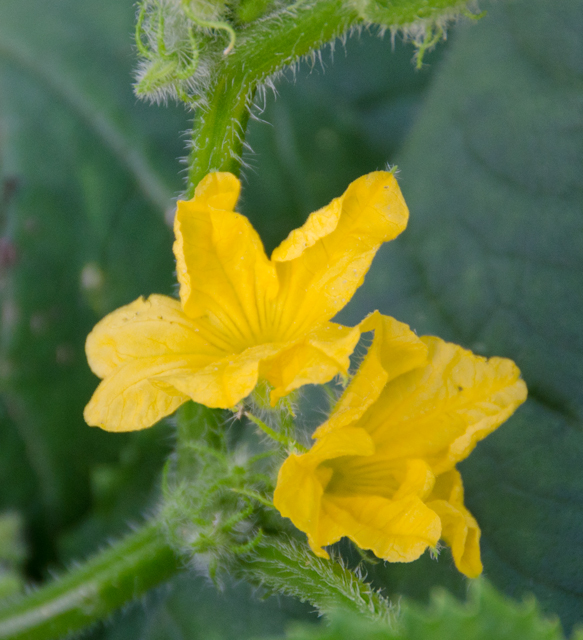
Cucumbers and radishes will never co-exist in our garden. Radishes need the cooler temperatures of spring while cucumbers didn’t make an appearance in our garden last year until August. This salad, loosely adapted from one in Bon Appetit, also utilizes another spring offering, sweet mild Hakurei turnips. Hakurei turnips are harvested at about the same size as a radish. They are pure white and their flavor lends nicely to salads.

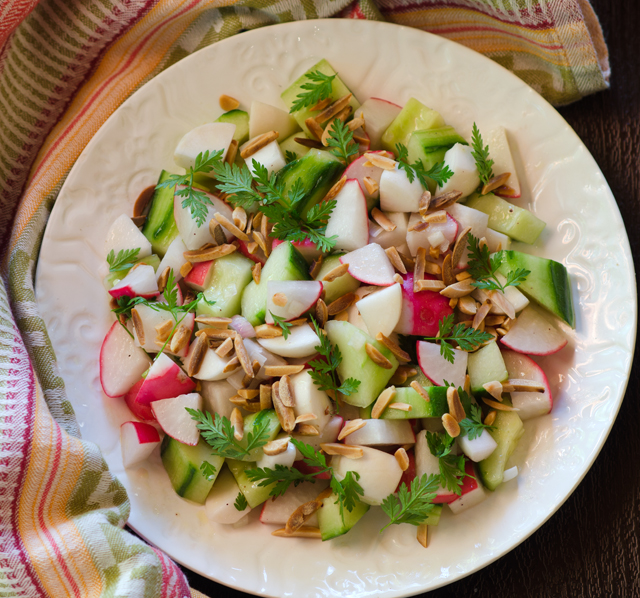
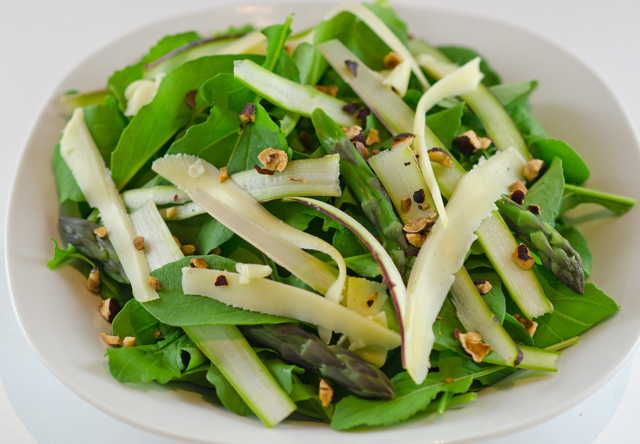
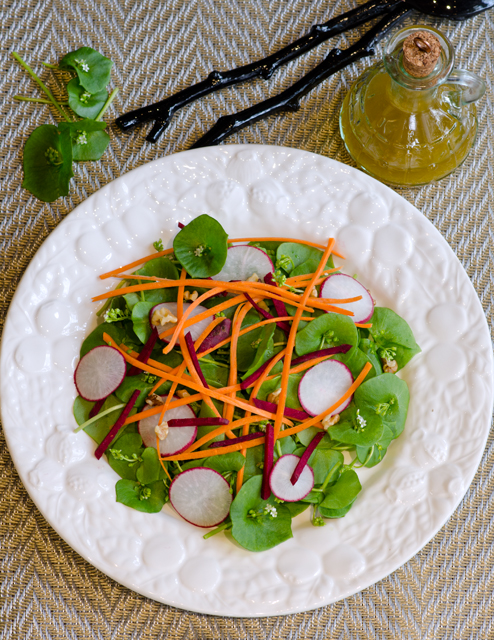
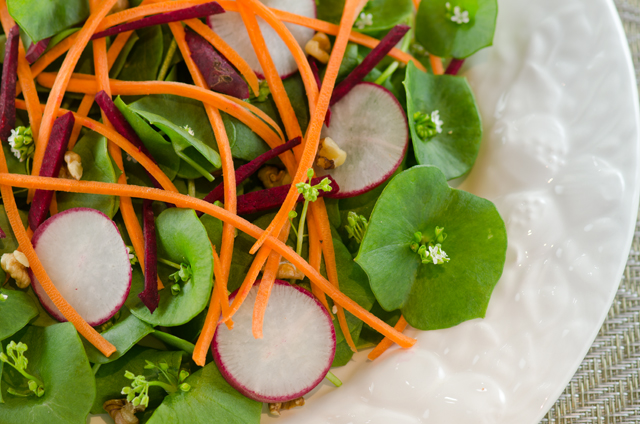
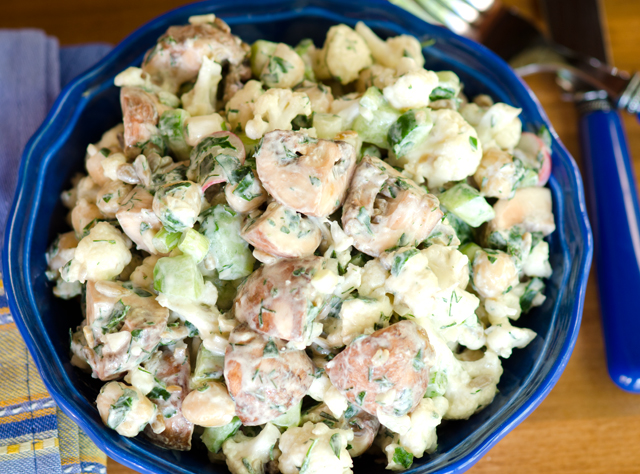
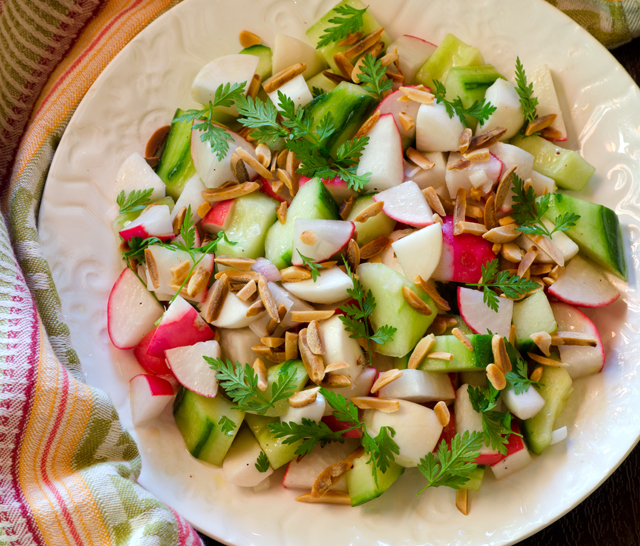
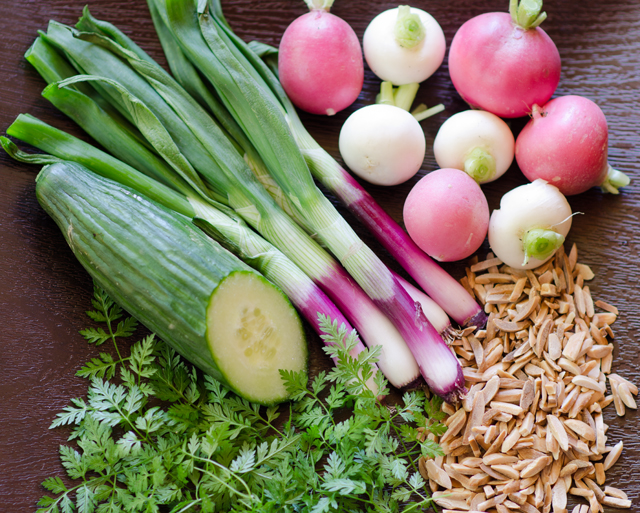
In this salad, small chunks of cucumber, radish and turnip are combined with toasted almond slivers and tossed with a vinaigrette.

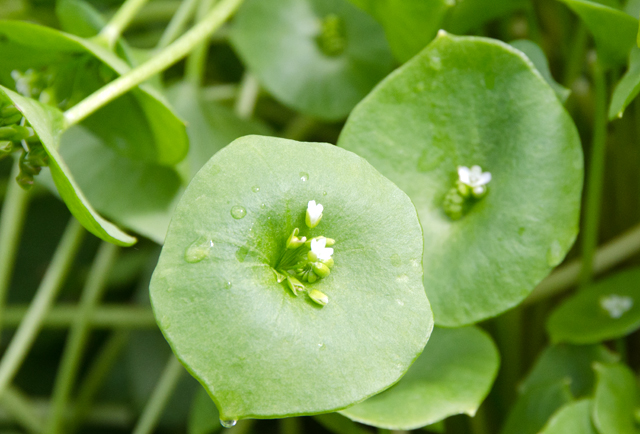
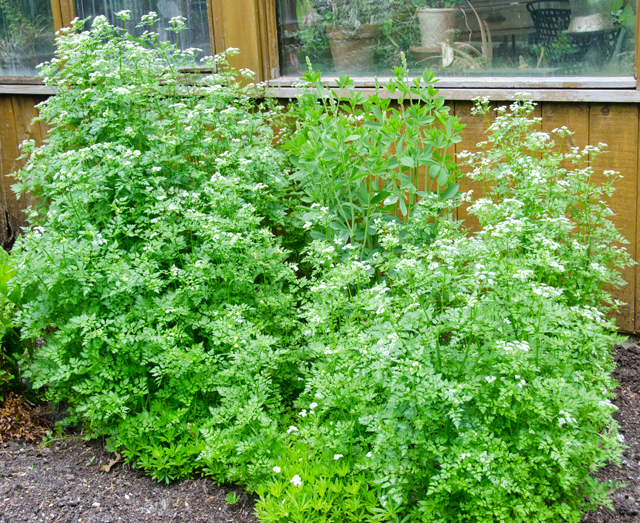
I made a vinaigrette accented with spring’s most etherial and delicate herb, chervil.  A cousin to parsley, it’s leaves look like delicate lacy ferns. Our chervil was originally planted in the garden but a new larger healthy patch has seeded itself in the back of the house, nowhere close to it’s orginal location. It is a plant that also prefers cooler temperatures and partial shade. The flavor is subtle, mildly anise with just a touch of parsley. Because of it’s delicate nature, it’s rare that you would find chervil in any market, farmers or otherwise. However it is easy to grow and fortunately often seeds itself.

Toasted almonds lend a nice crunch to this dish. Rather than the oven you could alternately toast these in a dry skillet on the stove top. Whatever choice you make, watch nuts carefully, one minute they’re a pale tan, the next they are too dark. Toss the nuts occasionally, and as soon as they turn uniformly golden in color, remove from the baking sheet because they will continue to cook and darken in the pan.

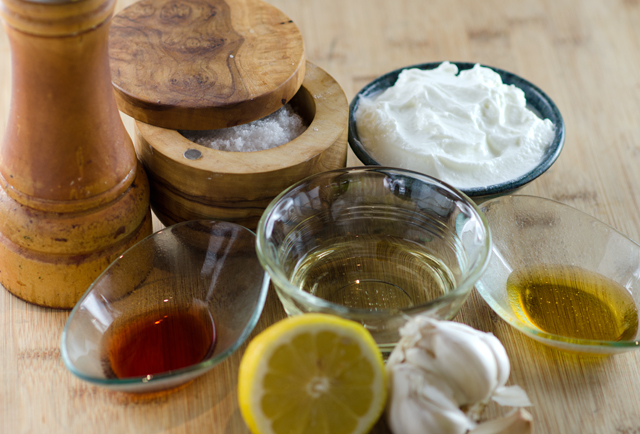
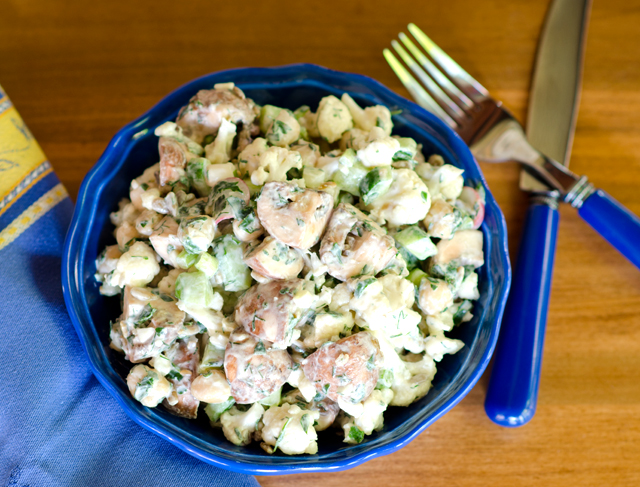
I cut all the vegetables into small uniform chunks, slicing all of them would make for a different texture and would make an interesting salad as well. I like a touch of sweetness in most of my vinaigrettes, I used honey from a new vendor at my local farmers market in Wrightstown. Truly Pure and Natural carries a whole line of natural products, including local honey. They have an entire line of delicious flavored honeys, everything from lavender, to coffee to one they call “hottie honey”. I availed myself to quite a few “tastings” and came home with a three pack.  I added just a touch of the hibiscus honey to my vinaigrette. I’m sure I will be back for more!

As with many salads, this one needs to be assembled right before serving.  If you don’t have chervil, flat leaved parsley can substitute.

This large patch of chervil surprised us at the back of the house.
We use both the turnip greens and the sweet  Hakurei turnips.
We use both the turnip greens and the sweet Hakurei turnips.
The first cucumber flowers didn't appear until later in the season last year.
The first cucumber flowers didn’t appear until later in the season last year.

DSC_2752a

Cucumber, Radish and Turnip Salad

Makes four servings

Ingredients

  • 1/2c slivered almonds
  • 1 or 2 spring onions, finely chopped
  • 1/4c raspberry champagne vinegar or your vinegar of choice
  • 1t honey (I used Hibiscus infused honey)
  • 1/4c extra virgin olive oil (more to taste)
  • Kosher salt and freshly ground pepper
  • 1c English hothouse cucumber chunks, peeled, seeded and cut into ½inch chunks
  • 1c radishes, trimmed and cut into ½inch chunks
  • 1c Hakurei turnips, trimmed and cut into ½inch chunks
  • 1c chervil leaves and more for garnishing the salad

Directions

  1. Preheat oven to 350°F. Spread almonds out evenly on a rimmed baking sheet. Toast, tossing occasionally, until golden brown, 8 to 10 minutes; let cool.
  2. Whisk onion, vinegar, honey and olive oil in a large bowl; season with salt and pepper. Add cucumbers, radishes and turnips, chervil and almonds; toss to coat.
  3. Season to taste with salt and pepper.

DSC_2757a


May 17, 2015 Shaved Asparagus Salad with Aged Gouda and Hazelnuts

DSC_2646a

Long before the term “Farm to Table” entered our vocabulary, chef, cookbook author and food and wine educator, John Ash authored the cookbook, From the Earth to the Table. His restaurant, John Ash and Company in the wine country of Santa Rosa, California, was one of the first to focus on local seasonal ingredients in his dishes. We have had the pleasure of dining in Mr. Ash’s restaurant on several occasions when visiting Sonoma County. It was for this reason I knew his recipe for Shaved Asparagus Salad with Aged Gouda and Hazelnuts in Fine Cooking magazine would be one worth trying.

Asparagus celebrates the arrival of spring and is one of the first local offerings of produce at our farmers market. The season is fleeting so I try to use it as often as possible.  When you bring asparagus home it’s important to store it properly. I store it the same way I store fresh herbs. Stand the stalks upright in a wide mouth glass or jar with an inch or two of water in it. Be sure that all the cut ends are in the water. Cover loosely with a  clear plastic gallon storage bag. The green in this salad is arugula and the timing couldn’t be more perfect. The temperatures here this past week have been far from spring like. The heat made it feel like it was mid July rather than May. That meant it was time to pick the arugula while it is still in it’s prime. Days of warmer temperatures make arugula’s peppery flavor even hotter and causes the plant to bolt or go to seed.

Begin the recipe by making a simple vinaigrette. Rice vinegar, lemon juice, honey, extra virgin olive oil  and shallot complement and allow the flavors of the salad to shine through. The only change to the original recipe I made here was to use a plain rice vinegar rather than a seasoned one. Seasoned rice vinegar contains sugar, corn syrup, salt and MSG. I knew the honey would bring enough sweetness to the dressing, and I prefer not to add the extra salt and MSG.

Remove the tips from the asparagus and set aside. The original recipe calls for thick asparagus but the vendor I buy asparagus from at the farmers market already has them bundled; purple, green, thick, thin, all in the same bunch. I found that medium stems are just as easy to peel as long as they are firm. A vegetable peeler does double duty in this recipe, use it to shave the asparagus stalks and the Gouda. Discard the first shaving of the asparagus, that will contain the more fibrous outer skin. The inner stalk is crisp and tender and is delicious raw. Marinade the tips and the shaved stalks for 15 minutes, long enough to blend the flavors and soften the asparagus a little.

How aged should your Gouda be for this salad? The complex caramel flavor of a five year Gouda is best on it’s own as a wine and cheese pairing. The Gouda at Wegmans that is aged for three months has a buttery flavor with a tangy finish and is just right for this recipe.  You may want to pop the Gouda in the freezer for about 10 minutes for easier shaving. The cheese will quickly come up to temperature.  The rich toasty flavor of hazelnuts is an excellent contrast to the Gouda.  If you are not a fan of hazelnuts, walnuts or pine nuts would be a good substitute.

Shaved Asparagus Salad with Aged Gouda and Hazelnuts

Serves 6

Ingredients

For the vinaigrette

  • 3T rice vinegar
  • 2T lemon juice
  • 2T extra virgin olive oil
  • 1T fragrant honey such as wild flower or orange blossom
  • 1T finely chopped shallot
  • Kosher salt and freshly ground black pepper to taste

DSC_2648a

DSC_2630a
Our first crop of arugula this season.

DSC_2631a

For the asparagus

  • 3/4 lb. medium to thick asparagus
  • 3c baby arugula
  • ½c toasted and chopped hazelnuts
  • 2½oz. thinly shaved aged Gouda

Directions

  1. Make the vinaigrette. Whisk all the ingredients together, cover. Can be refrigerated up to 3 days.
  2. Make the salad. Remove the tips of the asparagus and put them in a large bowl. Using a vegetable peeler, shave a stalk, discarding the first shaving. If shaving the first side becomes awkward, turn stalk over and repeat. Add shavings to the tips. Repeat with the remaining stalks.
  3. Toss the asparagus with 1/3 cup of the vinaigrette and let sit 10 to 5 minutes, this helps the asparagus to soften a bit and blends the flavors.
  4. Add the arugula and hazelnuts and toss, adding more dressing as needed to lightly coat the arugula. Arrange on plates and top with the shaved cheese. Serve immediately.

DSC_2642a

May 10, 2015 Raincoast Crisps with Raisins and Rosemary

DSC_2581aThere’s a cracker I love that I have to buy whenever I stop in at Whole Foods, Raincoast Crisps. Created by Parisian trained chef Lesley Stowe, she started her own cooking school and catering company in Canada’s raincoast, Vancouver, over 25 years ago. The crisps originated from a bran bread that she served in her catering business with smoked salmon. Always looking for new and original ideas, on one occasion she sliced the bread and dried it out. It was met with approval from her kitchen staff so she decided to “pump it up” with additional ingredients.  That was the beginning of the Raincoast Crisp.

The crisps are toasty and nutty, loaded with ingredients like pumpkin seeds, raisins, and pecans.  They are delicious to nibble on their own or maybe just a spread of soft cheese or your favorite preserve. One never tastes like enough and it’s easy to justify munching a box full because they are so good.  So what’s the problem? At 7.99 and up per 6 ounce box they are a pricey indulgence. So some intrepid bloggers came along and cracked the code and a rather similar recipe is available to any one who is able to whip up a quick bread.

The DIY recipe is very simple to make. Stir together the ingredients and bake in mini loaf pans. Alternately you could bake them in two square cake pans for longer skinny slices. Be sure to thoroughly cool the loaves after baking before proceeding to slice. You could give them a short stay in the freezer to firm them up or just wait till the next day to proceed with the recipe.

The next step is to slice the crackers as thinly as possible. Most of recipes I read said that it makes about 8 dozen crackers. That meant I needed to make 24 slices from each of the 4 loaves. I came fairly close, or maybe that had something to do with slices I had to “test” before baking! I used my thin blade serrated Cutco knife to make the thinnest and most even slices. I experimented with a food slicer which was ok, it’s important to maintain even pressure to keep the slices neat.

Bake the slices like super thin biscotti until they are crisp and golden. Now that I know the proportions of the recipe I am looking forward to customizing it.  Different flours,  dried fruits, spices and nuts, the possibilities are endless.  I served mine with a delicious soft goat cheese from Giggling Goat Dairy, a new vendor at my local farmers market in Wrightstown. The goat dairy is located in Dublin Pa and they make and sell fresh French-style goat cheese known as chèvre, a traditional style Feta as well as spreads and dips. I’m certain I will be frequenting their stand quite often this summer.

Raincoast Crisps with Raisins and Rosemary

Makes about 8 dozen

Ingredients

  • 2 c flour
  • 2t baking soda
  • 1t sea salt
  • 2c buttermilk
  • 1/4c brown sugar
  • 1/4c honey or maple syrup
  • 1c raisins
  • 1/2c lightly chopped pecans
  • 1/2c roasted unsalted pumpkin seeds
  • 1/4c sesame seeds
  • 1/4c flax seeds
  • 1T chopped fresh rosemary

Directions

  1. Preheat oven to 350°F.
  2. Stir together flour, salt and baking powder in a large bowl. Add the buttermilk, brown sugar and honey and stir to combine. Add the raisins, nuts, pumpkin seeds, sesame seeds. flax seed and rosemary and stir until all the ingredients are thoroughly combined.
  3. Pour the batter into 4 mini loaf pans that have been sprayed with nonstick spray. Bake loaves for 30 to 35 minutes, rotating halfway during baking time. The loaves should be golden and springy to the touch. Remove loaves from the pans and cool on a wire rack.
  4. Allow the loaves to cool completely, then freeze for about an hour. This will allow you to slice the loaves as thinly as possible. I used a serrated edge knife for the neatest cut.
  5. Place the slices on baking sheets that have been lined with parchment paper. Bake the slices at 300°F for about 15 minutes, then flip them over and bake for another 10 minutes until crisp. Cool completely and store in an airtight container.
DSC_2566a
Slices on a parchment lined sheet ready for their second bake.
Delicious on their own or with a spread of goat cheese, this is the fresh garlic peppercorn from Giggling Goat Dairy.

DSC_2584a


May 4, 2015 Claytonia Salad

DSC_2521a

Claytonia is not a small nation tucked away in the Alps, nor is it the latest addition to the periodic table of elements. Claytonia perfoliata, it’s full name, is a cold hardy salad green that grows wild up and down the west coast of the United States.  The plant grows up from thin, succulent stems. The leaves are delicate and small, shaped almost like a spade. Eventually tiny white flowers will grow out from the center of the leaf. The entire plant is edible from stem to flower with a texture reminiscent of spinach with a very mild flavor that is slightly sweet when first picked.

During the California gold rush, miners learned about claytonia from local Indians. It became an important part of their diet because it was plentiful and it’s vitamin C content helped to ward off scurvy, hence it’s other name, miner’s lettuce. It was because of it’s nutritional value, British settlers brought claytonia from America to Europe, and later to settlements in Australia and Cuba.

Joe first learned about claytonia from his readings in the books of his gardening hero, Eliot Coleman. Joe planted claytonia in the greenhouse and under a cold frame late last fall.  This time the plantings were successful but when the cold weather came on with a vengeance, the plants stopped growing. Since the plants can survive the freeze/thaw cycle, they were the first to start growing in the spring. Claytonia is supposedly an easy self-seeder but if not, Joe will plant it earlier in the fall to give it a better head start for winter salads.

I like to use it alone in a salad or with other similar greens with a delicate texture.  In this salad I paired the claytonia with other spring vegetables, carrots, beets and radishes. Since it bruises easily, I prefer to toss the greens first with the vinaigrette, then layer the other ingredients on top. The sweet tartness of apricot vinaigrette pairs nicely with the greens.

Claytonia or miner's lettuce thriving in the spring garden.
Claytonia or miner’s lettuce thriving in the spring garden.


Claytonia Salad

Serves two, the salad components are all approximations

Ingredients

  • Enough claytonia to fill the bowl of your choice
  • Shredded carrots
  • Finely julienned raw beets
  • Thinly sliced radishes
  • Chopped walnuts
  • Freshly ground black pepper
  • Apricot vinaigrette (recipe follows)  or the vinaigrette of your choice

Directions

  1. In a large bowl lightly dressing the claytonia with the vinaigrette. With tongs transfer the greens to salad plates. Top the dressed greens with the carrots, beets, radishes and walnuts. Add freshly ground pepper to taste.

Apricot Vinaigrette

Ingredients

  • ¼c apricot balsamic vinegar
  • 1t honey
  • 1 small clove garlic, finely chopped
  • ¼t Dijon mustard
  • 1/3 to ½c extra virgin olive oil
  • Kosher salt and freshly ground pepper

Directions

  1. In a small bowl whisk all ingredients together. Season to taste with kosher salt and freshly ground pepper.

DSC_2315a

DSC_2511a

DSC_2524a


March 10, 2015 Imam Bayildi Revisited

DSC_1861aImam Bayildi translates “the priest fainted”. Was it because the dish was so delicious or was it a reaction of this frugal priest  to the copious amount of expensive olive oil his bride used to make this dish? This is my second interpretation of this popular Turkish dish, one of a group of vegetarian recipes referred to as zeytinyagli or olive oil foods, served cold.  This recipe cuts down considerably in the amount of olive oil traditionally used in the original dish but definitely not on the flavor.

This is another recipe from Ana Sortum, chef at Oleana restaurant in Cambridge Massachusetts.  This recipe is similar to the first one I made in some of the steps.The eggplants are sprinkled with salt and brushed with olive oil and baked until the flesh is soft.  In the first recipe the flesh is scooped out and mixed in with the other ingredients, in the second the other ingredients are combined and pressed into the cooked eggplant, I liked that method. Onions, garlic, tomatoes, oregano and parsley are found in both recipes. Finely diced cauliflower, star ingredient of the moment, is a unique component for Imam Bayildi and adds a different texture and flavor to this dish that I liked. The second recipe also uses green bell pepper, an ingredient that I am not a big fan of. Green peppers are less expensive but not quite as nutritious as their red, yellow and orange counterparts. As a gardener, I have just considered them to be peppers that someone wasn’t patient enough to let ripen.  I am now coming around to seeing green bell peppers as a unique ingredient. In this dish they add an interesting  slightly bitter edge to the sweetness of the onion and the creaminess of the eggplant.

This is the first time I have ever grated tomatoes for a recipe. Choose ripe firm tomatoes and grate them over a shallow bowl with the largest holes of your box grater. Keep your hand flat and grate until the tomato flesh is scraped away from the skin. Discard the skin and you are left with tomato pulp that can be used in a variety of dishes. I am sure this is a technique I will use again.

Aleppo pepper is one of my favorite ingredient discoveries of the last several years. It is dark red, flaky and somewhat oily in texture. It takes it name from the ancient city of Aleppo in northern Syria, just east of the Turkish/Syrian border.  The flavor profile is rich, sweet and fruity with hints of cumin. The heat profile is moderate, just a bit hotter than paprika. As a result of the conflict in Syria, what now is sold as Aleppo is actually an identical pepper plant, Maras, that is grown in Turkey.

DSC_1848a

Imam Bayildi

Serves 8 as a side dish or 4 as an entrée

Ingredients

  •  4 small eggplants, about 1/2lb each
  • 10Tolive oil divided,  4T for brushing eggplants, 3T for sautéing, 3T for drizzling over finished dish.
  • Kosher salt
  • 2 1/2lb tomatoes, halved
  • 2c diced sweet onion
  • 1c diced green bell pepper
  • 1/2c finely diced cauliflower
  • 1T finely chopped garlic
  • 1/2c chopped Italian parsley, more for garnishing the finished dish.
  • 1t finely chopped fresh oregano or 1/2t dried
  • Aleppo pepper or crushed red pepper flakes
  • 3/4c crumbled feta, more for garnish

Directions

  1. Position a rack in the center of the oven and preheat to 375°F.
  2. Halve the eggplants lengthwise and place cut side up on a large rimmed baking sheet. Season the cut sides generously with kosher salt and brush with the first 4T of olive oil. Flip the halves over and bake cut side down until soft, about 30-35 minutes. Set aside until cooled.
  3. While the eggplant bakes, grate the cut sides of the tomato on the large holes of a box grater. It is easiest to put the grater in a bowl. Discard the skins. Drain the pulp in a fine meshed sieve until most of the liquid has drained through, about 20 minutes.
  4. Heat 3T of the oil in a 12-inch skillet over medium heat. Add the onion and cook, stirring occasionally, until soft, about 5 minutes. Add the pepper, cauliflower and garlic, cook, stirring occasionally, until all the vegetables have softened somewhat, about 5 minutes. Remove pan from the heat and stir in the tomato pulp, parsley and oregano. Season to taste with salt and pepper. Stir in the feta.
  5. Use a spatula to flip over the eggplant halves. With a slotted spoon, divide the filling among the eggplant, using the spoon to gently push the filling into the flesh.
  6. Drizzle with the remaining olive oil and bake until hot, about 10 minutes. Sprinkle with more crumbled feta and parsley and serve.

DSC_1856a

DSC_1857a

DSC_1872a

December 12, 2014 Creamy Kale Gratin

DSC_0072aWhen it comes to Thanksgiving I’m “all about the sides”. Now don’t get me wrong, we had three turkeys for Thanksgiving, roasted, grilled and smoked, all cooked to perfection by my hubby. No fried turkey this year, we tried it one Thanksgiving and the combination of a deep fryer and a windy day on a wooden deck made for an interesting and potentially dangerous afternoon.

I love fall vegetables, a variety of interesting winter squashes, beautiful brassicas and hearty root vegetables all appear at our table. In previous years I would make myself crazy with last minute preparations for a half dozen complicated side dishes before we sat down to Thanksgiving dinner. Now I like to roast a combination of root vegetables tossed with olive oil, salt and freshly ground pepper and supplement them with some other interesting sides.

If I am at home in the early afternoon I will occasionally turn on “The Chew”, a television program that has been described as “The View” for foodies. The panel includes among others, star chef, restauranteur and cookbook author, Mario Batali, and it was Mario’s recipe this day that caught my attention, Creamy Kale Gratin.
We are not newcomers on the ever expanding kale bandwagon. Joe has been growing it in the fall for quite a few years, before it achieved it’s current celebrity status. This year’s crop was abundant. He grew both the Red Russian variety with it’s reddish purple stems and curly leaves and the Lacinato or dinosaur kale with crinkly long dark green leaves. What most people don’t know is that after the first frost, kale becomes sweeter and could easily convert the most die hard kale hater.

Today’s episode was titled potluck party, focusing on dishes you could bring to a Thanksgiving dinner and I’m sure this dish would be a hit at any potluck meal, Thanksgiving or otherwise. Mario compared this dish to steakhouse creamed spinach, only made with kale. Mario had the assistance of actress Katherine Heigl, best known for her Emmy winning role on Grey’s Anatomy.  Her job, along with promoting her new television series, was to chop some of the kale while Mario made the Bechamel  sauce. I saw that chef Michael Symon was at the ready, most likely in case the task was too much for her to handle. I noticed she did a fine job, Michael said with a bit of surprise that she did a good job and Mario commented on her “mad skills”. She explained that she played a cook in one of her movies (Life As We Know It; I checked)  and they taught her to properly chop. She refered to it as a hidden talent, one of those things you learn as an actor.

The kale leaves are roughly chopped to the stem. Twenty cups may seem like a large quantity but like all greens, they cook down quickly. Rather than putting the stems in the trash, Mario puts the stems in half full pickle jars and snacks on them the next day. The kale is cooked in a large sautepan until wilted, it will cook fully when it is combined with the cheese sauce and croutons. A layer of croutons is placed on the bottom of a large buttered gratin dish. The next layer is the kale combined with the very cheesy sauce seasoned with freshly ground nutmeg. The remaining croutons are layered on top.

Either variety of  kale is suitable for this recipe. From my observation of the video it looks like they used a curly variety, I used the darker Lacinato with long crinkly leaves. I prepped my dish the day before, stopping before sprinkling the croutons with olive oil, salt and pepper. I brought the dish to room temperature the next day, finished the final steps and baked the gratin. The last dilemma the Chew tackled was how do you eat the bread bit? Fork and knife is fine but if you want to pick it up like a crostini, that’s just fine too.   We all enjoyed the gratin, a delicious way to enjoy one of the final offerings of the fall garden.

DSC_0029_edited-1
Lacinato kale in the fall garden.

Creamy Kale Gratin

Serves 10

Ingredients

  • 20 cups Russian or Lacinato kale, stems removed and roughly chopped
  • 1 loaf sourdough bread, cut into 1/2 inch slices
  • 6 T butter, and additional butter for the baking dish
  • 1/2c shallots, sliced
  • 1t red pepper flakes
  • 1/4c all purpose flour
  • 1 1/2c milk
  • 1 1/2c heavy cream
  • 8oz grated gruyere cheese
  • 8oz grated sharp white cheddar cheese
  • 1/2c crème fraiche
  • 1/2c Parmigiano Reggiano, freshly grated
  • 1/2t freshly grated nutmeg

Directions

  1. Preheat oven to 400°F
  2. Preheat a large sauté pan over medium high heat. Add 2 tablespoons butter and a drizzle of olive oil. When the butter has melted, add the shallots, salt, pepper and red pepper flakes. Sauté until translucent, about 4 minutes. Add the kale and season with salt and pepper. Sauté until wilted about 4 minutes. Set aside.
  3. Meanwhile, in a separate heavy bottomed pot (think Le Creuset) , melt 4 tablespoons butter. Add flour and stir to combine. Cook the flour mixture for 2 minutes, stirring continuously. Slowly pour in the milk and cream and whisk to combine. Continue to cook,, stirring continuously with a wooden spoon, until the béchamel sauce coats the back of a wooden spoon (about 5 minutes). Remove from the heat. Add in the cheeses and whisk until smooth. Season with freshly grated nutmeg, salt and pepper. Stir in the reserved kale mixture.
  4. Butter a large gratin baking dish. Lay an even layer of the read slices in the bottom of the gratin dish. Pour the creamy kale over the bread. Top the casserole with the remaining bread slices, placing them tightly together. Season the bread with salt and pepper and drizzle with olive oil. Place in the oven to bake for 30 minutes, until the topping is golden brown. Remove from the oven and allow to cool for 5 to 10 minutes before serving.
DSC_0035a
A rough chop is all you need for this dish.
DSC_0037a
A layer of bread slices are placed at the bottom of the dish.
DSC_0039_edited-1
Next, a layer of creamy, cheesy kale.
DSC_0062a
Then another layer of sourdough bread rounds.
DSC_0070a
Brush sourdough lightly with olive oil, sprinkle with salt and freshly ground pepper and bake. Delicious!


November 11, 2014 Puerto Rican Coleslaw

DSC_9489aA flavorful salad that’s a healthier alternative to mayonnaise based slaws. Crispy cabbage, celery and radishes are combined with sweet Sungold tomatoes in this very easy to make dish. Why is it considered Puerto Rican? Couldn’t find a definitive answer for that, but the addition of some sliced hearts of palm would give it a real Caribbean flair. Serve with a grilled steak or roast chicken, the leftovers keep for several days, that is, if you can keep it that long.

Puerto Rican Coleslaw

Makes about six servings

Ingredients

  • 6-8 c finely chopped green cabbage
  • 1 c diced small tomatoes
  • ½ c chopped celery, if the stalks are large, cut in half lengthwise first
  • 1/2c chopped celery leaves
  • 6-7 radishes, cut root and stem off first, then cut into half moon slices
  • ¼ c sliced green onion
  • 2 T apple cider vinegar
  • 1 t fresh lime juice
  • ½ t kosher salt, or more to taste
  • ¼  to 1/2t hot pepper sauce, I used sriracha sauce
  • 3T grapeseed or canola oil

Directions

  1. Chop up the cabbage, tomatoes and celery leaves, and slice celery, radishes and green onions, and toss into a large bowl. You can make this part ahead, place it in a container with a lid and pop it in the fridge until you’re ready to make the salad.
  2. In a small bowl, whisk together apple cider vinegar, lime juice, salt, hot sauce and oil. Taste to see if you want to add more hot sauce.
  3. Toss salad with the dressing. You can make this salad ahead and store it in the fridge for a few hours before you’re ready to serve.

October 25, 2014 Cauliflower Salad

DSC_9433a“Gifted” with another box of Brassicas this week, I was looking for a way to use cauliflower in a fall salad. A new cookbook, Bar Tartine : Techniques and Recipes, gave me the salad I was looking for.

Opened in 2005, Bar Tartine, located in the Mission District of San Francisco is an offshoot of the highly praised San Francisco bakery, Tartine. In addition to doing their own curing, preserving and in-house fermenting, the food draws influences from countries as diverse as Norway, Japan and Hungary.

The cauliflower is broken down into tiny florets, save the rest to make cauliflower “mashed potatoes”. In a bowl with the yogurt dressing, combine the florets with cucumbers, chickpeas and mushrooms. Our garden provided me with the radishes and serrano peppers needed for this salad. I was hesitant to use the two serranos as suggested, ours get quite hot so I went with just one. The yogurt dressing tamed the chiles heat quite a bit.
Resist the urge to roast or blanch the cauliflower before adding it to the salad, if you normally dislike it raw.  Marinating small florets in the dressing softens them up considerably without making them mushy. The yogurt dressing is especially good and would work well with other salad combinations.

DSC_9387a
Assembled ingredients for the yogurt dressing.


Bar Tartine Cauliflower Salad

Serves 6

Ingredients

For the dressing

  • 1 c Greek style yogurt, regular or low fat
  • 5T sunflower oil
  • 2 cloves of garlic, minced
  • 2T freshly squeezed lemon juice
  • 1T red wine vinegar
  • 1T honey
  • 1 1/2t fine grain sea salt
  • Freshly ground black pepper

Directions for the dressing

  1. In a bowl large enough to hold all the salad components, whisk together the yogurt, sunflower oil, garlic, lemon juice, vinegar, honey, salt and pepper to taste. If not using immediately, store dressing in an airtight container. Dressing can be made several days ahead.

Ingredients for the salad

  • 6-8 c cauliflower, trimmed into tiny florets
  • 2 medium cucumbers, peeled, seeded if necessary, cut into small dice
  • 4-5 scallions, cut into 1/4″ rounds
  • 1c cooked chickpeas, fresh is best but rinsed well and drained thoroughy if canned.
  • 8oz mushrooms, button or shiitake, quartered
  • 6-8 radishes, ends trimmed and thinly sliced
  • 1 or 2 green serrano chiles, stemmed, seeded and thinly sliced
  • 1/4c sunflower seeds, lightly toasted
  • 1/4c each chopped fresh flat leafed parsley, dill and tarragon

Directions for the salad

  1. Add the cauliflower, cucumbers, scallions, chickpeas, mushrooms, radishes, chilies, sunflower seeds and herbs to the bowl toss lightly and let stand for 15 minutes.
  2. During this time the vegetables will begin to exude some liquid the cauliflower will soften. Toss again and transfer salad to a bowl. Leftovers should keep for several days, if you can keep them around that long!

DSC_9428a

October 20, 2014 Cauliflower Tabbouleh

DSC_9376aCauliflower is a master of disguises. Toss cauliflower with olive oil, salt, freshly ground pepper and herbs of your choice and roast it. The florets carmelize and develop a nutty quality, reminiscent of popcorn. Because that’s how you will consume it, like popcorn. Or simmer it until very tender, mash it up with milk and butter (or your reasonable substitute of choice) and you have a side as flavorful as any bowl of mashed potatoes.

This time cauliflower takes the place of coarsely ground bulgur in a mock tabbouleh. Taboulleh is a Lebanese herb salad with bulgur, as food historian Clifford A. Wright points out in his book, Little Foods of the Mediterranean, not a bulgur salad with herbs. The advantage of using cauliflower is that, unlike bulgur, it will not continue to expand as the dish sits. By the nature of the vegetables in it, the mock tabbouleh will exude more liquid, so be judicious in the amount of dressing you use. If you have any leftover the next day, drain any excess liquid off before serving.

This was an opportunity for me to use a new acquision in my battery of herbs and spices, sumac. Not related to the poisonous variety, it is extracted from the berries of a bush that grows wild in Mediteranean regions. The berries or drupes are ground into a reddish powder that adds an astringent lemony taste to salads or meat dishes. Combined with dried thyme and sesame seeds, it’s also part of a seasoning blend from the Middle East called z’atar.

Other additions to the salad could include chickpeas or some finely chopped bell pepper. For an “authentic” presentation, serve with romaine lettuce leaves to scoop up the tabbouleh. This is a recipe that got a big thumbs up from my hubby, who thought it tasted even better the second day.

DSC_9372a

DSC_9368a
Use quick on and off pulses to chop the cauliflower florets finely to resemble medium grain bulgur.

Cauliflower Tabboulleh

Serves 6-8

Ingredients for the Dressing

  • 1T finely grated lemon zest
  • 3T fresh lemon juice
  • 1T red wine vinegar
  • 1/3-1/2c safflower or avocado oil
  • 1/2t  ground cumin
  • 1/2t  ground sumac
  • 1t kosher salt
  • 1/4t freshly ground black pepper

Directions for the dressing

  1. In a small bowl, whisk together lemon zest, lemon juice,vinegar, oil, cumin, sumac, salt and pepper. Set aside

Ingredients for the tabboulleh

  • 6-8 c cauliflower florets, use the stem part to make cauliflower “mashed potatoes”
  • 1c chopped cucumber, peeled, seeded and chopped into 1/2″ dice
  • 1c chopped tomato
  • 1 1/2c fresh flat leaf parsley leaves, chopped
  • 1/2c dill leaves, chopped
  • 1/4-1/2c mint leaves, chopped
  • 3-4 green onions, thinly sliced
  • 2 cloves finely minced garlic

Directions for the tabboulleh

  1. Chop cauliflower florets in a very fine dice, either with a box grater, by hand or in a food processor with short, quick pulses.  Do not overcrowd the processor, you may have to do this in batches. The final product should resemble medium bulgur grains. Transfer the chopped cauliflower to a large bowl. Add the chopped cucumber and tomato.
  2. Add chopped parsley, dill, mint, green onion and garlic to workbowl to chop more finely. Transfer to the bowl with the cauliflower. Gently mix to combine, add dressing and mix again. Taste for seasoning and serve.

DSC_9374aDSC_9379a


October 15, 2014 Baked Chiles Rellenos

DSC_9331aMy first exposure to Mexican cuisine didn’t occur until I was in college and that was limited to ketchupy salsa and salty tortilla chips. A few years later, I experienced the contrast of good Mexican food produced in a hole in the wall, mom and pop restaurant with a mediocre chain restaurant (remember Chi Chi’s anyone?)

As it was with other foreign cuisines I was unfamiliar with, I gained knowledge of the food by reading cookbooks. The cookbooks of Diana Kennedy and Rick Bayless introduced me to Mexican cuisine that varies from state to state, much the same as it does in the United States.  I bought a press and set out to make my own tortillas using a product I never heard of before, masa harina. My well-intentioned attempts were less than perfect for certain but I developed an appreciation for how it was done.

Then, there were the many varieties of peppers, used both fresh and dried I was unfamiliar with, their heat measured on the Scoville scale.  Some were hot, like the jalapeno and serrano, others very hot,  Habanero and Scotch bonnet, others with only mild heat, like poblanos and pasillas. The herbs, not readily available thirty years ago in markets like cilantro and Mexican oregano, were accessible to us as gardeners. There is always a small patch of cilantro in the garden in the warmer months, and we have a large Mexican oregano plant that Joe dries at the end of the season. We use hot peppers in their fresh, frozen and dried states. It has always surprised me that dried peppers, several years old are still as hot as a fresh one.
This year we have had a bumper crop of peppers, both sweet and hot. The peppers that are supposed to be hot, are hot. We learned last year, after a disappointing crop of rather mild jalapenos, the plants need to be stressed, as in, no special watering or fertilizing to produce hot peppers. I guess there is a life lesson there, but we can leave that for another time.
Another reason for the excellent pepper crop were the plant supports. When a plant starts producing peppers, it can weigh down the plant and many of the peppers touch the ground, making them susceptible to damage from pests and rotting. The delicate pepper plants stand tall with the supports and the peppers have room to grow.

We had the largest crop ever of poblano chiles. Poblanos have a dark green skin and left to ripen further on the vine will turn red. They are somewhat heart-shaped, 3-6 inches long and 2-3 inches wide. Which brings me to another pet peeve of mine. Our seed packet identified the pepper as an ancho and it was in actuality, a poblano. Poblano is the raw or cooked form of the pepper, it is only referred to as an ancho in its dried form. I had enough poblano peppers this season to dry some and to use some fresh.

Feeling ambitious, I decided to make my own interpretation of chiles rellenos. I will not lie to you and say this is an easy, quick, weeknight meal. The Mexican version of stuffed peppers, the translation of chiles rellenos, does take considerable time. The peppers were picked, sorted, with the wrinklier ones assigned to the drying pile. The chiles were roasted over the gas flame on the stove over the asador. Once charred on all sides I placed them in a large paper grocery bag to steam the peppers, loosening the skins even further and making them easier to peel. Remove the skin by running your hands down the chile, use a damp towel to remove any skin that won’t easily come off. Once peeled, the pepper is slit on the side so that you can remove the seed sac (Diana Kennedy refers to this as the placenta) and any large ribs.

Now it’s time to fill your peppers. I used about 1/3 to 1/2 cup filling per pepper. Some recipes instruct you to close the peppers up with toothpicks but I found the peeled pepper skin adheres nicely to itself. Most recipes call for dipping the peppers, first in flour, then in an egg and flour batter and fried in hot oil. I wanted to attempt something a bit simpler, so I dipped the peppers in an egg wash and rolled them in panko crumbs and baked them. I served them with an easy sauce of roasted tomatoes, cooked with onion, chipotle chile and some of the adobo sauce that the chipotles are packed in.

DSC_9318a-copy
Poblano pepper on the vine.

Baked Chiles Rellenos

Make one dozen stuffed chiles

Ingredients

  • 12 Poblano peppers, fresh, red or green with smooth, not wrinkly sides if possible

Directions

  1. For a gas stove, arrange the chiles over a lit burner (you can fit two to three per burner). For an electric stove, arrange all chiles on a foil-lined rimmed baking sheet and position it 4 inches below a hot broiler. As each side blackens and blisters, turn the chiles with tongs until they’re blistered all over.
  2. Immediately put the chiles in a large bowl, cover, and let steam for 15 minutes. Remove the skin with your fingers or a paper towel. (It’s OK if you can’t remove all of it.)
  3. Slit the chiles lengthwise, starting about 1/2 inch from the stem and ending about 1/2 inch from the point. Remove the seed core, being careful not to damage the stem.

Recipe for the filling and finishing the chiles

Ingredients

  • 1/2 c low-fat or regular ricotta cheese
  • ¼ c crumbled feta
  • ½ c shredded jack or cheddar cheese
  • ¾ c well-drained chopped spinach or chard (I used chard)
  • Kosher salt and freshly ground pepper
  • 1 large egg
  • 1 c panko crumbs (more or less)

Directions for the filling and finishing the chiles

  1. Preheat oven to 425°F. Combine the first four ingredients in a medium bowl. Mix well and season to taste with kosher salt and freshly ground pepper.
  2. Spoon about 1/2 cup of the filling into each chile and then press the cut edges together. (If the chiles tear, press the torn edges together.) Arrange the chiles on a tray or baking sheet.
  3. Whisk egg with 1/2 cup water in bowl. Spread panko crumbs on a small plate.
  4. Dip chiles in egg wash. Coat with breadcrumbs. Place on baking sheet, and bake 20 to 25 minutes, or until golden.

Ingredients for the sauce

  • ½ c finely chopped onion
  • 2 tsp. chili powder
  • 1 tsp. ground cumin
  • 1 28-oz. can whole tomatoes
  • 1 canned chipotle chile in adobo sauce, drained

Directions for sauce

  1.  Heat oil in saucepan over medium heat. Add onion, chili powder, and cumin, and cook 4 to 5 minutes, or until onion is soft and spices are fragrant.
  2. Add tomatoes, and simmer 10 minutes, breaking up tomatoes with spatula or wooden spoon. Transfer to blender, add chipotle chile, and blend until sauce is smooth.
  3. Serve chiles rellenos in sauce.

DSC_9259a

DSC_9255a
I like to roast pepper on an asador, an open grated grill over the gas flame.

DSC_9325a