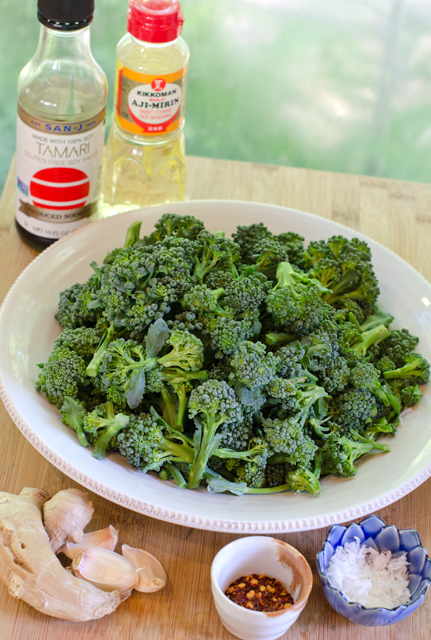
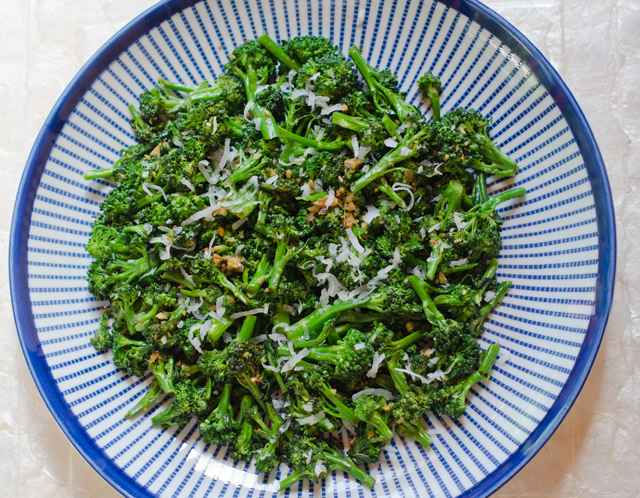
Broccoli and sweetened coconut shreds? Let’s just say I was as much curious as I was dubious about this recipe. My curiosity won out in the end and discovered I liked this easy and flavorful side dish.
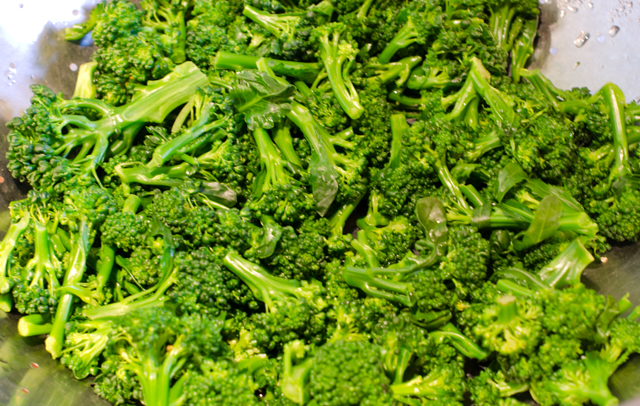
Broccoli florets are blanched in boiling salted water for a few minutes until crisp-tender. The florets are removed from the pot and shocked in a ice water bath. This stops the cooking process and preserves the bright green color. Drain the broccoli and dry well with paper towels. If the broccoli is too wet it will water down the dressing.
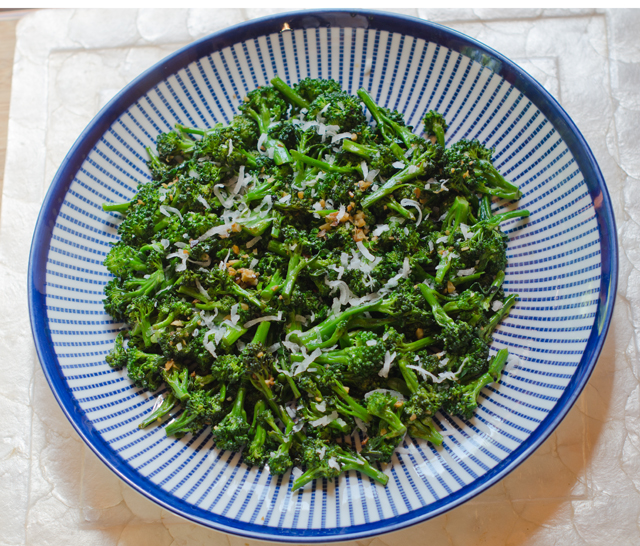
Aromatics, garlic, ginger and a pinch of spicy red pepper flakes are sautéed in a neutral oil until fragrant. Toss in the broccoli to coat and season with salt and pepper. Tamari and mirin are added to the pan and reduced to make a easy sauce. Tamari is a soy sauce that is made without wheat and has a milder and richer taste compared to regular soy sauce. Low sodium soy sauce could also be used in this recipe. Mirin, like sake, is a rice wine but with a higher sugar and lower alcohol content. The sweet flavor of mirin is a nice contrast to a saltier sauce like soy or tamari.
Reduce the liquid by half, then remove the broccoli to a serving platter. The sauce left behind in the pan is poured over the broccoli and the coconut shreds are sprinkled on top. I found the coconut added another dimension of flavor and was balanced out nicely by the sweet and salty sauce.
Shock the blanched broccoli to preserve the bright green color.
Asian Broccoli with Coconut
Serves 4
Ingredients
1 lb bite sized broccoli florets
1 T canola oil
2 cloves garlic, minced
1 T minced fresh ginger
Dash of red pepper flakes
Kosher salt and freshly ground black pepper
2 T tamari soy sauce
1 T mirin
1 T sweetened coconut flakes
Directions
Bring water to a boil in a 6-quart pot over high heat. Add florets and bring back to a boil. Cook until just tender 2-3 minutes
Remove broccoli with a slotted spoon to an ice water bath and let sit until cool, 5 minutes. Drain the broccoli and dry well on paper towels.
Heat oil in a 12-inch sauté pan over medium heat. Sauté garlic, ginger and red pepper flakes until fragrant, 1 minute. Gently toss in the broccoli to coat in the oil. Season with ¾ teaspoon of salt and pepper to taste.
Add the soy and mirin. Gently toss broccoli until liquid is reduced by half and broccoli is warmed through, 2-3 minutes. Remove broccoli to a medium serving platter. Pour soy over broccoli. Sprinkle shredded coconut over top.
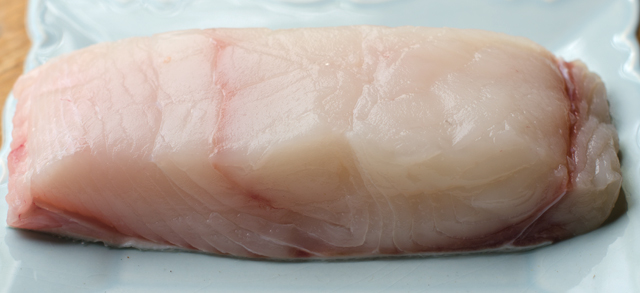
The creamy pinkish-white halibut I purchased at my favorite seafood store, Heller’s was the perfect match for a recipe on Friday’s episode of The Chew. The episode, tied in for Mother’s Day was titled, “Kitchen wisdom, things you learn from your mother about cooking”. This recipe shared by Michael Symon was not so much about things you learn from your mother, but treating your mom with a dinner she would be more likely to order out at a restaurant but probably wouldn’t want to cook at home
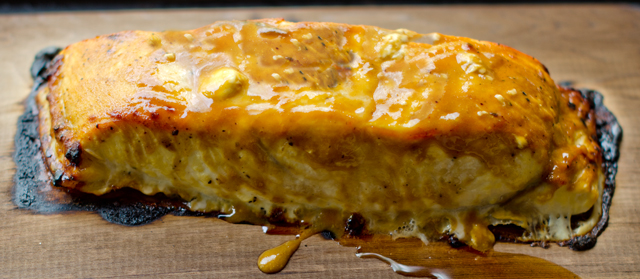
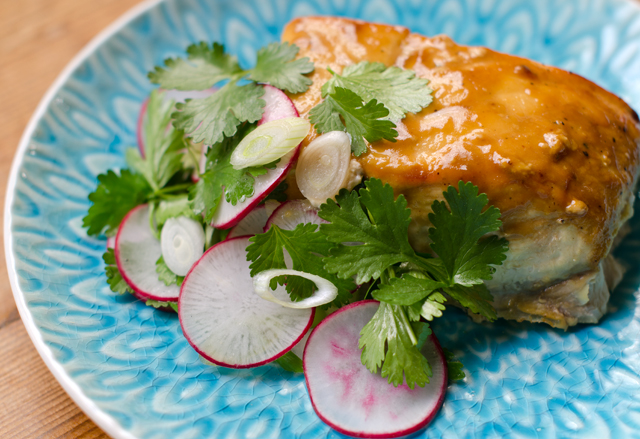
The recipe for wood planked halibut with herb salad sounded interesting and a bit different than how I usually prepare halibut. Michael chose halibut because it is in season and reasonably priced. Cod would be a good substitute. We have been using the cedar plank method of cooking for several years now but have only used it with salmon. I thought the delicate flavor of the halibut would be complemented nicely by the cedar.
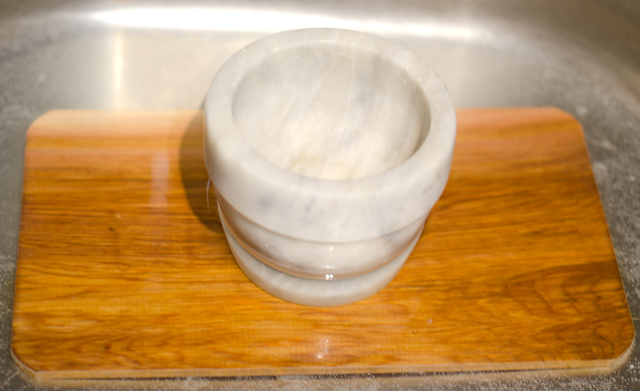
The first step in the recipe is to soak the wood planks, he was using three for three pounds of fish. Wood planks are becoming more readily available in grocery stores, many times they are set up with the barbecue displays. Most of the ones I have seen are cedar. Chef Symon said he was using an oak plank. Be sure to soak your plank for several hours, even overnight. You will need something to weight it down so it doesn’t float to the top, I use a heavy marble mortar. While you are soaking one plank for dinner that night, soak a second along with it, wrap it in foil and store it in the freezer for the next time. Michael said to soak it in salt water to season the underside of the fish,
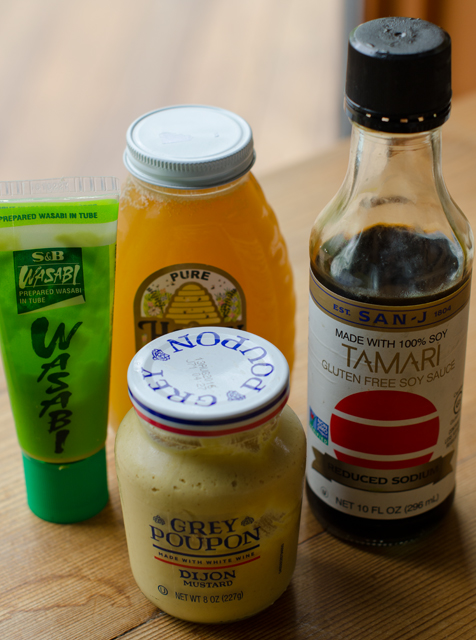
The first discrepancy in the recipe came with the proportions for the glaze. The online recipe called for quarter cup of soy sauce a tablespoon of hot Chinese mustard and 2 tablespoons of honey. On the television program, chef Symon said to use equal parts of each. That’s straight from the chef’s mouth so that’s how I followed the recipe.
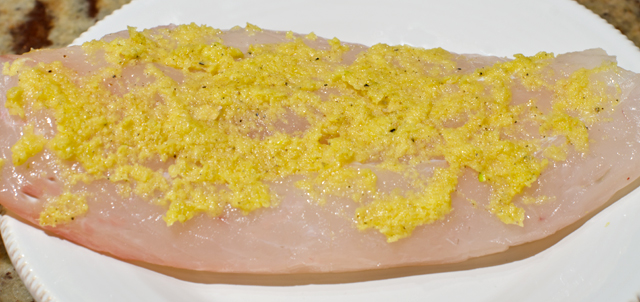
The online recipe called for 3 pounds of fish, by my estimates, that could serve 6 to 8 people depending on portion size. The online recipe stated it served four, those are pretty healthy portion sizes. I had a little less than a pound to serve two people, so I cut back on the glaze accordingly. Chinese mustard is the condiment in little packets you might have stuffed in the butter keeper in your refrigerator. Unfortunately I didn’t have any and couldn’t find any in my local supermarket. So I added about a quarter teaspoon of wasabi to some Dijon mustard. You can adjust the heat to your own liking, or skip the wasabi completely. Whisk the ingredients together, put half in a bowl to glaze the fish before cooking and the other half in a bowl as a finishing glaze.
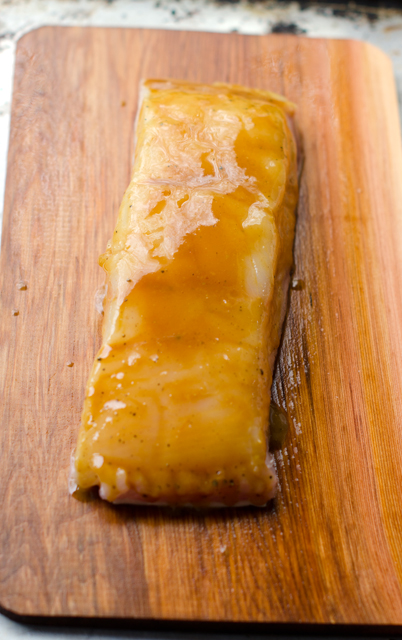
Season the halibut with salt-and-pepper on both sides, if you don’t like to see black specks on your white fish, use white pepper instead. Place the fish, skin side down on the plank. Michael puts his fish on a foil lined baking tray for easy clean up. Joe, who is the resident fish cooker, put our well soaked board directly on the oven rack. . Brush the first half of the glaze on the fish. This is where discrepancy number three comes in. The online written recipe states to cook the fish for 30 minutes. On the TV program, Chef Symon says it cooks in about 8 minutes or 5 under the broiler! Where is the truth here? We rely on the Canadian fisheries method of cooking fish which estimates the total cooking time of any fish to be 10 minutes (maybe even a little less ) for every inch of thickness, measuring at the thickest part at 450°F.
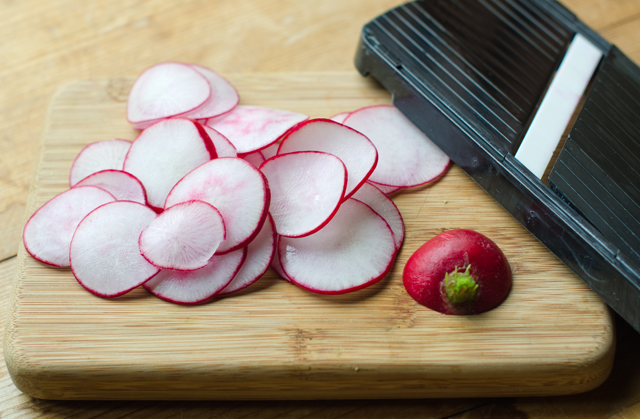
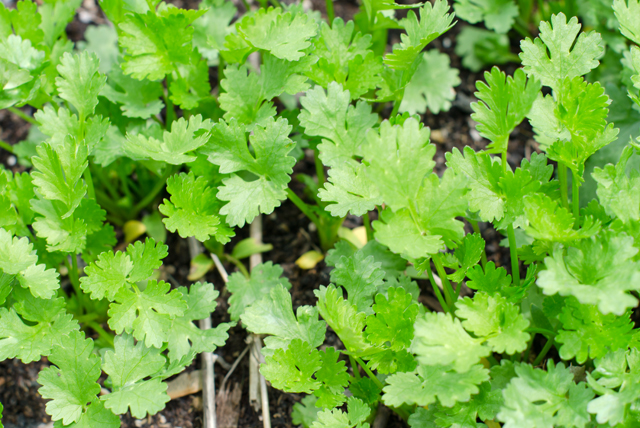
While the fish is cooking, you will have time to make the herb salad. It’s a combination of thinly sliced radishes, cilantro, and scallions tossed with lime juice and extra-virgin olive oil. We just finished our first crop of radishes and there’s lots of cilantro coming up “wild” in the circle garden. Don’t despair cilantro haters, Michael said any soft herb (as opposed to one that is woody, like rosemary) could be used. That would include parsley, dill and chervil. The amount of herb salad for the online recipe feeding four people/three pounds of fish was a reasonable portion for two so scale up the recipe if you are cooking a larger quantity of fish.
I would definitely make this recipe again, the wood smoke lightly permeates the fish and the kitchen, an added bonus. The glaze is easy, using mostly pantry ingredients. Michael Symon also pointed out that this method for cooking fish could be easily done on the grill, an added bonus for the summer months to come.
Soak the wood plank for several hours or overnight. Just be sure it doesn’t float to the top!Fresh halibut from Alaska.Ingredients for the marinade.
Half of the marinade is brushed on before it goes in the oven.While the fish is cooking, make the herb salad. I sliced the radishes as thinly as possible on a mandolin.Cilantro comes up in our garden on it’s own. If you don’t like cilantro, use parsley.Brush the remaining glaze over the fish after cooking.
Wood Planked Halibut with Herb Salad
Serves 2
Ingredients
2 T tamari or soy sauce
2 T dijon style mustard
¼t wasabi from a tube, more or less to taste
2 T honey
12-16 oz halibut
1 c thinly shaved radish
½ c cilantro leaves
½ c scallions, sliced thinly on the diagonal
3 T olive oil
½ lime juiced
1 cedar plank submerged in cold water for 2 hours and up to overnight
Kosher salt and freshly ground black pepper
Directions
Preheat oven to 450°F Line a baking sheet with foil and place the plank on it.
In a medium sized bowl add the soy, mustard, wasabi and honey. Mix until smooth. Divide the glaze evenly into two bowls.
Season the halibut on both sides with salt and freshly ground pepper. Place on the plank. Brush the contents of the first bowl evenly over the fish. Measure the fish at it’s thickest point to calculate the amount of time it needs to cook. The Canadian fisheries method of cooking fish is ten minutes per inch, measuring at the thickest part of the fillet, start checking at eight minutes, halibut is a fish that “puffs up” when cooked so a little additional time may be needed. Don’t overcook, fish still continues to cook after you take it off the heat. Remove fish from oven and brush with additional glaze.
While the fish is cooking add radishes, scallions and cilantro to a medium bowl. Season with salt and pepper. Add olive oil and lime juice, toss to combine.
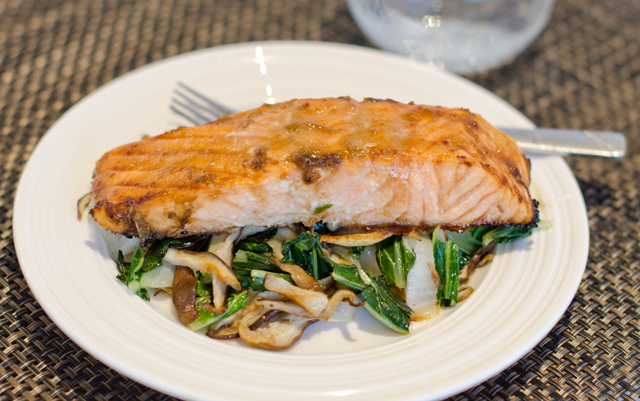
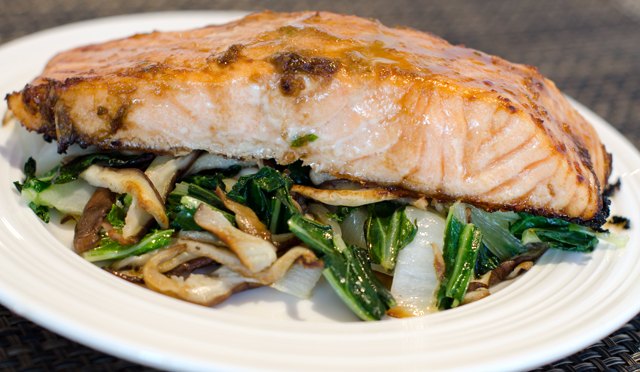
I am always on the look out for new and interesting recipes. I have a large collection of notebooks containing them, with recipes I have tried or hope to try in the future. Some recipes I try once, others, a couple of times and there are the ones that become regulars in the dinner rotation. Salmon bulgogi is a recipe I found many years ago in Bon Appetit, and one I make quite often. A very flavorful combination of spicy, salty and sweet, it delivers maximum flavor and requires minimal effort.
Bul means fire and gogi means meat in Korean and refers to cooking marinated meat over an open flame, typically thinly sliced beef. In this recipe, heart healthy salmon replaces the beef.
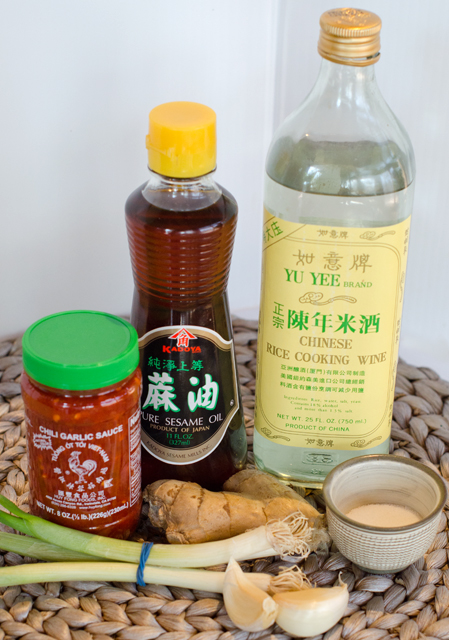
Since we have an extensive Asian pantry I usually have most of the marinade components on hand. The eight ingredients, garlic, green onions, soy sauce, rice vinegar, fresh ginger, sugar, sesame oil and chili garlic sauce are blended in a mini processor and spooned over the salmon. The original marinade was too salty for my taste so I cut the amount of soy sauce in half. Look for dark sesame oil when making this recipe. Pressed from deeply toasted seeds, it has a very concentrated flavor and a little goes a long way. A common ingredient in the bulgogi marinade, Asian pear, is used to tenderize the beef but not necessary for the salmon.
Don’t confuse chili garlic sauce with sriracha. Chili garlic sauce is chunky, not smooth and has a more pronounced garlicky flavor. Sambal oelek, a common table condiment in Asian restaurants, looks the same as chili garlic sauce. Sambal oelek is made from chilis preserved with vinegar and salt and does not contain garlic. Now that it is more widely available, it might be interesting to substitute gochujang, the Korean hot sauce made from chile peppers, glutinous rice, fermented soybeans and salt.
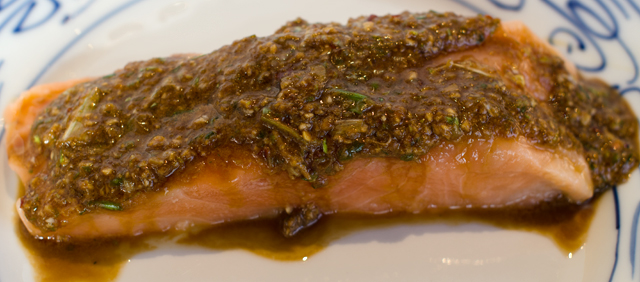
Marinade the fish for five minutes, I have left it on for up to a half hour. The original recipe calls for skinless fillets, we prefer to leave the skin on. Leaving the skin on makes for an easy transfer from pan to plate, plus Joe likes the crispy salmon skin. Scrape off as much of the marinade as you can and transfer the fish to a baking dish. In a small saucepan, bring the marinade to a boil and set aside. It’s not so much a glaze, it’s a bit chunky which is fine, unless you prefer to strain it and discard the solids. While the fish is roasting, stir fry the bok choy and mushrooms. The original recipe just adds a little pressed garlic to the mix, this time Joe added a little of my homemade sriracha sauce and a dash of yuzu juice to brighten the flavors. In season we will use baby bok choy or another Asian green from the garden. Divide the vegetables between the plates and top with salmon. Spoon the marinade over the fish and serve.
Salmon Bulgogi with Bok Choy and Mushrooms
Serves four
Ingredients
Two large garlic cloves, peeled and divided
1/3 c chopped green onions
2-3 T low sodium soy sauce
1 T Chinese rice wine or dry Sherry
1 ¾-inch cube peeled ginger
2 t sugar
1 t Asian sesame oil
1 t chili garlic sauce
4 6 oz center cut salmon fillets
1 T peanut oil
1 large bok choy, cut crosswise into ½ inch wide strips (about 7 cups)
4 oz fresh shiitake mushrooms, stemmed and caps sliced
The marinade ingredients, minus the soy sauce.A mini processor makes it easy to combine the marinade ingredients.Five minutes is all it takes to marinade the fish.
Directions
In a mini processor, blend one clove of garlic with the next 7 ingredients. Arrange salmon in a baking dish and spoon marinade over the fish. Let marinade for 5 minute and up to one half hour.
Preheat oven to 450°F. Arrange the fish with some of the marinade still clinging in a shallow baking dish. Transfer the marinade from the first dish to a small saucepan. Roast fish according to the Canadian fisheries method, which equates about one inch of the thickest part of the fish to 10 minutes of cooking time.
Bring marinade to a boil; set aside and reserve for glaze.
Heat oil in a large non-stick skillet over high heat. Add bok choy and mushrooms, using a garlic press, press in one garlic clove. Stir fry until mushrooms are tender and the bok choy is wilted, about 4-5 minutes, season with salt and pepper.
Divide vegetables among the plates. Top with salmon and brush with glaze.
Fish is on the menu three to four nights a week at our house and I am always looking for new and healthy ways to prepare it. This Asian influenced light main course from Fine Cooking is both easy to prepare and delicious enough for company.
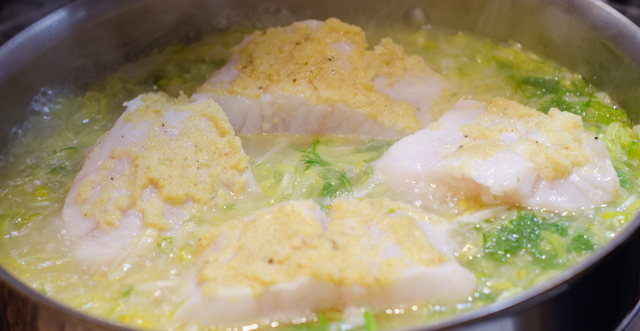
Originally the recipe called for halibut, but since it can be quite expensive (over thirty dollars a pound) any mild tasting firm fleshed fish will work. Our choice was grouper but sea bass or cod would also be a good substitute. The recipe begins with a simple but flavorful rub of ginger, garlic, and lemon. A microplane makes it easy to grate all three. Lightly pat this mixture on one side of the fish. The fish is added to a simmering broth that is enhanced with sauteed leeks and lemon juice. Add any additional stock needed to almost cover the fillets. Poaching ensures a moist flavorful fish. Transfer the cooked fish to shallow bowls and keep warm. The spinach, mint and scallions are quickly wilted in the broth. I confess I didn’t use the mint, Joe is not a big fan and I would only use some of the milder mint that we grow.
While the fish is cooking, you will have time to cook the soba noodles. Soba is both the Japanese word for buckwheat and the noodle made with buckwheat flour. They have a delicate texture and a nutty flavor. Soba can also be flavored with everything from green tea to wild yam. Years ago when I was first experimenting with Japanese recipes it took a special trip to the Asian market to find soba, now they are available in most grocery stores. Soba noodles are usually eaten cold, but in this recipe they are great warm for sopping up the broth.
.
Lemon-Ginger Poached Halibut with Leeks and Spinach
Serves four
Ingredients
2 t finely grated fresh ginger
1 t finely grated garlic
Finely grated zest and the juice of one lemon
2 T plus 1 t extra-virgin olive oil
Kosher salt and freshly ground black pepper
Four 1-inch thick skinless fillets of a firm fleshed white fish (halibut, grouper, sea bass etc.)
2 medium leeks, white and light green parts only, halved lengthwise, rinsed well and thinly sliced
3 c lower salt chicken broth or vegetable broth; more as needed
Water- to cook the soba noodles
Soba noodles, a handful or a wrapped portion per per person
4 c lightly packed spinach leaves, rinsed
¼ c roughly chopped fresh mint
¼ c thinly sliced scallions
Directions
In a small bowl, mix the ginger, garlic, lemon zest, 1 tsp of the olive oil, 1 tsp salt and ½ tsp pepper. Pat the mixture evenly over one side of the fish. Put a large pot of water on to cook the noodles, do not add salt to the water. Bring water to a boil.
In a 10-inch straight sided saute pan, heat the remaining 2 Tbs. oil over medium heat. Add the leeks and saute, stirring constantly, until softened, about 5 minutes.
Add the broth and 1 Tbs. of the lemon juice. Cover and bring to a simmer over high heat.
Arrange the fish lemon-ginger side up in a single layer on top of the leeks. If necessary add more broth until the fillets are almost but not completely submerged. Cover and turn the heat to low. Gently simmer until the fish is cooked through, 8 to 10 minutes.
While the fish is cooking, add the soba noodles to the boiling water and give them a quick stir so they all go underwater. Cook the noodles uncovered for 6-8 minutes, they should be slightly al dente. Drain the noodles into a colander and rinse with cold water to remove excess starch.
With a slotted spatula, transfer the fish to shallow bowls and keep warm.
Add the spinach, mint and scallions to the broth and stir until slightly wilted, about 1 minute.
Season to taste with more lemon juice, salt and pepper. Ladle the vegetables and broth around the fish, add the noodles to the bowl and serve.
A rub of ginger, garlic, lemon and olive oil is patted on one side of the fish.Poaching the fish in a chicken broth that is enhanced with leeks and lemon juice.
This is a twist on a recipe in the latest issue of Fine Cooking. In the Fine Cooking version, the scallops were tossed in a mixtue of citrus and Asian ingredients for a quick marinade. I wanted to make mine a salad so I patted the scallops dry, seared them and the marinade ingredients became the basis for an easy vinaigrette.
I love scallops for a quick meal and the jumbo sea scallops at Heller’s Seafood this week were pristine and just perfect. Wherever you shop, look for dry scallops. Wet scallops are soaked in a preservative phosphate solution. The solution preserves and whitens the scallops and causes them to absorb more water. So when you cook wet scallops they don’t brown as well or not at all because of the extra liquid. They can also have a soapy taste. Dry scallops are shucked and shipped packed on ice with no preservatives. Therefore they have a shorter shelf life and are fresher when you buy them. Dry scallops come with a higher price tag, but they are fresher and you are not paying for water weight.
It’s fairly easy to tell the difference, wet scallops are bright white because of the phosphate solution and dry scallops are ivory or pinkish. Don’t hesitate to sniff them, the scallops should smell like the ocean. When in doubt, ask, and if they don’t know, run! You shouldn’t be shopping there anyway.
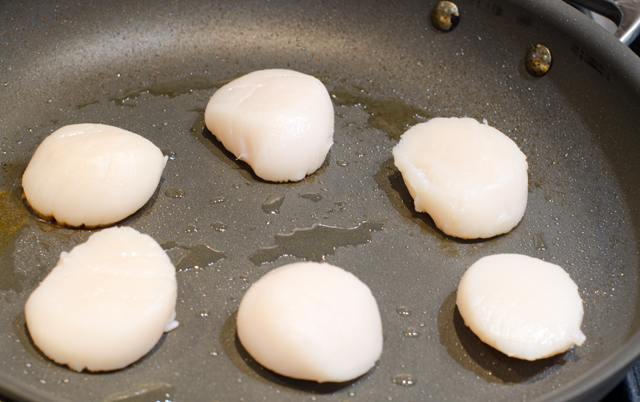
Prepare scallops by first removing the tough abductor muscle, it peels off easily. Then I pat them dry on both sides with paper towels. I coat a non-stick skillet with a neutral oil (vegetable or canola). Be sure that your skillet will hold the scallops without crowding them, you want to sear, not steam them. I turn the heat up to high and wait for the first sizzle. I add the scallops to the pan in a clockwise fashion with any extras in the middle. That way I know what scallop has cooked the longest. Now is the hard part, cook the scallops without moving them until a little peek (lift up the spatula a bit) shows a deep golden crust. Be sure not to overcook, you want the middle to stay tender and sweet. Two to three minutes per side will do.
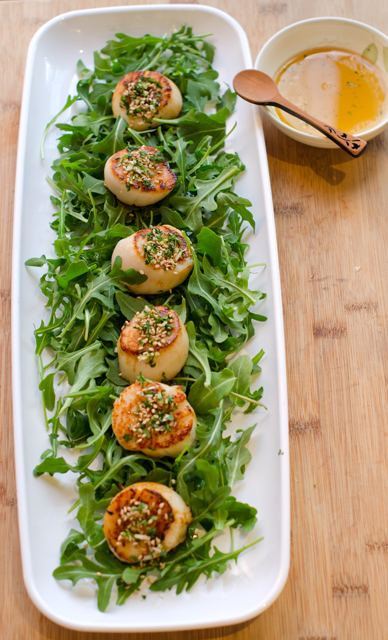
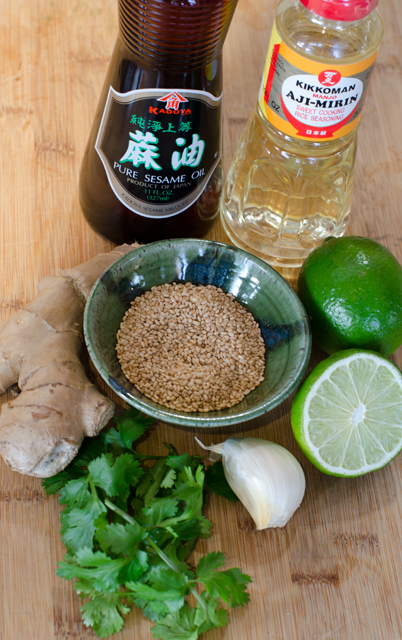
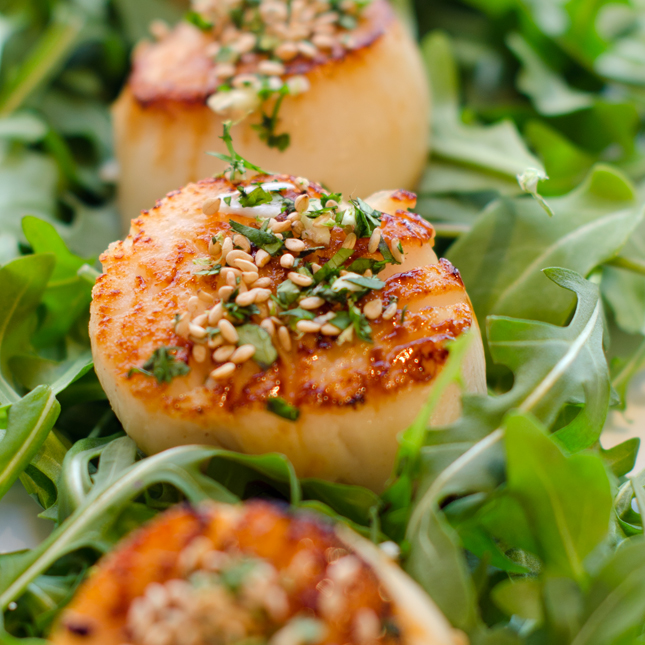
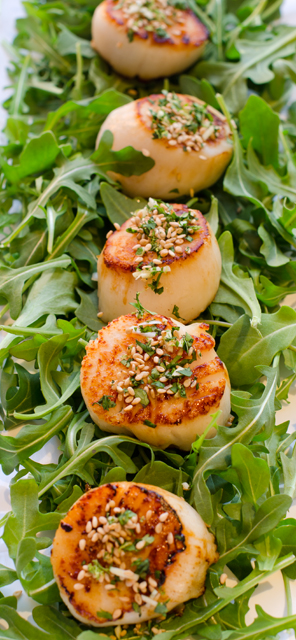
Gremolata is made from parsley, garlic and lemon zest and is the traditional topping for braised veal shank or osso buco. This version takes on a definite Asian flair using cilantro, garlic, sesame seeds and lime zest. These flavors harmonize perfectly with the sweet scallops. The marinade for the scallops included mirin, lime juice, ginger and sesame oil. In case you didn’t know, mirin is a type of rice wine, like sake but mirin is sweet and has a higher alcohol content. When you are looking for sesame oil it should be the dark variety. Both mirin and dark sesame oil are readily available in the Asian section of the supermarket. I used these flavors with a little additional honey to dress my salad greens with. I chose baby arugula, but a spring mix or baby spinach would work well too.
This dish comes together quickly, both the gremolata and the vinaigrette are easy to make. It is just important to take the time to cook the scallops correctly. This recipe can be doubled and is perfect for a first course or part of a small plates dinner.
Don’t crowd the pan, give the scallops room to brown, too close and they will steam.
Scallop Salad with Gremolata and Asian Vinaigrette
Serves 2
Ingredients for the scallops
½ to ¾lb dry packed sea scallops (about 6)
A neutral cooking oil, canola for example
Salt and freshly ground pepper
Directions for cooking the scallops
Remove the tough abductor muscle from the side of each scallop (some scallops are sold with the muscle already removed). If you feel any grit on the scallops, rinse them under cold water. Pat the scallops dry with paper towels; surface moisture impedes browning.
Heat a 10- or 12-inch nonstick skillet over medium-high heat for 1 to 2 minutes. Add the oil and heat until quite hot. Pat the scallops dry once more and put them in the pan in a single, uncrowded layer. Season with salt and pepper and let sear undisturbed until one side is browned and crisp, 2 to 3 minutes. Using tongs, turn the scallops and sear until the second side is well browned and the scallops are almost firm to the touch, 2 to 4 minutes.
Take the pan off the heat, transfer the scallops to a plate, and set them in a warm spot while you finish the other components of the recipe.
Ingredients for the sesame cilantro gremolata
¼c finely chopped cilantro
1T toasted sesame seeds
2t finely chopped garlic
1t lime zest
Directions for the sesame cilantro gremolata
In a small bowl, combine the cilantro, sesame seeds, garlic and lime zest. Set aside.
Ingredients for the dressing
3T mirin
1t grated ginger
2t fresh lime juice
1t honey (or more to taste)
3T sesame oil
Directions for the dressing
In a small bowl whisk all the ingredients together. Set aside
Final Assembly of the salad
Ingredients
4-5 cups of baby arugula, spring mix or baby spinach
Directions
Place the greens in one medium or individual salad plates.
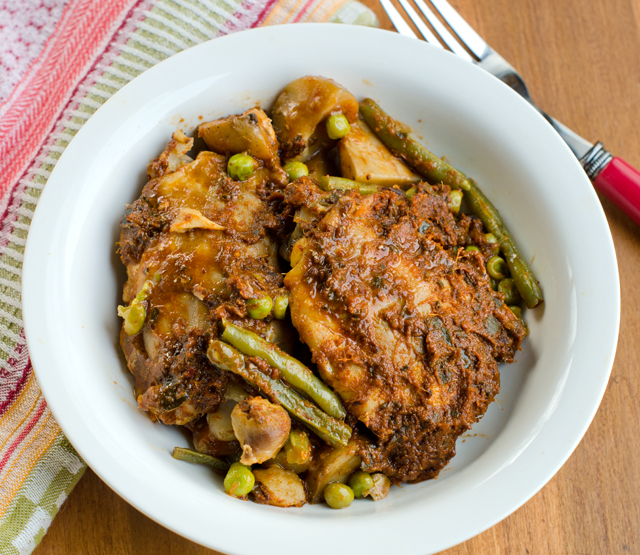
Smoky Indonesian style chicken curry gets it’s intense heat from pasilla chilies, smoked paprika and sambal oelek balanced with the fragrant warm spices of ginger, coriander and cumin. This is another recipe from Bruce Weinstein and Mark Scarbrough’s article, Slow Cooker Secretsin Fine Cooking magazine
The dark meat of chicken thighs is a natural for the long simmer in the slow cooker. In this recipe, no browning is required, the skin is removed before cooking and the thighs are coated with a rich complex chile paste.
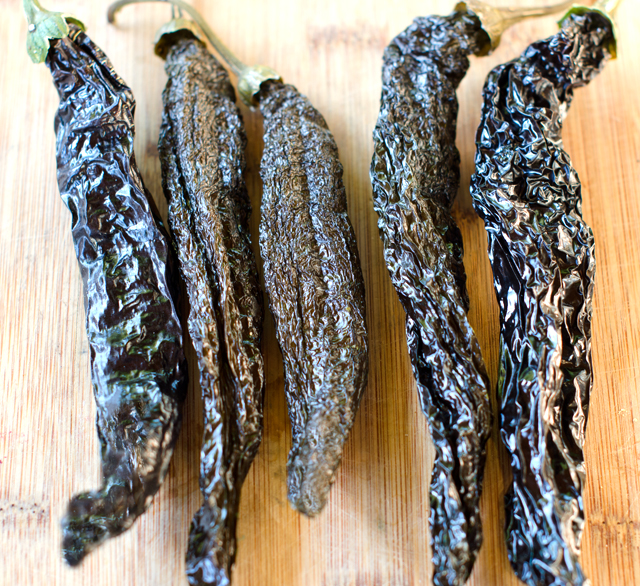
Pasillas are the chile of choice for this recipe. A variety we have grown for many years, pasilla roughly translates “little raisin” from the Spanish, referring to the way the dark green fruit turns a reddish brown and slightly wrinkled when mature. I especially like it for it’s mild heat and versatility for use in Mexican and Asian cuisine.Pasilla chiles can be used in chili sauces and pastes as well as moles. They are wonderful fresh on the grill in summer along with a steak. Pasillas are rich, earthy and mildly spicy with just a hint of sweetness.
We had a bumper crop of peppers this year and to preserve the harvest, I dry some of them. Start with whole, unblemished peppers that have been washed and dried. Place the peppers on a wire mesh rack over a large baking sheet with room between each pepper for air to circulate. I used the lowest convection setting (140°F) in my oven. Drying time varies and I check them every now and then to see how they are progressing. Smaller peppers will dry quicker, the larger ones could take a day or more. It is important that the peppers are completely dry before storing. Partially dry peppers will turn moldy and ruin the whole container, I know from prior experience.
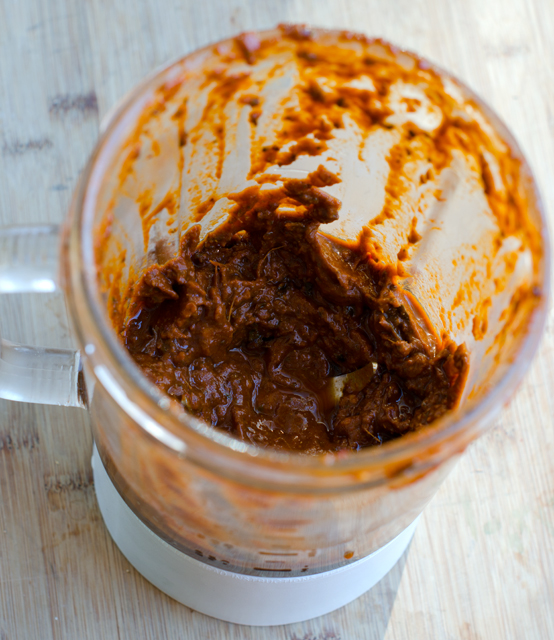
To use dried chilies, reconstitute by placing them in a bowl and covering them with boiling water. Check at about twenty minutes to see if they are soft. To make the chili paste, the reconstituted pasillas are combined with shallot, lemongrass, tomato paste, spices, brown sugar and sambal oelek. I am fortunate to have a large supply of lemongrass at my disposal. Our lemongrass plant grows large and bushy in the garden every summer. Joe harvests a large portion of the stalks that I freeze for recipes like this. The significantly cut back plant is brought indoors for the winter where it’s only predator is Cody, our Golden Retriever who enjoys nibbling on the leaves. Lemongrass has a mild citrus flavor with a floral aroma. Sambal oelek is a ground paste made only of chili peppers and salt. It is less acidic than sriracha and is chunkier and thicker in texture. It is readily available in the Asian section of most supermarkets.
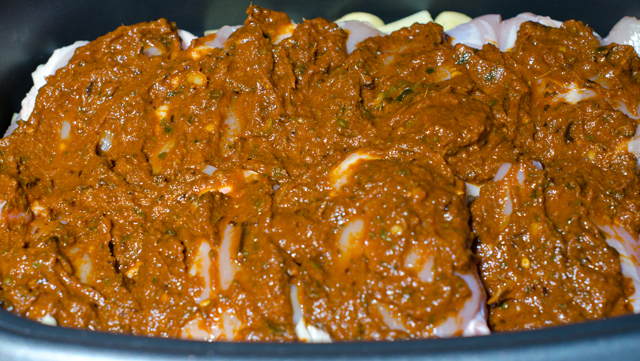
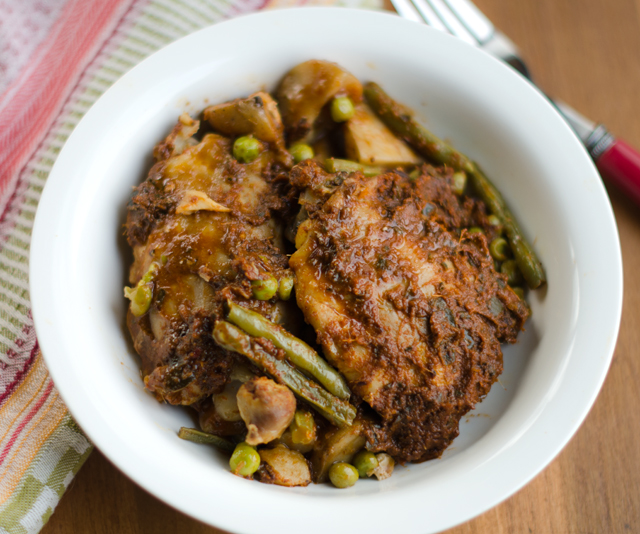
The chili ingredients are combined in the blender and chicken broth is added to make a thick sauce. I needed more broth than the original recipe called for, use as much broth as you need to make the sauce smooth, not chunky. Layer the potato pieces at the bottom of the slow cooker. Season the chicken pieces generously with salt and pepper. I found it easier to spread the chili paste on the chicken after it was in the slow cooker. Put the lid on and cook until the chicken and potatoes are tender, 2 to 3 hours on high, 6 hours on low. Turn the slow cooker on high (if you were cooking on low) and sprinkle the green beans evenly over the chicken and cook until crisp tender, 30 minutes. Add peas and cook until heated through, 10 minutes. They suggest serving it with rice, but one starch (potatoes) is sufficient for me.
Dried pasilla bajio chilies from the garden.
Smoky Indonesian Style Chicken Curry
Serves four
Ingredients
5 dried pasilla or New Mexico chiles, stemmed and seeded
1-1/4 lb. waxy potatoes, such as Yukon Gold, cut into 1-inch pieces (about 3-1/2 cups)
1/2 lb. green beans, trimmed and cut into 1-inch pieces
2/3 cup thawed frozen peas
Ingredients for the chili paste.The ingredients are blended together.Chicken thighs are coated with the chili paste before cooking.
Directions
Put the chiles in a medium bowl and cover with boiling water; set aside to soften for 20 minutes. Drain, then transfer the chiles to a blender.
Add the shallot, lemongrass, tomato paste, smoked paprika, ginger, brown sugar, sambal oelek, cumin, coriander, and 2 tsp. salt. Blend the mixture until smooth, drizzling the broth through the hole in the lid and stopping occasionally to scrape down the inside of the jar.
Generously season the chicken with salt and pepper and spread evenly with the chile mixture. Layer the potatoes in the bottom of a 5- to 6-quart slow cooker and arrange the chicken in an even layer on top. Cover and cook until the potatoes are fork-tender and the chicken is tender but not falling off the bone, 2 to 3 hours on high and 6 hours on low. (The curry can stay on the keep-warm setting for up to 3 hours.)
About 45 minutes before serving, turn the slow cooker to high (if it was on low or keep-warm), sprinkle the green beans evenly over the top, cover, and cook until crisp-tender, about 30 minutes. Add the peas and cook until heated through, about 10 minutes. Stir to combine, season to taste with salt and pepper, and serve.
During this busy holiday season it’s good to have a few recipes you can pull out that are quick, easy and most important, delicious too. Miso glazed salmon is one recipe that certainly fills that bill.
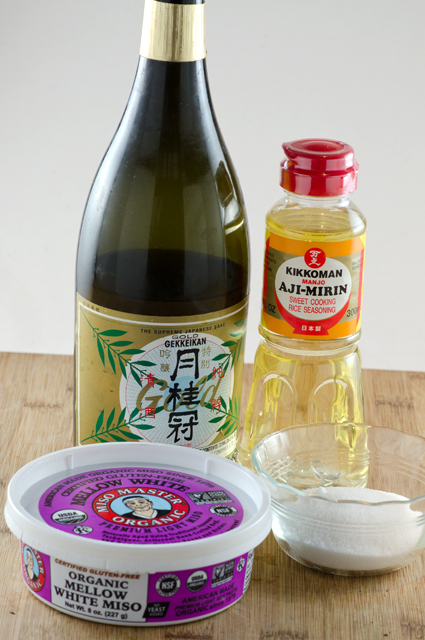
This is a Japanese technique that was used to preserve freshly caught fish for it’s journey to land. Chef Nobu Matsuhisa made the preparation famous with his black cod recipe and it has become a popular restaurant dish. Just four ingredients, miso, mirin, sake and sugar make up the marinade. If you are not already familiar with any of these, here is a little background information on these important staples of Japanese cooking.
Miso is fermented soybean paste. It is made by steaming and crushing soybeans, then adding salt and koji, a culture cultivated from rice, barley or soybeans that triggers fermentation. The flavor of miso has been described as salty, earthy and rich in umami. Miso ranges in color from white to pale yellow to a deep chocolate brown. The lighter the color, the sweeter (less salty) it will be. A light miso paste is most likely made from rice and is best suited for fish and light sauces.
Sake, pronounced SAH-keh, not sa-kee, is quite often described as Japanese rice wine. It is actually more akin to beer than wine since it is made from a grain, rice, and not a fruit as wine usually is. Unlike wine, sake is produced by a brewing process similar to that of beer. The alcohol content of sake usually is from 15-20 percent, compared to wine’s 9-15 percent content.
Mirin, is a type of rice wine but with a higher sugar content and lower alcohol. It is golden in color and it’s syrupy sweetness contrasts nicely with the saltiness of soy or tamari sauce.
Miso is easy to find in organic markets and large supermarkets. I definitely would recommend the white or shiro miso for this recipe. My favorite brand is Miso Master Organic Mellow White. You can use it for soups, sauces and dressings too. It will keep in the refrigerator for nine months. Mirin is an increasingly easier find, the Kikkoman brand seems to be prevalent in the Asian section of most supermarkets. If you don’t like the idea of purchasing a bottle of sake just for a few tablespoons used in the recipe, dry sherry or vermouth can fill in. Honey or another sweetener could possibly substitute for granulated sugar but I have not tried it this way. You could also cut the recipe in half if making for two.
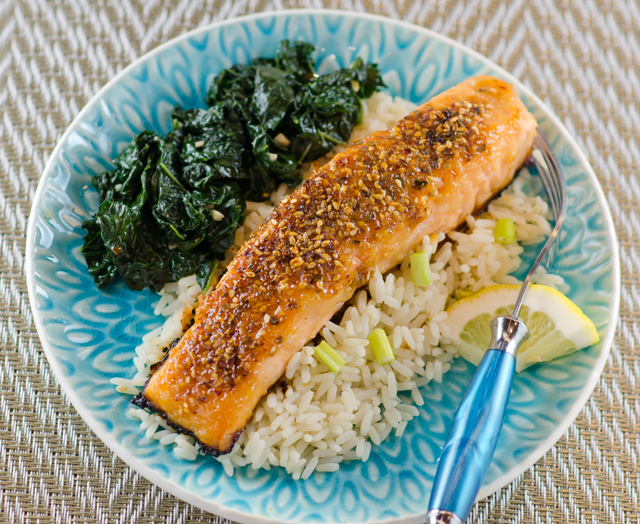
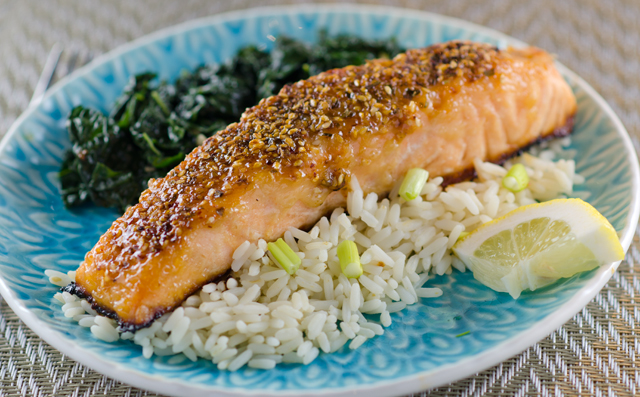
Whisk the four ingredients together in a medium bowl. I use a fork to smooth in the miso before I attempt to whisk it. Use a bowl or container that will hold the fish snugly. I pour enough of the marinade to coat the bottom of the container and place the fish in skin side down. Then I pour the rest of the marinade on top. Cover the container with plastic wrap and refrigerate until a half hour before you are ready to cook the fish. Preheat the oven to 450° F and measure the fillets using the Canadian Fisheries method to determine cooking time. Remove the fillets from the marinade, wiping off the excess and place leaving about an inch between each piece on a well oiled baking sheet or pan. I like to sprinkle the top with a sesame seed mixture, but it is fine without it too. Cook fish for the determined amount of time, between 10-12 minutes.The finished internal temperature of the fillet should be 125°F. Since you are cooking in a very hot oven, I turn the oven to broil at the end to brown the top of the fish a little bit. Transfer fish to warmed plates or a serving dish and serve with lemon wedges.
Four ingredients make up the marinade.
Miso Marinated Salmon
Serves 4
Ingredients
½c white miso paste
¼c granulated sugar
3T sake
3T mirin
4 6-8 ounce salmon fillets (skin-on)
Sesame seeds or sesame spice mixture
Lemon wedges
Directions
Whisk miso, sugar, sake and mirin together in a medium bowl until sugar and miso are dissolved, the mixture will be thick.
Pour some of the mixture into a container that will fit the fillets snugly. Place the fish on top and pour the rest of the mixture over the fish. Cover the container with plastic wrap and refrigerate for 6 to 24 hours.
A half hour before cooking bring the fish out to bring it to room temperature. Adjust oven rack to the middle position and preheat to 450°F.
Wiping excess marinade off the fillets, place on an oiled baking sheet or pan, leaving about an inch between each fillet. Sprinkle the tops of the fillets with the sesame seeds or sesame spice mixture.
Timing is always a function of the thickness of your fish. Measure fish at the thickest part of the fillet with a ruler, one inch of thickness equals about 10 minutes of cooking time.
Transfer cooked fish to a serving platter and serve with lemon wedges.
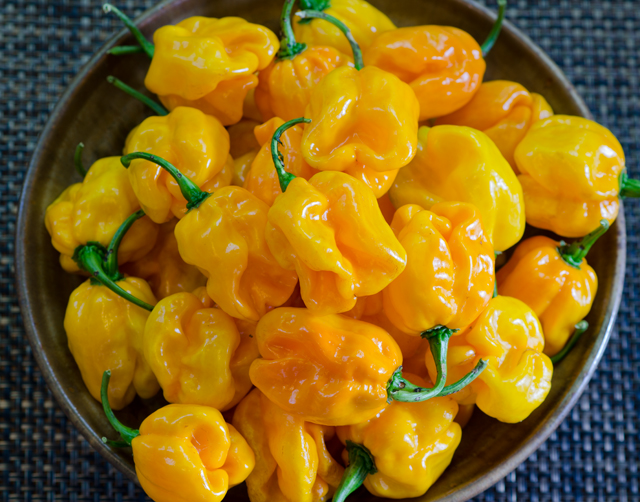
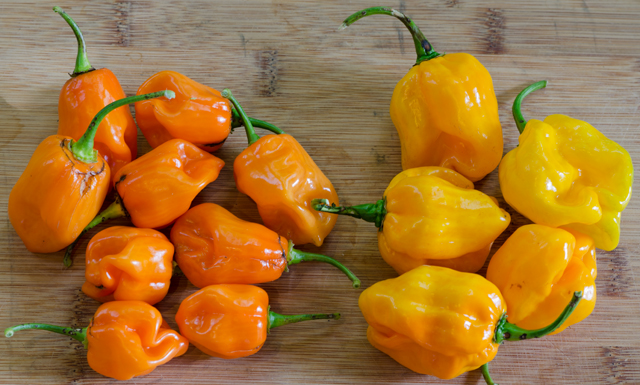
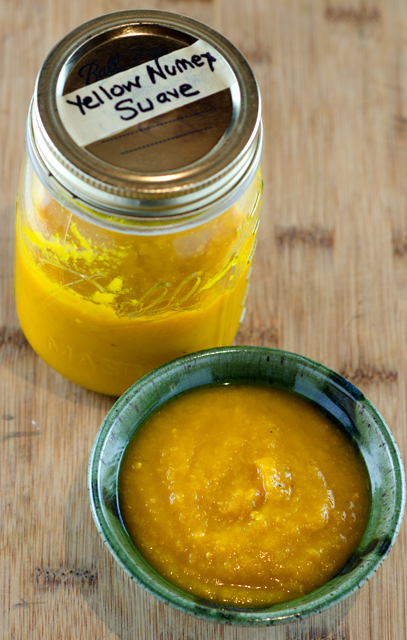
Last weeks plunge into the deep freeze meant it was time for one final harvest of hot peppers. With a formula that worked and an abundant source of peppers the challenge was to make a few hot sauces using the same method as the sriracha sauce from a few weeks ago. I first tried the NuMex Suave Orange peppers and several days later using green and red pasilla peppers and green poblano peppers. The jars fermented on the back kitchen countertop for about a week. I wasn’t sure what the results would be so my expectations weren’t very high.
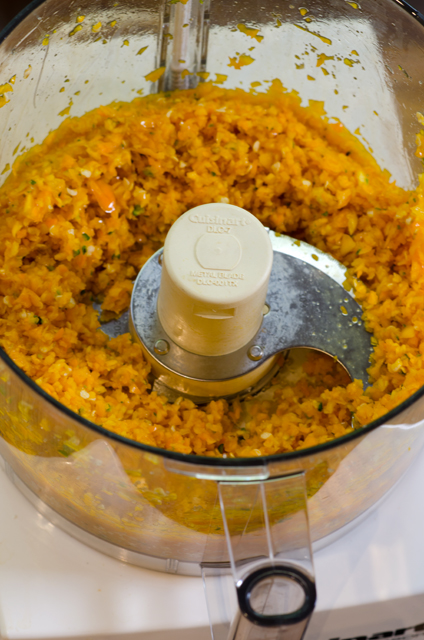
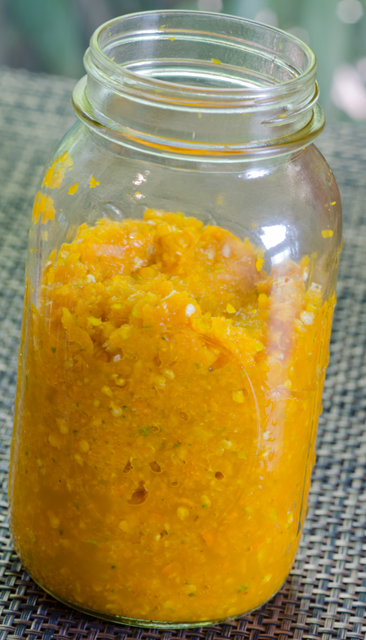
To finish, I followed the same procedure for each variety, transferring the chopped chilis to the food processor, adding enough (1/3 to 1/2cup) white vinegar to puree until smooth. I carefully washed out the processor between peppers to keep each type as pure as possible. I strained the mixture through the medium disc of the food mill to eliminate any seeds. I think it’s easier than the mesh strainer and gives the finished product a little texture.
Now for some taste testing. The Numex Suave Orange has the flavor nuances of the habanero that are usually missed because the heat dominates. The sauce has a citrusy flavor with hints of orange and lemon and finishes with a little heat. The green pasilla flavor reminds me of green bell pepper and has a touch of moderate heat. The green poblano has an initial hint of sweetness and finishes with more heat than the green pasilla. I especially like the red pasilla sauce. The color is a deep dark red and the flavor is rich and full but not too hot. I think it would be the perfect addition to a chili recipe.
Numex Suave Orange PeppersThe habanero peppers on the left measure a tongue burning 100,000 to 300,000 on the Scoville scale while the Numex Suave Orange on the right are a very mild 800!Adding peppers and garlic to the food processor.Chop the peppers as finely as possible.The peppers ferment for about a week.The finished product
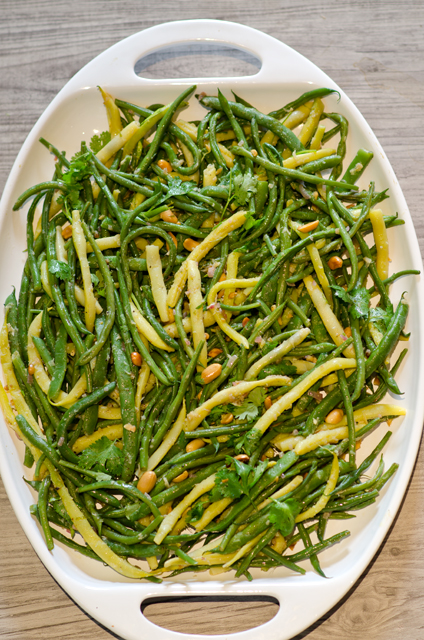
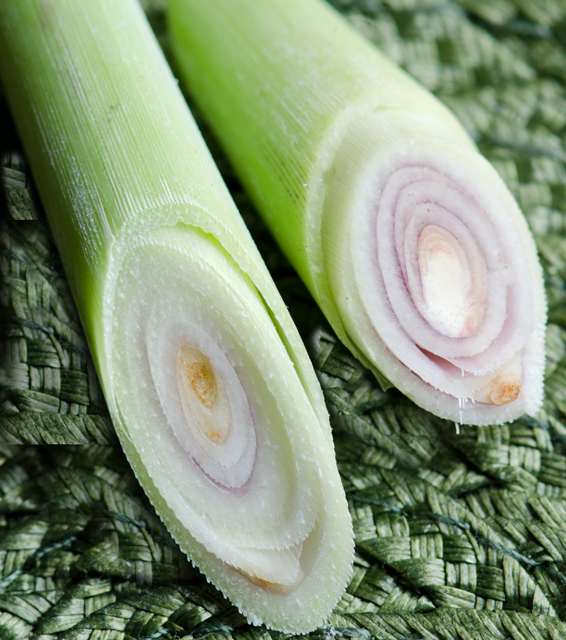
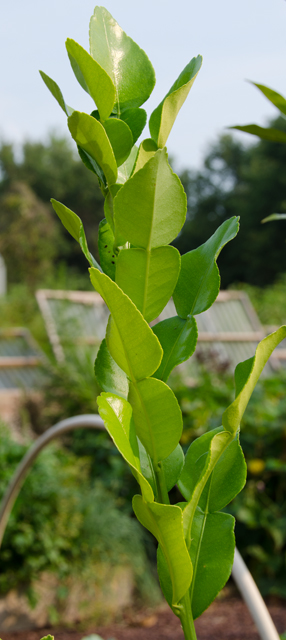
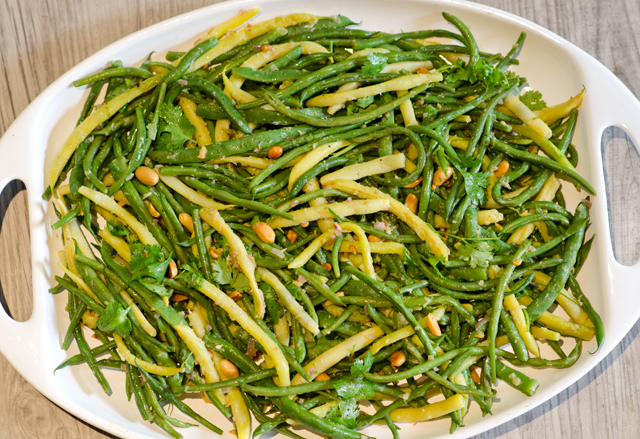
This is another bean salad from Jerusalem born, London based chef and cookbook author Yotam Ottolenghi, this time with a decidedly Asian twist. An assortment of fresh green and yellow beans are tossed in a dressing that includes two ingredients that would have seemed exotic and difficult to access ten years ago, lemongrass and kaffir lime leaves. Our love for Thai cooking was the reason we started growing them many years ago but with increased demand they have gone mainstream and now are readily available to the home cook.
Lemongrass is a tall tropical grass native to South and Southeastern Asia. Our lemongrass plant grows happily outdoors from June to late September forming a tall bushy plant, about 3 feet tall and 5 feet wide. Since it is only hardy in zones 9-10, which translates to south Florida, Joe digs the plant out, cuts it back severely and it winters indoors. There it’s only predator is our Golden Retriever Cody, who likes to nibble on the leaves when he thinks no one is looking. Lemongrasss has long sharp pale green leaves at the top and a brownish pink bulbous portion at the stem end. It has a mild citrus flavor with a floral aroma. If you don’t grow your own, the best lemongrass (and the cheapest too) is found in Asian markets. To use, cut off the woody tops with a chef’s knife and peel off the first tough layer of the bulb end. Now it is ready to slice into rounds or as in this recipe, grated with a microplane.
Our Kaffir lime trees are also summer visitors to the garden. The leaf of the kaffir lime tree has a sweet citrusy fragrance and is a key ingredient in Thai cooking. Kaffir lime leaves are not to be confused with the leaves from a standard lime tree. The leaf of the kaffir lime looks like a double spade. It is thick and glossy on top with a matte underside and a tough spine in the middle. When using in recipes they can either be used whole, seasoning a soup or stew or chopped very finely, as in this salad. If you are chopping it up, remove the spine first. Fresh and dried leaves are available, only use fresh leaves in this salad.
Bring a large pot of generously salted water to a rolling boil. Cook each type of bean you are using separately, the thin filet beans will only take about 2 minutes, larger beans take longer. I use a large chopstick to make sure all the beans are submerged in the water and I removed the beans as the batches were done with a Chinese strainer or spider as it is also known. This allows you to remove more beans with one scoop. Transfer the cooked beans to a bowl filled with ice water. Cool, drain and pat dry so the beans will absorb more of the dressing.
Next, the shallot is cooked until tender and the aromatics, ginger, lemongrass, garlic and coriander, are added. Transfer the shallot mixture to a large bowl that will be large enough to toss the beans. I wasn’t quite sure why you would need to sauté the already roasted peanuts, but they pick up the residual flavor from the shallot mixture and take on a toasty fragrance. Kaffir lime leaves, lime zest and juice, sugar, salt and oil are whisked into the shallot mixture. The kaffir lime leaves must be fresh and must be sliced as thinly as possible in this salad. If you don’t have access to them, don’t let that stop you from making this recipe, just add a little more regular lime peel and juice. The final step is to add the beans, toasted peanuts and cilantro to the large bowl, toss the beans in the dressing and season everything again with salt and pepper. The final dish is garnished with chopped peanuts and more cilantro.
Lemongrass plant does very well in the garden in summer but will be brought in before the first frost.Cross section of a lemongrass stalk.Kaffir lime tree with double spaded leaves.
2lb. assorted snap beans, green, wax, filet, Romano etc.
½t kosher salt plus additional
5T olive oil, divided
1/3c finely chopped shallot
1 1″ piece ginger, peeled and finely grated
1 lemongrass stalk, tough outer layers removed, finely grated on a Microplane
2 garlic cloves, finely grated
½t ground coriander
Freshly ground black pepper
1/3c roasted salted peanuts
3 kaffir lime leaves, very finely chopped
1t finely grated lime zest
3T fresh lime juice
¼t sugar
1/3c packed cilantro leaves with tender stems, plus more for serving
Directions
Working in batches by type, cook beans in a large pot of boiling salted water until crisp tender, 4-5 minutes per batch. Transfer with a strainer to a large bowl of ice water. Cool, drain and pat dry.
Heat 1T oil in a small skillet over medium heat and cook shallot, stirring occasionally under tender, about 3 minutes. Add ginger, lemongrass, garlic and coriander and cook until very fragrant, about 1 minute. Transfer to a large bowl and season with salt and pepper.
Heat 1T oil in same skillet over medium high. Cook peanuts, tossing often until golden brown and fragrant, about 2 minutes. Transfer to paper towels; let cool, then coarsely chop. Set aside 1T peanut for final presentation.
Whisk kaffir lime leaves, lime zest, lime juice, sugar, ½t salt and remaining 3T oil into shallot mixture. Add beans, remaining peanuts, and 1/3c cilantro and toss to coat; season with salt and pepper. Serve topped with more cilantro and reserved peanuts.
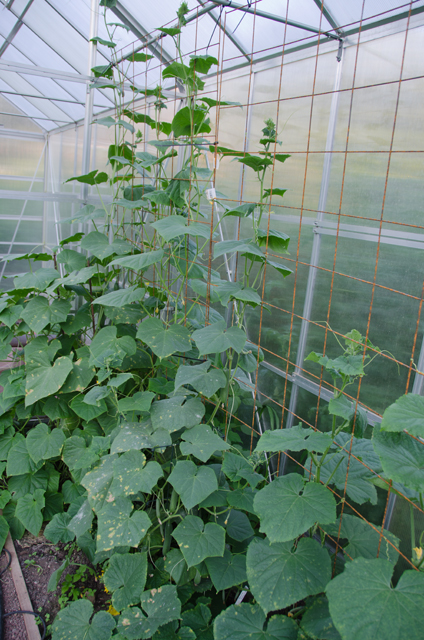
These days Joe is bringing in more cucumbers than I know what to do with them. I’m really not complaining, the season is short and I am using them in as many salads and cold soups as I can find recipes. Native to India, cucumbers require 70°F plus soil and air temperatures to grow but have a relatively short time from sowing to harvest. He has had great success growing them in the greenhouse that is situated in the garden. That environment provides just slightly warmer temperatures.
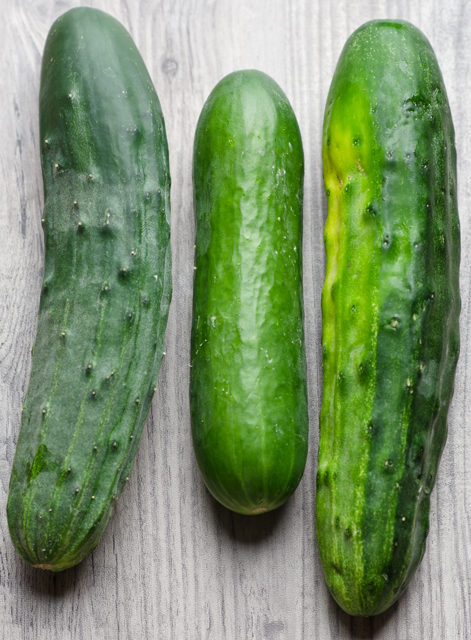
Since cucumbers are 96% water they are happiest when watered on a consistent basis. A well watered cucumber vine will produce the sweetest fruit. We stick with two varieties that produce well, Persian and Bush Champion. Persian cucumbers are small, about 6 inches long and 3/4 inch diameter with smooth edible skin and undeveloped seeds. They are the perfect size for pickling, if that is your inclination. Bush Champions are a bush variety that take one third of the space and are also suitable for containers.
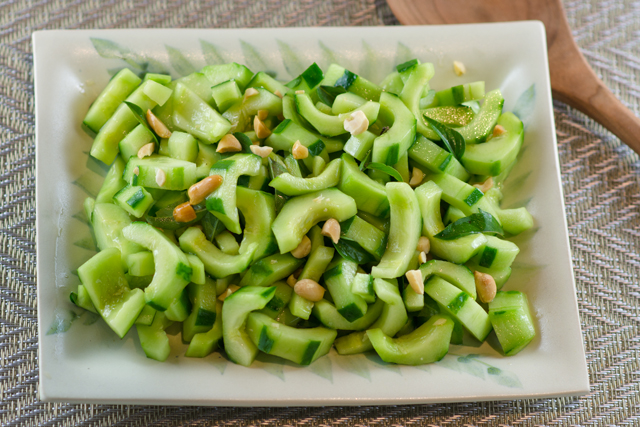
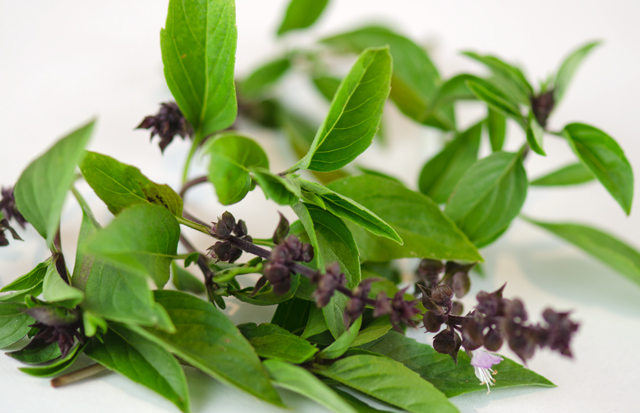
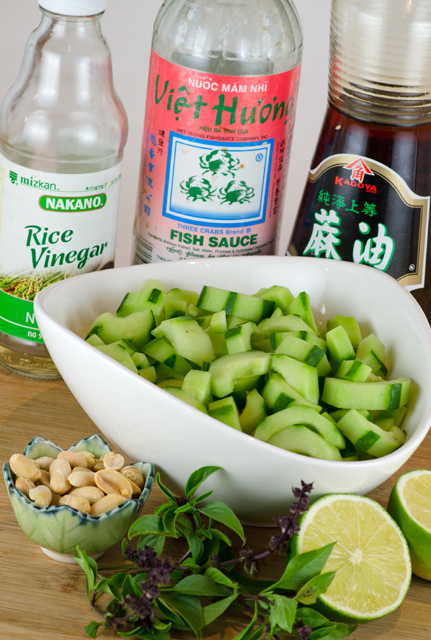
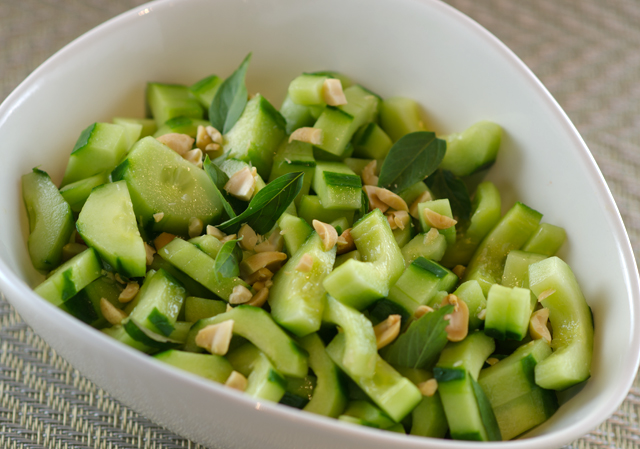
One of my all time favorite cucumber salads to make is a Thai cucumber salad. Light and crunchy, it is quick and easy to make, combining sweet, spicy and tangy flavors. The dressing draws most of it’s ingredients from the Asian pantry. Seasoned rice vinegar is either made from sake or by adding salt and sugar to regular white rice vinegar and is an easy boost to the sweet, salty and tangy elements of a dish. Plain rice wine vinegar is a bit more versatile and could be substituted. Just remember to adjust the seasonings accordingly. Whether you call it nam pla, nuoc nam or patis, fish sauce is made from the liquid drained from fermented anchovies and is a flavor enhancer like salt or soy sauce. A little goes a long way here. I am partial to the Three Crabs brand that is readily available in Asian markets. Sesame oil was one of the first exotic ingredients to grace our kitchen. Be sure to look for toasted sesame oil. It is dark in color and has a very intense aroma and flavor. Use Thai basil in this salad if you can find it. The beautifully named Siam Queen is one of the varieties we grow. The plant is more compact in apppearance than the standard Italian basil with smaller bright green leaves. There are clusters of purple flowers at the top of the plant. It has an intense licorice aroma and flavor.
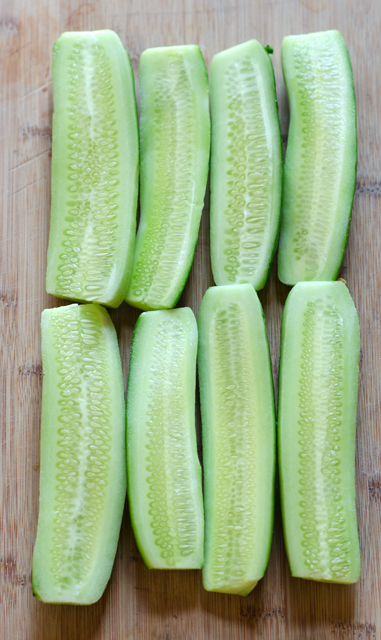
To make the salad, add the rice vinegar, sesame oil, lime juice and fish sauce to a large bowl. Peel about 1½ lbs cucumbers, I leave a little skin on for color contrast. Slice in half lengthwise, scoop out the seeds and slice diagonally into crescents. Peeling the cucumber allows the flavors of the dressing to be absorbed right into the flesh. Add cucumbers, basil and peanuts to the bowl, toss and serve. So simple to make, refreshing Thai cucumber salad is as much a natural next to a grilled satay as it is with your standard picnic fare.
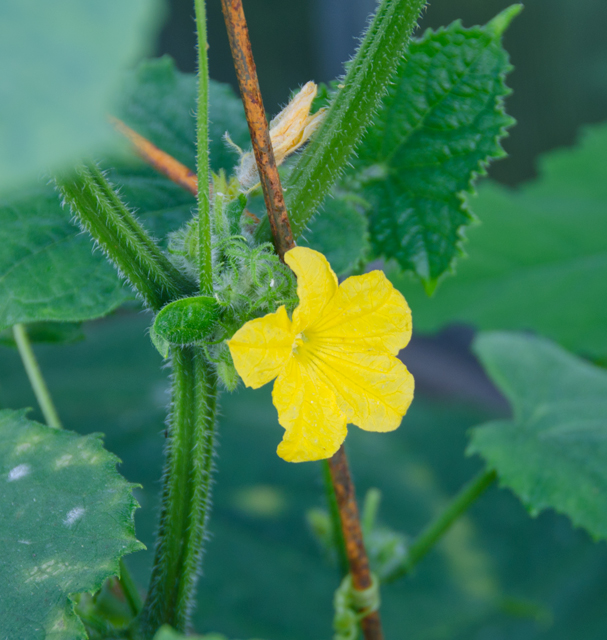
Cucumber vines in the greenhouse.This little flower is the beginning of a cucumber.Persian cucumber in the middle, flanked by the spiny Bush Champions.
Peel cucumbers (I like to leave small strips of skin for contrast), slice in half lengthwise. Scoop out the seeds and slice diagonally into ¼ inch crescents.
Add the cucumbers, torn basil and peanuts to the bowl with the vinaigrette, toss and serve.
 Broccoli and sweetened coconut shreds? Let’s just say I was as much curious as I was dubious about this recipe. My curiosity won out in the end and discovered I liked this easy and flavorful side dish.