July 26, 2015 Cauliflower “Alfredo” Sauce

DSC_3786aCauliflower is the vegetable master of disguise. We love it cut into florets or “steaks”  roasted with olive oil, salt and pepper and chow down on it like popcorn. It makes a satisfying substitute for mashed potatoes, and chopped finely it can replace couscous or other grains in some recipes. So my ears perked up the other day when I heard yet another way to use cauliflower.

If I am at home in the early afternoon I will turn on “The Chew”, a television program that has been described as “The View” for foodies. A recipe that caught my attention recently was a side by side comparison of traditional  Alfredo sauce, prepared by Iron Chef and restauranteur Michael Symon, with a “lightened up” version of the sauce, made by natural foods chef and author, Daphne Oz.

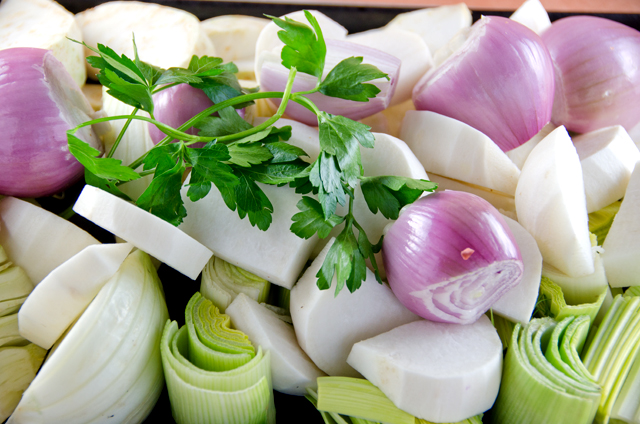
Michael and Daphne’s sauces start out with same five ingredients, shallots, parmesan cheese, extra virgin olive oil, parsley and butter. As Michael pointed out, he learned from fellow chef Mario Batali, traditional Alfredo sauce in Italy is butter, a little bit of the pasta water and Parmesan cheese.  It does not include heavy cream, an American addition to the dish. Michael and Daphne both added shallots to their sauce, also not traditional but adding an additional smoky sweet note to the sauce.

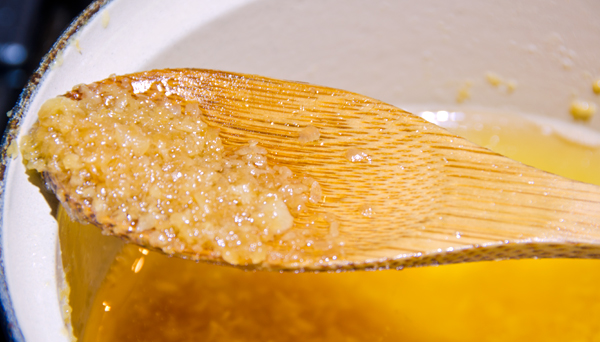
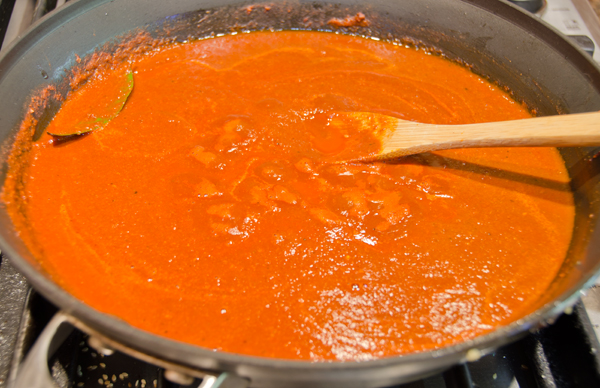
Here is where the recipes diverge. Michael’s traditional version of the sauce used one whole stick of butter and a cup of Parmesan cheese. Although Daphne’s recipe did include a quarter of the amount of the butter and cheese in Michael’s recipe, most of the velvety texture came from, you guessed it, cauliflower. She boiled cauliflower in milk and pureed it to make the base for the sauce. Cauliflower acted as a binder and gave the sauce it’s smoothness.

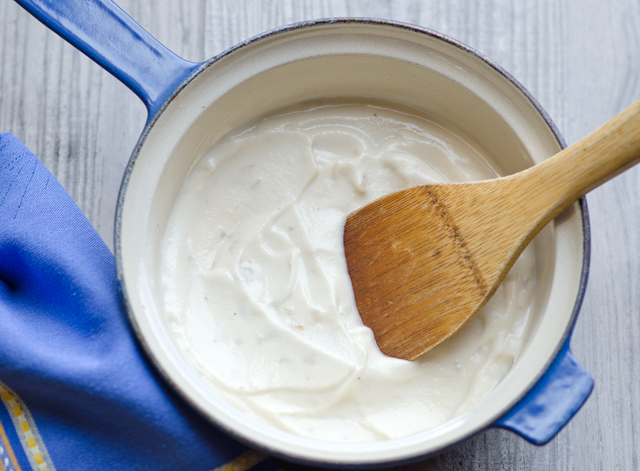
This was a recipe I had to try for myself. The recipe starts with four cups of cauliflower florets and a cup of milk added to a saucepan. Bring to a boil, reduce to a simmer and cook until fork tender, about 10-12 minutes. Strain out the cauliflower pieces and add to a blender, then add milk and butter. To make this a non-dairy preparation use almond milk and a butter substitute like Earth Balance.  Puree the ingredients until smooth and season with salt and pepper.

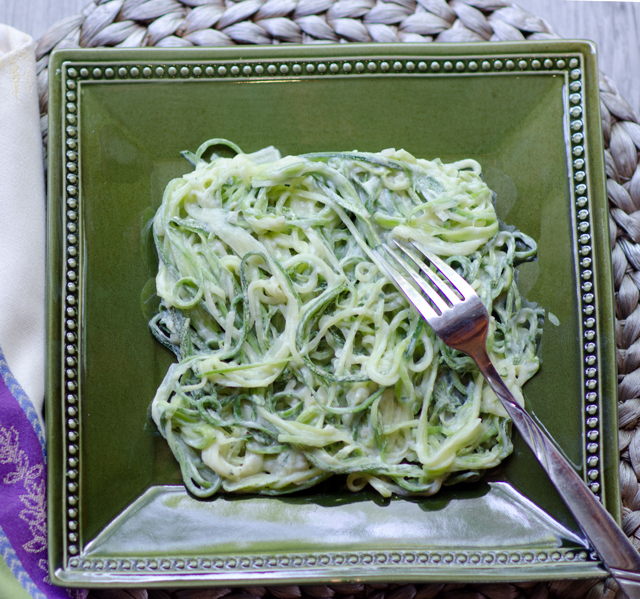
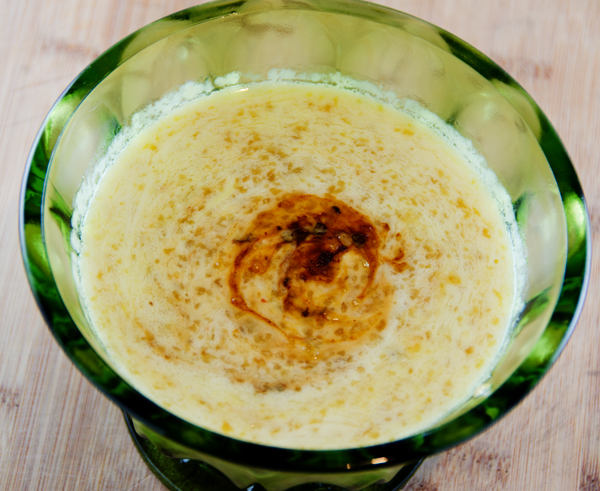
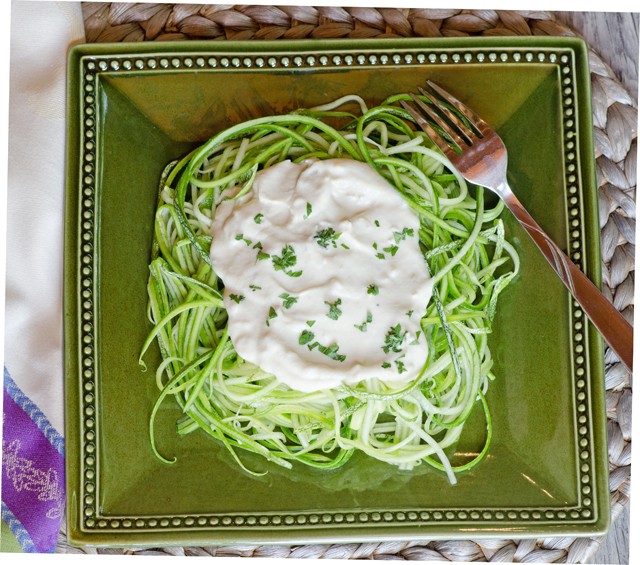
Shallots are sauteed in olive oil until softened and the pan is deglazed with a little white wine. Add the cauliflower puree to the pan and loosen the sauce with a little water or milk. Freshly grated Parmesan, nutmeg and a little chopped parsley are the finishing touches to the sauce. Both Daphne and Michael used fettucine noodles for their finished dish. Since we have eating our share of zucchini “noodles” this summer, I thought this would be another way to use them. I took zucchini noodles, added them to a saute pan to reduce as much liquid as possible and warm them up a bit.  I only cook them for a few minutes  since I still want them to retain a litttle crunch.

The sauce holds well and if you are going to make it, double up, use the whole head of cauliflower and freeze some for later use. I’m also thinking of using this as a substitute for bechamel sauce in my moussaka once the eggplants start rolling in.  As Daphne said, this is a sauce that will let you indulge without the guilt.

DSC_3845a

DSC_3779a

Cauliflower Alfredo Sauce

Serves six

Ingredients

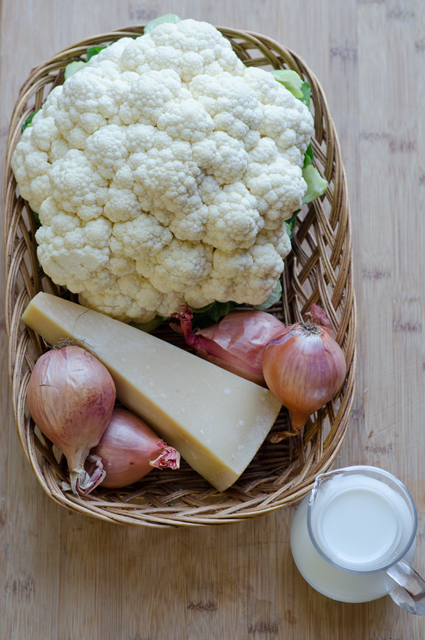
  • 4c cauliflower, cut into chunks
  • 1 c milk
  • Kosher salt and freshly ground pepper
  • 2T butter
  • 1-2T olive oil
  • 1 large shallot, finely minced (about ¼c)
  • ½c white wine
  • ¼c finely grated Parmigiano-Reggiano cheese
  • ¼t freshly grated nutmeg

Directions

  1. Put the cauliflower and the milk in a large saucepan and season with salt and pepper. Note:milk will not cover the cauliflower.
  2. Bring to a boil, reduce heat to a simmer , cover and cook until fork tender, about 10-12 minutes.
  3. Using a slotted utensil, transfer the cauliflower to a blender. Add the milk and butter and puree until smooth. Season with salt and pepper.
  4. Place a large sauté pan over medium heat and add 1-2 tablespoons of olive oil. Add the shallot and cook for 2-3 minutes, or until slightly tender.
  5. Deglaze with the white wine and reduce liquid by half, 1-2 minutes.
  6. Add the cauliflower puree to the pan, if sauce is too thick, add a little water or milk.
  7. Add freshly ground nutmeg and stir in the Parmesan.

DSC_3802a

March 4, 2015 Turkish Tarator Sauce

DSC_1788a

What’s in a name? When it comes to food, it may depend on what country you are in. Tarator is a prime example of this. In the Balkans, it is a cold yogurt based soup made with cucumbers and seasoned with dill and lemon, similar to the ingredients in Greek tzatziki. In many Middle Eastern countries, Tarator is a sauce or a dip based on sesame tahini. The tarator of Turkey is a savory sauce, thickened with nuts and used with a wide variety of foods.

This recipe, a Turkish tarator sauce from Fine Cooking magazine is courtesy of  James Beard award winning chef Ana Sortum. Her travels as a young chef exposed her to the exciting, flavorful home cooking of Turkey. When she returned to Cambridge, Massachusetts, she opened her first restaurant, Oleana combinig the bold flavors of the eastern Mediterranean with farm fresh ingredients.

Tarator is very easy to make. As with many traditional sauces, it was first made with a mortar and pestle, but a blender brings this sauce together in less than five minutes. Nuts are the base of the sauce and provide it’s richness. I have seen everything from walnuts, to hazelnuts to pine nuts used in different versions of this recipe, blanched almonds are the chef’s choice in this recipe. Some recipes also include bread as an additional thickener but I found this unnecessary.  Combine nuts, olive oil, lemon juice, water and garlic in the food processor. Blend until smooth and thick, scrape down the sides several times during this process, it takes about 3 minutes.  Season to taste with salt and pepper. When serving, garnish with some toasted almonds.

Use good ingredients, not those nuts that have been sitting in your cabinet for months, fresh lemon juice and a quality extra virgin olive oil. I purchase my best oils from The Tubby Olive. Their oils are sourced from small farm producers and I am able to taste what I buy. Unfortunately not every bottle of olive oil labeled extra virgin, actually is.   If you are interested in some good information regarding the misrepresentation of the origins and quality of some brands of olive oil, check here.

Tarator is traditionally served with a wide variety of dishes, ranging from grilled eggplant, beets and fried seafood. I served it with roasted salmon and lightly blanched sugar snap peas.  It would also be a flavorful dip for crudite or a sauce for fried calamari.

Turkish Tarator Sauce

Makes about a cup

Ingredients

  • 1/2 c blanched whole almonds
  • 2T toasted and chopped almonds for garnish
  • 1/4c extra virgin olive oil
  • 2t fresh lemon juice
  • 1 1/2t chopped garlic
  • Kosher salt and freshly ground pepper

DSC_1779a

Directions

  1. In a blender, puree the whole almonds, olive oil, lemon juice, garlic and 1/2c water until completely smooth and thick, at least 3 minutes.
  2. Season to taste with salt and pepper. Sauce keeps covered and refrigerated up to 3 days.

DSC_1799a

DSC_1790a

November 20, 2014 Mahi Mahi with Pomegranate Salsa

DSC_0009aFish is always my go-to selection for a quick and healthy dinner.  This weekend my fish market had quite a few excellent varieties and some beautiful mahi mahi fillets caught my eye.

Also known as dolphin fish, the Hawaiian name, mahi mahi, was used first by restaurants to distinguish it from the mammal. Despite the Hawaiian name, mahi mahi is mostly fished on the Atlantic coast. Wild caught in the United States from Massachusetts to Texas, it is considered a “best choice” by the Monterey Bay Aquarium Seafood Watch. Mahi mahi are fished by longline methods or troll and pole. These methods limit the accidental catch of sea turtles and other threatened species.

Mahi mahi is a lean fish with a delicate, mildly pronounced flavor and medium texture. The flesh usually has strips of brown running down the center of the fillet. This is a harmless discoloration, some (not us) think this makes the fish less attractive so they trim it off. Be sure to remove the skin before cooking, it is tough and tasteless. Halibut would be a good substitution if mahi mahi is not available.

We cook our fish very simply and compliment it with a bright sauce. I wanted to take advantage of seasonal fall ingredients and I noticed a display of pomegranates at the front of the supermarket. Whether it was inspiration or the power of suggestion, I’m not certain, I planned to make a pomegranate salsa. I combined jewel toned pomegranate arils with juicy pineapple, crispy cucumber and red onion. A little jalapeno from the garden provided enough heat to contrast with the sweet and I finished the salsa with a little cilantro. Served with rice and avocado slices and a salad, this made a quick and delicious dinner. This salsa would be good with tortilla or pita chips or even as a bruschetta with a creamy goat cheese.

DSC_0002a

Mahi Mahi with Pomegranate Salsa

Serves four

Ingredients

  • 4 mahi mahi fillets, 6 oz each
  • Cooked jasmine or other long grain rice
  • Sliced avocado
  1. Preheat  oven to 450°F.
  2. Measure the fillets at their thickest point. Season fish with salt and pepper and place on a baking sheet.
  3. Bake fish for 10 minutes for every inch of thickness. If you check internal temperatures, it should be about 130°F. Remember fish will continue to cook even off the heat.
  4. Mound the rice on plates and top with fish and salsa. Arrange avocado slices on the side. Sprinkle with cilantro and serve with lime wedges.

Pomegranate Salsa

Makes about 4 cups

Ingredients

  • 1c pomegranate arils
  • 3/4c peeled and diced cucumber
  • 3/4c diced pineapple
  • 1/4c diced red onion
  • 1-3 jalapeno peppers, seeded and minced
  • 1/3c diced sweet red pepper
  • 2T fresh lime juice
  • 1/3c finely chopped cilantro

Directions

  1. Combine all the ingredients in a bowl and stir to combine. Taste for heat preference and additional jalapeno if desired.

DSC_0012a

August 19, 2014 Tzatziki Sauce

DSC_8546aIt’s a deliciously creamy sauce or dip based on yogurt, cucumbers and dill, and yes the Greeks do have a word for that, tzatziki. Pronounced in English, zat-zee-key, it is a traditional Greek “meze” or something to whet the appetite. I serve it with chicken, fish and vegetables. Tzatziki is also great as a sauce with gyros or wraps.

Until the last several years, you would have needed to drain the yogurt for several hours before proceding with the recipe. With the advent of Greek yogurt, that step is eliminated. “Greek style” yogurt is strained to remove the whey, the watery part. The term “Greek” is not regulated and some yogurts are thickened with cornstarch and milk protein concentrates. Read the label, Greek yogurt should contain only milk and live active cultures. In Greece, sheep’s milk yogurt is traditionally used in tzatziki, I have read that it is sweeter and richer than cow or goat’s milk yogurt. If you are using regular yogurt it needs to be drained in a fine mesh sieve or cheesecloth for about four hours to obtain the thicker texture of Greek yogurt.

Grated cucumber, garlic, dill and sometimes mint are added to the yogurt base. Peel and seed the cucumber before grating. I use a teaspoon to make one long scoop down the middle to eliminate the seeds. Keep the cucumber in halves, they are large enough to shred on a box grater without hurting  your fingers. Put the shredded cucumber in a strainer over a bowl and sprinkle a little salt on it. This will drain out some of the excess liquid. I squeeze out the rest of the liquid by putting the cucumber in a clean cloth dishtowel and wringing it out. Alternately, squeeze the cucumber in your hands. This is an important step to ensure the sauce does not become watery.

The dill and mint should be fresh and if I am adding mint I will wait until right before serving since just picked mint can overwhelm the dish. Tzatziki is a versatile sauce that combines the slightly sour tang of yogurt along with the cool refreshing flavors of cucumber, dill and mint. It’s a great addition to your summer menus.

Tzatziki Sauce

Makes about two cups

Ingredients

  • 1-1/2 c plain whole or 2% milk yogurt, preferably Greek
  • 2 medium cloves garlic, finely chopped
  • 3/4 c peeled, seeded, and grated cucumber
  • 1 T fresh lemon juice
  • 2 t chopped fresh dill
  • 2t finely chopped mint (optional)
  • 2 t extra-virgin olive oil

Directions

  1. Put the cucumber in a colander over a bowl and lightly sprinkle with salt. After a half hour wrap the cucumber in a clean cloth dishtowel and squeeze as much liquid out of it as you can. Alternately, squeeze the liquid out with your hands.
  2. Add the chopped garlic, cucumber, lemon juice, dill, and olive oil to the yogurt mixture. Stir to blend and season to taste with salt. Cover and chill for at least 4 hours before serving.
Make Ahead Tips

The dip can be made up to a day ahead.

DSC_8611a

May 29, 2014 Cilantro Pesto with Shrimp

DSC_7543a

After spending some time weeding and watering in the greenhouse, Joe made an inspiring suggestion to me, “why don’t you make cilantro pesto sometime?” Now that the warmer temperatures have arrived, everything in the greenhouse is growing like mad. The lettuces are picture perfect and ready to harvest and a row of cilantro is at it’s best.

Cilantro, coriander, Chinese parsley, whatever you choose to call it, it’s one herb that people are rarely on the fence about. You either like it, or as I’ve heard often, feel it tastes like soap. Now maybe I haven’t consumed enough soap in my day, so I’m not sure what that’s all about.
Cilantro is one of our herb garden staples. It’s versatility takes it from Mexican to Thai, from salsas to curries. I decided to make a pesto that would accompany fresh Florida shrimp I purchased at our favorite seafood market, Hellers. Fresh, meaning never frozen, a rarity in this area. I decided to keep the pesto simple, no cheese, so that the bright flavor of the cilantro would shine through. Cilantro is the only herb I know of where the tender, and I must emphasize tender, stems have the same flavor and can be used along with the leaves. Limes would usually be my citrus of choice with cilantro, but since, I didn’t have any, they are quite expensive now and the ones I have purchased recently haven’t been that good, a juicy lemon would fill in quite nicely.

Toasted almond slivers added a subtle nutty quality to the pesto, walnuts or pine nuts are also good choices. I like to toast small quantities of  nuts in a dry nonstick skillet on the stove top. I find that when I toast nuts in the oven I am opening the door so frequently to shake the pan to avoid spotty burning, it’s easier to do them on the stove.

I chose an oil relatively new to me, avocado oil. It is cold pressed, high in monounsaturated fats and vitamin E. It’s flavor is mild and buttery. It can be used for skin and scalp care as well, but mine will stay in the kitchen.
The cilantro pesto was an excellent accompaniment to the shrimp that I cooked in the grill pan.  The addition of a little serrano pepper gave the pesto just enough heat.
As for some people’s dislike of cilantro, I read there is an essential oil found in the fresh leaves and unripe seeds that can be recognized immediately and not to everyone’s liking. It has to do with a genetic predisposition on how individuals perceive flavors. If you are a “hater” you are in good company. Julia Child is quoted as saying when asked what foods she hated most. “Cilantro and arugula, I don’t like at all. They’re both green herbs they have kind of a dead taste to me.” Harsh Julia, that’s just harsh. For the rest of us who enjoy the crisp, bright flavor of cilantro this is a simple recipe worth trying.

DSC_7519a

DSC_7532aDSC_7537a


Cilantro Pesto

Makes about 1 cup

Ingredients

  • 1 1/2c  packed coarsely chopped cilantro leaves and tender stems
  • 1/2c avocado oil
  • 1/4c lightly toasted slivered almonds
  • 1 medium clove garlic
  • 1t cumin
  • 1t chipotle chili powder
  • 1/2t kosher salt
  • 1/2t or more to taste finely chopped Serrano pepper

Directions

  1. Combine all the ingredients in a blender and puree until smooth. Use immediately or up to three days.

DSC_7524a

May 8, 2014 Turkey Spinach Meatballs

DSC_6855aNine times out of ten I would be more than likely to skip over a recipe that’s labeled “kid friendly”, especially if that recipe isn’t even in the magazine! But I was in search of a quick, mostly make ahead recipe that would include ground turkey and spinach.

The spinach in question was the last of the pick from seed Joe planted last October. It wintered over quite nicely in the greenhouse, considering the extremely cold and snowy winter we had. These were not the smaller leaves that we would use in salads but larger ones that would be fine incorporated into a stir fry or cooked down for a dish. I wasn’t in the mood for soup or a stir fry. Larb, the Thai dish that uses ground meat wrapped in lettuce leaves (I could substitute spinach..) was a possibility, but I still wasn’t satisfied yet.
Finally I found it, sort of, in the March edition of Bon Appetit, a column called “The Providers” written by bloggers and husband and wife, Jenny Rosenstrach and Andy Ward. It was an article about strategies for feeding a busy family with preplanned homemade meals. No recipe here but a small postscript to find a recipe for turkey and spinach meatballs on Bon Appetit.com.

Okay, I’m “biting” now, meatballs would be a change of pace for us and we haven’t had a meal with pasta in quite a while. Not that you would have to have them with pasta. Rice would work,so would polenta, on a roll or just by themselves. I pulled a few bags of my oven roasted tomatoes out of the freezer for the marinara sauce and I was ready to go.
The spinach in this recipe was the frozen variety, I have no problems with that, I always have some on hand. It’s just that I had fresh that wasn’t going to be fresh for long and wanted to use it up. The next question for me was, how many cups of fresh spinach does it take to make the equivalent of a ten ounce package? Since my frozen chopped spinach of choice these days is Birdseye, I checked the package, nutrition information yes, but nothing regarding the fresh equivalent. I checked the web, the best I could find was that 1.5 lbs of fresh spinach would cook down to the 10 ounces needed. I just trimmed the large stems and cooked all the spinach I had, a crisper bin full. It looked fairly close to 10 ounces, final weight after squeezing out excess liquid, 9.2 ounces, not too bad I would say.
The marinara sauce is very basic, quite similar to what I already make. I substituted 2 quart bags of our roasted tomatoes, drained of excess liquid. That excess liquid is certainly not the prettiest, but a very flavorful tomato juice, a special treat for the chef. Since I cooked whole leaf spinach, I roughly chopped it after it was cooked down and drained it well before adding it to the meat mixture.
After a somewhat messy beginning, I coated my hands with non stick spray before forming the meatballs so the mixture wouldn’t stick to my fingers. Another selling point of this recipe is that the meatballs are broiled in the oven, eliminating the splatter that comes along with stovetop cooking. This is a recipe that can be doubled, work once, eat twice. The writers of the article recommend freezing in single serving batches so they can be thawed as needed. It’s protein and vegetable all in one juicy meatball served with a simple but flavorful tomato sauce, a great weeknight meal.

DSC_6866a

Turkey Spinach Meatballs

from the Bon Appetit website

Makes 20 meatballs, serves 4

Ingredients for Marinara Sauce

  • 1/4 c olive oil
  • 1/2 small onion, chopped
  • 1 clove garlic, finely chopped
  • 1t dried oregano
  • 1/4t crushed red pepper flakes
  • Kosher salt and freshly ground pepper
  • 2T tomato paste
  • 1-28oz can whole peeled tomatoes (I used my own roasted tomatoes)

Directions for Marinara Sauce

  1. Heat oil in medium saucepan over medium heat. Cook onion, stirring often, until soft but not brown, about 5 minutes. Add garlic, oregano and red pepper flakes; season with salt and pepper and cook, stirring, until fragrant, about 1 minute. Add tomato paste and 1 tablespoon water and cook, until tomato paste coats onion and begins to darken, about 3 minutes.
  2. Add tomatoes to saucepan, crushing with a fork or wooden spoon when you add them. Bring to a boil, reduce heat, and gently simmer until slightly thickened, 20-25 minutes; season with salt and pepper. Be sure to stir frequently so the tomatoes don’t stick to the bottom of the pan.

Ingredients for the Meatballs

  • Non stick vegetable oil spray
  • 1 large egg, beaten to blend
  • 1/4 small onion, finely chopped
  • 1 clove garlic, finely chopped
  • 1 1/2 lb. ground turkey
  • 1 10-oz. package frozen chopped spinach, thawed, squeezed to remove excess moisture (I used fresh spinach that I cooked down and chopped)
  • 1/2c finely shredded Parmesan cheese
  • 1/2c plain dried breadcrumbs
  • 2T chopped fresh flat leafed parsley
  • 1t fennel seeds
  • 1t finely grated lemon peel
  • 1t kosher salt
  • 2T olive oil,

Directions for the Meatballs

  1. Preheat broiler. Cover a rimmed baking sheet with foil and coat with nonstick spray
  2. Using your hands or a fork, gently mix egg, onion, garlic, turkey, spinach, Parmesan, breadcrumbs, parsley, fennel seeds, lemon zest and salt in a large bowl until just combined.
  3. Scoop out turkey mixture by the 1/4 cupful and form into balls, you should have about 20. Place on the prepared baking sheet, spacing 2″ apart; brush with oil.
  4. Broil meatball, turning often, until browned all over and cooked through, 15-18 minutes. Add to marinara sauce.
  5. To do ahead: Meatballs with marinara sauce can be made 2 weeks ahead. Let cool completely and freeze individual portions in resealable plastic bags. To cook, reheat gently until meatballs are warmed through and sauce is bubbling, 15-20 minutes.
DSC_6820a
Fresh spinach, cooked down and ready to be chopped.


DSC_6825a
After the broiler, ready to be sauced.

DSC_6871a

August 8, 2013 Pesto Summer Vegetable Salad

DSC_1354a

This isn’t a recipe as much as it is a formula. In the summer months when we are enjoying vegetables fresh from the garden and the farmers market, we have the occasional leftover. A cup of cooked beans, several ears of corn, cherry tomatoes, roasted peppers, you get the idea. I decided one evening to combine what I had on hand into a summer vegetable salad that I dressed with a few splashes of a lemon vinegar and a few tablespoons of fresh pesto from the garden. You could even add a grain like quinoa or some cooked pasta. A quick and easy side dish, as long as you have pesto on hand. And why shouldn’t you? Take advantage of your garden’s or the farmers market’s fresh basil and make a batch today.

DSC_1381a

Basil Pesto

Makes 1 cup

Ingredients

  • 3 cloves of peeled garlic
  • 3T pine nuts or walnuts
  • 1/4t salt
  • 3c gently packed basil leaves
  • 1/2c extra virgin olive oil
  • 1/2 c freshly grated Parmigiano

Directions

  1. Chop the garlic, pine nuts and salt in a food processor until finely ground, about 15 seconds. Add the basil leaves and process until no whole leaves remain, another 15 seconds or so.
  2. With the machine running, pour the oil through the feed tube in a steady stream. Stop and scrape down the sides, process for a few more seconds.  The mixture should be ground to a paste-like consistency with a little of the leaves texture still remaining.
  3. Add cheese and pulse until incorporated.

DSC_1400a

Pesto Summer Vegetable Salad

Serves four to six

Ingredients

  • 8 c mixed vegetables such as cooked asparagus spears, cut into thirds, avocado slices, roasted or raw pepper strips, cooked corn off the cob, cherry tomatoes, sliced in half. cooked green or yellow beans in 1″ pieces, roasted portabello mushroom strips, cucumber rounds, cooked zucchini slices-try to have a variety of at least three
  • White wine, Sicilian lemon or another light vinegar
  • Basil pesto
  • Crumbled feta or goat cheese

Directions

  1. For the dressing, in a small bowl, stir together 3 tablespoons pesto and 1 tablespoon vinegar.
  2. Place vegetables in a large bowl.Add just enough vinaigrette to moisten the vegetables taking care not to overdress it (you may not need it all). Add the feta, if using and toss again. Let the salad rest for 10 to 15 minutes to allow the flavors to meld and then taste the salad again. If necessary, add a little viniagrette and salt and pepper. Serve as soon as possible.

DSC_1407aDSC_1418a

July 16, 2013 Roasted Lobster with Mojo Mayonnaise

DSC_0998a

Lobster is a once and a while treat for us and a sale at a local market was enough motivation to pick up a few and to pull out an old favorite recipe. When I was buying cookbooks on a regular basis and life was a bit simpler, I would occasionally try to cook my way through my latest purchase. Such was the case with the Rick Bayless cookbook, Mexico, One Plate at a Time.

Mexico, One Plate at a Time, written thirteen years ago is the fourth cookbook written by Mexican food authority, teacher, restaurant owner, cookbook writer and PBS television host, Rick Bayless. His motivation for writing this book was to help the average cook take the first steps toward understanding real Mexican cooking, not the Mexican American cooking so many of us are familiar with. He provides not only the history and culture behind some of Mexico’s classic dishes, he offers his best recipe for the classic and a contemporary take on the dish that brings it into the twenty-first century. The food stained pages attest to my efforts. I began by covering the basics, guacamole, salsa, moved into new territory with ceviches and found a new way to use the poblano chilis from our garden with delicious chiles rellenos. For entrees I tried the complex turkey mole, added red snapper vera cruz into our dinner rotation and discovered the rich, delicious roasted lobster tails with mojo mayo.

This lobster variation finds it’s roots in Seafood in Mojo de Ajo. He describes mojo de ajo as a bath of golden slow-cooked garlic that traditionally dresses shrimp or a white fish. Garlic, as with other foods (onions, cilantro) we might assume to be native to Mexico, actually were brought by the Spanish explorers of the sixteenth century. Most of us won’t be able to find the red-tinged ajo criollo that he recommends and Mexican cooks love, but it is important to find the freshest garlic available. Look for firm, plump heads that feel heavy for their size. A lighter head is a sign of dehydration. Also, stay away from garlic that is sending out green shoots, that garlic will most likely be bitter.

The garlic cooks in a good quality vegetable oil that will bubble gently at a very low simmer. This is where the mojo magic occurs, the sharp taste of raw garlic is mellowed and it’s sweetness emerges. Keep a watchful eye on your simmering pan, the final product should become the color of light brown sugar. If the garlic turns dark in color it will be bitter and inedible.

The dish reaches the next step when the cooled oil is added slowly to a base of egg yolks, fragrant lime juice and smoky chipotle peppers resulting in a lusicious mojo mayonnaise that will bring not only lobster but any seafood preparation to a new level.

As Mr. Bayless states at the beginning of his book, food, even a classic dish, is a dynamic evolving creation and he is certainly willing to adapt and accommodate his recipes for the time challenged modern cook. The cookbook version of the recipe for mojo de ajo requires peeling 3/4 of a cup of garlic cloves and a half hour of occasional stirring and temperature moderation of the slow cooked garlic. Two steps that require a certain amount of time and might have steered some (many) home cooks away from this recipe.

My recent observations both on his website, as well as a video from a Chicago block party segment he did on the Rachael Ray show from 2010 show how he has adapted the preparation of mojo de ajo from the original recipe in the book.  Although he did mention using fresh garlic he also gave approval to peeled garlic from the supermarket as a reasonable substitute. He told the large audience that over the course of years he developed an easy way to make a large quantity of the mojo. Rather than chop the garlic by hand, he puts it in a plastic bag and crushes it with a rolling pin. The garlic is then placed in a square baking pan and covered with three cups of olive oil. After cooking for 45 minutes in a 325°F oven he adds some lime juice and cooks for another fifteen minutes. In his book Mr. Bayless originally expressed that oven cooking the garlic in oil would result in a less reliable product, it is now the standard for the recipe on his website The liquid gold, as he often refers to it, can be stored in the refrigerator for several weeks, making it well worth the effort the home cook would put into it.  Mojo de ajo can also be used in vinaigrettes, hash brown potatoes or drizzled over hot pasta tossed with chili flakes and breadcrumbs. A compromise you say? If it gets more people in the kitchen and stimulates cooking creativity, then I would say no harm done.

Roasted Lobster Tails with Mojo Mayonnaise

Serves 6

Ingredients

  • 3/4c peeled garlic cloves
  • 1 1/4c good quality canola oil and a little more for brushing the tails
  • 2 large egg yolks
  • 3T fresh lime juice
  • 2 canned chipotle chiles in adobo, seeded and finely chopped
  • Kosher salt
  • Six 6 ounce lobster tails in their shell

Directions

  1. Either chop the garlic finely by hand into small pieces or drop the cloves through the feed tube of a food processor with the motor running and process until the pieces are 1/8 inch in size. You should have about 1/2 cup of chopped garlic. Scoop the garlic into a small saucepan and add all of the oil and set over medium low heat. Stir occasionally as the oil barely comes to a simmer. Adjust the heat to maintain the gentle simmer (bubbles will rise in the pot like sparkling mineral water) and cook, stirring occasionally until the garlic is a soft golden color, about 30 minutes. Cool to room temperature and transfer to a measuring cup with a spout.
  2. In a food processor or blender, combine the egg yolks and lime juice. Pulse to combine and then, with the machine running, slowly (I can’t emphasize slowly enough…) dribble in the oil along with stray pieces of garlic. The mixture will thicken into a mayonnaise. When all of the oil is in and the mayonnaise is thick, spoon in the rest of the garlic and process just long enough to combine. Scrape into a bowl, stir in the chopped chipotles and season with salt to taste. Cover the mojo mayonnaise and refrigerate until using.
  3. Kill and cut up the lobsters, if this is something you are uncomfortable doing, opt for lobster tails that just need an overnight thaw in the refrigerator.
  4. Heat the broiler. Crack open the lobster pieces. Lay the prepared lobster pieces or tails on a heavy duty baking sheet, for a whole lobster you will have a split front half, a split tail, 2 arms and 2 claws.  Brush the lobster meat with oil. Place about 8 inches below the broiler. Broil for 5 minutes. Remove from the broiler and check one of the tails for doneness by cutting off about 1/2 inch of the meat at the front, it should be just about tender but still have a hint of translucency at the center. If it is far from done, return the lobster to the broiler for about a minute or so. Smear all sides of the lobster meat evenly with an 1/8-inch layer of mojo mayonnaise and return to the broiler. Broil until the mayonnaise is a golden brown, about 1 minute more.
  5. Transfer the lobster to a serving platter, serving the remaining mayonnaise separately.
DSC_0960a
Oil and garlic slowly simmering in the pan, bubbles will rise in the pot like sparkling mineral water.
DSC_0969a
The garlic should turn a soft pale golden color, like the color of light brown sugar.
DSC_0989a
Mojo mayonnaise with tart lime juice and smoky and spicy chipotles en adobo.


May 5, 2013 Red Chile Sauce

DSC_0081a

Nine pounds of pork on the bone plus eight people equals a sizeable amount of leftovers. Looking for a good way to “repurpose” the pork I was thinking ahead to Cinco de Mayo and decided to go in a Mexican direction. Red chile sauce would be just the right accompaniment for some shredded pork to fill some tortillas.

The red in red chile sauce comes from ancho chiles. Ancho chiles are poblano chiles that have been ripened and dried.  They are a versatile chile with a rich fruity taste reminiscent of stone fruits with just the right amount of heat.

I have my own collection of dried chiles from the hot peppers that we have grown in the garden. It isn’t a difficult process. You must remember that chiles need to be dried in their mature state, which means the pepper is totally red (or yellow or orange in some instances), with no hint of green. There should be no blemishes, tears or other damage to the fruit. I have had success with several methods of drying chiles. I have taken the whole plant, hung it upside down to dry in a well ventilated room. Chiles can be spread out to dry on a screen, again in a well ventilated room.  I have my own special drying screen for herb/chile drying. I have dried them in ristras, which is a little more complicated, but also very attractive.The chiles are tied together by the stems and hung in long bunches. Probably the easiest and most foolproof method is to dry chiles on wire racks on top of baking sheets. This should be done at a very low temperature preferably in a convection oven, for my oven that is 140°F. You can get burns from chiles. Remember to wear gloves when you work with fresh chiles and never touch your face or eyes, or any part of your body for that matter. Yes, inevitably your nose will itch while you are working with chiles, but don’t be tempted!!

 
Toasting the dried chiles and the sesame seeds is definitely a worthwhile step, it brings out a complex toasted smoky flavor that you wouldn’t have otherwise. It is important to keep a watchful eye when toasting chiles and nuts and seeds. Only a matter of seconds can separate nicely toasted and burnt. Especially with seeds, keep them moving in the pan to ensure even browning and get them out of the pan quickly once done to stop the cooking.
I store dried chiles in unsealed but closed quart canning jars, labeled with type and year in a cool dark pantry. Some say the flavor and heat fade after time, but in the name of “science” I did an experiment with a jar labeled Jalapeno-Anaheim ( a cross?) from 1997. I bit into the tip of the pepper and it still packed quite a wallop and had me running for a glass of milk to neutralize the burning sensation in my mouth. The slow cooked pork was perfect with the chile sauce. I have heard it freezes well but I wouldn’t know since we used all of ours. The sauce would also be good with chicken thighs or braised beef.

Red Chile Sauce

Yields about 3 1/2 cups

Ingredients

  • 2 1/2 oz dried ancho chiles
  • 2T vegetable oil
  • 1 small white onion, chopped
  • 2 cloves garlic, chopped
  • 1/4c raw sesame seeds
  • 1/2 drained canned tomatoes (I used my roasted tomatoes)
  • 1t dried Mexican or regular oregano
  • 1/4t ground cumin
  • 3c low salt chicken broth
  • 1T apple cider vinegar
  • 2 fresh bay leaves
  • 1/2t kosher salt

Directions

  1. Heat a large non-stick skillet over medium heat. Add the dried chiles and cook for 20 to 30 seconds on each side, pressing down with a spatula, until soft, pliable and slightly redder in spots. Watch chiles carefully, you don’t want burnt chiles in your sauce. Rinse the chiles, remove the stems, veins and seeds and tear each one into several pieces. Put the chiles in a small saucepan with enough water to cover and cook at a gentle simmer until well softened, about 20 minutes.
  2. In a medium skillet, heat 1T of the vegetable oil, add the chopped onion and saute over medium heat until the edges of the onion are brown, 8-9 minutes. Add the garlic, cook for another minute, and set the pan aside.
  3. Toast the sesame seeds in a small dry skillet over moderately low heat until they turn a deep golden brown. Transfer the seeds immediately to a plate to cool when they are toasted.
  4. Drain the chiles, discarding the cooking water and transfer to a  blender bowl. Add the sauteed onion, garlic, sesame seeds, tomatoes, oregano, cumin and 1 cup of broth. Blend until completely smooth, scraping down sides several times. You will have a medium thick paste.
  5. Wipe out the skillet that you cooked the onion in. Heat the skillet again adding the remaining tablespoon of vegetable oil. When the oil is hot, add the paste from the blender. Cook the paste with a wooden spoon, stirring constantly. Stir in the broth, vinegar, bay leaves and salt. Bring to a simmer and cook until the sauce begins to thicken, about 20 minutes. Discard the bay leaves. Taste and adjust seasonings as needed. The sauce will thicken as it sits.
DSC_0052a
The mis en place.
DSC_0060a
Blended to a nice thick paste.


DSC_0062a
Simmered on the stovetop with some fresh bay leaves.


DSC_0091a
Makes a great burrito too!


March 24, 2013 Poached Chicken with Salsa Rustica

DSC_9310a

Chicken is a regular part of our weekly dinner rotation, whether it’s boneless breasts in a pesto sauce, chicken thighs and legs in a fragrant blend of Moroccan spices or crispy skinned roast chicken redolent of garlic and lemon.  I turn to poached chicken when I am making a broth that is going to be made into chicken stock or a chicken soup.  Recently, one too many dinners out, vacation and parties called for a few weeks of eating light. So I was interested to see an article in the latest issue of Fine Cooking, “Beyond Roast Chicken. Three new ways to cook a whole bird from three creative chefs.”

That’s what attracted me to the recipe that Lidia Bastianich offered in this article, poached chicken with salsa rustica. Lidia is a master of Italian cooking, a restaurateur, and author of many cookbooks. Her television programs on PBS are not only informative but entertaining as well. So I decided to follow Lidia’s lead and made a poached chicken for dinner.

Poaching is a technique that cooks chicken gently and slowly, submerged in a liquid that is heated to just under the boiling point, about 180F, when small bubbles begin to break the surface. The cooking process begins with a broth of herbs and spices, enhanced with dried porcini mushrooms and Parmesan rinds, providing the rich umami.  Fragrant root vegetables, fennel and celery root, along with shallots, leeks and turnips are added next to the broth. Taking a step from what we normally do with our roast chicken, she stuffs it with peppercorns, bay, crushed garlic and lemon. The chicken is double wrapped in cheesecloth which both keeps the aromatics in the bird and not in the broth and provides a way to retrieve the chicken from the pot at the end of cooking. Poaching chicken provides both a moist flavorful chicken with no additional fat and a flavorful broth to serve with the meal and later as a soup.

Don’t skip the salsa rustica that accompanies this dish. Made mostly with pantry ingredients, it’s the first salsa I’ve ever seen that includes a hard-boiled egg. It adds a pop of color to the very flavorful but pale chicken and a unique piquant flavor. I could see serving this salsa with fish and pork as well.

Be sure to use Turkish or true bay leaves, laurus nobilis. California bay leaves are not from the same family but are similar in shape. They have a strong menthol flavor that will overpower the dish. I am fortunate that we have several Turkish bay trees to pick my leaves from. The salsa rustica recipe called for dill gherkins but I picked up a jar of cornichons. So is there really that big of a difference? Gherkins can refer to both a variety of cucumber, harvested very small for the pickling process and the pickle itself. Gherkins can be either tart or sweet. French cornichons are the tart, crisp pickles made from gherkins or other cucumbers picked small. My choice was fine since the original recipe called for dill (tart) gherkins.

The broth, delicious on it’s own, can be made into a quick soup.  Bring the broth to a simmer and add a small pasta such as ditalini or orzo. Cook until al dente and serve topped with grated cheese and finely chopped parsley. We used the broth several days later to poach halibut fillets seasoned with a ginger citrus herb blend and topped with fresh lime peel.

Poached Chicken with Salsa Rustica from Fine Cooking #122

Serves 4-6, yields 3 quarts broth

Salsa Rustica

Ingredients

  • 1/3c extra virgin olive oil
  • 1/4c red wine vinegar
  • 1/3c thinly sliced scallions
  • 1/4c finely chopped red onion
  • 1/4c finely chopped jarred roasted red pepper
  • 1/4c finely chopped cornichons
  • 1 hard boiled egg, finely chopped
  • 1T balsamic capers, drained
  • 1/8t dried mustard
  • Pinch of cayenne pepper
  • 2T finely chopped flat leaved parsley
  • Kosher salt and fresh ground pepper to taste
DSC_9263a_edited-1
Components for the salsa rustica.

Directions

  1. In a medium bowl, whisk the olive oil and vinegar.  Add the scallions, onion, roasted red pepper, cornichons, egg, capers, mustard and a pinch of cayenne. Whisk to combine.
  2. The salsa can be made up to 5 days ahead, but you will probably consume it before the chicken is cooked so either make a double batch or make it the day of! Cover and refrigerate, let sit at room temperature for a half hour before serving. Before serving, stir in the parsley and  season to taste with salt and pepper.

DSC_9270

Poached Whole Chicken

Ingredients

  • 8 sprigs flat leaved parsley
  • 1T plus 2t whole black peppercorns
  • Kosher salt
  • 1/4c dried mushrooms (1/4oz), preferably porcini
  • 4 fresh Turkish bay leaves
  • 1 piece of Parmigiano-Reggiano rind (optional but nice)
  • 8 large shallots, peeled
  • 2 large turnips cut into 1 inch wedges (carrots were the original choice…)
  • 2 large leeks, white and light green parts, cut crosswise into 4-inch pieces, halved lengthwise and rinsed
  • 1 large fennel bulb, trimmed and cut through the root into 6 wedges
  • 1 medium celery root, trimmed, peeled and cut into large wedges
  • 1 whole chicken (about 3 1/2 lb) my brand of choice is Bell and Evans
  • 3 large cloves garlic, smashed
  • 1 lemon, halved
Root vegetables are added to the Parmesan porcini enhanced broth.

Directions

  1. Place the parsley sprigs and 1 tablespoon of the peppercorns on a six inch square of cheesecloth. Tie up with string to make a sachet.
  2. Pour 6 quarts of water to a 10-12 quart stockpot. Add the sachet, 2T salt, the dried mushrooms, 2 bay leaves and cheese rind if using.  Cover and bring to a boil over high heat.  Add the shallots, turnips, leeks, fennel and celery root. Return the liquid to a boil. Reduce heat to a simmer, partially cover and let vegetables simmer while you prepare the chicken, 10 to 15 minutes.
  3. Remove the giblets from the chicken (mine didn’t have them!!), rinse them and reserve. Into the chicken cavity place 1t salt, the garlic, the remaining 2t peppercorns, 2 bay leaves, the juice of the lemon and the squeezed lemon halves. Tie the bird’s legs together and tuck the wings behind the neck.
  4. Cut a 30 inch double-layer cheesecloth square and lay it on a work surface. Put the chicken in the center, breast side up. Tie two diagonally opposite corners snugly over the bird with a simple over hand knot. Tie the other corners the same way.
  5. Cut a yard long length of string and thread one end through the cheesecloth topknots. Pull the ends even and tie in a double knot close to the cheesecloth.
  6. Lower the chicken into the broth, being careful to keep the string out of the pot. Loop the free end of the string around a handle of the stockpot so it doesn’t fall into the pot. Add giblets if using. Bring to a boil over high heat, then lower the heat to maintain a gentle simmer.
  7. Cook, uncovered until the chicken is cooked through, an instant read thermometer inserted into the breast will register 158-160F. The chicken will continue to cook after you remove it from the pot, the final temperature will be 165F. Start checking at 45 minutes. If you prefer firmer vegetables, check on them sooner and remove them with a slotted spoon.
  8. Set a deep rimmed baking sheet large enough to hold the chicken near the pot. Transfer the chicken to the baking sheet, letting the excess liquid drain back into the pot. Using a slotted spoon, transfer the vegetables to a bowl and ladle a bit of the broth over them. Cover to keep warm.
  9. Unwrap the bird, remove the string and discard the ingredients from the cavity.  Pour some hot broth over the bird and cover loosely with foil to keep it warm.
  10. Set a fine strainer over a deep pot and strain the broth.
  11. Carve the chicken and serve with the vegetables, moistened with some broth and topped with salsa. Leftover broth can be refrigerated for 5 days or frozen up to 3 months.

DSC_9303a