January 21, 2016 Scallop Salad with Gremolata and Asian Vinaigrette

DSC_5726a
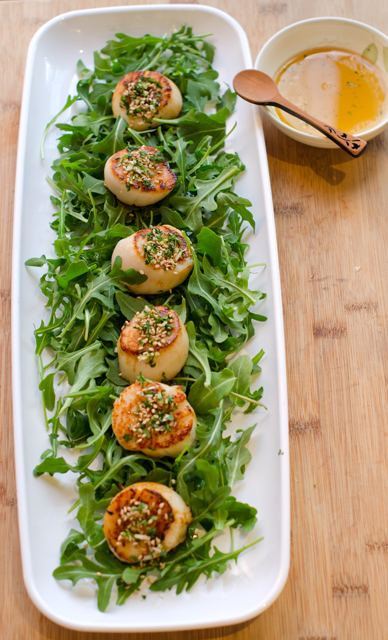
This is a twist on a recipe in the latest issue of Fine Cooking. In the Fine Cooking version, the scallops were tossed in a mixtue of citrus and Asian ingredients for a quick marinade. I wanted to make mine a salad so I patted the scallops dry, seared them and the marinade ingredients became the basis for an easy vinaigrette.
I love scallops for a quick meal and the jumbo sea scallops at Heller’s Seafood this week were pristine and just perfect. Wherever you shop, look for dry scallops. Wet scallops are soaked in a preservative phosphate solution. The solution preserves and whitens the scallops and causes them to absorb more water. So when you cook wet scallops they don’t brown as well or not at all because of the extra liquid. They can also have a soapy taste. Dry scallops are shucked and shipped packed on ice with no preservatives.  Therefore they have a shorter shelf life and are fresher when you buy them. Dry scallops come with a higher price tag, but they are fresher and you are not paying for water weight.

It’s fairly easy to tell the difference, wet scallops are bright white because of the phosphate solution and dry scallops are ivory or pinkish. Don’t hesitate to sniff them, the scallops should smell like the ocean.  When in doubt, ask, and if they don’t know, run! You shouldn’t be shopping there anyway.

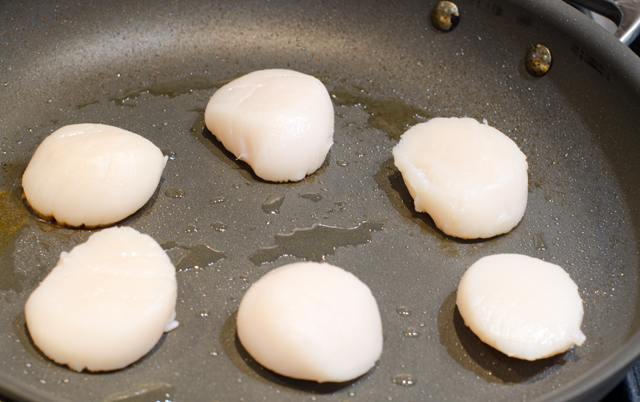
Prepare scallops by first removing the tough abductor muscle, it peels off easily. Then I pat them dry on both sides with paper towels. I coat a non-stick skillet with a neutral oil (vegetable or canola). Be sure that your skillet will hold the scallops without crowding them, you want to sear, not steam them. I turn the heat up to high and wait for the first sizzle. I add the scallops to the pan in a clockwise fashion with any extras in the middle. That way I know what scallop has cooked the longest. Now is the hard part, cook the scallops without moving them until a little peek (lift up the spatula a bit) shows a deep golden crust. Be sure not to overcook, you want the middle to stay tender and sweet.  Two to three minutes per side will do.

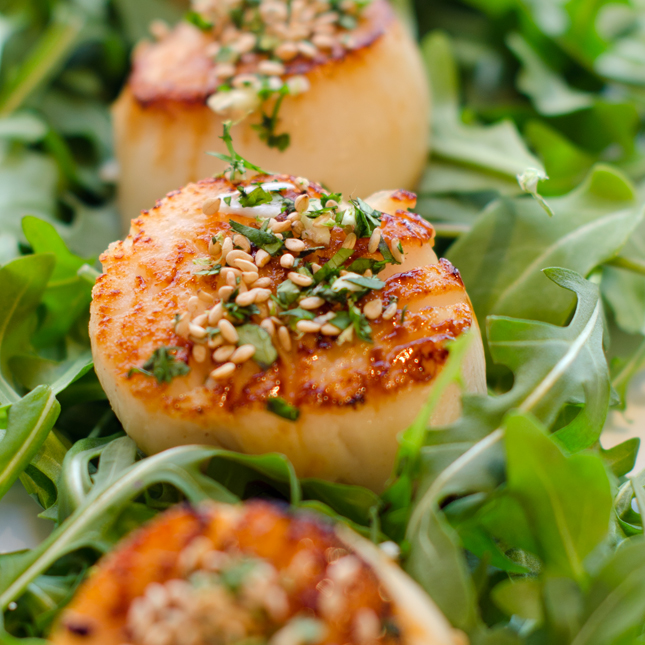
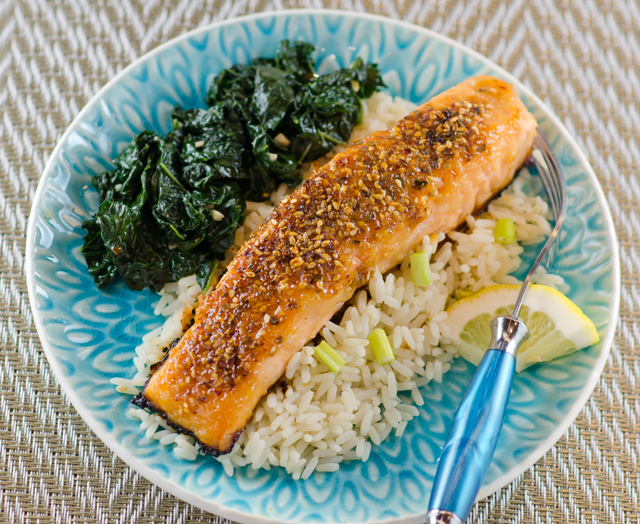
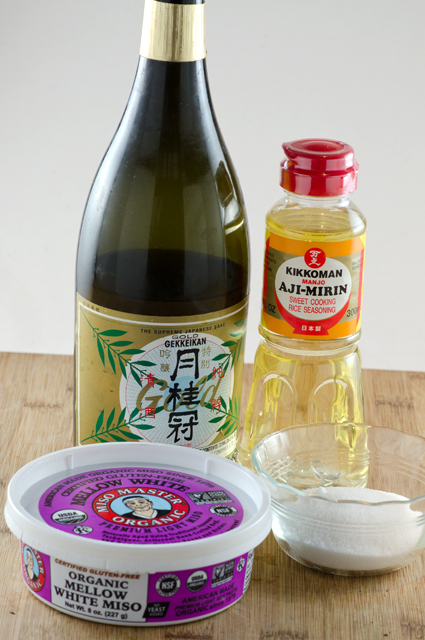
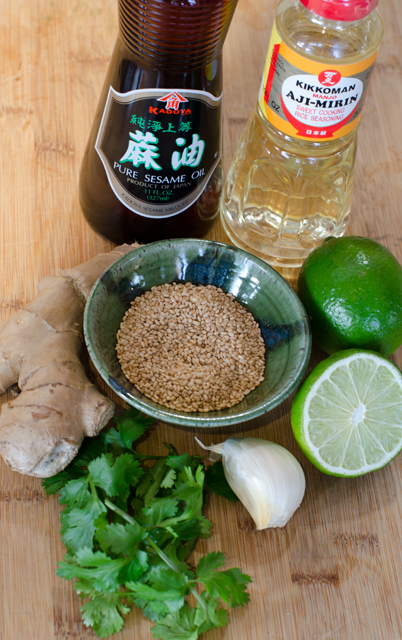
Gremolata is made from parsley, garlic and lemon zest and is the traditional topping for braised veal shank or osso buco. This version takes on a definite Asian flair using cilantro, garlic, sesame seeds and lime zest. These flavors harmonize perfectly with the sweet scallops. The marinade for the scallops included mirin, lime juice, ginger and sesame oil. In case you didn’t know, mirin is a type of rice wine, like sake but mirin is sweet and has a higher alcohol content. When you are looking for sesame oil it should be the dark variety. Both mirin and dark sesame oil are readily available in the Asian section of the supermarket.  I used these flavors with a little additional honey to dress my salad greens with. I chose baby arugula, but a spring mix or baby spinach would work well too.

This dish comes together quickly, both the gremolata and the vinaigrette are easy to make. It is just important to take the time to cook the scallops correctly. This recipe can be doubled and is perfect for a first course or part of a small plates dinner.

DSC_5720a

DSC_5721a
Don’t crowd the pan, give the scallops room to brown, too close and they will steam.

Scallop Salad with Gremolata and Asian Vinaigrette

Serves 2

Ingredients for the scallops

  • ½ to ¾lb dry packed sea scallops (about 6)
  • A neutral cooking oil, canola for example
  • Salt and freshly ground pepper

Directions for cooking the scallops

  1. Remove the tough abductor muscle from the side of each scallop (some scallops are sold with the muscle already removed). If you feel any grit on the scallops, rinse them under cold water. Pat the scallops dry with paper towels; surface moisture impedes browning.
  2. Heat a 10- or 12-inch nonstick skillet over medium-high heat for 1 to 2 minutes. Add the oil and heat until quite hot. Pat the scallops dry once more and put them in the pan in a single, uncrowded layer. Season with salt and pepper and let sear undisturbed until one side is browned and crisp, 2 to 3 minutes. Using tongs, turn the scallops and sear until the second side is well browned and the scallops are almost firm to the touch, 2 to 4 minutes.
  3. Take the pan off the heat, transfer the scallops to a plate, and set them in a warm spot while you finish the other components of the recipe.

Ingredients for the sesame cilantro gremolata

  • ¼c finely chopped cilantro
  • 1T toasted sesame seeds
  • 2t finely chopped garlic
  • 1t lime zest

Directions for the sesame cilantro gremolata

  1. In a small bowl, combine the cilantro, sesame seeds, garlic and lime zest. Set aside.

Ingredients for the dressing

  • 3T mirin
  • 1t grated ginger
  • 2t fresh lime juice
  • 1t honey (or more to taste)
  • 3T sesame oil

Directions for the dressing

  1. In a small bowl whisk all the ingredients together. Set aside

Final Assembly of the salad

Ingredients

  • 4-5 cups of baby arugula, spring mix or baby spinach

Directions

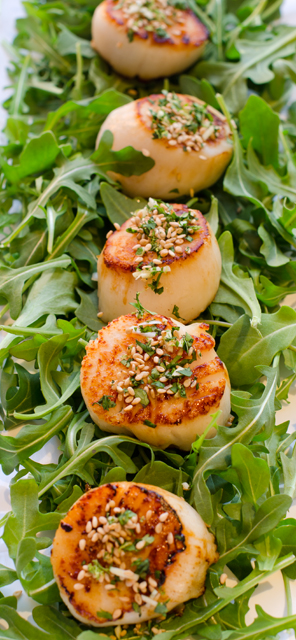
  1. Place the greens in one medium or individual salad plates.
  2. Top with seared scallops
  3. Sprinkle gremolata on the scallops.
  4. Dress greens and scallops lightly with dressing.
  5. Serve immediately.

DSC_5731a

DSC_5735a


January 13, 2016 Smoky Indonesian Style Chicken Curry

DSC_5680aSmoky Indonesian style chicken curry gets it’s intense heat from pasilla chilies, smoked paprika and sambal oelek balanced with the fragrant warm spices of ginger, coriander and cumin. This is another recipe from Bruce Weinstein and Mark Scarbrough’s article, Slow Cooker Secrets in Fine Cooking magazine

The dark meat of chicken thighs is a natural for the long simmer in the slow cooker. In this recipe, no browning is required,  the skin is removed before cooking and the thighs are coated with a rich complex chile paste.

Pasillas are the chile of choice for this recipe. A variety we have grown for many years, pasilla roughly translates “little raisin” from the Spanish, referring to the way the dark green fruit turns a reddish brown and slightly wrinkled when mature.  I especially like it for it’s mild heat and versatility for use in Mexican and Asian cuisine.Pasilla chiles can be used in chili sauces and pastes as well as moles. They are wonderful fresh on the grill in summer along with a steak.  Pasillas are rich, earthy and mildly spicy with just a hint of sweetness.

We had a bumper crop of peppers this year and to preserve the harvest, I dry some of them. Start with whole, unblemished peppers that have been washed and dried. Place the peppers on a wire mesh rack over a large baking sheet with room between each pepper for air to circulate. I used the lowest convection setting (140°F) in my oven. Drying time varies and I check them every now and then to see how they are progressing. Smaller peppers will dry quicker, the larger ones could take a day or more.  It is important that the peppers are completely dry before storing. Partially dry peppers will turn moldy and ruin the whole container, I know from prior experience.

To use dried chilies, reconstitute by placing them in a bowl and covering them with boiling water. Check at about twenty minutes to see if they are soft. To make the chili paste, the reconstituted pasillas are combined with shallot, lemongrass, tomato paste, spices, brown sugar and sambal oelek. I am fortunate to have a large supply of lemongrass at my disposal. Our lemongrass plant grows large and bushy in the garden every summer. Joe harvests a large portion of the stalks that I freeze for recipes like this. The significantly cut back plant is brought indoors for the winter where it’s only predator is Cody, our Golden Retriever who enjoys nibbling on the leaves. Lemongrass has a mild citrus flavor with a floral aroma. Sambal oelek is a ground paste made only of chili peppers and salt.  It is less acidic than sriracha and is chunkier and thicker in texture.  It is readily available in the Asian section of most supermarkets.

The chili ingredients are combined in the blender and chicken broth is added to make a thick sauce. I needed more broth than the original recipe called for, use as much broth as you need to make the sauce smooth, not chunky. Layer the potato pieces at the bottom of the slow cooker. Season the chicken pieces generously with salt and pepper. I found it easier to spread the chili paste on the chicken after it was in the slow cooker. Put the lid on and cook until the chicken and potatoes are tender, 2 to 3 hours on high, 6 hours on low. Turn the slow cooker on high (if you were cooking on low) and sprinkle the green beans evenly over the chicken and cook until crisp tender, 30 minutes. Add peas and cook until heated through, 10 minutes. They suggest serving it with rice, but one starch (potatoes) is sufficient for me.

Dried pasilla bajio chilies from the garden.


Smoky Indonesian Style Chicken Curry

Serves four

Ingredients

  • 5 dried pasilla or New Mexico chiles, stemmed and seeded
  • 1 small shallot, quartered
  • 2 Tbs. thinly sliced lemongrass
  • 2 Tbs. tomato paste
  • 2 Tbs. sweet smoked paprika
  • 1 Tbs. minced peeled fresh ginger
  • 1 Tbs. packed dark brown sugar
  • 1 Tbs. sambal oelek
  • 1-1/2 tsp. ground cumin
  • 1-1/2 tsp. dried coriander
  • Kosher salt
  • 6 Tbs. lower-salt chicken broth
  • 8 bone-in chicken thighs (about 3-1/4 lb.), skin removed
  • Freshly ground black pepper
  • 1-1/4 lb. waxy potatoes, such as Yukon Gold, cut into 1-inch pieces (about 3-1/2 cups)
  • 1/2 lb. green beans, trimmed and cut into 1-inch pieces
  • 2/3 cup thawed frozen peas
Ingredients for the chili paste.
DSC_5675a
The ingredients are blended together.
Chicken thighs are coated with the chili paste before cooking.

Directions

  1. Put the chiles in a medium bowl and cover with boiling water; set aside to soften for 20 minutes. Drain, then transfer the chiles to a blender.
  2. Add the shallot, lemongrass, tomato paste, smoked paprika, ginger, brown sugar, sambal oelek, cumin, coriander, and 2 tsp. salt. Blend the mixture until smooth, drizzling the broth through the hole in the lid and stopping occasionally to scrape down the inside of the jar.
  3. Generously season the chicken with salt and pepper and spread evenly with the chile mixture. Layer the potatoes in the bottom of a 5- to 6-quart slow cooker and arrange the chicken in an even layer on top. Cover and cook until the potatoes are fork-tender and the chicken is tender but not falling off the bone, 2 to 3 hours on high and 6 hours on low. (The curry can stay on the keep-warm setting for up to 3 hours.)
  4. About 45 minutes before serving, turn the slow cooker to high (if it was on low or keep-warm), sprinkle the green beans evenly over the top, cover, and cook until crisp-tender, about 30 minutes. Add the peas and cook until heated through, about 10 minutes. Stir to combine, season to taste with salt and pepper, and serve.

DSC_5684a


January 9, 2016 Spicy Slow Cooked Short Ribs with Lime and Basil

DSC_5664aI received my first slow cooker, a Crock Pot, almost thirty four years ago as a wedding present. It’s a very basic model,  just a low and high setting, no timers or special functions. Even though I have never replaced the glass lid that broke many years ago, I have other lids that fit just fine and it works as well today as the day I got it. I confess that in recent years my crock pot didn’t get much use, maybe just a little foodie snobbery on my part, only on Thanksgiving to keep soup warm or for hot apple cider. Then last February Joe used it to cook a short rib recipe from an article in a magazine as part of the multi course meal he treats me with every year for Valentine’s Day.

Before Christmas I discovered my brother and sister in law were in need of a slow cooker and I decided it would be a great and very practical gift.  I did some research and found one that I thought would fit the bill.  Not only can you slow cook in this model, you can brown your meat, steam vegetables or fish and it has a “keep warm” function that keeps your finished dish warm up to eight hours. Little did I know that when I was doing my research my hubby was looking for one for me as well. That meant my sister in law and I received new slow cookers (Cuisinart brand) as Christmas presents. It was the first gift I opened Christmas morning since Joe was anxious to recreate the recipe for our Christmas dinner.

The recipe for spicy slow cooked short ribs with lime and basil came from an article with recipes, Slow Cooker Secrets, in Fine Cooking magazine. Cookbook authors Bruce Weinstein and Mark Scarbrough wrote the article in conjunction with their recently published, The Great American Slow Cooker Book. Their goal in writing this book was to achieve the best results from an appliance that is found over 80% of American homes. They have found that the low and slow temperatures and the high moisture environment of the slow cooker are the perfect combination for braising all kinds of dishes. The busy cook can prepare their meal early in the day, set it and forget it while at work or doing other things.

Short ribs are a perfect match for the slow cooker. The meat is dense and well marbled with connective tissue that softens during the long cooking process.  Be sure to get English cut short ribs which are cut parallel to the bone rather than cut across the bone. Ribs cut across the bone are referred to as flanken cut and are used for Korean style short ribs.  Even though our slow cooker has a browning function, Joe thought he would achieve higher temperatures and better browning in a skillet. Once browned, the ribs are set aside and the onion is added to the same pan and cooked until soft. Additional aromatics, ginger, thyme, chilis, garlic, nutmeg and allspice are the next additions to the pan. The original recipe uses Thai bird chilies cut in half, we used whole (frozen from the garden) for a little less heat.

The next step is small but adds a unique flavor to the sauce.  A half cup of lime marmalade is stirred into the onions and aromatics.  Lime marmalade is found in the British section of many larger supermarkets and I think it’s tangy sweetness is worth looking for. If you can’t find it, orange marmalade is a good substitute, just add a little fresh lime juice and peel.

Add this sauce to the slow cooker insert, stir in soy and chicken broth and nestle your short ribs in the sauce. The ribs are cooked on low for 9 hours or 5-6 on high. The final step is to move the finished ribs to a platter, then defat and finish the sauce. Stir chopped basil into the sauce and season with salt and pepper to taste. Garnish with additional basil leaves. We made this twice in the week between Christmas and New Year, once with bone-in short ribs, the other time with boneless, both were delicious. The short ribs were incredibly tender and the sauce was spicy with a delicious citrusy tang.   We served this with soft polenta finished with some Parmesan to sop up the juices. A definite keeper for us.

The recipe uses English style short ribs, perfect for the slow cooker.
Brown the short ribs in a skillet or your slow cooker insert.
After the meat is browned, the onion and aromatics are added to the pan.

DSC_5638a

DSC_5642a
Adding the browned short ribs to the slow cooker insert.
My new Cuisinart slow cooker.
Nestling the browned short ribs into the sauce.


Spicy Short Ribs with Lime and Basil

Serves four

Ingredients

  • 1T peanut oil
  • 3lb bone-in short ribs
  • 1 medium onion, chopped
  • 6 small Thai bird chilies, stemmed and halved lengthwise
  • 2 medium cloves garlic, quartered
  • 1 3-inch piece of ginger, thinly sliced
  • 1t dried thyme
  • ½t ground allspice
  • ¼t freshly grated nutmeg
  • ½c lime marmalade
  • ½c lower salt chicken broth
  • 2T soy sauce
  • 1T white wine vinegar
  • 2T finely chopped fresh basil leaves; plus small leaves for garnish
  • Kosher salt and freshly ground pepper

Directions

  1. Heat the oil in a 12-inch skillet (or removable insert).
  2. Add half the short ribs, turn once, brown well.
  3. Transfer ribs to a bowl, repeat with remaining ribs.
  4. Add onion and cook stirring often until soft (about 3 minutes).
  5. Add chiles, garlic, ginger, thyme, allspice and nutmeg
  6. Stir until fragrant (about 1 minute).
  7. Add marmalade and stir until melted.
  8. Pour contents into slow cooker insert, if you were cooking in a skillet.
  9. Stir in broth and soy sauce.
  10. Nestle the ribs into the sauce pouring the meat juices into the pot.
  11. Cover and cook until fork tender (5-6 hrs on high or 9 hrs on high).
  12. The cooked ribs can stay on the “keep warm” setting for up to 2 hrs.
  13. Use tongs to transfer the short ribs to serving bowls or a platter.
  14. Strain the sauce, set aside.
  15. Pour the sauce into a saucepan.
  16. Add the vinegar to the sauce, bring to a boil, until reduced by half (about 8 min).
  17. Stir in basil and cook for 1 minute to let the flavors meld.
  18. Season to taste with salt and pepper, pour sauce over the short ribs.
  19. Garnish with small basil leaves.
Short ribs served on a bed of polenta.


January 5, 2016 Roasted Vegetable Salad

DSC_5416aJust because we are in the middle of a chilly (notice I didn’t say cold) and somewhat rainy winter, doesn’t mean that a green salad can’t be part of your meal. I have been using a formula from an article in Fine Cooking to make delicious and interesting winter salads. Hearty roasted vegetable salads combine mixed winter greens with roasted winter vegetables and fruits, nuts, cheeses and dried fruits.

I confess that even though I’m not making the trek out to the greenhouse these days where I still might find some spinach or claytonia, my local supermarkets are providing a varied assortment of fresh salad greens. I always purchase a smaller package because I am more likely use them up before the recommended expiration date. Choose from one of the many blends in your produce section or go solo with baby arugula or spinach.

Winter root vegetables are the next component in the salad. I line my pan first with parchment paper for easy clean up.  Uniformity is the key here, cut everything into a 3/4 inch dice or wedge and toss with a little olive oil and some kosher salt. If you choose to roast red beets they will need to be on a pan of their own so they won’t bleed into the other fruits and vegetables. High heat cooking carmelizes and brings out the sweetness in the vegetables and fruit. Just remember not to crowd the pan or you will end up steaming them.

Dried fruit balances out the bitterness of the greens, for this recipe I chose dried cherries. Some aged Gouda brings another layer of flavor and toasted slivered almonds add a little crunch. Toss the salad with a simple fruity vinaigrette, I combined a tangy red apple vinegar with toasted almond oil from the Tubby Olive.

Roasted Vegetable Salad

Ingredients

  • 4 generous cups winter greens such as spinach, arugula, endive, baby greens-kale, chard etc.
  • Roasted root vegetables and fruit, I used a combination of red and gold beets, and a firm tart apple such as a Braeburn, roasting recipe follows
  • ¼c toasted slivered almonds
  • 1/3c diced aged Gouda
  • 3T dried cherries
  • Kosher salt and freshly ground pepper
I roasted red and golden beets along with apples. Toasted almonds and dried cherries complemented the flavors nicely.


For the vinaigrette

Ingredients

  • 2T red apple balsamic vinegar
  • 1t honey
  • ½t Dijon mustard
  • 3T toasted almond oil
  • ¼ t grated lemon peel
  • Kosher salt and freshly ground pepper

Directions

  1. Whisk all the ingredients together in a small bowl.
  2. Season to taste with salt and pepper.

For the Roasted Vegetables

Ingredients

  • 6c mixed root vegetables and fruit (I used red and golden beets and apples) trimmed and cut into ¾ inch wedges
  • Olive oil to coat the vegetables
  • Kosher salt

Directions

  1. Position racks in the upper and lower third of the oven. Preheat oven to 450°F.
  2. In a large bowl combine the golden beets with the apples. Toss them with a little oil and some kosher salt. Transfer them to a large parchment lined heavy duty baking sheet and spread out in a single layer. Repeat the process with the red beets and transfer to their own baking sheet.
  3. Roast, flipping over with a spatula halfway through and rotating the baking sheets. The vegetables should be browned and tender.  It took me about 18 minutes, watch carefully so you don’t burn them.
Roasted golden beets and apples, red beets were roasted separately.


Directions for assembling the salad

  1. Put the greens in a bowl large enough to toss them. Drizzle the greens with about 2T of the vinaigrette. Toss the greens well and add a little more dressing if necessary. Arrange greens on salad plates or a large platter.
  2. Season the roasted vegetables lightly with some of the remaining vinaigrette. Arrange them over the greens, then top with the nuts, cheese and fruit.
  3. Serve with freshly ground pepper and additional dressing if desired.

DSC_5417a


December 8, 2015 Smoked Turkey Chili

DSC_5319aFor the first time in about thirty years we did not host Thanksgiving dinner. We did celebrate my favorite holiday with friends and family in a collaborative effort that was enjoyed by all. Our contribution included a fall salad, curried butternut squash soup, and smoked turkey breasts.

When we hosted Thanksgiving, the traditional roasted turkey was always on the table along with at least one other turkey variation. We did the puff pastry turkey à la Martha, delicious deep fried turkey, quick but dangerous on a wooden deck on a windy day. We have even smoked ducks, geese, Cornish game hens, but the favorite was and is still the smoked turkey.

We had plenty for the eleven of us who gathered for Thanksgiving dinner and plenty to take home for leftovers. Over the next several days that meant smoked turkey wraps with coleslaw and cranberry chutney and smoked turkey quesadillas, both great ways to use it. With more smoked turkey to “repurpose”, I thought a smoked turkey chili would be a great way to use what we had left.

When I normally make chili, I brown the onion and pepper first, then add uncooked ground turkey meat and brown it. Since I had already cooked turkey I wanted to add it later in the recipe, so the meat would be warmed up, not dried out and over cooked. This recipe is so simple and the smoky flavor of the turkey is great in a chili. You can make this as spicy or as mild as you choose. I used a medium chili powder, cumin and some chipotle powder which added it’s own smokiness.

DSC_5326a

Smoked Turkey Chili

Serves four to six

Ingredients

  • 1/3c each orange, red and yellow bell peppers, finely chopped
  •  1 cup chopped yellow onion
  •  1 t chopped garlic
  •  2T vegetable oil
  •  4c cooked kidney beans or other beans of your choice
  • 1 28oz can crushed tomatoes
  •  4-5c medium diced smoked turkey
  •  1c chicken stock
  • 1T chili powder (medium to hot according to your preference)
  • 1t ground cumin
  • 1 chipotle chili powder
  •  1t salt or to taste
    Chopped green onions, with tops (for garnish)

Directions

  1. Sauté the bell peppers, chopped yellow onion and garlic in oil over medium-high heat until they are just tender.
  2. Combine the cooked peppers, onion and garlic with the remaining ingredients (exept the green onions). Bring the turkey chili just to the boil, then reduce the heat. Simmer for one-half hour, stirring occasionally.

DSC_5316a

December 6, 2015 Miso Marinated Salmon

DSC_5314aDuring this busy holiday season it’s good to have a few recipes you can pull out that are quick, easy and most important, delicious too.  Miso glazed salmon is one recipe that certainly fills that bill.
This is a Japanese technique that was used to preserve freshly caught fish for it’s journey to land. Chef Nobu Matsuhisa made the preparation famous with his black cod recipe and it has become a popular restaurant dish.  Just four ingredients, miso, mirin, sake and sugar make up the marinade. If you are not already familiar with any of these, here is a little background information on these important staples of Japanese cooking.

Miso is fermented soybean paste. It is made by steaming and crushing soybeans, then adding salt and koji, a culture cultivated from rice, barley or soybeans that triggers fermentation. The flavor of miso has been described as salty, earthy and rich in umami. Miso ranges in color from white to pale yellow to a deep chocolate brown. The lighter the color, the sweeter (less salty) it will be. A light miso paste is most likely made from rice and is best suited for fish and light sauces.
Sake, pronounced SAH-keh, not sa-kee, is quite often described as Japanese rice wine. It is actually more akin to beer than wine since it is made from a grain, rice, and not a fruit as wine usually is. Unlike wine, sake is produced by a brewing process similar to that of beer. The alcohol content of sake usually is from 15-20 percent, compared to wine’s 9-15 percent content.
Mirin, is a type of rice wine but with a higher sugar content and lower alcohol. It is golden in color and it’s syrupy sweetness contrasts nicely with the saltiness of soy or tamari sauce.
Miso is easy to find in organic markets and large supermarkets. I definitely would recommend the white or shiro miso for this recipe. My favorite brand is Miso Master Organic Mellow White. You can use it for soups, sauces and dressings too. It will keep in the refrigerator for nine months.  Mirin is an increasingly easier find, the Kikkoman brand seems to be prevalent in the Asian section of most supermarkets. If you don’t like the idea of purchasing a bottle of sake just for a few tablespoons used in the recipe, dry sherry or vermouth can fill in. Honey or another sweetener could possibly substitute for granulated sugar but I have not tried it this way. You could also cut the recipe in half if making for two.
Whisk the four ingredients together in a medium bowl. I use a fork to smooth in the miso before I attempt to whisk it.  Use a bowl or container that will hold the fish snugly. I pour enough of the marinade to coat the bottom of the container and place the fish in skin side down. Then I pour the rest of the marinade on top. Cover the container with plastic wrap and refrigerate until a half hour before you are ready to cook the fish. Preheat the oven to 450° F and measure the fillets using the Canadian Fisheries method to determine cooking time. Remove the fillets from the marinade, wiping off the excess and place leaving about an inch between each piece on a well oiled baking sheet or pan. I like to sprinkle the top with a sesame seed mixture, but it is fine without it too. Cook fish for the determined amount of time, between 10-12 minutes.The finished internal temperature of the fillet should be 125°F.  Since you are cooking in a very hot oven, I turn the oven to broil at the end to brown the top of the fish a little bit. Transfer fish to warmed plates or a serving dish and serve with lemon wedges.

DSC_5296a
Four ingredients make up the marinade.

Miso Marinated Salmon

Serves 4

Ingredients

  • ½c white miso paste
  • ¼c granulated sugar
  • 3T sake
  • 3T mirin
  • 4 6-8 ounce salmon fillets (skin-on)
  • Sesame seeds or sesame spice mixture
  • Lemon wedges

Directions

  1. Whisk miso, sugar, sake and mirin together in a medium bowl until sugar and miso are dissolved, the mixture will be thick.
  2. Pour some of the mixture into a container that will fit the fillets snugly. Place the fish on top and pour the rest of the mixture over the fish. Cover the container with plastic wrap and refrigerate for 6 to 24 hours.
  3. A half hour before cooking bring the fish out to bring it to room temperature. Adjust oven rack to the middle position and preheat to 450°F.
  4. Wiping excess marinade off the fillets, place on an oiled baking sheet or pan, leaving about an inch between each fillet. Sprinkle the tops of the fillets with the sesame seeds or sesame spice mixture.
  5. Timing is always a function of the thickness of your fish. Measure fish at the thickest part of the fillet with a ruler, one inch of thickness equals about 10 minutes of cooking time.
  6. Transfer cooked fish to a serving platter and serve with lemon wedges.

DSC_5308a


November 27, 2015 Roasted Beet Salad with Beet Pesto, Goat Cheese and Hazelnuts

DSC_5227aAt the end of September we took a week long trip to Denver Colorado. Part of the time was fun, visiting Garden of the Gods, Pikes Peak, Rocky Mountain National Park, and the Denver Arboretum. Part of the time was study, well at least for Joe, he was attending the Family Medicine Experience, gaining CME (continuing medical education) in anticipation of the boards he took last week. All of the week was fun for me, I visited a local winery and a teahouse, went to Red Rocks, toured the Coors brewing facility (free samples) and went to a Mexican cooking demonstration at a Denver restaurant.

One of my main jobs in anticipation of any trip we take is to choose the restaurants we will enjoy that week. I take my responsibility seriously, and it took some arduous research to find the best restaurants. This was not our first trip to Denver, previous trips included dinners at the then trendy Rattlesnake Club, now closed and The Fort, a restaurant that serves “new foods of the old west”. On a more recent trip in 2004, we were one of the first to dine at the newly opened Frasca Food and Wine, now considered by many to be one of the best restaurants in the country. So the pressure was on.

I skip over the ads at the top of the search engine, any restaurant can call themselves “the best” and Trip Advisor is okay but sometimes a family friendly or a breakfast only spot can be at the top of the list. I prefer to look at the reviews of the local city magazine when I do this type of research, for that I turned to 5280 magazine which refers to Denver’s mile high altitude and their yearly ranking of the 25 best restaurants. I skipped over the restaurants that weren’t in Denver (sorry Frasca!) also steakhouses and sushi bars because I didn’t think they would provide enough of the local flavor.  I read the reviews, perused the menus and  looked for where they were in proximity to our hotel, we didn’t necessarily want to be driving all night to get to our destination.

I discovered there are a surprising amount of restaurants whose names include the word “and “, Stoic and Genuine, Beast and Bottle, Colt and Grey were all restaurants we ate at. That doesn’t include Work and Class, Olive and Finch, Hutch and Spoon. Definitely a trend.

Another trend, and one we definitely approve of, is the number of farm to table restaurants. Although we had enjoyable experiences at all of the restaurants we dined at, the one that really reminded us of eating at home was Root Down, an award winning “field to fork” restaurant, housed in what was once a circa 1953 gas station. Every course was thoroughly enjoyed and documented with a photo on the IPad. One of our favorites was a dish that Joe had, a roasted baby beet salad. The beets, both red and golden were served on a bed of arugula with goat cheese and toasted hazelnuts. There was a dollop of beet pesto (!) and the dressing was a basil vinaigrette artfully drizzed in circles on the plate.

Now, the job would be interpreting the dish at home. The beet harvest in the Kipp garden was over so my beets came from the farmers market (red) and the supermarket (golden).Since I was using greens from our garden greenhouse I had a varied selection to choose from, spinach, leaf lettuces, claytonia, upland cress and yes, some arugula. The cheese varied in the Instagram pictures I saw, sometimes it was a slice of a creamy goat cheese, other times it was crumbles of  chevre. The cheese on the salad at  Root Down was from Broken Shovel Farm, a local supplier. I used a chevre from Giggling Goat Dairy,  a supplier I became familiar with this summer at our local farmers market.  I stayed with toasted hazelnuts, but I think walnuts would work just as well.

Beet pesto was new for me and at first I wasn’t quite sure what qualified this as a pesto. It is usually a sauce that combines an herb, most often basil, with nuts, olive oil and cheese. The definition of the word that pesto originates from is pestare which means to pound or to crush, so it does qualify as a pesto.  I combined cooked beets, a dash of red apple balsamic, toasted unsalted sunflower seeds, a little lemon juice and extra virgin olive oil. It turned into a delcious vibrant magenta sauce that would be great as a dip, tossed with pasta or as a sandwich spread.
I changed the vinaigrette to accompany the salad from basil, not in season now and not my first choice with beets to a tarragon vinaigrette. The anisy tarragon contrasts beautifully with the natural sweetness of the beets.

Roasted Beet Salad with Beet Pesto, Goat Cheese and Hazelnuts

For the Roasted Beets

Ingredients

  • 1½ lb. each red and golden beets

Directions

  1. Preheat oven to 425°F. Wrap beets in foil packets, separating by color. Place on a baking sheet; bake until beets are slightly soft to the touch, 45 minutes to 1 hour depending on their size. Cool beets in packets, then rub off skins (use a paring knife for tough spots).
DSC_5086a
Ingredients for the beet pesto.

For the Beet Pesto

Ingredients

  • 1c cooked, roughly chopped red beets
  • 1 clove garlic, minced
  • 1/3c roasted unsalted sunflower seeds
  • 2T tarragon leaves
  • 1T apple balsamic vinegar
  • 1T lemon juice
  • 1/4c extra virgin olive oil

Directions

  1. Place all of the ingredients in a food processor and blend until smooth.

For the Vinaigrette

Ingredients

  • ¼c apple vinaigrette or a white balsamic
  • ½c roughly chopped red beets
  • 1t honey
  • 1/3c extra virgin olive oil
  • 2T tarragon leaves

Directions

  1. Combine all ingredients in a small food processor and process until well combined

Assembling the Salad

Ingredients

  • 6-8 c Baby arugula- I used a combination of greens from our greenhouse that included arugula
  • ½c toasted chopped hazelnuts
  • 4oz crumbled goat cheese
  • Roughly chopped roasted red and golden beets (from the first step)
  • Freshly ground black pepper

Directions

  1. Add arugula to salad plates. Top with goat cheese, hazelnuts and chopped beets.
  2. Add a dollop of beet pesto to the plate
  3. Serve vinaigrette on the side.
  4. Add a grind of black pepper to each salad as desired.

DSC_5231a

November 21, 2015 Sheet Pan Chicken Thighs with Delicata Squash, Fennel and Grapes

DSC_5102aHere is another no fuss sheet pan supper, this time from the Epicurious website. The star of the show, bone in chicken thighs, are paired with a different cast of characters, red grapes, fennel and delicata squash.

Fall is prime season for grapes, the fruit that is harvested now has been hanging on the vine all summer. This translates into succulent fruit with high sugar content and complex flavors. Roasted grapes are delicious and I doubled the amount from the original recipe. Crunchy and a little bit sweet, fennel is in season now and through early spring. I love it’s licorice flavor raw in salads and roasting fennel caramelizes it and mellows out it’s sweetness.  Delicata is the smallest of the winter squashes, usually weighing between 1/2 to 1 pound each. They are cylindrical in shape with yellow or cream colored skin with slight ribbing and dark green stripes. Unlike other winter squashes, the skin of the delicata is edible and has fewer seeds, making them easier to prepare.

The recipe starts with a flavorful rub that includes cumin, coriander, (my addition) brown sugar, salt, black and cayenne pepper. Half of the rub is tossed with the vegetables, the other half with the chicken thighs. You can do this step ahead earlier in the day and assemble the ingredients on the sheet pan before you are ready to roast. Space the components evenly on the baking sheet so all the ingredients get nice and brown. For even cooking, rotate  the pan halfway through the cooking time.  Be sure to use skin on bone in chicken thighs, even if you don’t eat the skin, it protects the meat while it is cooking.  As I previously posted, an instant read thermometer will give you the best results.

DSC_5042a

DSC_5077a

Sheet Pan Chicken with Delicata Squash, Fennel and Grapes

Serves four

Ingredients

  • 1T brown sugar
  • 1T ground cumin
  • 1T ground coriander
  • 1T kosher salt
  • 1T freshly ground black pepper
  • ¼t cayenne pepper
  • 1 delicata squash, about 1½lbs, halved lengthwise, seeded and cut into ¼” half moons
  • 1 fennel bulb, about ½lb, cut in half lengthwise, seeded and cut into half moons
  • 2c seedless red grapes
  • 1T olive oil
  • 2 lb. bone-in skin on chicken thighs (5-6 pieces)
  • 1/4c torn fresh mint leaves

DSC_5074a

Directions

  1. Preheat oven to 425°F with the rack in the lower third of the oven.
  2. Mix the first six ingredients in a small bowl. Toss squash, fennel and grapes with oil and half of the spice mixture. Arrange in a single layer on a sheet pan.
  3. Rub chicken thighs evenly with the remaining spice mixture. You can prepare both components several hours in advance and store in the refrigerator. Bring the chicken out about 20 minutes before proceeding with the recipe.
  4. Arrange the chicken thighs skin side up on top of fruit and vegetables. Roast until skin is browned and an instant read thermometer inserted into the thickest part of the thigh reads 165°F, about 25 minutes to one half hour.
  5. Divide chicken, fruit and vegetables between four plates and top with mint.

DSC_5101a

November 12, 2015 Okonomiyaki or Japanese Pancake

DSC_5036a“Okimiaki” was the one word message Joe sent me one Tuesday night during his office hours. My response, “huh?” seemed appropriate, poor guy, he has been working too much I thought. His response was “Japanese pancake made w cabbage- I want to make them”.

Okay, that was a new one for me, I thought I knew quite a bit about Japanese cooking so I did what everyone does these days, I Googled it. No appropriate response for the okimiaki spelling but when I googled “Japanese pancake” I started getting some information.

Joe heard about the Japanese pancake from a patient of his who is a chef and a writer. She and some friends were making them for a party. It was something new for both of us. I have quite a few Japanese cookbooks that go beyond the typical sushi and sashimi recipes, none gave any reference to Japanese pancakes or okonomiyaki as they are also called. I even called on a friend who travelled to Japan this past spring to see if she could give me any insight but she was not familiar with this now puzzling dish.

I learned that okonomiyaki is Japanese street food made popular in the cities of Osaka and Hiroshima. Because of it’s shape, it is sometimes referred to as Japanese pizza or pancake in the United States. The ingredients in an Osaka style okonomiyaki are mixed together while the ingredients in a Hiroshima style are layered and topped with noodles and a fried egg. Okonomi is translated “what you like” and “yaki” is grilled or cooked, so okonomiyaki is essentially “cooked as you like it.”  The one thing they all have in common is a pancake like batter and shredded cabbage, the rest is up to the cook to make the pancake “as they like it”. There is special okonomiyaki flour, the only difference I could find in it were the special seasonings and possibly some powdered yamaimo, Japanese yam. Yamaimo’s gelatinous texture gives the pancake added fluffiness.

The “as you like it” aspect can get interesting and I have seen recipes include shrimp, squid, pork belly, cheese and vegetarian options. How you top your pancake is equally important and might include chopped scallions, sesame seeds with a flourish of okonomi or tonkatsu sauce and Kewpie mayonnaise. Bottled tonkatsu with the red bull dog on the label is also labeled “vegetable and fruit sauce” but you have to read down the list of ingredients a bit to find either. I presume the brown color is from the prune paste. There are also recipes on line for tonkatsu sauce. You will find Kewpie mayonnaise on the Asian aisle in larger supermarkets. It has a Kewpie doll with outstretched arms on the package. It differs from our good old fashioned Hellman’s with it’s use of rice vinegar, giving it more tang and MSG to up the umami flavor.

I spent quite a bit of time contemplating what recipe to use. I wanted to stay fairly basic for our first attempt and decided on an Osaka style recipe from Serious Eats. We, or as I should really say, Joe made them on a sashimi night which is a weekend night when we recreate some of our favorite sashimi recipes using salmon, scallops and tuna. His efforts turned out quite good, the first was topped with bacon, then he got a little more creative and topped the second with seared tuna. We finished them off with tonkatsu sauce, mayo (not Kewpie) with sriracha, toasted sesame seeds and pickled ginger. The combination of the crispy exterior and soft interior is quite addictive and very filling. We had enough for a breakfast okonomiyaki for Joe and smaller ones for dinner the next day. Would we try them again? Not every week, but definitely.

Okonomiyaki

Makes 4 large pancakes

Ingredients

  • 2 cups all-purpose flour
  • 1 1/3 cups dashi or low-sodium chicken stock
  • 4 large eggs, beaten
  • 8 cups finely chopped cabbage-we used a combination of green and red
  • 2 cups chopped raw shrimp or baby shrimp
  • 8 scallions, sliced, divided
  • Kosher salt, to taste
  • 8 slices bacon, sliced in half- the second, slices of seared tuna
  • 2 tablespoons vegetable oil
  • Kewpie Mayonnaise or sriracha mayo
  • Okonomiyaki or tonkatsu sauce
  • Toasted sesame seeds
  • Pickled ginger

Directions

  1. In a large bowl whisk together flour, dashi or stock, and eggs. Add chopped cabbage and mix so that the cabbage is gently folded into the batter. Fold in shrimp and scallion whites then season with salt.
  2. Heat 1/2 tablespoon vegetable oil in a large non-stick skillet over medium high heat until shimmering. Add 1/4 of the batter, gently pushing the batter down with a spatula until flattened. Cook until underside is browned, about 4 minutes, then place 4 pieces of halved bacon on the top side. Gently flip the pancake so that the side with the bacon is now cooking. Cook until the bacon is crisp and the pancake is cooked through, about 5 more minutes. Serve immediately with mayonnaise, okonomiyaki sauce, toasted sesame seeds, pickled ginger, and scallion greens. Repeat with remaining pancakes.

    DSC_5024a

    DSC_5027a

    DSC_5028a

    DSC_5031a


November 8, 2015 Curried Chicken with Cauliflower, Apricots and Olives

DSC_5012aStep aside slow cookers, move over microwaves, there’s  a new method for getting dinner on the table in a hurry, sheet pan suppers. It provides the busy weeknight cook with easy preparation, the convenience of cooking everything on one pan and makes clean up a snap.

The sheet pans I have stood the test of time, they have served me well for over 25 years.  They may have a little more “character” than a new one but they still do the job. As a caterer I used them constantly, for roasting vegetables and meats, baking cookies, rolls and countless hors d’oeurves. Actually the correct name is a half sheet pan, usually 13″x18″ in dimension,  just the right size to fit in most standard ovens. A full sheet pan is18″x26″, the size fits the rack in a commercial oven. Don’t confuse a jelly roll pan with a sheet pan, jelly roll pans are flimsy and you would need to double them up and you still wouldn’t achieve the same sturdiness. A sheet pan is an inexpensive addition to your cooking equipment. You will find them in both restaurant equipment stores or in the catering aisle of any big box store. Choose one that is aluminum or stainless steel, they hold up well under high heat cooking. I would not recommend a non stick sheet pan, the surface will eventually erode and could possibly contaminate the food you are cooking.

Curried Chicken Thighs with Cauliflower, Apricot and Olives is from Molly Gilbert, author of Sheet Pan Suppers. She calls this a riff on the classic eighties Silver Palate recipe for Chicken Marabella. In Ms. Gilbert’s version the flavor profile moves from Meditteranean to Moroccan, the capers in the original recipe are gone, the olives remain and the prunes have been replaced with dried apricots.

Start the recipe by combining the chicken thighs with half of the curry powder and smoked paprika, oil, vinegar, cinnamon, cayenne and salt. I think it’s beneficial for a  recipe that uses an ingredient in two different steps to read, 4 teaspoons curry powder, divided. That would be helpful for the cook, (and we all do it) who maybe isn’t reading the recipe that carefully.

Next is the issue of curry powder, a blend of many spices that can range in flavor from very mild (sweet) to the Madras blend which is quite hot. I think the sweet curry powder is the right choice for most palates making this recipe. The paprika called for in the recipe is smoked, giving another interesting flavor dimension to the dish.

Toss the chicken with the spices, cover and refrigerate for at least eight hours but preferably overnight. The recipe calls for boneless skinless chicken thighs, I used bone-in thighs because I felt they would hold up better to the high heat cooking. When you are ready to cook, place the rack in the center of the oven. The recipe calls for a 450°F oven but I reduced mine to 425°F since I was roasting with convection heat.

A large head of cauliflower translated into about eight cups for me.  I like to cut the head in half and then into quarters through the core. Then I separate the florets from the central stem and break the florets into smaller, relatively equal sized pieces. Toss the cauliflower with the remaining oil, curry powder, paprika and salt to evenly coat. Spread the cauliflower evenly on the sheet pan in a single layer and add the chopped apricots and olives. Soak the apricots for five minutes to soften, anything longer will turn them mushy. I used Castelvetrano olives, my personal favorites and easy to find on the Mediterranean bar of any good supermarket.

Remove the chicken from the marinade and space the pieces evenly over the cauliflower. Add the apricots and olives to the baking sheet. You might want to tuck some of them under the chicken since they get quite brown. Roast, rotating the pan halfway through the cooking time. I used an instant read thermometer and my chicken pieces were done in a little less than a half hour. If you are not using a convection oven it may take a little longer but no matter what, the instant read thermometer is always key to getting the best results.

This is a great weeknight supper because everything can be ready in advance, chicken marinated, cauliflower, apricots and olives prepped. At dinnertime get everything ready to cook while your oven preheats. A simple salad will complete the meal.

Curried Chicken with Cauliflower, Apricots and Olives

Serves 4

Ingredients

  • 8 bone-in chicken thighs (about 2lbs)
  • ¼c extra virgin olive oil, divided,  2T chicken, 2T cauliflower
  • 1T apple cider vinegar
  • 4t sweet curry powder, divided, 2t chicken, 2t cauliflower
  • 1t smoked paprika, divided, ½t chicken, ½t cauliflower
  • ½t ground cinnamon
  • ¼t cayenne pepper
  • Kosher Salt
  • 1 large head cauliflower, cut into bite-sized florets
  • ¾c chopped dried apricots, soaked in hot water for 5 minutes and drained
  • 1c pitted green olives, halved
  • ½c chopped fresh cilantro or parsley
  • 1 large lemon cut into wedges
DSC_5006a
Toss the cauliflower with curry powder, cinnamon, smoked paprika, cayenne pepper and salt.
Everything ready to go on the sheet pan.

Directions

  1. Combine the chicken thighs with 2T oil, the vinegar, 2t curry powder, cinnamon, cayenne and ¾t salt in a medium bowl, tossing to coat. Cover and refrigerate for at least 8 hours and up to overnight.
  2. Position the oven rack in the center and preheat oven to 450°F (425°F if using convection heat). Line a large sheet pan with parchment paper. Combine on the pan, the cauliflower with the remaining 2T oil, 2t sweet curry powder, ½t paprika and ¾t salt, tossing to coat. Be sure the cauliflower is spread out evenly.
  3. Add the apricots and olives and spread them evenly on the pan.
  4. Remove the chicken thighs from the marinade and place them evenly spread over the cauliflower. Roast, rotating the pan halfway through the cooking time, between 30-35 minutes. Remove the chicken from the pan and toss the cauliflower with the pan drippings. Serve chicken and cauliflower with a sprinkle of cilantro or parsley  and lemon wedges on the side.

DSC_5019a