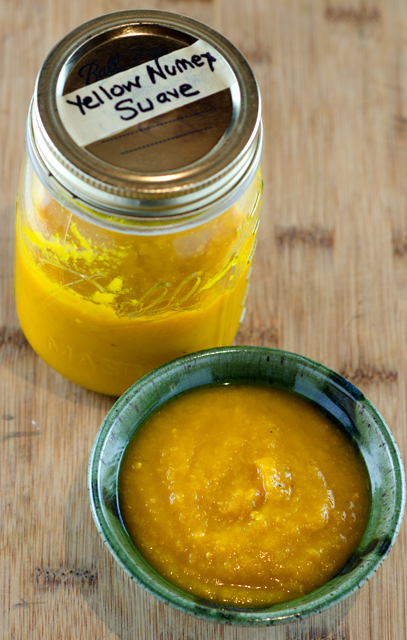
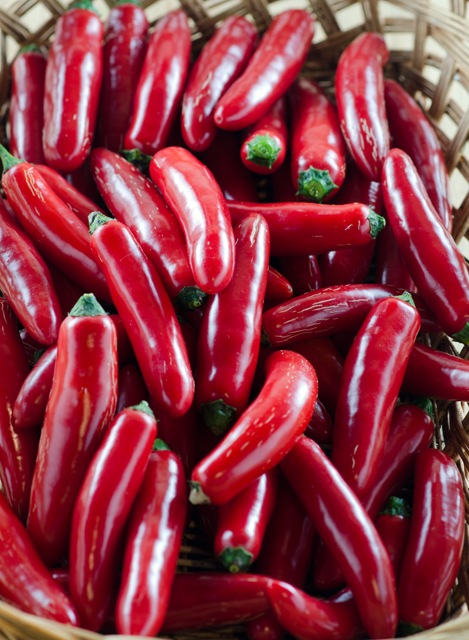
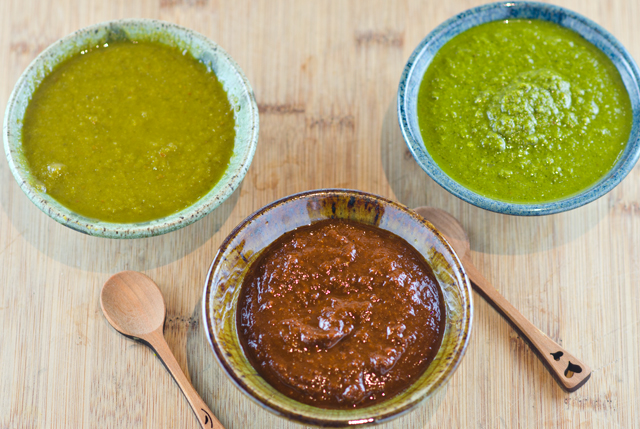
Last weeks plunge into the deep freeze meant it was time for one final harvest of hot peppers. With a formula that worked and an abundant source of peppers the challenge was to make a few hot sauces using the same method as the sriracha sauce from a few weeks ago. I first tried the NuMex Suave Orange peppers and several days later using green and red pasilla peppers and green poblano peppers. The jars fermented on the back kitchen countertop for about a week. I wasn’t sure what the results would be so my expectations weren’t very high.
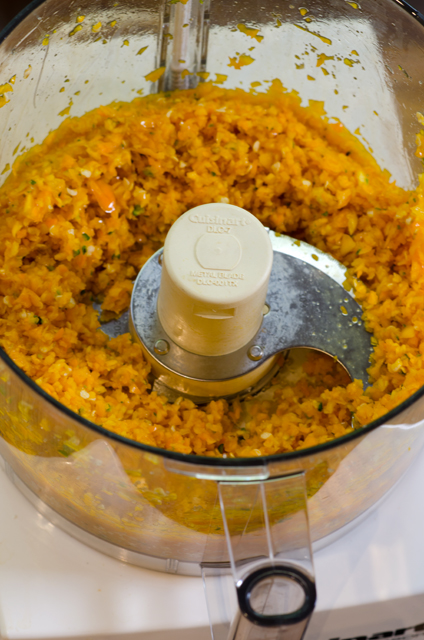
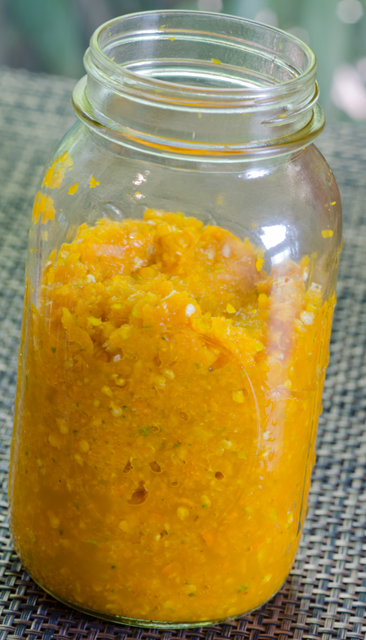
To finish, I followed the same procedure for each variety, transferring the chopped chilis to the food processor, adding enough (1/3 to 1/2cup) white vinegar to puree until smooth. I carefully washed out the processor between peppers to keep each type as pure as possible. I strained the mixture through the medium disc of the food mill to eliminate any seeds. I think it’s easier than the mesh strainer and gives the finished product a little texture.
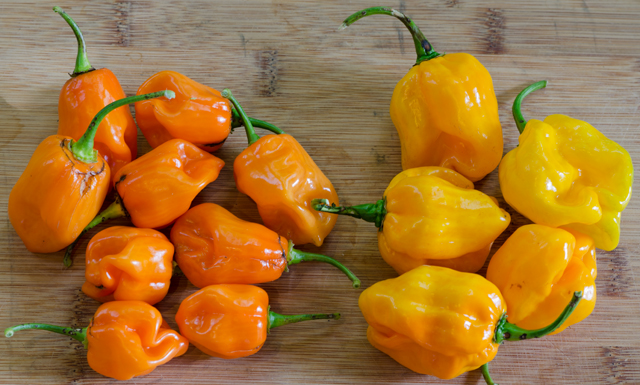
Now for some taste testing. The Numex Suave Orange has the flavor nuances of the habanero that are usually missed because the heat dominates. The sauce has a citrusy flavor with hints of orange and lemon and finishes with a little heat. The green pasilla flavor reminds me of green bell pepper and has a touch of moderate heat. The green poblano has an initial hint of sweetness and finishes with more heat than the green pasilla. I especially like the red pasilla sauce. The color is a deep dark red and the flavor is rich and full but not too hot. I think it would be the perfect addition to a chili recipe.
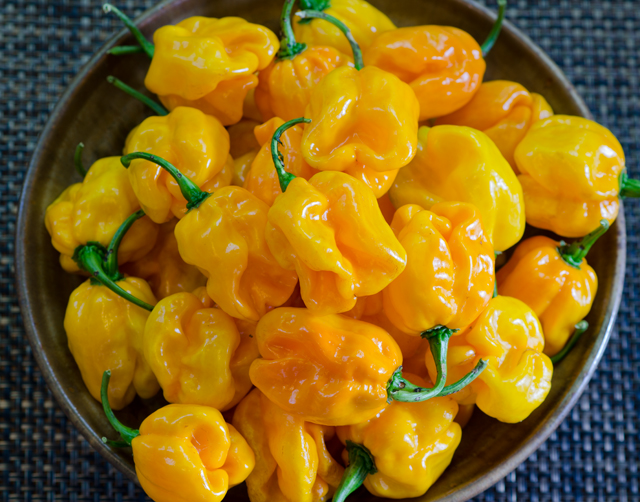
Numex Suave Orange PeppersThe habanero peppers on the left measure a tongue burning 100,000 to 300,000 on the Scoville scale while the Numex Suave Orange on the right are a very mild 800!Adding peppers and garlic to the food processor.Chop the peppers as finely as possible.The peppers ferment for about a week.The finished product
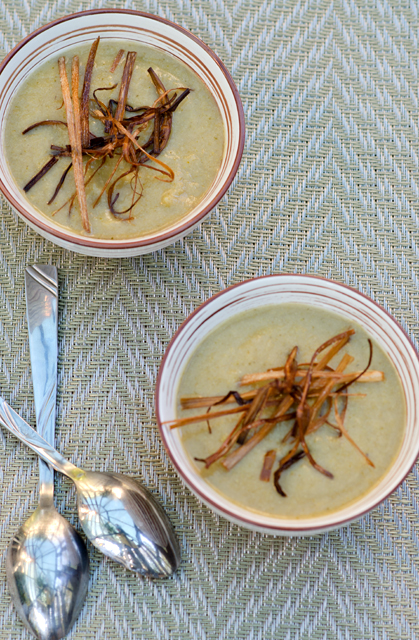
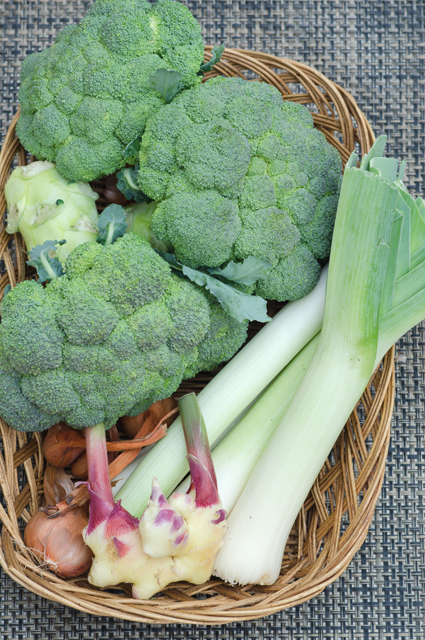
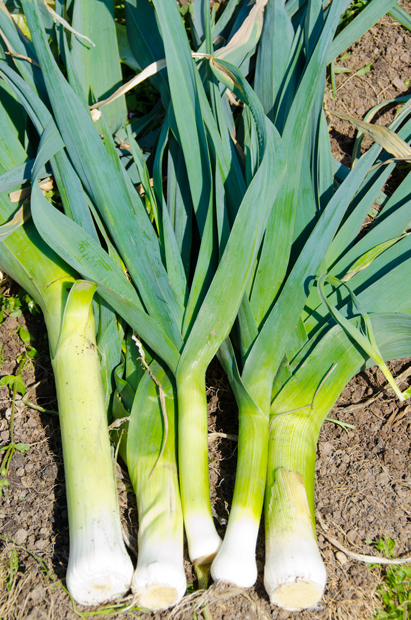
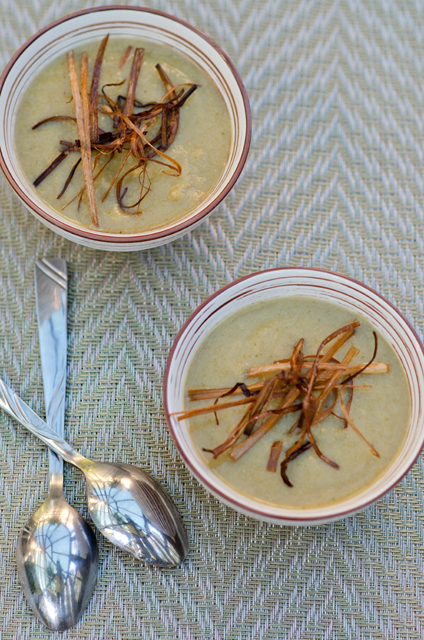
The fall crop of broccoli is making it’s appearance in our farmers market and I love making broccoli soup now that the cooler weather is upon us. This time I combined it with leeks and shallots from our own harvest and one of the more unique offerings at our local farmers market, freshly harvested ginger.
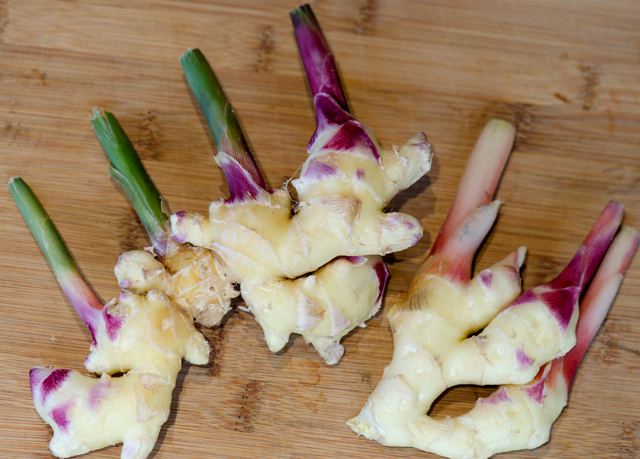
This ginger is younger than the ginger you buy at the grocery store. The skin is a yellowish beige with pink and purple markings. The flavor is milder and the flesh is delicate and juicy, not fibrous. This is the ginger commonly used in pickled ginger. You can substitute fresh ginger in any recipe, but because of it’s milder flavor, you will need to use more.
Ginger from the grocery store that has sprouted can be planted but there is no guarantee if it will be disease and pest free. Our local farm, Blooming Glen Farm buys rhizomes from certified organic farms in Hawaii. They start their plants in the spring and grow them in conditions that are similar to the warm temperatures the plants are accustomed to in Hawaii. The rhizomes are ready for harvest by mid October. A bit pricey, 18.99 a pound, but a nice splurge this time of year. I’m going to hold a few aside for Joe to plant so we can have our own ginger next fall. This soup comes together very quickly and the frizzled leeks that top it are very easy to do and add a nice textural contrast.
Broccoli Leek Soup with Fresh Ginger
Makes about 6 cups
Ingredients
2-3 T olive oil
¼c chopped shallots
1T finely chopped fresh ginger
3 large leeks, sliced, white and light green parts only
1 large head of broccoli, cut into florets
4-5c chicken or vegetable stock
Kosher salt and freshly ground pepper to taste
Frizzled leeks as garnish-see recipe following
Fresh ginger from the farmers market.Part of the fall leek harvest.
Directions
Add olive oil to a large sauté pan over medium high heat. Stir in the chopped shallots and ginger and sauté for about 3 minutes. Add the garlic and sauté for an additional 2 minutes.
Add the broccoli florets and cook for an additional 2-3 minutes.
Add stock and bring to a boil. Reduce heat to low and simmer for 30-40 minutes.
Puree the soup in batches in a blender. Add additional stock if the soup is too thick.
Season to taste with salt and pepper
Garnish soup with frizzled leeks.
Frizzled Leeks
Ingredients
1 leek, trimmed
Olive oil
Kosher salt and freshly ground pepper
Directions
Cut leek in half lengthwise and rinse away any grit. Slice thinly and pat dry to insure the oil will not splatter.
In a small skillet over medium heat, warm ¼ inch olive oil. Add a handful of leeks and fry until golden brown, about a minute or so. Remove with a slotted spoon and transfer to a paper-towel-lined plate. Sprinkle lightly with salt. Repeat with remaining leeks.
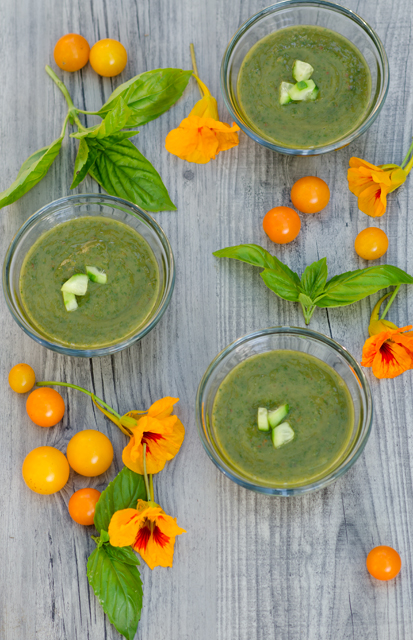
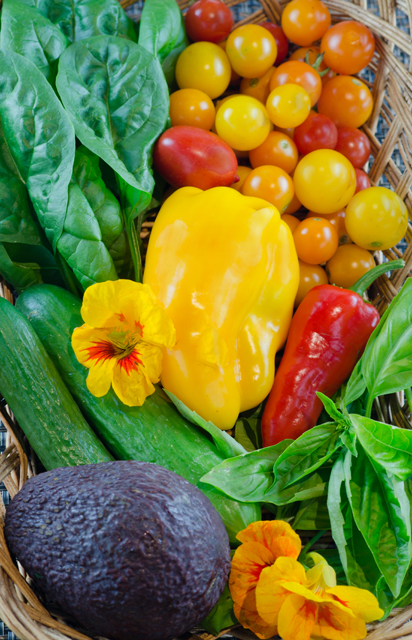
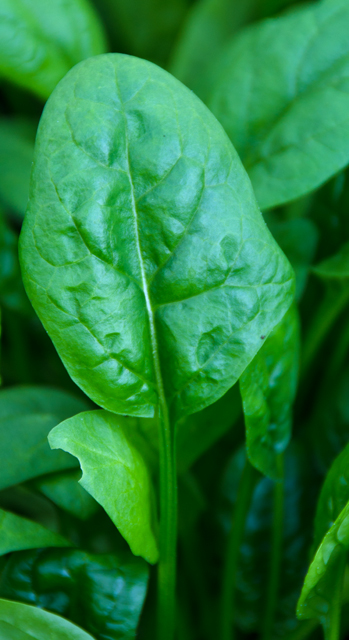
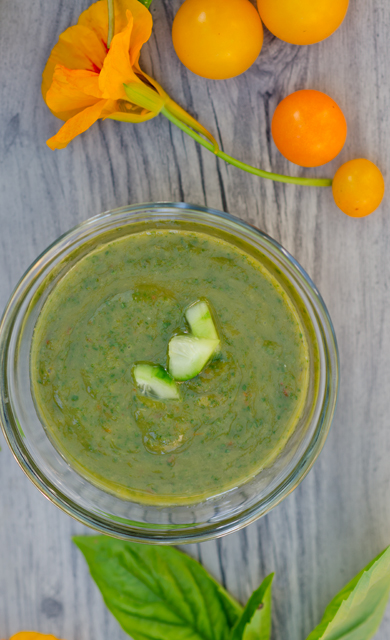
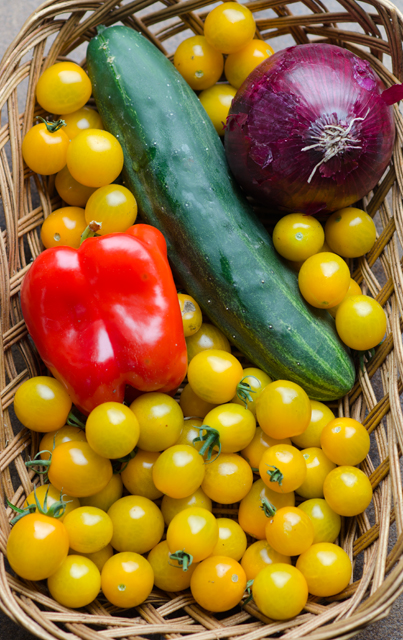
Summer was officially over several weeks ago and the first touch of frost was on our lawn Sunday. That doesn’t mean the garden is giving up yet. There are still some tomatoes, peppers, both sweet and hot, eggplants and herbs ready for the picking.The tomatoes may not be the prettiest, but they are certainly the sweetest. Joe has planted a large crop of spinach and salad greens in the garden greenhouse that we will enjoy for several months to come. After a week of indulging in Denver’s finest cuisine it was time to get back on the healthy eating track. What better way to use some of these ingredients than in a cold refreshing green gazpacho?
Gazpacho by definititon is a liquid salad that originated from the southern Spanish region of Andalusia. The name possibly originated from the Latin word “caspa” meaning fragments, alluding to the small pieces in gazpacho. You can make this as chunky or as smooth as you choose. I love the addition of avocados in our nightly salad with dinner and had a few extra ripe ones to give this soup a creamy texture. I used the bounty of our garden and the addition of a cucumber for it’s crisp sweetness. Give this soup several hours to chill and the flavors to blend.
Substitutions are permitted, watercress for the spinach, that will bring a spicy kick to the soup. Cilantro can sub for the basil, add a touch of Tabasco if you don’t have a fresh hot pepper, I would be happy to share. I always stock up on vinegars at The Tubby Olive and used their Alfoos Mango in my soup, love them in our vinaigrettes too. If you don’t have a fruit vinegar, use white wine vinegar and a touch of honey. A little chopped cucumber as garnish gives a little crunch and since our nasturtiums are still in bloom I couldn’t resist adding a few for their vibrant color and spiciness.
A new crop of spinach in the garden greenhouse is ready for harvest.
End of Summer Green Gazpacho
Makes about 4 cups
2 medium tomatoes or 12-15 small tomatoes
3-4 small cucumbers peeled and cut into chunks
1 avocado, flesh cut into large chunks
½c basil leaves
½c flat leafed parsley leaves
½ to 1 whole hot pepper, jalapeno or serrano
1 sweet pepper, seeded, stemmed and cut into chunks
2c packed baby spinach leaves
2 cloves garlic, finely chopped
2-3T fruity balsamic vinegar (I used Mango from Tubby Olive)
Cold water to blend
Kosher salt and freshly ground pepper
Water as needed
1T extra virgin olive oil
Directions
Reserve ½ cup cucumber chunks and chop finely.
Combine the tomatoes, cucumbers, avocado, basil, hot pepper and sweet pepper, spinach, garlic and balsamic vinegar with cold water as needed in the bowl of a food processor or blender. Process until smooth adding more water as necessary to achieve a smooth texture. Taste and season with salt, pepper and more vinegar if desired.
Refrigerate until cold, pour into bowls and garnish with cucumber chunks.
Over the years I have made my share of homemade condiments. Joe’s ability to produce an abundant harvest from our garden often has me looking for ways to preserve some of that bounty for the fall and winter months. I have made my own ketchup, chili sauce and tomato paste from the tomatoes in our garden. Not to mention homemade mustard, jams, chutneys and preserved lemons. In fact the first cookbook that Joe ever bought me, even before we were married was Better Than Store Bought, a classic to this day for the DIY cook.
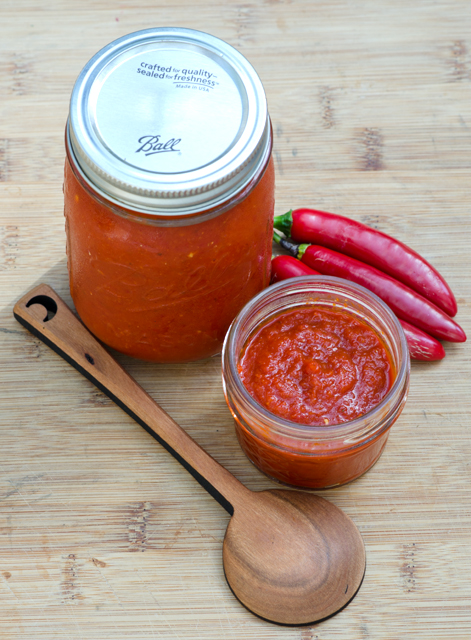
The latest to be added to my homemade list is sriracha. As long time fans of Thai cuisine, sriracha has been on our food radar since the early eighties. We love the spicy, garlicky, slightly sweet sauce that was a table condiment at our local Thai restaurant. Back then I would have to travel to local Asian markets to find the thick red sauce that came in a squeeze bottle with a green cap and a rooster on the label. We, and obviously many others, were definitely on to something, over the years the popularity of sriracha has grown by leaps and bounds. Now it can be found in supermarkets everywhere and sriracha flavors products as diverse as popcorn, potato chips, beer and lip balm.
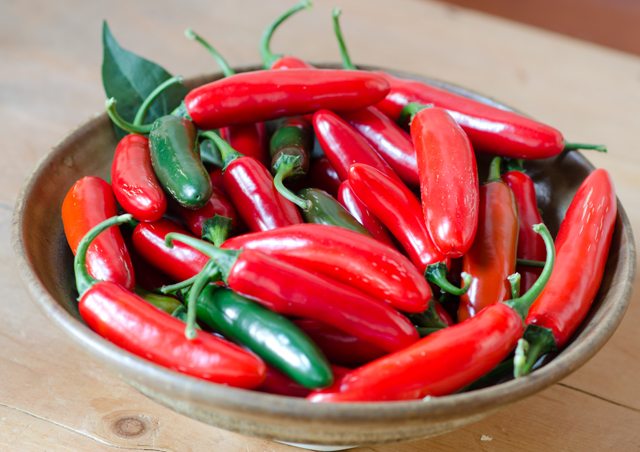
It was first produced in the United States by a Vietnamese immigrant, David Tran, who was unable to find a hot sauce he liked. He developed and named his sauce after one that he tasted in the Thai southern coastal city of Si Racha, where it was made for dishes served at local seafood restaurants. The success of Mr. Tran’s company Huy Fong Foods, named for the boat that brought him to the United States, is legend. Since 1980 sales of sriracha have increased by 20% a year without paid advertising. Unlike other hot sauces, sriracha is made with fresh chilies, Tran says this is what separates sriracha from the competition. So with a large crop of hot peppers in many varieties, I set out to make my own version of sriracha. I looked at quite a few recipes, some promising sriracha in twenty minutes, that might be fine for some, but I knew that fermentation is one of the steps that makes sriracha unique and since I had the time and an abundant supply of peppers, why take any shortcuts? I chose a recipe from Serious Eats, a blog that is dedicated to “definitive recipes, hard core food science, trailblazing techniques and innovative guides to essential food and drink anywhere and everywhere.” Sounds good to me.
My first consideration was the variety of pepper to use. The Serious Eats recipe used red jalapenos but in one of the reader comments I learned that serranos were the original peppers Huy Fong used to make sriracha until the late nineties. The change to jalapenos was due to production costs. Since I had more than enough serranos, I chose them for my recipe. Since the serrano pepper is hotter than the jalapeno you may want to adjust your recipe accordingly, I didn’t. The peppers are left whole with the stems are snipped with the crown remaining. This brings a floral component to the finished product. As with all hot pepper recipes, take the usual precautions, wear rubber gloves when making the recipe, don’t rub your eyes, and so on. The recipe is very simple with very little handling of the product, peppers, peeled garlic cloves, brown sugar and salt are pulsed to a fine texture in a blender or food processor.
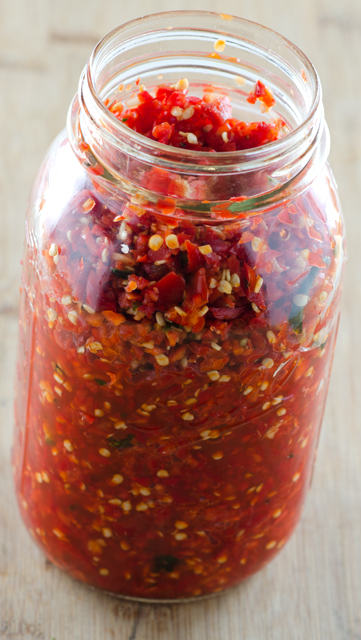
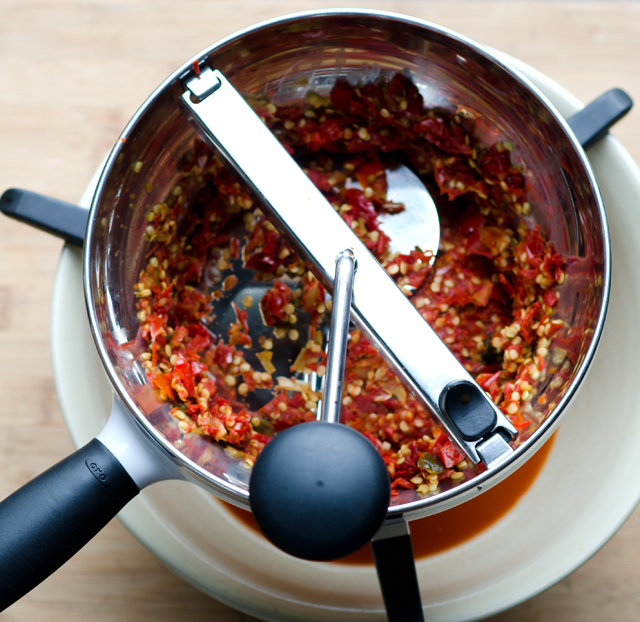
The mixture is transferred to a clean jar, covered and sits at room temperature. I checked the mixture daily to check for little bubbles forming at the bottom of the jar, indicating fermentation. The recipe indicated that the fermentation would begin in 3-5 days, my peppers only began to ferment after 7 days. I will attribute that to the freshness of my peppers. Since my peppers were picked the day I tried the recipe, they were days fresher than any hot pepper purchased in a grocery store. My fermentation was complete in 10 days. I carefully transfered the chopped chili mixture to the bowl of a food processor, my blender is too small, added the distilled white vinegar and pureed it until smooth. The recipe suggests transferring the mixture to a mesh strainer over a medium saucepan and using a rubber spatula to push the pulp through. I wasn’t getting a thick enough consistency so I transferred the peppers to the food mill with a medium disc which gave me a product that resembled sriracha, though a bit more chunky. The mixture is placed in a saucepan, brought to a boil, then simmered until the sauce clings to the back of a spoon, 5 to 10 minutes. Transfer sauce to clean jars and store in the refrigerator for up to six months.
I am very pleased with the consistency of my sriracha, the food mill made that part of the process much easier than the strainer. Since we have other varieties of hot peppers I may try the same recipe with different peppers.
Just picked serrano peppers for my sriracha sauce.
Sriracha Sauce
Recipe slightly adapted from Serious Eats
Ingredients
1 1/2 lbs red jalapeños (or serranos), stems snipped off, leaving green tops intact
6 cloves garlic, peeled
4 tablespoons light brown sugar
1 tablespoon Kosher salt
1/2 cup distilled white vinegar
Directions
Place peppers, garlic, sugar, and salt in bowl of a food processor fitting with steel blade. Pulse until chilies are very finely chopped, stopping to scrap sides of bowl as necessary. Transfer mixture to a clean jar, cover, and let sit at room temperature.
Check jar each day for fermentation, when little bubbles start forming at bottom of jar, about 3-5 days. Stir contents each day, continuing to let ferment until chilies are no longer rising in volume, an additional 2-3 days.
Transfer chilies to jar of a blender or food processor, add in white vinegar, and puree until completely smooth, 1-3 minutes. Transfer to a mesh strainer set atop of a medium saucepan. Strain mixture into saucepan, using a rubber spatula to push trough as much pulp as possible, only seeded and larger pieces of chilies should remain in strainer. I found that a food mill with the medium disc made this easier.
Bring mixture to a boil, reduce heat, and simmer until sauce thickens and clings to a spoon, 5 or 10 minutes. Transfer to an airtight container and store in refrigerator for up to 6 months.
Pureed peppers, garlic, brown sugar and kosher salt ready to be fermented.The food mill gave me the consistency that I was looking for.My finished product was thick even before cooking.
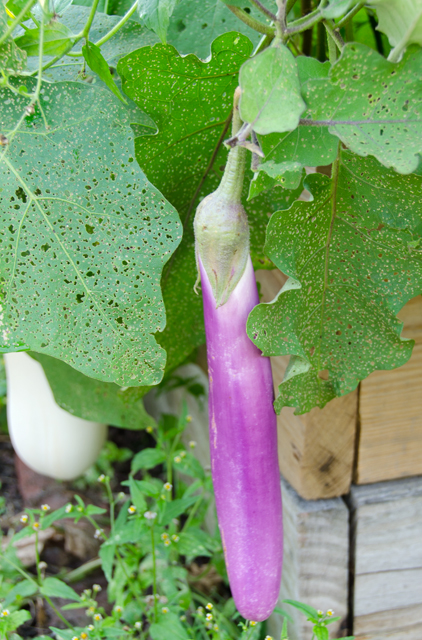
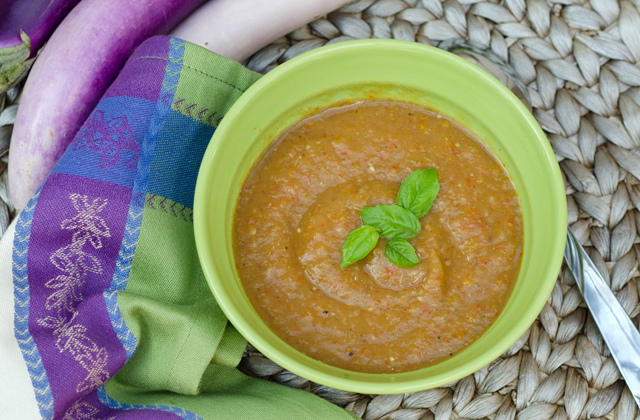
Even though the temperatures are still in the eighties, fall is rapidly approaching and it’s time to say goodbye to our summer vegetables. What better way to use them now and enjoy them later than in an end of summer eggplant soup. Another good reason to have soup on hand was the stomach virus that Joe and I suffered through last week. Nothing tastes better when you are on the road to recovery is a nutritious soothing soup.
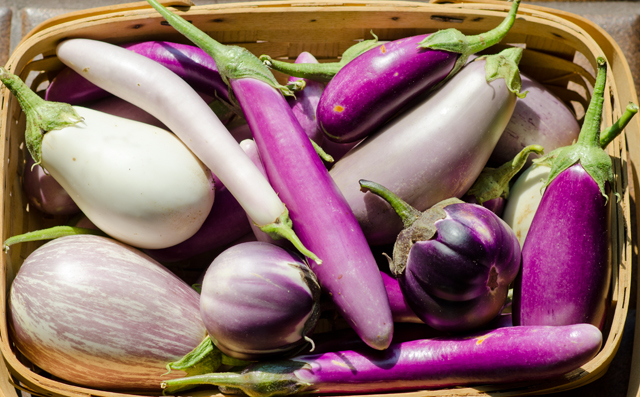
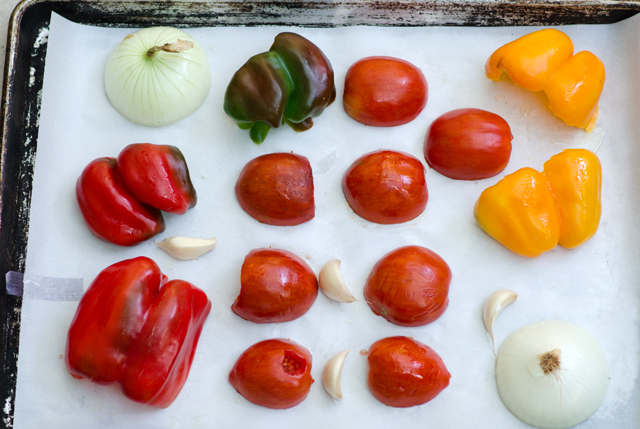
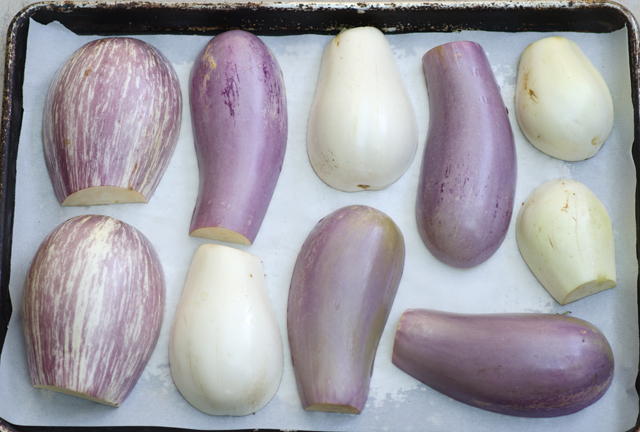
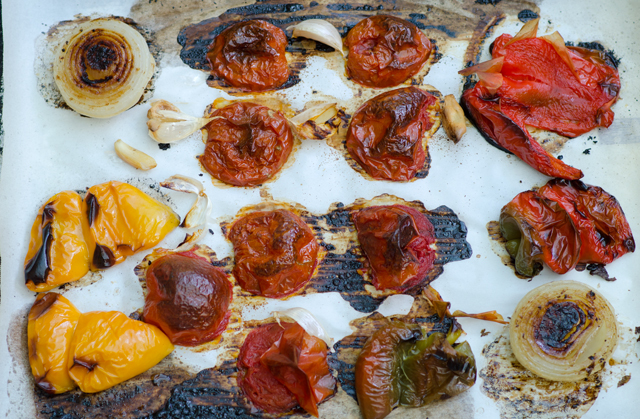
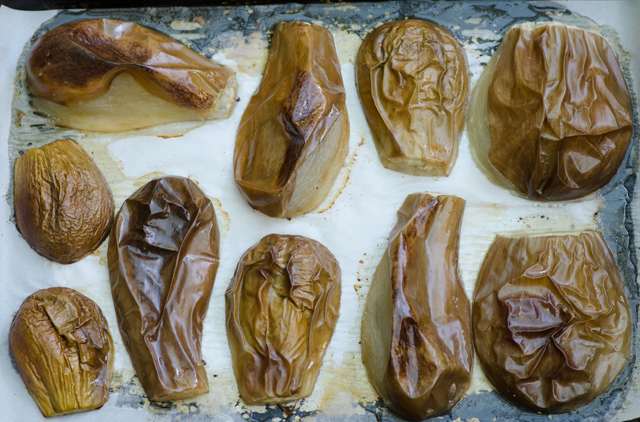
I am still picking eggplants, peppers and tomatoes, but not in the same quantities as a few weeks ago. The days are getting shorter and even though the days are warm, the nights are definitely cooler. After an afternoon pick yesterday I came back with quite a nice variety of eggplants, several peppers and a few tomatoes. This is the type of recipe you could make differently every time, depending on what is still there for the picking. I wanted to make this as easy as possible so I decided to roast the vegetable first before combining them in a soup. Carrying over on the easy concept, I lined the baking trays with parchment to make clean up a snap. I cut the eggplants in half and lightly brushed the cut edge with olive oil and sprinkled with salt and pepper. On the second large baking sheet I added several tomatoes, peppers, an onion and some unpeeled garlic cloves, brushed everything with olive oil, and sprinkled on kosher salt and freshly ground pepper.
I decided on a 375°F oven, the temperature we use when oven roasting vegetables. I checked the tray with the tomatoes, peppers, garlic and onion first, they were done in about 12-15 minutes, getting a nice toasty brown. The eggplants took a little longer, they are done when the skins start to collapse. Once cooled, it’s easy to separate the flesh from the skin. Squeeze the garlic from the skins and roughly chop the onion. I pureed the vegetables in the food processor in batches. Because some of my eggplants were seedy I put the puree through a food mill with a medium disc. Pour the finished puree into a stockpot. I added ground cumin, coriander, salt, freshly ground black pepper and a touch of cayenne. Add chicken or vegetable stock to thin out the consistency. Make some to enjoy now and freeze some for the cold winter months.
Late summer harvest of eggplants.
Place vegetables on a parchment lined baking sheet.
The skin easily peels off the peppers and tomatoes. Roughly chop the onion.Eggplants are ready when they start to collapse. The flesh separates from the skins.
End of Summer Eggplant Soup Serves: 6
Ingredients
3 ½lb eggplant, any type, halved lengthwise
2 red or yellow bell peppers, or any combination, halved and cored
3-4 tomatoes, halved and cored
1 small onion peeled and halved
4 garlic cloves
Olive oil
Kosher salt and freshly
½t ground cumin
½t ground coriander
3-4 cups chicken or vegetable stock
Basil leaves as garnish
Directions
Preheat oven to 375°F.
Line two large baking pans with parchment paper. Brush cut side of eggplant with olive oil, sprinkle with salt and pepper and arrange cut side down in one layer on baking sheet. On the second sheet, arrange tomatoes, bell peppers, garlic, and onions, cut side down, in a single layer. Brush with olive oil and sprinkle with salt and freshly ground pepper. Bake vegetables until eggplant and bell peppers have a slight char on their skins. Check at 15 minutes, as garlic may need to come out earlier so that it doesn’t burn. Let cool until ready to handle. Remove skins as much as possible.
Working in batches, pulse vegetables in a food processor, you can either roughly chop or take them down to a puree. If necessary, put the mix through a food mill. Transfer vegetables to a large stockpot and add broth and spices. Cook for 15-20 minutes over medium heat, stirring occasionally.
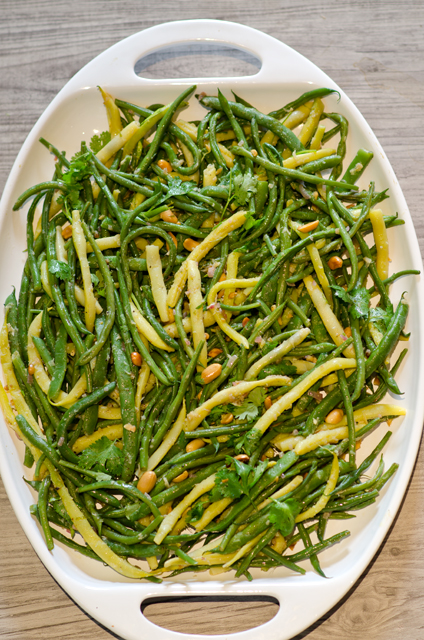
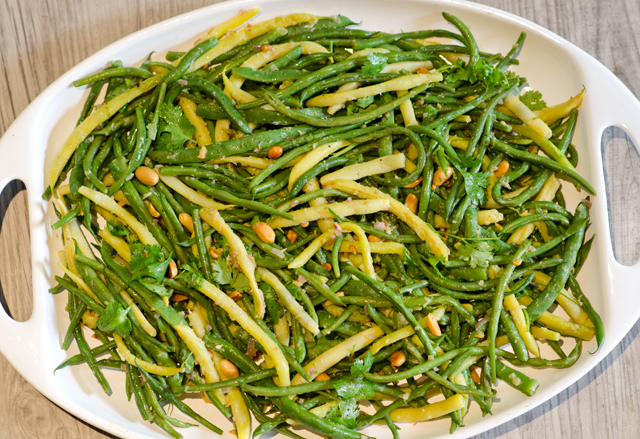
This is another bean salad from Jerusalem born, London based chef and cookbook author Yotam Ottolenghi, this time with a decidedly Asian twist. An assortment of fresh green and yellow beans are tossed in a dressing that includes two ingredients that would have seemed exotic and difficult to access ten years ago, lemongrass and kaffir lime leaves. Our love for Thai cooking was the reason we started growing them many years ago but with increased demand they have gone mainstream and now are readily available to the home cook.
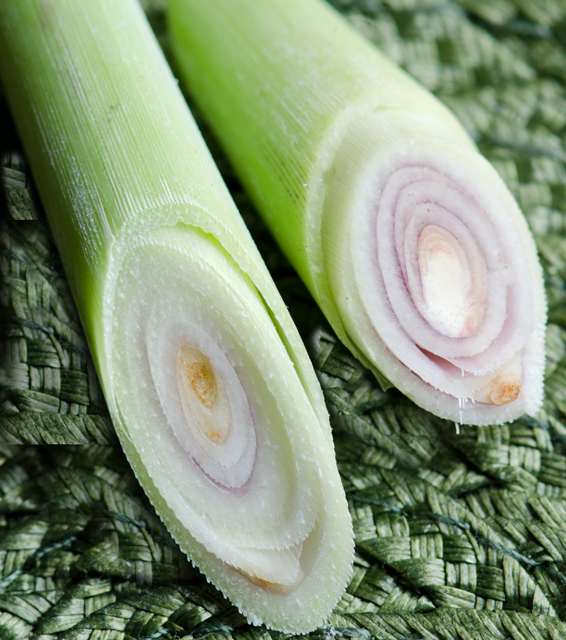
Lemongrass is a tall tropical grass native to South and Southeastern Asia. Our lemongrass plant grows happily outdoors from June to late September forming a tall bushy plant, about 3 feet tall and 5 feet wide. Since it is only hardy in zones 9-10, which translates to south Florida, Joe digs the plant out, cuts it back severely and it winters indoors. There it’s only predator is our Golden Retriever Cody, who likes to nibble on the leaves when he thinks no one is looking. Lemongrasss has long sharp pale green leaves at the top and a brownish pink bulbous portion at the stem end. It has a mild citrus flavor with a floral aroma. If you don’t grow your own, the best lemongrass (and the cheapest too) is found in Asian markets. To use, cut off the woody tops with a chef’s knife and peel off the first tough layer of the bulb end. Now it is ready to slice into rounds or as in this recipe, grated with a microplane.
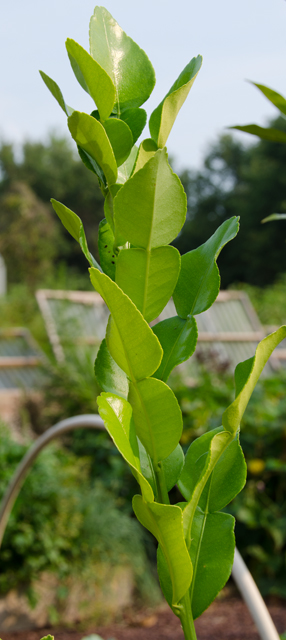
Our Kaffir lime trees are also summer visitors to the garden. The leaf of the kaffir lime tree has a sweet citrusy fragrance and is a key ingredient in Thai cooking. Kaffir lime leaves are not to be confused with the leaves from a standard lime tree. The leaf of the kaffir lime looks like a double spade. It is thick and glossy on top with a matte underside and a tough spine in the middle. When using in recipes they can either be used whole, seasoning a soup or stew or chopped very finely, as in this salad. If you are chopping it up, remove the spine first. Fresh and dried leaves are available, only use fresh leaves in this salad.
Bring a large pot of generously salted water to a rolling boil. Cook each type of bean you are using separately, the thin filet beans will only take about 2 minutes, larger beans take longer. I use a large chopstick to make sure all the beans are submerged in the water and I removed the beans as the batches were done with a Chinese strainer or spider as it is also known. This allows you to remove more beans with one scoop. Transfer the cooked beans to a bowl filled with ice water. Cool, drain and pat dry so the beans will absorb more of the dressing.
Next, the shallot is cooked until tender and the aromatics, ginger, lemongrass, garlic and coriander, are added. Transfer the shallot mixture to a large bowl that will be large enough to toss the beans. I wasn’t quite sure why you would need to sauté the already roasted peanuts, but they pick up the residual flavor from the shallot mixture and take on a toasty fragrance. Kaffir lime leaves, lime zest and juice, sugar, salt and oil are whisked into the shallot mixture. The kaffir lime leaves must be fresh and must be sliced as thinly as possible in this salad. If you don’t have access to them, don’t let that stop you from making this recipe, just add a little more regular lime peel and juice. The final step is to add the beans, toasted peanuts and cilantro to the large bowl, toss the beans in the dressing and season everything again with salt and pepper. The final dish is garnished with chopped peanuts and more cilantro.
Lemongrass plant does very well in the garden in summer but will be brought in before the first frost.Cross section of a lemongrass stalk.Kaffir lime tree with double spaded leaves.
2lb. assorted snap beans, green, wax, filet, Romano etc.
½t kosher salt plus additional
5T olive oil, divided
1/3c finely chopped shallot
1 1″ piece ginger, peeled and finely grated
1 lemongrass stalk, tough outer layers removed, finely grated on a Microplane
2 garlic cloves, finely grated
½t ground coriander
Freshly ground black pepper
1/3c roasted salted peanuts
3 kaffir lime leaves, very finely chopped
1t finely grated lime zest
3T fresh lime juice
¼t sugar
1/3c packed cilantro leaves with tender stems, plus more for serving
Directions
Working in batches by type, cook beans in a large pot of boiling salted water until crisp tender, 4-5 minutes per batch. Transfer with a strainer to a large bowl of ice water. Cool, drain and pat dry.
Heat 1T oil in a small skillet over medium heat and cook shallot, stirring occasionally under tender, about 3 minutes. Add ginger, lemongrass, garlic and coriander and cook until very fragrant, about 1 minute. Transfer to a large bowl and season with salt and pepper.
Heat 1T oil in same skillet over medium high. Cook peanuts, tossing often until golden brown and fragrant, about 2 minutes. Transfer to paper towels; let cool, then coarsely chop. Set aside 1T peanut for final presentation.
Whisk kaffir lime leaves, lime zest, lime juice, sugar, ½t salt and remaining 3T oil into shallot mixture. Add beans, remaining peanuts, and 1/3c cilantro and toss to coat; season with salt and pepper. Serve topped with more cilantro and reserved peanuts.
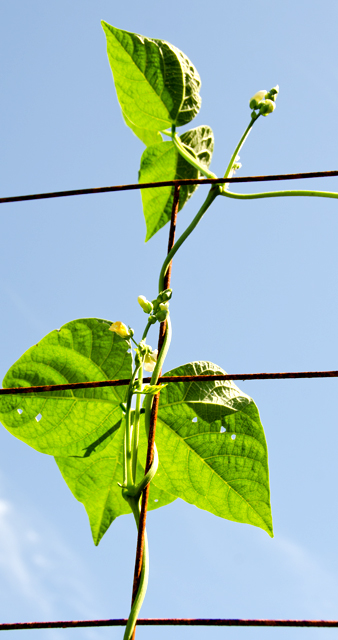
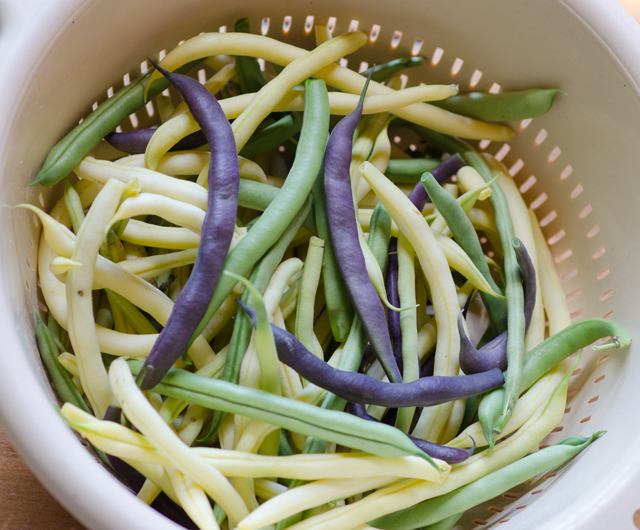
String or snap beans are in season from mid summer to early autumn and we have had a steady stream of them since the middle of July. Joe grows both pole and bush varieties. Pole bean plants fare best when they are given support to grow, like a trellis or a teepee while bush beans grow on their own without added support. The bush beans were the first to produce, followed by the later maturing pole beans and now the bush beans are producing again. The crop this year has been quite successful and at times, overwhelming. I froze quart bags of blanched beans for fall and winter days when I will miss being able to pick them fresh. I even pickled a few jars of the very slim and straight filet beans.
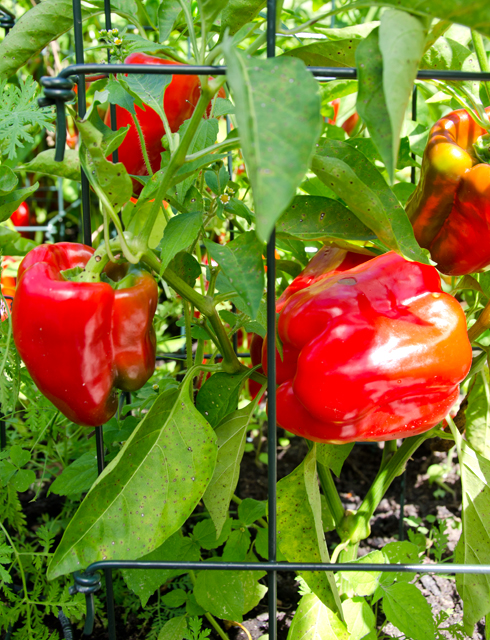
In the cooler months we serve them hot, simply seasoned with garlic and thyme, but in the summer I like to serve them along side grilled vegetables in a cold salad. My latest inspiration, Mixed Bean Salad came from Yotam Ottolenghi and Sami Tamimi’s cookbook, Jerusalem. Jerusalem won the IACP cookbook of the year in 2013 and was the 2013 James Beard award winner for the best international cookbook. The recipes are very approachable, not too “cheffy” and introduces the reader to the vibrant multicultural cuisine of that city.
The “mixed” in the mixed bean salad refers to the combination of green and yellow beans paired with red pepper strips. Mr Ottolenghi likes yellow beans for their tenderness and the look they bring to the dish. This is the best time of year to find them at the farmers markets and we have no shortage here. If you are making this and yellow bean are not available, substitute all green beans.
In his introduction to the recipe, Mr Ottolenghi states that string beans are symbolic of the Jewish New Year but he didn’t indicate how, so I did a little research of my own. Beans are mentioned in the Talmud as “ruviah” and are symbolic because their Hebrew name sounds like the Hebrew “to increase” and indicates a desire for increased blessings in the new year. Reminds me of the symbolism of foods associated with Chinese New Year.
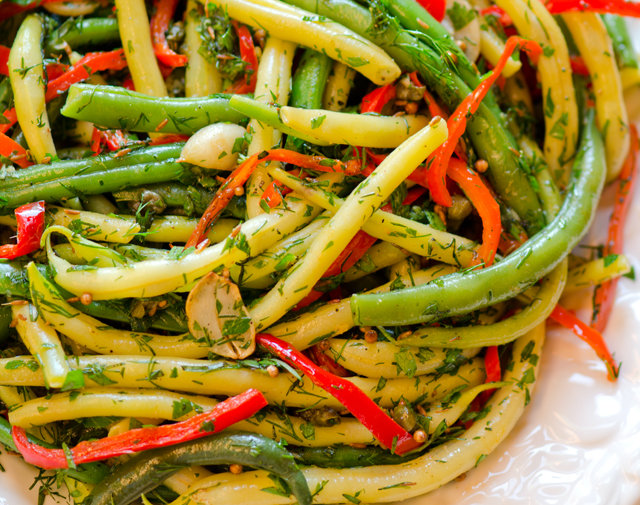
Begin the recipe by blanching the beans until tender crisp. Look for beans that are relatively the same size in diameter so they will cook in the same amount of time. If you are not sure if the beans are ready, test one for doneness before draining the pot. Roast red pepper strips that have been tossed in olive oil until they are tender. They make a beautiful contrast to the green and yellow beans. Next step are the aromatics, lightly toasted garlic, then capers that bring a salty element and their own unique texture. Rinse the capers well and dry them, careful when you add them to the oil, they will spit, so you might want to use a spatter screen. Cumin and coriander seeds are bloomed in the olive oil to best bring out their aromas and flavor. Pour the warm dressing over the beans and pepper strips and toss. Green onions, herbs, lemon peel, salt and pepper are the next addition to the dish.
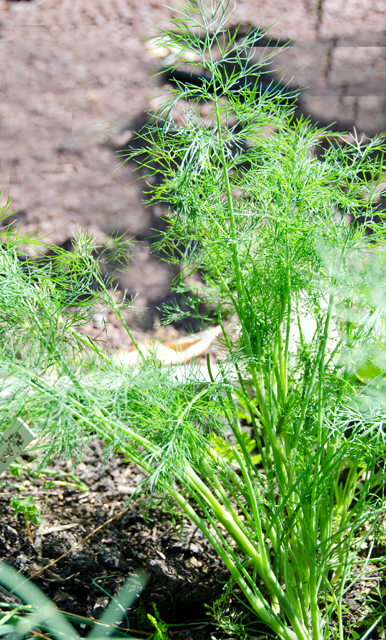
The original recipe calls for 2/3 cup chervil, not an easy or common ingredient for the home chef. I have never seen it sold in the supermarket or even at our local farmers market for that matter. We have an abundance of it that comes up from seed in the early spring and bolts as soon as the weather gets hot. He suggests a substitute combination that everyone has access to, dill and parsley.
I will not mislead you, this is not a salad you can whip together in 15 minutes, but it is certainly worth making. Step one for me is a trip to the garden for beans, peppers and herbs. It is very important for your ingredients to be “mis en place” ready to go so the warm dressing will thoroughly season the beans and peppers. I have had my cookbook only two weeks and I have made this salad twice and plan on making it again for a Labor Day picnic. I think that constitutes a winning recipe.
Dill in the garden.
Mixed Bean Salad
From the Jerusalem Cookbook
Ingredients
1¼ lbs. mixed green and yellow beans
2 medium sweet red peppers, cut lengthwise into ¼ inch strips
4T olive oil-1T for the peppers, 3T for the salad
3 cloves garlic, thinly sliced
6T capers, drained, rinsed and patted dry
1t cumin seed
2t coriander seed
4 green onions, thinly sliced
1/3 c each, roughly chopped tarragon, dill and shredded parsley.
Grated zest of one lemon
Kosher salt and freshly ground pepper
Directions
Preheat the oven to 450°F.
Bring a large pot of lightly salted water to a boil. Add the beans to the pot and cook for 4-5 minutes, take a bean out at this point to check doneness. It should be cooked through but still be “toothsome”. When done, immediately drain in a colander and refresh the beans with very cold water. Drain well, pat them dry with a towel and place in a large bowl.
Toss the pepper strips with a teaspoon of olive oil, then spread them out on a baking sheet. Bake for five minutes or until tender. Add pepper strips to the bowl of cooked beans.
Heat the remaining 3 tablespoon olive oil in a small saucepan. Add the garlic and cook for 30 seconds; add the capers (be on guard for spatters) and fry for 15 seconds. Add the cumin and coriander seeds and continue frying for another 15 seconds. The garlic slices should be golden by now. Remove pan from the heat and pour this over the bowl of beans and pepper strips. Toss and add the green onions, herbs, lemon zest, salt and pepper to taste.
You may serve immediately or refrigerate up to one day. Just remember to bring the salad back to room temperature before serving.
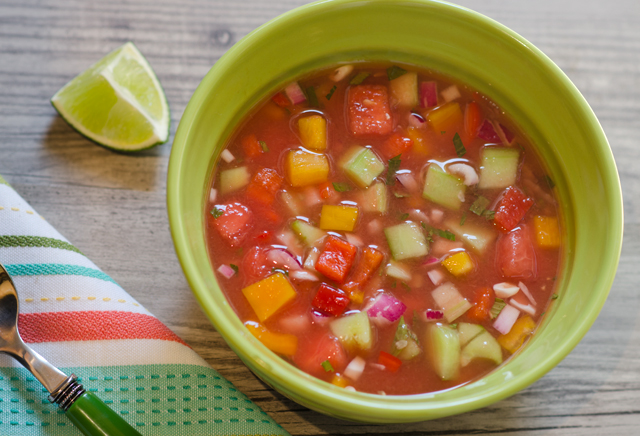
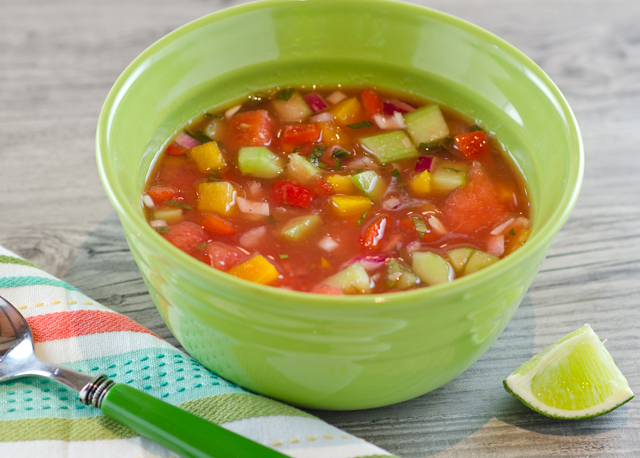
During the warm summer days of August, there is nothing better to keep you cool and well nourished than a bowl of gazpacho. I took a break from the never ending pile of tomatoes that I am canning to make this gazpacho that is ironically, or was that intentionally, made without tomatoes In this version, the delicate flavors of watermelon and cucumber go hand in hand to make a sweet and savory soup. A natural combination, since both cucumbers and watermelons, along with all varieties of squash, are members of the cucurbit family.
Choose your watermelon carefully, it should be dull in color, a shiny melon indicates that it’s underripe. It should also be uniform in size, an irregular shape indicates inconsistent amounts of water or sun. Check out the field patch, the place that the watermelon rested on the ground. A creamy yellow indicates that the melon had a longer time to ripen on the vine and develop more flavor. When you pick it up, the melon should feel heavy for it’s size. Watermelons are 92% water and the ripest ones have the highest water content. This is the prime time for cucumbers at the farmers markets. I am fortunate that I can pick fresh cucumbers right from the garden. They are abundant and nothing compares to the sweet juicy sweet flavor of a just picked one.
In the spirit of the season, no cooking is required for this recipe. The most time consuming part of this recipe is cutting the vegetables, but it is a worthwhile step. They stay cool and crispy in the soup and are a nice contrast to the watermelon-cucumber broth. Adjust the balance of savory and sweet, along with the amount of mint and heat according to your own taste. Refrigerate for several hours before serving so the flavors will have time to blend together, it’s even better if you have time, to refrigerate overnight. If you do refrigerate overnight, adjust the seasonings again since the cubed melon will exude more liquid and potentially dull the flavor. This soup would be perfect as a first course on a warm summer evening.
1 medium cucumber, peeled, seeded, diced (about 2 cups)
1 medium-size red bell pepper, seeded, diced (about 1 cup)
1 medium-size yellow bell pepper, seeded, diced (about 1 cup)
1 small jalapeño chile, seeded, minced
3 pale green inner celery stalks, diced (about 1/2 cup)
1/2 small red onion, diced (about 1 cup)
1/4 cup finely chopped fresh mint
3 tablespoons fresh lime juice
2 tablespoons red wine vinegar
1/4 teaspoon salt
Directions
Puree 4 cups watermelon in blender until smooth. Transfer puree to large bowl. Add remaining 1 cup diced watermelon and next 10 ingredients; stir to combine. Cover gazpacho and refrigerate until cold, at least 1 hour and up to 4 hours.
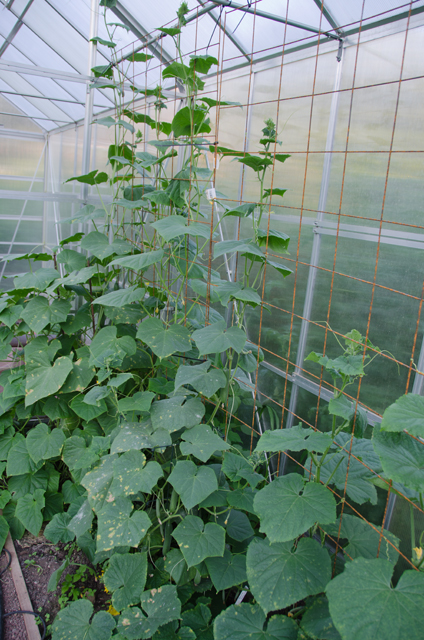
These days Joe is bringing in more cucumbers than I know what to do with them. I’m really not complaining, the season is short and I am using them in as many salads and cold soups as I can find recipes. Native to India, cucumbers require 70°F plus soil and air temperatures to grow but have a relatively short time from sowing to harvest. He has had great success growing them in the greenhouse that is situated in the garden. That environment provides just slightly warmer temperatures.
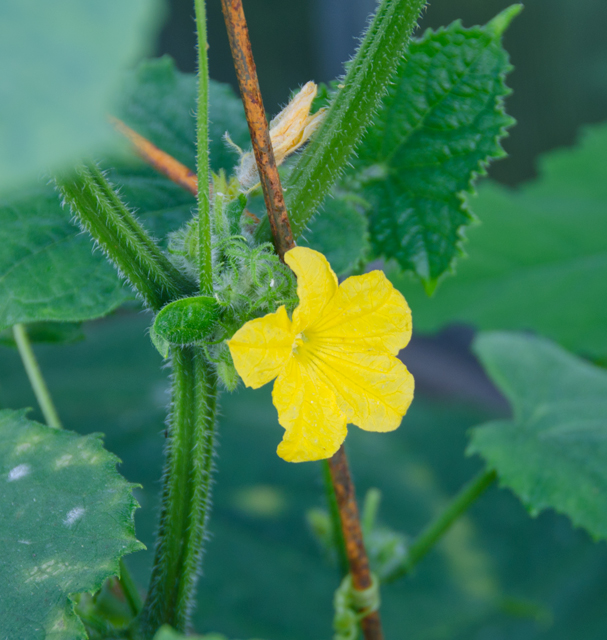
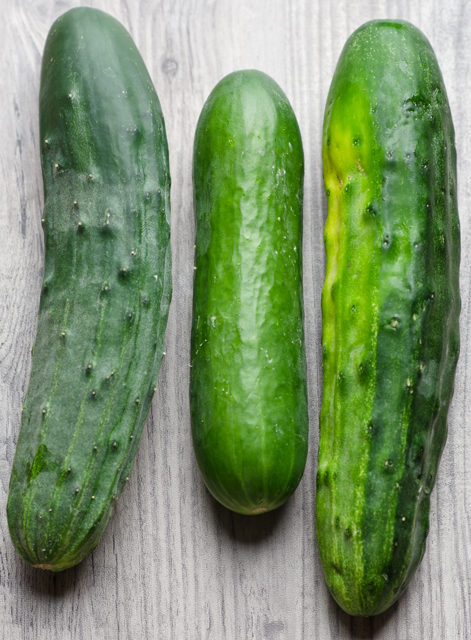
Since cucumbers are 96% water they are happiest when watered on a consistent basis. A well watered cucumber vine will produce the sweetest fruit. We stick with two varieties that produce well, Persian and Bush Champion. Persian cucumbers are small, about 6 inches long and 3/4 inch diameter with smooth edible skin and undeveloped seeds. They are the perfect size for pickling, if that is your inclination. Bush Champions are a bush variety that take one third of the space and are also suitable for containers.
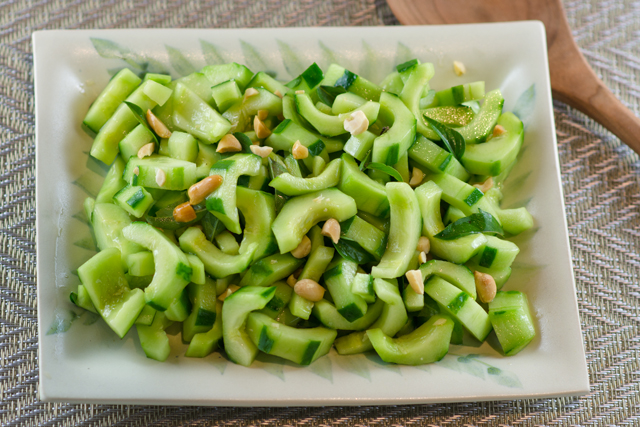
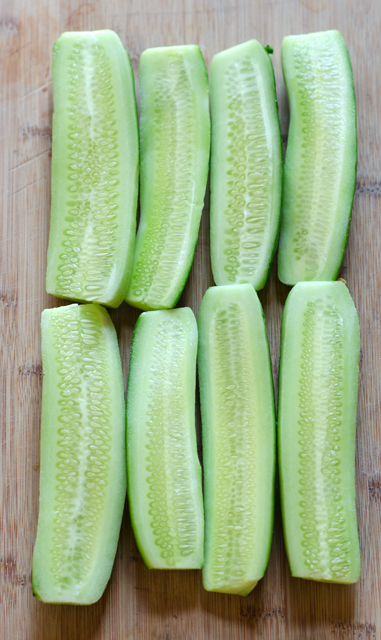
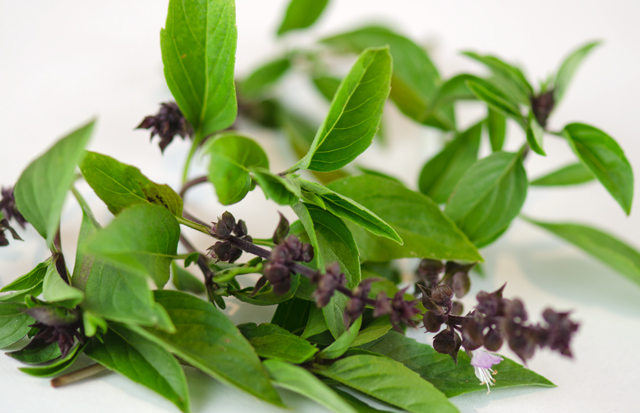
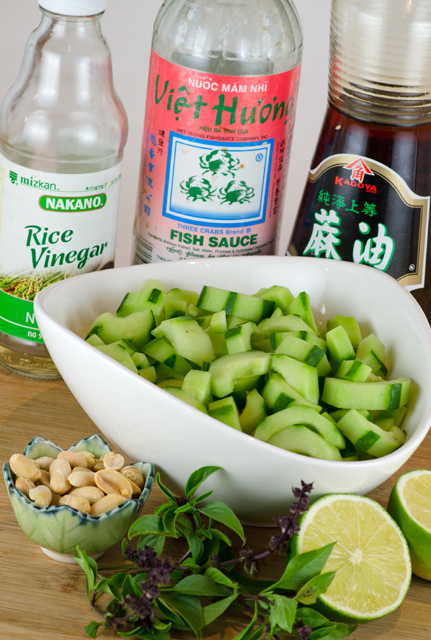
One of my all time favorite cucumber salads to make is a Thai cucumber salad. Light and crunchy, it is quick and easy to make, combining sweet, spicy and tangy flavors. The dressing draws most of it’s ingredients from the Asian pantry. Seasoned rice vinegar is either made from sake or by adding salt and sugar to regular white rice vinegar and is an easy boost to the sweet, salty and tangy elements of a dish. Plain rice wine vinegar is a bit more versatile and could be substituted. Just remember to adjust the seasonings accordingly. Whether you call it nam pla, nuoc nam or patis, fish sauce is made from the liquid drained from fermented anchovies and is a flavor enhancer like salt or soy sauce. A little goes a long way here. I am partial to the Three Crabs brand that is readily available in Asian markets. Sesame oil was one of the first exotic ingredients to grace our kitchen. Be sure to look for toasted sesame oil. It is dark in color and has a very intense aroma and flavor. Use Thai basil in this salad if you can find it. The beautifully named Siam Queen is one of the varieties we grow. The plant is more compact in apppearance than the standard Italian basil with smaller bright green leaves. There are clusters of purple flowers at the top of the plant. It has an intense licorice aroma and flavor.
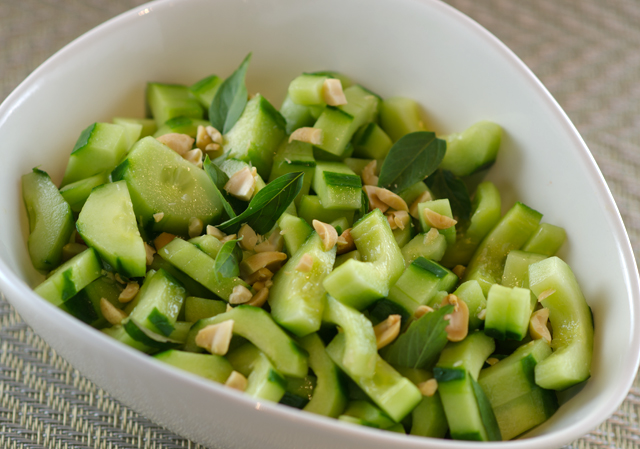
To make the salad, add the rice vinegar, sesame oil, lime juice and fish sauce to a large bowl. Peel about 1½ lbs cucumbers, I leave a little skin on for color contrast. Slice in half lengthwise, scoop out the seeds and slice diagonally into crescents. Peeling the cucumber allows the flavors of the dressing to be absorbed right into the flesh. Add cucumbers, basil and peanuts to the bowl, toss and serve. So simple to make, refreshing Thai cucumber salad is as much a natural next to a grilled satay as it is with your standard picnic fare.
Cucumber vines in the greenhouse.This little flower is the beginning of a cucumber.Persian cucumber in the middle, flanked by the spiny Bush Champions.
Peel cucumbers (I like to leave small strips of skin for contrast), slice in half lengthwise. Scoop out the seeds and slice diagonally into ¼ inch crescents.
Add the cucumbers, torn basil and peanuts to the bowl with the vinaigrette, toss and serve.
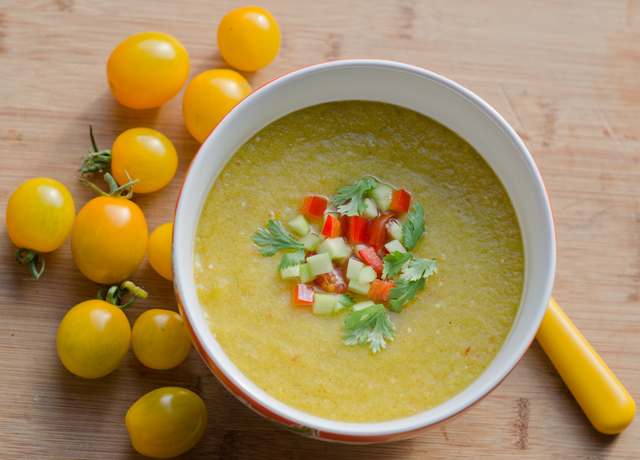
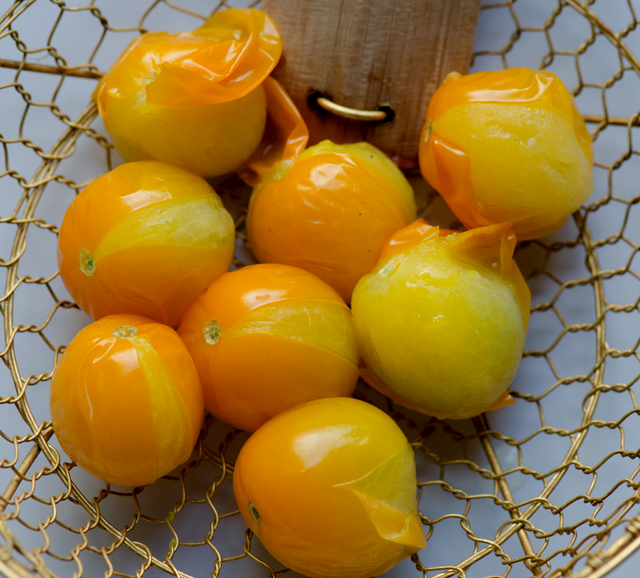
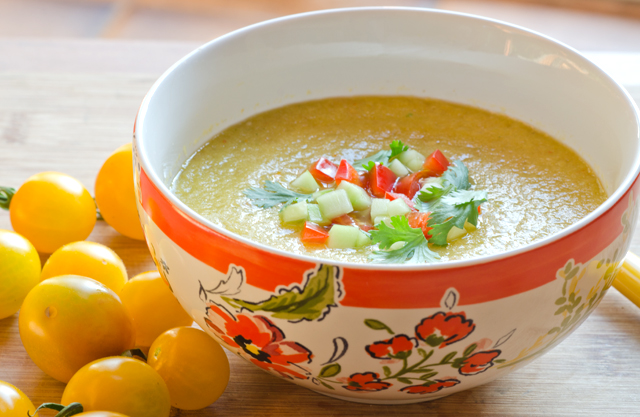
In August, when tomatoes are at their peak, I enjoy making cool and refreshing soups like this yellow tomato gazpacho. This recipe, a classic from Los Angeles chef Suzanne Goin from her cookbook, Sunday Suppers at Lucques, combines a few of summer’s best offerings and comes together in very little time.
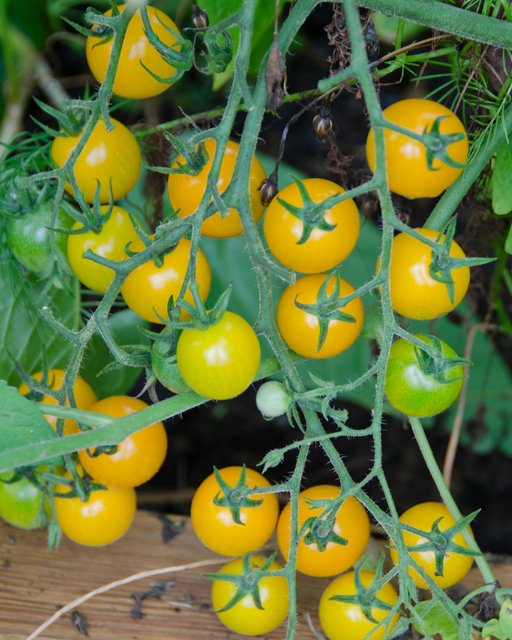
This is a recipe that demands the freshest of ingredients, whether your tomatoes were picked right from the garden or bought at the farmers market. Our bright yellow Sweet Gold tomatoes are one of a trio of cherry tomatoes available from Renee’s Garden Seeds that Joe has planted for several seasons now. Sweet Golds have a full, sweet, fruity flavor with little acidity. Their flesh is dense and crack free compared to varieties we have grown in past seasons.
The most time consuming part of the recipe was blanching and peeling the tomatoes. I’m pretty sure Ms. Goin doesn’t make her soup with about 75 yellow cherry tomatoes! But that said, it took less than a minute to blanch the tomatoes and the skins slipped off very easily, once they cooled down a bit. I did not core the tomatoes as called for in the original recipe, because they were small. The original recipe called for red wine vinegar, I substituted a white grapefruit balsamic to emphasize the fruitiness. The blanched tomatoes along with cucumber, jalapeno, cilantro, garlic, vinegar and oil are blended in batches. Since I prefer a smoother texture, I put the soup through a food mill.
As with all cold soups this needs to be chilled until very cold. While you are chilling the soup, it’s time to prepare the garnishes. Finely dice cucumber, red pepper for a nice contrast and some red onion. Season some red cherry tomato halves with salt and pepper and prepare some cilantro leaves. If you don’t like cilantro, substitute some flat leafed parsley. The finishing touch is a drizzle of your best quality extra virgin olive oil.
This recipe is great for entertaining, everything can be made in advance, soup chilled and garnishes prepped. It also could be dressed up with a seared scallop or a poached shrimp on top. Yellow tomato gazpacho can be served family style too. Serve the soup in an attractive container, garnish with tomato halves and pass the diced vegetables on the side.
Yellow Tomato Gazpacho
Serves 6
Ingredients
2½lb ripe yellow tomatoes
3 small or 1 large cucumber-reserve part for garnish
½ jalapeno, seeded and cut in half
Cilantro or flat leafed parsley sprigs
2 garlic cloves, coarsely chopped
2T red wine vinegar
1/3c extra virgin olive oil (optional)
Kosher salt and freshly ground black pepper
3T diced red or orange sweet pepper
3T diced red onion
18 small cherry tomatoes, cut in half
Fine quality extra-virgin olive oil for drizzling
The skins of the Sun Gold tomatoes slipped off easily after they were blanched.
Directions
Blanch the yellow tomatoes in rapidly boiling water until the skins begin to burst, 30-45 seconds. Cool the tomatoes in a bowl of ice water for a few minutes. Once cool enough, use your fingers to slip off the skins. If using small tomatoes, leave them whole, for large tomatoes, core and coarsely chop. Reserve the ice water.
Reserve about 3T of peeled and seeded cucumber for the garnish. Peel and coarsely chop the rest of the cucumber.
Place half of the yellow tomatoes, the coarsely chopped cucumber, jalapeno, several cilantro sprigs, garlic, vinegar and olive oil (if using) in a blender with salt and pepper to taste. Process on the lowest speed until the mixture is broken down. Turn the speed to high and puree until the soup is completely smooth. If the soup is too thick, add a little of the reserved ice water. Strain the soup through a fine mesh sieve or a food mill, pressing out as much liquid as possible. Taste for seasoning. Repeat with the rest of the soup ingredients. Chill the soup in the refrigerator until very cold.
While you are waiting for the soup to chill, dice the cucumber, pepper and red onion. Toss them together in a small bowl. Season the cherry tomatoes halves with salt and pepper To serve, pour the gazpacho into chilled soup bowls and scatter the pepper mixture over the soup. Place 6 cherry tomato halves and a few cilantro leaves at the center of each bowl. Finish each soup with a drizzle of olive oil.
 Last weeks plunge into the deep freeze meant it was time for one final harvest of hot peppers. With a formula that worked and an abundant source of peppers the challenge was to make a few hot sauces using the same method as the sriracha sauce from a few weeks ago. I first tried the NuMex Suave Orange peppers and several days later using green and red pasilla peppers and green poblano peppers. The jars fermented on the back kitchen countertop for about a week. I wasn’t sure what the results would be so my expectations weren’t very high.