June 24, 2013 Korean Barbecue

DSC_0761a

An article in Fine Cooking on Korean barbecue inspired our most recent Sunday cookout. I admit I knew practically nothing about Korean food in spite of the fact that the two Asian markets I frequent are both Korean. When I shop at them I am usually buying ingredients to cook other Asian cuisines. When I am cooking Thai I am looking for my favorite brand of coconut milk, authentic curry pastes, fish sauce and green papayas. If it’s Japanese I’m looking for, then I head to the yuzu juice, kombu and nori. Our Chinese new year feast is the most challenging. Then I will be looking for sweet and spicy Chinese sausages, preserved vegetable, dried cole (that was a tough one..) and different varieties of soy sauces and pastes.
The Assi market is in North Wales. It is the larger of the two with an extensive produce section, seafood, meat (your pork is always ground fresh…) , rice cookers, pots, pans and a full food court. Until recently, I found it difficult to find help due to language barriers but this year an enterprising assistant manager actually helped me find an unusual ingredient. If you go there on the weekend, entire families from grandparents to toddlers shop together. It’s always an adventure and we usually buy twice as much as what we set out to purchase. There’s still a basil seed with honey flavored beverage in the fridge that caught Joe’s eye on our last trip.
 
H Mart is a bit closer and quite a bit smaller. It occupies space in a Levittown strip mall that also houses the Italian Peoples Bakery.  The music is always interesting, I always seem to pay attention to supermarket music. Some weeks at the H Mart it’s obscure fifties pop, other weeks, Christian praise music in Korean and English. On my most recent trip, I enjoyed tunes from diverse artists ranging from U2 to Taylor Swift.There is also a large selection of Hispanic ingredients to service the growing population in this area. I can also count on it being cold, I am always sorry if I didn’t bring a sweater even on the hottest day in the summer. It’s a store where squid balls (frozen for your convenience) are just an aisle away from Happy Boy margarine.

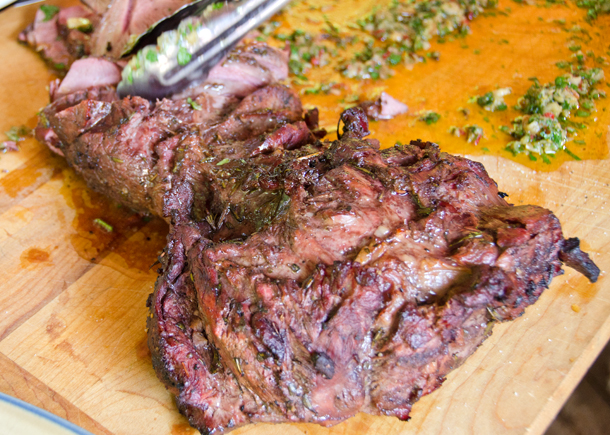
For my first expedition to purchase Korean ingredients for our barbecue I wrote out a very detailed list. When I got to the store I thought it best just to take the magazine in the store with me in case I needed to refer to the pictures. I knew they had the flanken style beef ribs I needed for the kalbi. A bit more costly than most of the meat they sell, the ribs looked very red and pristine, well worth the price. Roasted sesame seed, another ingredient in a few of the recipes, is a staple in our house. I was not familiar with the Korean pastes. Dwenjang is a paste made from boiled and stone ground soybeans. It’s a stronger version of Japanese miso. I got a small container of that. Gochujang, a favorite of the “Chopped” basket, was an ingredient I have wanted to try for awhile. It’s made of glutinous rice powder, fermented soybeans and red peppers. It’s spicy, but not too spicy, a bit sweet and pungent from the fermented soybeans. I picked up the same size tub the dwenjang came in. Mul yut or malt syrup was a no-show. There was a space on the shelf for it, but it was empty. The light corn syrup would have to fill in. Now for the hard part, looking for the saeujeot or salted shrimp. I knew that fish sauce would be acceptable but I was going for authenticity. I think I went down some aisles twice with no luck. So I took a small detour to the back of the produce section to find the soy sprouts where I spotted the salted shrimp near the refrigerated kimchi. Another ingredient procured!!
I took my bounty to the checkout register, that was manned (womanned) by two Korean ladies. The one approvingly nodded to the other. She picked up the sauejeot and said “for Kimchi”. I showed her the magazine article and they both smiled. The next part of this adventure would be going home and cooking with these new ingredients.

DSC_0759a
Pictured starting from top left, Korean spinach, Korean barbecued chicken (dak gogi), bok choy, lettuce for wrapping, onions, mushroom asparagus japchae, cucumber kimchee, white rice.

June 15, 2013 My Big Fat Greek Cookout featuring Grilled Branzino with Ladolemono

DSC_0567a

To make our Sunday cookouts more interesting this summer we have decided to go in an international direction. Since we wanted to serve boneless leg of lamb, Greek cuisine seemed like a natural. Joe applied the “charred and scruffed” approach to the lamb, making a board dressing with roasted garlic, Greek olive oil and fresh Italian (oops) parsley, salt and pepper.

We like to serve two entrees and at first were thinking chicken but a recipe in Bon Appetit and the unanimous positive user reviews convinced me otherwise. Whole bronzino, a Mediterranean sea bass, already a favorite of ours, seasoned simply with a little olive oil, kosher salt and fresh ground pepper. The light and flaky cooked fish is drizzled with ladolemono, a classic Greek vinaigrette. What makes this vinaigrette unique is the one-to-one ratio of acid to oil as opposed to the traditional one-to-three, found in most vinaigrettes. Fresh squeezed lemon juice is combined with Greek extra virgin olive oil and dried (we used fresh since we had it ) Greek oregano is crumbled over the top. Very simple and delicious, I know we will repeat this again.

Grilled vegetables, though not exclusively Greek, are an important part of  Mediterranean cuisine and complimented both entrees very nicely.  A Greek potato salad of fingerling potatoes, haricots verts, crumbled feta and black olives was a Bobby Flay contribution. Since we love green salads I made a classic Greek salad of tomatoes, cucumbers, feta and Kalamata olives. I like to combine those ingredients with some crunchy Romaine lettuce and top it with a simple vinaigrette of red wine vinegar, oregano, garlic and Greek extra virgin olive oil. Spanakopita or spinach pie was a natural addition, a dish that I often make when our crop of spring spinach is plentiful. Sometimes I make this dish with puff pastry but since the theme was Greek I used phyllo. I made whole wheat pita breads to wrap up the lamb and vegetables, just wished they had puffed up more. Next time I will bake them on the Kamado.

I made tzatziki, the Greek cucumber yogurt sauce that is accented with lemon, garlic and fresh dill. It went perfectly with the lamb and grilled vegetables. When I made this as a caterer I would need to strain the yogurt to give it a thicker texture. The ready availability of Greek yogurt has eliminated that step.

Dessert was Kathy’s delicious and flaky baklava and cheesecake topped with my homemade strawberry frozen yogurt. Greek wines and licoricey iced tea were the beverages. A delectable feast that was enjoyed by all.

Grilled Branzino with Ladolemono

From Bon Appetit June 2011

Makes 2-4 servings

Ingredients

  • 2 whole bone-in branzino, cleaned
  • 1T extra virgin olive oil, Greek preferably
  • Kosher salt and freshly ground pepper
  • 1/2c ladolemono (recipe follows)
  • 1T dried Greek oregano

Directions

  1. Prepare a grill to medium high heat.  Brush fish with oil and season skin and cavity with salt and pepper
  2. Grill fish, turning once, until cooked through, about 10 minutes. Transfer to a platter, drizzle with ladolemono, crumble oregano over, and serve

Ladolemono

Make 1/2 cup

Ingredients

  • 1/4c fresh lemon juice
  • 1/4c extra virgin olive oil, Greek preferably
  • Kosher salt and freshly ground pepper

Directions

  1. Whisk together lemon juice and oil. Whisk in kosher salt and freshly ground pepper to taste.
DSC_0542a-copy
The boneless leg of lamb was marinated in garlic, rosemary and olive oil.
DSC_0551a
The fish “cage” makes it easier to flip. A few fennel fronds for extra flavor.
DSC_0546a
Opa! Joe likes to toss the vegetables with a little flourish.
DSC_0559a
Bobby Flay’s Greek potato salad
DSC_0557a
Spanakopita, Greek spinach pie
DSC_0564a
Succulent lamb, enhanced by a flavorful board dressing.
DSC_0558a
Whole wheat pita breads for wrapping up lamb, tzatziki and veggies.
DSC_0561a
Pouring some of the ladolemono over the cooked branzino


 .

June 12, 2013 Strawberry Frozen Yogurt with Strawberry Sauce

 DSC_0592a

Our Sunday cookouts are taking on an international flavor this year and a craving for lamb (mine!) gave rise to a Greek theme for this past week. I like to contribute a frozen dessert of some type so the first ripe red strawberries at the local farmers market inspired me to make strawberry frozen yogurt.

It’s hard to believe it but frozen yogurt has only been part of the dessert scene for less than forty years. It appeared first in New England in the late seventies as a healthier alternative to ice cream. At first consumers complained about the too tart flavor. Manufacturers retooled their recipes and frozen yogurt started to catch on in the health conscious eighties.

Making your own frozen yogurt is hands down better than anything you might find at the local “froyo” shop. When I have made frozen yogurt in the past, step one was to strain the yogurt through cheesecloth to give the finished product a denser texture and prevent the finished product from becoming too icy. Now that Greek yogurt is readily available I can skip that step.

What is the difference between regular and Greek yogurt? The watery whey is strained off several more times than regular yogurt resulting in a thicker product. Greek yogurt is more expensive than regular yogurt but it has almost twice the protein content and half the amount of sodium. The term “Greek” yogurt is not regulated at this point, so some manufacturers achieve thickness with cornstarch and milk protein concentrate. If that is important to you, look for Greek yogurt that contains only milk and live active cultures.

I turned to the always reliable recipes of David Lebovitz for my frozen strawberry yogurt recipe. David prefers a full-fat yogurt for his base, I went cross eyed looking over the very large display of yogurt at the local market. First, it was hard to find any plain varieties and most were labeled zero fat. I settled on a Greek plain 2% fat version and the results were great. A creamy and smooth frozen yogurt with just the right amount of tartness with early summer’s best fruit, sweet flavorful strawberries. I topped my frozen strawberry yogurt with even more berries in a simple sauce made from strawberries, sugar, a dash of lemon juice with a little pomegranate molasses.

Strawberry Frozen Yogurt

from David Lebovitz’s book The Perfect Scoop

 Makes about 1 quart

Ingredients

  • 1 pound strawberries, rinsed and hulled
  • 2/3 c sugar
  • Optional but good, he suggests  2 teaspoons vodka or kirsch, I used Chambord
  • 1 c  plain 2% Greek yogurt
  • 1 t fresh lemon juice

Directions

  1. Slice the strawberries into small pieces. Toss in a bowl with the sugar and liquor of your choice until the sugar begins to dissolve. Cover with plastic wrap and let stand at room temperature for 2 hours, stirring every now and then.
  2. Transfer the strawberries and their juice to a blender or food processor. Add the yogurt and fresh lemon juice. Pulse the machine until the mixture is smooth. If you wish, press mixture through a mesh strainer to remove any seeds. (I did..)
  3. Chill for 1 hour, then freeze in your ice cream maker according to the manufacturer’s instructions.

Strawberry Pomegranate Sauce

Makes about a cup

Ingredients

  • 1 c fresh strawberries, rinsed, hulled and cut into quarters
  • 2/3c granulated sugar
  • 1t fresh lemon juice
  • 2T pomegranate molasses

Directions

  1. Combine all ingredients in a small saucepan and cook over medium heat  until the strawberries cook down and begin to look syrupy.
  2. Serve at room temperature.
DSC_0409a
Beautiful ripe strawberries from the Wrightstown Farmers Market.
DSC_0411a
Getting juicy!
DSC_0420a
Blend it up!


DSC_0582a

June 11, 2013 Classic American Potato Salad

 DSC_0432a

Potato salad is hard. It’s much easier to plunk down your 4.99 at the Giant than making this classic from scratch.  Potato salad was a popular side dish when I was catering, and I knew that I could never charge for the time it took to make a great potato salad. My copy of Julia Child’s “The Way to Cook”, naturally opens to the pages on cooking potatoes and potato salad because I have used her recipes countless times.
 
First, you need to choose your potatoes, carefully examining each one. I’ve given up on bagged potatoes because more than once that “one bad apple” or in this case potato, has started to spoil the whole bunch. Then the potatoes need to be peeled and uniformly sliced to insure the proper cooking time. Next you have to find the right moment when the cooked potatoes are not too hard, crunchy potato salad will never catch on, but not too soft so that the potatoes crumble and turn to mush. The potatoes are then drained and the slices are allowed to firm up for 3 to 4 minutes. Now you should be ready to do the initial seasoning with the still warm potatoes, salt, pepper, onions, celery, vinegar or maybe some potato water. Additional ingredients can be added when the potatoes have cooled off. I like finely diced cornichon pickles, some crispy bacon, chopped hard boiled egg and parsley with enough mayonnaise to coat it lightly. Homemade mayonnaise is wonderful but good old Hellmann’s does the trick for me most of the time.

Potato salad brings back good family memories for me. When I was growing up the summer family cookouts were at our house. Most of the relatives on my father’s side lived in the city and we were the only ones with a large enough backyard to host such an event. My dad was the grillmeister, cooking burgers and hot dogs in a cloud of barbecue smoke. Adults and the older children would play spirited games of badminton and the younger cousins enjoyed the swing set. I’m sure there were salads, jello and otherwise but the dish I remember most was my grandmom’s German potato salad. My dad’s mom, Grandmom to us, would come with her potatoes, onion, bacon and vinegar ready to cook. That was quite a challenge because my parent’s home had the typical fifties kitchen, small with very little counter space. Everyone would get out of her way and she went to work, peeling potatoes, chopping onions and cooking bacon. She poured her vinegary dressing over the potatoes and served it still warm. Delicious, you didn’t want to be one of the last ones to be served or you might not get any. Grandmom died suddenly, just one day after our Labor Day picnic of 1969. I never thought to get her recipe, I had just turned 15 at the time and the only cooking I had done to that point was for a Girl Scout badge. Many have attempted but no one has ever quite duplicated her recipe. The lesson to be learned here?  If you or someone in your family makes something that you love from memory, take the time to observe, write it down and capture the recipe for future generations. Don’t let it be just a memory but a part of your family’s legacy.

Master Recipe for Cooking Sliced Potatoes for Salad

  • 3lbs Yukon Gold or red potatoes
  • Kosher Salt-1t per quart of water

Directions

  1. Fill a saucepan to the halfway point with cold water. Wash the potatoes. Peel the potatoes and cut into 1/4″ thick slices. Drop the peeled potatoes into the pan of cold water to prevent discoloration while you peel the rest.
  2. Once all the potatoes are peeled, drain out the water and add fresh cold water to cover and add the salt. Bring the potatoes to the simmer and simmer for 3-4 minutes, until the potatoes are just tender. Test them by eating a slice to be certain you have achieved the right texture.
  3. Drain out the water, reserving a cup or so if you want to use it as part of your dressing. Cover the pan and set aside for 3 minutes and no longer than 5 to give the slices the time to “firm up”. Uncover the potatoes and do the initial seasoning while they are still warm.

American Potato Salad

Serves 6-8

Ingredients

  • 3lb Yukon Gold or red potatoes-cooked according to the master recipe
  • 2/3c liquid, 3T cider vinegar plus chicken broth or potato water to make up the difference
  • 1/2c finely diced red onion, soaked in ice water for 10 minutes to eliminate the “bite”, well drained
  • 2/3c finely diced tender celery
  • 1/4c finely diced cornichons or dill pickle
  • 3-4 strips of crisply cooked bacon, crumbled
  • 3 hard boiled eggs, diced
  • 3T minced Italian parsley
  • 3/4-1c homemade or Hellman’s mayonnaise

Directions

  1. Turn the still warm potato slices in a large bowl and toss gently with the vinegar/liquid mixture, onions, celery, pickle and seasonings to taste. Let it steep for about 10 minutes, carefully tossing several times.
  2. When the salad is cool, toss with the bacon, eggs, parsley and just enough mayonnaise to coat lightly. The potato salad can be made 24 hours in advance.
  3. Before serving, check for seasonings and add more mayonnaise if needed. Sprinkle with additional parsley.
DSC_0403a
Cooked potatoes tossed with seasonings, finely chopped red onion, cornichons and celery.
DSC_0407a
Once the potatoes have cooled, add bacon, chopped hard boiled egg and parsley.
DSC_0421a
Add just enough mayonnaise to coat. Sprinkle a little more parsley on the salad before serving.


June 6, 2013 A Salad and a Slaw

DSC_0441a

The first  “burgers and dogs” cookout of the season called for sides, one, very traditional, the other, an update on an old classic.

The variations are endless when it comes to pasta salad.  As a caterer I had more than a dozen in my repertoire. Pasta salads can reflect whatever taste or ethnicity you are in the mood for. They are a perfect addition to summer picnics and barbecues. This pasta salad features traditional Mediterranean flavors and is as simple as can be. It can be made in not much more time than it takes to cook the pasta and uses mostly pantry ingredients. Rotelle pasta works well here, feel free to substitute whatever twisted shape suits your fancy.  If you are using canned diced tomatoes, hold back on the saucy component of the tomatoes, you can always add more sauce later.

DSC_0433b
Cabbage is a main ingredient in many slaw recipes so why not substitute the “cabbage turnip” or kohlrabi as it is translated from the German. Though it looks like a root vegetable it is a swollen stem that grows above ground. Farmers markets and spring gardens are abundant with kohlrabi this time of year. The mild flavor is somewhere between broccoli stems and a turnip and young kohlrabi are sweet and quite tender. I added some jicama to my slaw for additional crispness, Granny Smith apples for their sweet-tart flavor and a carrot to enhance the color. The kohlrabi I used was young, there was no need to peel the purple skin and it gave the salad some more color. l chose to julienne the vegetables in my slaw, a box grater or the shredding disc of a food processor would work as well but would give the slaw a different texture.

 DSC_0444a

 Pasta Salad with Tomatoes, Garbanzos and Feta

Serves 6-8

  • 1/2lb pasta (rotelle or rotini works best here)
  • 1/4 c finely chopped fresh basil
  • 2 T fresh lemon juice
  • 2 T white wine vinegar
  • 1 T chopped garlic
  • 2 t  grated lemon peel
  • 6 tablespoons olive oil
  • 2 cups chopped plum tomatoes (fresh or canned)
  • 1/4c finely minced sun-dried tomatoes
  • 1/4c sliced black olives
  • 1 15- to 16-ounce can garbanzo beans (chickpeas), drained and rinsed
  • 4 ounces feta cheese, crumbled
  • Additional chopped fresh basil

Directions

  1. Cook pasta in large pot of boiling salted water until just tender but still firm to bite. Drain and rinse with cold water to cool. Drain again.
  2. Combine basil, lemon juice, vinegar, garlic and lemon peel in large bowl. Gradually whisk in oil. Add pasta, tomatoes, garbanzo beans and feta cheese. Toss to blend well. Season salad to taste with salt and pepper. (Can be prepared ahead. Let stand at room temperature 2 hours; or cover and refrigerate overnight, them let stand at room temperature 1 hour before serving.)
  3. Mound salad on large shallow platter. Garnish with additional basil.

DSC_0436a

Kohlrabi Slaw

Serves 6-8

Ingredients

  • 1 medium kohlrabi
  • 1/2 medium jicama
  • 2 Granny Smith apples
  • 1 medium carrot
  • 1/4c golden raisins
  • 1/4c dried cranberries
  • 1/4c balsamic vinegar (I used cranberry-pear)
  • 1/2c extra virgin olive oil
  • 1t lemon peel
  • Kosher salt and freshly ground black pepper

Directions

  1. Cut top, bottom and “tentacles” off the kohlrabi. Peel the skin off the kohlrabi only if it is tough. Peel the jicama, apples and carrots.
  2. Cut all vegetables into matchstick julienne or shred in a food processor or on a box grater. Combine in a bowl along with the raisins and dried cranberries.
  3. Combine vinegar, oil and lemon peel in a small bowl, whisk to combine.
  4. Add enough vinaigrette to coat, let sit at room temperature for about ten minutes and add a little more vinaigrette if necessary. Season to taste with salt and pepper.

May 29, 2013 Spring Salad

DSC_0389a


Our spring salads are a combined effort. The greens are from our garden, arugula, mache, spinach and lettuces with names like Freckles and Burgundy colored Red Velvet. Last year I discovered Hakurei turnips at the farmers market and they are a welcome addition to this years garden. We are harvesting them now and they are pure white and sweet as can be. The farmers market offered French breakfast radishes, purple and green kohlrabi and the first asparagus of the season. Our first batch of radishes has already been picked but with succession planting the next are soon to come.

Trimmed kohlrabi reminds me of little space aliens and are a crunchy addition to the salad. Since this is young kohlrabi, I julienne them raw since the purple color is only skin deep. Many years ago we had an asparagus patch, but the time and effort didn’t seem worth it. Now we enjoy the harvest from our local farms.

The supermarket provided organic golden baby beets, our own beets are less than a week away. The first beet micro green thinnings are part of our salads, then used as cooked greens as they get bigger. We are growing three varieties this year, Golden, candy-striped Chiogga and the ruby red Detroit Red.

Soft cheeses like feta and chopped nuts would be a welcome addition to this salad. In weeks to come our salads will include snow peas, more radishes, carrots and eventually tomatoes, cucumbers and all the produce that summer brings.

A Spring Salad for two

Ingredients

  • 1/4 c Sicilian lemon vinegar
  • 1t Dijon mustard
  • 1t minced shallot
  • 3/4 c extra virgin olive oil
  • splash of lemon olive oil
  • Kosher salt and freshly ground pepper
  • 6c loosely packed salad greens, spinach, mache, arugula, baby lettuces
  • 1 small kohlrabi, purple or green, cut into matchstick julienne (if possible, don’t peel to maintain the color)
  • 2 small Hakurei turnips peeled and thinly sliced on a mandoline
  • 1 Golden beet, peeled and very thinly sliced on a mandoline
  • 8 asparagus spears, trimmed, sliced on the diagonal and steamed until crisp-tender
  • 4 French breakfast radishes, sliced

Directions

  1. Combine the first five ingredients in a small bowl, whisk to combine, add salt and pepper to taste
  2. Place lettuce on serving platter, top with turnip slices, beet slices, asparagus and radishes. Toss with enough dressing to lightly coat, there will be some left. Top with fresh ground pepper to taste
DSC_3787a
Kohlrabi root is the swollen stem of the plant that grows above ground.
DSC_0508a
This variety of lettuce is named “Freckles”.
DSC_0465a
We harvest the Hakurei turnips very small.
DSC_0466a
Beautiful Red Velvet lettuce with some carrot greens peeking in.

May 27, 2013 Yellowtail Snapper with Mango Salsa

DSC_0372aFirm white fleshed fish is a canvas on which many dishes can be created. With descriptors like clean, bright, and mild, the preparation can take you in many directions. A good pristine piece of fish can be prepared as simply with a little salt, pepper and a squeeze of citrus. You can also add a sauce and a rub and the flavors can transport you to the cuisine of your choice.

Our fish this evening was a yellowtail snapper fillet, named for the single yellow stripe that runs the length of the fish, even along the head. It is considered to be one of the best flavored snappers and since this very perishable fish made the trip up from Florida, I decided to “snap” one up.

I find that many people have a fear of cooking fish. They err on the side of overcooking it and the result is dry and flavorless. Perfectly cooked fish is moist and delicious. We have found a method of cooking fish that gives us consistently good results. In 1959, The Canadian Department of Fisheries and Oceans published a cookbook to help promote the country’s fishing industry. Popularized by late chef and food writer James Beard, they came up with a method of calculating how long to cook a piece of fish. Measure your piece of fish at the thickest point and cook at 10 minutes per inch or 1 minute per one tenth of an inch at 450°F. If you are baking a fillet, fold the thinner tail section under to maintain a uniform thickness. Check your fish a few minutes before the prescribed cooking time. It should be opaque in the center and cooked until translucency is gone. Also remember that the fish continues to cook from residual heat when first removed from the oven. To measure, any clean, well marked ruler will do. We still have our “Perfect Fish” that was patent pending in 1984 and not available now as far as my research found.

 
I decided to go in an island direction and prepared a Caribbean style rub and a simple mango salsa to accompany our fish. You can substitute red snapper, bronzino or sea bass for the yellowtail. It is important to note that your dish will only be as good as the fish you purchase. If you are purchasing whole fish look for bright, clear eyes. The flesh should be firm and shiny, not dried out. Ask to smell the fish if you need to, it should smell like seawater or nothing at all. Look for a dealer who properly handles seafood. My store of choice is Hellers Seafood in Warrington Pa, about 12 miles from my home. If I am planning to buy fish I bring a cooler filled with ice packs to keep the fish as cold as possible. Then it immediately goes in the fridge and used the same day. Just remember, no amount of sauce or rub will make a bad piece of fish taste any better.

DSC_0345a

Mango Salsa

Makes 2 cups

  • 1 1/2c diced mango
  • 1c diced cucumber
  • 1/2c pepper (red, yellow or orange)
  • 1/3c diced red onion
  • 1 small red jalapeno, chopped, seeds and ribs removed
  • 3T fresh lime juice
  • 1/4c torn cilantro leaves
  • 1T or more of Persian lime oil
  • Kosher salt and freshly ground pepper to taste

Directions

  1. Combine all ingredients in a medium bowl. Add salt and pepper to taste.

Caribbean Rub for Fish

  • 1/2 t allspice
  • 1t cumin
  • 1 1/2t thyme
  • 1t onion powder
  • 1t black pepper
  • 1/2t salt
  • 1/4t cayenne pepper (or to taste)
  • 1t brown sugar

Directions

  1. Whisk all spices together in a small bowl.
  2. Sprinkle the spice rub over the fillet before cooking.

Canadian fisheries method of cooking fresh fish

General Directions

  1. Preheat your oven to 450°F.
  2. Measure your whole fish, steak or fillet at it’s thickest point.
  3. Bake fish for 10 minutes for every inch of thickness. The original instructions say to turn the fish over at the halfway point, you can, we don’t. If you check internal temperatures, it should be about 145°F.

 DSC_0360a

May 21, 2013 Chive Oil


DSC_0339aJust exactly what is a bunch? That is the question I had to pose after looking at Bon Appetit ‘s June issue.The current issues of  both Bon Appetit and Fine Cooking have extensive articles about cooking with herbs. The article and recipes in Fine Cooking were contributed by Aimee Olexy. We had the pleasure of dining at her Philadelphia restaurant,Talula’s Garden last year. The article is a wealth of recipes that use fresh herbs, in everything from a grain salad to a pound cake. There is also a page that gives the reader the basic formulas for herb butters, oils, vinegar, syrup etc.  Bon Appetit devotes ten pages, if you count photos, to a spiked lemonade, tea, dessert, a board dressing and chive oil, among others. Chive oil caught my eye since our chives are peaking and I am trying to find ways to use them in my everyday cooking. This is where the bunch question arose.


Bon Appetit’s recipe calls for 3 bunches of chives and 1 1/3 cups of grapeseed or vegetable oil. Gourmet Sleuth says 1 bunch of chives = 1/2c chopped, I’m not sure on what authority they have determined this. One CSA farm cooperative labeled a bunch at one ounce, another more generous with a 2 ounce measurement. Oh yes, there’s an app for that, Produce Converter. Basil, parsley and oregano made the cut, sadly no chives. 

So I returned to my old tried and true recipe from the Herbfarm Cookbook.  A book that is open in my kitchen all summer long, author and former chef of the Herbfarm restaurant, Jerry Traunfeld is more exacting in his measurements. His ratio of 1 cup of coarsely snipped chives to 3/4c extra virgin oil worked well for me. Bon Appetit’s recipe heats the oil for a more concentrated mixture. Aimee and Jerry’s recipes rely on the heat that is generated by the blender.

So is it better to make this in a food processor or a blender? All three articles agreed that the initial way to combine the herbs and oil is in a blender. Blenders are best suited for liquid preparations, pureeing, emulsifying and blending.  Food processors are better at shredding, chopping, slicing and grating. Even though the bowl of a food processor is large, liquids in it can be no higher that the blade or it will run out the sides, I can certainly attest to that. A blender bowl can be filled almost to the top without the contents leaking out.
Any herb oil must be stored in the refrigerator for safety reasons. Botulism can occur when fresh herbs and oil are combined and left at room temperature. The equation for spoilage is even greater if garlic is added to the recipe. Ms Olexy gives a shelf life of two days to her herb and garlic oil. All fresh herb preparations are at their best in the first few days. After topping salmon with it, adding it to a vinaigrette and using it in a sauce for chicken, I’m sure I will have to make a new batch in a few days.

Chive Oil

Makes 1/2 cup

Ingredients

  • 1 c coarsely chopped chives
  • 3/4c extra virgin olive oil

Directions

  1. Put the chives and oil in a blender and puree until the oil begins to warm, 2 to 3 minutes.
  2. Pour the oil into a very fine strainer, or a coarse strainer lined with a double layer of cheesecloth, set over a bowl. Let the oil drip for one hour or longer to extract as much as possible. The oil should drip undisturbed to achieve the clearest oil. Discard the contents of the strainer and store the oil in a covered container in the refrigerator. Bring to room temperature before using. Will keep for a week.
DSC_0308a
Everything ready to go.


DSC_0315a
All blended up.


DSC_0316a
I love the bright green color!


DSC_0324a
Let the oil drip undisturbed for several hours for the clearest oil.

May 18, 2013 Chive Butter

 DSC_0301a

Martha was the first to introduce me to compound butters. Over thirty years ago when I was first married I spent a lot of time in bookstores paging through volumes of my new found interest, cookbooks. I always knew that I would enjoy cooking and Joe and I were beginning to enjoy preparing meals for ourselves and entertaining friends in our townhouse. One of the first books that really caught my attention was Entertaining, Martha Stewart’s first cookbook. At first I wasn’t sure if Martha was just a model for the book cover or in fact, the author. Actually both were true, she was a model through college and she had written the book from her experiences as a caterer. I was fascinated with the layout of the book, each chapter was a different type of party. Cocktail parties, dinner parties, holiday parties, the omelette party, eventually I would become familiar with them all.  At that time I wasn’t sure if I could justify the thirty-five dollars for this beautiful book. Fortunately, a dear friend loaned me the copy she had received as a wedding gift and I had it on a long term loan (thanks Wilma!).

Back to the butters, Entertaining had a recipe for fruit butter to accompany muffins and sweet breads and an herb butter to serve along with homemade savory breads. As my well worn copy of the book would attest, yes I did break down and buy it, I have made them many times, for our parties and as a caterer, for countless occasions. Herb butter is a compound butter which simply means butter creamed with another ingredient, whether it’s herbs, garlic, shallots, or honey or jam in the case of sweet butters. Compound butters can be made at any time but it’s a great way to preserve and enjoy herbs at their peak. Right now and at the end of summer, chives flower and show new growth.  I kept the recipe simple this time, just chives, sea salt and a little lemon peel. It’s great on fish, vegetables, steak, maybe even mixed into some freshly popped popcorn. Just bring butter to room temperature and stir in finely minced herbs. You can do the mincing with either a knife or scissors. Using unsalted butter allows you to add salt, but to your own liking. Chives can be used in combination with other herbs, tarragon, parsley and dill to name a few.

Martha came out with a update to her Entertaining book last year, this time it’s called, Martha’s Entertaining: A Year of Celebrations. Seventy five dollars, weighing in at six pounds, about a hundred plus more pages and yes, a recipe for a compound butter. This time it’s a garlic and herb butter to accompany her garden crudites for a luncheon. Can’t wait to try that one too.

DSC_0271a
Chives from the garden in a basket from the low country of South Carolina.

Chive Butter

Makes 8 ounces

Ingredients

  • 2 sticks of unsalted butter
  • 1/4 c finely chopped chives (you can include flower buds also)
  • 1/4t finely minced lemon peel
  • Sea salt to taste

Directions

  1. In a large bowl, mash the butter with a potato masher.You can even cream the butter using the paddle attachment of a stand mixer or in the bowl of a food processor.The goal is just to get the butter soft so you can incorporate the chives.
  2. Add the chopped chives and continue mashing/mixing the butter until fully incorporated. Mix in the lemon peel and salt to taste.
  3. Spread out a large (1-foot or bigger) square of plastic wrap across your work surface. Spoon the butter out in a band about 1 inch wide on the bottom third of the plastic. Tightly roll up the butter in the plastic to form a log. Grab the excess plastic at both ends of the log and twist the ends in opposite directions. The cylinder should be taut and as round as possible. 
  4. Tie the excess plastic wrap at the ends of the cylinder into a knot, or just use little pieces of string to tie off the ends.
  5. To store the butter, wrap the plastic covered log tightly in aluminum foil and refrigerate for up to a week or freeze for up to 3 months.
DSC_0290a
You can even add a few chive flowers along with your chopped chives.
DSC_0295a
Mixing the ingredients by hand will leave the chive flower petals intact. Using a food processor will produce a more homogeneous result.

DSC_0297a

May 14, 2013 Red Snapper Veracruzana

DSC_0122a

With influences from both Old and New World cuisine, red snapper veracruzana is a classic Mexican dish with definite Spanish overtones. When the Spanish explorer Hernan Cortes landed on the southeastern gulf area of Mexico on Good Friday, 1519 he gave it the name “Villa Rica de la Vera Cruz” which translates to  the rich village of the true cross. Rich not just in the abundance of the gold and silver that they would soon find here but in seafood, tomatoes, peppers, and vanilla as well as their diet staples, corn, beans and squash. Cultivated first by the Mayans and later by the Aztecs, the Spanish introduced the tomato throughout their empire. The Spanish conquistadors in turn brought parsley, cilantro and thyme, as well as garlic, onions and olives to the coastal Mexican cuisine which influences it to this day. Red snapper or huachinango as it it called in Mexico, is nestled in a sauce of rich ripe tomatoes, onions and garlic with a salty tang that comes from Manzanilla (Spanish) olives and capers. Pickled jalapenos add tartness and only a moderate amount of spice. I like to make my own pickled jalapenos in late summer when our pepper plants are prolific. I used a whole fish in this preparation but don’t let that stop you from trying this recipe. The sauce would be just as good on fish fillets or even shrimp.

Red Snapper Veracruzana

Slightly adapted from Mexico One Plate at a Time

Serves four to six

Ingredients

  • One 4 pound cleaned and scaled firm meaty fish, such as snapper, grouper, striped bass, pompano (ask your fishmonger to cut out the red gills and trim off the fins at the top, bottom and alongside the gills. An easier approach, to feed four, use four 5-6 ounce boneless skinless fish fillets of the same type of fish named above. You will not need as much sauce, only about five cups will be needed for this recipe. Reserve the rest for another use.
  • 2 limes juiced
  • Kosher Salt
  • 1/4c olive oil
  • 1 medium white onion, thinly sliced
  • 4 large cloves of garlic, peeled and finely chopped
  • 3lbs ripe tomatoes, cored and chopped into 1/2 in pieces (7 cups)
  • 3 fresh Turkish bay leaves
  • 1 1/2 teaspoons dried Mexican oregano (can substitute standard oregano)
  • 3T chopped flat leafed parsley
  • 1c pitted and roughly chopped Manzanilla olives
  • 1/4c capers, drained and rinsed
  • 3 or 4 pickled jalapeno peppers, stemmed, seeded and thinly sliced

Directions

  1. Cut two parallel slashes across each side of the fish, cutting through the flesh to the backbone. Place the fish in a baking dish large enough to hold it comfortably. Drizzle both sides of the fish with the lime juice and sprinkle generously with salt. Cover and refrigerate from one to four hours.
  2. In a five quart Dutch oven, heat the oil over medium heat. Add the onion and cook, stirring regularly, until just beginning to brown, about 5 minutes. Add the garlic and cook 1 minute more, stirring occasionally. Raise the heat to medium high and add the tomatoes, bay leaves, oregano, parsley and half of the olives, capers and chiles. Simmer briskly, stirring frequently, for about 5 minutes to evaporate some of the liquid. Reduce the heat to medium low, stir in one cup of water and simmer for 15 minutes. Taste and season with salt to taste. Remove from the heat.
  3. Heat the oven to 350°F. Lightly oil a roasting pan large enough to hold the fish comfortably.  Remove the fish from the lime marinade and lay it in the pan. Cover the fish with the tomato sauce. Bake in the center of the oven until internal temperature of fish is about 140°F or until flesh is opaque and separates easily with a fork, start checking at the 35 minute mark. Prepare a serving platter large enough to hold the entire fish. Use two sturdy large metal spatulas to transfer the fish from the baking pan to the serving platter. Spoon up the rest of the sauce from the pan and cover the fish. Sprinkle your finished dish with the remaining olives, capers and parsley.
  4. To serve your beautiful presentation, set out the spatulas you used to move the fish from the pan to the plate along with a very sharp knife.Using the sharp knife , cut between the head and body until the knife touches the backbone. Repeat on tail end. Insert knife at tail end, and cut from backbone to cavity. With knife resting against backbone, cut up to head. Insert a spatula underneath flesh of fish, on top of the backbone and lift. Lift tail; remove backbone.If desired, remove skin from fillet.
DSC_0062
Can you just smell the tomatoes, garlic, just-picked bay leaves and Mexican oregano? I used my roasted tomatoes I freeze every season. According to the video I watched of the Mexican chef preparing this dish on the Epicurious website, Mexican chefs don’t mind skin on their tomatoes.


DSC_0121a
If the fish tail extends beyond the roasting pan, wrap it in foil to prevent it from burning.