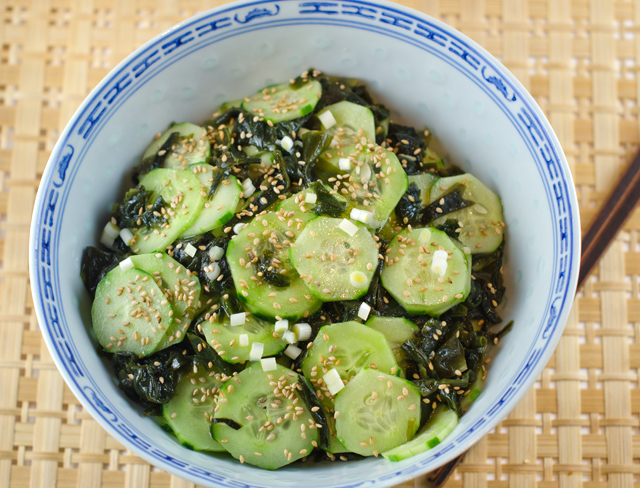
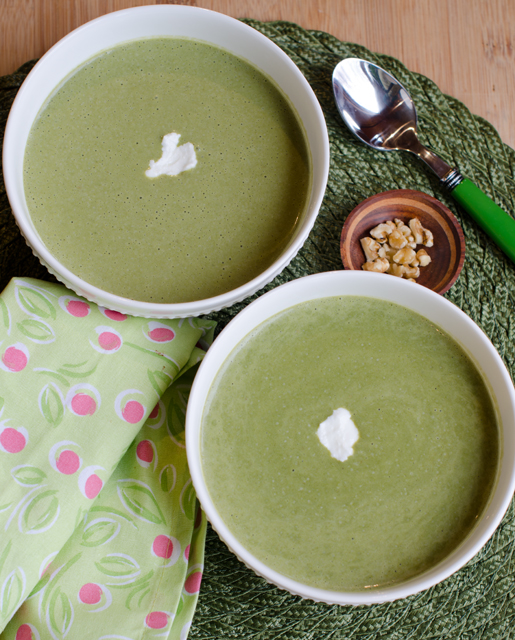
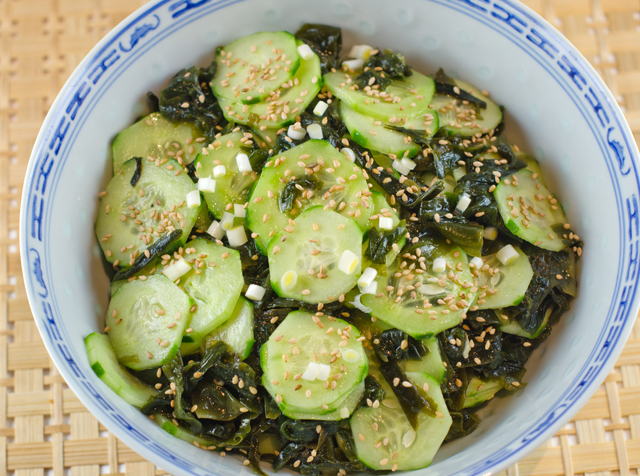
Seaweed has been a regular part of the Japanese diet for centuries. It is low in calories, fat and cholesterol, a good source of dietary fiber, vitamins and minerals. So why don’t I think of making seaweed salad more often?
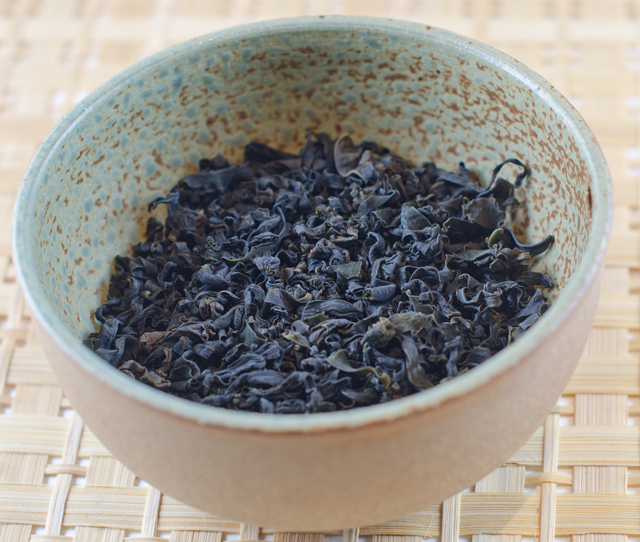
Granted it’s not the most attractive item you will find at your local health food store or Asian market and the word weed makes it sound like something you might toss in the mulch heap. But sea vegetables, as they are also known, make an interesting addition to salads. I have several types in my pantry, nori for rolls, kombu for dashi, the base for miso soup. I chose wakame (wah-ka-may) for this salad. It has a chewy texture and a very mild flavor, a little sweet and a little salty. Not much is needed, an ounce of dried seaweed is enough for a salad to serve four. Dried wakame may not look like much but after soaking, it expands up to six to eight times it’s original size.
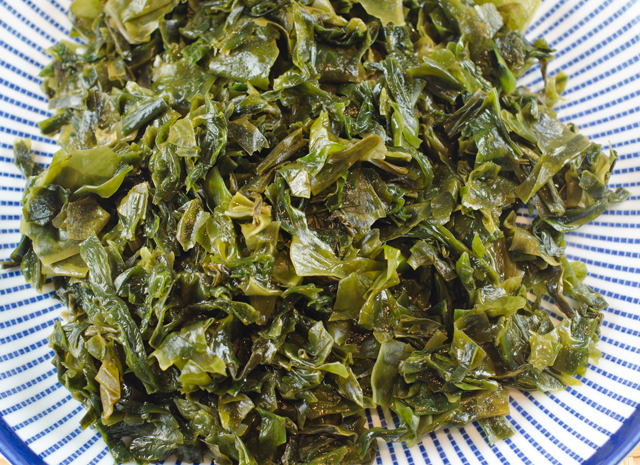
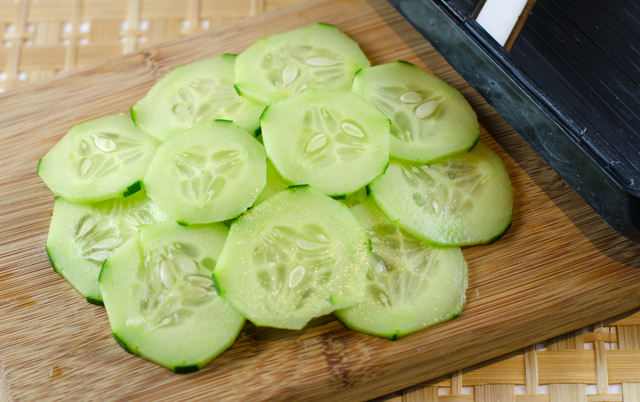
The wakame should not soak any longer than the directions suggest, it will get soggy. Drain well and rinse with cold water. Remove the inedible stem if present. Thinly slice an equal amount of Persian or seedless cucumbers with a mandolin. The simple dressing uses staples from the Japanese pantry, miso, rice vinegar, and mirin. Combine the wakame, scallions and cucumbers in a medium bowl and toss with the dressing. Top with toasted sesame seeds.
We nibbled on this light, refreshing salad while enjoying the sushi and sashimi dinner Joe prepared last weekend. In Japanese cuisine it is considered a sunomono (vinegar based cold dish). The crunchy cucumber, (fresh from the garden of course) contrasts nicely to the soft chewy texture of the wakame.
Wakame and Cucumber Salad
Serves four
Ingredients
1 ounce dried wakame seaweed
¼ c rice wine vinegar
1 T fresh lime juice
1 T yellow miso paste
1 T freshly grated ginger
1 t honey
1 T mirin
1 T dark sesame oil
1/3 c canola oil
Salt to taste
6 thinly sliced, Persian cucumbers or 1 large seedless cucumber
2 thinly sliced scallions
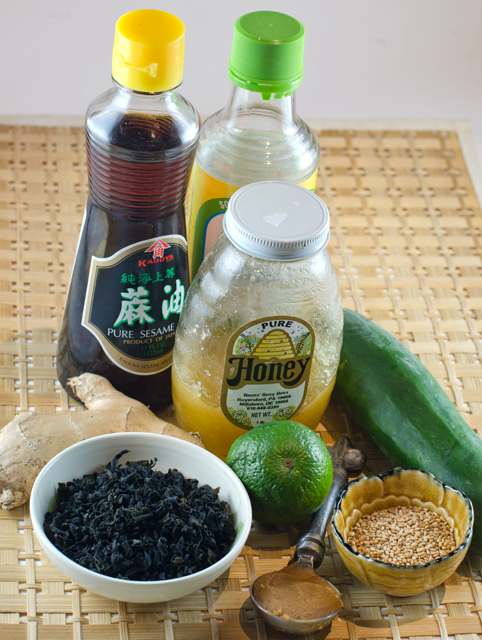
Ingredients for the salad.Dried wakame.Wakame can expand six to eight times it’s size from the dried state.The mandolin gives uniform thin slices, always use the finger guard!
Directions
Soak seaweed in warm water to cover, 5 minutes. Drain, rinse briefly with cool water and drain again. Use a paper towel to blot excess water. Set seaweed aside.
In a medium bowl, whisk together the vinegar, lime juice, miso paste, ginger, honey, mirin, sesame and canola oil.
Add the wakame along with the cucumbers and scallions and toss well.
My very thoughtful husband gave me two very special gifts for Christmas last year. The first, tickets for the South Beach Food and Wine festival that we attended in February, the second, tickets to the Food and Wine Classic. Held over a mid June weekend in Aspen Colorado for 35 years, the Classic is the nation’s premiere culinary event.
The Classic brings together the world’s foremost authorities on wine and food at over 80 cooking demonstrations and wine seminars. In between the classes and seminars we had time to sample gourmet bites, wines and other libations in the large white tents that made up the grand tasting pavilion. One of our favorite places to stop was to taste the creative offerings of Food and Wine magazine’s “Best New Chefs”. For the past 28 years the best new chefs have showcased the next culinary superstars. At each Grand Tasting, two of the chefs offered up their best bites to a hungry crowd. While pressing through the line to receive their offerings, I made a point to congratulate each one on this significant accomplishment. The July issue of Food and Wine magazine concurrently features an article about the best new chefs and a recipe or two from each one. Occasionally I will try some of these recipes, this year several caught my attention.
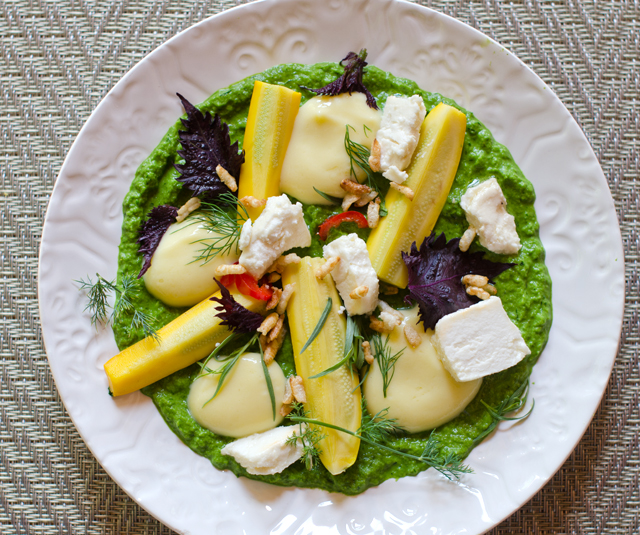
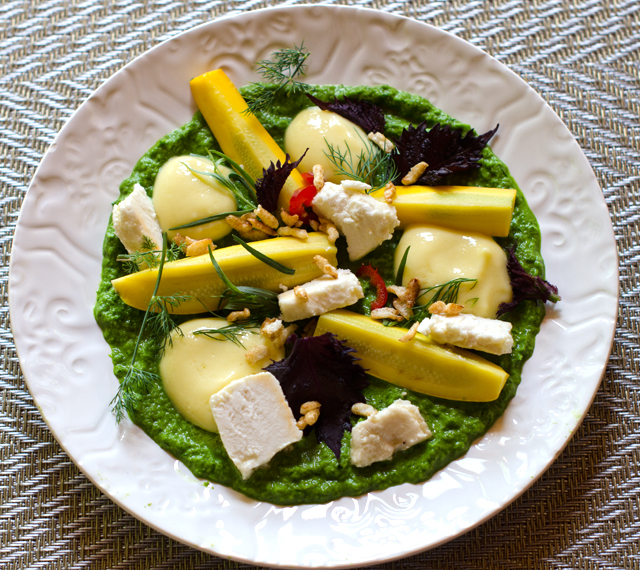
Chef Brad Kilgore serves up his “playfully brilliant” dishes at his restaurant,Alterin Miami’s Wynwood neighborhood. Chef Kilgore stated in the article that squash and zucchini are not his favorites, so his goal was to make something great from them. His recipe for Summer Squash with Lemon Curd and Citron Vinaigrette, despite having many steps looked like something I could do and make use of produce from the garden.
Since it can be made three days ahead, my first step was to make the lemon curd. Lemon and lime curd tarts were a regular on the dessert buffets in my catering business. I admit I was a little dubious about lemon curd in a savory preparation. The addition of lemongrass and ginger made this curd unique and the lemon juice was courtesy of our Meyer lemon tree. There is a lemongrass plant in the garden but it was easier to use a few stalks from my supply in the freezer. They come back to room temperature fairly quickly and they are easier to slice when cold. The curd ingredients are put in the blender and blended until smooth. Strain the curd over a fine sieve and press down on the solids to extract as much flavor as possible from the ginger and lemongrass. Put a medium saucepan of water on to simmer and put the curd in a heatproof bowl that is large enough to sit on top of but not in the pan. The bowl shouldn’t be too big but large enough that you can comfortably whisk the curd without sloshing it on the counter top
Whisk constantly for about five minutes until it thickens, the curd should coat the back of a spoon. Remove the pan from the heat and whisk in the butter 1 tablespoon at a time and finish by adding the extra virgin olive oil. Cover the surface of the curd directly with plastic wrap, this will prevent the curd from forming a skin and refrigerate until cold about three hours.
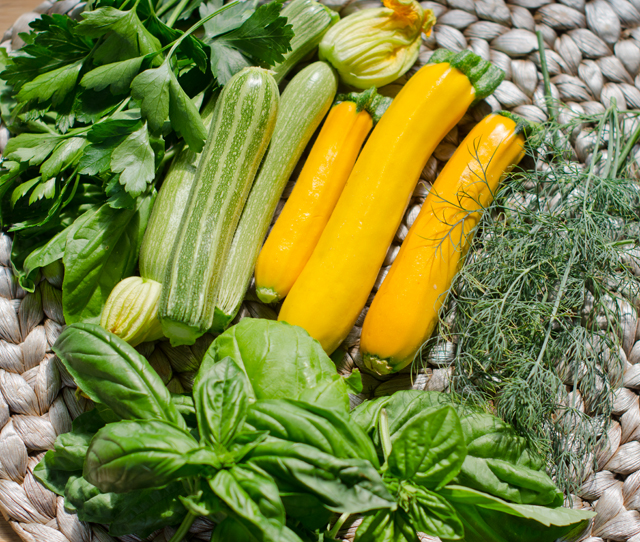
The zucchini herb puree can also be prepared before the salad is assembled. Our source for yellow squash and several varieties of zucchini is from a company called Seeds of Italy. Every summer my intention is to pick them small before they get to the size of a baseball bat but there are always a few that get away from me. Just picked little zucchini actually have a delicate nutty flavor.
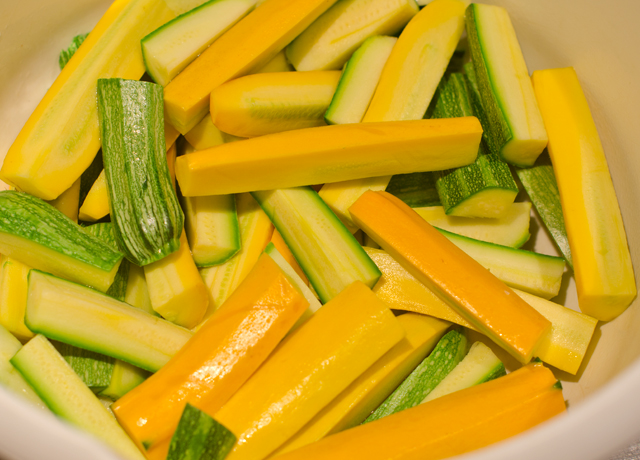
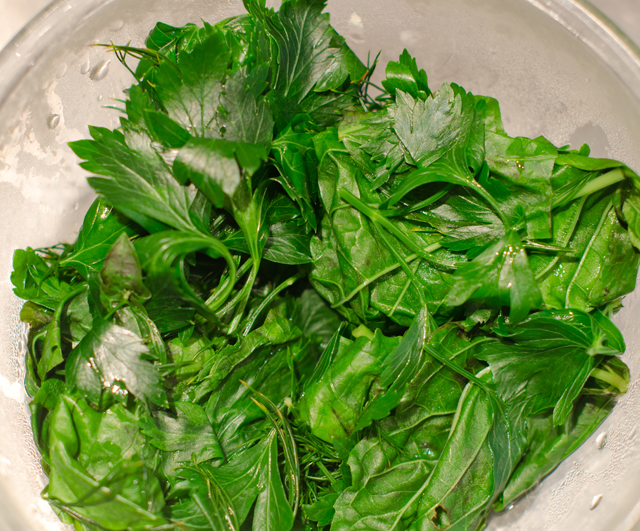
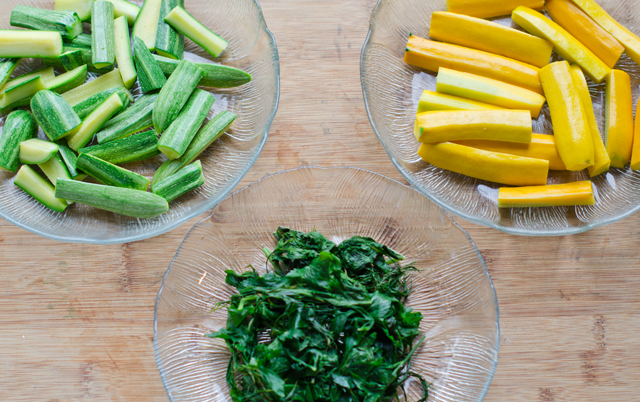
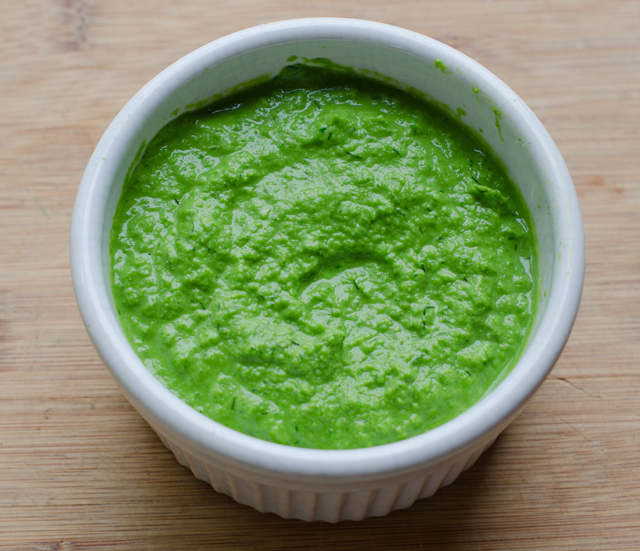
The original recipe called for the squash and zucchini to be seeded which is a good idea if you are buying medium to large sized squash. Since the seed pods in the zucchini and yellow squash that I picked were not fully developed yet I didn’t feel the need to remove the seeds. I picked basil, parsley and dill from the garden for the purée. Blanch the zucchini and squash and the herbs in boiling water for only 30 seconds. Blanching brightens the color of both the squash and the herbs. Immediately transfer them to an ice bath to stop the cooking. Drain them well. Pat the zucchini and squash dry with paper towels. Squeeze all the excess moisture out of the herbs. Set The yellow squash aside and purée the zucchini and the herbs in the blender. Add olive oil and salt to taste.
The vinaigrette is very simple, the acids, lemon juice and white wine vinegar are combined with chopped tarragon and honey, canola and extra virgin olive oil. I love the anisey flavor tarragon brings to any dish.
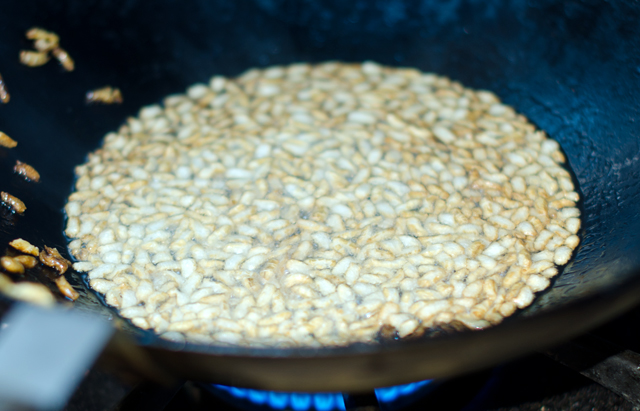
I read the recipe again to be certain I had all the components to plate it. Dill and tarragon sprigs, check. I added some red shiso leaves too. They grow like mad in the garden and seem to be a chef favorite. Thinly sliced chilies, were also a check. The last garnish had me initially stumped, puffed rice. Did they mean like the cereal? Probably not was my guess.
I found a slightly time consuming but easy way to make it. I cooked a cup of brown basmati rice until it was done, about 40 minutes and let it cool. I preheated my convection oven to 250°F, spread the rice out in a thin layer on a baking sheet and let it dry out for about an hour. I turned the oven off and let the rice dry out overnight. Line several baking sheets with paper towels. The next step is to heat about an inch of cooking oil in a wide pan , I used my wok for this. When the oil reaches 375°F add a kernel of rice, if it puffs up they are ready to go. Add the rice in batches, when it hits the hot oil the rice puffs up in seconds. You should be prepared with a fine mesh strainer to scoop out the puffed kernels before they get too brown. Puffed rice smells great, all toasty, it’s good as a salad garnish or just for munching.
With all components ready, I was ready to assemble the salad. Spread a thin layer of the zucchini herb purée on each plate. Dollop a little of the curd on the purée. Toss the yellow squash with some of the vinaigrette and season with salt. Arrange a few pieces of squash on the plates along with the marinated cheese. Garnish with herbs, chilies and puffed rice.
Joe declared the salad delicious and over the top, a unique combination of flavors and textures. On first glance this recipe looks very “cheffy” Lots of special steps and components, usually enough to scare the average home cook away. Obviously it’s not something you would whip up after work on a week night. But the steps are manageable, the curd, puree and vinaigrette can all be done ahead. It was a wonderful salad, beautiful, very unique, a wonderful combination of flavors and textures. Hmm, guess that’s why he’s a best new chef.
I was also interested to read that Chef Kilgore makes all of the desserts at his restaurant, that’s not typical of most head chefs. The lemon curd infused with lemongrass and ginger was very good. I have some left over from the salad and will serve it with some of our fresh blueberries that should be ready to harvest this weekend. The zucchini herb puree I had leftover made a good sauce for salmon and would work for poached chicken too. I’m certain I will be making it again this summer. The puffed rice was a bit of a revelation and fun to do. It makes an interesting addition to a salad and just for munching too.
Summer Squash Salad with Lemon Curd and Citron Vinaigrette
Serves four
Ingredients for the lemon curd
1/3 c fresh lemon juice
3 large eggs
2½ T sugar
1 T thinly sliced lemongrass, tender inner bulb only
2 t minced peeled fresh ginger
4 T unsalted butter, cut into tablespoons and at room temperature
½ T extra virgin olive oil
Ingredients for the lemon curd.
Directions for the lemon curd
In a blender, combine lemon juice, eggs, sugar, lemongrass and ginger and blend until smooth. Strain the mixture through a fine sieve into a medium heatproof bowl, pressing on the solids.
Place the bowl over, not in, a saucepan of barely simmering water. Cook the curd, whisking constantly until the curd is thick enough to coat the back of a spoon, 5-7 minutes.
Remove the bowl from the heat and whisk the butter in until incorporated, then whisk in the olive oil. Press a sheet of plastic wrap on the surface of the curd and refrigerate until cold.
Ingredients for the zucchini-herb purée
8 oz yellow squash, quartered lengthwise, seeded if necessary and cut into 3″ pieces
5 oz zucchini, quartered lengthwise, seeded if necessary and cut into 3″ pieces
½ c each, basil, parsley and dill
2 T extra virgin olive oil
Kosher salt
Ingredients for the zucchini herb puree.
Directions for the zucchini herb purée
In a medium saucepan of salted boiling water, blanch the squash and zucchini for 30 seconds; using a slotted spoon, transfer to an ice bath to cool completely. Blanch the herbs until wilted, about 30 seconds. Drain and transfer to an ice bath to cool. Drain the squash, zucchini and herbs; pat the squash and zucchini dry and squeeze excess water out of the herbs.
Reserve the yellow squash in a small bowl. In a blender, purée the zucchini with the herbs and a half a cup of water until smooth. With the machine on, add the half cup of olive oil. Season to taste with salt.
Didn’t need to seed these zucchini and yellow squash.Plunge into ice water after blanching for thirty seconds.It brightens their color.Squeeze the herbs dry .Ready to blend.The final product.
Ingredients for the vinaigrette
2 T fresh lemon juice
2 t white wine vinegar
1 T chopped tarragon
¼ t honey
¼ c canola or grapeseed oil
2 T extra-virgin olive oil
Kosher salt
Tarragon in the garden after the rain.Ingredients for the vinaigrette.
Directions for the vinaigrette
In a small bowl combine the lemon juice, vinegar, tarragon and honey. Gradually whisk in both of the oils until emulsified. Season the vinaigrette with salt.
Final assembly of the salad
4 oz marinated sheep or goat’s milk cheese, cut into small chunks for serving
Small tarragon, dill, shiso, or other herb sprigs
Thinly sliced chilies
Puffed rice
Spread a thin layer of the zucchini purée on 4 small plates. Dollop a few small teaspoons of the lemon curd on the puree. Toss the squash with 2 tablespoons of the vinaigrette and season with salt. Reserve remaining vinaigrette for another use. Arrange three pieces of squash on each plate along with some of the marinated cheese. Garnish the salads with the herb sprigs, chilies and puffed rice.
I loved making puffed rice!
Probably the most unique salad I’ve ever made/tried. 2 thumbs up!
He’s back, Christopher Kimball that is. The bespectacled and bow tied co founder of America’s Test Kitchen and editor in chief of Cooks Illustrated, Kimball left both posts last November over a contract disagreement.
Accepting no advertising, Cooks Illustrated has been the authority for developing well tested, (sometimes over 100 times!) absolute best recipes for everything imaginable for almost 25 years. I have been a huge fan of Cooks Illustrated from day one and have saved every issue. Although I use recipes from many sources I always return to CI for its foolproof results. Fortunately for his devoted followers, Mr Kimball is back on the culinary scene with his new project, Milk Street Kitchen. Named for the street in Boston where the company is located, Milk Street will house offices for a new magazine and other media content, a retail cooking school and a studio where a new PBS show will be filmed.
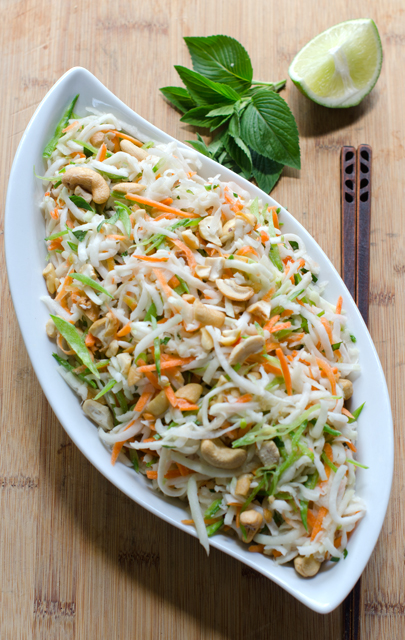
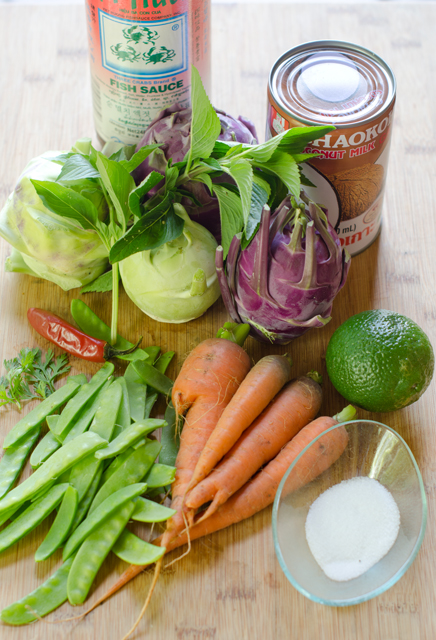
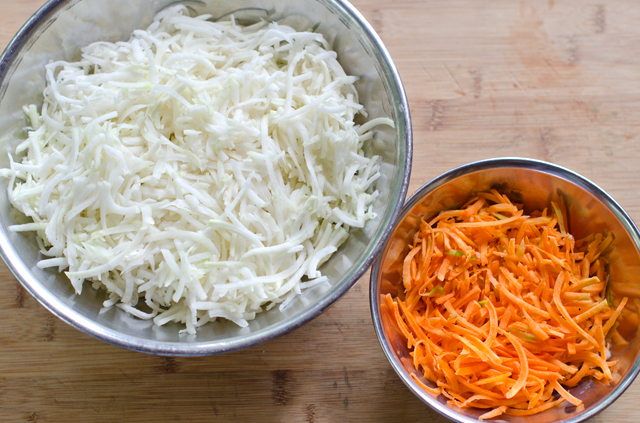
I received the first email newsletter from Milk Street Kitchen this past week. This recipe from the newsletter, Thai Coleslaw, looked like a perfect fit for what I have been harvesting from the garden this week. I made some changes to the slaw ingredients. I substituted kohlrabi for the napa cabbage, carrots for the radishes and since our first crop of cilantro has died off, lime basil. The last of the snow peas make an appearance in this slaw as well.
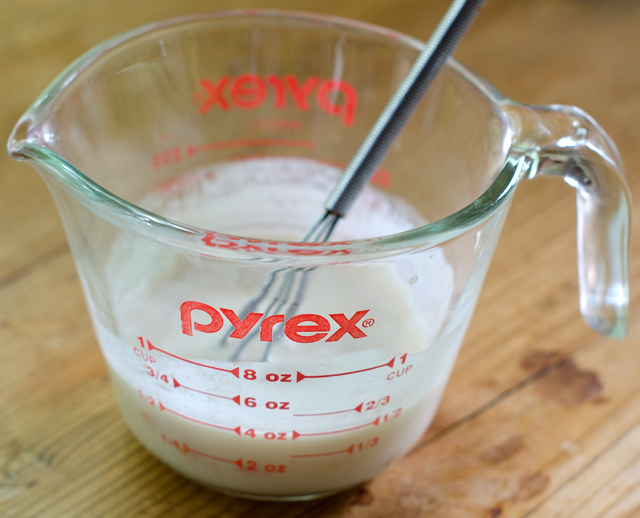
What gives the slaw a Thai flair is the dressing. It combines lime juice, sugar, a serrano chili and coconut milk. To get the most juice from a fresh lime, microwave it for a few seconds to get the juices flowing. After I cut the fruit in half I score the sections to further loosen things up a bit. One average sized lime gave me a little more than the 3 tablespoons I needed.
Coconut milk has been a staple in my pantry since we discovered our love for Thai food over thirty years ago. Look for canned coconut milk found in the Asian section of your supermarket. This is not to be confused with the dairy-free milk substitute or cream of coconut, an ingredient in piña coladas. There are many brands on the market these days, my favorite is still Chaokoh. With all canned coconut milk, shake the can well before opening since the fat and the liquid separate. Fish sauce is another ingredient that gives this dish a southeast Asian touch. It is extracted from the fermentation of fish, usually anchovies, that are salted. The amber colored liquid give a unique depth of flavor to many dishes, including this slaw. A serrano pepper, seeded and minced, gives the right amount of heat to the dressing.
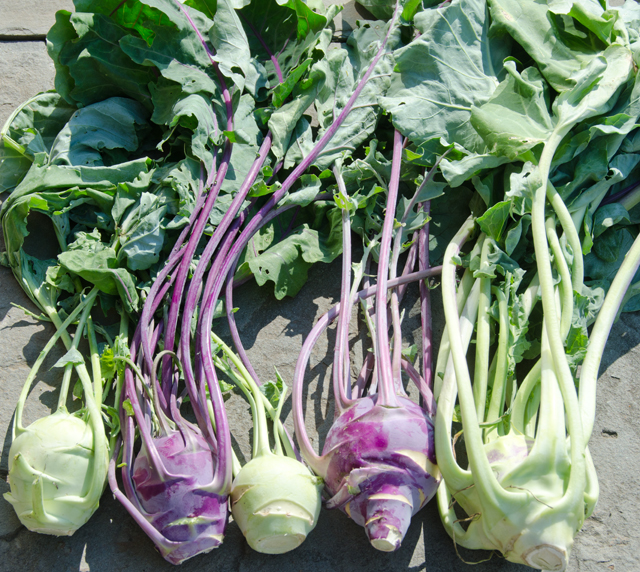
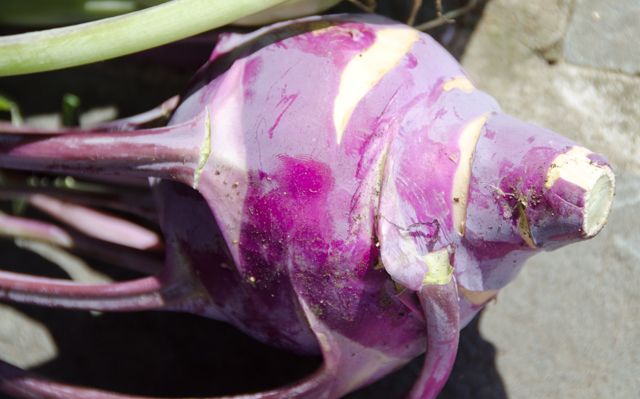
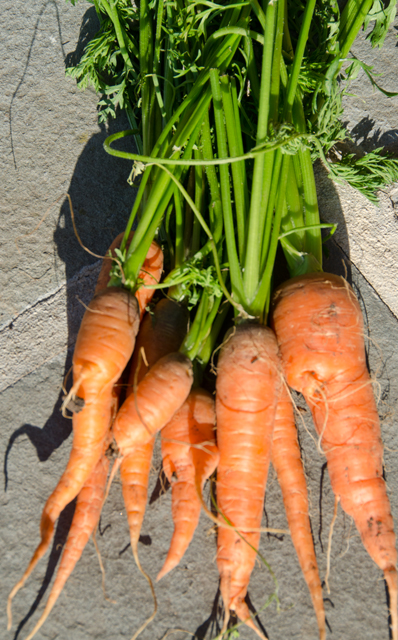
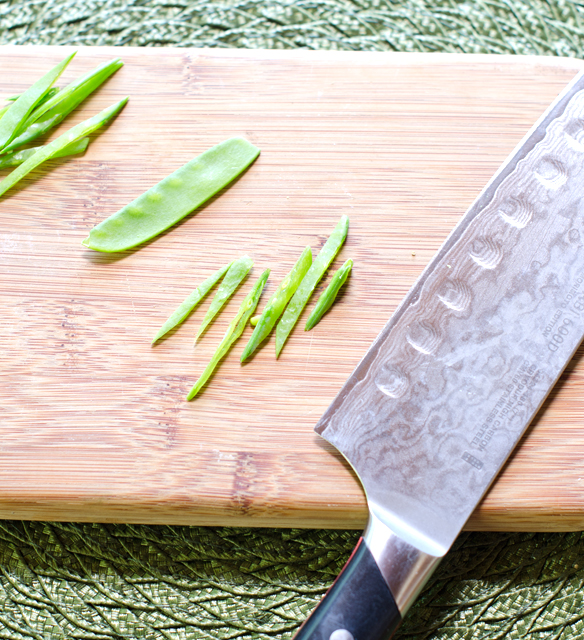
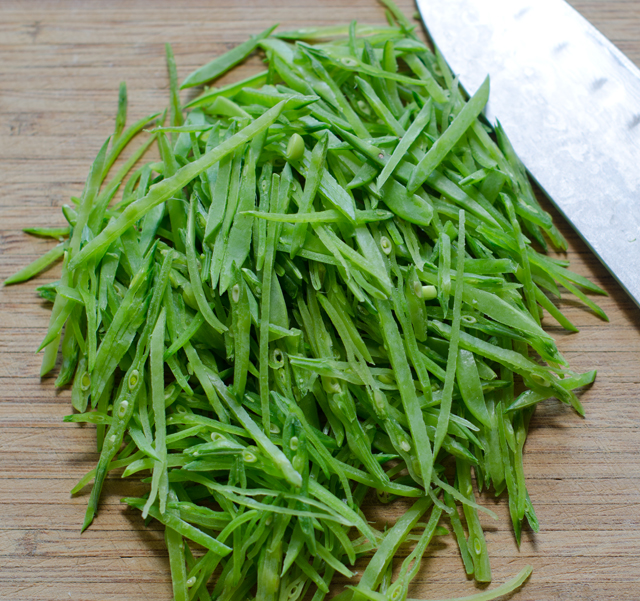
Kohlrabi gets it’s name from a German word, kohl-cabbage (as in coleslaw) and rabe-turnip. It has a milder flavor than either of those vegetables, the best description I read was that it tastes like broccoli stems. Kohlrabi is not a root vegetable since the bulbous part grows above the ground and is studded and topped with leaves that resemble those on a broccoli plant. The vegetable “minion” was a good substitute for the crisp and crunchy napa cabbage. Shredded carrots and julienned snow peas (last of the season) added more color and crunch. The radishes originally called for in the salad won’t be back until the fall garden.
With the exception of the coconut milk, combine the dressing ingredients in a liquid measuring cup, let sit for ten minutes. The fresh serrano is cooked in the lime juice and mellows out it’s flavor. Stir in the coconut milk. Combine the kohlrabi, carrots, snow peas and herbs in a large bowl. Pour the dressing over and toss until well combined. Stir in the cashews and serve. It’s a delicious alternative with pork barbecue.
We grow both green and purple kohlrabi.
Maybe not the prettiest, but I love fresh carrots from the garden.Ready to go!Snow peas are julienned on the diagonal.Finished product.Shredding the kohlrabi and carrots is easy in the food processor.Combining the dressing ingredients.
Thai Coleslaw
Serves 4-6
Ingredients
3 tablespoons lime juice
4 teaspoons sugar
1 tablespoon fish sauce
1 medium serrano chili, seeded and minced
5 tablespoons coconut milk
8 cups shredded kohlrabi or napa cabbage
2 cups shredded carrots
4 ounces sugar snap peas, strings removed and thinly sliced
½ cup chopped basil (I used lime) or cilantro
¼ cup coarsely chopped fresh mint
½ cup roasted, salted cashews, coarsely chopped
Directions
In a liquid measuring cup, combine the lime juice, sugar, fish sauce and chili. Let sit for 10 minutes. Whisk in the coconut milk until combined.
In a large bowl, combine the kohlrabi, carrots, peas, basil or cilantro and mint. Add the dressing and toss until evenly coated. Stir in the cashews and serve.
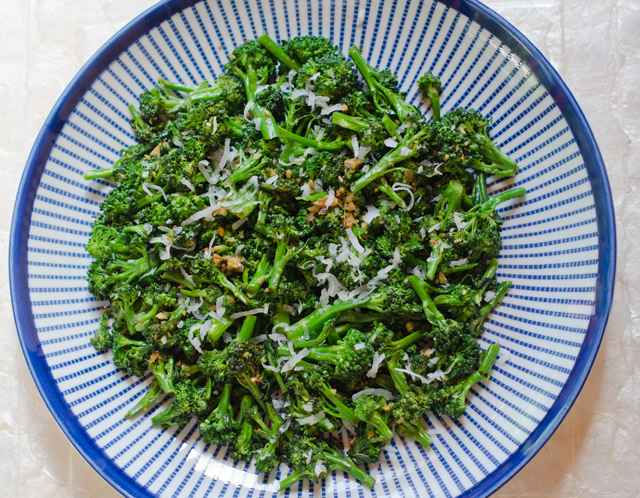
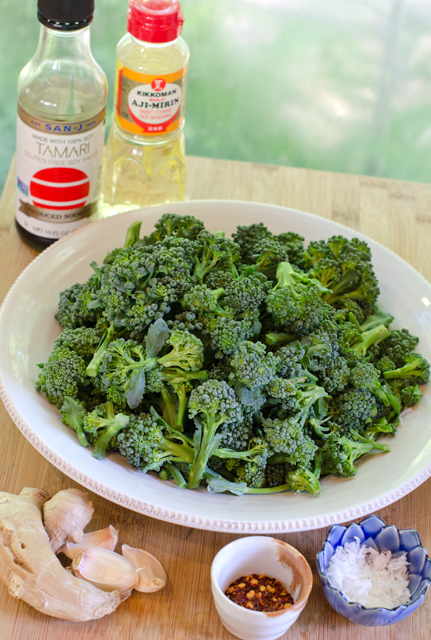
Broccoli and sweetened coconut shreds? Let’s just say I was as much curious as I was dubious about this recipe. My curiosity won out in the end and discovered I liked this easy and flavorful side dish.
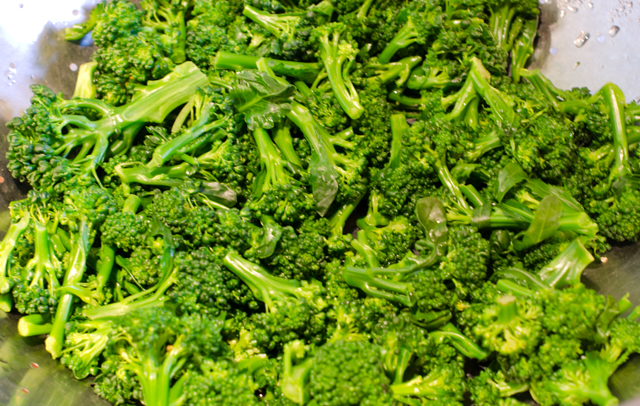
Broccoli florets are blanched in boiling salted water for a few minutes until crisp-tender. The florets are removed from the pot and shocked in a ice water bath. This stops the cooking process and preserves the bright green color. Drain the broccoli and dry well with paper towels. If the broccoli is too wet it will water down the dressing.
Aromatics, garlic, ginger and a pinch of spicy red pepper flakes are sautéed in a neutral oil until fragrant. Toss in the broccoli to coat and season with salt and pepper. Tamari and mirin are added to the pan and reduced to make a easy sauce. Tamari is a soy sauce that is made without wheat and has a milder and richer taste compared to regular soy sauce. Low sodium soy sauce could also be used in this recipe. Mirin, like sake, is a rice wine but with a higher sugar and lower alcohol content. The sweet flavor of mirin is a nice contrast to a saltier sauce like soy or tamari.
Reduce the liquid by half, then remove the broccoli to a serving platter. The sauce left behind in the pan is poured over the broccoli and the coconut shreds are sprinkled on top. I found the coconut added another dimension of flavor and was balanced out nicely by the sweet and salty sauce.
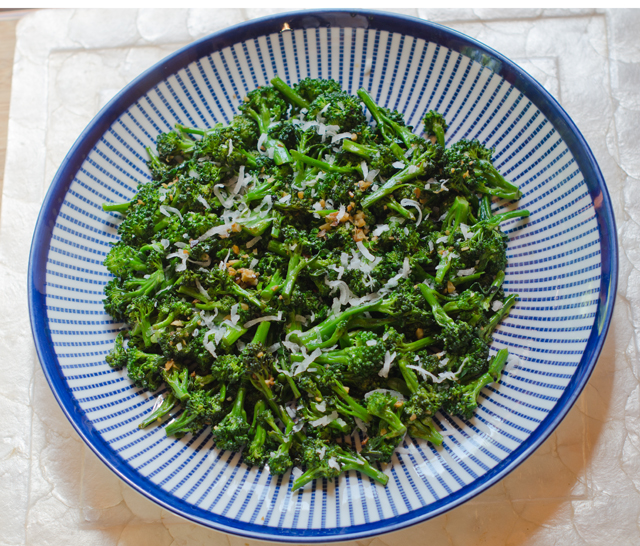
Shock the blanched broccoli to preserve the bright green color.
Asian Broccoli with Coconut
Serves 4
Ingredients
1 lb bite sized broccoli florets
1 T canola oil
2 cloves garlic, minced
1 T minced fresh ginger
Dash of red pepper flakes
Kosher salt and freshly ground black pepper
2 T tamari soy sauce
1 T mirin
1 T sweetened coconut flakes
Directions
Bring water to a boil in a 6-quart pot over high heat. Add florets and bring back to a boil. Cook until just tender 2-3 minutes
Remove broccoli with a slotted spoon to an ice water bath and let sit until cool, 5 minutes. Drain the broccoli and dry well on paper towels.
Heat oil in a 12-inch sauté pan over medium heat. Sauté garlic, ginger and red pepper flakes until fragrant, 1 minute. Gently toss in the broccoli to coat in the oil. Season with ¾ teaspoon of salt and pepper to taste.
Add the soy and mirin. Gently toss broccoli until liquid is reduced by half and broccoli is warmed through, 2-3 minutes. Remove broccoli to a medium serving platter. Pour soy over broccoli. Sprinkle shredded coconut over top.
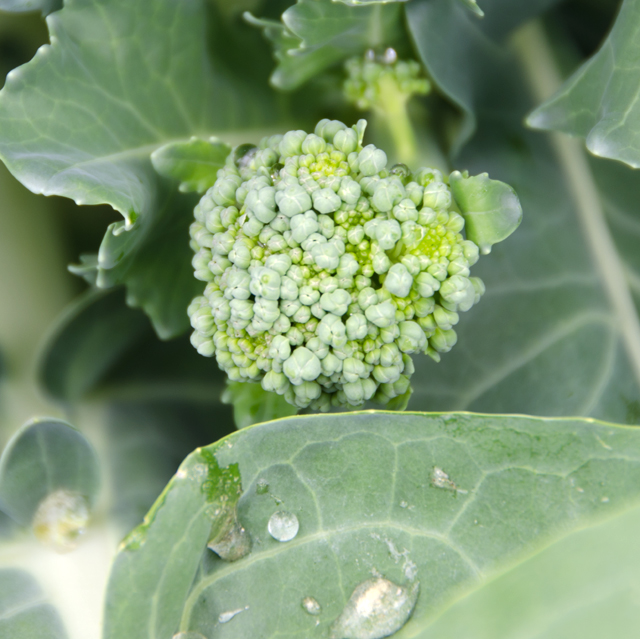
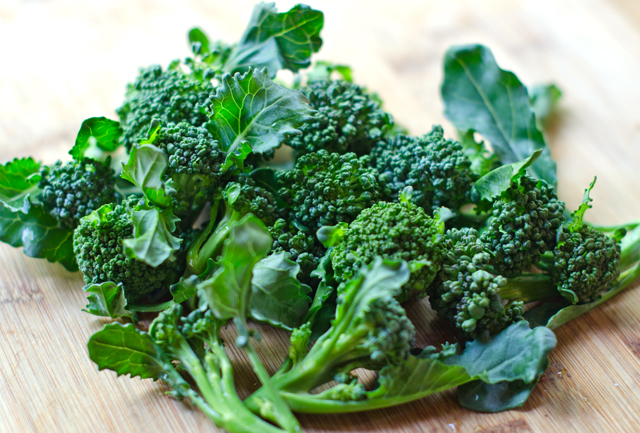
We always leave room for a large row of broccoli plants in the garden. But somehow this year, Joe forgot to buy broccoli seeds. We remedied that by purchasing “starts”, small broccoli plants from the garden center at the Home Depot. They are very healthy plants. They took well to transplanting and we’ve encountered no cabbage worm problem this year. But something wasn’t right. Normally, broccoli plants have form one large head in the center. After the center head is harvested, it produces additional side growth for a few more weeks. This year the plants produced no center head but a reasonable amount of side growth.
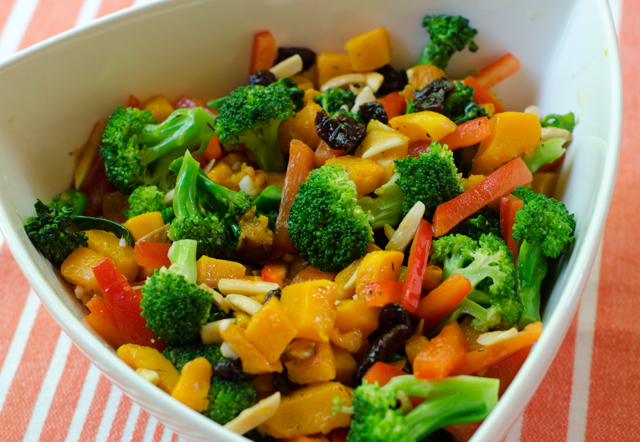
I did a little research and there is a good possibility that the plants were subject to “buttoning” before we bought them. They could have been exposed to cold temperatures (35-50°F) for several days. Other possible stressors include insufficient water, a lack of nitrogen, excessive salt in the soil, pests or disease. I guess the moral of the story is to plant as much as you can from seed, that way you can be certain your plants have been nurtured properly. That said, we still have some broccoli and I created this healthy salad from some of those side shoots plus other ingredients in my kitchen, butternut squash, red pepper, dried cherries and slivered almonds.
Toss butternut squash cubes with olive oil, salt and pepper. Spread them out on a baking sheet and bake in a 375°F oven. Toss them occasionally on the baking sheet to ensure even browning on all sides. Squash cubes shrink, the four cups you start with will yield about 2 1/2 cups of finished product. Even though the broccoli I used was picked that day, I prefer to blanch it for thirty seconds to brighten the color and bring out it’s flavor. After you drain it in a colander, plunge the broccoli into an ice bath. This will stop the hot broccoli cooking and prevent it from turning limp and watery. After it has cooled down, place the florets on a clean kitchen towel to dry.
You could just add plain nuts to the recipe, but toasting them really brings out the flavor. Add the nuts to a skillet large enough to stir or toss them in, depending how brave you are. Cooking over medium high heat, keep the nuts moving at all times to ensure even toasting and no burnt spots. Toasting brings out some of their oil and makes the kitchen smell great! Any nut will work, walnuts, pecans even sunflower seeds.
I had several types of dried fruit in the kitchen and decided that dried cherries would add a tangy sweet element to the dish. I made a vinaigrette with Sicilian Lemon White Balsamic from The Tubby Olive. It has a pleasant acidity with a bright crisp lemon flavor. I combined it with a few tablespoons of their Roasted Almond Oil and finished it with some extra virgin olive oil. Toss the broccoli florets, squash cubes and pepper strips with some of the dressing. Add the cherries and almonds and toss again, adding dressing if necessary. Veggies exude their own liquid, so be judicious in adding the vinaigrette. Refrigerate the salad for several hours to bring out the flavors. Taste before serving, adding any additional dressing, salt and pepper. It’s a colorful, healthy and very flavorful salad.
Little broccoli shoot hiding between the leaves.Broccoli side growth, just as good for this salad.Very colorful ingredients.
Broccoli and Butternut Squash Salad
Serves four
Ingredients
4 c broccoli florets
1 medium butternut squash, peeled, seeded and cut into 1″ cubes, about 4 cups
Extra virgin olive oil
Kosher salt and freshly ground pepper
1 c red pepper strips, 2″ x ½” from one small pepper
½c slivered almonds
½c dried cherries
¼c Sicilian Lemon balsamic vinegar
1 small clove garlic, chopped
Pinch of dried thyme
2 T Roasted almond oil
¼c extra virgin olive oil
Directions
Preheat oven to 375°F.
In a large bowl, toss butternut squash cubes with 1-2 tablespoons of extra virgin olive oil and sprinkle with salt and pepper. Spread out evenly on a baking sheet.
Place in the preheated oven and bake for 16-20 minutes, tossing occasionally to be certain squash gets browned on all sides. Let cool to room temperature.
Fill a large pot with water and a pinch of salt and bring to a boil. Put a colander large enough to accommodate the broccoli in the sink.
Have an ice bath (bowl with water and ice at the ready. Plunge the broccoli in the boiling water and count to 30. Immediately drain the broccoli in the colander then transfer it to the ice bath to stop the cooking.
Drain the broccoli when it has cooled a bit and place broccoli florets on a clean dishcloth to dry them off a bit.
Toast almonds in a medium dry skillet over medium high heat. Keep them constantly moving to ensure even coloring. They will exude some of their oil and they smell great. Remove from the pan and cool.
In a small bowl, combine the lemon balsamic, garlic, thyme and oils. Stir to combine. Season with salt and pepper.
Place the butternut squash, broccoli and pepper strips in a large bowl and toss with some of the dressing. Add the dried cherries and almonds and toss again, add a little more dressing if needed. Chill before serving.
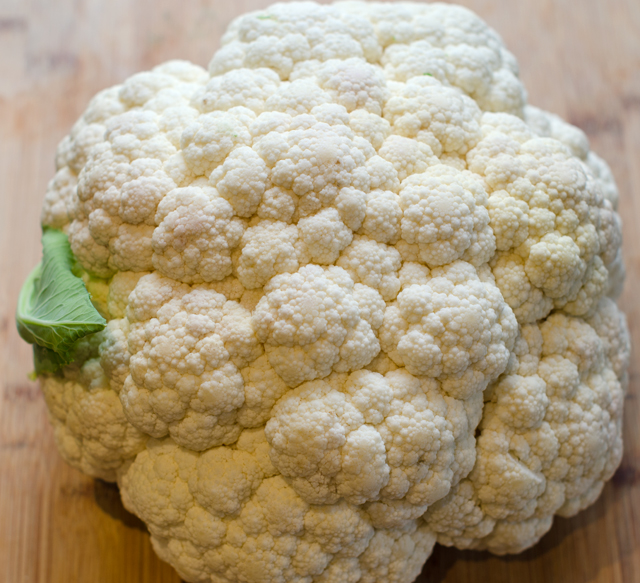
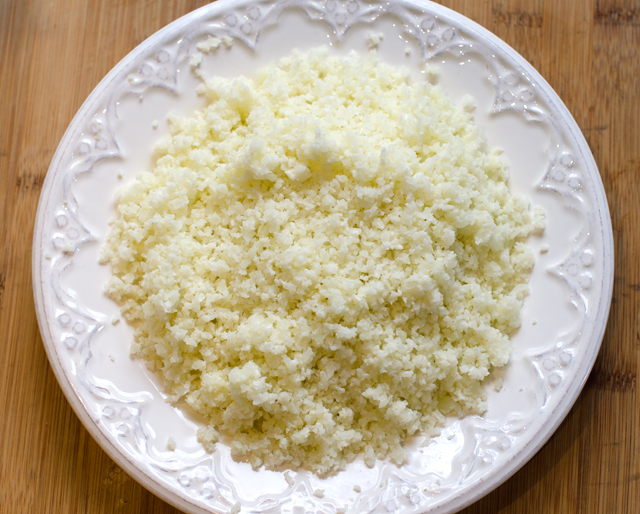
Consider the amazing versatility of cauliflower. Tossed with olive oil, salt and freshly ground black pepper and roasted until it is golden brown, it’s addictive as popcorn. It’s a delicious gluten-free substitute for mashed potatoes and couscous and the secret ingredient in a healthier version of Alfredo sauce.
In this recipe, the vegetable master of disguise is the basis for a pizza crust. I began my research by reading through about 20 recipes for cauliflower pizza I found online. They were written by cookbook authors, celebrity chefs and food bloggers. No two recipes were exactly the same and some were quite vague in their instructions. I used these recipes to construct my own version of a crust that works every time.
Line a pizza pan or a baking sheet with parchment paper. I used a nonstick spray on the corners to make sure it stayed in place. Preheat your oven to 425°F.
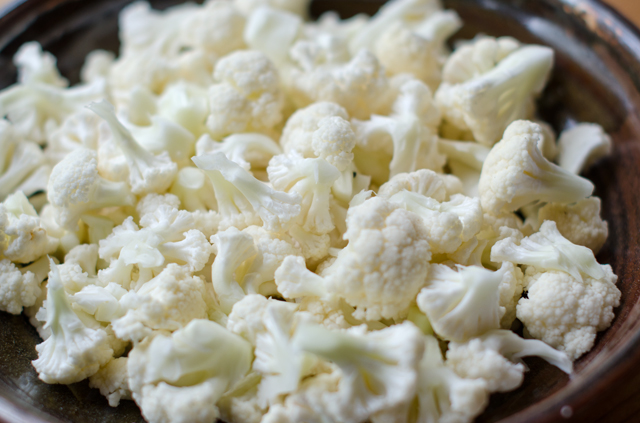
Start with a head of cauliflower, chop it into four cups of smaller florets, you want uniform pieces that won’t overwhelm your food processor.
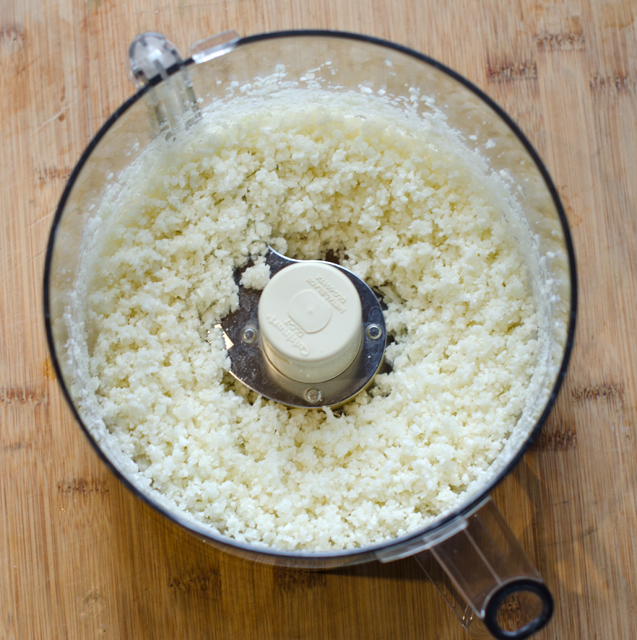
If you are using a hand grater leave the pieces larger and the stem attached so you don’t scrape your fingers. Save the stems for cauliflower mashed potatoes. Pulse the florets with the metal blade in the food processor until the cauliflower is the consistency of small grains of rice or couscous. Some writers referred to this as cauliflower “snow”. 4 cups of cauliflower florets yielded two and three-quarter cups of finely chopped cauliflower.
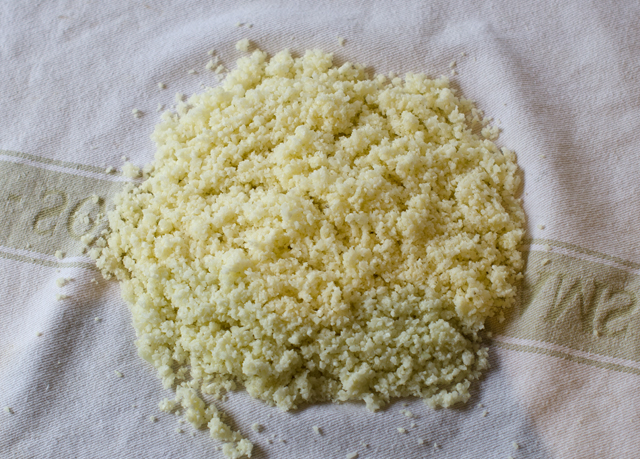
Cauliflower needs to be cooked to get rid of excess moisture. Some of the recipes I read called for sautéing the cauliflower on the stove top, others chose steaming and a few didn’t cook it at all. I am not a big fan of the microwave, but I feel it’s the easiest way to cook the cauliflower for this recipe and there is no need for additional water to be added. Place the cauliflower in a microwave safe container and cover with plastic. I cooked mine on the “fresh vegetable” setting for about six minutes. Let the cauliflower cool thoroughly before proceeding with the next step, if you don’t you could easily burn your fingers.
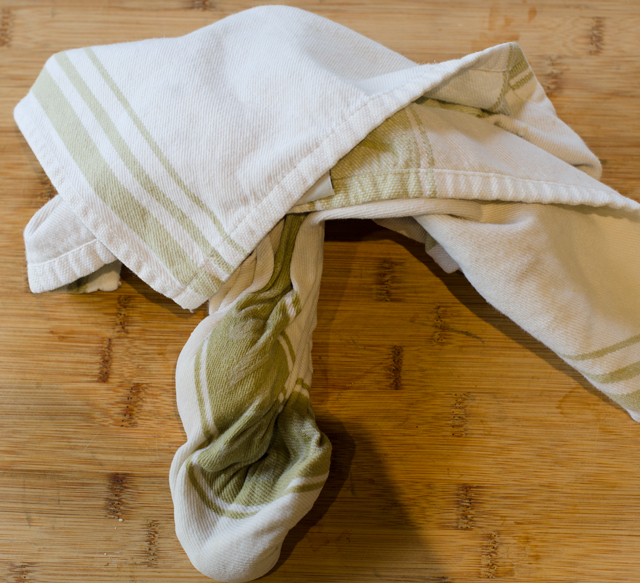
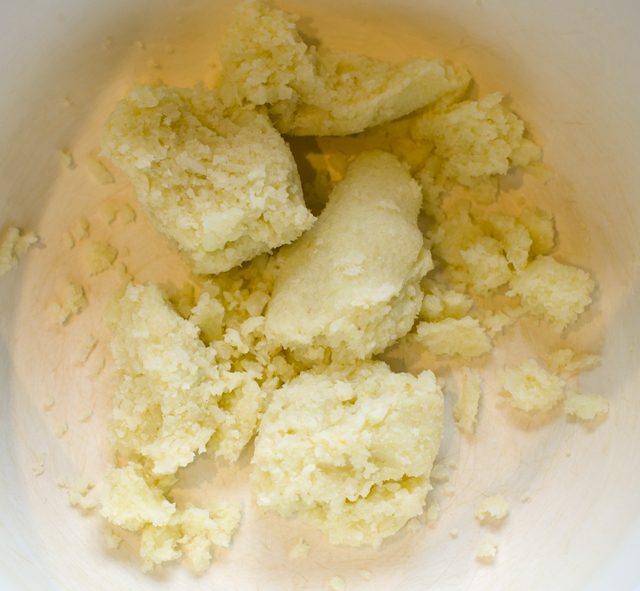
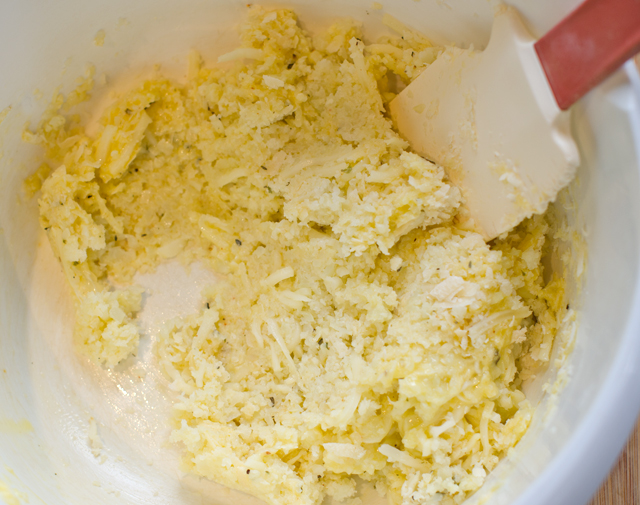
The next step is crucial to the success of this recipe. Dump the cauliflower into the center of a clean, cloth dish towel. Gather up the four corners and twist. Squeeze the bottom to extract as much liquid from the cauliflower as possible. When you think you’ve squeezed enough, squeeze one more time. Transfer the cauliflower pulp to a bowl, you should have about a scant cup. Add to this one lightly beaten large egg, a pinch of salt, three quarters of a cup of shredded mozzarella, half cup of shredded Parmesan cheese. Although not necessary you can add a half teaspoon each of dried oregano and basil. Mix first with a spatula to incorporate the ingredients, then mix with your hands for best results.
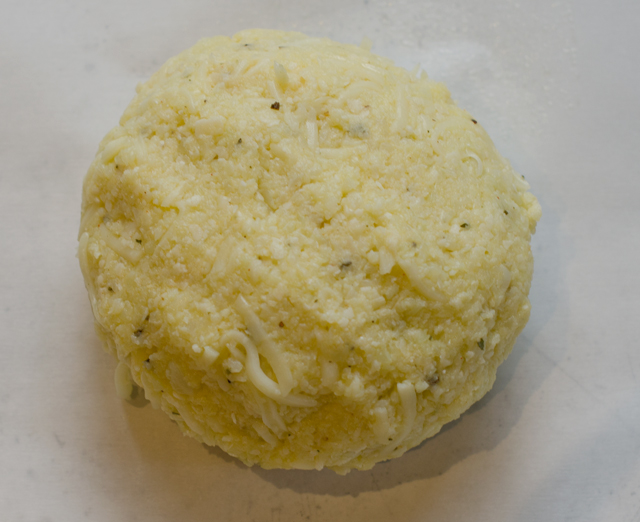
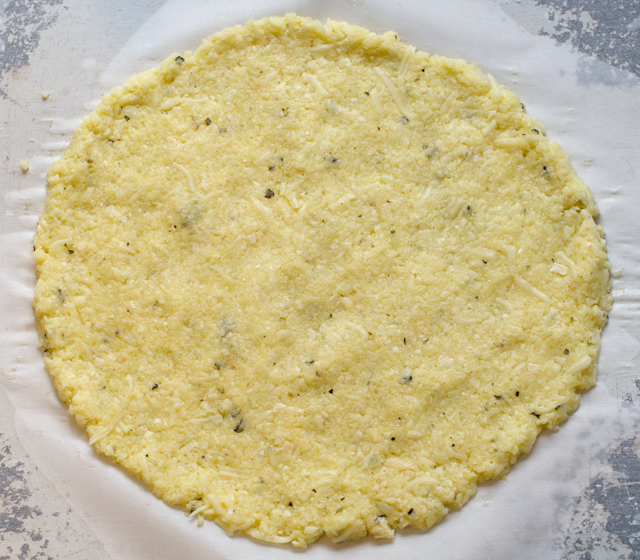
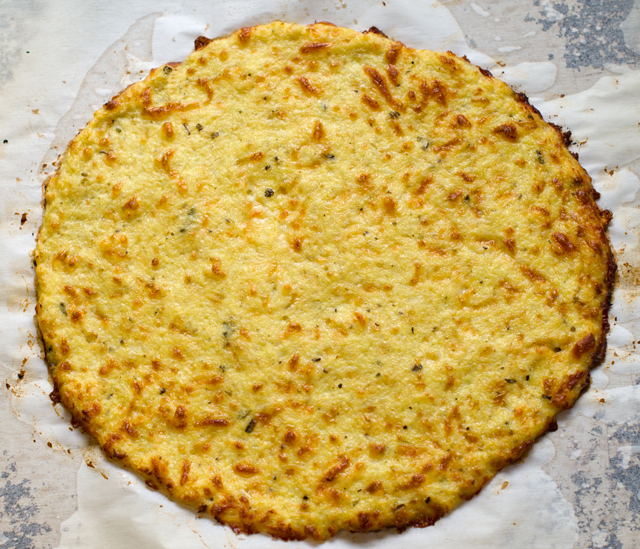
Form into a disk and place on the prepared baking sheet. Press out from the center evenly to make a 10 inch circle. Be sure that the crust is evenly pressed out, with no thin or thick spots. Some sources said to spray the surface of the parchment paper with nonstick spray but I didn’t and my results were fine. Place the baking sheet on the middle rack of your preheated oven. Bake until spotty brown, it took about 12 minutes in the convection oven, it may take you a little longer for a conventional oven.
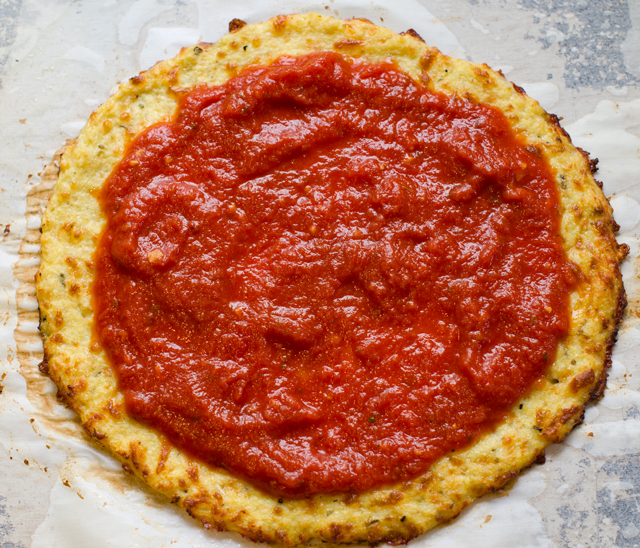
Remove baking sheet from the oven and add your favorite toppings. I made a basic tomato sauce and mozzarella cheese pizza. I baked it in the oven for another 10 minutes, until the cheese was melted and bubbly. I was able to cut the pizza with a wheel and the slices held together nicely. The possibilities for toppings are endless. In about a month or so I will be topping this crust with basil pesto and thinly sliced zucchini.
Start with a large head of cauliflower, you won’t need it all.Separate into smaller florets.Add to the food processor with metal blade attached.Process finely until you get rice or couscous like granules.Now it is ready for the microwave.Place the cooked cauliflower in the middle of a cotton dishtowel.Squeeze to extract all the excess liquid.You will be left with cauliflower “pulp”.Mix in beaten egg, cheeses, salt and dried herbs.Form it into a ball.Flatten into a 10 inch round.Bake at 425 F for ten to fifteen minutes, until starting to brown in spots.Top with sauce.And mozzarella cheese.Bake for 10 minutes, until the cheese is bubbly.Delicious!
Makes one 10″ round
Ingredients
4 cups of cauliflower florets
1 large egg, lightly beaten
¾ c shredded low fat mozzarella cheese
½ freshly grated Parmesan cheese
½ t dried oregano
½ t dried basil
Directions
Line a rimmed baking sheet or pizza pan with parchment paper and preheat oven to 425°F.
Chop cauliflower into 4 cups of smaller florets. Transfer to a food processor and pulse until the cauliflower is the consistency of rice or couscous, my finished product measured 2 ¾ cups. Alternately grate larger pieces on a box grater until you have 2 ¾ cups of finely grated cauliflower.
Place in a large bowl and microwave on high for 6 minutes. Remove from oven and let cool.
Dump the cauliflower into the center of a cotton dish towel, flour sack types are best. Draw up the corners and twist tightly. Squeeze the cauliflower in the dish towel to extract as much liquid as possible.
Transfer the cauliflower “pulp” to a bowl. Next, add the beaten egg, cheeses and herbs. Combine with a rubber spatula and for best results, finish the mixing with your hands.
Form into a disk and place on the prepared baking sheet or pan. Press out from the center to make an even 10″ round.
Place baking sheet on the lower middle rack of the preheated oven. Bake until spotty brown, mine took about 12 minutes, the crust may be ready anywhere from 10 to 15 minutes.
Remove crust from the oven and top with your favorite pizza combinations. Bake until cheese is melted and bubbly, another 10 minutes.
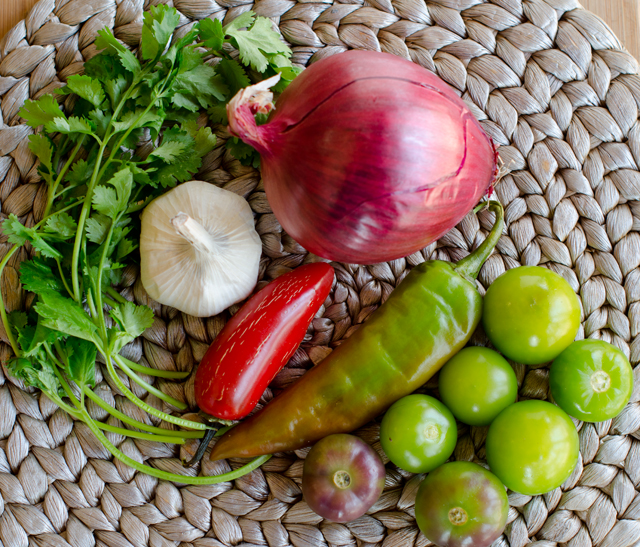
Still inspired by an abundance of, you guessed it, spinach, I was looking for yet another way to use our bounty. Inspiration this time came to me in the form of a quesadilla. Crispy on the outside and melted and creamy inside, spinach adds a healthy component to this popular dish. Quesadillas are easy and delicious any time of day, as a quick snack, lunch, even for breakfast. To accompany the quesadillas I made a simple tomatillo salsa.
With the exception of the cilantro and garlic, the ingredients for the tomatillo salsa came straight from our freezer. Preparing tomatillos for the freezer is easy, I remove the papery husks and freeze them whole and raw in quart bags. A previously frozen tomatillo will not hold up to roasting but are fine in raw preparations like this. The Numex Joe E. Parker pepper used in this recipe is an Anaheim style pepper with a long slender shape and mild heat. We have an interesting variety of frozen hot peppers from gardens past, milder ones like Joe E Parker and poblanos to hotter ones, cayenne, jalapeno, serrano and Thai hot. The surprising thing is that freezing them does not diminish their heat in the least. When a recipe calls for several hot peppers, I start with one, it is much easier to add heat than to take it away.
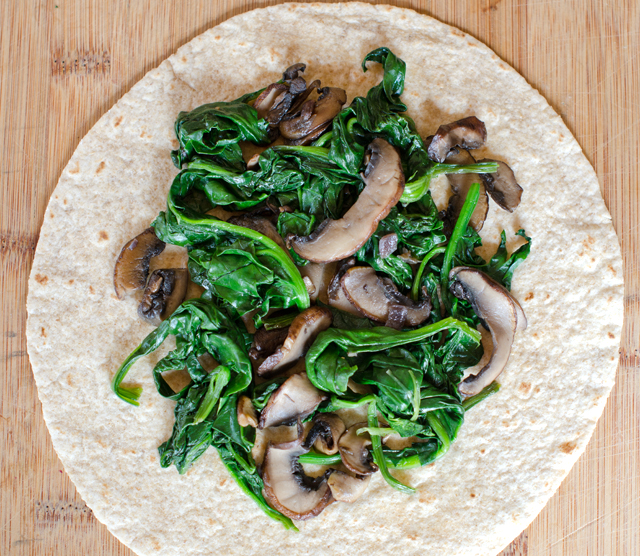
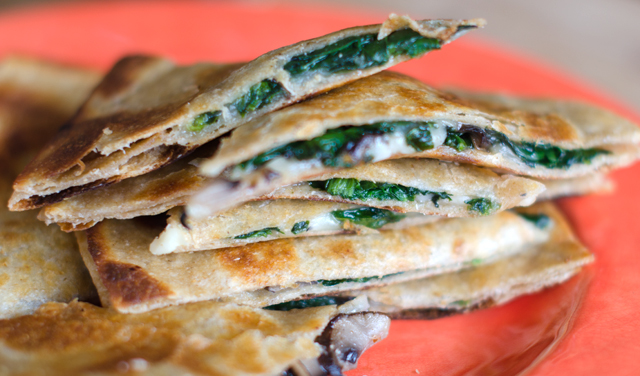
As always, picking the spinach takes more time than most of the steps in the recipe. The filling is easy to make and used twelve cups of fresh spinach, a real plus for me. If you don’t have an abundance of spinach in your garden, use bagged baby spinach. The slightly more assertive flavor of cremini mushrooms compliments the spinach nicely.
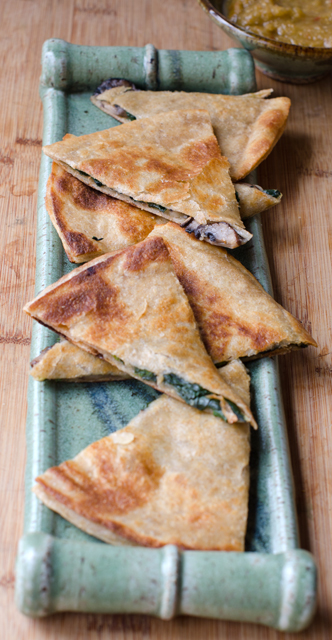
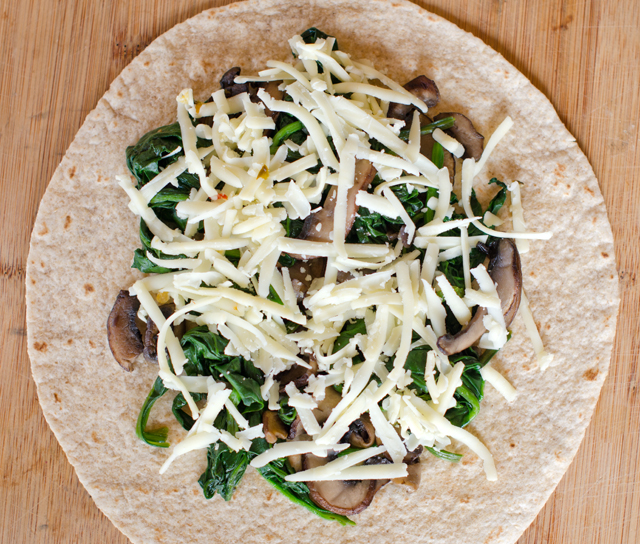
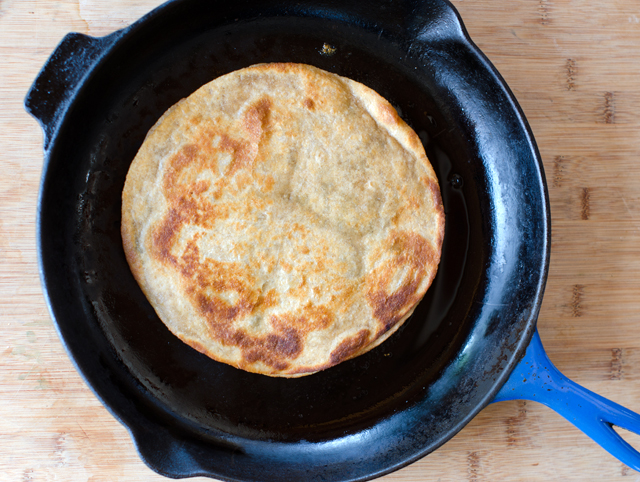
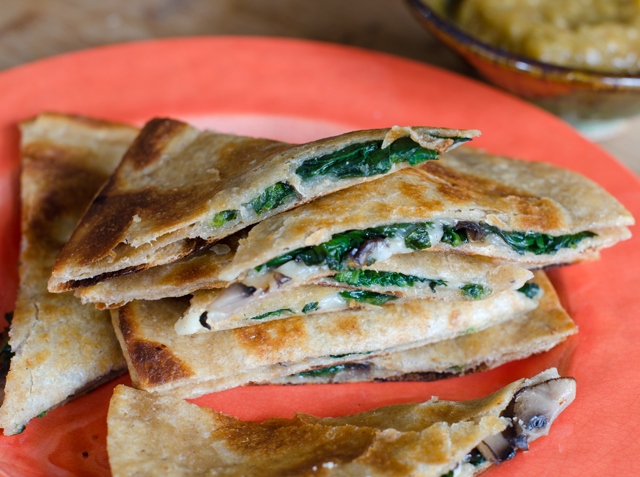
The options for cheese are endless. I used pepper jack and cheddar cheese, a good melting cheese is important here. Choose a large heavy bottom skillet to cook quesadillas. Just a light brushing of oil in the pan is all that’s necessary to brown the tortilla and keeps it from getting greasy. You can either fold one tortilla in half or stack one on top of another. I press lightly on the quesadilla in the pan to allow the cheese to melt a bit and hold the layers together before it is flipped. The pizza wheel is the perfect tool to cut it into portions. Finished quesadillas can be held in an oven on low heat for 20 minutes.
Spinach and Mushroom Quesadillas
Makes four 8″ quesadillas
Ingredients for the filling
1½ T olive oil or bacon drippings
8 oz mushrooms, button or cremini, stemmed and sliced
2-3 cloves garlic, finely chopped
¼ c finely chopped red onion
12 c spinach, large stems removed
Directions for the filling
In a large skillet heat the oil or bacon drippings over medium high heat.
Add the mushrooms, stirring constantly, until they begin to brown.
Add the onion and garlic and continue cooking, stirring frequently until it looks translucent.
Add the spinach by the handful, wilting it before adding more, until it is all used. Do not overcook. Season with salt to taste.
Ingredients for assembling the quesadillas
Eight 8″ soft tortilla or taco shells, I used whole grain
Olive Oil
1½-2 c grated cheese, I used a combination of pepper jack and cheddar
Directions for assembling and cooking the quesadillas
Preheat oven to 180°F.
Place four tortillas on two baking sheets, divide evenly the spinach and mushroom filling and the grated cheese between them.
Top with the four remaining tortillas and lightly press to seal.
Place a 12″ heavy bottomed skillet over medium high heat. Brush the skillet lightly with olive oil.
Place the quesadillas in the skillet one at a time, pressing down lightly but firmly and cook for about 3 minutes on each side. You can peek by lifting up with a spatula to see if it is getting golden brown. Transfer the cooked quesadillas to a baking sheet and keep warm in the oven, lightly covered with foil.
Slice each quesadilla into 6-8 wedges, a pizza cutter works well here, and serve hot with tomatillo salsa or your own favorite.
Tomatillo Salsa
Ingredients
3 cloves garlic, peeled
1 jalapeno pepper, stemmed and seeded and quartered
1 Numex pepper, stemmed and seeded and quartered
¼ c roughly chopped red onion
1 lb tomatillos, husked, rinsed and cut into quarters
¾ c loosely packed, lightly chopped cilantro
Directions
With a food processor or blender running, drop in the garlic cloves one at a time letting each piece get finely chopped before adding the next. Add the peppers, onion, tomatillos and cilantro and process until smooth.
Spring made an early entrance this year, but it’s not quite sure if it wants to stick around permanently yet. One day it’s rainy and seasonably warm, the next we are anticipating wet snow that will bring a coating to possibly an inch to grassy surfaces.
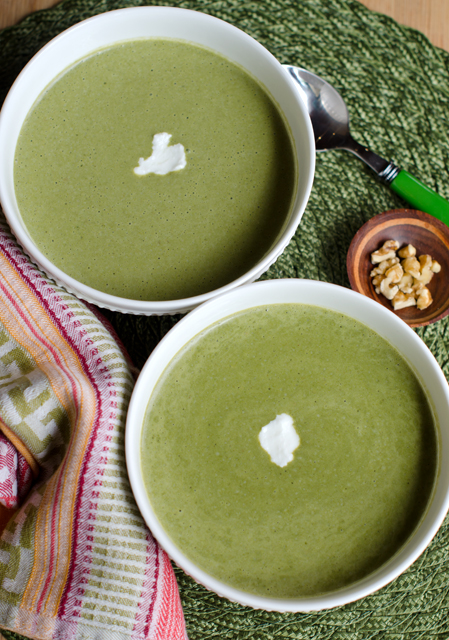
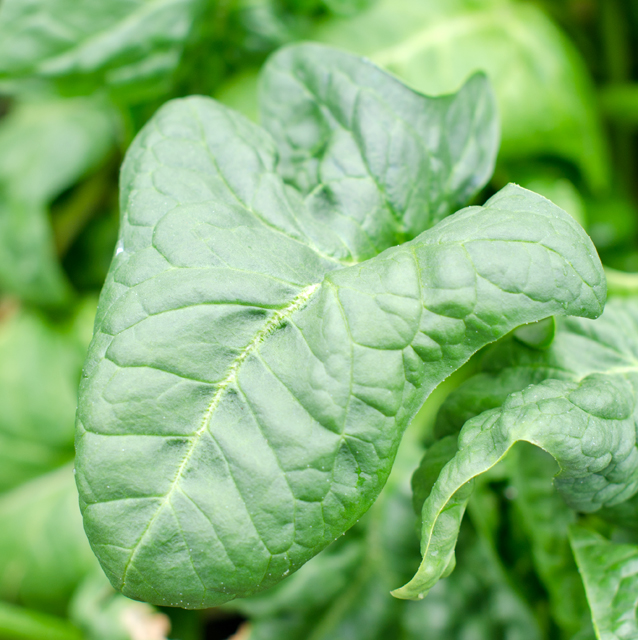
The occasional warm day we’ve been having is causing the spinach in the greenhouse to bolt, that is, go to seed. It ‘s time to pick as much as possible, so recipes that use mass quantities of spinach look good to me. This recipe for spinach soup with middle eastern spices uses a pound and a half of fresh spinach. That translates into approximately 18 cups of spinach, and I say, bring it on!
Cookbook author and New York Times food columnist Martha Rose Shulman got her inspiration for this soup from a Syrian pan cooked spinach recipe. The warming spices, clove, allspice, nutmeg, cinnamon and coriander are a pleasing contrast to the sweet, mild flavor of freshly picked spinach.
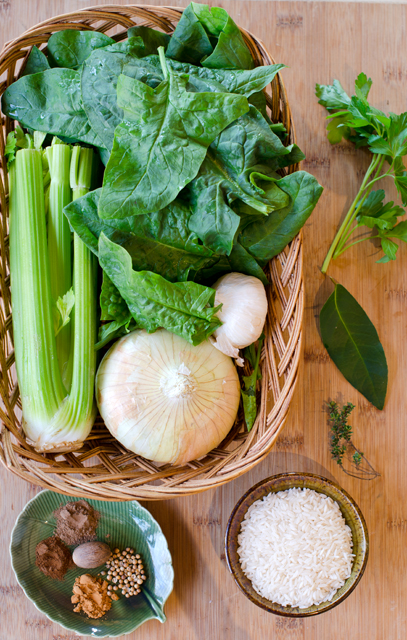
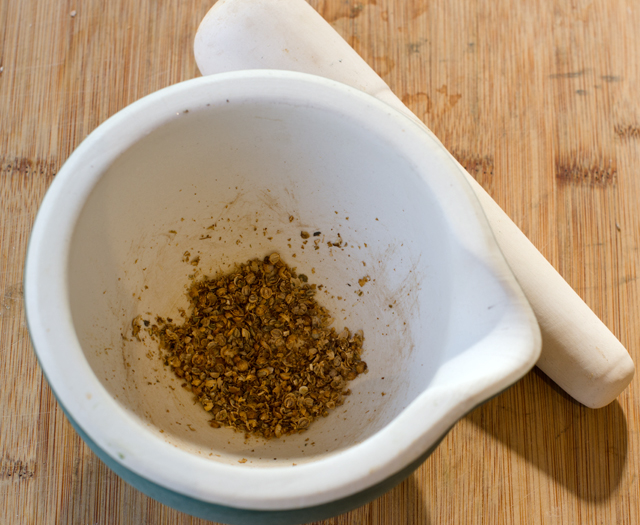
To start, saute a medium chopped onion and celery in a Dutch oven. I checked with the NOA, National Onion Association and they say a medium onion equals about 1 cup chopped onion. When the vegetables soften, add a few cloves of chopped garlic and cook until fragrant. Add stock, rice, bouquet garni and a generous pinch of salt. Bring the mixture to boil and simmer for 30 minutes. This infuses the broth with flavor and cooks the rice which thickens the soup. Remove the bouquet garni and add the spices and the spinach. It is best to add the spinach in batches to the hot broth, continue to add more until it is all wilted. Cover and cook for five minutes, no longer. The spinach should retain it’s bright green color, any longer it could turn gray.
Puree the soup in batches in a blender or blend in the pot with an immersion blender. The final touch is the addition of some tangy yogurt, half is blended into the soup and the rest is a garnish for each bowl. Sprinkle a few chopped walnuts on top before serving. I served it hot but I think it would be good cold as well.
Spinach Soup with Middle Eastern Spices
Makes 4-6 servings
Ingredients
1T extra virgin olive oil
1 medium onion, chopped
1/3 c finely diced celery
Salt to taste
2 garlic cloves, minced
¼ to ½c medium grain rice
6 c chicken or vegetable stock
Bouquet garni of a few sprigs parsley and thyme and a bay leaf
1 ½ lbs fresh spinach, washed thoroughly, large stems removed
¼t ground allspice
1/8 t ground cloves
1/8 t freshly ground nutmeg
¼ t ground cinnamon
1t coriander seeds, lightly toasted and ground
Kosher salt and freshly ground pepper
2 c Greek yogurt (low or full fat)
¼ c chopped walnuts to garnish
Directions
Heat the olive oil in a large heavy soup pot or Dutch oven. Add the chopped onion and celery and cook until tender, about 5 minutes. Add the garlic and a pinch of salt and cook until garlic is fragrant, about 1 minute.
Add the stock, rice, bouquet garni and salt to taste and bring to a boil. Reduce heat to a simmer, cover and cook for 30 minutes.
While the stock is simmering you will have time to measure out the spices and toast and grind the coriander.
After the stock has simmered, remove the bouquet garni. Add the spices and add the spinach in batches, wilting it as you go. Cover and simmer for 5 minutes. Spinach should still retain its bright color.
Puree the soup in batches in a blender. Be sure to not to overfill and hold down the lid tightly. Alternately you could puree the soup in the pot with a hand blender. Stop at this step if you are not serving the soup immediately.
Return the soup to the pot and heat through, stirring occasionally. Whisk half of the yogurt into the soup and season to taste with salt and pepper.
Serve the soup with a swirl of yogurt and garnish with chopped walnuts.
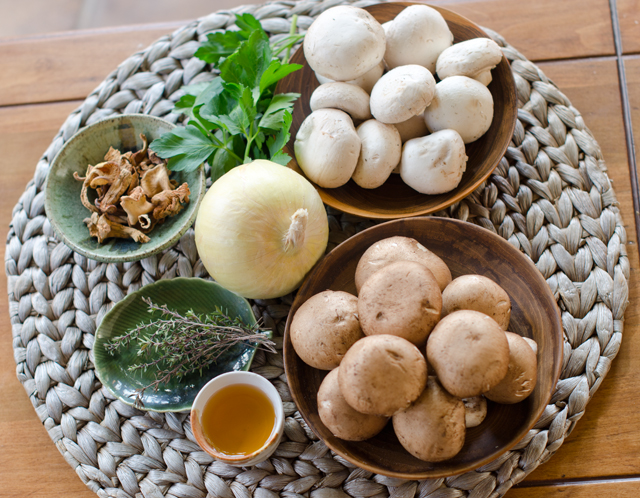
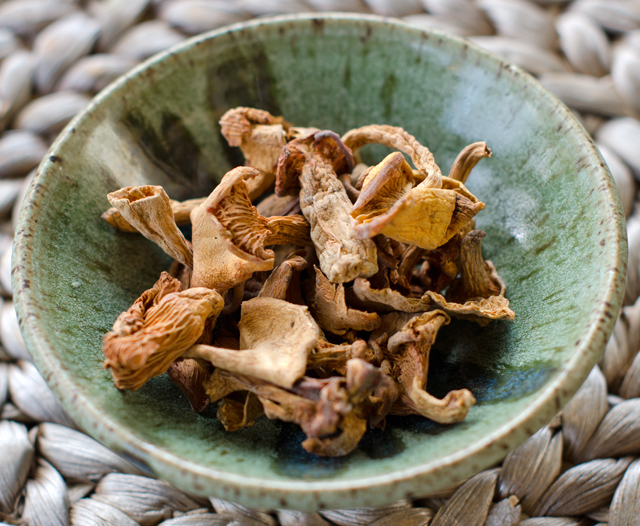
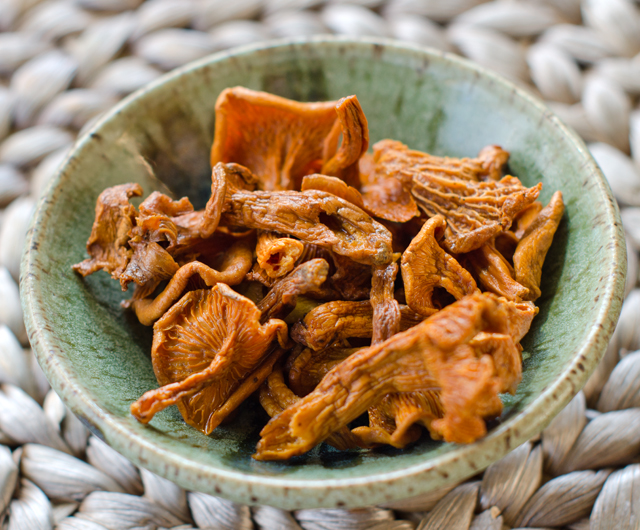
Creamy, rich mushroom soup, a dish that is so simple, yet so refined. This version, from chef Anthony Bourdain provides maximum flavor with not a great deal of effort. The rich velvety texture of this soup doesn’t come from cream, it comes from the butter that the mushrooms are sautéed in. I used two of the most readily available mushroom varieties, white “button” mushrooms and creminis. If you were not aware, creminis are referred to as portabellos when they grow to full maturity. To up the mushroom quotient, add some reconstituted dried mushrooms, I used chanterelles. Not too many, I started with about a quarter of a cup dried, you don’t want to overwhelm the soup.
We live about an hour from the mushroom capital of the world, close enough for mushrooms to be sold as a local product at our farmers market. Kennett Square in Chester County Pennsylvania is home to farms that produces over a million pounds of mushrooms a week. Kennett Square did not become the mushroom capital for reasons of climate or soil conditions but for reasons of ingenuity. Enterprising and frugal Quaker farmers in the late nineteenth century were looking for ways to use the wasted space under the elevated benches where they grew flowers. They imported spawn from Europe, created the right growing environment and a successful industry was born.
Whenever possible I prefer to purchase whole loose mushrooms. Inspect mushrooms carefully, they should feel damp, not moist. Try to avoid mushrooms that are badly bruised or broken. Many sources say that you shouldn’t rinse mushrooms because they soak up water but the folks at Cooks Illustrated have proven that wrong. They found that after a quick rinse of a six ounce container of mushrooms they gained only a quarter ounce of water. The key is to rinse, not soak and dry immediately. Cooks Illustrated also suggests that if you store mushrooms it should be in a partially open zipper bag. This maximizes air circulation without letting the mushrooms dry out.
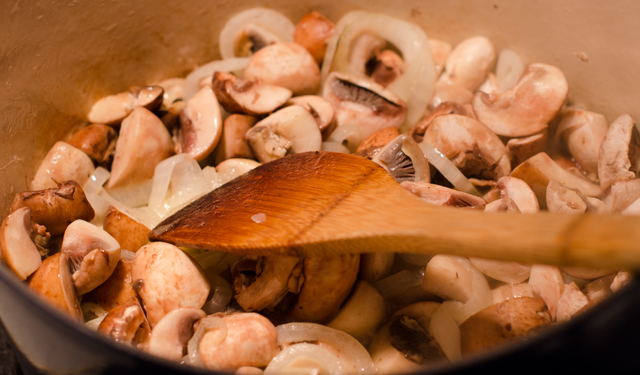
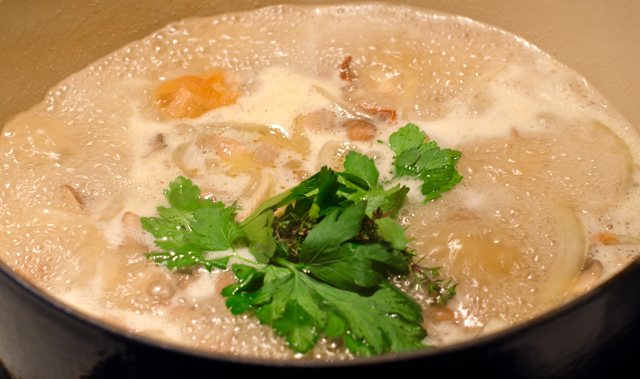
Begin the recipe by melting butter in a medium sized pan, I prefer my Le Crueset 5 quart Dutch oven for any soup I make. Add the sliced onions and cook until soft and translucent, about 5 minutes. Next add the mushrooms and allow the vegetables to sweat, that is, to soften without taking on any color. The mushrooms will exude their liquid and cook down considerably. If you want, add 1/4 cup of dried mushrooms that have been reconstituted in warm water for about 20 minutes. Stir in the chicken stock (vegetable if you prefer a vegetarian dish) and a small bouquet garni of a few sprigs of parsley and some fresh thyme. Bring the pot to a boil, reduce the heat and simmer for about an hour. Although it wasn’t in the original recipe, I added a small piece of Parmesan rind to add to the umami quality of the soup.
After an hour, discard the piece of Parmesan rind if using, and the herbs. Allow the soup to cool for about 15 minutes then transfer the soup to the blender in batches, being careful to keep the lid on tight; blend until smooth. Return the soup to the pot, season with salt and pepper, reheat and add sherry. One last word of admonition, do not use cooking sherry. It is sherry with salt and other additives to prolong it’s shelf life. Look for a dry sherry to compliment the flavors in this recipe. Saute a few mushrooms slices to garnish the soup and maybe a small sprig of thyme.
Triple Mushroom Soup
Serves four, can easily be doubled
Ingredients
6 T butter
1 onion, thinly sliced
12 ounces mushrooms (I used half button and half crimini)
¼c dried mushrooms (shiitake, chanterelles etc.) reconstituted in warm water for about 20 minutes and well drained, optional
4 cups chicken stock
Several sprigs of parsley
1 sprig of fresh thyme
2 ounces sherry
salt and pepper
Directions
Over medium heat, melt two tablespoons of the butter in a saucepan. Toss in the onion and cook until soft but not browned.
Toss in the remaining butter and then add the mushrooms. Cook for 8 minutes.
Pour in the chicken stock, add the herbs and rind (if using), and bring to a boil. When bubbling, reduce to a simmer and cook for an hour.
Pour soup into a blender (you might need to do this in stages), and process until smooth. Return to the saucepan and bring to a simmer. Pour in the sherry, and season with salt and pepper. Garnish with sauteed mushroom slices and a sprig of thyme.
Dried chanterelle mushroomsThe same chanterelles after a twenty minute soak.Sauteeing the mushroomsAdd chicken stock , herbs and bring to a boil.
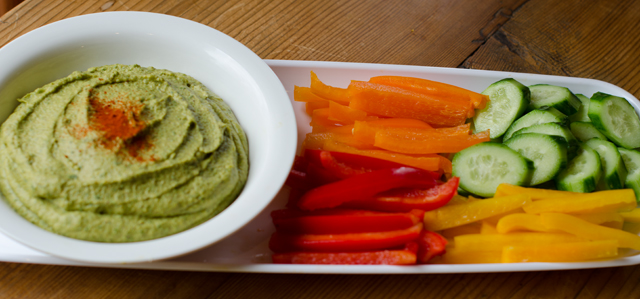
When I am looking for a snack, hummus is a healthy choice I feel good about adding to my shopping cart. But the truth is, it’s takes just minutes to make my own, and it’s healthier (no additives), tastier and cheaper too. The word hummus in Arabic means chickpea so strictly speaking, hummus is the term for a chickpea dip. Hummus bi tahini means chickpeas with tahini, a paste of ground sesame seeds. Whether you add tahini or not, a basic hummus includes garlic, lemon juice, olive oil and salt.
One of my favorite food memories is a chickpea soup Joe made for me one Valentine’s Day. I absolutely love the sweet nutty flavor of freshly cooked chickpeas and in a perfect world I would always use them when I make hummus. However, dried chickpeas need to be soaked overnight, drained the next day and cooked for 1-3 hours, depending on freshness. I don’t always have time for that and the delayed gratification it requires.
However if you have the time, substitute one half the quantity of dried beans for the canned. The standard 15 ounce can of chickpeas drained is about 9 ounces or 1 ½ cups of beans. This translates into 4.5 ounces of dried beans or ¾ cup. Many cooks add a pinch of baking soda to tenderize dried beans to both the soaking and cooking water. The United States dried bean council (of course there’s one!) points out that it destroys part of the thiamine (aka vitamin B 1), making the amino acids less digestible and negatively affects the nutritional value. I’ll leave that heavy decision up to you.
A basic hummus recipe is easy and delicious and just the jumping off point for countless variations. I have previously shared a beet hummus recipe, this time I added fresh spinach and roasted garlic to the recipe.
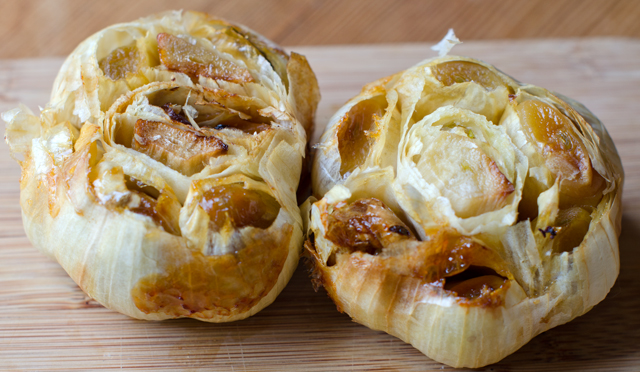
If you are not already roasting garlic cloves, you should. It takes more time to get your oven up to temperature than in does to get this kitchen staple together. The first time I roasted garlic I winged it but I am pleased to say my uninformed guess was pretty much on target. This is the basic recipe; cut about the top quarter off each head of garlic with a sharp knife to expose all the cloves. Slowly pour olive oil over each head, letting it soak into and around the cloves. Wrap the prepared heads of garlic in foil and bake in a 425°F oven. Start checking the garlic at the 45 minute mark. The finished cloves should be soft, golden and slightly protruding from the skins. I always roast more than what I need, it will keep in the fridge for about a week, that is if it lasts that long. You can also freeze roasted garlic for several months.
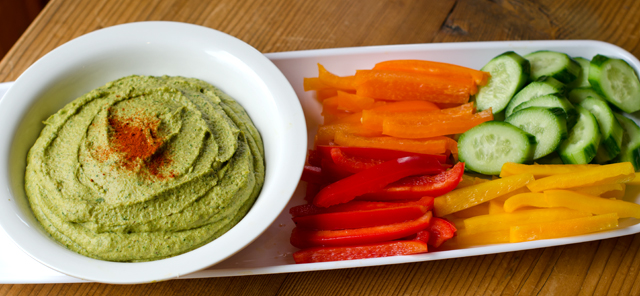
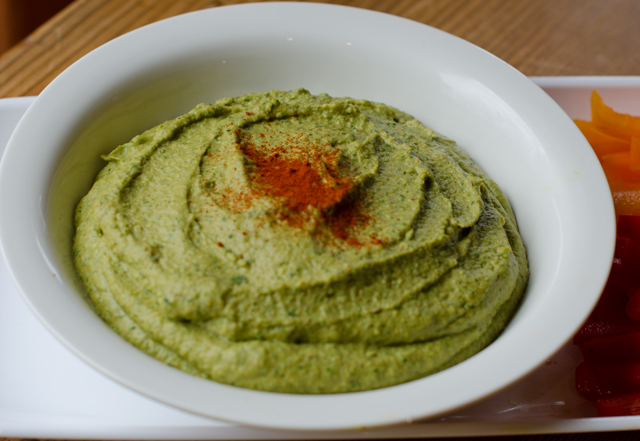
Everything goes into the food processor or blender, except the reserved chickpea liquid. I added three cloves of roasted garlic to my basic hummus recipe, along with three loosely packed cups of spinach leaves. I added a half teaspoon each of some appropriate dried herbs, cumin, for it’s smoky flavor, smoked paprika also brings smokiness and a little heat. Sumac is the herb you may not be familiar with, it has a fruity astringent taste, milder than a lemon. I shared more background on it in this post. It is readily available from several of the herb and spice mail order sights.
Add the additional bean liquid to get it completely smooth and holds it’s shape. Taste and add more salt if needed. Transfer mixture into a serving dish. Garnish with a dash of olive oil and a sprinkle of smoked paprika. Serve at room temperature.
Spinach and Roasted Garlic Hummus
Makes about 2 cups
Ingredients
1-15 ounce can garbanzo beans (chickpeas) drained and liquid reserved
3-4 c spinach leaves, large stems removed
1/3 c tahini
3 T fresh squeezed lemon juice
3-4 cloves roasted garlic, or to your taste
½ t salt, and more to taste
1 t each cumin, sumac and smoked paprika
1-2 T extra virgin olive oil
A dusting of smoked paprika for the topping
Directions
Add all the ingredients to your food processor or blender. Pulse, adding additional bean liquid as needed to get the hummus completely smooth.
Taste and add salt if desired.
Scoop into a serving bowl and sprinkle top with smoked paprika and a little olive oil if desired.
 Seaweed has been a regular part of the Japanese diet for centuries. It is low in calories, fat and cholesterol, a good source of dietary fiber, vitamins and minerals. So why don’t I think of making seaweed salad more often?