September 25, 2014 Eggplant Involtini

DSC_9067aWith lots of caponata, grilled eggplant, ratatouille, and a double batch of eggplant parmesan under my belt, I was looking for another way to enjoy the bounty of our eggplants this season. It came in the July/August issue of Cooks Illustrated magazine, eggplant involtini.

After all these years (30+) I still look forward pouring over the latest issues of the cooking magazines I subscribe to. Since the magazines are a little in advance of what is ready to harvest from the garden, I put a yellow sticky note on the seasonal recipes I would like to try. Eggplant involtini was in the July/August issue that arrived in June when our eggplants didn’t even have their first flowers, so I have been waiting several months to try this recipe.

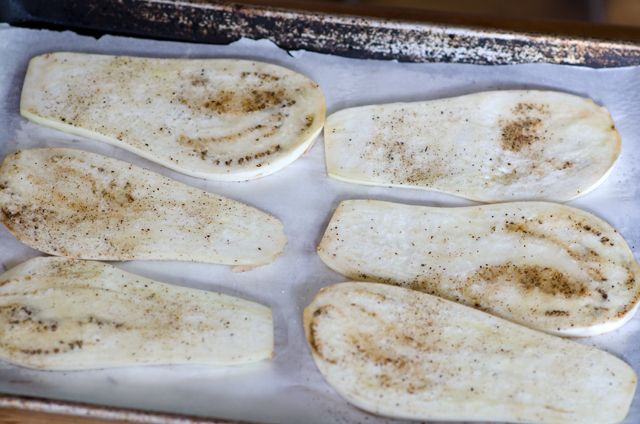
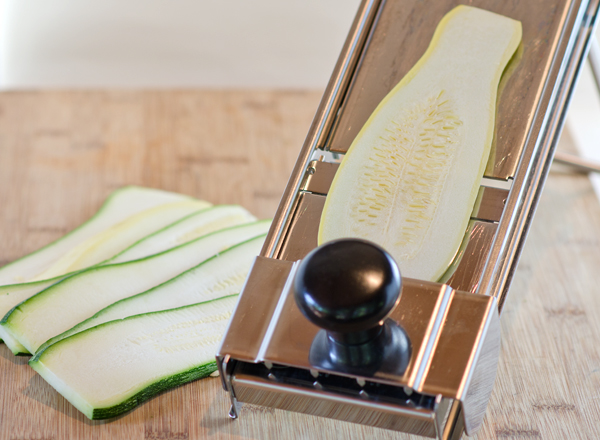
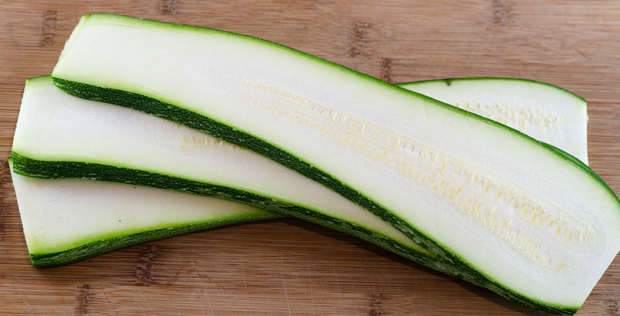
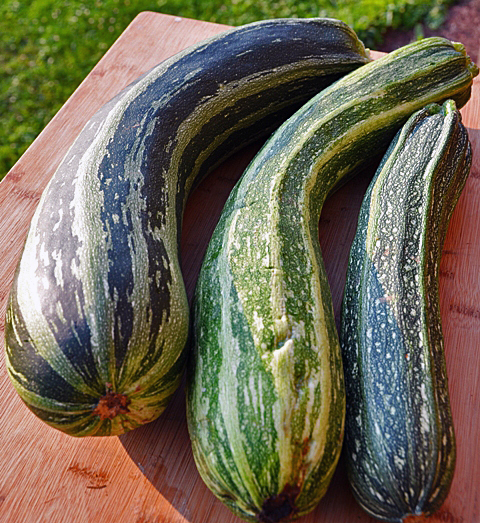
Involtini are neat little bundles of stuffed meat, fish or vegetables. Fillings can be as varied as your imagination. Eggplant works especially well as a wrapper for involtini. Use your largest, broadest eggplants to make the planks. Lop off the stem and hold the eggplant upright. With a very sharp knife, make approximately 1/2″ thick planks. For the first and last pieces you will need to trim off the rounded outer edge. I found that a vegetable peeler handled the problem nicely.

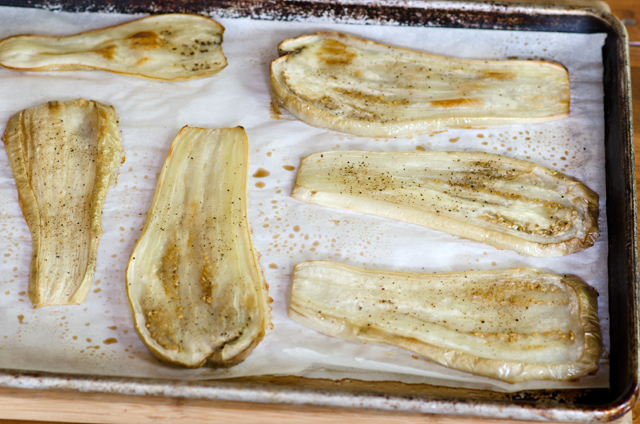
Instead of frying, which is called for in many involtini recipes, the slices are brushed lightly on both sides with olive oil, and seasoned with salt and pepper and baked. This makes the slices pliable enough to roll without falling apart.

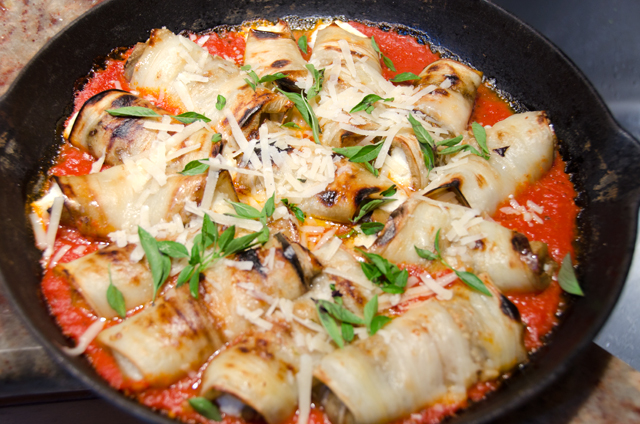
Once the slices have cooled a bit, fill with the fatter edge closest to you and roll up. Ricotta, though it doesn’t have much flavor of it’s own is a good binder for the more flavorful ingredients, pecorino romano and basil. The addition of fresh lemon juice brightens the flavors. A generous tablespoon of filling is enough for each slice. The original recipe called for some bread crumbs in the filling to bind it a little, I didn’t include this step and thought my filling held up nicely.

While you are cooking the eggplant there’s time to make a very basic sauce. Canned whole tomatoes, garlic, oregano, kosher salt and pepper are all you need. I always use my whole roasted tomatoes from the garden that I freeze for months without tomatoes. We had a bumper crop this year so I will be making a lot of chili, lasagna, stuffed peppers over the winter months. As for the canned varieties, in a taste test done by Cooks Illustrated, Muir Glen Organic Whole Tomatoes was the winner. Muir Glen is about a dollar more per can than the more familiar runner up, Hunts.

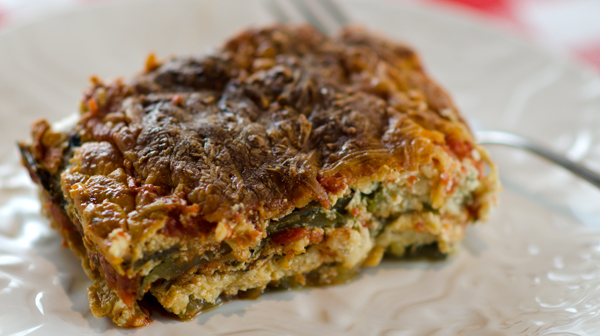
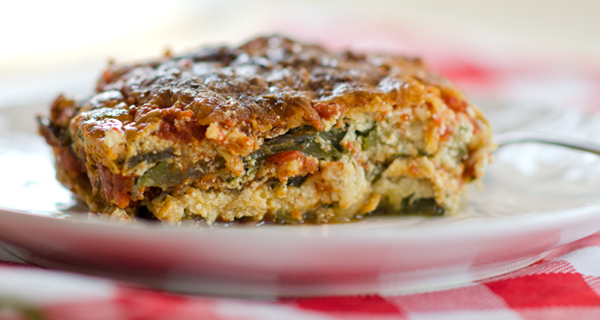
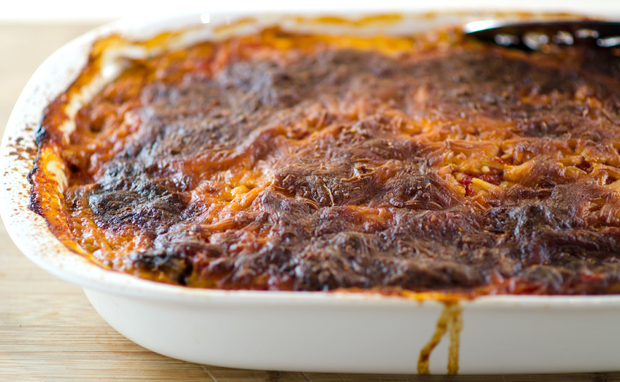
The involtini rolls, are added to the thickened sauce and brought to a simmer. Once the sauce is warmed, additional cheese is sprinkled on top. The rolls are browned and the cheese is melted in the broiler. Finish off with a sprinkle of basil, mini basil leaves worked well here.

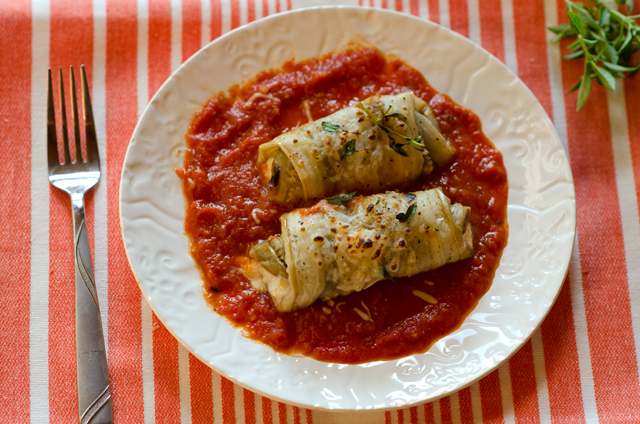
Not the quickest or easiest preparation, but both the rolls and the sauce can be made in advance and assembled right before serving. An impressive dish good enough for company.

Eggplant Involtini

Serves 4 to 6

Ingredients

  • 2 large eggplants, shorter wider eggplants are best (1 1/2 pounds each), if skin is thick, peel, I did not peel mine
  • 6T olive oil
  • Kosher salt and pepper
  • 2 cloves garlic, finely minced
  • 1/4t dried oregano
  • Pinch red pepper flakes
  • 1 28oz canned whole peeled tomatoes drained with juice reserved, chopped coarse-I used my garden roasted tomatoes
  • 1c  whole-milk or part skim ricotta cheese
  • 3/4c hard Italian grating cheese like Gran Padano or Pecorino Romano
  • 1/4c plus 1 tablespoon chopped fresh basil or torn mini basil
  • 1T fresh lemon juice

Directions

  1. Slice each eggplant lengthwise into 1/2-inch-thick planks (you should have 12 planks). Trim rounded surface from each end piece so it lies flat. I found that using a vegetable peeler made this easier. Adjust 1 oven rack to lower-middle position and second rack 8 inches from broiler element. Heat oven to 375°F.
  2. Line 2 rimmed baking sheets with parchment paper and spray generously with vegetable oil spray.
  3. Arrange eggplant slices in single layer on prepared sheets. Lightly brush 1 side of eggplant slices with oil and sprinkle with kosher salt and pepper. Turn slices over and repeat brushing and seasoning.
  4. Bake until tender and lightly browned, 30 to 35 minutes, switching and rotating sheets halfway through baking. This process took about 10 minutes less in my convection oven.  Let cool for 5 minutes. Using thin spatula, flip each slice over. Heat broiler.
  5. While the eggplant is cooking, heat remaining 1 tablespoon oil in 12-inch broiler-safe skillet, over medium-low heat until just shimmering. Add garlic, oregano, pepper flakes, and 1/2 teaspoon salt and cook, stirring occasionally, until fragrant, about 30 seconds.
  6. Stir in tomatoes and their juice. Increase heat to high and bring to simmer. Reduce heat to medium-low and simmer until thickened, about 15 minutes. Cover and set aside.
  7. Stir together ricotta, 1/2 cup cheese, 1/4 cup basil, lemon juice, and 1/2 teaspoon salt in medium bowl.
  8. With widest ends of eggplant slices facing you, evenly distribute ricotta mixture on bottom third of each slice. Gently roll up each eggplant slice and place seam side down in tomato sauce.
  9. Bring sauce to simmer over medium heat. Simmer for 5 minutes. Transfer skillet to oven and broil until eggplant is well browned and cheese is heated through, 5 to 10 minutes. Sprinkle with remaining 1/4 cup Pecorino and let stand for 5 minutes. Sprinkle with remaining 1 tablespoon basil and serve.
DSC_8719a
The variety I used for this dish was Clara, a pure white Italian style eggplant.
DSC_9051a
Eggplant slices are brushed with olive oil and seasoned lightly with salt and pepper.
DSC_9054a
After baking the slices are soft enough to roll but don’t fall apart.
DSC_9055a
I used roughly torn mini basil in my filling.
DSC_9059a
The very simple filling made of ricotta cheese, Pecorino Romano, fresh lemon juice and mini basil.
DSC_9060a
The eggplant slices are easy to roll up. Place them seam side down in the warmed sauce.

DSC_8993aDSC_9079a

August 22, 2013 Zucchini Lasagna

DSC_1857a

When you grow big zucchini, make zucchini lasagna. In this recipe, zucchini or yellow squash “noodles” replace the usual pasta. I cut the zucchini in half lengthwise first so that I would have a flat surface to work with. A mandoline works best here. In case you didn’t know, a mandoline, also spelled mandolin is a hand operated kitchen tool with adjustable blades that produces uniform slices. They can cost anywhere from about  two hundred dollars for a professional stainless steel style model all the way down to less than twenty dollars for a plastic model. The more expensive models will slice, julienne and waffle cut, the less expensive ones just slice. Whatever model you choose, use the hand/finger guard when you run the food against the blade, believe me, I speak from personal experience.  If you have steady hands and no slicer, use a sharp knife and be sure to use a cutting board to stabilize the squash to ensure even slices. Since zucchini is 95% water it is best to precook it to reduce excess moisture that will end up in your finished dish. Some of the recipes I saw suggested parboiling, sautéing, but I found that grilling worked well for me. My version is totally vegetarian. If you want something more substantial, add ground beef, turkey or sausage to your sauce. Just like regular lasagna, it tastes even better the next day, if it lasts that long!

DSC_1993a


Zucchini Lasagna

Serves four to six

Ingredients

  • 3-4 long zucchini/yellow squash
  • 4 c thick tomato sauce
  • 1 15 oz container of regular or low-fat ricotta cheese
  • 3 lightly beaten eggs
  • 2 T fresh chopped basil
  • 2 T fresh chopped flat leaf parsley
  • 1 t dried oregano
  • Kosher salt and fresh ground pepper to taste
  • 1 ½ c grated Parmesan cheese or other similar grated cheese
  • 1 lb grated mozzarella cheese

Directions

  1. Preheat oven to 350° F. Place baking rack in the lower position.
  2. Cut squash into ¼ inch thick slices, to fit the pan lengthwise, if your squash is shorter, just orient the slices in the opposite direction, just be sure they cover the pan.  You should have enough slices to make three layers.
  3. Heat a grill pan or an outdoor grill to medium high heat. Brush both sides of the slices lightly with olive oil.
  4. Grill squash slices on both sides so that they have grill marks, 3-5 minutes each side. Squash should be cooked but not falling apart.
  5. In a medium bowl, combine the ricotta, eggs, parsley, basil, oregano and a cup of the Parmesan cheese. Reserve the rest for the top layer.
  6. In a 9×13 glass or ceramic dish, spoon a thin layer of sauce on the bottom of the pan.
  7. Place the first layer of squash over the sauce. Spoon a third of the ricotta mixture over the squash. Sprinkle with a third of the mozzarella cheese. Repeat the layers two more times, sauce, “noodles” ricotta, ending with the mozzarella cheese and reserved Parmesan from step four.
  8. Bake for one hour, rotating pan half way through cooking time. Let lasagna rest for at least a half hour before serving.
DSC_1844a
I used my Matfer mandolin slicer, a gift many years ago to get neat uniform slices.
DSC_1976a
Slices should be 1/4″ thick
DSC_1850a
Use the grill or a grill pan to slightly cook the zucchini.
DSC_1998a
Fresh zucchini with tomato sauce, delicious!

DSC_1982a

September 25, 2012 Chard Chips and Pickled Chard Stems


When the new issue of Fine Cooking came last week I was ready to put it aside for a few weeks. The holiday desserts and side dishes looked very tempting, but the beginning of fall was just last Saturday and I am still enjoying cooking as much as I can with the harvest from our garden. As I quickly thumbed through the issue I happened to notice an article that interested me, “What We Are Cooking Now.” Specifically, what really caught my eye were Swiss chard chips. I had heard of kale chips, both the pricey little bags sold in health food stores and the homemade varieties that a friend introduced me to. So why not chard chips? We have three sections of chard of the Bright Lights and Rhubarb variety still producing, so I thought it would be fun to try my hand at this. Since I am a proponent of using both the chard leaves and the stems, I wanted to use the colorful stems in another healthy nibble so a refrigerator pickle seemed to be the best choice here.
My on-line research revealed many different approaches to making chard chips and after reading them all, came up with my own method. There are certain important things to remember if you are going to make chard chips. Wash the leaves thoroughly, chard leaves are usually very crinkly, and those crevices can be dirty. After washing the leaves, remove the stems, reserve if using. Spin the leaves dry in a salad spinner and use paper towels to remove any excess moisture. Any moisture left on the leaves will cause them to steam, not bake and crisp up. A  “bunch” is a non-specific term, to be exact as possible, I used 25 chard leaves that were about 12-14 inches long after stemming. When in doubt, keep the leaf pieces larger, 2 inch squares approximately. The leaves will break easily when they are dry and too many small pieces will give you chard crumbles or dust.  Place the dry leaf pieces in a large bowl and toss lightly with olive oil and your seasonings of choice. Start with a modest amount, about a tablespoon of oil, you can always add more, it’s not as easy to take it away. I used a little Espelette pepper olive oil, kosher salt, fresh ground pepper, a little garlic powder and a little plain olive oil to taste. I did not grease my baking sheet or use cooling racks to elevate the leaves. I did not crowd or overlap the leaves. I used four large baking sheets in two ovens, racks in the top and the bottom set to 275F on the convection bake setting. The caveat here is, know your own oven, my chips seemed to be ready quicker than most of the recipes I looked at, keep a watchful eye to ensure a crispy, not a burnt chip!
Chard Chips

  • 1 large bunch of chard, 25 leaves, 12-14 inches long
  • Olive oil
  • Seasoning of your choice, I used kosher salt, garlic powder and freshly ground pepper

Directions

  1. Preheat oven to 275F (convection bake). Put racks in the top and bottom of oven.
  2. Wash chard leaves thoroughly in several changes of water. Remove the stems from the leaves, reserve for chard stem pickles.
  3. Dry chard leaves, first in a salad spinner, then remove excess moisture with paper towels. Cut leaves into 2″x2″ pieces, or a size as close as possible, when in doubt, larger is better.
  4. Spread leaves on a large ungreased baking sheet, do not overlap or crowd. My leaves took up four sheets that I baked in two ovens.
  5. Bake chard for six to seven minutes, check to see how the leaves are drying, at this point I loosened the leaves with a spatula and my fingers and rotated the baking sheets, top to bottom and front to back.
  6. Bake for another six to seven minutes, chard should be crisp, not burnt.
Trimmed chard leaves ready to be tossed with olive oil and seasonings


Give the chard leaves enough room to ensure even baking.
Not the prettiest snack, but certainly tastes good!


Pickled Chard Stems

Colorful Bright Lights and Rhubarb chard stems are too pretty to waste.

Pickling shows off the brightly colored stems in another healthy nibble. Refresh the stems in some ice water to crisp them up and cut to even lengths to fit your canning jar. I chose pint jars but one cup sized jars would work as well. I used a basic refrigerator pickle recipe and added my own spice blend combination. Allow them to cure in the refrigerator for a few days, after three days they were ready. If your stems are wide, cut them in half lengthwise, there will be less chance for the stems to be stringy.

Quick Chard Pickle

Makes  2 pints

  • 2 pint canning jars and lids
  • Enough chard stems to pack tightly into the jars
  • 2c water
  • 1c rice wine vinegar
  • 1/4c granulated sugar
  • 1/2t cumin seed
  • 1/2t coriander seed
  • 1/2t fennel seed
  • 1 small piece of cinnamon stick about 2″
  • 1/2t pink peppercorns
  • 1/2t white peppercorns

Directions

  1. Sterlize two pint canning jars by washing them in hot soapy water, rinsing and drying them thoroughly. Crush spices in a mortar and pestle or small food processor. Distribute spices evenly between the two jars.
  2. In a medium saucepan bring two cups of water to a boil. Add vinegar, sugar and salt and bring the mixture back to a boil.
  3. Pack the chard stems in the jars as tightly as possible. Using a wide mouth canning funnel, pour the brine over the stems to cover completely. Place lids and bands on the jars and let cool. Refrigerate, chard pickles will be ready in a few hours but at their best in about two days.

    My spice blend ready to crush in the mortar and pestle.
Pickled chard stems ready for the refrigerator. Notice the classic Bicentennial Liberty Bell jar on the right.


August 7, 2012 Pasta Salad with Sun Gold Tomatoes, Green Beans and Pesto Dressing

Pasta salad, that ubiquitous summer take along for picnics, barbecues and potlucks doesn’t have to be boring. This particular one was made with fresh ingredients from our garden and a spicy pesto vinaigrette. I picked very sweet and fruity Sun Gold tomatoes and a combination of our second growth of bush beans with the first of the pole beans. I chose penne rigate as the pasta, not just because it was the only acceptable pasta shape we had on hand but the ridges would nicely hold the bits of pesto. The dressing is a slightly deconstructed take on pesto, the toasted pine nuts are added to the salad separately rather than part of the dressing to give the salad some extra crunch. Sun gold tomatoes are a relatively new favorite of ours. They are a tangerine-orange cherry tomato developed in Japan where consumers prefer a tomato that is sweet rather than tart. The recipe is just a canvas to fill in with your own summer ingredients. Choose grilled slices of zucchini, chunks of pepper, cubes of cooked eggplant, or a different variety of tomato. Walnuts would be a good choice to replace the pine nuts and a Grana Padano could replace the more traditional  Parmigiano Reggiano. Just be sure to use freshly grated cheese, not pre grated or the stuff that comes in a green can!

Pasta Salad with Sungold Tomatoes, Green Beans and Pesto Dressing

Created using the Fine Cooking pasta salad recipe maker

Serves eight

Ingredients

For the Vinaigrette

  • 1 1/2 c lightly packed basil leaves
  • 1/2c extra virgin olive oil
  • 1/2 c or more fresh, finely grated Parmigiano-Reggiano cheese
  • 3T red wine vinegar
  • 2T fresh lemon juice
  • 2t  finely chopped garlic
  • 1/2t finely grated lemon zest
  • 1t kosher salt
  • Freshly ground black pepper

For the salad

  • kosher salt
  • 1 lb green, purple and wax beans, trimmed and cut into 2-inch lengths
  • 1/2 lb small chunky pasta
  • 1T olive oil
  • 2 1/2 cups of cherry tomatoes, halved (l love using my Cutco steak knife for this)
  • 3T pine nuts, toasted
  • Freshly ground pepper

Directions for the Vinaigrette

  1. Put the basil, olive oil, Parmigiano, vinegar, lemon juice, garlic and lemon zest in a blender. Blend until smooth. Season with salt and pepper to taste.

Directions for the salad

  1. In a large pot bring 4 quarts of salted water to a boil over high heat
  2. Drop the beans into the boiling water and cook until they are just crisp-tender, about 4-5 minutes. Remove beans from pot with a slotted spoon and place in colander. Rinse with cool water and transfer beans to a baking sheet lined with paper towels to drain and cool.
  3. Return the water to a boil and add the pasta. Cook until al dente, following package instructions. Drain the pasta thoroughly in a colander and transfer to a rimmed baking sheet. Toss the pasta with the olive oil to prevent sticking.
  4. Transfer the cooled pasta to a large serving bowl. Add beans and cherry tomatoes and toss. Add just enough vinaigrette to moisten the pasta, do not over dress. Add the pine nuts and toss again. Let the salad rest for 20 minutes or so to allow the flavors to blend and then taste the salad again. If needed, add a little more vinaigrette, salt and pepper. Grate a little extra cheese on top if desired.


The little green bean at the bottom left of the picture will eventually turn as purple as the blossoms!


Sun Golds at various stages of ripeness.

August 3, 2012 Zucchini “Pasta”

Gardeners, we’ve all done it. You are diligent at first picking zucchini from your garden. For days you happily pluck small to medium zucchini off the vines, sometimes with the blossoms still attached. Then it happens, you get busy doing other things, it rains for several days or you just simply forget. Those compact little fruits are now the size of a major league baseball bat. Well, before you make one more loaf of zucchini bread or sneak it down to the compost pile, I have another idea.

I make something I refer to as “zucchini pasta”. Kuhn-Rikon, a Swiss cookware company has a tool that makes short work of over-sized zucchini. The stainless steel julienne peeler moves effortlessly down the length of the squash. Steady the zucchini with one hand, start at the top, press the teeth of the peeler into the flesh and pull down. You will have the finest Julienne imaginable in no time. Just stop soon enough to avoid the seedy interior. Although all varieties of zucchini work well with this preparation, I especially like the Italian variety Striato d’Italia which translates Italian stripe. When this variety gets bigger, it doesn’t get as fat as other zucchini, it gets longer, making for longer capellini pasta-like shreds. Put your strands into a bowl and separate any that stick together with your fingers. I like to slightly wilt the strands in a saute pan with some olive oil but  they could  be used raw. I like to toss the “pasta” with some pesto and sometimes I will add halved cherry tomatoes, either raw or cooked slightly. You could also pair it with a cooked tomato sauce or just about anything you like on regular pasta.  Don’t just use the julienne peeler for zucchini. Shred carrots and jicama for a slaw or beets for a salad. The possibilities are limitless.

The longest zucchini in this picture is 22 inches!

The julienne peeler makes short work of this zucchini.

Use your fingers to separate any strands that stick together.


July 12, 2012 Swiss Chard


Let’s begin with two misconceptions regarding chard. Swiss chard is not from Switzerland, but the botanist who named it in the nineteenth century was, and named it for his homeland.  Second, it is pronounced chard, not shard. I can understand why the mistake can occur. Chardonnay, a wine grape varietal, is referred to in a shorthand kind of way  by many people (moi included) as “shard”. The “ch” is pronounced “sh” in French, like chalet. Also a shard is a sharp piece of glass, not something one would consume.

Chard is from the Latin and the French for the word “thistle”. However, chard is not a member of the thistle family but belongs to the beet family.  Chard is cultivated for the leaves and stems of the plants, not the roots.  It is the cooked green of choice in the summer months in our house. We grow many varieties that are as pretty to look at as they are nutritious for you. Varieties like Rhubarb with its bright red stems and Bright Lights with its neon pink, orange and yellow stems give beautiful accents of color in the garden. Chard is a nutritional powerhouse with vitamins K, A and C, and is  a good source of potassium, iron and fiber.

European cooks are partial to chard stems discarding the leafy part and in America most cooks use the leaf and discard the stem. I take advantage of both the stems and the leaves .  The tiniest leaves are an interesting addition to salad mixes. When using larger leaves, the stems need to be separated from the leaves to cook both parts correctly. This is a recipe with the gardener in mind. If you don’t grow your own, your local farmer’s market is a good source for chard. Supermarket chard looks sad for the most part and wouldn’t make a chard lover out of anyone.

Swiss Chard with Garlic

Serves 4-6

Ingredients

  • 1 large bunch of chard
  • Kosher salt and fresh ground pepper
  • Low sodium chicken broth
  • Extra virgin olive oil
  • Several cloves of garlic, peeled and chopped

Directions

  1. Trim the bottoms of the stems and wash chard in several changes of water
  2. Cut the stems from the leaves. Chop stems into 1/2 to 1 inch pieces. Cut leaves into 1 to 2 inch ribbons. Stacking leaves on top of leaves and stems in an even row  makes the task go quicker.
  3. Bring a large pot of well-salted water to a boil. Add chard stems and blanch for 4-5 minutes. The timing will depend on how thick you cut the stems and how soft you want them to be. Remove stems from water with a slotted spoon or spider. Add a little more water to the pot if necessary and keep at a boil.
  4. Add chard leaves in batches and blanch until wilted, 2-3 minutes. Drain in a large colander. Squeeze out excess liquid when cool enough to handle.
  5. Heat a tablespoon or so of extra virgin olive oil in a large skillet over medium high heat for about a minute. Add stems and toss gently to coat. Add wilted chard leaves and stir often, until tender, adding a little chicken broth if the mixture seems too dry. Push chard to one side of pan, add a little more olive oil, add garlic to pan and saute garlic until golden, another minute or two.
  6. Serve warm. Cooked chard could be added to a frittata or omelet as well.


Crinkly rhubarb chard leaf with bright red stem.

Soak chard leaves in several changes of water. Dirt will sink to the bottom when you lift the leaves out. Drain chard in a colander.


Trim the bottom of the chard leaves. Cut the leaf away from the stalks, I prefer using scissors or a small serrated knife. Chop leaves in 1-2 inch ribbons. Stacking the leaves speeds the process along.

Chop stalks into 1/4 to 1/2 inch pieces.


Always cook more chard than you think you will need. This large bowl cooked down to this.


As you can see from the measuring cup, some of the color leaches out during the blanching process but they remain predominately red.


Saute the stems and leaves together and finish with a little chopped garlic.  A flavorful extra virgin olive oil will really enhance the flavors in this dish.