November 17, 2013 Eggplant “Pizzas”

DSC_3935a


Joe’s not so little greenhouse set out in the garden extended our growing season for some vegetables to the latest date ever. When he brought in the last of the peppers and eggplants on Sunday I knew I needed to find a special way to use them to commemorate the end of their growing season. The peppers, for the most part were transformed into one of his favorites, stuffed peppers and for the eggplant I turned to a recipe from Julia Child.

In her 1975 cookbook, From Julia Child’s Kitchen, among personal anecdotes  and recipes for Caesar Salad (yes, Mr. Caesar Cardini actually made this tableside for a young Julia and her family), consommés, stews and apple charlotte is this gem. Tranches d’aubergine a l’italienne might put off the average cook, but eggplant pizzas, now that’s something we can all relate to. The recipe made a second appearance as miniature eggplant pizzas in her 1989 work and one of my favorite go-to cookbooks, The Way to Cook.

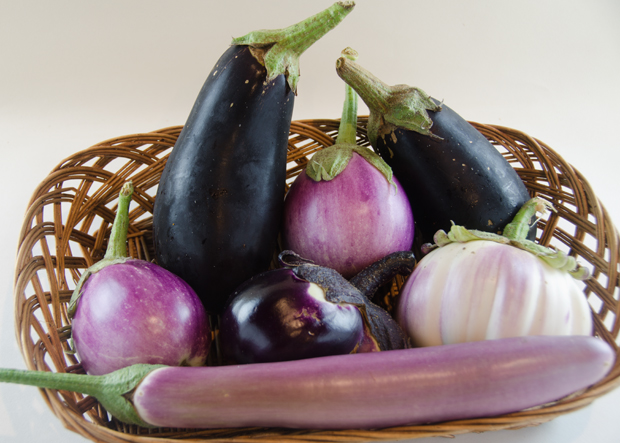
The classic pear shaped variety of eggplant like Black Beauty works best here. I began by cutting the eggplants crosswise into 3/4 inch planks, the skin was relatively thin so I left it on.Then I salted the slices on both sides to extract excess liquid. This is a step I would skip in the summer when the eggplants are at their freshest and not very seedy. I let the eggplants sit for about a half hour and started my sauce.

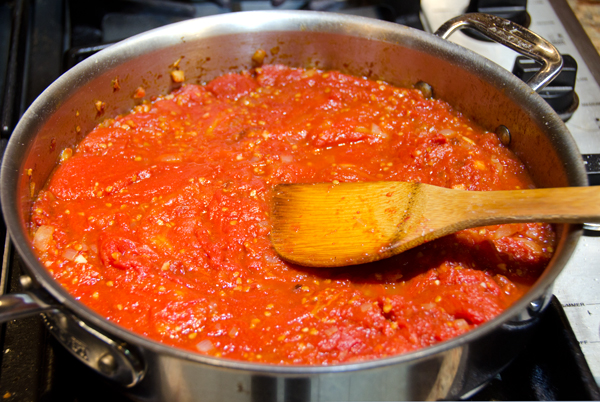
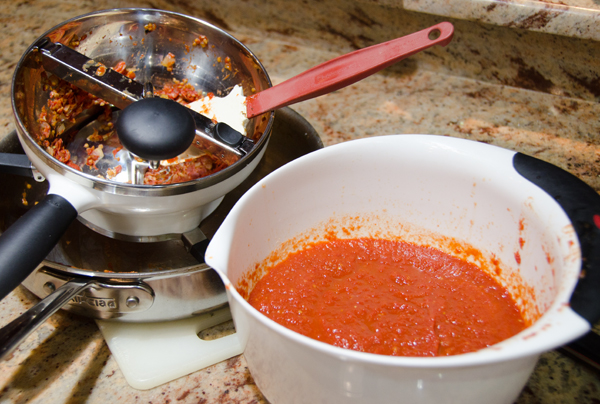
The day before I defrosted two quart bags of my roasted tomatoes, a 28 ounce can of plum tomatoes or a store bought sauce can substitute here. Step one for me is to pour off the liquid that accumulates in the bag, a little lagniappe for the chef. It’s definitely not the prettiest, but it is the best tasting tomato juice you will ever try. I sautéed one finely chopped onion and two chopped cloves of garlic until softened but not brown, about five minutes. Then the tomatoes and the rest of the liquid are added to the pan, breaking up the larger chunks of tomatoes with the back of a wooden spoon. When the tomatoes have cooked down sufficiently, I put them through a food mill to strain out most of the seeds. This results in a smoother sauce.

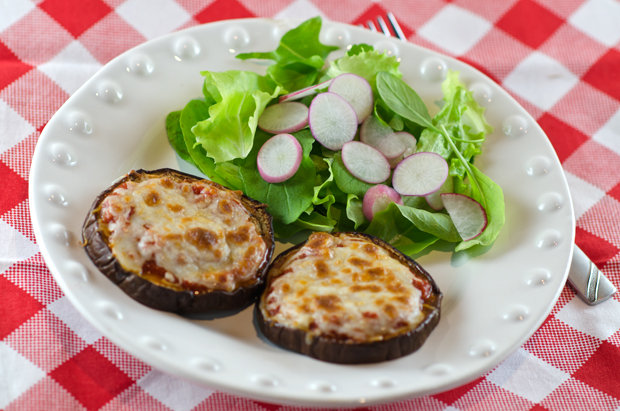
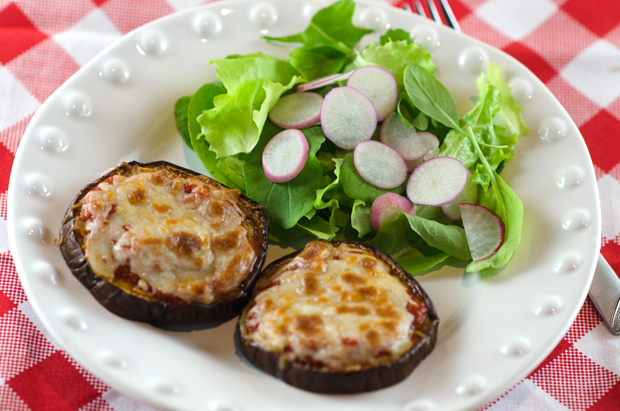
The eggplant slices are patted dry and lightly brushed with olive oil. I baked the eggplant slices on a wire rack over a baking sheet so that both sides would cook evenly. As Julia says “not so long that the slices become mushy and lose their shape”. After twenty five minutes I removed the baking sheet from the oven and now set the oven to broil. I covered the slices with a generous coating of tomato sauce and sprinkled a combination of mozzarella and grated Parmesan. The “pizzas” are now returned to the oven until the cheese is melted and slightly browned. Julia suggests these as part of a vegetarian combination or arranged around a main event, be it an omelet, a steak or a roast lamb.

Eggplant pizzas would make a good snack or a light lunch with a salad. A recipe that’s vegetarian, low carb and gluten free, as always “Our Lady of the Ladle“, Julia was ahead of her time.


Julia Child’s Eggplant Pizzas

Ingredients

  • 2  large eggplants (about 1 lb. each)
  • 1T salt, for drawing water out of eggplant
  • 2T olive oil for brushing eggplant before roasting
  • 2 t Italian seasoning, for sprinkling on eggplant before roasting
  • 1/3 c freshly grated Parmesan
  • 1/3 c finely grated low-fat mozzarella

Sauce Ingredients

  • 1T olive oil
  • 1 small onion, finely chopped (about 1 cup)
  • 2 large garlic cloves, very finely chopped
  • 1 28 oz. can of plum tomatoes (or use 3 cups peeled and diced fresh tomatoes)
  • 1/2 t Italian seasoning
  • 1/4 t dried oregano

Directions

  1. Cut eggplant into 3/4 inch thick slices. Place eggplant pieces on a double layer of paper towels and sprinkle both sides generously with salt. Let the eggplant sit with the salt on it for about 30 minutes to draw out the liquid. (After the eggplant sits for 15 minutes, turn on the oven to 375°F.
  2. Make the tomato sauce while the eggplant sits. Heat 1 tablespoon of olive oil and sauté the onion and garlic just until it becomes softened and fragrant.   Add the diced tomatoes, Italian seasoning and oregano.
  3. Then let the sauce simmer on low until it’s thickened. Break up tomatoes with a fork while the sauce cooks. (You can add water as needed. Let sauce simmer until ready to put on eggplant slices.)
  4. After 30 minutes, pat the eggplant dry with paper towels. Brush both sides of the eggplant slices lightly with olive oil and sprinkle tops with Italian seasoning. Place eggplant slices on a wire rack over a baking sheet. Roast the eggplant about 25 minutes, but “not so long that the slices become mushy and lose their shape” as Julia says.
  5. While the eggplant roasts, combine Parmesan with mozzarella. After 25 minutes or when eggplant pieces are done, remove eggplant from the oven and turn oven setting to broil. Spread a few tablespoons of sauce on the top of each eggplant slice, sprinkle with thin basil slices and top with cheese blend. Put pizzas under the broiler until the cheese is melted and slightly browned.
DSC_3951a
We are still harvesting salad greens, spinach and arugula from the greenhouse.
DSC_3918a
Cooking down the roasted tomatoes.
DSC_3919a
Putting the cooked tomato sauce through a food mill makes a smoother sauce and eliminates most seeds.
DSC_3911a
Doesn’t look like the stuff in a bottle, but it is the best tasting tomato juice you will find.
DSC_3932a
Served with a simple salad of baby greens and radishes from the garden, eggplant pizzas make a delicious light lunch.


September 3, 2013 Eggplant Caponata revisited

DSC_2138a


Summer is berry season and each month brings a new arrival. June is time for plump juicy strawberries. July brings succulent raspberries and blueberries. August brings one of my favorite berries, eggplant. A berry? you say. First, the members of the nightshade family, tomatoes, pepper and eggplants to name just a few, are actually fruit, not vegetables. Botanically speaking, fruit are seed bearing structures that develop from the ripened ovaries of flowers. But eggplant are not just any old fruit, they are considered berries because they are indehiscent which means they do not sprout open when ripe. With these technicalities aside, there are two burning questions that most people have when it comes to eggplant; should I salt or not? and are there male and female eggplants?

DSC_2012a
A round up of the varieties of eggplant we grow.


Young eggplants, picked fresh from the garden or purchased at the farmers market will not need salting. They will have thinner skin and fewer seeds. The bitterness originates in the seeds which contains nicotinic alkaloids. Did I mention tobacco is another member of the nightshade family? So the larger the eggplant, the greater the likelihood of it having more seeds. Salting, also known as degorging, is good for drawing out excess liquid from the eggplant so that it doesn’t absorb as much oil in the cooking process, but it is only successful in masking bitterness.

The male vs. female eggplant was a tale that even I fell victim to. I was surprised at the number of websites that propose the theory of male and female eggplants as fact. The story goes that a dash-shaped slit on the bottom of the fruit indicates a female eggplant and a deep round indent indicates a male. The male eggplant reportedly has fewer seeds and is more desirable. It’s debunking time again. Fruit, like eggplants develop from the female flower on the plant but have no sex of their own.

So, how do you choose the best eggplant?  Look for eggplant that have smooth, bright, shiny skin. When you press on the skin it should spring right back. Select eggplant that are heavy for their size, indicating younger fruit. The calyx, the green leaves at the stem end should be fresh and green, not dried out and brown.

Our garden in the month of August yields an abundance of the nightshade family, tomatoes, peppers and eggplants. While our tomato harvest is better than last year, this has proven to be not the best year for eggplants and peppers. I wanted to take advantage of the eggplants we did grow and make one of our favorites, caponata.

I posted a different recipe for caponata last year, this is one from my catering days.  A great room temperature dish, caponata always tastes better the second day, after the flavors had the chance to meld. It is an agro dolce, a sweet and sour dish from Sicily that shows the influence of North African flavors on the region. Serve on grilled baguette slices and garnish with toasted pine nuts and chopped flat leafed parsley.

DSC_2117a


Eggplant Caponata

Serves 6-8 as a side dish

Ingredients

  • 1/3c olive oil
  • 3c diced eggplant
  • 1 1/2c chopped onion
  • 1c thinly sliced celery
  • 2c chopped tomatoes
  • 3T minced garlic
  • 2T tomato paste
  • 1/4c red wine vinegar
  • 1c sliced green or black olives
  • 1/3c capers, well drained
  • 1 or 2 anchovies, drained and chopped
  • 1T sugar
  • 1/2t crushed red pepper flakes
  • 1/2c minced flat leafed parsley
  • Kosher salt and freshly ground black pepper
DSC_2065a
A lot of chopping but the dish comes together quickly after that.

DSC_2069a


Directions

  1. Heat the olive oil in a large skillet. Add the eggplant and sauté until somewhat soft, 3-4 minutes. Add the onions, celery, tomatoes and garlic and cook for another 10-12 minutes, stirring occasionally.
  2. Remove from the heat, add the remaining ingredients and toss lightly. Refrigerate until ready to serve, preferably the next day. Bring to room temperature before serving.

DSC_2131a

DSC_2122aDSC_2145a-copy

September 19, 2012 Roasted Eggplant Caponata

The days are getting shorter, there is a chill in the morning air, only three days until the official beginning of autumn. Our summer vegetables are on the wane and this morning I harvested some of the last eggplants, peppers, fennel and tomatoes of the season. The sweet and sour flavors of eggplant caponata would be the right contrast to the richness of the king salmon we were having for dinner.
Caponata is a dish native to Sicily by way of the Arabs (then called the Saracens)  who ruled the island from the ninth to the eleventh century. Along with citrus fruits, pasta and eggplants, just to name a few, the Saracens brought the sweet and sour flavor combination to Sicily, the sour coming from vinegar and sweet from sugar or honey.  Among several theories, the word caponata came from the Sicilian dialect, capunata, the name for a sailor’s dish of a biscuit steeped in oil and vinegar, served with chopped vegetables.
The vegetables in my caponata were the “last gasp” of certain varieties we were growing. I used lavender-white Asian Bride  and magenta colored Beatrice eggplant, both ideal because of their thin skin (no peeling required), some small yellow Admiral peppers, and  a red Anaheim pepper that had just a little heat. Fennel isn’t typically an ingredient in caponata, but I thought the slight licorice flavor would add to the sweetness. The most time consuming part of the recipe is the hand chopping of the vegetables, a food processor is definitely not the right choice here. Unlike most of the recipes I make with eggplant, I salted the eggplant to eliminate any bitter flavors from these plants that had been on the vine for a while. Salting also prevents the eggplant from absorbing too much oil and becoming greasy. I decided to roast the vegetables in this recipe is to keep the olive oil to a minimum. I cut the vegetables a bit smaller than I would usually since I was using it as a topping for fish. Caponata is also wonderful scooped up with a pita, in a sandwich and as a topping for pasta. It is best made a day ahead so the flavors have time to blend. Caponata keeps about a week in the refrigerator, if it lasts that long.

Eggplant Caponata

Makes about 4 cups

  • 1 medium eggplant or a combination of smaller eggplants to equal about 1 1/2lbs, unpeeled, and trimmed
  • 3 ribs of celery cut into 1/2 inch dice
  • 1 small red onion cut into 1/2 inch dice
  • 1 small yellow pepper cut into 1/2 inch dice
  • 1 small red pepper cut into 1/2 inch dice
  • 1 small fennel bulb cut into 1/2 inch dice (optional)
  • Olive oil
  • 1 1/2 cups peeled plum tomatoes with juices or 1 14 oz can of diced tomatoes
  • 1T tomato paste
  • 2-3T Pomegranate red wine vinegar
  • 1-2t granulated sugar or honey
  • 2 anchovy filets, minced
  • 1/3 c green olives, pitted and slivered
  • 3T drained and rinsed balsamic capers
  • 2T chopped Italian parsley
  • Kosher salt and freshly ground pepper

Directions

  1. Preheat oven to 450F. Place racks in the top and bottom shelves of the oven.
  2. Cut the eggplant into 1-inch cubes. Place the cubes in a bowl, sprinkle with a tablespoon of  kosher salt. Spread the cubes on a baking sheet that has been lined with a paper towel. Allow cubes to sit for one hour. Pat cubes dry with paper towel and remove any excess salt. Do not rinse.
  3. Place the cubes in a bowl and toss with 1-2T of olive oil. Place cubes on a baking sheet, spread them out evenly, crowded vegetables will steam, not roast. Set aside. In another bowl, toss the celery, onion, fennel and peppers with another tablespoon or more of olive oil. Spread on another baking sheet, making sure that the vegetables are spread out evenly and not crowded.
  4. Place vegetables in preheated oven and cook for about 5 minutes. With a spatula, loosen them from the baking sheet to promote even browning and rotate the baking sheets, top and bottom as well as front and back. Continue to roast in the oven until vegetables are softened and browned around the edges. Start checking the pan after 5 minutes.
  5. Allow vegetables to cool on baking sheet. In a medium saute pan cook tomatoes and their liquid. Add tomato paste, red wine vinegar, sugar or honey and anchovies (if using) and stir to combine. Taste and adjust the sweet and sour flavor as desired.  Add the cooled vegetables, toss gently but thoroughly to combine. Add chopped olives, capers and chopped parsley. Taste and adjust seasoning as desired. Set aside to allow flavors to blend. Serve at room temperature as accompaniment to fish or chicken or with crusty bread or crostini.


August 3, 2012 Zucchini “Pasta”

Gardeners, we’ve all done it. You are diligent at first picking zucchini from your garden. For days you happily pluck small to medium zucchini off the vines, sometimes with the blossoms still attached. Then it happens, you get busy doing other things, it rains for several days or you just simply forget. Those compact little fruits are now the size of a major league baseball bat. Well, before you make one more loaf of zucchini bread or sneak it down to the compost pile, I have another idea.

I make something I refer to as “zucchini pasta”. Kuhn-Rikon, a Swiss cookware company has a tool that makes short work of over-sized zucchini. The stainless steel julienne peeler moves effortlessly down the length of the squash. Steady the zucchini with one hand, start at the top, press the teeth of the peeler into the flesh and pull down. You will have the finest Julienne imaginable in no time. Just stop soon enough to avoid the seedy interior. Although all varieties of zucchini work well with this preparation, I especially like the Italian variety Striato d’Italia which translates Italian stripe. When this variety gets bigger, it doesn’t get as fat as other zucchini, it gets longer, making for longer capellini pasta-like shreds. Put your strands into a bowl and separate any that stick together with your fingers. I like to slightly wilt the strands in a saute pan with some olive oil but  they could  be used raw. I like to toss the “pasta” with some pesto and sometimes I will add halved cherry tomatoes, either raw or cooked slightly. You could also pair it with a cooked tomato sauce or just about anything you like on regular pasta.  Don’t just use the julienne peeler for zucchini. Shred carrots and jicama for a slaw or beets for a salad. The possibilities are limitless.

The longest zucchini in this picture is 22 inches!

The julienne peeler makes short work of this zucchini.

Use your fingers to separate any strands that stick together.