March 8, 2014 Chicken and Andouille Sausage Gumbo

DSC_6186a

A whole new world opened up to me when I discovered my love of cooking and good food over thirty years ago. To learn as much as I could, I immersed myself in cooking magazines, cookbooks and food programs on television. In the pre Food Network days the only option was the local PBS affliliate. Sure there was Julia, but there was also Nathalie, Madeline and a program called The Great Chefs. The Great Chefs programs were the first to take the television cameras behind the scenes and into the kitchens of the finest restaurants in the world. Two of the those programs, Great Chefs of New Orleans and the Great Chefs Louisiana New Garde became my first encounter with the Cajun and Creole cooking of New Orleans. Probably the first celebrity chef to come out of  that town, even before Emeril, was Paul Prudhomme. I bought his first cookbook, Chef Paul Prudhomme’s Louisiana Kitchen and began cooking away.

We had parties revolving around the food of NOLA, Jambalaya Jams, we called them, featuring the spicy cuisine of that city. We also had the pleasure of visiting New Orleans several times and even dined at K-Paul’s, Prudhomme’s eponymous restaurant. While Joe was busy with medical seminars, I enjoyed some demonstration cooking classes to further my exploration in the cooking techniques of the region. I learned about a very different “holy trinity” than I was familiar with, how simple it is to make “prah-leens”,and that a roux (pronounced roo) was the basis of many of the region’s best dishes.

A New Orleans style roux is a fifty-fifty mixture of flour and oil. The oil, always something neutral like a vegetable oil, is heated to a high temperature, then the flour is added gradually. The flour will first bubble as it releases it’s moisture, then toasts as you continue to stir, and stir you must, constantly. The tool of choice here is a long-handled wooden spoon or heat proof spatula. The well-earned nickname “Cajun napalm” comes from the fact that splattering roux will stick to your skin and result in a nasty burn.  The roux will toast and begin to turn a caramel color and develop a wonderful nutty fragrance. A roux can range anywhere from light brown to almost black. Chef Prudhomme says that Cajun tradition is the darker the meat in the dish, the lighter the roux. A dark roux will provide less thickening since the starch is thoroughly cooked but will impart a richer flavor to the dish. If the roux has black specks in it, or smells burnt, discard it and start all over again. A burnt roux cannot be saved!

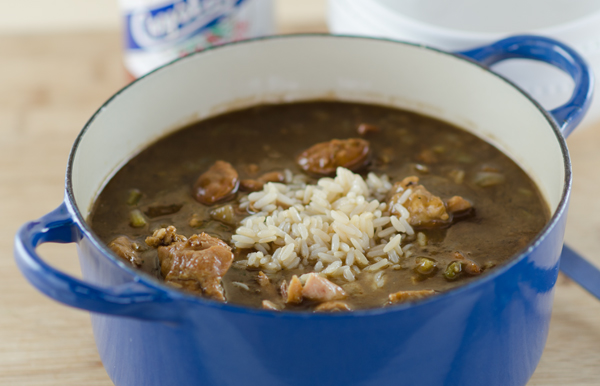
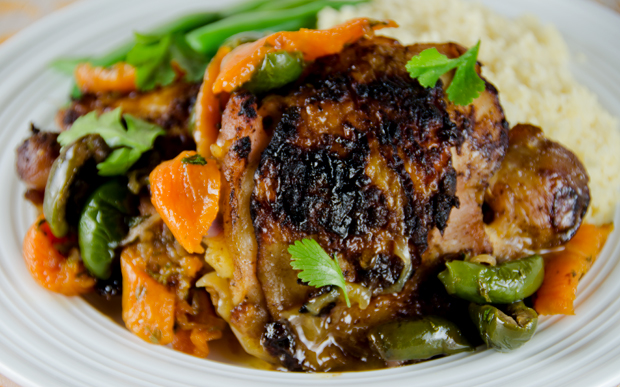
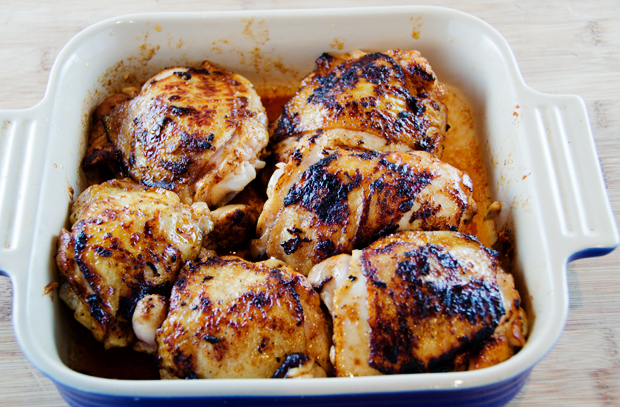
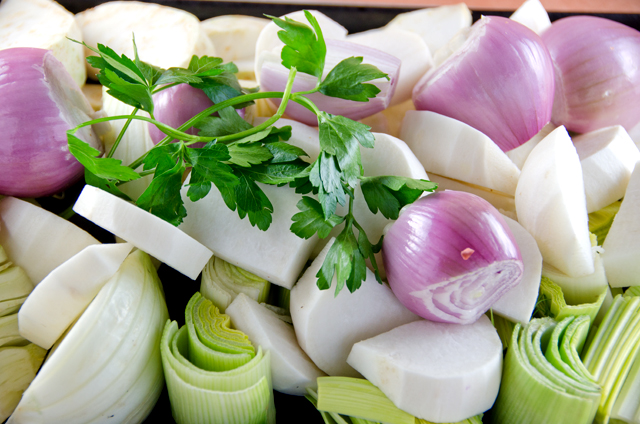
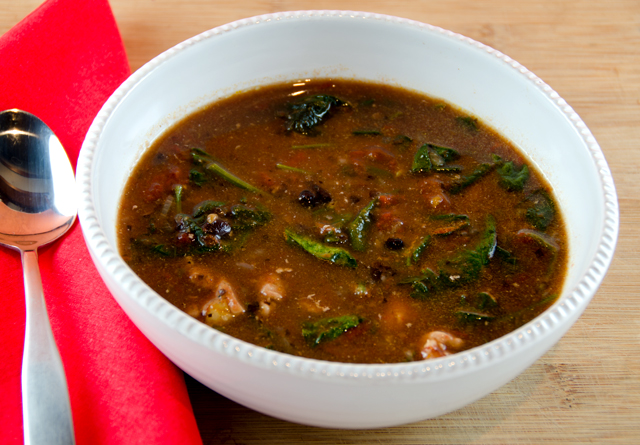
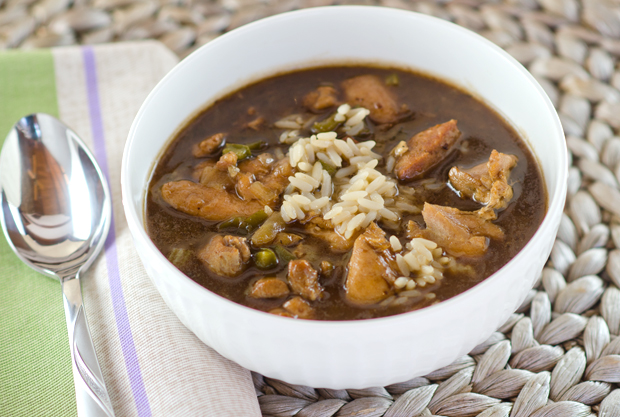
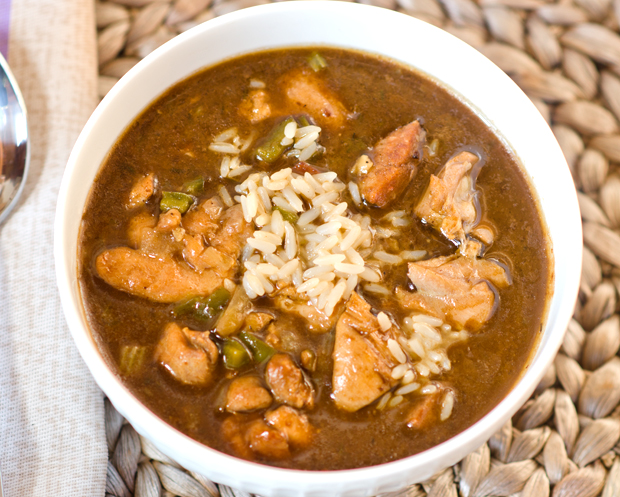
Gumbo is a classic New Orleans dish claimed by both Cajun and Creole cooks.  Along with a toasty roux, the flavor base of gumbo is enhanced by the “holy trinity” that I mentioned before, a Creole mirepoix of celery, onion and green pepper.  I chose to make this gumbo with chicken thighs since they stand up well to reheating and some andouille sausage to add a little spiciness and authenticity to the dish. Okra and file powder are traditional thickeners added at the end of the cooking process.  Okra is a green pod that is sliced into rounds and breaks down to thicken the gumbo. Okra, both the plant and it’s fruit contain mucilage. That is why some think okra brings a “slimey” quality to the dish. The other option, filé powder is made with the ground leaves of the sassafras tree. It smells like eucalyptus and adds a certain earthiness to gumbo. Filé powder needs to be added to individual bowls right before serving, cooking it makes it become stringy.

Intrestingly enough either one of these two thickeners could be the origin of the word gumbo. The African Bantu word for okra is “kingombo” and the Choctaw Indians were the first to make and sell filé powder which they called “kombo”.

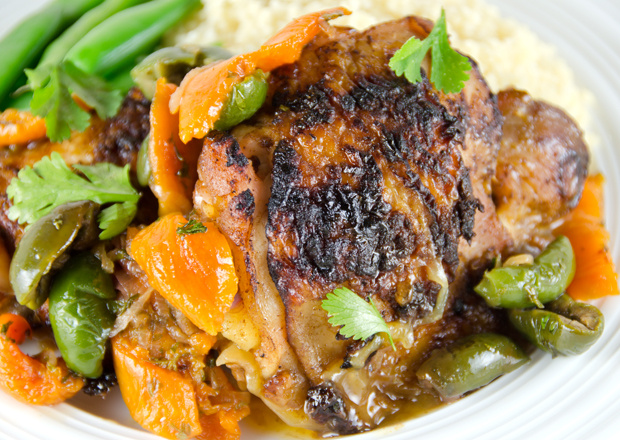
Gumbo is a great make ahead dish. As with many stews, it tastes even better the next day. Gumbo can be stored in the refrigerator for several days or frozen. Serve over white rice, garnish with chopped scallions and pass around the Louisiana style hot sauce for a satisfying one dish meal.

DSC_6194a


Chicken and Andouille Sausage Gumbo

Serves 6-8

Ingredients

  • 2lbs boneless skinless chicken thighs, cut into 1″ pieces
  • 1t kosher salt
  • 1t garlic powder
  • 1/2-1t cayenne pepper
  • 6c chicken stock or low sodium chicken broth
  • Vegetable oil (1/2 cup plus a little more)
  • 1/2lb Andouille sausage or other spicy sausage, sliced in half lengthwise, then cut into 1/3 inch half moon slices
  • 1/4c Canadian bacon, cubed
  • 1 1/2c finely chopped onion
  • 1c finely chopped green pepper
  • 1c finely chopped celery
  • 3 cloves garlic, finely chopped
  • 2 bay leaves
  • 2t dried thyme
  • Finely chopped scallions
  • Louisiana style hot sauce
  • Hot cooked white rice
  • Filé powder

Directions

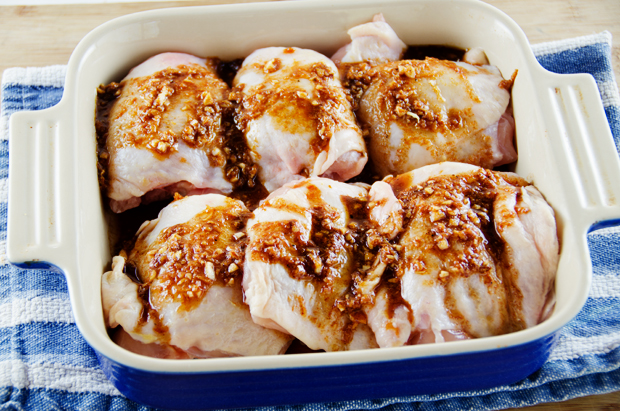
  1. Place the chicken in a bowl large enough to hold it comfortably. Mix salt, garlic powder and cayenne in a small bowl. Toss the chicken with the spices and let stand at room temperature for 30 minutes.
  2. Warm the chicken stock over medium heat.
  3. Heat 1 tablespoon vegetable oil in a 7-8 quart Dutch oven over medium high heat until hot, 1-2 minutes. Add the sausage and the Canadian bacon and cook, stirring occasionally with a wooden spoon, until well browned, 4-6 minutes. Transfer to a bowl with a slotted spoon.
  4. Add 2 tablespoons to the Dutch oven and sauté the chicken in several batches until golden brown, about 6-7 minutes. Transfer the chicken to the bowl with the sausage.
  5. Add enough vegetable oil to the Dutch oven to make 1/2 cup. Using a wooden spoon to scrape and loosen browned bits from the bottom of the pot.
  6. Using a long handled whisk, gradually stir in the 1/2 cup flour. Cook whisking constantly. I switched back and forth between a whisk and flat edged wooden spoon to make sure nothing stuck to the bottom of the pan. It will take anywhere from 4 to 8 minutes for the roux to reach a dark caramel color.
  7. Remove the pan from the heat and immediately add the onion, celery, pepper and garlic. Stir constantly to stop the roux from getting darker.
  8. Return pan to low heat and cook until vegetables are soft, about 5 minutes, stirring constantly and scraping the bottom of the pan well.
  9. Stir in the chicken broth, sausage, Canadian bacon, chicken, thyme and bay leaves.
  10. Bring to a boil and then reduce heat and simmer for 30 minutes.
  11. Gumbo can be served immediately or stored in the refrigerator for several days. Reheat gently before serving.
  12. Serve in large soup bowls over cooked rice. Add scallions, filé powder and hot sauce to taste.

DSC_6206a

January 25, 2014 Chicken Salad with Grapes and Pecans

DSC_4428aIn almost 25 years as a caterer,  Chicken salad with grapes and pecans was a perennial favorite. Whether served in pate a choux puffs on a buffet, on a croissant as a luncheon favorite or in daintily cut tea sandwiches this salad has always been a taste combination that everyone enjoys.

I have no claims for inventing this version of chicken salad, though I have never used a recipe and tweaked it over the years to make it my own. The most important part of the recipe is making sure that the cooked chicken is still moist and juicy. All the mayonnaise in the world won’t cover up dried out chicken breasts. Since I prefer using all white meat, split, bone-in chicken breasts from Bell and Evans are my usual choice but have on occasion used boneless skinless chicken breasts. Just remember the boneless breasts will take less time to cook.

An instant read thermometer is essential here, you are looking for an internal temperature of 160°F in the thickest part of the breast. I like to cook my chicken in convection mode on a wire rack above a parchment or foil lined baking sheet to allow air to circulate so the chicken cooks evenly. Allow the chicken to fully cool before shredding, remembering to shred with the grain.  Pressed for time? Use the meat from an already cooked supermarket rotisserie chicken.

About a cup of finely diced celery has always seemed to be the right proportion to the 5 to 6 cups of chicken. Cutting grapes in half makes for easier eating. It’s like finding a whole cherry tomato in your salad. Do you risk having it burst all over you and the people seated near by when you bite into it or do you stab it with your steely (or plastic) knife to avoid embarrassment? Red or green grapes? Whatever variety looks better the day you are making the salad. Taste a grape before you buy,( trust me, no one is watching), to be sure they are sweet enough.Homemade mayonnaise is always a nice touch but Hellmann’s has always been fine with me.  I use just enough mayonnaise to lightly coat all ingredients. If I have the luxury of time, I refrigerate the salad overnight and add any additional mayonnnaise and the pecans at the last minute to maximize crunch.

Chopped nuts are a less expensive way to buy them, usually in a medium chop which is perfect for the salad. If you choose to toast the nuts, preheat oven to 350°F and spread nuts evenly on a shallow baking sheet. Toast 5-7 minutes, checking halfway through cooking time to give the sheet a little shake and rotate. Walnuts, almonds and cashews are all good substitutes for the pecans. You could also add thinly sliced apple but that would be something I would add right before serving the salad.

I enjoy serving this chicken salad, as I did at a friend’s daughter’s wedding shower, on a bed of bibb lettuce. A basket of freshly baked rolls accompanied the salad for those who wanted to make a sandwich. I love the combination of flavors in this salad, tender juicy chicken, sweet-tart grapes, crunchy pecan and creamy mayonnaise. They make a chicken salad that is hard to beat.

DSC_4424a


Chicken Salad with Grapes and Pecans

Makes 6 cups

Ingredients

  • 3-4 Split chicken breasts, bone in and skin on
  • Olive oil
  • Salt and pepper
  • 1c celery in small dice
  • 1c pecan pieces
  • 1c seedless grapes (red or green) sliced in half
  • 1 to 1 1/4c  homemade or Hellmann’s mayonnaise

Directions

  1. Preheat oven to 350°F. Line a baking sheet with parchment paper or foil and place a wire rack on the sheet. Place chicken on the wire rack, spacing evenly to allow air to circulate.  Brush chicken breasts lightly with olive oil and season with salt and pepper.
  2. Roast chicken until an instant read thermometer inserted into the thickest part of the breast registers 160°F. If the breasts you are cooking are different in size, start checking the smallest at about the half hour mark.
  3. Remove chicken from oven and let sit until cool enough to handle. Remove the skin and pick the chicken off the bones. Tear or chop chicken into 3/4 inch pieces. You will have 4-5 cups of chicken.
  4. In a large bowl, combine chicken, chopped celery and grapes. Add mayonnaise, starting with about 2/3 cup and toss lightly. There should be enough mayonnaise to coat everything lightly.
  5. Add pecans and toss ingredients again, adding more mayonnaise as needed. Taste and adjust seasonings with salt and pepper.


November 23, 2013 Chicken Tomatillo Soup

DSC_3964a


As previously confessed, when we first grew tomatillos I wasn’t only unfamiliar with how to cook with them, but more importantly how the fruit develops and matures in the garden. The first year we grew them by about the beginning of July I was certain our crop was a bust.

The sprawling bushy plants grew to about three foot tall and were quite healthy. The vines produced little yellow flowers that eventually turned into small bright green papery looking Chinese lanterns.  When I examined the fruit, it felt like only a small pea was inside the husk. So I would either forget about them or months later gather up the few that would finally burst out of their now light brown husks.

Since then I have learned quite a bit about this member of the nightshade family. Tomatillos are more closely related to cape gooseberries than they are to eggplants and tomatoes.  I learned that as the fruit matures it fills out the husk. Tomatillos are about the size of a large cherry tomato, low in calories, a good source of iron and magnesium and vitamins C and K. Though they look like green tomatoes, they are much firmer in texture when ripe.  The thin papery coating will turn light brown as the fruit matures. They can be stored in the fridge for a couple of weeks or frozen whole.  Leave the husks on the fruit until ready to use.  To prepare tomatillos, remove the husk and stem and rinse off the remaining sticky residue that coats the fruit.

I am enjoying tomatillos more each season. We grow both green and purple tomatillos. The purple variety is supposed to be sweeter, I can’t say that for certain, but they certainly make an attractive addition to the garden. My tomatillo recipe repertoire to this point was limited to accompaniments. Roasting tomatillos for salsa verde was initially a good way to use them but now I wanted to branch out  This year I did something I never did before, I ate one raw. I was surprised and delighted with the bright, not too tart citrusy flavor. Prior to this I thought that biting down on a tomatillo would be the same as eating a green tomato, not necessarily a pleasant experience.

This time I used them in an easy to put together soup.  Bright lemony flavored tomatillos are combined with tomatoes, smoky cumin and green chilies. Homemade chicken stock is always a good base for a soup but low sodium chicken broth is fine also. I prefer using chicken thighs in soup recipes because they will hold up better if the soup is reheated.

DSC_0233a


Chicken and Tomatillo Soup

Ingredients

  • Olive oil
  • 1lb boneless, skinless chicken thighs cut into 1″ pieces
  • 1 medium onion, finely chopped
  • 2 t chile powder
  • 1T cumin
  • 1 t dried oregano (for this recipe I prefer Penzey’s Mexican oregano)
  • 1 clove garlic finely chopped
  • 2T diced canned roasted mild green chiles
  • 8 cups chicken stock or substitute low sodium chicken broth
  • 2c diced tomatoes, I use my roasted tomatoes, substitute your brand of choice
  •  3c finely chopped tomatillos
  • 1 can Great Northern beans
  • Kosher salt and freshly ground black pepper

Directions

  1. Heat 1T olive oil over medium-high heat in a 5- to 6-quart Dutch oven. Add the chicken pieces and brown on all sides, about 5-6 minutes. Remove to a plate and keep warm.
  2. Add onion and cook, stirring, until tender, 4 to 5 minutes. Add the chili powder cumin, oregano, and garlic and cook until fragrant, about 1 minute longer.
  3. Stir in the chicken and chiles and then add the broth, chopped tomatoes and tomatillos and a can of beans. Bring to a simmer. Reduce the heat to low and simmer, partially covered and stirring occasionally, until the flavors blend, about 30-40 minutes. Season to taste with salt and pepper.

DSC_0030aDSC_3961a


May 9, 2013 Moroccan Chicken with Apricot-Olive Relish

DSC_0150a

Sweet tart apricots combine with plump juicy olives in this Moroccan inspired dish. It’s quick enough for a weeknight but is special enough to serve to guests. The blend of Moroccan inspired spices, cumin, coriander, cinnamon and ginger give the dish a wonderful aroma. Toasting your own spices brings out the flavor even more.

Smoked paprika or pimenton de la Vera is not the paprika that many of us have been cooking with for years.  Pimenton originates from the La Vera region of southwest Spain. Chilis are smoke dried over fires that are kindled with the local oak logs.  The dried pepper can range from sweet (dulce) to hot (picante). This recipe uses the sweet version that has the mildest amount of heat.

Cerignolas are my olives of choice in this dish. I can usually find them at the supermarket olive bar at Wegmans.  Cerignolas are a large, meaty olive that originate from the town of Cerignola in the province of Puglia, Italy. They are milder in flavor because they are cured in lye, yes, like drain cleaner lye, there is a recipe here.  I prefer the green Cerignola but they also come in black and red. The red color is the result of food coloring and never seemed quite natural to me.  Cerignolas always come with the pit. To remove the pit, place olives on a cutting board and whack lightly with the side of a chef’s knife. The pit pulls out easily.

Don’t over plump your apricots. Five minutes is long enough for just purchased dried apricots, any longer may turn the apricots to mush. The apricot balsamic vinegar is a worthwhile addition to the dish. It adds a richness and nicely compliments the flavors in the dish. Serve with couscous and a green vegetable.

Moroccan Chicken with Apricot-Olive Relish

adapted from a recipe in Food and Wine Magazine

Serves three or two with leftovers

Ingredients

  • 2t cumin seeds
  • 1t coriander seeds
  • 2T honey
  • 2T apricot balsamic vinegar (if not using, increase honey to 3T)
  • 1/4c canola oil plus 1T canola oil
  • 1T grated fresh ginger
  • 3T fresh lemon juice
  • 1 clove minced garlic
  • 1/2t cinnamon
  • 1t smoked Spanish paprika or sweet pimenton de la Vera
  • 1t kosher salt
  • 1/2t freshly ground black pepper
  • 6 chicken thighs on the bone, with skin (about 2 to 2 1/4 lb)
  • 1c dried apricots
  • boiling water
  • 2 medium thinly sliced shallots
  • 1/2 cup pitted green olives, such as Cerignola or Picholine
  • 2T chopped cilantro

Directions

  1. Preheat oven to 375F
  2. Toast cumin and coriander in a small saute pan over medium heat until slightly browned and fragrant. Remove from heat, cool and grind in spice grinder or small food processor.
  3. In a bowl, whisk the honey, apricot vinegar, 1/4c canola oil, lemon juice, grated ginger, garlic, cumin, coriander, cinnamon, smoked paprika, cayenne, salt and pepper. Arrange the chicken in one layer in a glass or ceramic baking dish. Reserve 1/4 cup of marinade and pour the rest over the chicken. Turn to coat pieces. Refrigerate for 2-3 hours, turning once.
  4. Meanwhile, in a small bowl, pour boiling water over the apricots to cover and let stand until plump, about 6 minutes.
  5. Remove chicken from marinade. Heat the remaining tablespoon of oil over medium high in a large saute pan. Working in batches so as not to crowd the pan, brown the chicken well all over, about 3 minutes per side, transferring each batch to a plate.
  6. Return chicken to the baking dish, cover with foil and bake for about 25 minutes or until chicken is cooked through.
  7. In the same skillet, heat the remaining tablespoon of oil. Add the shallots and cook over moderate heat until softened and slightly browned, about 5 minutes. Add the apricots, olives and reserved marinade and bring to a simmer.  Cook over moderately high heat until the marinade is thickened and glazes the apricots and olives, about 2 minutes. Stir in the cilantro.
  8. Transfer chicken to plates, top with apricot olive relish and serve.
DSC_0097a
Marinade the chicken pieces for several hours.
DSC_0103a
Colorful apricot olive relish
DSC_0110a
Browned chicken pieces are returned to the dish, covered with foil and baked in the oven for twenty-five minutes.

DSC_0141a

DSC_0153a

April 23, 2013 Chicken Parmesan

DSC_9878a

What’s in a name? Sometimes a bit of confusion. You might think a dish with the name Parmesan originated from the city of Parma in the northern Italian region of Emilia- Romagna .  Well you would be wrong. Both the island of Sicily and southern region of Campania claim the origins of this dish.  There it is known as Parmigiana di Melanzane or Parmesan of Eggplant because of the prominence of Parmigiana-Reggiano in the dish. Author Mary Taylor Simeti offers another interesting explanation in her book, “Pomp and Sustenance: 25 Centuries of Sicilian Food”. Sicilians thought that their local dish of sliced eggplant layered with tomato sauce and caciocavallo cheese was originally Melanzane alla Palmitiana. Palmitiana means shutter in Sicilian and refers to the layered louver-like pattern of eggplant slices. It is said that Sicilians have a difficult time pronouncing the letter “l”, so the dish became known as parmigiana.
Whatever the explanation, Cooks Illustrated offered their second version of Chicken Parmesan in their March/April 2013 issue. It is a lighter version of the Italian classic. I used my own roasted tomatoes that I froze last summer to make a very simple but flavorful sauce. In the Cooks Illustrated recipe the breast cutlets are sliced horizontally,  I like to pound mine to an even thickness. The chicken has a light coating of panko crumbs, herbs and Parmesan cheese. Always buy real Parmigiano-Reggiano not the green powdered stuff in a can.

When Cooks Illustrated did their first redo of this classic fifteen years ago in 1998 they suggested using panko bread crumbs, not widely available at that time. Then you could only get them in Asian markets or by mail order. Now every supermarket and big box store carries panko. Even Emeril has his own brand. Panko differs from other bread crumbs because it is processed into flakes, not crumbs. Flakes result in a broader surface area when frying and gives the finished product a lighter crispy coating. A sprinkling of mozzarella and fontina and the chicken goes under the broiler to finish.Only two tablespoons of the sauce top the finished cutlet  That way all the components maintain their integrity; the chicken is juicy with a nice crispy crust, the sauce complements without overwhelming and there is just enough creamy melted cheese to coat it .  The recipe makes plenty of sauce so be certain to cook some pasta to enjoy it with the chicken.

DSC_9894a

Chicken Parmesan

Adapted slightly from Cooks Illustrated #121

Serves four

Ingredients for sauce

  • 1T olive oil
  • 2 minced garlic cloves
  • 1/2t dried oregano
  • Pinch of red pepper flakes
  • 1 (28oz) can crushed tomatoes (I used 2 quart bags of roasted tomatoes)
  • 1/4t sugar
  • 2T chopped fresh basil

Directions for sauce

  1. Heat the olive oil in a straight sided sautepan over medium high heat until just shimmering.
  2. Add garlic, 1t salt, oregano and pepper flakes, cook, stirring occasionally until fragrant, about 30 seconds.
  3. Stir in tomatoes and sugar, increase heat to high and bring to a simmer.
  4. Reduce heat to medium-low and simmer until thickened, 20-25 minutes. Since I use my own tomatoes this is the point where I put the tomatoes through a food mill to eliminate the seeds and give the sauce a smooth texture.
  5. Off heat, stir in basil. Season with salt and pepper to taste. Cover and keep warm.

Ingredients for the chicken

  • 4 boneless, skinless chicken breasts, 4-6 oz each, pounded 1/2 inch thick
  • 1t kosher salt
  • 1/2c shredded whole milk or part-skim mozzarella cheese
  • 1/2c fontina cheese
  • 1 large egg
  • 1T all-purpose flour
  • 3/4c freshly grated Parmesan cheese
  • 1/2c panko bread crumbs
  • 1/2t garlic powder
  • 1/4 t dried oregano
  • Freshly ground black pepper
  • 1/3c vegetable oil
  • 1/4c fresh basil, julienned

Directions for the Chicken

  1. Sprinkle each side of the cutlets with 1/8 t of salt and let stand at room temperature for twenty minutes.
  2. Combine the mozzarella and fontina cheese in a bowl. Set aside.
  3. Adjust oven rack 4 inches from the broiler element and heat broiler.
  4. Whisk egg and flour together in a shallow pan until completely smooth.
  5. Combine Parmesan, panko, garlic powder, oregano and a grind of fresh pepper in a second shallow pan.
  6. Pat the chicken dry with paper towels. Working with 1 cutlet at a time, dredge cutlet in egg mixture. Allow excess to drip off.
  7. Coat the cutlets in the Parmesan mixture, pressing gently so crumbs adhere. Transfer to a large plate.
  8. Heat oil in a 10-inch nonstick skillet over medium high heat until shimmering. Carefully place two of the cutlets in the skillet and cook without moving them until bottoms are crispy and golden brown, 1 1/2 to 2 minutes. Using tongs, carefully flip cutlets and cook on second side until golden brown, 1 1/2 to 2 minutes. Transfer cutlets to a paper towel lined plate and repeat with remaining cutlets.
  9. Place cutlets on a rimmed baking sheet and sprinkle cheese mixture evenly over cutlets. Broil until cheese is melted and beginning to brown, 2-4 minutes. Watch carefully! Transfer chicken to serving platter and top each cutlet with 2 tablespoons sauce. Sprinkle with basil, serve immediately, passing remaining sauce separately.
DSC_0470a
Can’t wait for the basil in the garden.


DSC_5375
Some of last year’s tomato harvest.

DSC_9884a


March 24, 2013 Poached Chicken with Salsa Rustica

DSC_9310a

Chicken is a regular part of our weekly dinner rotation, whether it’s boneless breasts in a pesto sauce, chicken thighs and legs in a fragrant blend of Moroccan spices or crispy skinned roast chicken redolent of garlic and lemon.  I turn to poached chicken when I am making a broth that is going to be made into chicken stock or a chicken soup.  Recently, one too many dinners out, vacation and parties called for a few weeks of eating light. So I was interested to see an article in the latest issue of Fine Cooking, “Beyond Roast Chicken. Three new ways to cook a whole bird from three creative chefs.”

That’s what attracted me to the recipe that Lidia Bastianich offered in this article, poached chicken with salsa rustica. Lidia is a master of Italian cooking, a restaurateur, and author of many cookbooks. Her television programs on PBS are not only informative but entertaining as well. So I decided to follow Lidia’s lead and made a poached chicken for dinner.

Poaching is a technique that cooks chicken gently and slowly, submerged in a liquid that is heated to just under the boiling point, about 180F, when small bubbles begin to break the surface. The cooking process begins with a broth of herbs and spices, enhanced with dried porcini mushrooms and Parmesan rinds, providing the rich umami.  Fragrant root vegetables, fennel and celery root, along with shallots, leeks and turnips are added next to the broth. Taking a step from what we normally do with our roast chicken, she stuffs it with peppercorns, bay, crushed garlic and lemon. The chicken is double wrapped in cheesecloth which both keeps the aromatics in the bird and not in the broth and provides a way to retrieve the chicken from the pot at the end of cooking. Poaching chicken provides both a moist flavorful chicken with no additional fat and a flavorful broth to serve with the meal and later as a soup.

Don’t skip the salsa rustica that accompanies this dish. Made mostly with pantry ingredients, it’s the first salsa I’ve ever seen that includes a hard-boiled egg. It adds a pop of color to the very flavorful but pale chicken and a unique piquant flavor. I could see serving this salsa with fish and pork as well.

Be sure to use Turkish or true bay leaves, laurus nobilis. California bay leaves are not from the same family but are similar in shape. They have a strong menthol flavor that will overpower the dish. I am fortunate that we have several Turkish bay trees to pick my leaves from. The salsa rustica recipe called for dill gherkins but I picked up a jar of cornichons. So is there really that big of a difference? Gherkins can refer to both a variety of cucumber, harvested very small for the pickling process and the pickle itself. Gherkins can be either tart or sweet. French cornichons are the tart, crisp pickles made from gherkins or other cucumbers picked small. My choice was fine since the original recipe called for dill (tart) gherkins.

The broth, delicious on it’s own, can be made into a quick soup.  Bring the broth to a simmer and add a small pasta such as ditalini or orzo. Cook until al dente and serve topped with grated cheese and finely chopped parsley. We used the broth several days later to poach halibut fillets seasoned with a ginger citrus herb blend and topped with fresh lime peel.

Poached Chicken with Salsa Rustica from Fine Cooking #122

Serves 4-6, yields 3 quarts broth

Salsa Rustica

Ingredients

  • 1/3c extra virgin olive oil
  • 1/4c red wine vinegar
  • 1/3c thinly sliced scallions
  • 1/4c finely chopped red onion
  • 1/4c finely chopped jarred roasted red pepper
  • 1/4c finely chopped cornichons
  • 1 hard boiled egg, finely chopped
  • 1T balsamic capers, drained
  • 1/8t dried mustard
  • Pinch of cayenne pepper
  • 2T finely chopped flat leaved parsley
  • Kosher salt and fresh ground pepper to taste
DSC_9263a_edited-1
Components for the salsa rustica.

Directions

  1. In a medium bowl, whisk the olive oil and vinegar.  Add the scallions, onion, roasted red pepper, cornichons, egg, capers, mustard and a pinch of cayenne. Whisk to combine.
  2. The salsa can be made up to 5 days ahead, but you will probably consume it before the chicken is cooked so either make a double batch or make it the day of! Cover and refrigerate, let sit at room temperature for a half hour before serving. Before serving, stir in the parsley and  season to taste with salt and pepper.

DSC_9270

Poached Whole Chicken

Ingredients

  • 8 sprigs flat leaved parsley
  • 1T plus 2t whole black peppercorns
  • Kosher salt
  • 1/4c dried mushrooms (1/4oz), preferably porcini
  • 4 fresh Turkish bay leaves
  • 1 piece of Parmigiano-Reggiano rind (optional but nice)
  • 8 large shallots, peeled
  • 2 large turnips cut into 1 inch wedges (carrots were the original choice…)
  • 2 large leeks, white and light green parts, cut crosswise into 4-inch pieces, halved lengthwise and rinsed
  • 1 large fennel bulb, trimmed and cut through the root into 6 wedges
  • 1 medium celery root, trimmed, peeled and cut into large wedges
  • 1 whole chicken (about 3 1/2 lb) my brand of choice is Bell and Evans
  • 3 large cloves garlic, smashed
  • 1 lemon, halved
Root vegetables are added to the Parmesan porcini enhanced broth.

Directions

  1. Place the parsley sprigs and 1 tablespoon of the peppercorns on a six inch square of cheesecloth. Tie up with string to make a sachet.
  2. Pour 6 quarts of water to a 10-12 quart stockpot. Add the sachet, 2T salt, the dried mushrooms, 2 bay leaves and cheese rind if using.  Cover and bring to a boil over high heat.  Add the shallots, turnips, leeks, fennel and celery root. Return the liquid to a boil. Reduce heat to a simmer, partially cover and let vegetables simmer while you prepare the chicken, 10 to 15 minutes.
  3. Remove the giblets from the chicken (mine didn’t have them!!), rinse them and reserve. Into the chicken cavity place 1t salt, the garlic, the remaining 2t peppercorns, 2 bay leaves, the juice of the lemon and the squeezed lemon halves. Tie the bird’s legs together and tuck the wings behind the neck.
  4. Cut a 30 inch double-layer cheesecloth square and lay it on a work surface. Put the chicken in the center, breast side up. Tie two diagonally opposite corners snugly over the bird with a simple over hand knot. Tie the other corners the same way.
  5. Cut a yard long length of string and thread one end through the cheesecloth topknots. Pull the ends even and tie in a double knot close to the cheesecloth.
  6. Lower the chicken into the broth, being careful to keep the string out of the pot. Loop the free end of the string around a handle of the stockpot so it doesn’t fall into the pot. Add giblets if using. Bring to a boil over high heat, then lower the heat to maintain a gentle simmer.
  7. Cook, uncovered until the chicken is cooked through, an instant read thermometer inserted into the breast will register 158-160F. The chicken will continue to cook after you remove it from the pot, the final temperature will be 165F. Start checking at 45 minutes. If you prefer firmer vegetables, check on them sooner and remove them with a slotted spoon.
  8. Set a deep rimmed baking sheet large enough to hold the chicken near the pot. Transfer the chicken to the baking sheet, letting the excess liquid drain back into the pot. Using a slotted spoon, transfer the vegetables to a bowl and ladle a bit of the broth over them. Cover to keep warm.
  9. Unwrap the bird, remove the string and discard the ingredients from the cavity.  Pour some hot broth over the bird and cover loosely with foil to keep it warm.
  10. Set a fine strainer over a deep pot and strain the broth.
  11. Carve the chicken and serve with the vegetables, moistened with some broth and topped with salsa. Leftover broth can be refrigerated for 5 days or frozen up to 3 months.

DSC_9303a


February 2, 2013 Chicken and Black Bean Soup

DSC_8312a

Last week I made chicken and black bean soup or should I more accurately describe it, cooking by the power of suggestion. Our ladies Bible study group is currently in a series on the book of Nehemiah. The teacher of the series, Kelly Minter is a self described foodie and each chapter of the study ends with a few of her favorite recipes. This past week there was a recipe for her favorite Southwest Chicken Soup. I didn’t want to follow her recipe exactly but a concept was set in my mind and the frigid temperatures we were experiencing definitely called for a satisfying warm soup.

The starting point for a good soup is a good homemade chicken stock and I like to have it on hand for impromptu meals like this one. Not only do you benefit from the richer flavor of homemade but you can control the amount of salt in your recipe.  Another plus is that when your homemade stock has been cooled and refrigerated, the fat separates at the top and can easily be scraped off. Normally when I make stock I simmer the chicken long enough for it to be cooked through. Then I remove the meat from the bones and cook the broth, vegetables and bones a bit longer before straining. But because of Hurricane Sandy and the need to consolidate all of our frozen foods into one freezer, some of my supply of frozen chicken had fallen victim to the dreaded freezer burn.  Not bad, just icy, a little dried out and less than optimal. So I used some boneless and bone in pieces to make this batch of stock. I didn’t waste the chicken, the dogs were quite happy to partake in this batch, supplementing their usual food.

For my soup I used homemade stock, chopped, roasted tomatoes that I froze last summer and a pickled jalapeno from a batch that I canned. I did use canned beans, since the meal was impromptu; I didn’t have time to soak and cook fresh ones. I chose boneless chicken thighs because the dark meat holds up better when reheating a soup, and let’s face it, most soup does get reheated. Good canned chicken broth is a reasonable substitute. I prefer a low sodium version and usually have a few containers of the Pacific brand of both chicken and beef on hand. I seasoned my chicken with Penzey’s adobo seasoning to enhance the flavor profile of the southwest. Substitute a combination of cumin, oregano and cayenne if you don’t have this blend.  A small can of chopped roasted tomatoes could stand in for my garden variety. You get the idea, use what you have. I added the chopped spinach at the end since I knew it didn’t need to cook very long and wanted to give the soup a green vegetable element. We had ours with a salad, maybe a little sour cream top the soup and some crusty bread would also be a welcome addition.

Chicken and Black Bean Soup

Serves 4-6

Ingredients

  • 1 small onion, finely chopped
  • 1T canola oil
  • 3 boneless skinless chicken thighs cut into 1″ pieces
  • 2t Penzey’s adobo seasoning or a combination of cumin, smoked paprika and oregano
  • 1 qt bag roasted tomatoes, chopped or 1 can
  • 1 finely chopped pickled jalapeno (optional)
  • 4-5 c defatted, homemade chicken stock or low fat canned chicken broth
  • 3-4c baby spinach
  • Kosher salt and freshly ground pepper to taste

Directions

  1. Heat chicken stock or broth over medium high heat in a 5 quart Dutch oven until heated through.
  2. In a saute pan, cook  the onion over medium heat until softened but not browned, 3-4 minutes. Set aside.
  3. Sprinkle adobo seasoning over chicken, add to the saute pan and cook, adding a little broth to the pan as needed until slightly browned, 10-12 minutes.
  4. Puree 1/2 c of the black beans in a mini food processor.
  5. Add cooked onion, pureed beans, chopped tomatoes, pickled jalapeno and the rest of the canned beans to the broth. Add cooked chicken and heat through. Add salt and freshly ground pepper to taste.
  6. Soup can be prepared up to 2 hours ahead. Reheat over medium heat. Before serving, add spinach to wilt. Serve in warmed bowls.
DSC_5791b
The first blush on a jalapeno last summer.


November 6, 2012 Crispy Braised Chicken Thighs with Olives, Lemon and Fennel


Our Sunday dinners are often inspired by the recipes in Thomas Keller’s cookbook, Ad Hoc at Home. Ad Hoc is Keller’s casual dining restaurant with menus inspired by the family-style meals that feed his staff. It is a coffee table sized book full of recipes featuring Keller’s home-style recipes and beautiful food photography.  However, this is one book not to leave on your table to collect dust.  Our family has enjoyed his recipes from this book for short ribs, beef stroganoff and roasted chicken with root vegetables to name a few.  Unlike most cookbooks where I pick and choose recipes, this is one that I have read cover to cover. The recipes are well suited for the enterprising home cook and filled with tips and techniques for success from master chef Keller.

Crispy braised chicken thighs with olives, lemon and fennel is an easy satisfying dish.  In this recipe, flavorful bone-in chicken thighs are first browned then braised along with olives, fennel, onion, lemon zest and red pepper flakes.  Keller avoids the usual rubbery chicken skin that can occur with braises by briefly broiling the skin at the end of the cooking time. So you have a winning combination of tender succulent meat and crispy skin. The combination of delicate sweet fennel, salty olives and refreshing lemon take this recipe in a definite Mediterranean direction. The only ingredient you may have difficulty in finding are the Ascolane olives. I actually prefer the juicy briny Ceringolas and have no problem finding them at the Wegmans olive bar. I made one and a half times the recipe to allow for leftovers and take home meals.

Crispy Braised Chicken Thighs with Olives, Lemon, and Fennel

Serves 6

Ingredients

  • 3 fennel bulbs
  • 12 chicken thighs
  • Kosher salt
  • Canola oil
  • 1 cup coarsely chopped onion
  • 1 tablespoon finely chopped garlic
  • 1/4 cup dry white wine, such as Sauvignon Blanc
  • 1 cup Ascolane or other large green olives, such as Cerignola
  • 1/4 teaspoon red pepper flakes
  • 4 fresh or 2 dried bay leaves
  • 4 strips lemon zest – removed with a vegetable peeler
  • 8 thyme sprigs
  • 1 cup lower sodium chicken stock
  • About 1/3 cup flat-leaf parsley leaves

Directions

  1. Cut off fennel stalks. Trim bottom of bulbs and peel back the layers until you reach the core; reserve the core for another use. Discard any bruised layers, and cut the fennel into 2-by-1/2-inch batons. You need 3 cups fennel for this recipe; reserve any remaining fennel for another use.
  2. Preheat oven to 375 degrees. Set a cooling rack on a baking sheet.
  3. Season chicken thighs on both sides with salt. Heat some canola oil in a large ovenproof saute pan or roasting pan that will hold all the thighs in one layer over medium-high heat. Add thighs skin-side down and brown on the skin side, about 4 minutes. Turn thighs over and cook for about 1 minute to sear the meat. Transfer to the cooling rack.
  4. Reduce heat to medium-low, add onion to the pan, and cook for 1 1/2 minutes. Add garlic and cook for 1 minute. Cook, stirring often, until onion is translucent, about 5 minutes. Stir in fennel, turn heat up to medium, and cook, stirring often, until fennel is crisp-tender, about 10 minutes.

  5. Pour in wine and simmer for about 2 minutes to burn off alcohol. Stir in olives, red pepper flakes, bay leaves, lemon zest, and thyme, then pour in chicken stock. Increase heat, bring liquid to a simmer, and cook until fennel is tender, about 1 minute.

  6. Taste the stock and season with salt as needed. Return chicken to the pan skin-side-up, in a single layer. When the liquid returns to a simmer, transfer to the oven and cook for about 20 minutes, until chicken is cooked through.

  7. Turn on the broiler, and put the pan under the broiler for a minute or two to crisp and brown the skin. Remove from oven, and transfer to a serving platter. Garnish with parsley leaves.

    The chicken thighs are first browned then put aside while the vegetables are cooked in the chicken fat.


Saute the vegetables before adding the chicken thighs back in.


A delcious combination of fennel, sweet onion, Ceringola olives and lemon peel are a good compliment to the chicken thighs.

July 26, 2012 Chicken with Eggplant, Tomatoes and Almonds

Chicken with eggplant, tomatoes and almonds is a dish I revisit every summer. It gave me the opportunity to use the last of our frozen roasted tomatoes from summer 2011 with our garden’s first eggplant, a Rosa Bianca. One of the pleasures of gardening is the interesting varieties of vegetables that are available to you. In the past few years some of our newer favorites are from an Italian seed company, Franchi Seeds. We have found several unique varieties of zucchini, candy striped Chiogga beets and Rosa Bianca eggplant to name just a few. The Rosa Bianca is a teardrop shaped Italian heirloom variety of eggplant with rosy lavender skin. It has milky-white flesh that is denser than most eggplant. No need to salt and weight this eggplant to get rid of bitterness. When cooked, it has a delicate creamy flavor. In this dish it cooks down to almost a sauce. Aromatic spices make this a dish that smells as good as it tastes.
This is a good make-ahead meal, keep the chicken and the eggplant separate until finishing the dish. When eggplants are plentiful, I will double up on the amount of eggplant I use in the recipe. A can of drained chickpeas would be a good addition. Serve with Israeli couscous or basmati rice to sop up all the wonderful juices.

Chicken with Eggplant, Tomatoes and Almonds

Adapted from Bon Appetit

Ingredients

  • 3 T olive oil, divided
  • 1 ½ c thinly sliced onions
  • 3 cloves minced garlic
  • 1 ½ t Hungarian sweet paprika
  • 1 ½ t coarse kosher salt
  • ½ t turmeric
  • ½ t ground coriander
  • 1 t fennel seeds, ground
  • 1 t freshly ground pepper
  • ½ t ground cumin
  • ¼ t ground ginger
  • 1 28 oz  canned tomatoes or one quart roasted tomatoes
  • 1 ½T fresh lemon juice
  • 8 bone-in skin-on chicken thighs
  • 1 large eggplant, unpeeled, cut into 1-inch cubes
  • 1 T fresh oregano
  • ¼ c slivered almonds
  • Chopped fresh cilantro

Directions

  1. Pat chicken thighs dry. Season on both sides with salt and pepper.
  2. Heat 1 T olive oil in a large heavy-bottomed Dutch oven over medium-high heat until shimmering, not smoking, add chicken, skin side down, do not crowd. Cook on first side until skin is golden, 4 to 5 minutes. With tongs, flip on other side and cook for an additional 4 minutes. Transfer chicken to a plate and set aside.
  3. Add onions cook until soft, about 6-8  minutes. Add garlic to pot and saute until fragrant, about 30 seconds. Add paprika, salt, turmeric, coriander, fennel, pepper, cumin, and ginger; stir 1 minute. Add tomatoes with their juices and lemon juice, bring to a boil.
  4. Arrange chicken in a single layer in the Dutch oven, spoon some sauce over the chicken. Bring to a boil. Reduce heat to low, simmer until chicken is cooked through, about 40 minutes turning chicken pieces with tongs halfway through cooking, While the chicken is cooking, preheat oven to 400°F. Brush a large rimmed baking sheet with olive oil. Place eggplant and 2 T olive oil in a large bowl. Season with salt and pepper and toss to coat. Spread eggplant out on prepared baking sheet and bake until soft and brown, stirring occasionally, about 25 minutes.
  5. Stir eggplant and oregano into chicken. Simmer uncovered 10 minutes to heat through and blend flavors. Season to taste with more lemon juice, salt and pepper. Transfer chicken to shallow serving bowl. Sprinkle with almonds and cilantro.


Beautiful Rosa Bianca eggplant.

March 24, 2012 Quick Chicken Saute with Asparagus, Peppers and Tomatoes


I can’t wait for the produce to start appearing in the farmer’s markets and in our garden. Until then I will have to make do with what looks reasonable in the supermarkets. Last night’s dinner was inspired by a recipe on the Fine Cooking  magazine website. The original recipe was titled, Quick Chicken Saute with Asparagus, Cherry Tomatoes and Lemon Pan Sauce. A good foundation that I would make some changes to.  Quick sounded good to me, I could have all the elements ready and just wait for Joe to tell me he was on his way home. The recipe called for chicken breast, I chose to use chicken thighs. I have found that chicken thighs are moister in a sauteed dish. I doubled the asparagus, added a julienned yellow pepper and substituted readily available cherub tomatoes for the definitely seasonal cherry tomatoes. Any leftover vegetables, and there were not many, could be added to the next morning’s omelet or runny egg dish. The dish also called for some minced fresh basil at the end, but I would prefer to wait until it is really in season. I substituted sun dried tomato pesto to amplify the tomato flavor.  The result was a quick, tasty weeknight dinner. The only change I would make next time would be a grating of fresh Parmesan cheese to the finished dish.

Quick Chicken Saute with Asparagus, Peppers and Tomatoes

Serves two

  • 3 boneless chicken thighs, cut into 3/4 inch chunks
  • Kosher salt and freshly ground pepper
  • 2 T plus 2 t  olive oil
  • 12 small “cherub” tomatoes
  • 12 medium asparagus spears, trimmed and cut on the diagonal into 2″ pieces
  • 1 yellow pepper cut into julienned strips
  • 3 cloves garlic, thinly sliced
  • 1/3 c low sodium chicken broth
  • 3 T fresh lemon juice
  • 2 T unsalted butter, cut into pieces
  • 1 T  sun dried tomato pesto
  • Fresh Parmesan cheese to grate over the dish
  1. Season chicken with salt and pepper. Heat 1 T oil in a medium saute pan over medium high heat. Add the tomatoes, pepper and asparagus and cook, stirring occasionally, until the tomatoes have softened, and asparagus and pepper are golden brown around the edges, 2 to 3 minutes. Transfer to a medium bowl and keep warm.
  2. Heat the remaining tablespoon of oil in the pan and add the chicken. Cook, turning occasionally, until the chicken is golden brown, about 5 minutes. Add chicken to the vegetables.
  3. Reduce heat to medium and heat remaining 2t oil in the pan. Add garlic and cook until golden brown, about 1 minute. Add chicken broth and lemon juice and use a wooden spoon to scrape up the browned bits in the pan and blend into the sauce, stir in the sun dried tomato pesto.  Simmer sauce for three minutes, reduce to medium low and add the butter. Stir in the chicken, vegetables and the juices that remain.  Season with salt and pepper to taste. Grate a little Parmesan over the dish if desired and serve immediately.

Notes-the cherub tomatoes have a tougher skin than cherry tomatoes so they may need to be “coaxed” to burst with the tip of a sharp knife. Other vegetables may be added or substituted, zucchini, mushrooms etc.