A flavorful salad that’s a healthier alternative to mayonnaise based slaws. Crispy cabbage, celery and radishes are combined with sweet Sungold tomatoes in this very easy to make dish. Why is it considered Puerto Rican? Couldn’t find a definitive answer for that, but the addition of some sliced hearts of palm would give it a real Caribbean flair. Serve with a grilled steak or roast chicken, the leftovers keep for several days, that is, if you can keep it that long.
Puerto Rican Coleslaw
Makes about six servings
Ingredients
6-8 c finely chopped green cabbage
1 c diced small tomatoes
½ c chopped celery, if the stalks are large, cut in half lengthwise first
1/2c chopped celery leaves
6-7 radishes, cut root and stem off first, then cut into half moon slices
¼ c sliced green onion
2 T apple cider vinegar
1 t fresh lime juice
½ t kosher salt, or more to taste
¼ to 1/2t hot pepper sauce, I used sriracha sauce
3T grapeseed or canola oil
Directions
Chop up the cabbage, tomatoes and celery leaves, and slice celery, radishes and green onions, and toss into a large bowl. You can make this part ahead, place it in a container with a lid and pop it in the fridge until you’re ready to make the salad.
In a small bowl, whisk together apple cider vinegar, lime juice, salt, hot sauce and oil. Taste to see if you want to add more hot sauce.
Toss salad with the dressing. You can make this salad ahead and store it in the fridge for a few hours before you’re ready to serve.
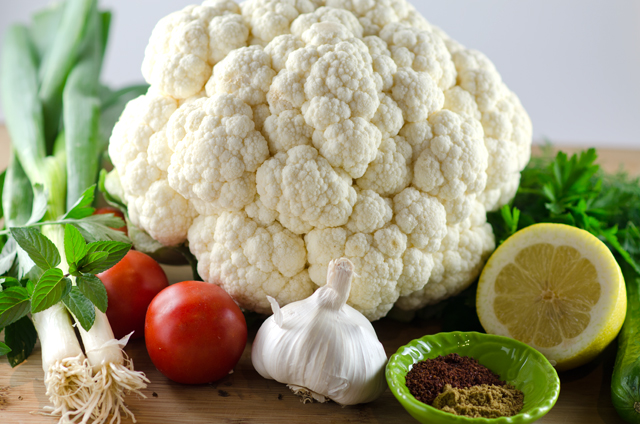
“Gifted” with another box of Brassicas this week, I was looking for a way to use cauliflower in a fall salad. A new cookbook, Bar Tartine : Techniques and Recipes, gave me the salad I was looking for.
Opened in 2005, Bar Tartine, located in the Mission District of San Francisco is an offshoot of the highly praised San Francisco bakery, Tartine. In addition to doing their own curing, preserving and in-house fermenting, the food draws influences from countries as diverse as Norway, Japan and Hungary.
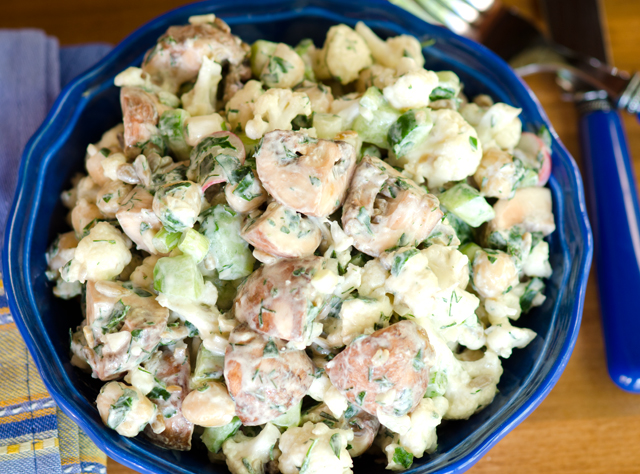
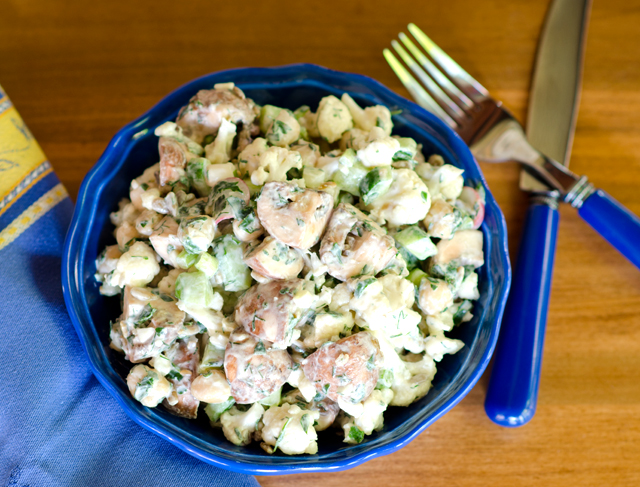
The cauliflower is broken down into tiny florets, save the rest to make cauliflower “mashed potatoes”. In a bowl with the yogurt dressing, combine the florets with cucumbers, chickpeas and mushrooms. Our garden provided me with the radishes and serrano peppers needed for this salad. I was hesitant to use the two serranos as suggested, ours get quite hot so I went with just one. The yogurt dressing tamed the chiles heat quite a bit.
Resist the urge to roast or blanch the cauliflower before adding it to the salad, if you normally dislike it raw. Marinating small florets in the dressing softens them up considerably without making them mushy. The yogurt dressing is especially good and would work well with other salad combinations.
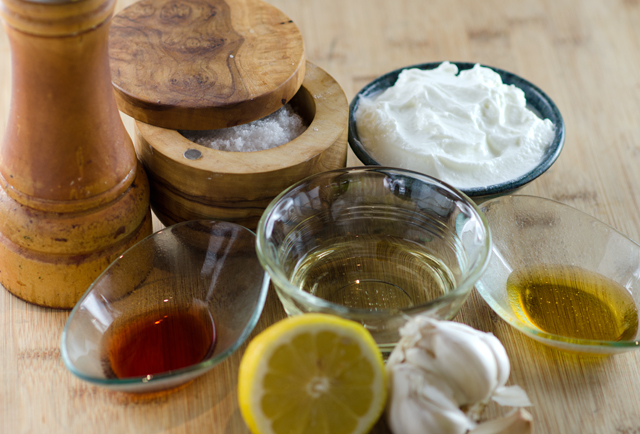
Assembled ingredients for the yogurt dressing.
Bar Tartine Cauliflower Salad
Serves 6
Ingredients
For the dressing
1 c Greek style yogurt, regular or low fat
5T sunflower oil
2 cloves of garlic, minced
2T freshly squeezed lemon juice
1T red wine vinegar
1T honey
1 1/2t fine grain sea salt
Freshly ground black pepper
Directions for the dressing
In a bowl large enough to hold all the salad components, whisk together the yogurt, sunflower oil, garlic, lemon juice, vinegar, honey, salt and pepper to taste. If not using immediately, store dressing in an airtight container. Dressing can be made several days ahead.
Ingredients for the salad
6-8 c cauliflower, trimmed into tiny florets
2 medium cucumbers, peeled, seeded if necessary, cut into small dice
4-5 scallions, cut into 1/4″ rounds
1c cooked chickpeas, fresh is best but rinsed well and drained thoroughy if canned.
8oz mushrooms, button or shiitake, quartered
6-8 radishes, ends trimmed and thinly sliced
1 or 2 green serrano chiles, stemmed, seeded and thinly sliced
1/4c sunflower seeds, lightly toasted
1/4c each chopped fresh flat leafed parsley, dill and tarragon
Directions for the salad
Add the cauliflower, cucumbers, scallions, chickpeas, mushrooms, radishes, chilies, sunflower seeds and herbs to the bowl toss lightly and let stand for 15 minutes.
During this time the vegetables will begin to exude some liquid the cauliflower will soften. Toss again and transfer salad to a bowl. Leftovers should keep for several days, if you can keep them around that long!
Cauliflower is a master of disguises. Toss cauliflower with olive oil, salt, freshly ground pepper and herbs of your choice and roast it. The florets carmelize and develop a nutty quality, reminiscent of popcorn. Because that’s how you will consume it, like popcorn. Or simmer it until very tender, mash it up with milk and butter (or your reasonable substitute of choice) and you have a side as flavorful as any bowl of mashed potatoes.
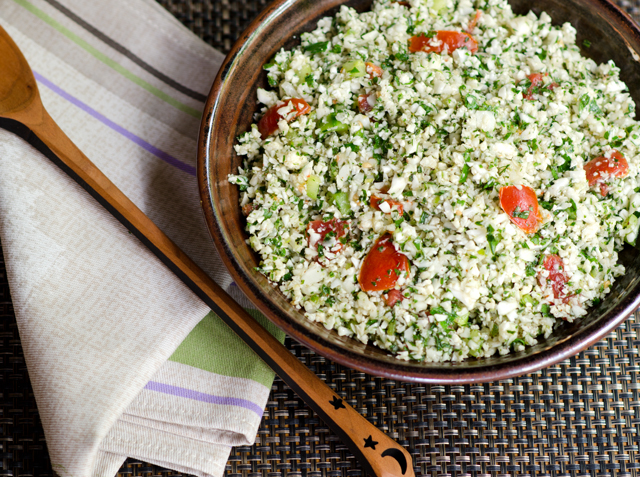
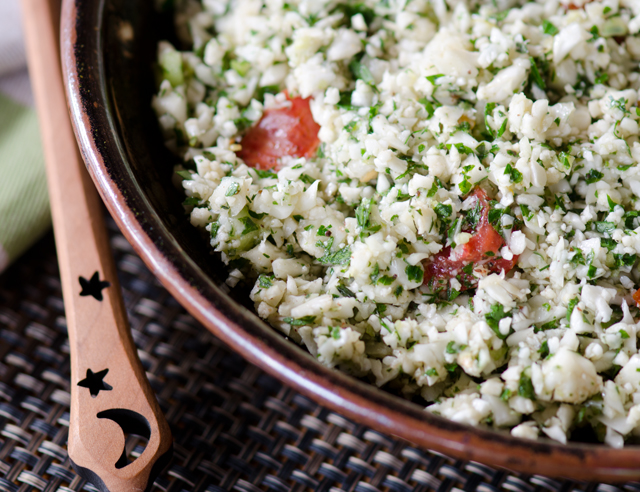
This time cauliflower takes the place of coarsely ground bulgur in a mock tabbouleh. Taboulleh is a Lebanese herb salad with bulgur, as food historian Clifford A. Wright points out in his book, Little Foods of the Mediterranean, not a bulgur salad with herbs. The advantage of using cauliflower is that, unlike bulgur, it will not continue to expand as the dish sits. By the nature of the vegetables in it, the mock tabbouleh will exude more liquid, so be judicious in the amount of dressing you use. If you have any leftover the next day, drain any excess liquid off before serving.
This was an opportunity for me to use a new acquision in my battery of herbs and spices, sumac. Not related to the poisonous variety, it is extracted from the berries of a bush that grows wild in Mediteranean regions. The berries or drupes are ground into a reddish powder that adds an astringent lemony taste to salads or meat dishes. Combined with dried thyme and sesame seeds, it’s also part of a seasoning blend from the Middle East called z’atar.
Other additions to the salad could include chickpeas or some finely chopped bell pepper. For an “authentic” presentation, serve with romaine lettuce leaves to scoop up the tabbouleh. This is a recipe that got a big thumbs up from my hubby, who thought it tasted even better the second day.
Use quick on and off pulses to chop the cauliflower florets finely to resemble medium grain bulgur.
Cauliflower Tabboulleh
Serves 6-8
Ingredients for the Dressing
1T finely grated lemon zest
3T fresh lemon juice
1T red wine vinegar
1/3-1/2c safflower or avocado oil
1/2t ground cumin
1/2t ground sumac
1t kosher salt
1/4t freshly ground black pepper
Directions for the dressing
In a small bowl, whisk together lemon zest, lemon juice,vinegar, oil, cumin, sumac, salt and pepper. Set aside
Ingredients for the tabboulleh
6-8 c cauliflower florets, use the stem part to make cauliflower “mashed potatoes”
1c chopped cucumber, peeled, seeded and chopped into 1/2″ dice
1c chopped tomato
1 1/2c fresh flat leaf parsley leaves, chopped
1/2c dill leaves, chopped
1/4-1/2c mint leaves, chopped
3-4 green onions, thinly sliced
2 cloves finely minced garlic
Directions for the tabboulleh
Chop cauliflower florets in a very fine dice, either with a box grater, by hand or in a food processor with short, quick pulses. Do not overcrowd the processor, you may have to do this in batches. The final product should resemble medium bulgur grains. Transfer the chopped cauliflower to a large bowl. Add the chopped cucumber and tomato.
Add chopped parsley, dill, mint, green onion and garlic to workbowl to chop more finely. Transfer to the bowl with the cauliflower. Gently mix to combine, add dressing and mix again. Taste for seasoning and serve.
My first exposure to Mexican cuisine didn’t occur until I was in college and that was limited to ketchupy salsa and salty tortilla chips. A few years later, I experienced the contrast of good Mexican food produced in a hole in the wall, mom and pop restaurant with a mediocre chain restaurant (remember Chi Chi’s anyone?)
As it was with other foreign cuisines I was unfamiliar with, I gained knowledge of the food by reading cookbooks. The cookbooks of Diana Kennedy and Rick Bayless introduced me to Mexican cuisine that varies from state to state, much the same as it does in the United States. I bought a press and set out to make my own tortillas using a product I never heard of before, masa harina. My well-intentioned attempts were less than perfect for certain but I developed an appreciation for how it was done.
Then, there were the many varieties of peppers, used both fresh and dried I was unfamiliar with, their heat measured on the Scoville scale. Some were hot, like the jalapeno and serrano, others very hot, Habanero and Scotch bonnet, others with only mild heat, like poblanos and pasillas. The herbs, not readily available thirty years ago in markets like cilantro and Mexican oregano, were accessible to us as gardeners. There is always a small patch of cilantro in the garden in the warmer months, and we have a large Mexican oregano plant that Joe dries at the end of the season. We use hot peppers in their fresh, frozen and dried states. It has always surprised me that dried peppers, several years old are still as hot as a fresh one.
This year we have had a bumper crop of peppers, both sweet and hot. The peppers that are supposed to be hot, are hot. We learned last year, after a disappointing crop of rather mild jalapenos, the plants need to be stressed, as in, no special watering or fertilizing to produce hot peppers. I guess there is a life lesson there, but we can leave that for another time.
Another reason for the excellent pepper crop were the plant supports. When a plant starts producing peppers, it can weigh down the plant and many of the peppers touch the ground, making them susceptible to damage from pests and rotting. The delicate pepper plants stand tall with the supports and the peppers have room to grow.
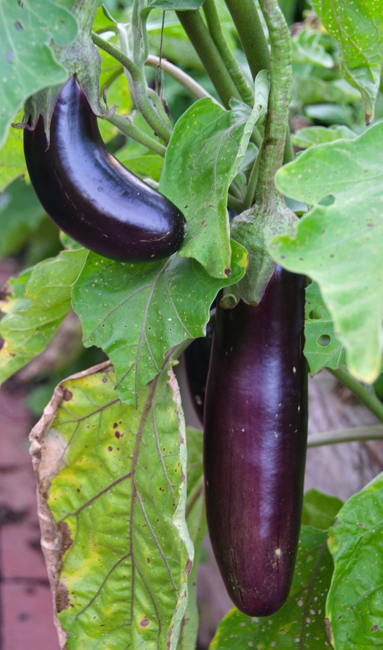
We had the largest crop ever of poblano chiles. Poblanos have a dark green skin and left to ripen further on the vine will turn red. They are somewhat heart-shaped, 3-6 inches long and 2-3 inches wide. Which brings me to another pet peeve of mine. Our seed packet identified the pepper as an ancho and it was in actuality, a poblano. Poblano is the raw or cooked form of the pepper, it is only referred to as an ancho in its dried form. I had enough poblano peppers this season to dry some and to use some fresh.
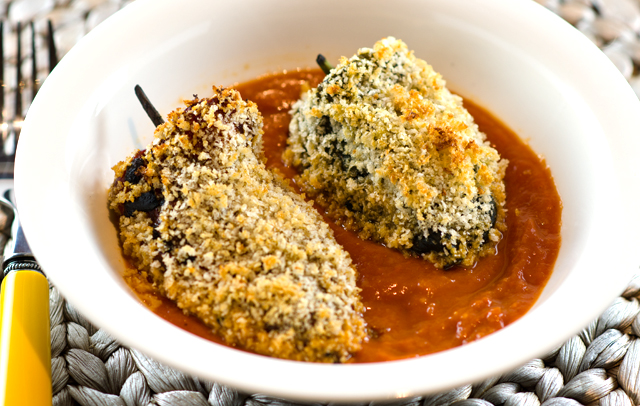
Feeling ambitious, I decided to make my own interpretation of chiles rellenos. I will not lie to you and say this is an easy, quick, weeknight meal. The Mexican version of stuffed peppers, the translation of chiles rellenos, does take considerable time. The peppers were picked, sorted, with the wrinklier ones assigned to the drying pile. The chiles were roasted over the gas flame on the stove over the asador. Once charred on all sides I placed them in a large paper grocery bag to steam the peppers, loosening the skins even further and making them easier to peel. Remove the skin by running your hands down the chile, use a damp towel to remove any skin that won’t easily come off. Once peeled, the pepper is slit on the side so that you can remove the seed sac (Diana Kennedy refers to this as the placenta) and any large ribs.
Now it’s time to fill your peppers. I used about 1/3 to 1/2 cup filling per pepper. Some recipes instruct you to close the peppers up with toothpicks but I found the peeled pepper skin adheres nicely to itself. Most recipes call for dipping the peppers, first in flour, then in an egg and flour batter and fried in hot oil. I wanted to attempt something a bit simpler, so I dipped the peppers in an egg wash and rolled them in panko crumbs and baked them. I served them with an easy sauce of roasted tomatoes, cooked with onion, chipotle chile and some of the adobo sauce that the chipotles are packed in.
Poblano pepper on the vine.
Baked Chiles Rellenos
Make one dozen stuffed chiles
Ingredients
12 Poblano peppers, fresh, red or green with smooth, not wrinkly sides if possible
Directions
For a gas stove, arrange the chiles over a lit burner (you can fit two to three per burner). For an electric stove, arrange all chiles on a foil-lined rimmed baking sheet and position it 4 inches below a hot broiler. As each side blackens and blisters, turn the chiles with tongs until they’re blistered all over.
Immediately put the chiles in a large bowl, cover, and let steam for 15 minutes. Remove the skin with your fingers or a paper towel. (It’s OK if you can’t remove all of it.)
Slit the chiles lengthwise, starting about 1/2 inch from the stem and ending about 1/2 inch from the point. Remove the seed core, being careful not to damage the stem.
Recipe for the filling and finishing the chiles
Ingredients
1/2 c low-fat or regular ricotta cheese
¼ c crumbled feta
½ c shredded jack or cheddar cheese
¾ c well-drained chopped spinach or chard (I used chard)
Kosher salt and freshly ground pepper
1 large egg
1 c panko crumbs (more or less)
Directions for the filling and finishing the chiles
Preheat oven to 425°F. Combine the first four ingredients in a medium bowl. Mix well and season to taste with kosher salt and freshly ground pepper.
Spoon about 1/2 cup of the filling into each chile and then press the cut edges together. (If the chiles tear, press the torn edges together.) Arrange the chiles on a tray or baking sheet.
Whisk egg with 1/2 cup water in bowl. Spread panko crumbs on a small plate.
Dip chiles in egg wash. Coat with breadcrumbs. Place on baking sheet, and bake 20 to 25 minutes, or until golden.
Ingredients for the sauce
½ c finely chopped onion
2 tsp. chili powder
1 tsp. ground cumin
1 28-oz. can whole tomatoes
1 canned chipotle chile in adobo sauce, drained
Directions for sauce
Heat oil in saucepan over medium heat. Add onion, chili powder, and cumin, and cook 4 to 5 minutes, or until onion is soft and spices are fragrant.
Add tomatoes, and simmer 10 minutes, breaking up tomatoes with spatula or wooden spoon. Transfer to blender, add chipotle chile, and blend until sauce is smooth.
Serve chiles rellenos in sauce.
I like to roast pepper on an asador, an open grated grill over the gas flame.
One day last week I received several phone calls and a text message from my husband at his office in a very short period of time. I wasn’t sure what was up since I had just been there, so I had to find out what was so urgent. “Are you near by? he asked, “A patient came in and brought me some of the biggest broccoli, cauliflower and cabbage I’ve ever seen.” I wasn’t, nearby that is, so he planned to bring them home that evening.
When he came in that evening, something was missing, the vegetables. Joe left them in the computer room on his way out and since computer rooms can get a little warm, we promptly hopped back into the car and back to the office to rescue the Brassicas and the computer room from smelling like broccoli, cauliflower and cabbage!
With the advent of autumn and cooler temperatures a new harvest of Brassicas are arriving at local farmers markets.Brassicas are a genus of plant in the mustard family. They are less frequently referred to these days, as cruciferous vegetables, giving note to the crosslike shape of plant’s flowers. The usual suspects we think of most are broccoli, cauliflower and brussels sprouts but they also include all types of radishes, turnips and even watercress. Brassicas are counted as some of the healthiest vegetables around containing high amounts of vitamin A caretonoids, vitamin C, folic acid and fiber.
With these huge veggies staring me down every time I opened the refrigerator door, the obvious question came, how was I going to use them? Cauliflower was an easy start, I like to toss the florets with olive oil, kosher salt and Aleppo and chipotle pepper. Roasted until it was a warm golden brown, we devoured the whole tray, before we even sat down to dinner one night.
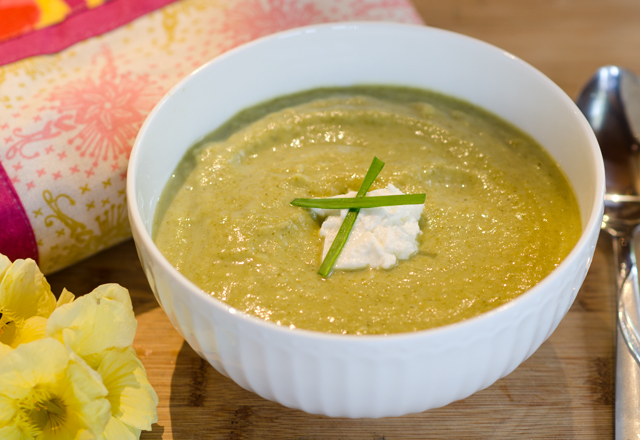
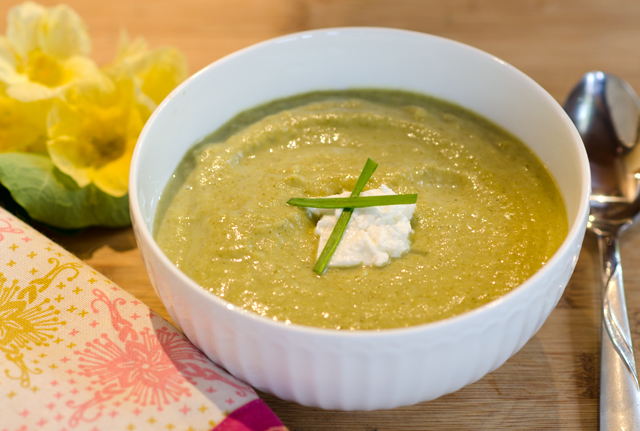
Broccoli soup has always been a cooler weather favorite of ours. Previous recipes I have made were heavy in the cream, butter and cheese department. My rich broccoli cheddar soup was a yearly birthday request from one of my co workers many years ago. This time I wanted to try something a little lighter. The recipe I chose this time showcases the sweet and flavorful broccoli, accented by just a little bit of fresh herbs. Don’t forget to use the broccoli stalks as well, especially when you have very fresh broccoli, they have as much flavor as the florets. Half and half is optional, I thought the soup had a creamy texture without it.
This is a healthy soothing soup that would pair well with a salad for lunch but is elegant enough to serve as a first course when you are entertaining. Now it’s back to the kitchen for me to find creative ways to use cabbage!
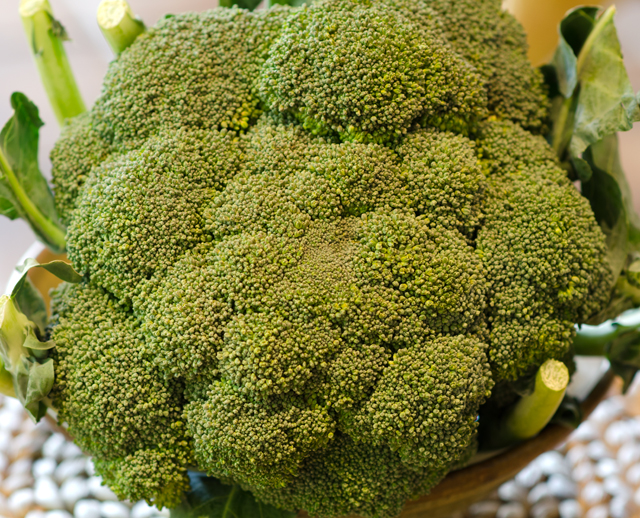
A very healthy head of broccoli.Ingredients, ready to go.
Broccoli Soup
Serves four
Ingredients
1T butter
1T extra virgin olive oil
1 medium onion, chopped
2 cloves garlic, chopped
1 stalk celery chopped
1t each of fresh parsley and thyme
8c chopped broccoli (use both the stems and florets)
6c reduced sodium chicken broth or vegetable broth
1/2c half and half (optional)
Freshly ground pepper and kosher salt to taste
Directions
Heat butter and oil in a Dutch oven over medium high heat until the butter melts. Add onion and celery; cook, stirring occasionally, until softened, 4 to 6 minutes.
Add garlic, thyme and parsley; cook, stirring, until fragrant, about 30 seconds.
Stir in broccoli. Add broth; bring to simmer over high heat and reduce heat to maintain the simmer. Cook until the broccoli is very tender, about 8 minutes.
Puree the soup in batches in a blender until smooth. Season to taste with salt and pepper. Stir in half and half if desired.
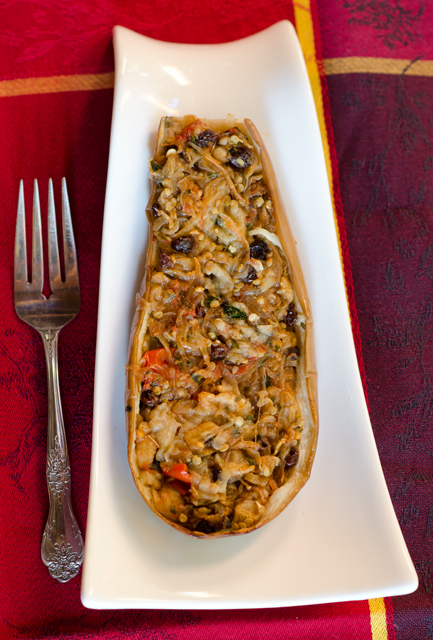
Imam bayildi translates roughly,”the priest fainted”. But why, was it because the eggplant dish was so delicious, did he eat too much at one sitting or was he just in shock at the amount of expensive olive oil used to make it?
One account in Turkish lore tells the story of an imam or priest, well known for his love of good food. One day the Imam announced his engagement to the daughter of a wealthy olive oil merchant. Part of her dowry included huge casks of olive oil, the size of a man, twelve in all. After the couple were married, the new bride proved to be an amazing cook. One dish in particular, eggplant cooked in olive oil, proved to be the imam’s favorite. In fact he requested the exact same dish twelve nights in a row. But the thirteenth night his favorite dish was missing from his evening meal. When asked why she didn’t make it, she told him the enormous supply from her dowry was used up. The news so shocked him that…..the priest fainted.
No matter what the story, Imam bayildi is a very well known Turkish meze, not really an appetizer but comparable to the small plate tapas dishes of Spain. Traditionally the dish is an eggplant cut down the middle, stuffed with garlic, onion, tomatoes and aromatic spices and simmered in olive oil to cover.
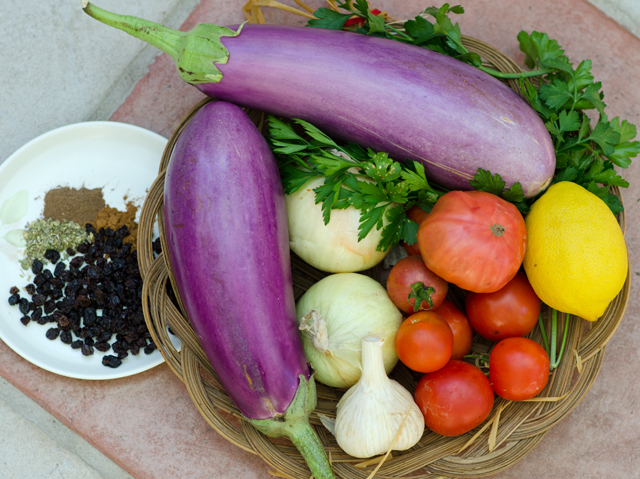
My goal in making this recipe was to cut back on the copious amount of olive oil but still make a flavorful dish. Rather than cook the eggplant whole in olive oil, I cut the eggplants in half, brushed the cut side with olive oil and baked it until the flesh was easy to scoop out. I combined the chopped eggplant with sauteed onion, garlic and tomato and currants. The addition of the aromatic spices, cinnamon and allspice will make your kitchen smell heavenly. I could also see the addition of feta cheese, pine nuts, even ground beef or the more traditional lamb. Serve warm or at room temperature along with a green salad for a delicious luncheon entree.
Imam Bayildi or Baked Stuffed Eggplant to Make a Priest Faint
Serves four
Ingredients
4 medium eggplants
6 T extra virgin olive oil
2 medium onion, very thinly sliced (I used a mandoline)
4 cloves garlic, finely chopped
1 1/4c chopped tomatoes
5T chopped flat leafed parsley
1/2t dried oregano
1/4c currants
1/4t ground allspice
1/4t ground cinnamon
2T fresh lemon juice
Kosher salt and freshly ground pepper
Directions
Preheat oven to 375F. Cut the eggplants in half lengthwise. Cut several lengthwise slits in the eggplant halves. Brush with olive oil and sprinkle lightly with salt. Bake, cut side down for about 1/2hr, until the flesh is soft and easy to scoop out. Keep oven on at same temperature.
While eggplant is cooking, heat 2 tablespoons of olive oil in a large non-stick frying pan. Cook the onions over low heat, stirring occasionally, until very soft, 20 minutes. Add the chopped garlic and cook for an additional 5 minutes. Add the tomatoes, 4 tablespoons of the parsley and the oregano and simmer until almost dry, about another 5 minutes. Add the currants, allspice and cinnamon. Season to taste with salt and pepper. Set this mixture aside.
Scoop out the eggplant flesh with a spoon, leaving the skin and 1/4 inch of the lining intact. Finely chop the pulp and add it to the onion and tomato mixture. Mix well and season with salt and pepper.
Place the eggplant shells in a baking dish just large enough to hold them. Fill them with the tomato onion mixture. Sprinkle with fresh lemon juice. Cover and bake the eggplants for 15 minutes. Uncover and bake an additional 10 minutes.
Serve warm or cool at room temperature.
Ingredients, ready to go!Cut the eggplants in half, brush with olive oil and place cut side down on a parchment lined baking sheet. This variety is an “Italian pink” called Dancer.
The shells are now filled with the eggplant, onion, tomato and aromatic spice mixture and baked.
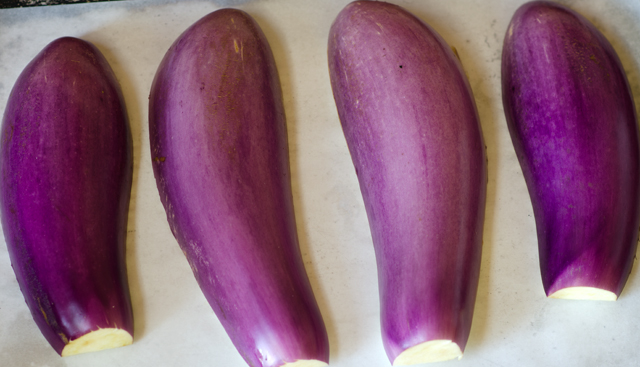
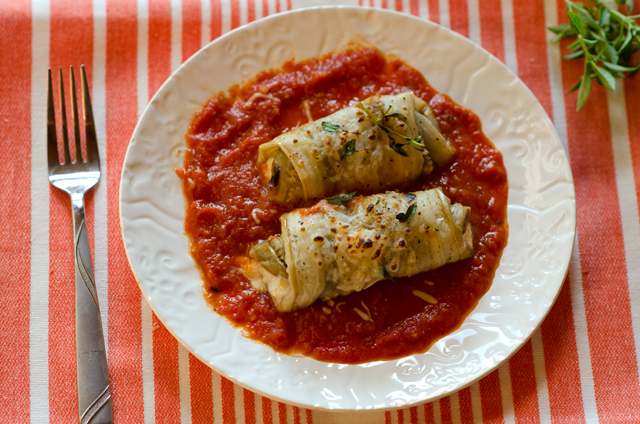
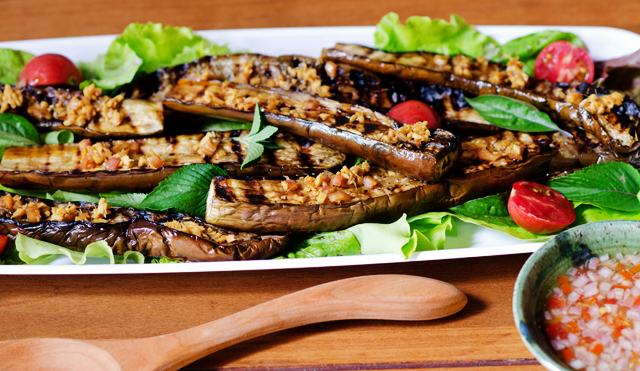
With lots of caponata, grilled eggplant, ratatouille, and a double batch of eggplant parmesan under my belt, I was looking for another way to enjoy the bounty of our eggplants this season. It came in the July/August issue of Cooks Illustrated magazine, eggplant involtini.
After all these years (30+) I still look forward pouring over the latest issues of the cooking magazines I subscribe to. Since the magazines are a little in advance of what is ready to harvest from the garden, I put a yellow sticky note on the seasonal recipes I would like to try. Eggplant involtini was in the July/August issue that arrived in June when our eggplants didn’t even have their first flowers, so I have been waiting several months to try this recipe.
Involtini are neat little bundles of stuffed meat, fish or vegetables. Fillings can be as varied as your imagination. Eggplant works especially well as a wrapper for involtini. Use your largest, broadest eggplants to make the planks. Lop off the stem and hold the eggplant upright. With a very sharp knife, make approximately 1/2″ thick planks. For the first and last pieces you will need to trim off the rounded outer edge. I found that a vegetable peeler handled the problem nicely.
Instead of frying, which is called for in many involtini recipes, the slices are brushed lightly on both sides with olive oil, and seasoned with salt and pepper and baked. This makes the slices pliable enough to roll without falling apart.
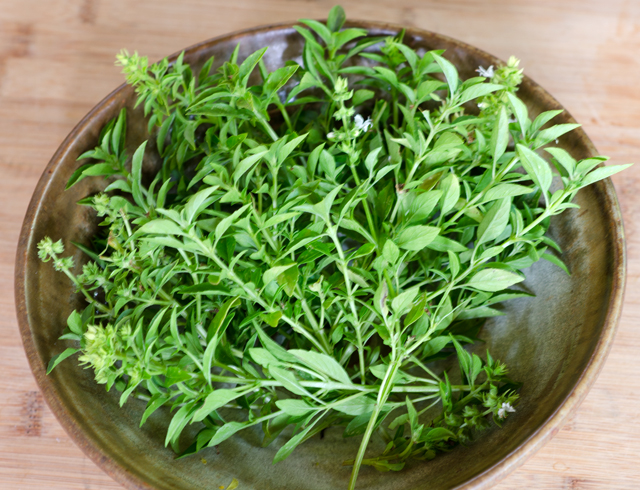
Once the slices have cooled a bit, fill with the fatter edge closest to you and roll up. Ricotta, though it doesn’t have much flavor of it’s own is a good binder for the more flavorful ingredients, pecorino romano and basil. The addition of fresh lemon juice brightens the flavors. A generous tablespoon of filling is enough for each slice. The original recipe called for some bread crumbs in the filling to bind it a little, I didn’t include this step and thought my filling held up nicely.
While you are cooking the eggplant there’s time to make a very basic sauce. Canned whole tomatoes, garlic, oregano, kosher salt and pepper are all you need. I always use my whole roasted tomatoes from the garden that I freeze for months without tomatoes. We had a bumper crop this year so I will be making a lot of chili, lasagna, stuffed peppers over the winter months. As for the canned varieties, in a taste test done by Cooks Illustrated, Muir Glen Organic Whole Tomatoes was the winner. Muir Glen is about a dollar more per can than the more familiar runner up, Hunts.
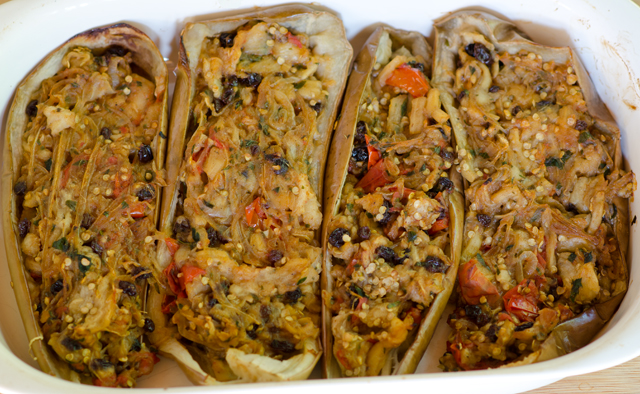
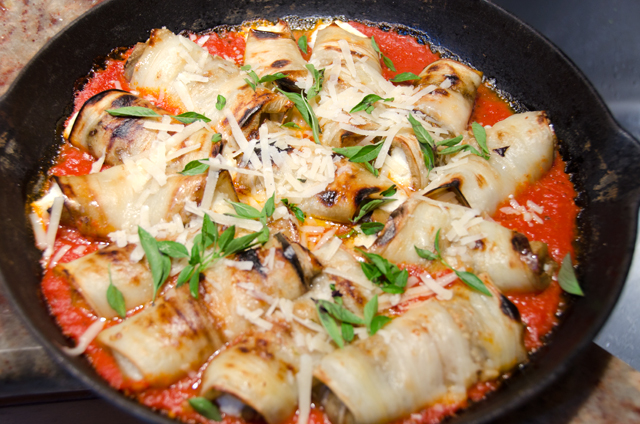
The involtini rolls, are added to the thickened sauce and brought to a simmer. Once the sauce is warmed, additional cheese is sprinkled on top. The rolls are browned and the cheese is melted in the broiler. Finish off with a sprinkle of basil, mini basil leaves worked well here.
Not the quickest or easiest preparation, but both the rolls and the sauce can be made in advance and assembled right before serving. An impressive dish good enough for company.
Eggplant Involtini
Serves 4 to 6
Ingredients
2 large eggplants, shorter wider eggplants are best (1 1/2 pounds each), if skin is thick, peel, I did not peel mine
6T olive oil
Kosher salt and pepper
2 cloves garlic, finely minced
1/4t dried oregano
Pinch red pepper flakes
1 28oz canned whole peeled tomatoes drained with juice reserved, chopped coarse-I used my garden roasted tomatoes
1c whole-milk or part skim ricotta cheese
3/4c hard Italian grating cheese like Gran Padano or Pecorino Romano
1/4c plus 1 tablespoon chopped fresh basil or torn mini basil
1T fresh lemon juice
Directions
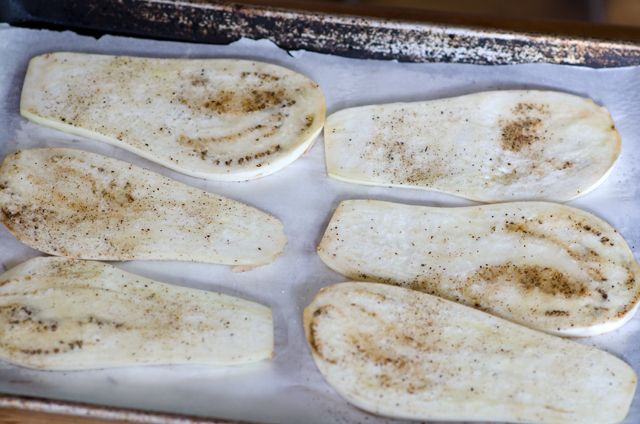
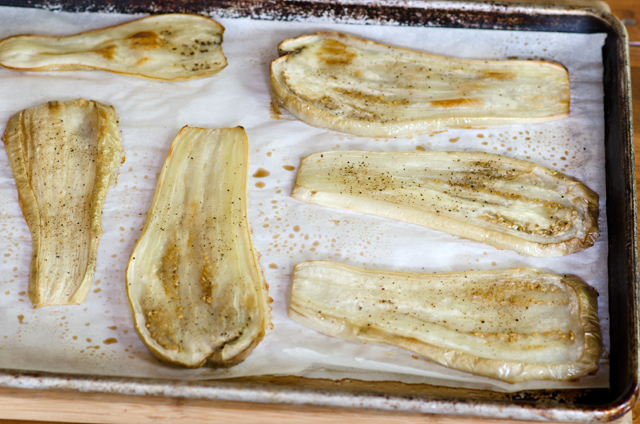
Slice each eggplant lengthwise into 1/2-inch-thick planks (you should have 12 planks). Trim rounded surface from each end piece so it lies flat. I found that using a vegetable peeler made this easier.Adjust 1 oven rack to lower-middle position and second rack 8 inches from broiler element. Heat oven to 375°F.
Line 2 rimmed baking sheets with parchment paper and spray generously with vegetable oil spray.
Arrange eggplant slices in single layer on prepared sheets. Lightly brush 1 side of eggplant slices with oil and sprinkle with kosher salt and pepper. Turn slices over and repeat brushing and seasoning.
Bake until tender and lightly browned, 30 to 35 minutes, switching and rotating sheets halfway through baking. This process took about 10 minutes less in my convection oven. Let cool for 5 minutes. Using thin spatula, flip each slice over. Heat broiler.
While the eggplant is cooking, heat remaining 1 tablespoon oil in 12-inch broiler-safe skillet, over medium-low heat until just shimmering. Add garlic, oregano, pepper flakes, and 1/2 teaspoon salt and cook, stirring occasionally, until fragrant, about 30 seconds.
Stir in tomatoes and their juice. Increase heat to high and bring to simmer. Reduce heat to medium-low and simmer until thickened, about 15 minutes. Cover and set aside.
Stir together ricotta, 1/2 cup cheese, 1/4 cup basil, lemon juice, and 1/2 teaspoon salt in medium bowl.
With widest ends of eggplant slices facing you, evenly distribute ricotta mixture on bottom third of each slice. Gently roll up each eggplant slice and place seam side down in tomato sauce.
Bring sauce to simmer over medium heat. Simmer for 5 minutes. Transfer skillet to oven and broil until eggplant is well browned and cheese is heated through, 5 to 10 minutes. Sprinkle with remaining 1/4 cup Pecorino and let stand for 5 minutes. Sprinkle with remaining 1 tablespoon basil and serve.
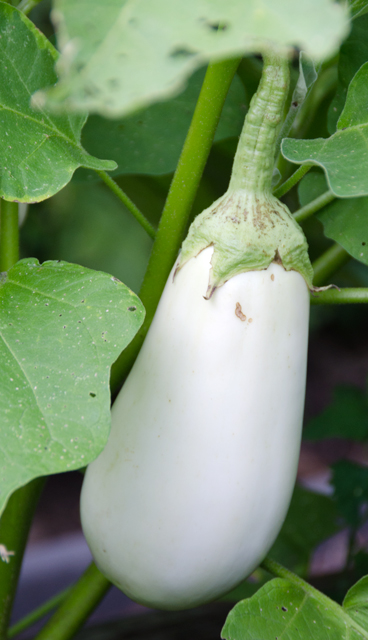
The variety I used for this dish was Clara, a pure white Italian style eggplant.Eggplant slices are brushed with olive oil and seasoned lightly with salt and pepper.After baking the slices are soft enough to roll but don’t fall apart.I used roughly torn mini basil in my filling.The very simple filling made of ricotta cheese, Pecorino Romano, fresh lemon juice and mini basil.The eggplant slices are easy to roll up. Place them seam side down in the warmed sauce.
In our garden we have a selection of 20 varieties of heirloom tomatoes. An heirloom is regarded as something that has been passed down from generation to generation because of it’s value, whether intrinsic or sentimental. Heirloom tomatoes are grown from seed that has been passed from one generation to the next. We usually think of heirlooms as varieties that are over sixty years old, before the introduction of hybrids to the general market. Another term we associate with heirlooms is open pollenated. These are seeds that are pollenated by natural methods, like insects or wind. If you collect the seed of one variety of an heirloom and plant it you should get a plant that should be quite similar to the parent plant.
One of our favorites is the Garden Peach, a native of Peru and according to food historian William Woys Weaver, introduced to the United States in 1862 from France. The Garden Peach has a thin matte yellow skin that is slightly fuzzy. When ripe, Garden Peach has a rosy blush. The fruits are small, 2-4 ounces on average, and quite prolific. Garden Peach tomatoes will never remind you of a peach plucked off the tree but the flavor is light, mild and sweet. This variety is a “keeper”. At the end of the season it stores well on your countertop or in a box.
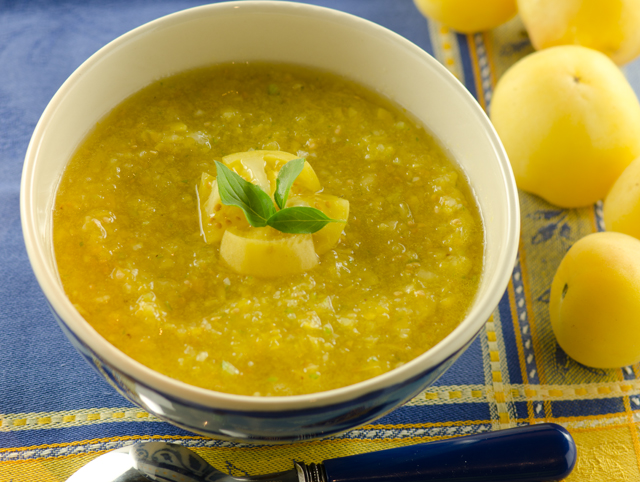
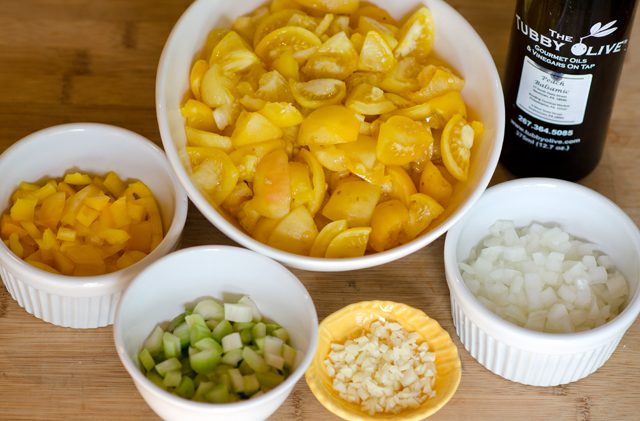
In my never ending quest to use our abundance of tomatoes in new ways, I created a cold Garden Peach soup. Is this a soup or gazpacho? According to Merriam Webster, gazpacho is defined as “a spicy cold soup made with chopped vegetables (such as tomatoes, cucumbers, peppers and onions). So I can also call this a gazpacho. I combined chopped garlic, onion, celery and Garden peach tomatoes in the food processor. To give the soup just a hint of peach flavor I added a few tablespoons of peach white balsamic vinegar from The Tubby Olive. A light refreshing soup perfect for the waning days of summer.
Garden Peach Tomato Gazpacho
Serves four
Ingredients
3/4c medium chopped Vidalia or other sweet onion
1/2c medium chopped celery
1 clove of garlic, finely chopped
3/4c medium yellow pepper, seeded, ribs removed, chopped medium
1 3/4lb Garden Peach tomatoes (about 16)
1t fresh coarsely chopped mini basil leaves
Kosher salt and freshly ground pepper
2T or more to taste, peach balsamic vinegar or white balsamic
Ripe Garden Peach tomatoes have a rosy blush.
Directions
Combine all ingredients in a food processor and pulse on and off until just slightly chunky. Taste and add kosher salt and freshly ground pepper as needed. Add 2-3 tablespoons peach balsamic vinegar, or as to taste.
Place in a covered container and refrigerate 6-8 hours or longer for flavors to meld
Serve soup chilled, garnished with tomato chunks and mini basil leaves.
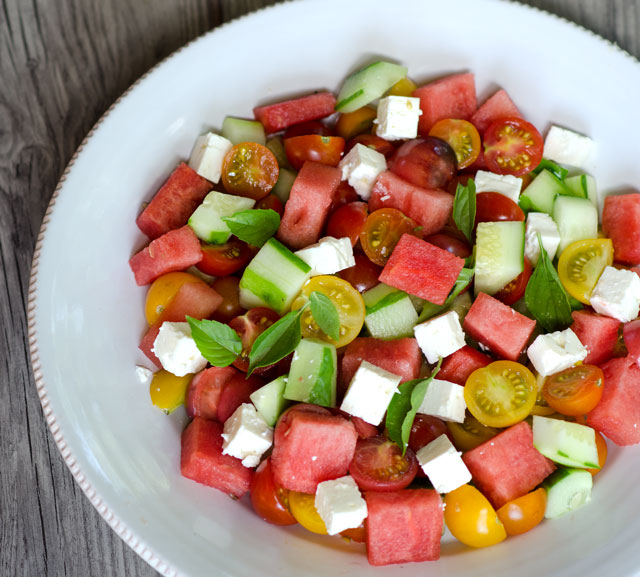
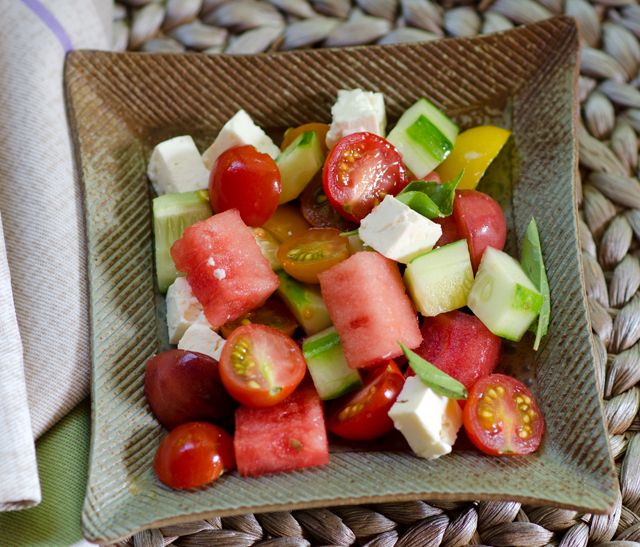
Cool, crisp, quick and delicious, what higher praise could I bestow on a summertime salad? This best-of-summer salad brings together sweet cherry tomatoes, crunchy cucumbers, succulent watermelon and creamy salty feta.
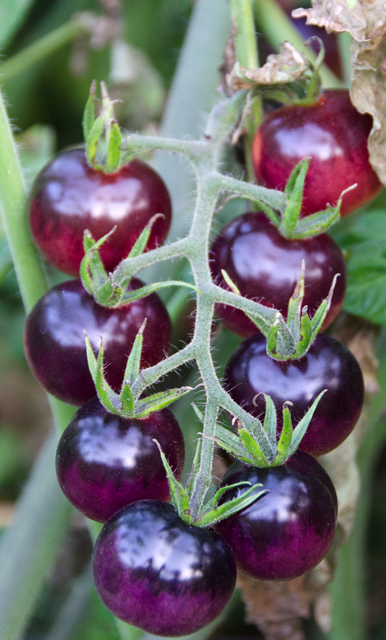
Joe has grown more tomatoes than ever and the varieties are amazing. Indigo Blue Berries, Black Cherry, Pink Bumble Bee, Sungold, to name a few, as beautiful to behold as they are sweet and juicy to devour.
Indigo Blue Berries are a new variety this year. Like the blueberry, Indigo Blue Berry tomatoes contain high levels of anthocyanin, a naturally occuring antioxidant. Pink Bumble Bee tomatoes are a round pink cherry tomato striped with yellow and orange. The Black Cherry tomato is a deep red with a blackish hue. Sungolds are an apricot orange in color with a sweet tropical flavor.
It’s best to cut the tomatoes in half for easier eating. My serrated edge Cutco knife always gives me a neat cut through the tomato skin. I peel most of the skin from the cucumber and leave a strip of skin on for color. Scoop out the seeds if they are too large.
Another member of the cucurbit family, watermelon, brings a refreshing sweetness to the salad. The watermelon you will most likely find anywhere these days will be seedless. Over the past several years it has become increasingly difficult to find seeded watermelons. Only 10% of watermelons grown on farms in 2011 were of the seeded variety, in 2003, almost 37% were.
Seedless watermelons are not genetically modified but are “the watermelon version of the mule.” They are a sterile hybrid achieved by crossing the pollen of the normal diploid (2 sets of chromosomes) watermelon with a female flower that is a tetraploid (4 sets of chromosomes). The genetic change occurs from the use of colchicine, a chemical derived from the fall blooming crocus that impacts chromosomes and has been used for years to treat and cure gout. The resulting seeds from these two plants are triploids (3 sets of chromosomes) and will produce sterile seedless watermelons. The white seeds, also known as “pips” you may find in your seedless watermelons are hollow seed coats that didn’t mature.
Seedless or seeded, which type tastes better? Is it just nostalgia, do we fear the end of the days of watermelon seed spitting contests? If you still want seeds in your watermelon you may find those varieties at your farmers market or you may just need to grow your own.
As someone who always likes to sprinkle a little salt on her watermelon, feta just seems like a natural addition to this flavor combination. Feta brings both a creamy texture and a contrasting saltiness that brings out the flavors of the other elements of this salad. The simplest of dressings and a scattering of fresh basil and you have a great summer salad, colorful and easy to put together, a refreshing addition to any barbecue or cookout.
Pink Bumble Bee is a new addition to our tomato selection this year.The Indigo Blue Berry is definitely blue, when ripe it develops a reddish hue.
Tomato Cucumber and Watermelon Salad
Serves four
Ingredients
2c assorted cherry tomatoes, halved
1 1/2c medium diced seedless watermelon
1 large cucumber, peeled, quartered, seeded if necessary, cut into 3/4″ pieces
3/4c feta cheese, cut into half inch cubes
1/4c fresh mini basil leaves or large leaves torn into small pieces
1T extra virgin olive oil
1T lemon juice
Kosher salt and freshly ground pepper
Directions
Put the cherry tomatoes, watermelon, cucumber, feta and basil in a large bowl.
In a small bowl whisk together the olive oil, lemon juice, 1/4t salt and a 1/4t fresh ground pepper. Drizzle the dressing over the salad and toss gently to coat.
It’s a great time of year to try out some new eggplant recipes. Whether from the farmers market, your local CSA or your own garden, freshly harvested eggplants are at their best. Our garden has produced an amazing array of eggplants this summer. Bright fuchsia Dancer, slender dark violet Orient Express, pure white Clara, beautifully variegated Nubia, all the varieties we have harvested this year have thin skin and minimal seeds.
What we most often consider to be Asian eggplants are the long slim tapered varieties. Actually Asian eggplants, whether Chinese, Japanese, Thai or Indian can be round or pear shaped, pure white or lime green and as small as an egg as well as the dark purple we are most familiar with.
In this Thai-style recipe for a yamor salad, eggplant slices are brushed with oil and grilled. If the weather is inclement or you just don’t have the time to fire up the grill they can be cooked indoors on a ridged grill pan.
Save the seasoning until after the grilling the eggplant. It’s then the creamy flesh will soak up the flavor of the ginger and soy, transforming the once raw bitter slices to something delicious.
Though not necessarily typical of this type of salad, I served the grilled eggplant slices on salad greens. Our lettuces have made their late summer return to the garden and I tossed some assorted greens with a few sweet cherry tomatoes, basil and mint. I used the small spicy leaves of Thai basil and Vietnamese mint that doesn’t overpower the salad. An Asian style vinaigrette combining the traditional combination of hot, sour salty and sweet dresses the greens and enhances the flavor of the grilled eggplant.
Beautiful dark purple Orient Express eggplant.
Grilled Asian Eggplant Salad
Serves four
Ingredients
1/4 c freshly squeezed lime juice
1/4 c peanut or canola oil
3 T finely minced shallot
1 1/2 T fish sauce
2 t granulated sugar
1 to 2 Thai bird chiles, minced, or 1-1/2 to 2 serrano chiles, seeded, minced
Kosher salt and freshly ground black pepper
2 T minced fresh ginger
1-1/2 T soy sauce
1 1/2 lb. long, slender Asian eggplants, trimmed and halved lengthwise
4-5 c baby lettuce leaves
10 to 12 oz. cherry or grape tomatoes, halved (about 2 cups)
1 c packed fresh basil leaves, Thai, if you have it
1/4 c packed fresh mint leaves, I used Vietnamese mint (very mild)
Directions
Prepare a medium-high gas or charcoal grill fire. Alternately heat a grill pan over medium high heat.
In a small bowl, whisk 3 Tbs. of the oil with the lime juice, 2 Tbs. of the shallot, the fish sauce, 1 tsp. of the sugar, and the chiles. Season to taste with salt and pepper.
In another small bowl, combine 2 tsp. water with the ginger, soy sauce, the remaining 1 Tbs. shallot, and 1 tsp. sugar.
Arrange the eggplant halves on a rimmed baking sheet, brush both sides with the remaining 1 Tbs. oil, and sprinkle with salt and pepper. Grill the eggplant, covered, until tender, 3 to 5 minutes per side. Alternately grill the eggplant in a grill pan, 3-5 minutes on each side until tender.
Combine the lettuces, tomatoes, basil, and mint in a large bowl. Re whisk the lime dressing and toss just enough into the salad to lightly coat the greens. Season the salad to taste with salt and pepper. Transfer the salad to a platter and arrange the eggplant over the salad. Spoon the ginger mixture over the eggplant, and serve immediately.
 A flavorful salad that’s a healthier alternative to mayonnaise based slaws. Crispy cabbage, celery and radishes are combined with sweet Sungold tomatoes in this very easy to make dish. Why is it considered Puerto Rican? Couldn’t find a definitive answer for that, but the addition of some sliced hearts of palm would give it a real Caribbean flair. Serve with a grilled steak or roast chicken, the leftovers keep for several days, that is, if you can keep it that long.