For lovers of culturally authentic and delicious food, the dim sum experience in New York City’s Chinatown is not to be missed. After arriving in the heart of Chinatown at what looks like the lobby of a typical office building, we were whisked away by elevator to one of two floors where food is served. We were seated in a spacious, brightly lit banquet room at tables with starched white tablecloths, gold brocade chair covers and red walls .The room, full of hungry diners, were mostly Chinese, but also of every other ethnic persuasion, from toddlers to grandmas. Red velvet walls display dragons and large screen television sets broadcasted news and variety programs from China.
But that’s not what we were there for. We were waiting for the waiters and waitresses who maneuvered their metal carts stacked high with bamboo steamers through the crowd of anxious diners. A photograph and price of each item was on the outside of the cart to avoid any language barrier issues. Not that there was one at our table, our good friend is from China and fills our table with a diverse offering of dim sum, from the unusual, chicken feet and jellyfish (yes I have tried them both) to the very popular char siu buns. I enjoyed the buns so much that I decided to add them to our Chinese New Year menu several years ago.
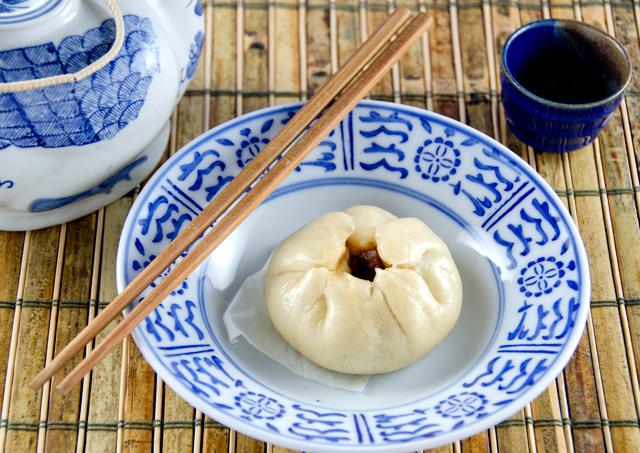
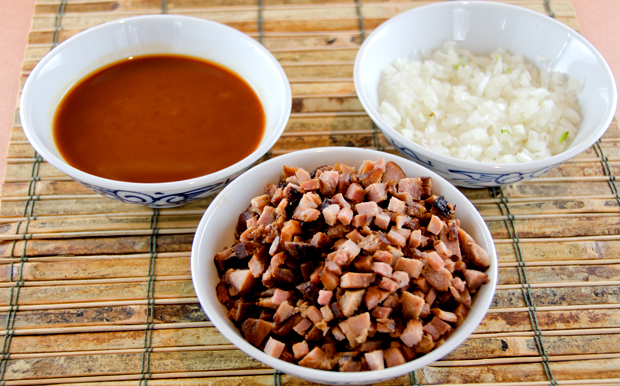
Char siu bao (buns) are a Cantonese dim sum favorite. They can be either baked or steamed and can have a variety of fillings ranging from savory, like vegetables, tofu, chicken or pork to sweet like sweetened red or mung bean paste. The buns in this recipe are filled with barbecued pork (char siu) and encased in a pillowy soft, slightly sweetened dough. Only a cup and half of the char siu I wrote about in a previous post is needed for this recipe. If you make that recipe, the additional pork can be used in stir fries, dumplings and noodle dishes. The finely chopped pork is added to what I would call a Chinese barbecue sauce. It is best to refrigerate the filling overnight to enhance the flavors and make the filling easier to work with.
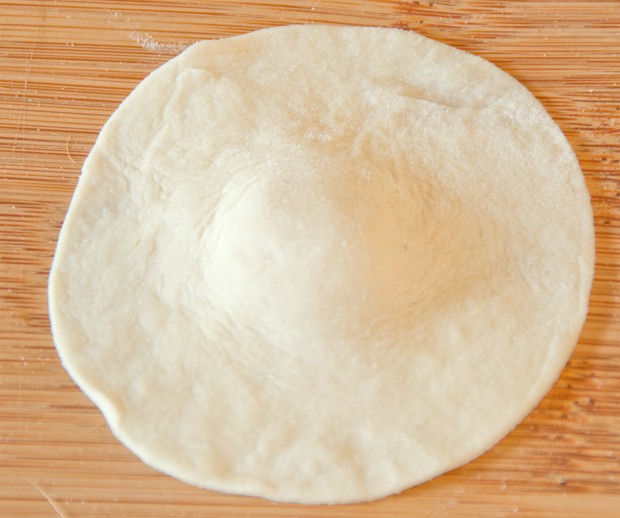
Some recipes for the buns just use baking powder as a leavening agent but I prefer a recipe that uses two leavening agents, baking powder and yeast. The dough is easier to stretch and manipulate which results in a more attractive finished product. The dough is shaped into a 12 inch roll and in this case, cut into sixteen pieces. For mini buns, cut into 32 pieces, or 12 pieces for large buns. The pieces are rolled into a ball and then flattened into a disk. A small wooden dowel is used to roll out the dough circles. When I first attempted rolling out the dough in years past I used a conventional rolling pin with not always the best results. Last year Joe made me my own small dowel rolling pin and it makes the dough much easier to work with. Your dough round should have a plump “belly button” in the center. That means you roll toward but not fully into the center of the dough, turning the dough after each roll of the pin, totally avoiding the center of the round. The thinner outer edges are easier to pleat and the belly stretches over and protects the filling.
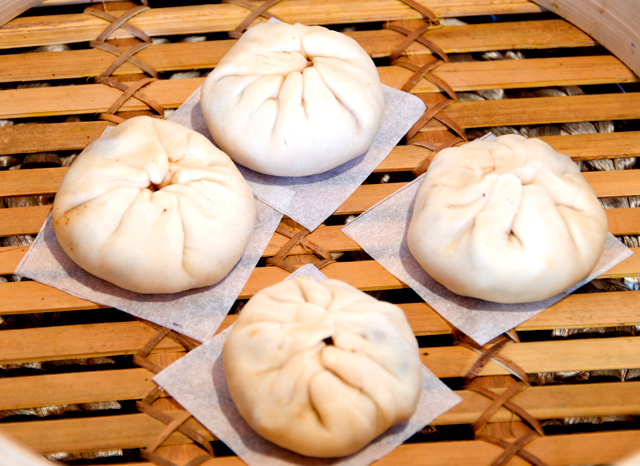
After the dough rises, the buns can either be baked or steamed. When I first made buns I gravitated to the baked variety. I thought the browned exterior the oven gave them a real “finished” look. I have learned to love the steamed buns over the years, no color change, but puffy and just as tasty. The steps of the recipe can be executed over the course of several days. Finished buns can be frozen for about a month. Take as many as needed out of the freezer and revive in a bamboo steamer.
Char Siu Bao
Fine Cooking #109
F
For the filling
- 1/2 c lower-salt chicken broth
- 2 T oyster sauce
- 2 T. ketchup
- 5 t granulated sugar
- 4 t cornstarch
- 1 T dark soy sauce
- Kosher salt and freshly ground white pepper
- 1 1/2 c Chinese barbecued pork, cut into small pieces
- 2 Tbs. peanut oil
- 1 small yellow onion, cut into 1/4-inch dice (1/2 cup)
- 1 Tbs. Shaoxing (Chinese rice wine)
- 1-1/2 tsp. Asian sesame oil
Directions for the filling
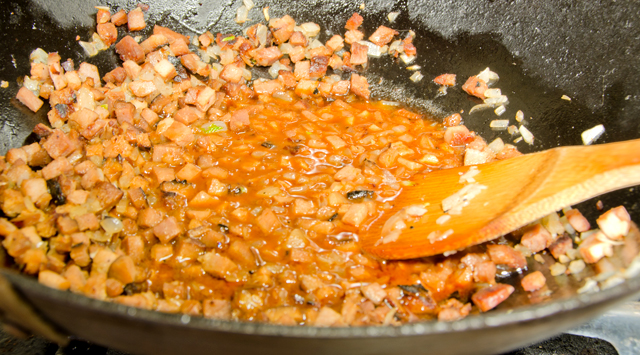
- In a medium bowl, stir or whisk the broth, oyster sauce, ketchup, sugar, cornstarch, soy sauce, 1/2 tsp. salt, and a pinch of pepper. Finely dice enough of the barbecued roast pork to yield 1-1/2 cups (about 6 oz.). Heat a wok over high heat for 30 seconds. Add the peanut oil and swirl to coat. When a wisp of white smoke appears, in about 30 seconds, add the onion. Reduce the heat to medium low and cook, stirring often, until golden-brown, about 6 minutes.
- Add the pork, increase the heat to high, and stir-fry to combine, 2 to 3 minutes. Drizzle the wine from the edge of the wok into the pork mixture and stir well. Reduce the heat to medium.
- Make a well in the center of the mixture and pour in the sauce. Stir until the mixture thickens, about 3 minutes. Add the sesame oil and mix well. Refrigerate until cool, preferably overnight.

For the dumplings
Adapted from Asian Dumplings
Makes enough for 12 large, 16 medium or 32 small buns
Ingredients
- 1 1/2 t instant dry yeast
- 3/4 c lukewarm water
- 2T canola oil
- 2T sugar
- 2 t baking powder
- Scant 3 cups (12 1/2 ounces) flour
- To make the dough in a food processor: Combine the sugar, instant yeast, baking powder and flour in the bowl of the food processor. Pulse two or three times to combine. With the motor on, pour in the lukewarm water and canola oil through the feed tube in a steady stream and allow the machine to continue running until the dough starts coming together into a ball, about 20 seconds. Add more lukewarm water as needed by the teaspoon if that doesn’t occur. Let the machine continue for only 45 to 60 seconds to knead most of the dough into a large ball that cleans the sides of the bowl; a little may be left behind. The finished dough should feel somewhat soft but not sticky.
- Place the dough in a clean oiled bowl. Cover with plastic wrap and place in a warm draft-free place to rise for about 45 minutes or until almost doubled. Alternately, let the dough rise overnight in the refrigerator. Return the dough to room temperature before using.
Form and fill the buns
- Yeast dough from the previous step
- 1 1/2c char siu bun filling from first step
- Pat the dough into a disc on a lightly floured surface. Cut the disk in half and wrap half with plastic to prevent the dough from drying out while you work with the other half.
- Roll the dough into a 12″ log. Cut the log in half, then cut into 8 pieces for medium, 16 for small. Roll each piece into a ball, then flatten into a 1/4 inch thick disk. A small wooden dowel is best for this step. The rim should be thinner than the center; keeping a one inch wide belly in the center to ensure consistent thickness. Lay the finished circle on a tray, lightly dusting the bottom with flour to prevent the rounds from sticking.
- Cut parchment paper into 2 1/2 or 3-inch squares (for small or medium buns, respectively) before you begin to assemble the buns.
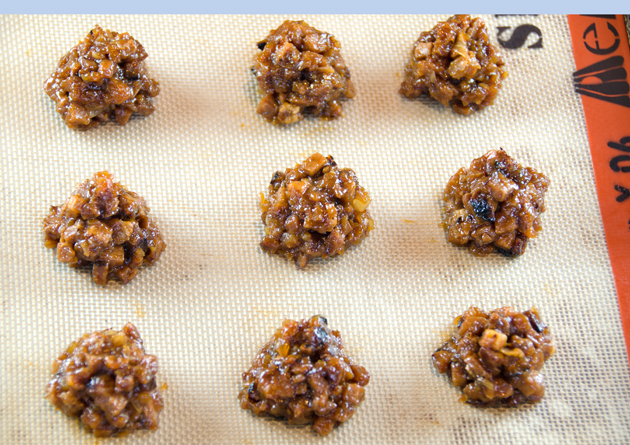
- Hold a dough circle in your hand, spoon filling in the center of the circle, leaving enough dough clear on the sides to pull up on . I like to pre-portion the filling to ensure a uniform amount in each bun.
- Bring the sides of the dough up while depressing the filling, pinching the dough as it reaches the top. Finally, twist the top to fully seal the bun.
- Place the buns on the parchment squares and place in a warm draft-free again to rise until doubled in size, about 45 minutes.
- The buns are ready now to steam, 12 minutes for small, 15 for medium. A finished bun will look puffy and dry. Serve warm.
- Leftover buns can be refrigerated for up to a week or frozen for up to a month. Revive cooked buns by steaming them for 5 to 8 minutes