June 18, 2014 Spinach and Mushroom Crustless Quiche

DSC_7849a
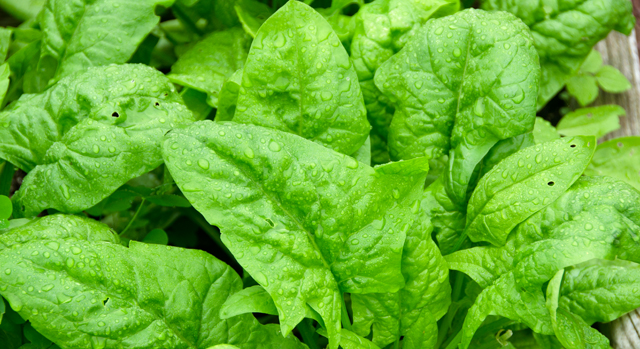
As the old song goes “see you in September”. It was time to say good bye to the spinach in our garden. Spinach does not like warm weather and temperatures have soared into the 90+ vicinity the last several days. So before it all bolted or went to seed I picked the remaining spinach.Then the plants could be pulled out of the ground and the space could be used to plant something else.
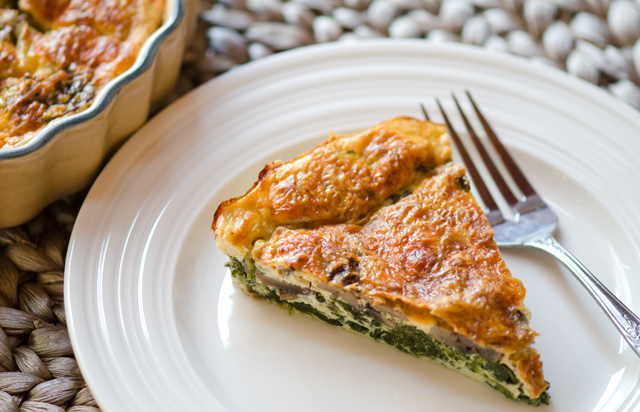
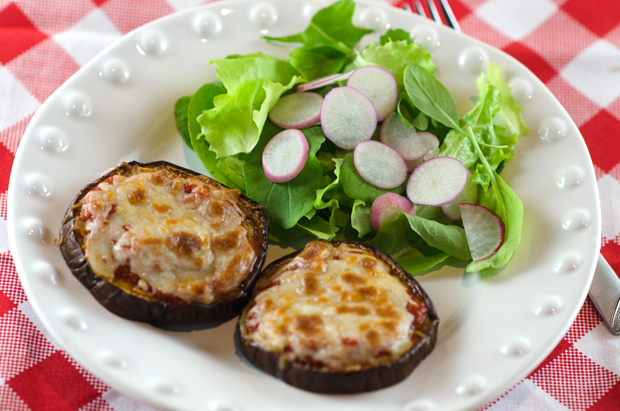
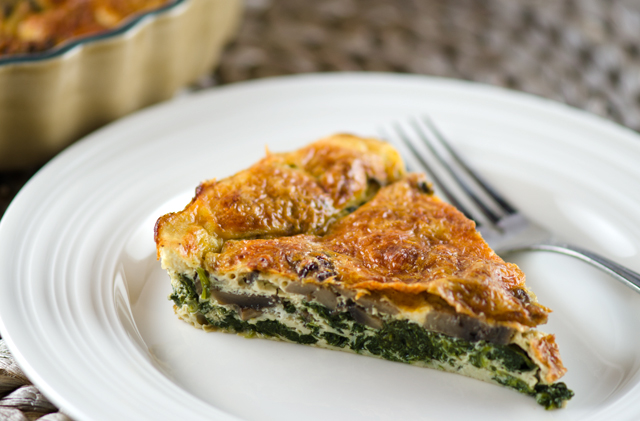
Most of the time we enjoy fresh garden spinach with dinner just sautéed with a little olive oil and garlic. It cooks down so quickly that a large bowl full of uncooked spinach soon becomes a very small plate of cooked spinach.  I decided for the last hurrah to make a crustless spinach and mushroom quiche. It would make a nice light lunch and breakfast for the next day.

A quiche essentially is a savory custard that is baked in a piecrust. A custard mixture is a liquid, usually milk or cream and combined with eggs and baked until it sets. I used fresh spinach but frozen spinach or bagged spinach would work as well. Just remember to squeeze out all the water or the custard will be too wet. Eliminating the crust saves time and calories too. Spinach and feta are a natural combination, but any cheese with good melting qualities will work, mozzerella, cheddar and parmesan to name a few.

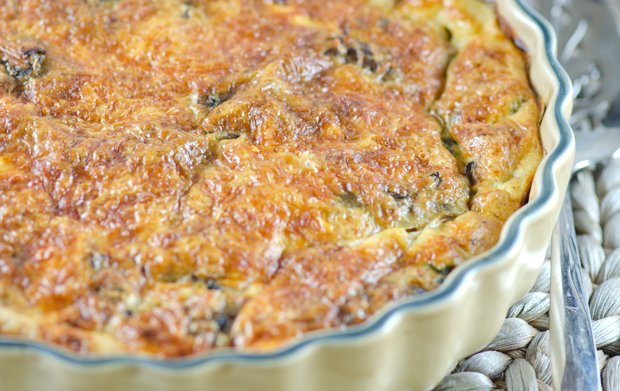
A minor disaster occurred about fifteen minutes into baking my quiche, the power went out. We weren’t having a storm or bad weather at all, it just went out long enough (five minutes) that I had to reset all the clocks in the house and the oven, though still warm, had to be brought back to temperature. I didn’t take the quiche out of the oven, I just adjusted my baking time to make certain the custard was cooked. The top was a little too brown but still tasted good.
A delicious way to say good bye for the summer!

DSC_7839a

Spinach and Mushroom Crustless Quiche

Serves six

Ingredients

  • I cup of fresh sliced mushrooms (white, cremini etc.)
  • 8 cups of fresh spinach or 1 box frozen chopped spinach
  • 1T olive oil
  • 1t chopped garlic
  • 4 large eggs
  • 1 cup of milk, cream or half and half
  • 1/2c feta cheese, crumbled
  • 1/3c grated parmesan cheese
  • 1/2c shredded mozzarella cheese
  • Kosher salt and freshly ground pepper

Directions

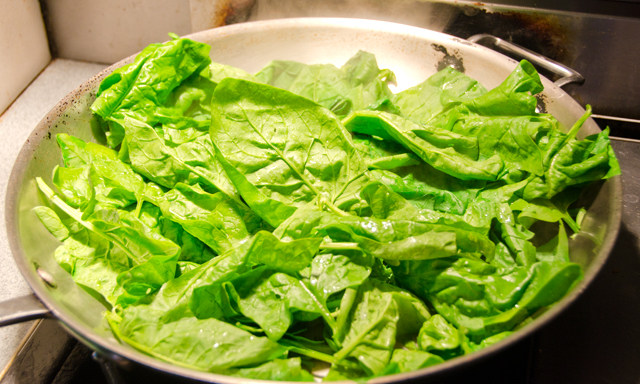
  1. Preheat oven to 350F degrees. If using fresh spinach, cook it down in a large sauté pan and drain in a colander. Squeeze out the rest of the moisture in a clean dish towel. I cooked whole leaves so at this point I chopped it. If using frozen chopped spinach, thaw in microwave and drain well.
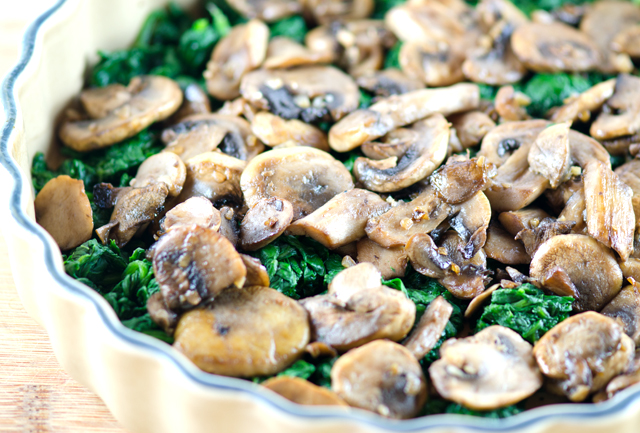
  2. In the same pan, heat the olive oil and add the chopped garlic. Sauté garlic until it starts to brown slightly then add the mushrooms.  Sprinkle a little salt and a grind of pepper over the mushrooms and sauté until they have released all of their moisture and no more water remains on the bottom of the skillet. This should take about five minutes.
  3. Lightly grease or spray with nonstick spray a 9 inch pie pan or quiche dish. Evenly spread the spinach over the dish, scatter the mushrooms over the top, then sprinkle the feta over.
  4. In a medium bowl whisk the eggs. Add the milk, parmesan and a grind of fresh pepper. Pour the liquid over the ingredients in the dish.
  5. Sprinkle the mozzarella cheese over top. Place the dish on a baking sheet, this will make it easier to transfer the dish in and out of the oven.  Place dish in the oven and bake until the quiche is golden brown and a tester comes out clean. This will take between 45 minutes to an hour, starting checking at 45 minutes.
  6. Allow quiche to cool a bit, cut into slices and serve. It’s also good cold!

DSC_7795aDSC_7829aDSC_7833aDSC_7842aDSC_7851a

June 9, 2014 Chicken Paillards with Asparagus, Garlic and Tarragon

DSC_7650aFor an easy weekend supper, nothing comes together quicker than a chicken paillard. A paillard, (pi-YAR) is a  boneless piece of meat, in this case, chicken that has been pounded flat and sauteed or grilled quickly. Actually the term paillard has fallen out of favor in the cooking world and has been replaced with the word escalope (es-kuh-LOHP). In English we would refer to it as a “scallop”, not of the seafood varety of course.

I couldn’t find the word paillard in The Food Lover’s Companion or in James Peterson’s exhaustive work, Glorious French Food. But everyone, from Rachael Ray to Daphne Oz of “The Chew” to Martha Stewart has recipes online for chicken paillards, so it’s worth keeping that definition under your hat.

Remove any tenderloins or extra fat before wrapping the breast in plastic wrap. Then pound out the meat with the flat side of a mallet to an even thickness. Pound from the fattest part of the breast outward to avoid tearing the meat.
Another French term is very important to this recipe, mise en place (MEEZ ahn plahs). Translated, this means “to put in place”. Start by reading the recipe all the way through, then check to see that you have all the ingredients necessary, or at least a reasonable substitute. I chose to use tarragon in this recipe, the original used dill. The tarragon in our garden is starting to fill in nicely and it’s anisey flavor is a natural with chicken dishes. All of the other ingredients should be measured out, prepped and ready to go, garlic sliced, lemon zested and juiced and vegetables cleaned and cut to size. In less than fifteen minutes of cooking time you can have a meal on your table that is easy and elegant.

Tarragon in the garden.

Chicken Paillards with Asparagus, Lemon, Garlic and Tarragon

Serves 4

Ingredients

  • 4 boneless, skinless chicken breast halves, tenders removed
  • 1/3c all purpose flour
  • Kosher salt and freshly ground pepper
  • 1/4c extra virgin olive oil
  • 1/2c lower salt chicken broth or chicken stock
  • 6 medium cloves garlic, thinly sliced
  • 1 large lemon, finely grated to yield 1t zest and squeezed to yield 3T juice
  • 1 lb. asparagus, trimmed and cut into 2-inch pieces
  • 1 medium orange or yellow pepper cut into 2-inch strips
  • 2T chopped fresh tarragon
  • 2T unsalted butter, cut into 3-4 pieces

Directions

  1. Using the flat side of a meat mallet, pound each chicken breast between 2 sheets of plastic wrap to an even 1/4-1/2 inch thickness
  2. In a shallow bowl, combine the flour, 2t salt and 1t pepper.
  3. Heat 2T oil in a 12-inch skillet over medium-high heat. Dredge 2 paillards in the flour, shaking off any excess, and place in the skillet. Cook, flipping once, until lightly browned, about 4 minutes total. Transfer chicken to a plate and keep warm. Repeat with the remaining oil and paillards
  4. Add the garlic to the skillet and cook over medium high heat, stirring occasionally, for about a minute. Add the chicken broth and lemon zest, scraping up any browned bits from the skillet. Add the asparagus, pepper, chicken and any accumulated juices. Nestle the chicken pieces into the liquid. Bring to a boil, turn down the heat to maintain a simmer. Cover and cook until the chicken is cooked through and the vegetables are tender, 5 to 7 minutes. Transfer the chicken to a serving platter or plates.
  5. Remove the skillet from the heat and stir in the lemon juice, tarragon and the butter. Season to taste with salt and pepper. Spoon the vegetable mixture over the chicken and serve.

DSC_7646a

May 8, 2014 Turkey Spinach Meatballs

DSC_6855aNine times out of ten I would be more than likely to skip over a recipe that’s labeled “kid friendly”, especially if that recipe isn’t even in the magazine! But I was in search of a quick, mostly make ahead recipe that would include ground turkey and spinach.

The spinach in question was the last of the pick from seed Joe planted last October. It wintered over quite nicely in the greenhouse, considering the extremely cold and snowy winter we had. These were not the smaller leaves that we would use in salads but larger ones that would be fine incorporated into a stir fry or cooked down for a dish. I wasn’t in the mood for soup or a stir fry. Larb, the Thai dish that uses ground meat wrapped in lettuce leaves (I could substitute spinach..) was a possibility, but I still wasn’t satisfied yet.
Finally I found it, sort of, in the March edition of Bon Appetit, a column called “The Providers” written by bloggers and husband and wife, Jenny Rosenstrach and Andy Ward. It was an article about strategies for feeding a busy family with preplanned homemade meals. No recipe here but a small postscript to find a recipe for turkey and spinach meatballs on Bon Appetit.com.

Okay, I’m “biting” now, meatballs would be a change of pace for us and we haven’t had a meal with pasta in quite a while. Not that you would have to have them with pasta. Rice would work,so would polenta, on a roll or just by themselves. I pulled a few bags of my oven roasted tomatoes out of the freezer for the marinara sauce and I was ready to go.
The spinach in this recipe was the frozen variety, I have no problems with that, I always have some on hand. It’s just that I had fresh that wasn’t going to be fresh for long and wanted to use it up. The next question for me was, how many cups of fresh spinach does it take to make the equivalent of a ten ounce package? Since my frozen chopped spinach of choice these days is Birdseye, I checked the package, nutrition information yes, but nothing regarding the fresh equivalent. I checked the web, the best I could find was that 1.5 lbs of fresh spinach would cook down to the 10 ounces needed. I just trimmed the large stems and cooked all the spinach I had, a crisper bin full. It looked fairly close to 10 ounces, final weight after squeezing out excess liquid, 9.2 ounces, not too bad I would say.
The marinara sauce is very basic, quite similar to what I already make. I substituted 2 quart bags of our roasted tomatoes, drained of excess liquid. That excess liquid is certainly not the prettiest, but a very flavorful tomato juice, a special treat for the chef. Since I cooked whole leaf spinach, I roughly chopped it after it was cooked down and drained it well before adding it to the meat mixture.
After a somewhat messy beginning, I coated my hands with non stick spray before forming the meatballs so the mixture wouldn’t stick to my fingers. Another selling point of this recipe is that the meatballs are broiled in the oven, eliminating the splatter that comes along with stovetop cooking. This is a recipe that can be doubled, work once, eat twice. The writers of the article recommend freezing in single serving batches so they can be thawed as needed. It’s protein and vegetable all in one juicy meatball served with a simple but flavorful tomato sauce, a great weeknight meal.

DSC_6866a

Turkey Spinach Meatballs

from the Bon Appetit website

Makes 20 meatballs, serves 4

Ingredients for Marinara Sauce

  • 1/4 c olive oil
  • 1/2 small onion, chopped
  • 1 clove garlic, finely chopped
  • 1t dried oregano
  • 1/4t crushed red pepper flakes
  • Kosher salt and freshly ground pepper
  • 2T tomato paste
  • 1-28oz can whole peeled tomatoes (I used my own roasted tomatoes)

Directions for Marinara Sauce

  1. Heat oil in medium saucepan over medium heat. Cook onion, stirring often, until soft but not brown, about 5 minutes. Add garlic, oregano and red pepper flakes; season with salt and pepper and cook, stirring, until fragrant, about 1 minute. Add tomato paste and 1 tablespoon water and cook, until tomato paste coats onion and begins to darken, about 3 minutes.
  2. Add tomatoes to saucepan, crushing with a fork or wooden spoon when you add them. Bring to a boil, reduce heat, and gently simmer until slightly thickened, 20-25 minutes; season with salt and pepper. Be sure to stir frequently so the tomatoes don’t stick to the bottom of the pan.

Ingredients for the Meatballs

  • Non stick vegetable oil spray
  • 1 large egg, beaten to blend
  • 1/4 small onion, finely chopped
  • 1 clove garlic, finely chopped
  • 1 1/2 lb. ground turkey
  • 1 10-oz. package frozen chopped spinach, thawed, squeezed to remove excess moisture (I used fresh spinach that I cooked down and chopped)
  • 1/2c finely shredded Parmesan cheese
  • 1/2c plain dried breadcrumbs
  • 2T chopped fresh flat leafed parsley
  • 1t fennel seeds
  • 1t finely grated lemon peel
  • 1t kosher salt
  • 2T olive oil,

Directions for the Meatballs

  1. Preheat broiler. Cover a rimmed baking sheet with foil and coat with nonstick spray
  2. Using your hands or a fork, gently mix egg, onion, garlic, turkey, spinach, Parmesan, breadcrumbs, parsley, fennel seeds, lemon zest and salt in a large bowl until just combined.
  3. Scoop out turkey mixture by the 1/4 cupful and form into balls, you should have about 20. Place on the prepared baking sheet, spacing 2″ apart; brush with oil.
  4. Broil meatball, turning often, until browned all over and cooked through, 15-18 minutes. Add to marinara sauce.
  5. To do ahead: Meatballs with marinara sauce can be made 2 weeks ahead. Let cool completely and freeze individual portions in resealable plastic bags. To cook, reheat gently until meatballs are warmed through and sauce is bubbling, 15-20 minutes.
DSC_6820a
Fresh spinach, cooked down and ready to be chopped.


DSC_6825a
After the broiler, ready to be sauced.

DSC_6871a

March 29, 2014 Roast Pork Tenderloin with Carrot Romesco

DSC_6375aLet’s see, it’s salmon on Monday, leftovers on Tuesday, chicken on Wednesday and pork tenderloin shows up on our dinner menu most Thursdays. Boring you say, well it could be, but I am always on the look out for new ways to season and sauce that low fat and easy to cook cut of  “the other white meat.” Pork tenderloin’s mild flavor lends itself nicely as a canvas for many different cuisines.

The most basic pork tenderloin recipe we enjoy is seasoned with salt and pepper and topped with a honey mustard rosemary glaze that is brushed on right before the end of cooking. We often enjoy it “Thai style” borrowing from a dish that I have enjoyed at a local Thai restaurant for many years, pork tenderloin in a spicy peanut sauce over a bed of watercress. Looking through some of the recent recipes from Bon Appetit, pork tenderloin with a carrot Romesco seemed to be quick and intriguing enough to give a try.

I am quite familiar with Romesco, a Spanish sauce of roasted peppers, tomatoes, garlic and almonds and even wrote about it here. Bon Appetit’s new version combined roasted carrots with garlic and pine nuts, definitely stretching the definition of Romesco. It does mimic the rough texture of the classic sauce, reminiscent of pesto. The roasted carrots bring a body and sweetness to the sauce that nicely compliments the pork.

Resist overcooking the pork tenderloin, nothing is worse than dried out pork.  It should still be somewhat pink in color and will be quite juicy. Remember that because of carry over cooking you should take the tenderloin out of the oven when it is 5 to 10 degrees below your desired temperature. The temperature of the meat will continue to rise after it’s taken out of the oven  I don’t know where Bon Appetit finds their pork tenderloins, I have never encountered one that is a pound and a half. Mine were about 3/4lb each, with two to a package.

My local market had beautiful hydroponically grown upland cress, also known as creasy greens in the south. It is a cousin of watercress with dark green heart shaped leaves with a slightly more peppery pungent flavor. I used mine right away but for longer storage could have submerged the root ball in a small container of water and kept it at room temperature for a week. I think that toasted almonds would be a good substitute for the pine nuts. Aleppo pepper adds another dimension to the sauce with it’s rich fruity heat with just a hint of tartness. Would I make this again? A definite yes. The sauce was easy to assemble and soon the carrots and the spicy greens I will be using will be harvested from our garden.

DSC_6364aDSC_6368a


Roast Pork Tenderloin with Carrot Romesco

Serves four

From Bon Appetit Magazine April 2014

Ingredients

  • 1/4c pine nuts
  • 1 1/2 lbs. small carrots, peeled and halved if larger
  • 5T olive oil, divided
  • Kosher salt and freshly ground pepper
  • 2 medium pork tenderloins, about 3/4lb each
  • 1 small clove garlic, finely chopped
  • 1 tsp. Aleppo pepper
  • 2T red wine vinegar, divided
  • 2 or more cups spicy greens like cresses or baby mustard greens

DSC_6367a

Directions

  1. Preheat oven to 350°F. Toast pine nuts on a rimmed baking sheet, shaking occasionally until nuts are golden brown, 5-6 minutes. Remove from baking sheet and allow nuts to cool.
  2. Increase oven temperature to 450°F. Toss carrots with 1T oil on another baking sheet, season with salt and pepper. Roast, tossing occasionally, until softened and browned, about 15 minutes; let cool slightly.
  3. Pulse pine nuts, garlic and 3T oil in a food processor to a coarse paste. Add Aleppo pepper, one fourth of the carrots, 1T vinegar and 1T water. Process, adding more water as needed to a coarse paste; season romesco with salt, black pepper and more vinegar if desired.
  4. Brush 1T oil in a large ovenproof grill pan over medium high heat. Season pork with salt and pepper and cook until golden brown grill marks appear on all sides, about 8 to 10 minutes. Transfer the skillet to oven and roast pork until a thermometer inserted into the thickest portion registers 135°F.Remove pork from oven and let rest for 5 minutes before slicing.
  5. Toss greens with remaining carrots and 1T vinegar in a large bowl; season with salt and pepper. Serve pork with romesco and salad.

DSC_6387a

January 4, 2014 Swordfish with Tomato, Cucumber and Radish Relish

DSC_4354a

A new year and a time for new beginnings. No more lobster bisque with heavy cream, filet wrapped in bacon with blue cheese. Time to put those tempting chocolate caramels topped with sea salt and every imaginable variation of chocolate truffles away for awhile. It’s time to eat healthy again and lose those few extra holiday pounds. As of January 2nd we have embarked on a healthy eating plan. What it doesn’t mean is deprivation.

We both love fish and swordfish steaks are one of my favorites. Swordfish can weigh as much as 1000 pounds but usually average between 50 and 100 pounds. The “sword” accounts for one third of their length. Due to mismanagement and overfishing the swordfish population was dwindling at the end of the twentieth century. After more than a decade of responsible management, the United States swordfish population is thriving. Now the Monterey Bay Aquarium Sea Watch rates North Atlantic swordfish (harpoon and hand line caught) a “best choice”. They are fished all along the North Atlantic coast, from Newfoundland to coastal Florida, wherever and whenever the water is warm.

There is a consumption advisory for swordfish, due to elevated levels of mercury. From what I have read in the most recent literature the health benefits of swordfish outweigh the detriments for most people. Large ocean fish, like swordfish have higher concentrations of selenium, a trace mineral necessary to all functions of the body. Selenium bonds to the mercury in swordfish and prevents the body from absorbing mercury.

Fish markets buy sections of swordfish called wheels, the thickness of which are measured in knuckles. Each knuckle corresponds to one of the fish’s vertabrae. A wheel is either sliced into steaks or quartered into loins. Swordfish flesh is firm, lean and sweet.

As the title of the book says this recipe is fast, easy and fresh. I call this a relish and not a salsa, I know that salsa means sauce but the secondary connotation is that a salsa will have some heat. This recipe is not hot, though that is an option open to the cook. You could add some avocado, red onion, a little celery, a small fresh chili, the options and combinations are many. When I need raw tomatoes out of season I prefer Campari tomatoes. They are small but have the best flavor of any tomato I have tried. Remember never refrigerate any tomato. They lose flavor and quickly become mealy.

Our swordfish piece was on the thin side so all the cooking it needed was a few minutes on each side in a hot grill pan, you want the center of the steak to remain moist. If you can make it through the snow, grilling would be another cooking option. Refer to my previous swordfish post for cooking a thicker piece of swordfish using the Canadian Fisheries method.

DSC_4363a


Swordfish with Tomato, Fennel, Cucumber, and Radish Relish

Adapted from The Bon Appetit Cookbook: Fast Easy Fresh

Serves 2

  • 2 6-to-7 ounce swordfish steaks
  • 3T olive oil
  • 2 t fresh lemon juice
  • 2 tomatoes or 5 Campari tomatoes, diced
  • 1/2c diced pickling cucumber or English hothouse cucumber
  • 1/2c finely diced fennel
  • 4 medium radishes, diced
  • 3 T chopped fresh cilantro

Directions

  1. Spray grill pan with Pam and preheat grill pan to medium-high heat.
  2. Combine the tomatoes, cucumbers, fennel, radishes and cilantro, 3 tablespoons olive oil, and 2 teaspoons fresh lemon juice in a small bowl. Stir to combine and season with salt and pepper.
  3. Timing is always a function of the thickness of your fish. One inch thickness of fish equals 10 minutes cooking time. Measure first!
  4. Sprinkle fish with salt and pepper and grill over a medium-high heat, our fish took  about 4 minutes per side, rotate fish half way through each cooking time to create a crosshatch pattern.
  5. Serve fish with relish.

DSC_4367a

January 1, 2014 Prime Rib

DSC_4341aA prime rib roast is a welcome centerpiece to the dinner table, a culinary highlight of the holiday season. Improper treatment of that piece of meat will waste your money, produce dry unappetizing meat  and leave you and your guests disappointed. So let’s go over the steps for  the perfect prime rib.

First things first, what makes a prime rib prime? The entire rib section of the animal, ribs six through twelve, is known by butchers as a primal cut. A prime rib roast can consist of anywhere from two to seven ribs. Many butchers will cut the prime rib, also known as a standing rib roast into two cuts. Ribs ten through twelve is the narrower end, also known as the loin end or the first cut. Ribs 6 through 9  is the chuck end or the second cut.

Prime rib does not mean that your roast is USDA prime. In fact, it probably isn’t, most prime meat is reserved for high end restaurants and upscale markets. The prime rib you will find at your supermarket will either be graded choice or select. The higher the grade of meat, the more marbling of fat. As always, fat equals flavor and that tenderizes the meat.

I purchase my bone-in roast with the bones cut off but tied back on the roast. Tying the roast makes for a more attractive presentation and keeps the outer flap of meat from overcooking. Bones off makes for easier carving, but the bones add flavor to the au jus that accompanies the roast. Enjoy the beef spare ribs as a chef’s treat the next day. Figure on about a pound of bone in meat per person if prime rib is your only entree.

Steak houses cook their prime rib low and slow in a 120°F degree oven to achieve consistently rosy meat from the center to the outer edges. Since no household oven I know of has a setting that low, we have been using the method for cooking prime rib from Cooks Illustrated magazine for many years with good results.

Now that you have that roast home, first step, up to four days before you cook the prime rib, liberally season the meat with salt. Let the meat sit uncovered in the refrigerator. Salting ahead allows the salt to penetrate the meat, break down some of the proteins and not just flavor the surface of the meat. The day you plan on cooking your roast, bring your roast out of the refrigerator several hours ahead so that the meat comes to room temperature. Preheat your oven to 200°F, place a rack in the lowest setting, of course you checked your oven ahead to be certain it can hold this large piece of meat.

To achieve the dark caramelized exterior that makes a fabulous prime rib Cooks Illustrated instructs you to sear all the edges of the meat in a pan on the stovetop before putting it in the oven. Effective but a little cumbersome and you dirty an extra pan. We used this method for years until we learned a tip from Thomas Keller in his cookbook, Ad Hoc. He browns the outside of his prime rib with a propane torch, not one of those little torches they sell in kitchen stores for crème brulee (yes I have one) a real propane torch. The torch gives you a way to control the flame and start a beautiful crust. Place the roast on a rack in pan you plan to cook it in.  Sear the meat until the fat begins to render and turn brown, The oven will continue to cook your meat and render the fat. The big torch works great also when you are serving crème brulee as well.

Season your meat with freshly ground pepper and place it in the preheated oven.  We start checking the internal temperature of the meat at the 2 1/2 hour point. Look for an internal temperature of 120°F for rare and 125°F for medium rare. It is very important to have a well calibrated thermometer, we rely on our thermapen instant read for accurate results. Meat cooked at higher temperatures will continue to cook and rise in temperature after they are removed from the oven. Since this recipe calls for cooking your roast at a low temperature, the rise in temperature of your roast when you remove it from the oven will be minimal.

Let your roast rest for about 20 minutes for the juices to redistribute. Transfer the meat and carve, serving with the juices. Have guests who don’t like pink meat? Quickly brown those slices in a sauté pan.

DSC_4318a
Prime rib after being aged in the refrigerator for five days.


Perfect Prime Rib

Recipe adapted from Cooks Illustrated, Nov/Dec 95 and Nov/Dec 11 and Ad Hoc

Serves 6-8

Ingredients

  • 1 (7-pound) first-cut beef standing rib roast (3 bones), meat removed from bones, bones reserved
  • Kosher salt and freshly ground pepper
  • 2 t vegetable oil

DSC_4327a

Instructions

  1.  Using sharp knife, cut slits in surface layer of fat, spaced 1 inch apart, in crosshatch pattern, being careful to cut down to, but not into, meat. Rub 2 tablespoons salt over entire roast and into slits. Place meat back on bones (to save space in refrigerator), transfer to large plate, and refrigerate, uncovered, at least 24 hours and up to 96 hours.

    2. Adjust oven rack to middle position and heat oven to 200 degrees. Heat oil in 12-inch skillet over high heat until just smoking. Sear sides and top of roast (reserving bone) until browned, 6 to 8 minutes total (do not sear side where roast was cut from bone). Alternately, place the roast fat side up on a rack in a roasting pan and sear the meat until the fat begins to render and turn gray. Place meat back on ribs, so bones fit where they were cut, and let cool for 10 minutes; tie meat to bones with 2 lengths of twine between ribs. Transfer roast, fat side up, to wire rack set in rimmed baking sheet and season with pepper. Roast until meat registers 110 degrees, 3 to 4 hours.

    3. Turn off oven; leave roast in oven, insert a temperature probe in the roast at this time and quickly close the oven door, minimalizing heat loss is crucial. Set your probe for about 120 degrees for rare or about 125 degrees for medium-rare, 30 to 75 minutes longer.

    4. Remove roast from oven (leave roast on baking sheet), tent loosely with aluminum foil, and let rest for at least 20 minutes.

    5.  Transfer roast to carving board; cut twine and remove roast from ribs. Slice meat into 3/4-inch-thick slices. Season with coarse salt to taste, and serve.

    DSC_4331a


December 17, 2013 Pork Chili Verde

DSC_4267a
We left the warmth and sunshine of a much needed vacation visiting dear friends in south Florida to return to the frigid temperatures and snow of Bucks County. It’s hard to believe that we are experiencing our third snowfall and winter is still about a week away. Cold temperatures call for warming dishes so chili is always a good choice. I wanted to try something a little different and watching television with mom gave me my inspiration. Guy Fieri, of Food Network and Diners, Drive-Ins and Dives was preparing a pork chili with tomatillos. I froze quite a few bags of tomatillos from our fall harvest and wanted to see what they would add to the flavor of a warm bowl of chili.
Pork shoulder is the meat of choice in this recipe. It is a well marbled cut that benefits from slow cooking and because of it’s higher fat content is less likely to dry out.  Be sure to cook the pork in a single layer and don’t crowd the pan which will yield nicely browned cubes of meat. A crowded pan will result in steamed, not browned pork. Don’t be tempted to turn the pieces too quickly, if they stick, they are not ready to turn yet.A combination of fresh and dried chiles adds to the depth of flavor in the finished dish.
I used both fresh and dried poblano peppers . Fresh poblano peppers are very dark green in color and bring flavor more than overwhelming heat to the dish. Ancho chile is the dried version of the poblano. The heat of the ancho is mild to medium with a sweet smoky flavor reminiscent of raisins or figs. Fresh jalapeno peppers brings just enough heat to the dish. Since every pepper can be a little different, It’s wise to taste just a little bit of your fresh chili peppers before adding them to the dish. It’s always easier to add heat than try to tone it down.
Roasting tomatillos gives the chili a little smokiness along with citrusy kick.  The chili is thickened with masa harina, a dry powder made from corn and used to make corn tortillas. I made this a day before serving it, giving time for the flavors to blend. Leftovers? It would be a delicious filling for a pork taco.
DSC_4258a
Pork Chili Verde
Ingredients
  • 2 dried ancho peppers, stems removed
  • 2 tablespoons canola oil
  • 1 large sweet onion, diced
  • 1 fresh poblano pepper, seeded and diced
  • 1 jalapeno, seeded and minced
  • 3 garlic cloves, minced
  • 1 pounds tomatillos, husks removed
  • 2 1/2 pounds boneless pork butt, trimmed of fat and cut into 1-inch cubes
  • ½ cup white wine
  • 2 tablespoons white vinegar
  • 1 quart low-sodium chicken stock
  • 1 tablespoons dried oregano (I used Mexican oregano)
  • 1 tablespoons ground cumin
  • 1 bay leaf
  • Kosher salt and freshly ground black pepper
  • scant 1/4 cup masa harina
  • 1 lime, juiced
  • Freshly chopped cilantro,
  • For garnish: crispy tortilla strips, shredded cheese, chopped scallions, sour cream
Directions
  1. Begin by rehydrating the ancho chilis. Place them in a bowl with ¾ cup warm water and let sit for 20 minutes.
  2. Place the tomatillos on a sheet tray and place under broiler for 7-8 minutes until lightly charred all over. Set aside to cool, then roughly chop them up.
  3. Tear up the hydrated Ancho peppers into small pieces and reserve the water they were rehydrated in.
  4. In a large Dutch oven, heat the oil, add the onion, ancho, poblano and jalapeno peppers, and garlic. Sauté until translucent but not brown. Remove from pan and set mixture aside.
  5. Season the pork with salt and pepper. Add to Dutch oven and cook over high heat until browned on all sides, about 8 minutes. Add the onion-pepper mixture back to the pan with the pork. Mix thoroughly, then deglaze with the wine and vinegar. Cook the mixture for 5 minutes to reduce, then add the chicken stock, 2 cups water, oregano, cumin, bay leaf, tomatillos, torn ancho, 2 cups water and soaking water.  Season with salt and pepper. Bring to a boil, then lower the heat to a simmer.
  6. Place a lid on the Dutch oven and simmer for 30 minutes. Whisk in the masa harina, which will thicken the chile. Simmer for 30 minutes more, or until sauce is thickened and pork is tender.
  7.  Finish with a squeeze of fresh lime juice. Serve in bowls and garnish with fresh cilantro, crispy tortilla strips, shredded cheese, and chopped scallions.

DSC_4261a

November 17, 2013 Eggplant “Pizzas”

DSC_3935a


Joe’s not so little greenhouse set out in the garden extended our growing season for some vegetables to the latest date ever. When he brought in the last of the peppers and eggplants on Sunday I knew I needed to find a special way to use them to commemorate the end of their growing season. The peppers, for the most part were transformed into one of his favorites, stuffed peppers and for the eggplant I turned to a recipe from Julia Child.

In her 1975 cookbook, From Julia Child’s Kitchen, among personal anecdotes  and recipes for Caesar Salad (yes, Mr. Caesar Cardini actually made this tableside for a young Julia and her family), consommés, stews and apple charlotte is this gem. Tranches d’aubergine a l’italienne might put off the average cook, but eggplant pizzas, now that’s something we can all relate to. The recipe made a second appearance as miniature eggplant pizzas in her 1989 work and one of my favorite go-to cookbooks, The Way to Cook.

The classic pear shaped variety of eggplant like Black Beauty works best here. I began by cutting the eggplants crosswise into 3/4 inch planks, the skin was relatively thin so I left it on.Then I salted the slices on both sides to extract excess liquid. This is a step I would skip in the summer when the eggplants are at their freshest and not very seedy. I let the eggplants sit for about a half hour and started my sauce.

The day before I defrosted two quart bags of my roasted tomatoes, a 28 ounce can of plum tomatoes or a store bought sauce can substitute here. Step one for me is to pour off the liquid that accumulates in the bag, a little lagniappe for the chef. It’s definitely not the prettiest, but it is the best tasting tomato juice you will ever try. I sautéed one finely chopped onion and two chopped cloves of garlic until softened but not brown, about five minutes. Then the tomatoes and the rest of the liquid are added to the pan, breaking up the larger chunks of tomatoes with the back of a wooden spoon. When the tomatoes have cooked down sufficiently, I put them through a food mill to strain out most of the seeds. This results in a smoother sauce.

The eggplant slices are patted dry and lightly brushed with olive oil. I baked the eggplant slices on a wire rack over a baking sheet so that both sides would cook evenly. As Julia says “not so long that the slices become mushy and lose their shape”. After twenty five minutes I removed the baking sheet from the oven and now set the oven to broil. I covered the slices with a generous coating of tomato sauce and sprinkled a combination of mozzarella and grated Parmesan. The “pizzas” are now returned to the oven until the cheese is melted and slightly browned. Julia suggests these as part of a vegetarian combination or arranged around a main event, be it an omelet, a steak or a roast lamb.

Eggplant pizzas would make a good snack or a light lunch with a salad. A recipe that’s vegetarian, low carb and gluten free, as always “Our Lady of the Ladle“, Julia was ahead of her time.


Julia Child’s Eggplant Pizzas

Ingredients

  • 2  large eggplants (about 1 lb. each)
  • 1T salt, for drawing water out of eggplant
  • 2T olive oil for brushing eggplant before roasting
  • 2 t Italian seasoning, for sprinkling on eggplant before roasting
  • 1/3 c freshly grated Parmesan
  • 1/3 c finely grated low-fat mozzarella

Sauce Ingredients

  • 1T olive oil
  • 1 small onion, finely chopped (about 1 cup)
  • 2 large garlic cloves, very finely chopped
  • 1 28 oz. can of plum tomatoes (or use 3 cups peeled and diced fresh tomatoes)
  • 1/2 t Italian seasoning
  • 1/4 t dried oregano

Directions

  1. Cut eggplant into 3/4 inch thick slices. Place eggplant pieces on a double layer of paper towels and sprinkle both sides generously with salt. Let the eggplant sit with the salt on it for about 30 minutes to draw out the liquid. (After the eggplant sits for 15 minutes, turn on the oven to 375°F.
  2. Make the tomato sauce while the eggplant sits. Heat 1 tablespoon of olive oil and sauté the onion and garlic just until it becomes softened and fragrant.   Add the diced tomatoes, Italian seasoning and oregano.
  3. Then let the sauce simmer on low until it’s thickened. Break up tomatoes with a fork while the sauce cooks. (You can add water as needed. Let sauce simmer until ready to put on eggplant slices.)
  4. After 30 minutes, pat the eggplant dry with paper towels. Brush both sides of the eggplant slices lightly with olive oil and sprinkle tops with Italian seasoning. Place eggplant slices on a wire rack over a baking sheet. Roast the eggplant about 25 minutes, but “not so long that the slices become mushy and lose their shape” as Julia says.
  5. While the eggplant roasts, combine Parmesan with mozzarella. After 25 minutes or when eggplant pieces are done, remove eggplant from the oven and turn oven setting to broil. Spread a few tablespoons of sauce on the top of each eggplant slice, sprinkle with thin basil slices and top with cheese blend. Put pizzas under the broiler until the cheese is melted and slightly browned.
DSC_3951a
We are still harvesting salad greens, spinach and arugula from the greenhouse.
DSC_3918a
Cooking down the roasted tomatoes.
DSC_3919a
Putting the cooked tomato sauce through a food mill makes a smoother sauce and eliminates most seeds.
DSC_3911a
Doesn’t look like the stuff in a bottle, but it is the best tasting tomato juice you will find.
DSC_3932a
Served with a simple salad of baby greens and radishes from the garden, eggplant pizzas make a delicious light lunch.


November 12, 2013 Kale, Shellfish and Sausage Soup

DSC_3868a It’s the beginning of November and the garden is still providing inspiration and produce for our menus. The spinach and chard have been harvested but the kale is now at it’s peak. The first kiss of frost sweetens the taste of this vitamin and mineral rich member of the cabbage family. We are currently growing two varieties in the garden. Lacinato kale, which also goes under the names of dinosaur kale, Tuscan kale, black kale or Cavolo Nero and the very distinctive Red Russian. Lacinato, the current “rock star” of the vegetable world has deep green oblong leaves with a pebbly texture. The Red Russian variety has sage green leaves with reddish purple veins. Red Russian has flat fringed leaves that resemble oversized oak leaves.

DSC_3895a
Cavalo Nero or Tuscan kale
DSC_3888a
Red Russian kale

This soup is very loosely based on the national soup of Portugal, caldo verde which translates “green soup”. In it’s simplest form caldo verde is broth or water, onion, thin strips of kale or collard greens and potatoes for thickening. Since this was considered peasant food, small slices of linguica, a Portuguese pork sausage would be added before serving. This soup takes on many variations for us. The base this time was homemade chicken stock but we have made it with a combination of low sodium chicken broth and bottled clam juice. How much kale is up to you, about eight cups of shredded leaves is a good starting point. The leaves need to be separated from the hard kale stems and then cut into thin strips. This will allow the kale to cook quicker. I added littleneck clams and mussels adding another depth of flavor. I wanted a lighter soup this time, so I did not add the traditional potatoes. Chopped tomatoes or cannelini beans would also be flavorful additions to this soup. Sausage like linguica or chorizo would bring another layer of flavor, my sausage was from our local pork producer, Purely Farms. I chose their very delicious cervallata  which features broccoli rabe, aged provolone, fennel and freshly ground black pepper along with the Purely Pork sausage. Joe added a few hot peppers, remove them after cooking or they will permeate the dish.

Is this a soup or a stew? Definitions of both terms abound, I turned to The Food Lovers Companion written by Sharon Tyler Herbst as my final authority. Ms Herbst defines a soup as any combination of vegetables, meat or fish cooked in a liquid. Soup can be thick or thin, smooth or chunky, cold or hot.  A stew is a dish of meat, vegetables and a thick broth resulting from the combination of the stewing liquid and the natural juices of the food being stewed. She also states that the food in a stew is cooked slowly for a long period of time. So a kale, shellfish and sausage soup it is.

DSC_3876a

Kale, Shellfish and Sausage Soup Serves 4-6 Ingredients

  • 1T olive oil
  • 1 lb.  linguica, chorizo, or other spicy sausage, split along the length and sliced 1/2-inch thick
  • 1 onion, diced
  • 3 cloves garlic, minced
  • 8 c (about 1 lb.) kale, preferably Tuscan, stems removed and chopped into thin ribbons
  • 4 cups chicken broth
  • 1 small hot pepper (optional)
  • 2 dozen littleneck clams
  • 2 dozen mussels
  • Kosher salt and freshly ground pepper to taste

Directions

  1. Set a dutch oven or large soup pot over medium-high heat and add the oil. When the oil is hot, add the sausage and sauté until the sausage is golden brown on all sides. Remove the sausage and drain on a paper towel.
  2. Reduce heat to medium and add the onion. Sauté until the onion is translucent then add the garlic and sauté until fragrant, about 30 seconds.
  3. Add the chicken broth, pepper if using and the kale to the pot. Stir to coat everything with chicken broth and then cover the pot with a lid. Stir the kale every three minutes until it is barely tender.
  4. Add the clams and mussels to the pot. Add the sausage and cook until the mussels and clams have opened and the kale is tender. Taste for seasonings and salt.
  5. Serve this soup in individual bowls with  a crusty slice of bread to sop up the broth at the bottom of the bowl.
DSC_3894a
The veins of the Red Russian kale are magenta in color.

DSC_3881a

October 31, 2013 Lobster Mac and Cheese

DSC_3722a

Fall is a season of transition. We still grill outside but our chilly evenings have moved our dining permanently indoors. It’s time to return to the comfort foods of fall. Since lobsters were on sale this week at a local supermarket I wanted to incorporate them into our Sunday dinner. After browsing through some recipes on the Fine Cooking website, I thought the recipe for Lobster Mac and Cheese seemed like a great choice. Who doesn’t love creamy macaroni and cheese and the addition of  lobster would take it over the top.

Lobster is a splurge even when it’s on sale. It’s hard to believe that lobsters were considered peasant food and the fare of slaves and prisoners in the nineteenth century. If you are squeamish about cooking your own lobster, I have found that most markets will steam the lobsters for you at no additional charge. Joe steamed the lobsters for me. He cooked them for a minute less than if we were eating the lobsters on their own, just steamed. The lobster will cook a little more when the mac and cheese bakes and overcooked lobster would defeat the purpose of adding it to the dish in the first place.

I removed the lobster meat from the tails and the claws with assistance from my lobster cracker, trusty Cutco scissors and seafood pick. I kept the pieces on the large side, about 2 inches so that everyone would get good chunks of lobster. The shells went into freezer bags for a future lobster stock.

The sauce for the mac and cheese begins with a roux. A roux is made with equal parts flour and fat, in this case, unsalted butter. Melt the butter over medium heat, when the butter is melted and starts to bubble, add the flour and start whisking. The roux will eventually liquefy in about 3-4 minutes, continue to cook the roux over low heat to eliminate any floury taste. Still whisking, now slowly add the milk to the roux until it comes to a simmer. Now is the time to add the cheeses, nutty Gruyere, Emmenthaler and a sharp Cheddar, spices and salt and freshly ground pepper to taste. I chose smoky Spanish paprika, dry mustard and just a pinch of saffron to compliment the lobster.

My pasta of choice was the traditional elbow macaroni but any small shape that has a lot of nooks and crannies would work well. I made my dish in one large casserole but individual gratin dishes would also be an excellent choice. A crunchy breadcrumb topping gives a nice contrast to the creamy filling underneath. If you have leftovers, the good news is, as with any good mac and cheese dish, it’s even better the next day.

DSC_3779a

Lobster Mac and Cheese

Adapted from Fine Cooking

Ingredients

  • 7T unsalted butter, a little more for the baking dish
  • 1c breadcrumbs, or 2 slices stale white bread
  • Kosher salt and fresh ground pepper
  • 1/3c all purpose flour
  • 4c whole milk
  • 1 1/2c each Gruyere, Emmenthaler and Cheddar cheese
  • 1t dry mustard
  • 1/4 to 1/2t saffron threads
  • 1t Spanish smoked paprika
  • 1lb pasta-I used elbow, choose something small to medium with lots of nooks and crannies
  • 4-1 1/4lb lobsters, steamed, shelled, meat cut into 2-inch pieces
  • 2t finely chopped flat leaf parsley, for garnish

Directions

  1. Heat the oven to 425°F. Lightly butter a 3-quart ovenproof dish and set aside.
  2. If using bread, tear it into 1-inch pieces and pulse them in a food processor until smooth. Melt 2T of the butter in a skillet over medium heat, add the breadcrumbs and swirl to coat with butter. Cook the breadcrumbs until browned, about 2-3 minutes. Season with salt and pepper. Set the crumbs aside.
  3. In a large saucepan, melt the remaining 5T butter over medium heat. When the butter begins to bubble, whisk in the flour and cook, until the mixture begins to liquefy, 3 to 4 minutes. Continue to cook the roux over low heat until it has a toasty smell. Whisk in the milk in a slow steady stream, whisking constantly for 3 minutes. When the sauce comes to a simmer, stir in the cheeses, saffron, dry mustard and smoked paprika; season with salt and pepper to taste. Remove from the heat and cover.
  4. Boil a large pot of water, season with salt, and cook pasta according to package directions. Drain the pasta well and pour it into a very large bowl.
  5. Add the cheese sauce and lobster chunks to the pasta; mix well. Transfer to the prepared dish. Sprinkle the breadcrumb topping evenly over the macaroni mix. Bake uncovered for 20 to 30 minutes, or until golden brown. Let cool for 5 minutes before serving. Garnish with parsley and serve.

DSC_3712aDSC_3714aDSC_3734aDSC_3782a