September 14, 2015 Mixed Beans with Peanuts, Ginger and Lime

DSC_4200a
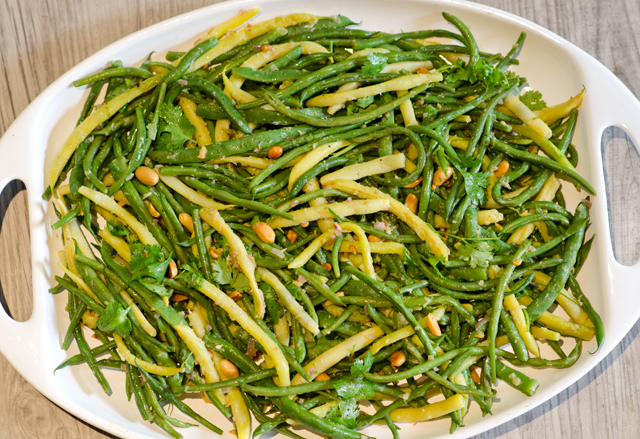
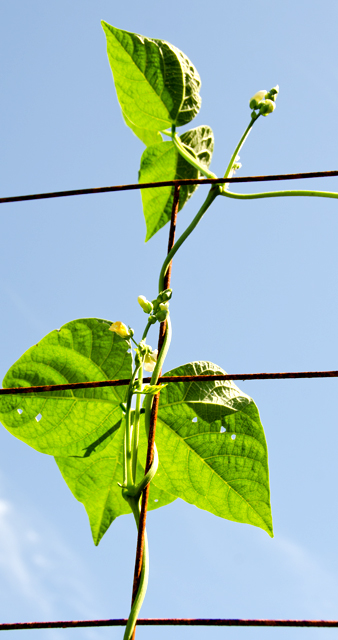
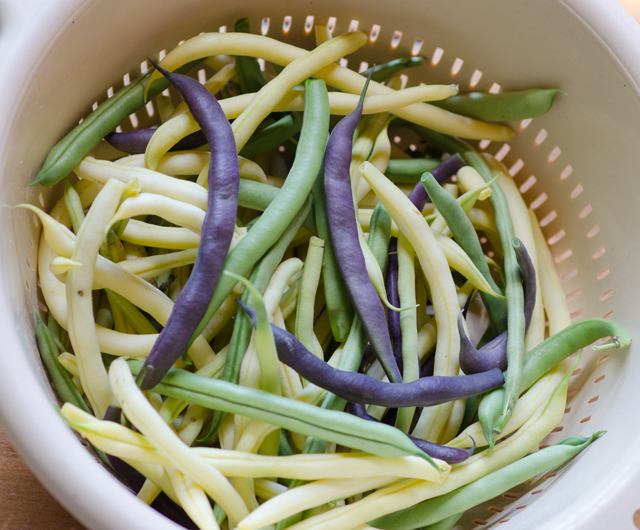
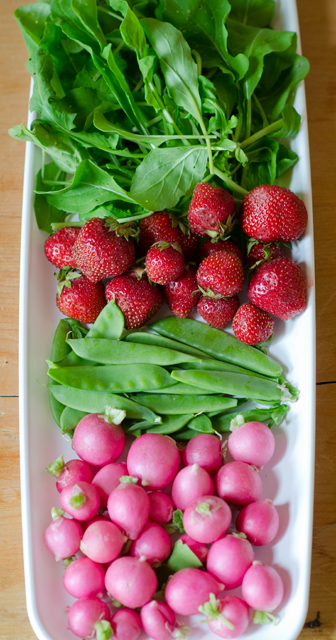
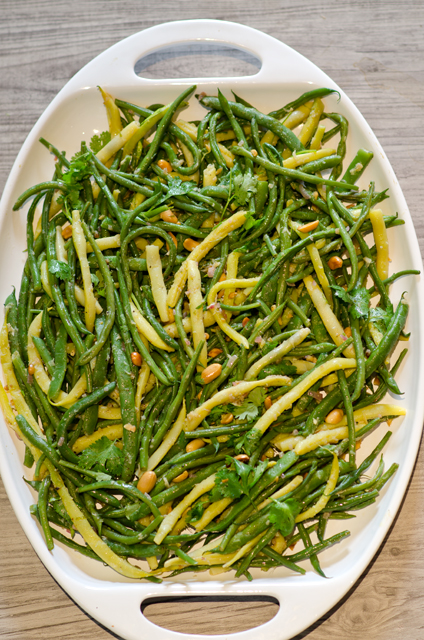
This is another bean salad from Jerusalem born, London based chef and cookbook author Yotam Ottolenghi, this time with a decidedly Asian twist. An assortment of fresh green and yellow beans are tossed in a dressing that includes two ingredients that would have seemed exotic and difficult to access ten years ago,  lemongrass and kaffir lime leaves. Our love for Thai cooking was the reason we started growing them many years ago but with increased demand they have gone mainstream and now are readily available to the home cook.

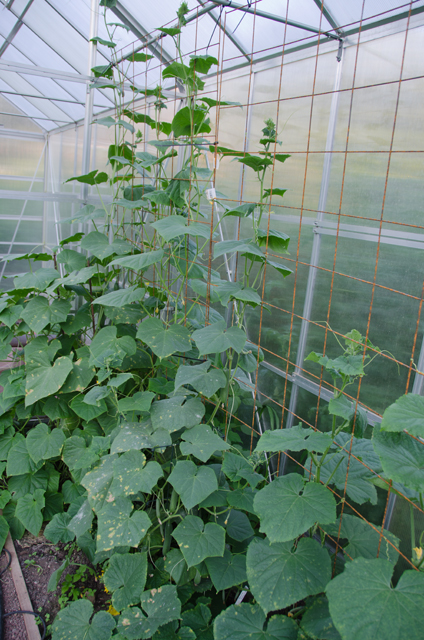
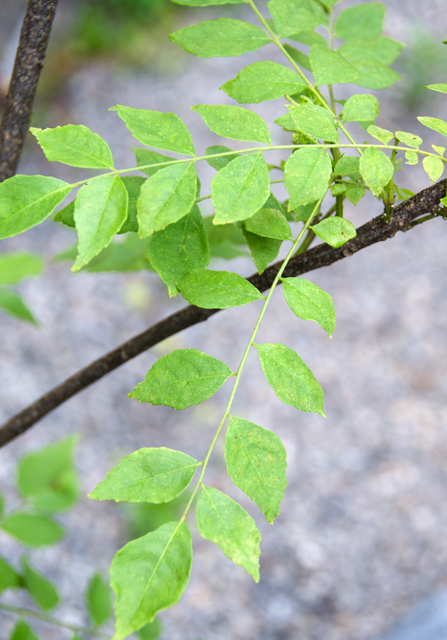
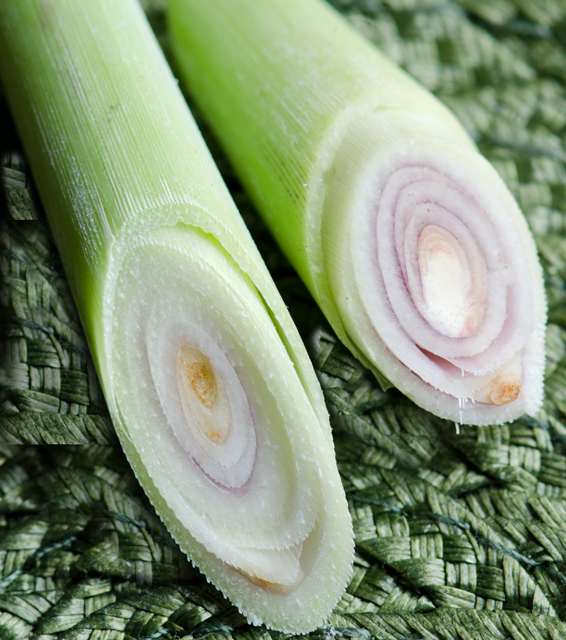
Lemongrass is a tall tropical grass native to South and Southeastern Asia.  Our lemongrass plant grows happily outdoors from June to late September forming a tall bushy plant, about 3 feet tall and 5 feet wide.  Since it is only hardy in zones 9-10, which translates to south Florida, Joe digs the plant out, cuts it back severely and it winters indoors. There it’s only predator is our Golden Retriever Cody, who likes to nibble on the leaves when he thinks no one is looking.  Lemongrasss has long sharp pale green leaves at the top and a brownish pink bulbous portion at the stem end. It has a mild citrus flavor with a floral aroma. If you don’t grow your own, the best lemongrass (and the cheapest too) is found in Asian markets. To use, cut off the woody tops with a chef’s knife and peel off the first tough layer of the bulb end. Now it is ready to slice into rounds or as in this recipe, grated with a microplane.

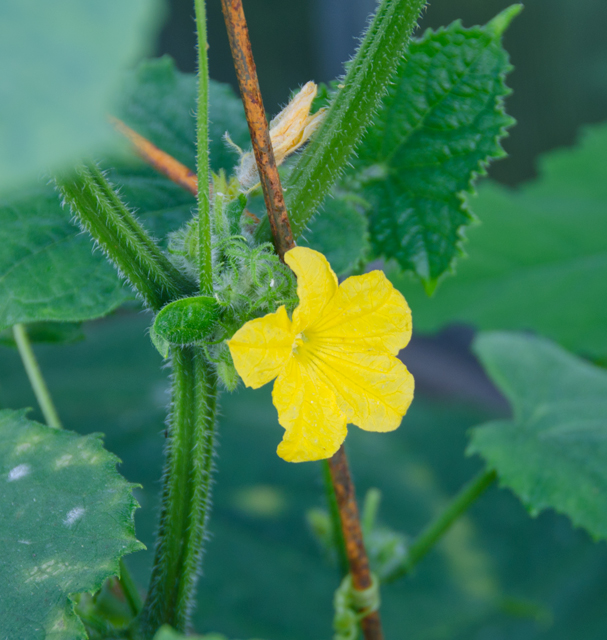
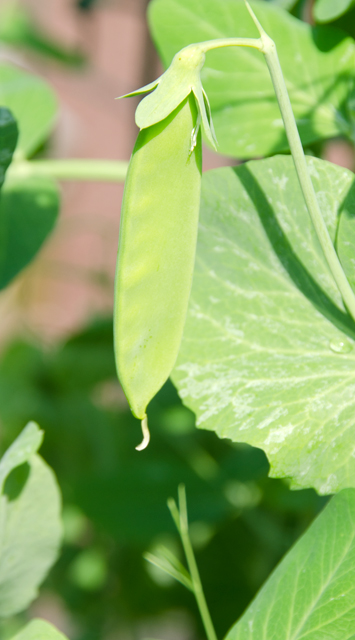
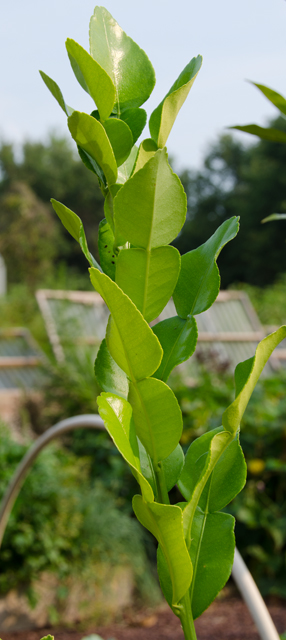
Our Kaffir lime trees are also summer visitors to the garden. The leaf of the kaffir lime tree has a sweet citrusy fragrance and is a key ingredient in Thai cooking. Kaffir lime leaves are not to be confused with the leaves from a standard lime tree. The leaf of the kaffir lime looks like a double spade.  It is thick and glossy on top with a matte underside and a tough spine in the middle. When using in recipes they can either be used whole, seasoning a soup or stew or chopped very finely, as in this salad. If you are chopping it up, remove the spine first. Fresh and dried leaves are available, only use fresh leaves in this salad.

Bring a large pot of generously salted water to a rolling boil. Cook each type of bean you are using separately, the thin filet beans will only take about 2 minutes, larger beans take longer. I use a large chopstick to make sure all the beans are submerged in the water and I removed the beans as the batches were done with a Chinese strainer or spider as it is also known. This allows you to remove more beans with one scoop.  Transfer the cooked beans to a bowl filled with ice water. Cool, drain and pat dry so the beans will absorb more of the dressing.

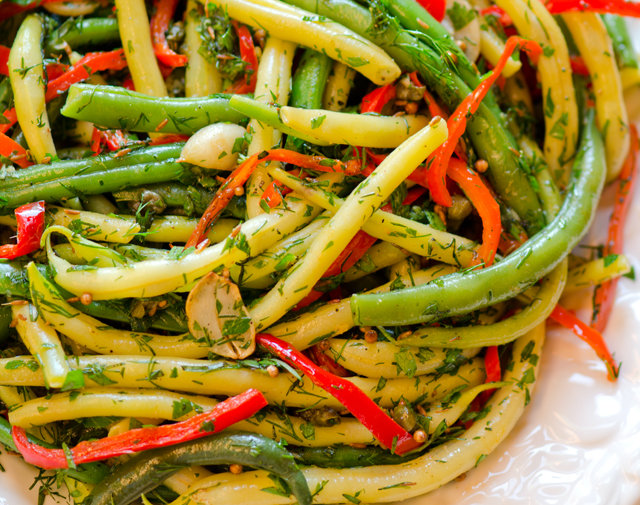
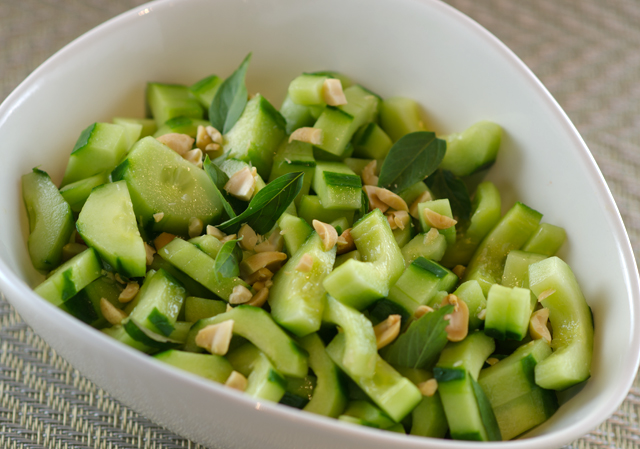
Next, the shallot is cooked until tender and the aromatics, ginger, lemongrass, garlic and coriander, are added. Transfer the shallot mixture to a large bowl that will be large enough to toss the beans. I wasn’t quite sure why you would need to sauté the already roasted peanuts, but they pick up the residual flavor from the shallot mixture and take on a toasty fragrance. Kaffir lime leaves, lime zest and juice, sugar, salt and oil are whisked into the shallot mixture. The kaffir lime leaves must be fresh and must be sliced as thinly as possible in this salad. If you don’t have access to them, don’t let that stop you from making this recipe, just add a little more regular lime peel and juice. The final step is to add the beans, toasted peanuts and cilantro to the large bowl, toss the beans in the dressing and season everything again with salt and pepper. The final dish is garnished with chopped peanuts and more cilantro.


Lemongrass plant does very well in the garden in summer but will be brought in before the first frost.
Cross section of a lemongrass stalk.
Kaffir lime tree with double spaded leaves.


Mixed Beans with Peanuts, Ginger and Lime

from Bon Appetit

Serves six

Ingredients

  • 2lb. assorted snap beans, green, wax, filet, Romano etc.
  • ½t kosher salt plus additional
  • 5T olive oil, divided
  • 1/3c finely chopped shallot
  • 1 1″ piece ginger, peeled and finely grated
  • 1 lemongrass stalk, tough outer layers removed, finely grated on a Microplane
  • 2 garlic cloves, finely grated
  • ½t ground coriander
  • Freshly ground black pepper
  • 1/3c roasted salted peanuts
  • 3 kaffir lime leaves, very finely chopped
  • 1t finely grated lime zest
  • 3T fresh lime juice
  • ¼t sugar
  • 1/3c packed cilantro leaves with tender stems, plus more for serving

Directions

  1. Working in batches by type, cook beans in a large pot of boiling salted water until crisp tender, 4-5 minutes per batch. Transfer with a strainer to a large bowl of ice water. Cool, drain and pat dry.
  2. Heat 1T oil in a small skillet over medium heat and cook shallot, stirring occasionally under tender, about 3 minutes. Add ginger, lemongrass, garlic and coriander and cook until very fragrant, about 1 minute. Transfer  to a large bowl and season with salt and pepper.
  3. Heat 1T oil in same skillet over medium high. Cook peanuts, tossing often until golden brown and fragrant, about 2 minutes. Transfer to paper towels; let cool, then coarsely chop. Set aside 1T peanut for final presentation.
  4. Whisk kaffir lime leaves, lime zest, lime juice, sugar, ½t salt and remaining 3T oil into shallot mixture. Add beans, remaining peanuts, and 1/3c cilantro and toss to coat; season with salt and pepper. Serve topped with more cilantro and reserved peanuts.

DSC_4198a


September 1, 2015 Mixed Bean Salad

DSC_4130aString or snap beans are in season from mid summer to early autumn and we have had a steady stream of them since the middle of July. Joe grows both pole and bush varieties.  Pole bean plants fare best when they are given support to grow, like a trellis or a teepee while bush beans grow on their own without added support. The bush beans were the first to produce, followed by the later maturing pole beans and now the bush beans are producing again. The crop this year has been quite successful and at times, overwhelming. I froze quart bags of blanched beans for fall and winter days when I will miss being able to pick them fresh. I even pickled a few jars of the very slim and straight filet beans.

In the cooler months we serve them hot, simply seasoned with garlic and thyme, but in the summer I like to serve them along side grilled vegetables in a cold salad. My latest inspiration, Mixed Bean Salad  came from Yotam Ottolenghi and Sami Tamimi’s cookbook, Jerusalem. Jerusalem won the IACP cookbook of the year in 2013 and was the 2013 James Beard award winner for the best international cookbook. The recipes are very approachable, not too “cheffy” and introduces the reader to the vibrant multicultural cuisine of that city.

The “mixed” in the mixed bean salad refers to the combination of green and yellow beans paired with red pepper strips. Mr Ottolenghi likes yellow beans for their tenderness and the look they bring to the dish.  This is the best time of year to find them at the farmers markets and we have no shortage here. If you are making this and yellow bean are not available, substitute all green beans.

In his introduction to the recipe, Mr Ottolenghi states that string beans are symbolic of the Jewish New Year but he didn’t indicate how, so I did a little research of my own. Beans are mentioned in the Talmud as “ruviah” and are symbolic because their Hebrew name sounds like the Hebrew “to increase” and indicates a desire for increased blessings in the new year. Reminds me of the symbolism of foods associated with Chinese New Year.

Begin the recipe by blanching the beans until tender crisp. Look for beans that are relatively the same size in diameter so they will cook in the same amount of time. If you are not sure if the beans are ready, test one for doneness before draining the pot. Roast red pepper strips that have been tossed in olive oil until they are tender. They make a beautiful contrast to the green and yellow beans.  Next step are the aromatics, lightly toasted garlic, then capers that bring a salty element and their own unique texture. Rinse the capers well and dry them, careful when you add them to the oil, they will spit, so you might want to use a spatter screen. Cumin and coriander seeds are bloomed in the olive oil to best bring out their aromas and flavor.   Pour the warm dressing over the beans and pepper strips and toss. Green onions, herbs, lemon peel, salt and pepper are the next addition to the dish.

The original recipe calls for 2/3 cup chervil, not an easy or common ingredient for the home chef.  I have never seen it sold in the supermarket or even at our local farmers market for that matter.  We have an abundance of it that comes up from seed in the early spring and bolts as soon as the weather gets hot.  He suggests a substitute combination that everyone has access to, dill and parsley.

I will not mislead you, this is not a salad you can whip together in 15 minutes, but it is certainly worth making. Step one for me is a trip to the garden for beans, peppers and herbs.  It is very important for your ingredients to be “mis en place” ready to go so the warm dressing will thoroughly season the beans and peppers. I have had my cookbook only two weeks and I have made this salad twice and plan on making it again for a Labor Day picnic. I think that constitutes a winning recipe.

DSC_4114a

DSC_4125a

Dill in the garden.
Dill in the garden.


Mixed Bean Salad

From the Jerusalem Cookbook

Ingredients

  • 1¼ lbs. mixed green and yellow beans
  • 2 medium sweet red peppers, cut lengthwise into ¼ inch strips
  • 4T olive oil-1T for the peppers, 3T for the salad
  • 3 cloves garlic, thinly sliced
  • 6T capers, drained, rinsed and patted dry
  • 1t cumin seed
  • 2t coriander seed
  • 4 green onions, thinly sliced
  • 1/3 c each, roughly chopped tarragon, dill and shredded parsley.
  • Grated zest of one lemon
  • Kosher salt and freshly ground pepper

DSC_4111a

Directions

  1. Preheat the oven to 450°F.
  2. Bring a large pot of lightly salted water to a boil. Add the beans to the pot and cook for 4-5 minutes, take a bean out at this point to check doneness. It should be cooked through but still be “toothsome”. When done, immediately drain in a colander and refresh the beans with very cold water. Drain well, pat them dry with a towel and place in a large bowl.
  3. Toss the pepper strips with a teaspoon of olive oil, then spread them out on a baking sheet. Bake for five minutes or until tender. Add pepper strips to the bowl of cooked beans.
  4. Heat the remaining 3 tablespoon olive oil in a small saucepan. Add the garlic and cook for 30 seconds; add the capers (be on guard for spatters) and fry for 15 seconds. Add the cumin and coriander seeds and continue frying for another 15 seconds. The garlic slices should be golden by now. Remove pan from the heat and pour this over the bowl of beans and pepper strips. Toss and add the green onions, herbs, lemon zest, salt and pepper to taste.
  5. You may serve immediately or refrigerate up to one day. Just remember to bring the salad back to room temperature before serving.

DSC_4134a


August 29, 2015 Watermelon Cucumber Gazpacho

DSC_4101aDuring the warm summer days of August, there is nothing better to keep you cool and well nourished than a bowl of gazpacho. I took a break from the never ending pile of tomatoes that I am canning to make this gazpacho that is ironically, or was that intentionally, made without tomatoes  In this version, the delicate flavors of  watermelon and cucumber go hand in hand to make a sweet and savory soup.  A natural combination, since both cucumbers and watermelons, along with all varieties of squash, are members of the cucurbit family.

Choose your watermelon carefully, it should be dull in color,  a shiny melon indicates that it’s underripe. It should also be uniform in size, an irregular shape indicates inconsistent amounts of water or sun. Check out the field patch, the place that the watermelon rested on the ground.  A creamy yellow indicates that the melon had a longer time to ripen on the vine and develop more flavor. When you pick it up, the melon should feel heavy for it’s size.  Watermelons are 92% water and the ripest ones have the highest water content. This is the prime time for cucumbers at the farmers markets.  I am fortunate that I can pick fresh cucumbers right from the garden.  They are abundant and nothing compares to the sweet juicy sweet flavor of a just picked one.

In the spirit of the season, no cooking is required for this recipe. The most time consuming part of this recipe is cutting the vegetables, but it is a worthwhile step. They stay cool and crispy in the soup and are a nice contrast to the watermelon-cucumber broth. Adjust the balance of savory and sweet, along with the amount of mint and heat according to your own taste. Refrigerate for several hours before serving so the flavors will have time to blend together, it’s even better if you have time, to refrigerate overnight.  If you do refrigerate overnight, adjust the seasonings again since the cubed melon will exude more liquid and potentially dull the flavor. This soup would be perfect as a first course on a warm summer evening.

DSC_4096a

Watermelon Cucumber Gazpacho

Serves four

Ingredients

  • 1 3-pound seedless watermelon, diced (about 5 cups), divided
  • 1 medium cucumber, peeled, seeded, diced (about 2 cups)
  • 1 medium-size red bell pepper, seeded, diced (about 1 cup)
  • 1 medium-size yellow bell pepper, seeded, diced (about 1 cup)
  • 1 small jalapeño chile, seeded, minced
  • 3 pale green inner celery stalks, diced (about 1/2 cup)
  • 1/2 small red onion, diced (about 1 cup)
  • 1/4 cup finely chopped fresh mint
  • 3 tablespoons fresh lime juice
  • 2 tablespoons red wine vinegar
  • 1/4 teaspoon salt

Directions

  1. Puree 4 cups watermelon in blender until smooth. Transfer puree to large bowl. Add remaining 1 cup diced watermelon and next 10 ingredients; stir to combine. Cover gazpacho and refrigerate until cold, at least 1 hour and up to 4 hours.

DSC_4107a


August 20, 2015 Cucumber, Basil and Peanut Salad

DSC_4048aThese days Joe is bringing in more cucumbers than I know what to do with them. I’m really not complaining, the season is short and I am using them in as many salads and cold soups as I can find recipes. Native to India, cucumbers require 70°F plus soil and air temperatures to grow but have a relatively short time from sowing to harvest. He has had great success growing them in the greenhouse that is situated in the garden. That environment provides just slightly warmer temperatures.
Since cucumbers are 96% water they are happiest when watered on a consistent basis. A well watered cucumber vine will produce the sweetest fruit. We stick with two varieties that produce well, Persian and Bush Champion. Persian cucumbers are small, about 6 inches long and 3/4 inch diameter with smooth edible skin and undeveloped seeds. They are the perfect size for pickling, if that is your inclination. Bush Champions are a bush variety that take one third of the space and are also suitable for containers.

One of my all time favorite cucumber salads to make is a Thai cucumber salad.  Light and crunchy, it is quick and easy to make, combining sweet, spicy and tangy flavors. The dressing draws most of it’s ingredients from the Asian pantry. Seasoned rice vinegar is either made from sake or by adding salt and sugar to regular white rice vinegar and is an easy boost to the sweet, salty and tangy elements of a dish. Plain rice wine vinegar is a bit more versatile and could be substituted. Just remember to adjust the seasonings accordingly. Whether you call it nam pla, nuoc nam or patis, fish sauce is made from the liquid drained from fermented anchovies and is a flavor enhancer like salt or soy sauce. A little goes a long way here. I am partial to the Three Crabs brand that is readily available in Asian markets. Sesame oil was one of the first exotic ingredients to grace our kitchen. Be sure to look for toasted sesame oil. It is dark in color and has a very intense aroma and flavor. Use Thai basil in this salad if you can find it. The beautifully named Siam Queen is one of the varieties we grow. The plant is more compact in apppearance than the standard Italian basil with smaller bright green leaves. There are clusters of purple flowers at the top of the plant. It has an intense licorice aroma and flavor.

To make the salad, add the rice vinegar, sesame oil, lime juice and fish sauce to a large bowl. Peel about 1½ lbs cucumbers, I leave a little skin on for color contrast. Slice in half lengthwise, scoop out the seeds and slice diagonally into crescents. Peeling the cucumber allows the flavors of the dressing to be absorbed right into the flesh. Add cucumbers, basil and peanuts to the bowl, toss and serve. So simple to make, refreshing Thai cucumber salad is as much a natural next to a grilled satay as it is with your standard picnic fare.

Cucumber vines in the greenhouse.
This little flower is the beginning of a cucumber.
Persian cucumber in the middle, flanked by the spiny Bush Champions.

I removed the seeds for this salad but really didn't need to.

Beautiful Siam Queen basil.

DSC_4042a

Cucumber, Basil and Peanut Salad

Adapted from Fine Cooking magazine

Serves six

Ingredients

  • 3T seasoned rice vinegar
  • 1t Asian sesame oil
  • 1t fresh lime juice
  • 1t fish sauce
  • 1½lb cucumbers
  • ¼c torn basil leaves (Thai is preferred)
  • ¼c coarsely chopped salted peanuts

Directions

  1. In a large bowl, mix the first four ingredients.
  2. Peel cucumbers (I like to leave small strips of skin for contrast), slice in half lengthwise. Scoop out the seeds and slice diagonally into ¼ inch crescents.
  3. Add the cucumbers, torn basil and peanuts to the bowl with the vinaigrette, toss and serve.

DSC_4047a

August 13, 2015 Yellow Tomato Gazpacho

DSC_3992aIn August, when tomatoes are at their peak, I enjoy making cool and refreshing soups like this yellow tomato gazpacho. This recipe, a classic from Los Angeles chef Suzanne Goin from her cookbook, Sunday Suppers at Lucques, combines a few of summer’s best offerings and comes together in very little time.

This is a recipe that demands the freshest of ingredients, whether your tomatoes were picked right from the garden or bought at the farmers market. Our bright yellow Sweet Gold  tomatoes are one of a trio of cherry tomatoes available from Renee’s Garden Seeds that Joe has planted for several seasons now. Sweet Golds have a full, sweet, fruity flavor with little acidity. Their flesh is dense and crack free compared to varieties we have grown in past seasons.

The most time consuming part of the recipe was blanching and peeling the tomatoes. I’m pretty sure Ms. Goin doesn’t make her soup with about 75 yellow cherry tomatoes! But that said, it took less than a minute to blanch the tomatoes and the skins slipped off very easily, once they cooled down a bit. I did not core the tomatoes as called for in the original recipe, because they were small. The original recipe called for red wine vinegar, I substituted a white grapefruit balsamic to emphasize the fruitiness. The blanched tomatoes along with cucumber, jalapeno, cilantro, garlic, vinegar and oil are blended in batches. Since I prefer a smoother texture, I put the soup through a food mill.

As with all cold soups this needs to be chilled until very cold. While you are chilling the soup, it’s time to prepare the garnishes. Finely dice cucumber, red pepper for a nice contrast and some red onion. Season some red cherry tomato halves with salt and pepper and prepare some cilantro leaves. If you don’t like cilantro, substitute some flat leafed parsley. The finishing touch is a drizzle of your best quality extra virgin olive oil.

This recipe is great for entertaining, everything can be made in advance, soup chilled and garnishes prepped. It also could be dressed up with a seared scallop or a poached shrimp on top. Yellow tomato gazpacho can be served family style too. Serve the soup in an attractive container, garnish with tomato halves and pass the diced vegetables on the side.

DSC_4002a

Yellow Tomato Gazpacho

Serves 6

Ingredients

  • 2½lb ripe yellow tomatoes
  • 3 small or 1 large cucumber-reserve part for garnish
  • ½ jalapeno, seeded and cut in half
  • Cilantro or flat leafed parsley sprigs
  • 2 garlic cloves, coarsely chopped
  • 2T red wine vinegar
  • 1/3c extra virgin olive oil (optional)
  • Kosher salt and freshly ground black pepper
  • 3T diced red or orange sweet pepper
  • 3T diced red onion
  • 18 small cherry tomatoes, cut in half
  • Fine quality extra-virgin olive oil for drizzling
The skins of the Sun Gold tomatoes slipped off easily after they were blanched.

Directions

  1. Blanch the yellow tomatoes in rapidly boiling water until the skins begin to burst, 30-45 seconds. Cool the tomatoes in a bowl of ice water for a few minutes. Once cool enough, use your fingers to slip off the skins. If using small tomatoes, leave them whole, for large tomatoes, core and coarsely chop. Reserve the ice water.
  2. Reserve about 3T of  peeled and seeded cucumber for the garnish. Peel and coarsely chop the rest of the cucumber.
  3. Place half of the yellow tomatoes, the coarsely chopped cucumber, jalapeno, several cilantro sprigs, garlic, vinegar and olive oil (if using) in a blender with salt and pepper to taste. Process on the lowest speed until the mixture is broken down. Turn the speed to high and puree until the soup is completely smooth. If the soup is too thick, add a little of the reserved ice water. Strain the soup through a fine mesh sieve or a food mill, pressing out as much liquid as possible. Taste for  seasoning. Repeat with the rest of the soup ingredients. Chill the soup in the refrigerator until very cold.
  4. While you are waiting for the soup to chill, dice the cucumber, pepper and red onion. Toss them  together in a small bowl.  Season the cherry tomatoes halves with salt and pepper To serve, pour the gazpacho into chilled soup bowls and scatter the pepper mixture over the soup.  Place 6 cherry tomato halves and a few cilantro leaves at the center of each bowl. Finish each soup with a drizzle of olive oil.
Sun Golds at different stages of ripeness.

DSC_3999a

July 23, 2015 Zucchini Pesto Frittata

DSC_3760aIf you’re like me and not always in the mood to cook something when you get up in the morning for breakfast, but still want a little something to eat, a frittata is a great choice. Made the day before, they warm up quickly and also taste good at room temperature.  But frittatas aren’t just for breakfast, they make a nice lunch, light supper, sliced thin as an hors d’oeurve or anytime you just want a little nibble. This time of year they are a great way to showcase farm fresh eggs and produce.

For this recipe I chose the smallest zucchini I could find in the garden. Since their seed pods are still underdeveloped, they have a sweet nutty quality to them. I wanted very thin slices rather than shreds which is the usual method of preparation. Slice by hand, or for real uniformity, I used the 2mm slicing disk on the food processor. Larger zucchini should be shredded and salted then squeezed dry before adding to the frittata. If you skip that step, when you cook the zucchini you essentially will be steaming, not sauteing it. A couple of tablespoons of a chopped fresh herb is a welcome addition to a frittata, but since I had just made some, I opted for pesto, a delcious addition to this dish.

A 10″ non stick skillet with an oven safe handle is essential for this recipe. Begin by cooking the zucchini until it releases some liquid and the slices start to brown and become tender, this should take about 5-6 minutes. Set the pan aside.

Preheat your oven’s broiler and place a rack in the upper middle position. Beat the eggs and Parmesan cheese in a medium bowl.  Stir in pesto and the cooked zucchini. Add the rest of the oil to the empty skillet and heat to medium. Add zucchini-egg mixture and cook for 4-5 minutes, frittata will look set around the edges. Move the skillet to the broiler and leave a potholder on the oven door, that handle will get hot. I set a timer now for 90 second intervals. It took about 2 intervals for the frittata to get brown, which translates to about 4 minutes.

Using the potholder, remove frittata from the oven and allow to rest for 5 minutes.Run spatula around the edge of the skillet to loosen the frittata. You can serve the frittata warm right from the skillet, or slide unto a platter for a prettier presentation.

DSC_3460a

Zucchini Pesto Frittata

Serves 4

Ingredients

  • 2T olive oil
  • 1 1/3 lbs. of very small zucchini, washed and ends trimmed
  • Kosher salt and freshly ground pepper
  • 1-2T pesto or freezer pesto, thawed with cheese added
  • 6 large eggs
  • 3T grated Parmesan cheese
  • 2t olive oil

DSC_3719a

Directions

  1. Heat broiler.
  2. Slice trimmed zucchini by hand or with the thinnest slicing blade of the food processor.
  3. Heat 2 tablespoons oil in a 10-inch non stick skillet over medium high heat. Add zucchini; cook, stirring occasionally, until zucchini is tender, about 5 minutes. Season with kosher salt and freshly ground pepper.
  4. Beat six large eggs with 3 tablespoons grated Parmesan cheese in medium bowl. Stir in pesto and cooked zucchini into beaten eggs.
  5. Heat additional 2 teaspoons oil in the now empty skillet over medium heat. Add zucchini, pesto and egg mixture; cook until frittata is almost set, 4-5 minutes.
  6. Slide skillet until the broiler and cook until frittata is set and the top is browned.
  7. Serve directly from the skillet or flip unto serving plate. Serve hot or at room temperature.
The seed pods are not developed yet in baby zucchini.

DSC_3724a

DSC_3726a

DSC_3731a

DSC_3767a

July 3, 2015 Oven Roasted Broccoli and Carrots

DSC_3357aMy original idea for this post was to make a salad, but sometimes the simplest things are the best. Freshly harvested broccoli and carrots are tossed with a good quality extra virgin olive oil, salt, freshly ground black pepper and my favorite ingredient to add to the roasting mix, aleppo pepper. Aleppo pepper, as I have mentioned before in a previous post is one of my favorite new ingredients of the past several years. It is dark red in color, flaky and somewhat oily in texture. It’s flavor profile is rich, sweet and fruity with hints of cumin.  Aleppo’s heat profile is moderate, only just a little hotter than paprika.

Begin by cutting your vegetables in relatively uniform pieces; in this case; the broccoli in individual florets and carrots in one inch lengths so they will roast in the same time as the broccoli.  Remember that vegetables shrink when roasting so always cook more than what you might if you were steaming or sautéing.

Although some recipes have you do it right in the pan, vegetables are more evenly oiled and seasoned in a bowl . Use just enough oil to give an even coating, about two tablespoons for this quantity should be enough. Season generously with salt, freshly ground pepper and whatever herb you might choose. In addition to Aleppo pepper, I have used paprika, chipotle pepper, cumin, thyme, it all depends on what compliments your vegetables best.

Roasting should always be done on a large shallow sided sheet pan. The ones I use are called “half size” and have a 18″x13″ dimension. They are relatively inexpensive and available in most big box stores. I consider them indispensible and have about a dozen from my catering days. Using a pan or baking dish with high sides will cause them to steam rather that roast because of the high water content of vegetables.

Give the vegetables room for roasting, everything should be in a single layer on the pan with a little room between each piece. I like to roast on a relatively high heat, 425°F to 450°F to insure they will caramelize on the outside and be nice and tender on the inside.  I like to stir or shake the pan every five minutes or so to roast every surface.  Time may vary for desired doneness, that’s why I check them frequently. The larger your pieces are, the longer it will take them to cook.

For a finishing touch to my roasted vegetables I added some cashews and a little fresh cilantro. In this case, simple was the best.

DSC_3324a

DSC_8441a

DSC_3352a
Cut vegetables into uniform pieces and spread out evenly on a sheet pan.

Oven Roasted Broccoli and Carrots

Serves 2-3

Ingredients

  • 1 large head of broccoli, florets chopped off the stalk, about 6-7 cups
  • 3 medium carrots, cut in half and into 1″ lengths
  • 2-3T extra virgin olive oil
  • 2-3t kosher salt
  • 2t freshly ground black pepper
  • 1t Aleppo pepper
  • 1/4c unsalted cashews
  • 1/4c cilantro leaves

Directions

  1. Preheat oven to 425°F.In a large bowl, toss the vegetables together with the olive oil, salt and pepper.
  2. Transfer vegetables to a large sheet pan, spreading them out evenly.
  3. Roast vegetables, shaking the pan every five minutes or so to be certain all surfaces are roasted. My vegetables were very fresh and took about 15 minutes total to cook. Your time may vary.
  4. Transfer vegetables to a serving bowl. Garnish with cashews and cilantro.

June 14, 2015 Crustless Spinach, Mushroom and Canadian Bacon Quiche

DSC_3155aConsider a humble little package of frozen chopped spinach, a convenience and a staple in many kitchens, including mine. You might be quite surprised how many cups of fresh spinach it takes to make that 10 ounce brick of frozen. That was the information I was looking for this week.

Our spinach plants are going to seed and it was time to do one last serious pick before pulling them out and getting the space ready for another planting. When picking spinach, especially in the extreme hot weather (95°F) it is important to not use a metal bowl or colander, they will put your freshly picked leaves into immediate wilt that will be hard to revive from.  I prefer using a clear plastic “pebble” bowl, sturdy hard plastic bowls I used in my catering business. I snip off the best leaves with scissors, leaving the plant and damaged leaves behind for the mulch pile. Next, I soak the spinach in a clean sink of cold water. I start the process by swishing the leaves around in the sink. I let them sit for a few minutes, the spinach will float to the top, and the dirt and debris will sink to the bottom.  Then I gently lift out the leaves and transfer them to a colander. I will repeat the process again to be sure all the dirt is removed. I refrigerated the spinach in the large bowls with some plastic wrap draped over the top.

Now it was time to find ways to use up this bounty.  Spinach is a powerhouse of nutrition, low in calories, a rich source of iron, vitamins A, C, and K, potassium, calcium and magnesium. End of the season spinach is still very good, but not necessarily something you would want to use in a salad. So I was on the hunt for recipes with cooked spinach. Frittata, quiche, spanakopita, all good choices but many recipes just call for that ubiquitous ten ounce package of frozen spinach. I needed to find the conversions to take that very large bowl to the amount of cooked spinach I needed.

Spinach is 90% water in composition and when cooked, 1 pound of fresh spinach is equivalent to 10 to 12 cups and will cook down to 1 cup. One 10-ounce package of frozen spinach is the equivalent of 1 1/2 pounds of fresh spinach or about 15-18 cups of spinach. In my pictures you will see a before and after of the spinach. To reduce it, I cooked the spinach in a 10″ sauté pan using just the water that clung to the leaves. Then I drained it thoroughly in a fine mesh colander, squeezed it dry and chopped it roughly.

My efforts paid off. With the spinach I picked, I was able to make all three, frittata, quiche and spanakopita. This quiche can be put together in minutes since the most time consuming part is eliminated, making the crust.  I added some sauteed sliced mushrooms and Canadian bacon. In case you didn’t know, American bacon comes from the fatty belly of the pig and Canadian bacon is cut from the loin.  Of course a 10 ounce package of frozen spinach can be substituted in this recipe. It makes a nice breakfast or light lunch and reheats well the next day.

DSC_3115a
Fifteen to eighteen cups of fresh spinach.
Cooks down to this!
Cooks down to this!

DSC_3148a

Crustless Spinach and Canadian Bacon Quiche

Makes 6-8 servings

Ingredients

  • 1c finely chopped onion
  • 1c sliced fresh mushrooms
  • 1T vegetable oil
  • 1 package (10 ounces) frozen chopped spinach or 1½c cooked and chopped fresh spinach
  • 2/3c finely chopped Canadian bacon
  • 5 large eggs
  • 3c shredded swiss cheese (other cheeses will work too like cheddar or Monterey Jack)
  • 1/8t freshly ground pepper

Directions

  1. In a large skillet, sauté onion and mushrooms in oil until tender.
  2. Add spinach and ham, cook and stir until the excess moisture is evaporated.  Cool slightly.
  3. Beat eggs, add cheese and mix well. Stir in spinach mixture and season with pepper; blend well.
  4. Spread evenly into a greased 9-inch pie plate or quiche dish.
  5. Bake at 350°F for 40 to 45 minutes or until a knife inserted near the center comes out clean.

DSC_3145aDSC_3162a


June 10, 2015 Arugula, Strawberry, Snow Pea and Radish Salad

DSC_2927aJune’s warm temperatures are making an appearance again this week, but technically it’s still spring until the 21st. This end of spring salad brings together four elements that are a part of the early June gardens in our area. All salad greens love the cooler temperatures of spring and arugula is no exception. We have been enjoying pea shoots for several weeks now and the peas started making their appearance last week. They  will probably only last to the end of this month when warmer temperatures will cause the vines to die off.

I just harvested our most currant crop of radishes, another vegetable that doesn’t like mid summer heat.  At my request, Joe planted a strawberry bed this spring.  In fact, some of the plants are already flowering. He has removed the flowers from these ambitious plants to give them time to establish themselves before producing fruit.  So there is a good chance that the plants that bear two times in a season will produce their first strawberries late in the summer.

A strawberry vinaigrette is the perfect accompaniment for this salad. I chose a strawberry balsamic vinegar from The Tubby Olive, a store that is always inspiring new salad combinations for me. For the dressing I combined garlic, shallot, Dijon mustard, strawberry balsamic, just a touch of honey and a good extra virgin olive oil. When making a salad be sure to use a bowl that gives you plenty of room to combine the ingredients.  I start by tossing the greens first with dressing to coat them lightly and then add some of the other components and toss again. I leave the rest to top the salad with, this ensures the last person who is served doesn’t get all the heavier ingredients that end up in the bottom of the bowl.

DSC_2940a

Arugula Strawberry Snow Pea and Radish Salad

Serves two

Ingredients

For the dressing

  • 1t finely minced garlic
  • 3T minced shallot
  • 1t Dijon mustard
  • 3T Strawberry balsamic vinegar
  • 1/4t honey
  • 1/4c extra virgin olive oil
  • Kosher salt and freshly ground pepper

For the salad

  • 4-5 cups of arugula, washed and trimmed
  • 1c strawberries, stemmed and sliced in half
  • 1c snow peas, strings removed, lightly steamed
  • 1c radishes, thinly sliced
  • 1/4c slivered almonds, lightly toasted
  • 2-3 slices of prosciutto, crisped in a non stick pan
  • 1/4c creamy feta, crumbled
  • Freshly ground pepper

Directions

  1. To make the dressing, combine all the ingredients in a small bowl and whisk together until evenly combined. Taste and adjust if necessary. Season to taste with kosher salt and pepper.
  2. Place the salad greens in a large bowl and toss with some of the vinaigrette and taste. Add about half of the other ingredients, toss again, adding more of the dressing if necessary. Top the salad with the remaining ingredients. Season each portion to taste with freshly ground black pepper. Reserve remaining vinaigrette for a later use.

DSC_7727a

DSC_3016a
Our new strawberry patch. They need to be “nipped in the bud” to produce stronger plants.
Joe will plant more arugula in the fall.

DSC_2933a

June 6, 2015 Spinach and Chickpea Curry

DSC_2863aStill on the hunt for spinach themed dishes, I found this recipe for Spinach and Chickpea Curry in Fine Cooking. It is similar to a northern Indian dish called palak  chole, palak being the Punjabi word for spinach and chole the word for chickpea. The dish can be made in no time at all with some basic pantry ingredients.

Curry powder, a staple in many kitchens, is not a single spice like basil or oregano but a combination of ingredients and will vary by region and country. Most curry powder recipes include coriander, turmeric, cumin, cayenne, ground ginger and mustard seed. To add to the confusion, there is also a curry plant that is supposed to smell like curry and a curry leaf plant. The leaves of the curry leaf plant are used mostly in the cooking of southern India.  The leaves look like small bay leaves but are edible and have a lime-lemony taste.

Garam masala is the other spice blend in this dish. Garam is the Indian word for warm or hot and masala is a mixture of spices. Garam masala is a blend of dry roasted ground spices from northern India. Dry roasting adds to the complexity of garam masala and it is not as hot and spicy as other blends. It may contain up to 12 spices including black pepper, cinnamon, cloves, coriander, cumin, cardamom, dried chilis, mace, nutmeg and other spices.  As with all spice blends they should be kept in a cool dark cabinet and have a shelf life of about six months.

Saute onion, ginger, spice blends and cayenne over medium high heat. The fragrance is absolutely intoxicating. Stir in drained and rinsed chickpeas, canned diced tomatoes and a little kosher salt. Next, add handfuls of spinach, stirring to wilt as you go. The recipe calls for baby spinach but I used garden spinach that I cut down to size and removed large ribs and stems from. This was a dish that came together in less than an hour, and that including picking, washing and trimming the spinach. Serve garnished with cilantro and some plain yogurt to stir in if you choose. Next time I think I will make some naan to sop up the juices. Leftovers are fabulous, that is, if you have them.  This dish was so good, it was requested two days in a row.

DSC_2860a

Spinach and Chickpea Curry

Ingredients

  • 3T canola oil
  • 1/4c chopped red onion
  • 2T finely chopped fresh ginger
  • 1T curry powder
  • 1t garam masala
  • 1/8t cayenne pepper
  • 1 15oz can chickpeas, drained and rinsed
  • 1 14½oz can diced tomatoes
  • 1¼t kosher salt plus additional for final seasoning
  • 7-8c fresh spinach, torn into 1″ pieces
  • ¼c chopped cilantro
  • Plain Greek style yogurt for serving

Directions

  1. Heat canola oil in a 12″ sauté pan over medium high heat. Add onion, ginger, curry powder, garam masala and cayenne pepper. Cook, stirring often until the onion is softened, 2-3 minutes.
  2. Stir in one can of drained and rinsed chickpeas, one can of diced tomatoes and 1¼t salt.
  3. Add spinach by the handful, stirring to wilt as you go. Continue to cook, stirring often, until the spinach is completely wilted and the flavors have melded, 4 to 5 minutes more. Season to taste with more salt. Remove the pan from the heat and stir in ¼c cilantro.
  4. Spoon onto a platter and serve with Greek yogurt for dolloping on top.
The curry leaf plant.

DSC_2866a